Lab 8 - Feedback and Journey
Last modified: Tue, 6 Aug 2024
Table of Contents
| Topic | Lab Type | Difficulty Level | Estimated length |
|---|---|---|---|
| Introduction to Experience Management | Watch & Understand | EASY | 7 min |
| Configure Post Call IVR Survey | Practical Lab | EASY | 10 min |
| Configure Post Interaction Digital Survey | Practical Lab | EASY | 10 min |
| Customer Journey Data Services (JDS) Introduction | Watch & Understand | EASY | N/A |
| JDS Feature Overview | Watch & Understand | EASY | 10 min |
| Provision JDS | Practical Lab | EASY | N/A |
| Setup Desktop Customer Journey Widget | Practical Lab | EASY | 30 min |
| JDS APIs | Practical Lab | MEDIUM | 40 min |
| JDS Use Case Samples | Practical Lab | MEDIUM | 60 min |
Overview of the lab:
In this lab, we will configure all the required elements to collect and view end-customer feedback using the new Experience Management.
Lab Objective
- Create a basic survey
- Upload audio files to the survey
- Configure the survey in flow designer
- Simulate a customer interaction with survey feedback
- Download and verify survey feedback
Pre-requisites
- You have completed Lab 1 - Admin Experience:
- You are familiar with Control Hub and navigation within Control Hub
- You have completed Lab 2 - IVR Contact Routing:
- You are familiar with creating and modifying flows
- You have completed Lab 3 - Agent Desktop:
- You are familiar with logging in as an Agent and accepting inbound interactions
-
You have Webex Calling installed in your mobile phone and supervisor created in Lab 1 from which you can make calls to the contact center
Quick Links
Control Hub: https://admin.webex.com
Portal: https://portal.wxcc-us1.cisco.com/
Agent Desktop: https://desktop.wxcc-us1.cisco.com\
Introduction
Introduction to Experience Management Post Interaction and Post Call Surveys
Experience Management is a next-gen tool that facilitates post interaction surveys and outcomes. It allows you to track and measure customer satisfaction using anchor metrics like Net Promoter Score (NPS), Customer Effort Score (CES), and Customer Satisfaction (CSAT). Webex Contact Center brings in an integration of Experience Management for its post call survey interactive voice response (PCS IVR) and digital channels.
Lab Section
Configure Post Call IVR Survey
Create a survey
- Click on Contact Center under Services from Control Hub
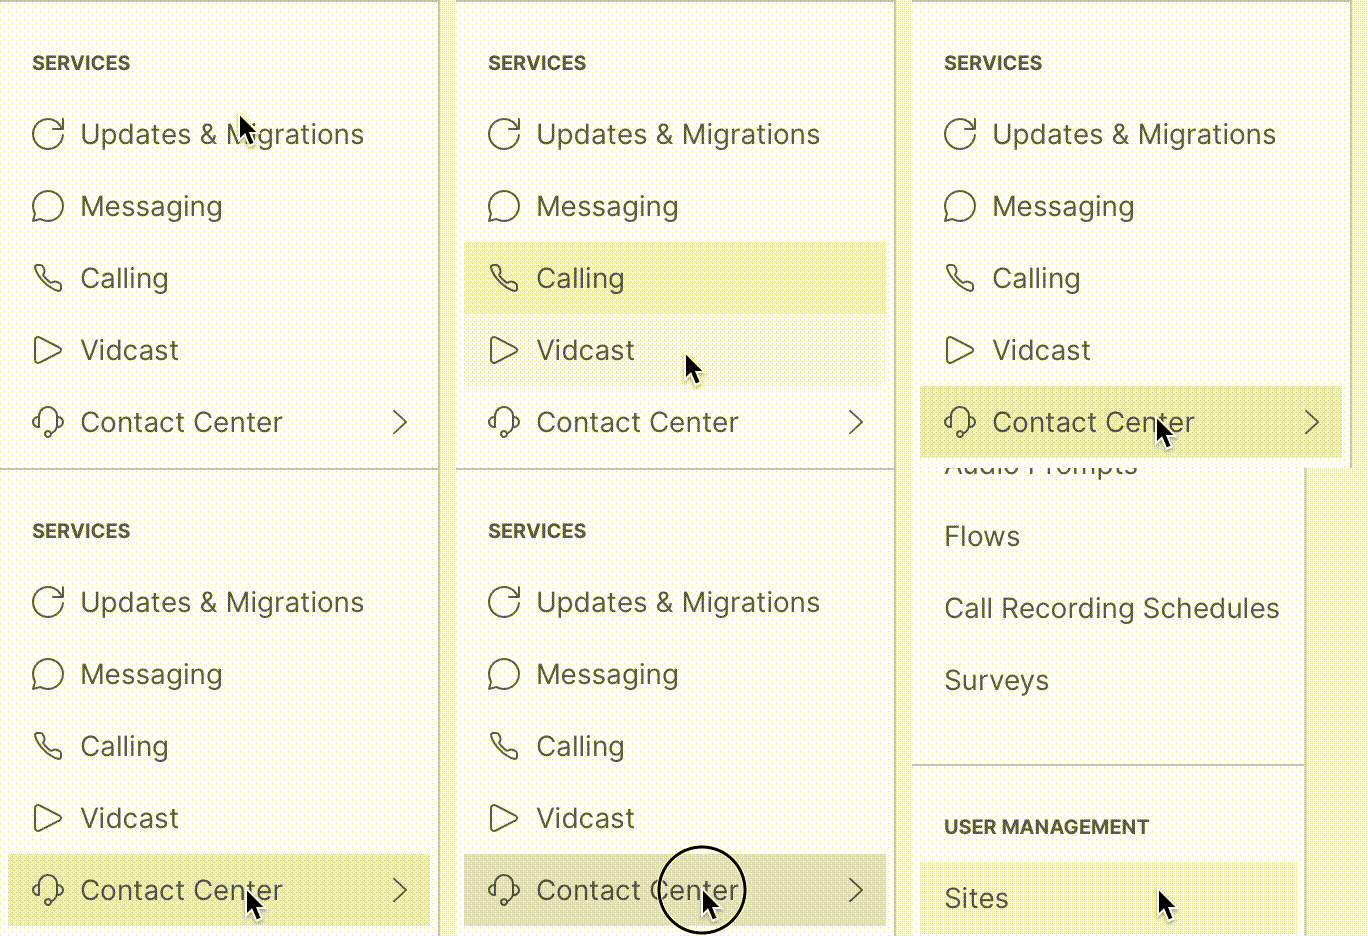
- Under Contact Center, click on Surveys
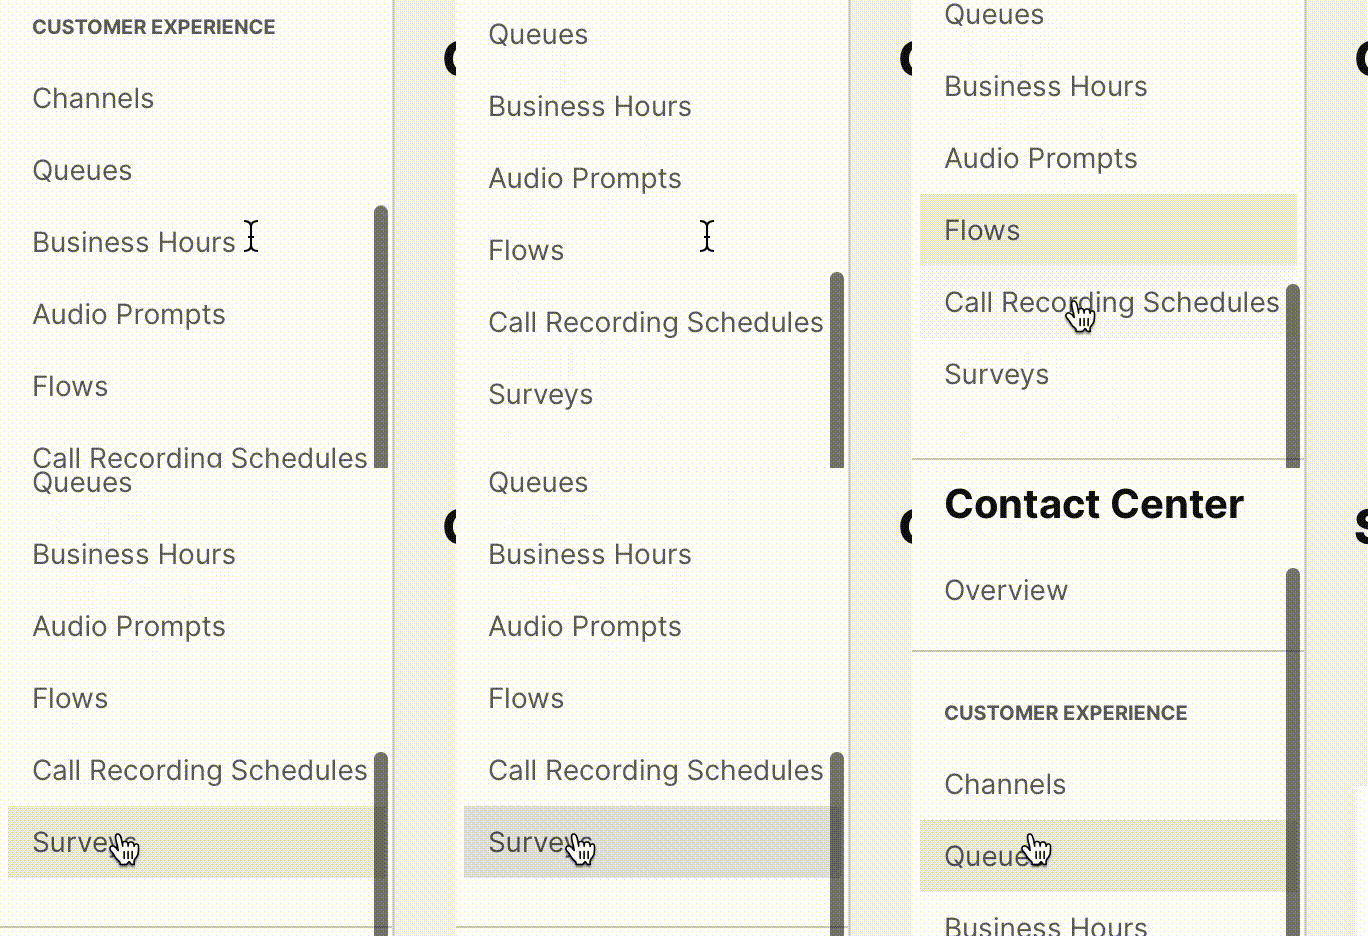
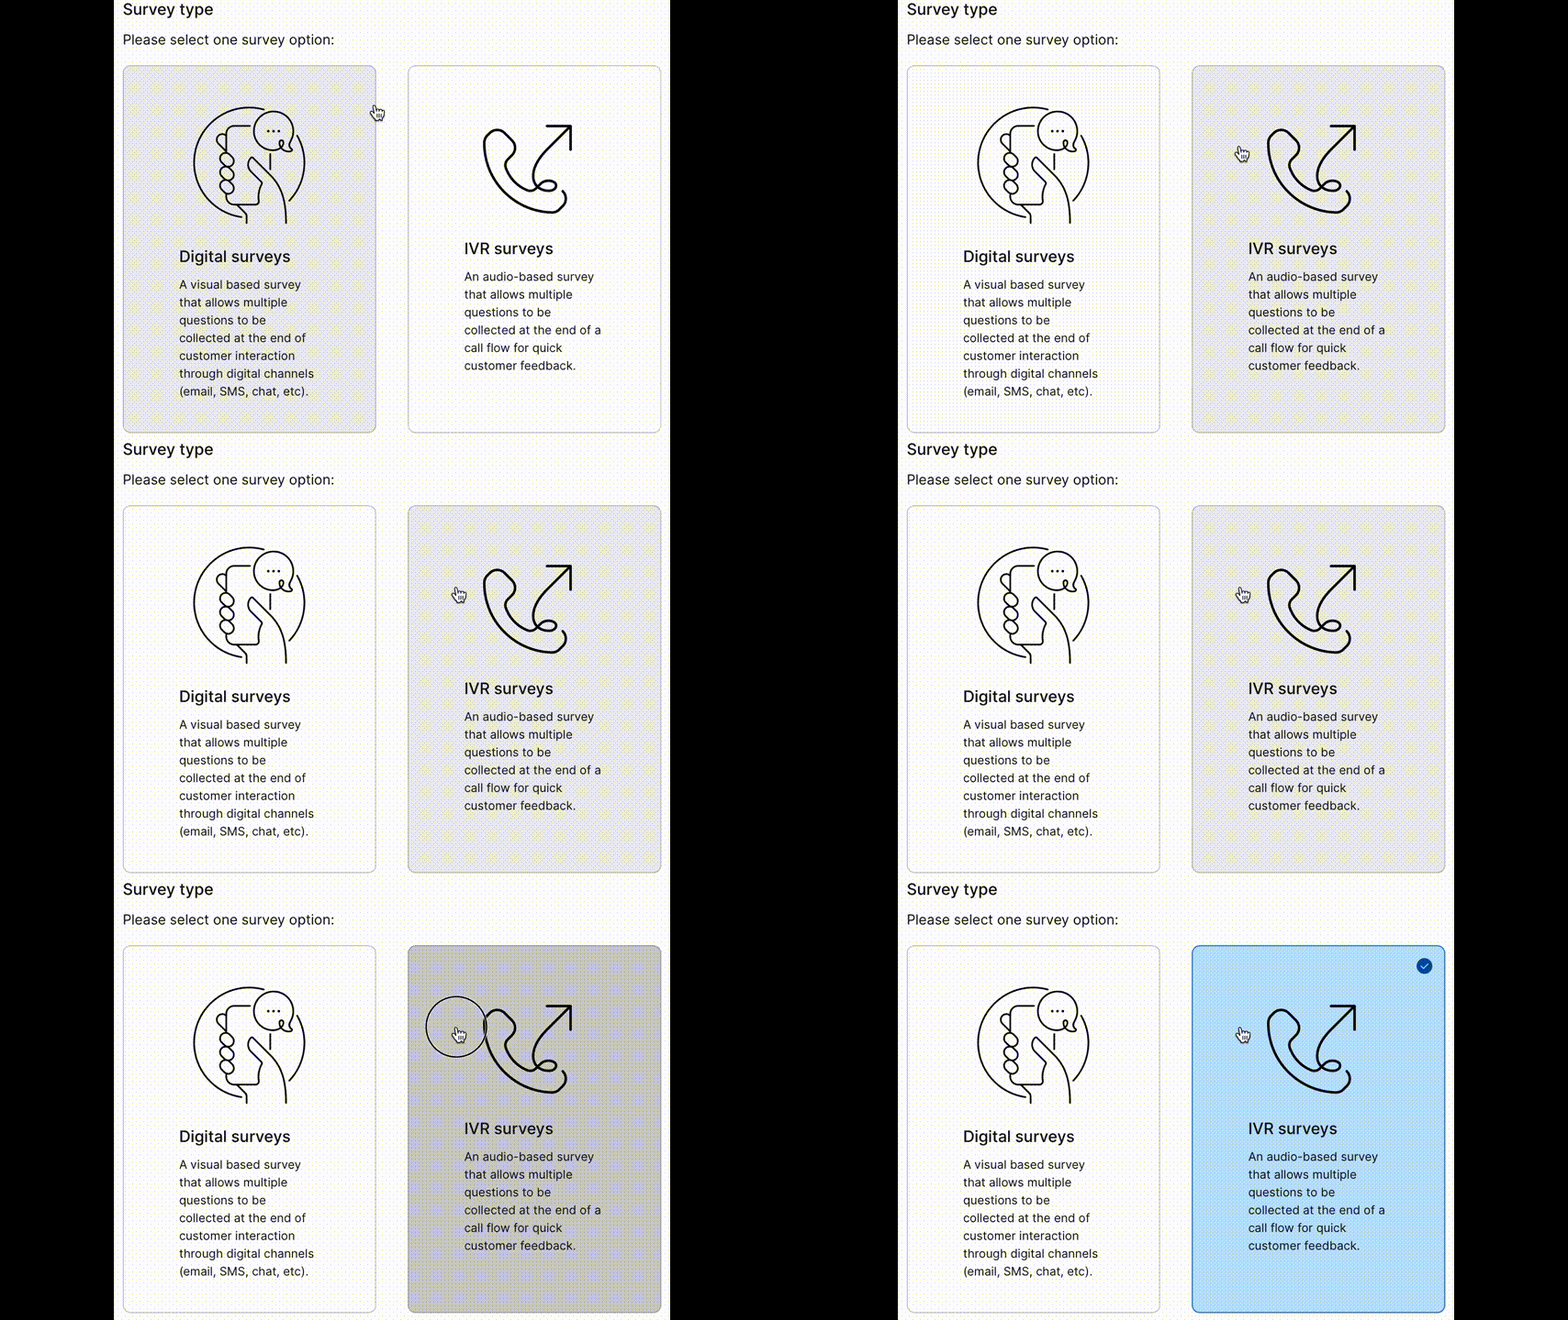
- Click the “Create new survey” button on the top-right corner of the Survey page
Select Survey type as IVR
Provide a name for your survey appended with your Attendee ID

Choose the additional languages for the survey from the drop-down (optional)

Click on Next
- Add audio files to the Welcome and Thank you notes (Audio Files)
Click on the pencil icon to the right
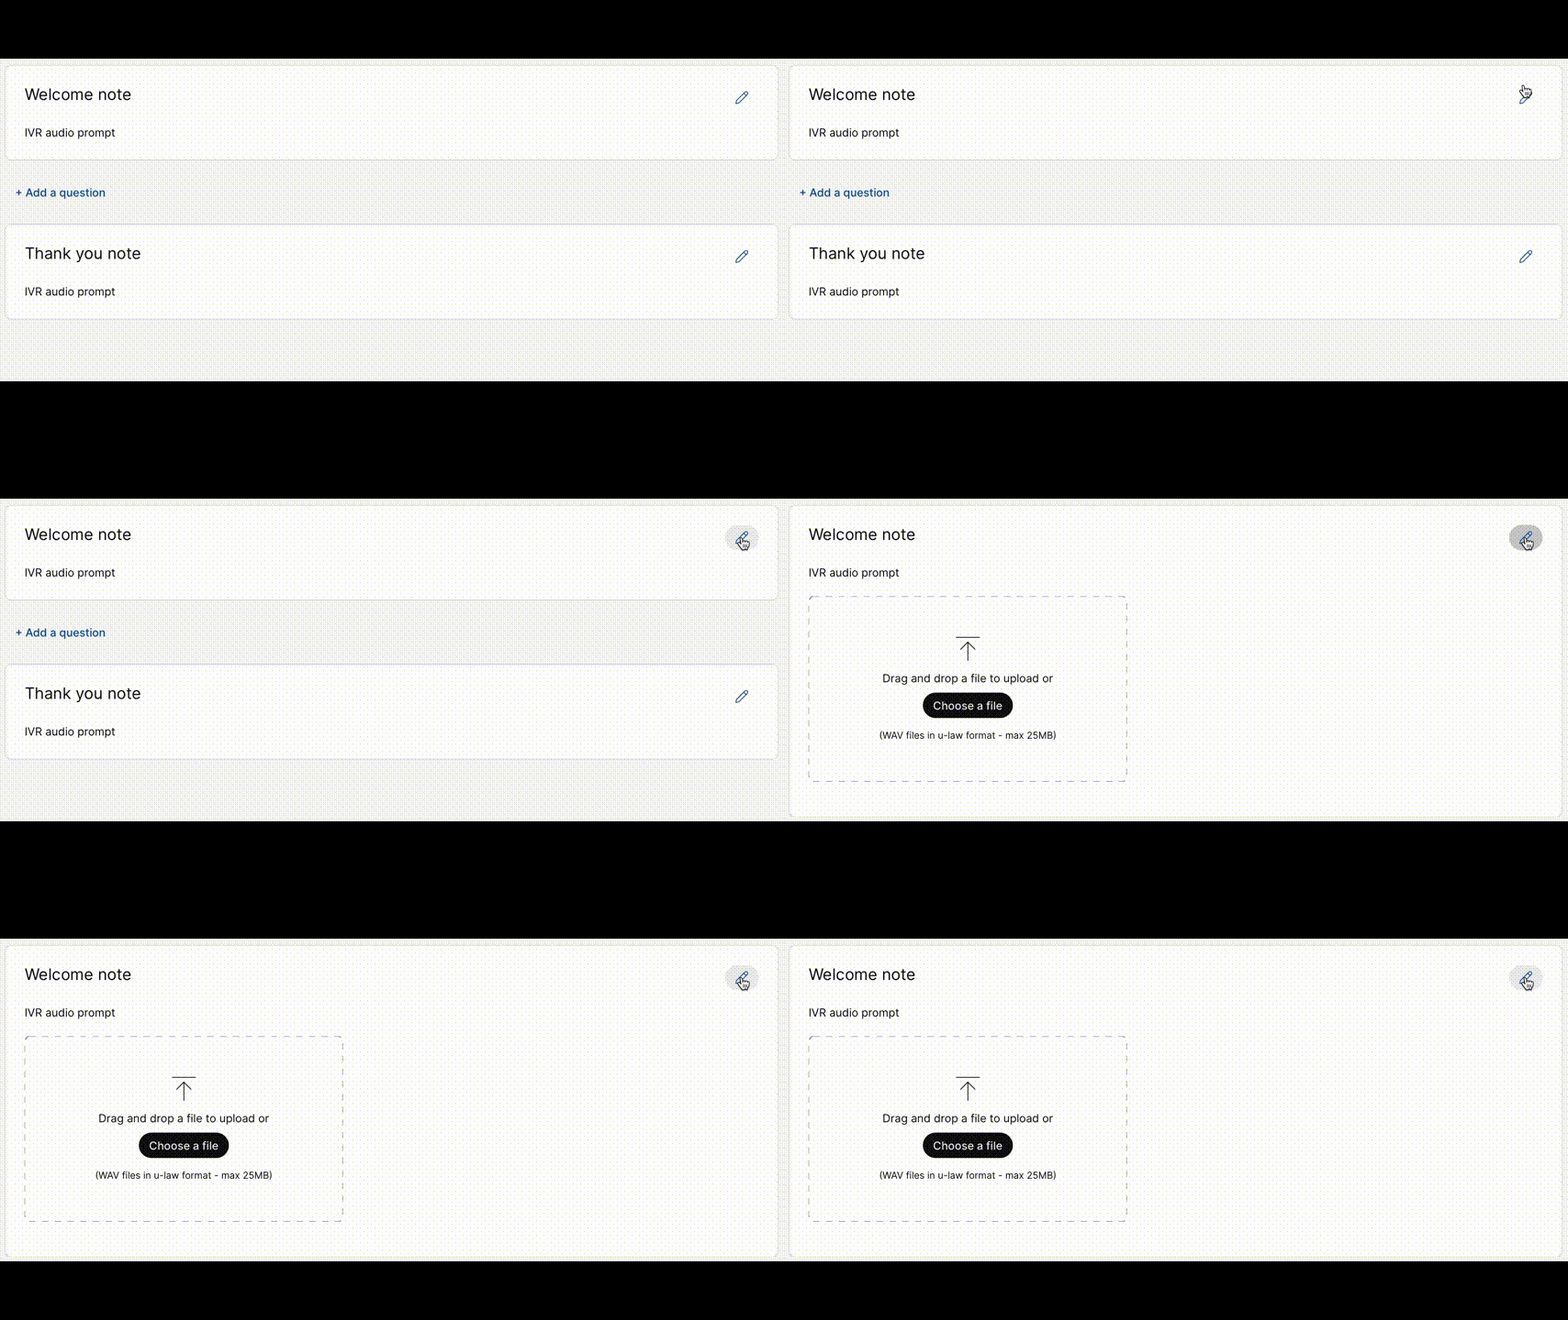
Select Choose a file when the note expands, pick the audio file (Welcome.wav) and upload
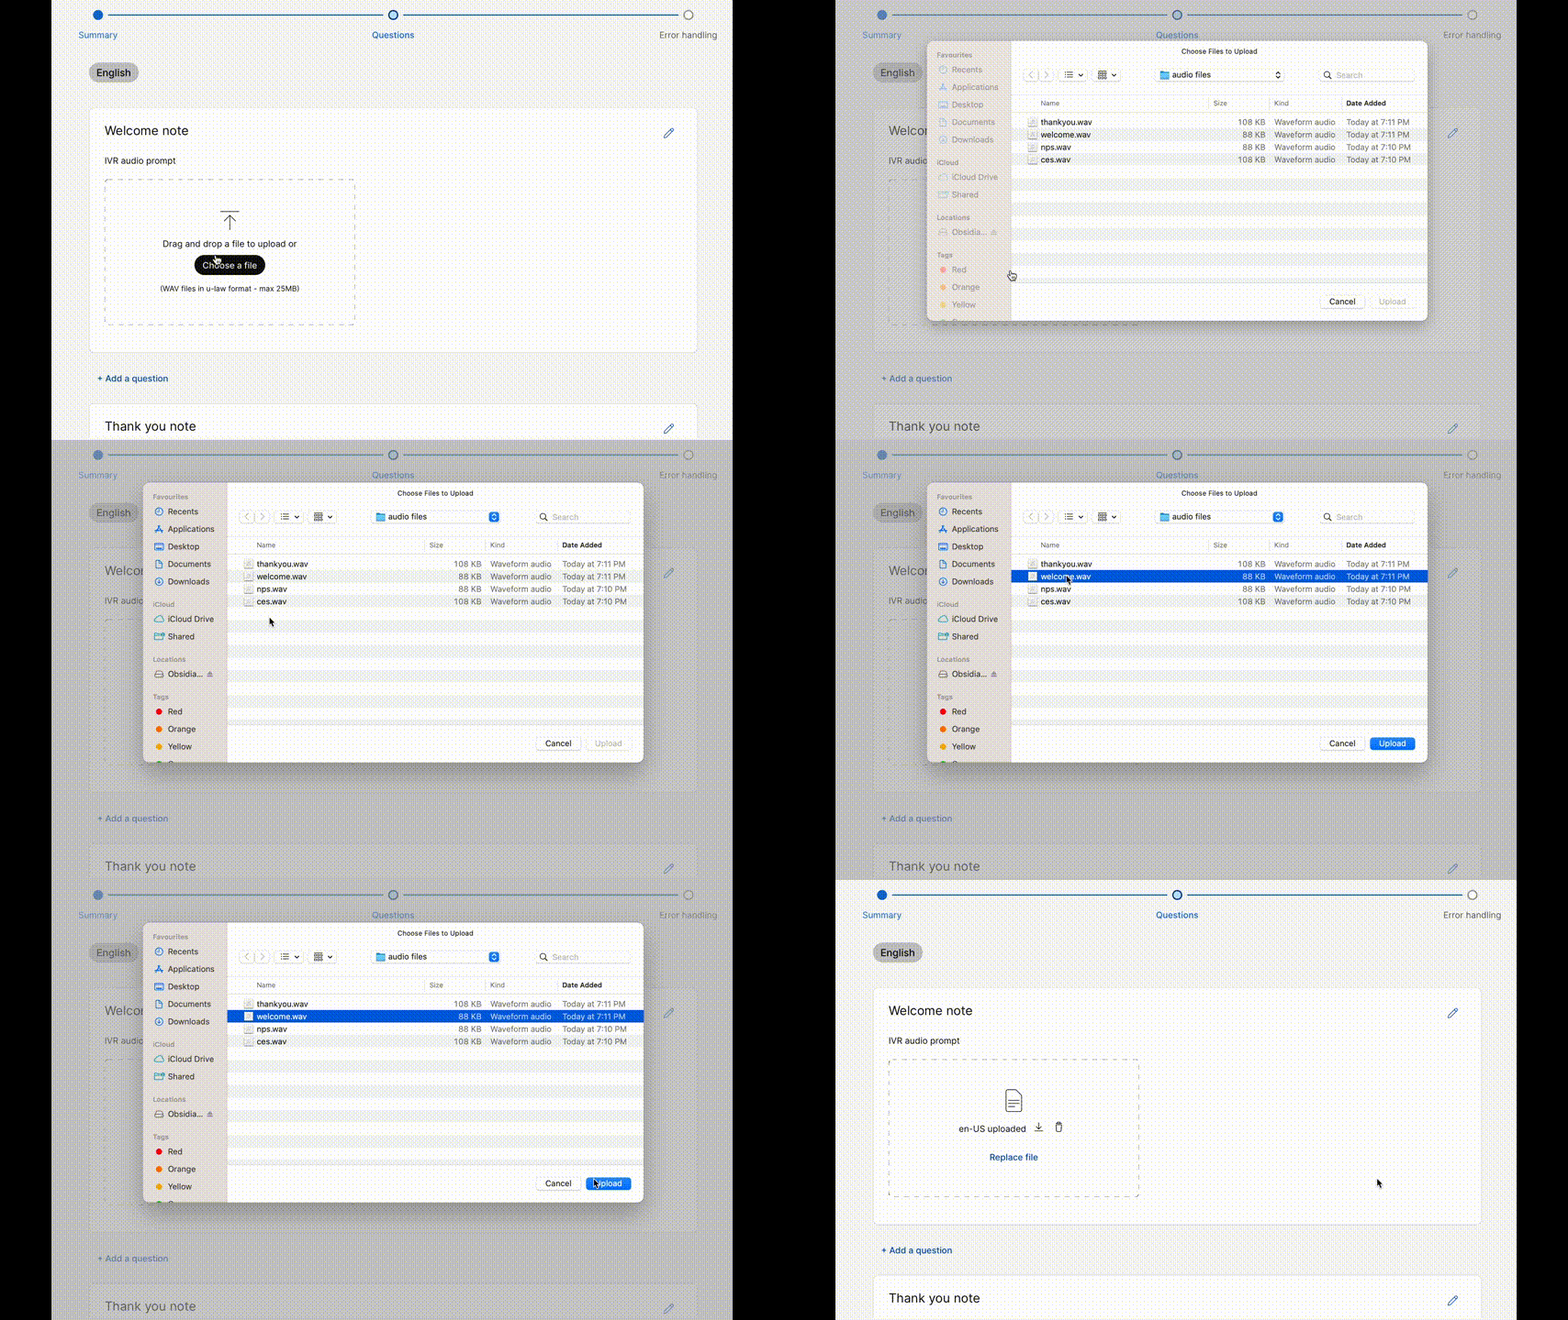
Repeat steps for Thank you note (Thankyou.wav)
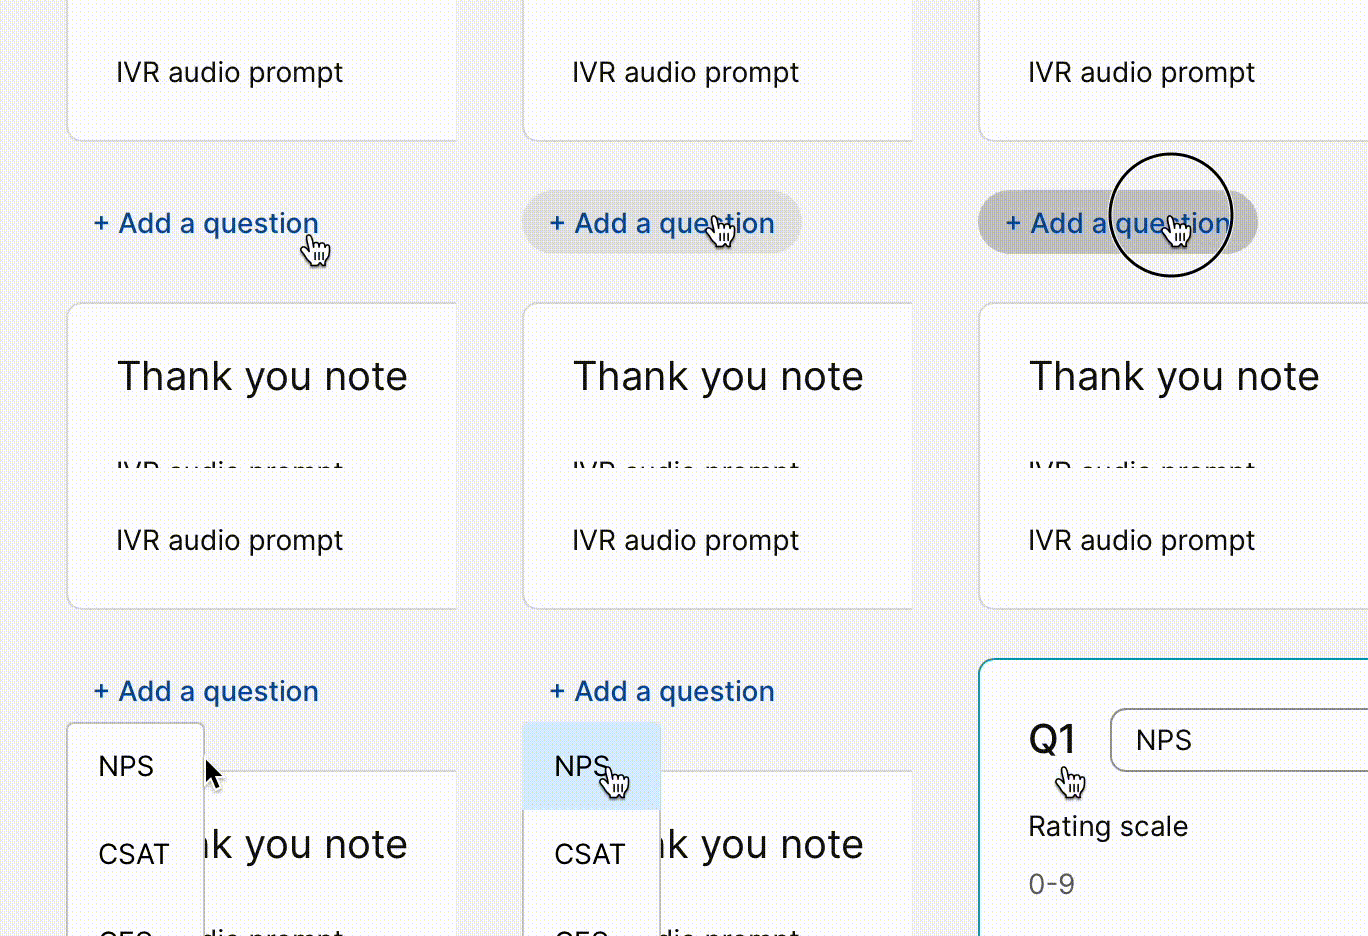
- Add a question to your survey
Select the NPS question from the drop-down by clicking + Add a question
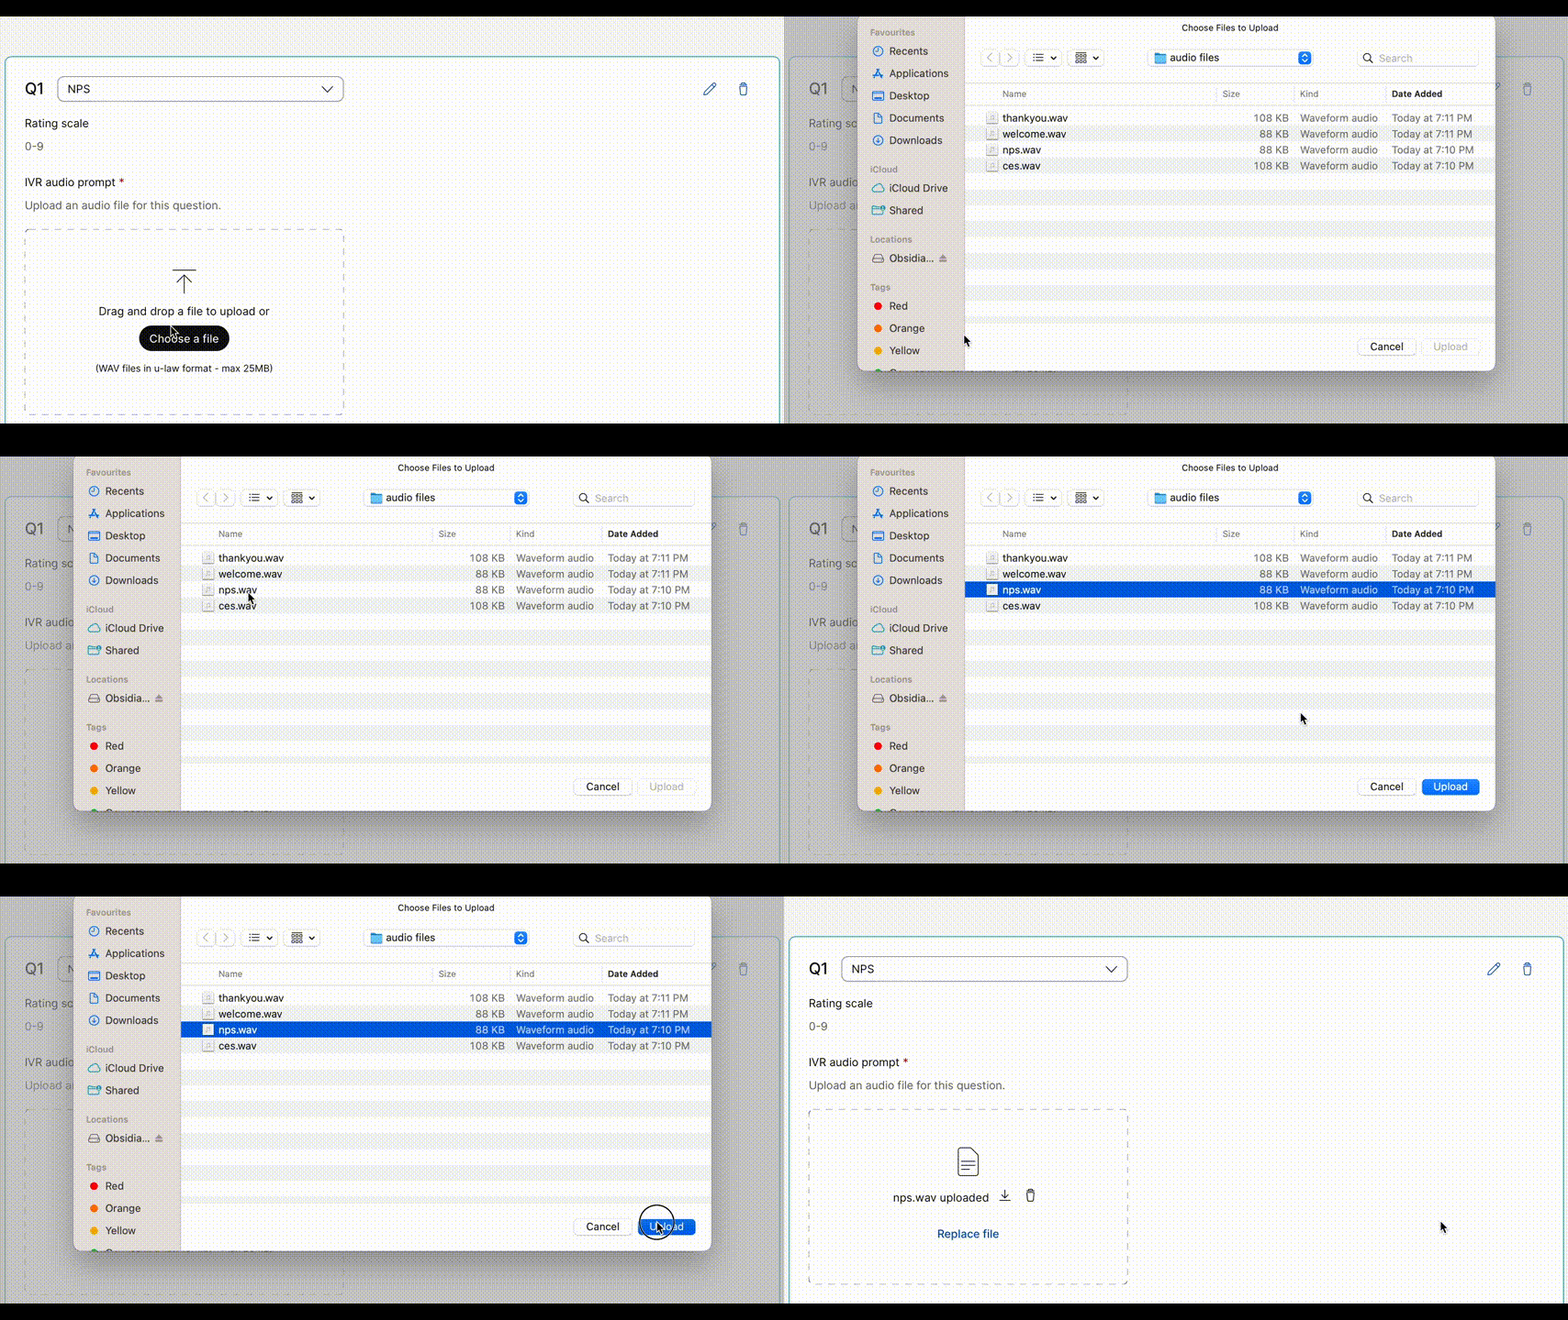
Choose the corresponding audio file, nps.wav for the NPS question and upload (Audio Files)
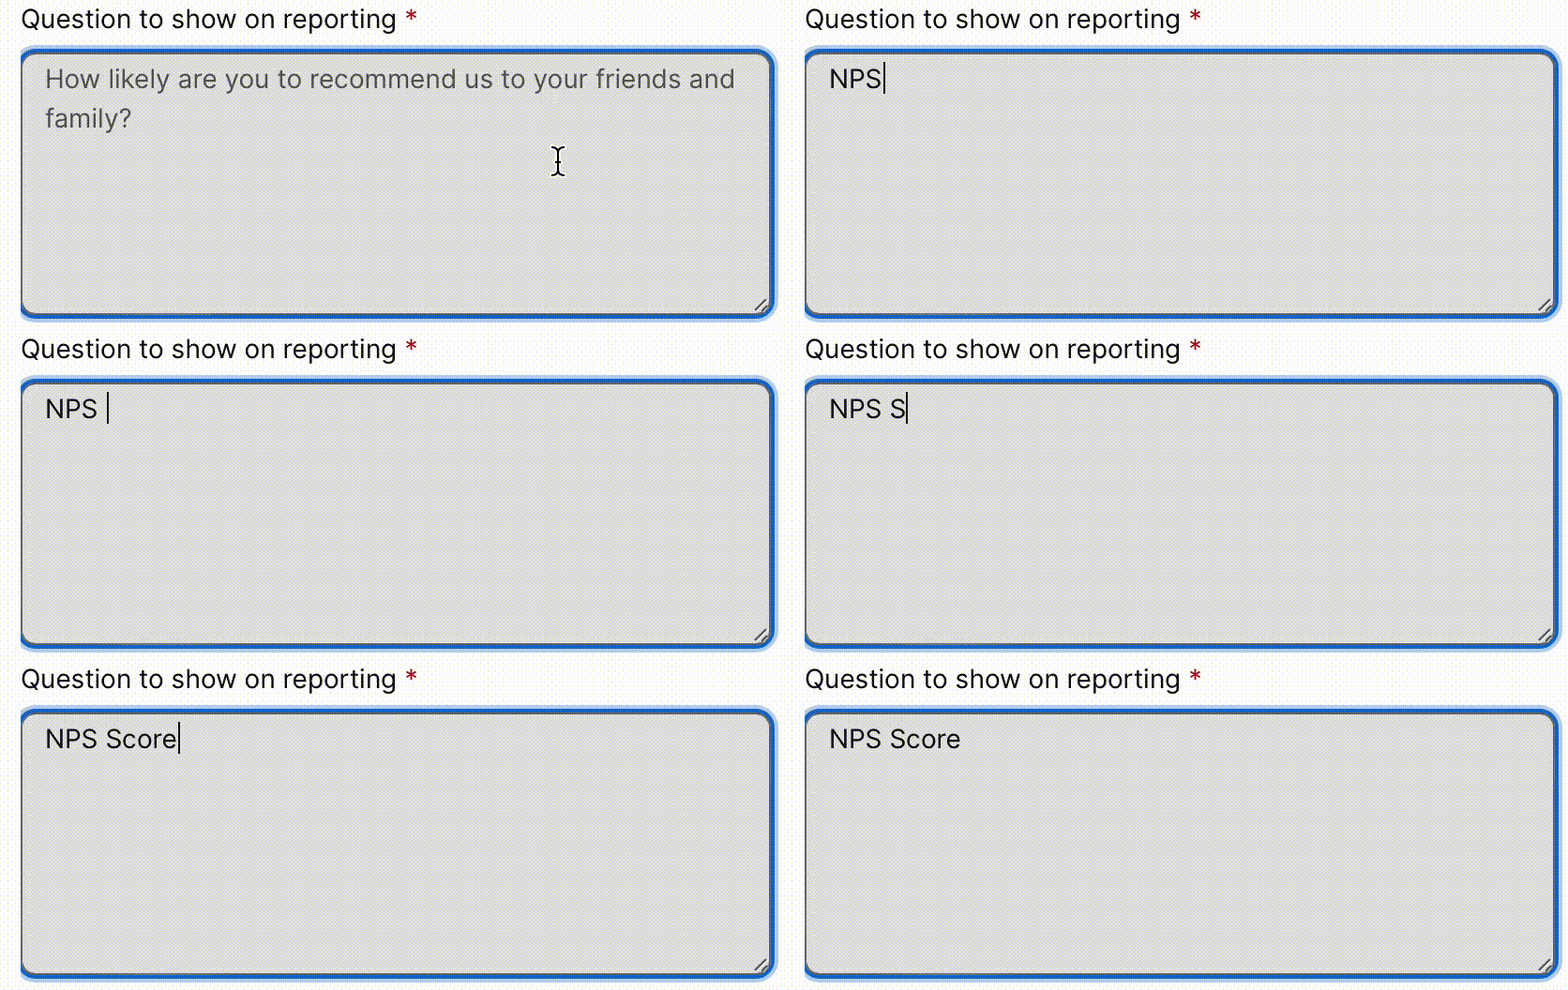
Under Question to show on reporting type the column name as “NPS Score”
- Update Error handling settings (optional)
Upload audio files for Invalid Input and Timeout by clicking on Choose a file under each section
Set the maximum number of invalid inputs and timeouts allowed from the drop-down
Choose an audio file for exceeding maximum tries
- Save the survey from the bottom right corner
Add the feedback activity to your flow
NOTE: Refer to the Lab 2 - IVR Contact Routing if you are unfamiliar with working on flow designer
- Open your flow created from Lab 2 - IVR Contact Routing
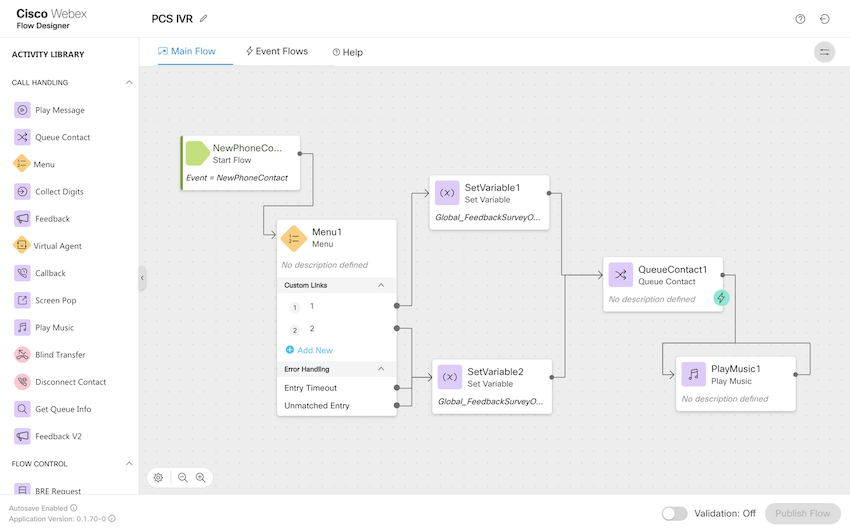
- Introduce a Menu into your main flow to prompt the caller to opt-in for the survey in between the NewPhoneContact event and the Queue Contact node
Activity Label: surveyOptin
Prompt: OptinMenu.wav (Audio Files)
Make Prompt Interruptible: True
Digit Number - 1
Link Description: Opt-In
Digit Number - 2
Link Description: Opt-Out
- Assign true and false values for the Global_FeedbackSurveyOptin variable
Drag and drop two Set Variable nodes into your main flow after the Menu
Click on the first Set Variable node
Activity Label: OptIn
Variable: Global_FeedbackSurveyOptin
Set Value: TRUE
Click on the second Set Variable node
Activity Label: OptOut
Variable: Global_FeedbackSurveyOptin
Set Value: False
- Connect the nodes together
Connect Custom Menu Links for digit 1 to the Set Variable node with Global_FeedbackSurveyOptin set as true
Connect Digit 2 and error handling links to the Set Variable node with Global_FeedbackSurveyOptin set as false
Connect the Set Variable blocks back to your flow before Queue Contact
Example Flow
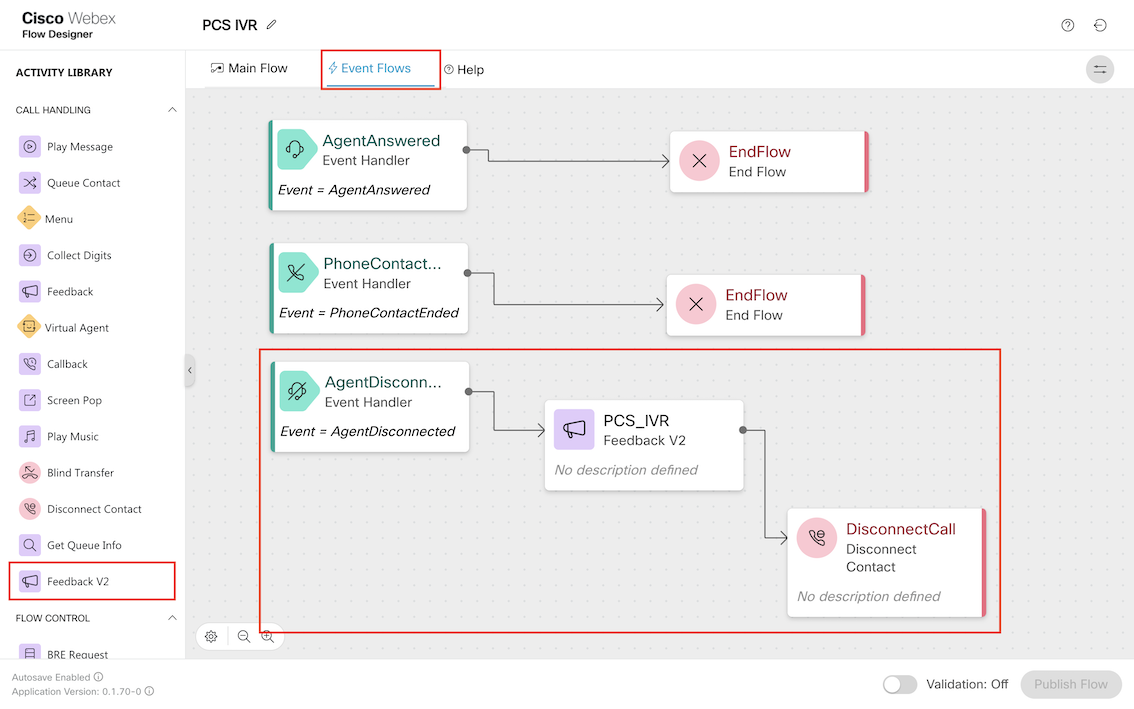
- Navigate to the Event Flows tab
- Add the Feedback V2 node
Connect the Feedback V2 node to the AgentDisconnected Activity
Click on the Feedback V2 node
Activity Label: PCS_IVR
Survey Method: Voice Based
Select survey created earlier from drop-down
Timeout: 10
- Complete the flow by adding a Disconnect Contact node after the Feedback V2 node
Example Flow
- Validate and Publish the flow
Provide a survey response
NOTE: Refer to the section Basic Features in Lab 3 - Agent Desktop if you are unfamiliar with testing an incoming call
- Login to your Agent Desktop and make your state Available
- Dial your designated DN and accept the incoming voice interaction
- Provide the DTMF input 1 to opt-in to the survey
- End the interaction from the Agent Desktop
- Provide a rating on the scale 0-9
Download and validate the survey response
- Navigate to the Surveys page on Control Hub
- Click on the download button on the far right of your survey
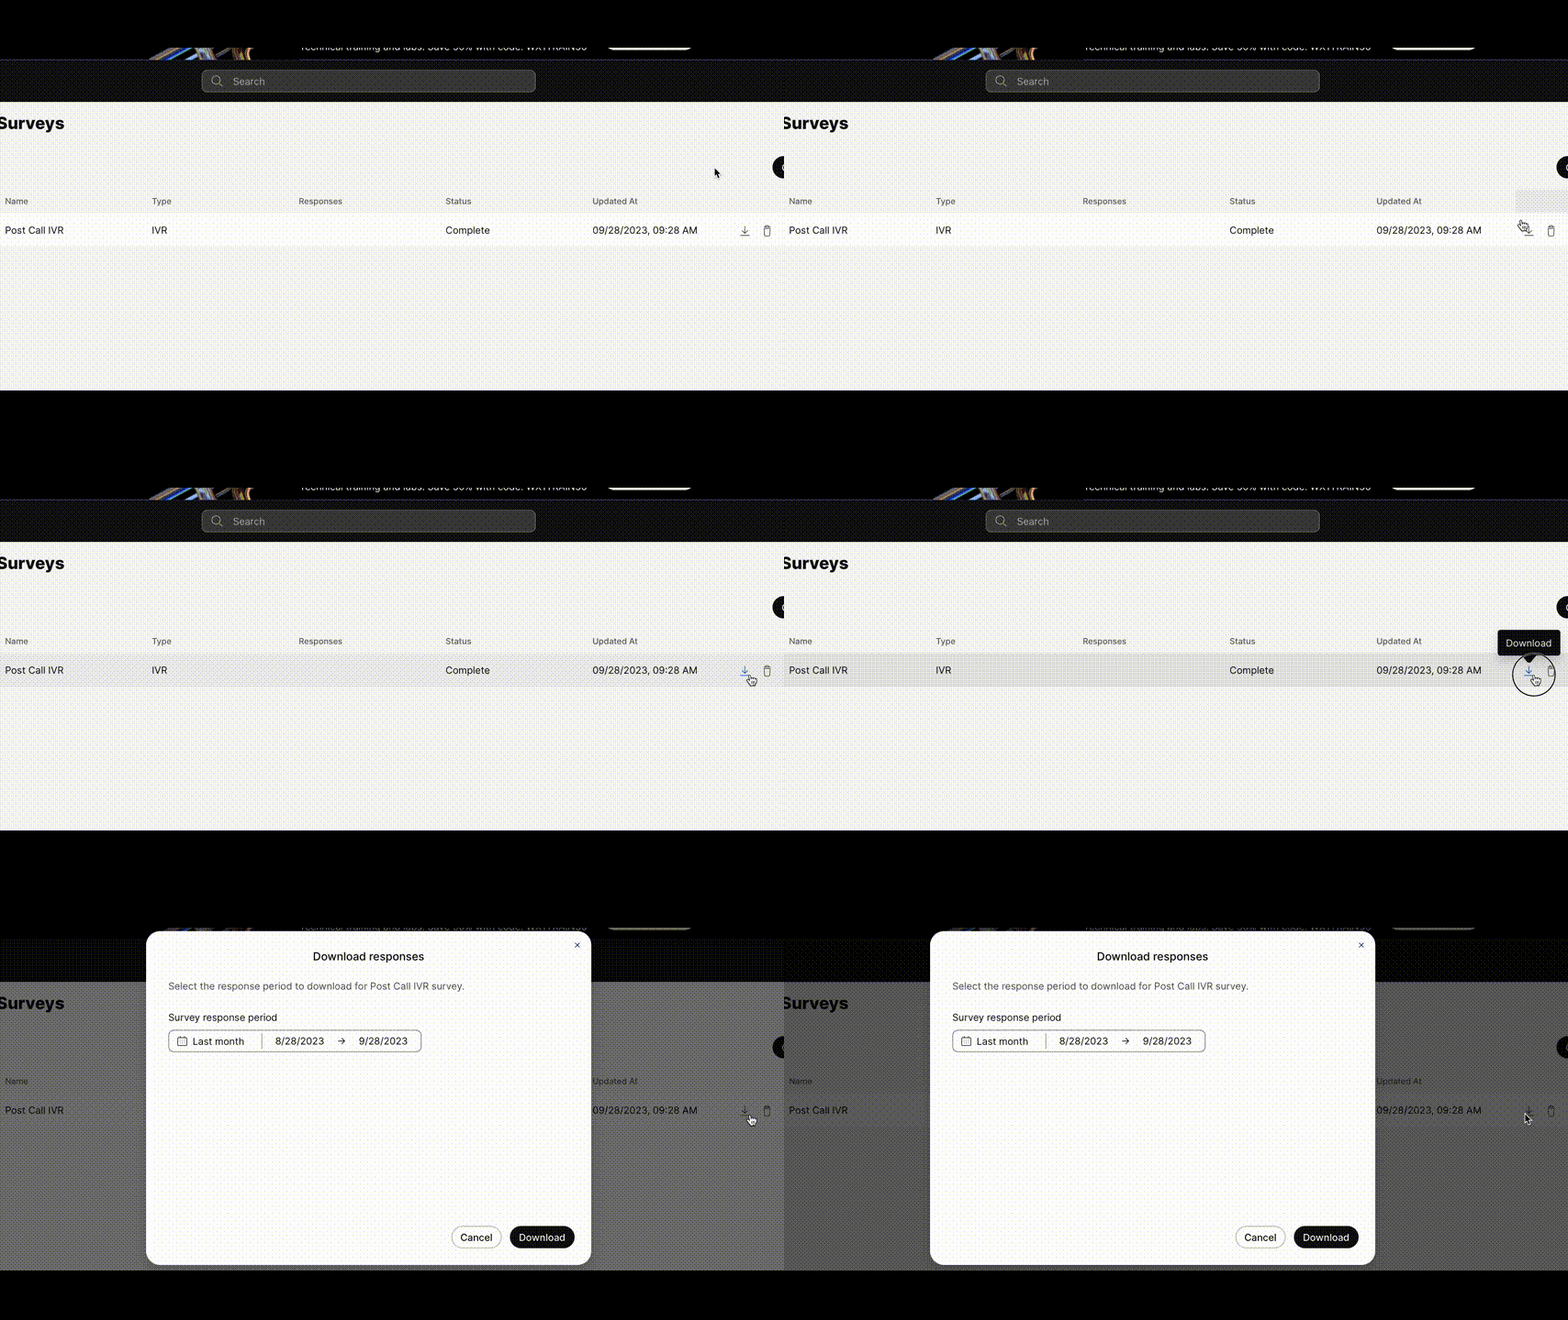
- Select the date range for the survey response period as Last 7 days and click Download
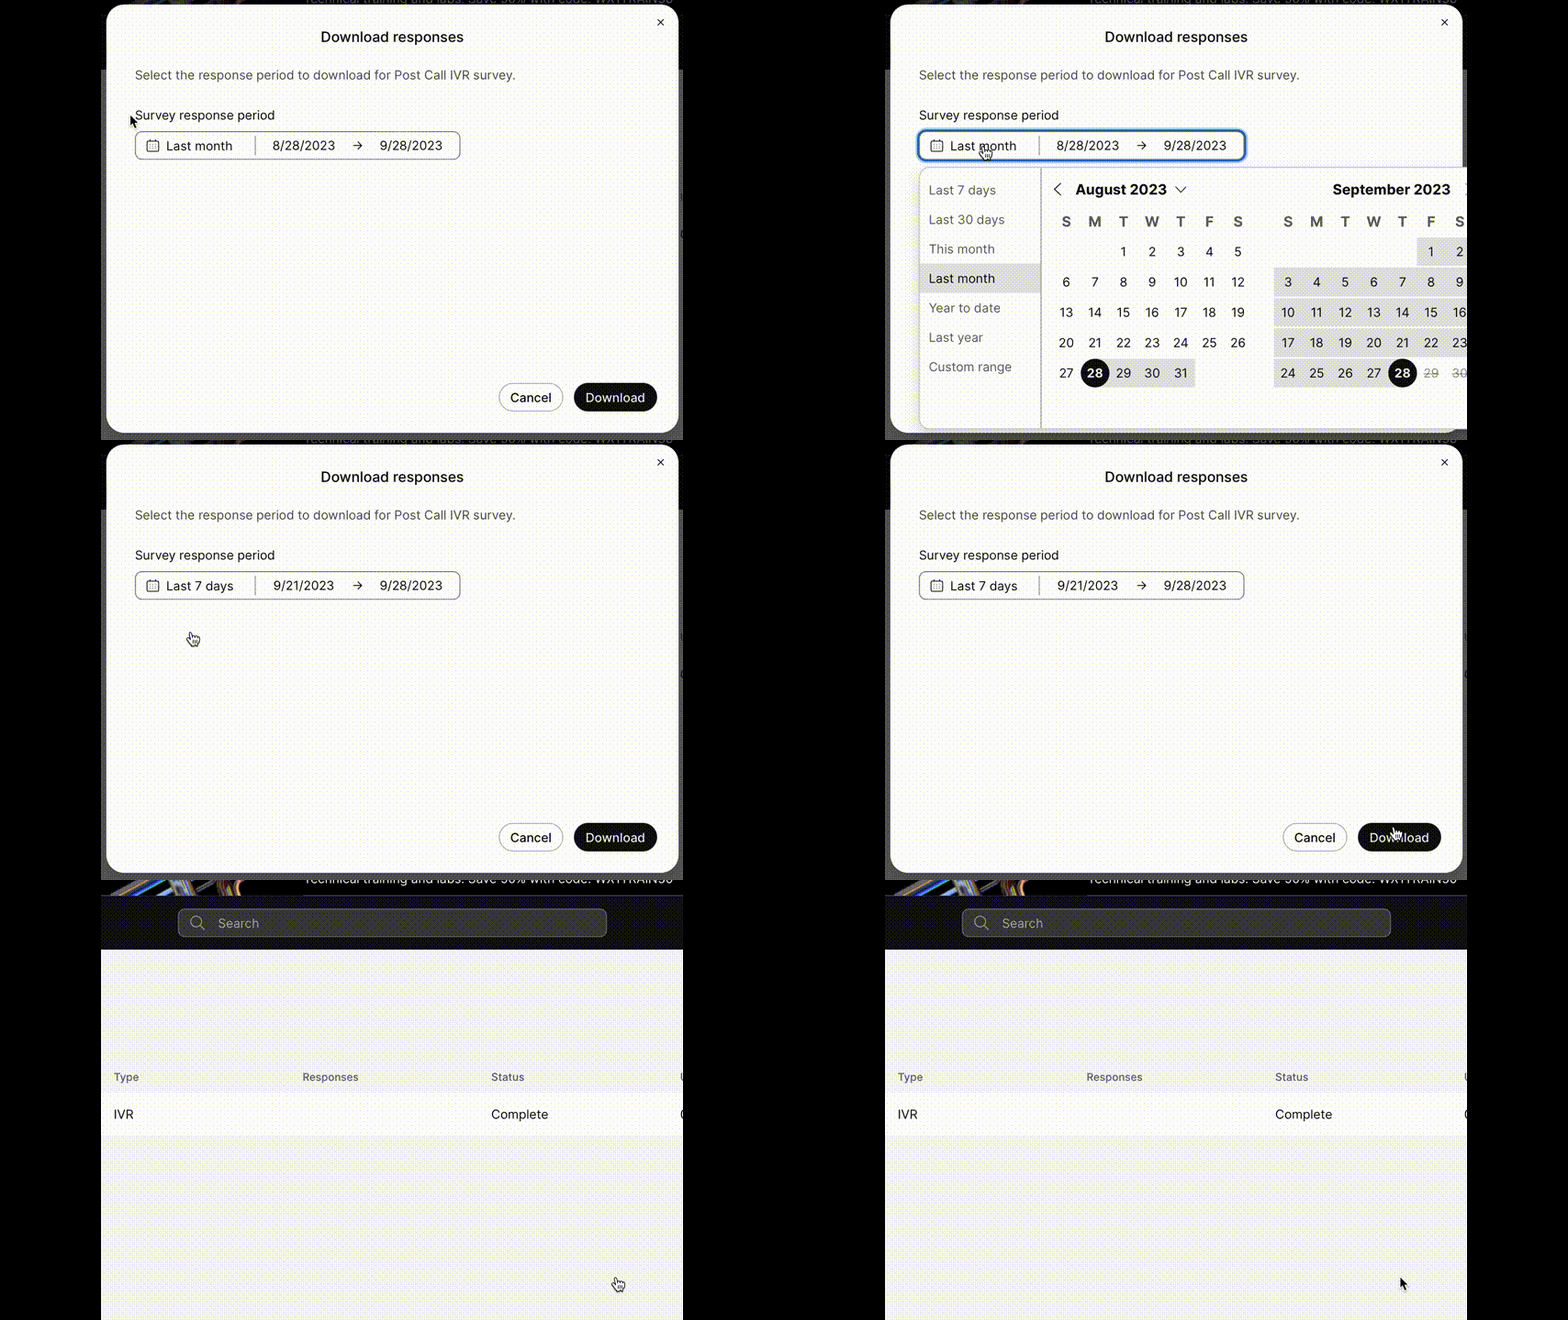
- Verify your response in the excel sheet to the one you provided on the call

Configure Post Interaction Digital Survey
Coming soon. ETA is December 2024.
Customer Journey Data Services (CJDS)
Overview of the Lab
In this lab, we will understand what is the Customer Journey Data Services (JDS) feature, how we can set it up and configure it in the Control Hub and how to enable the JDS Desktop widget for agents. Furthermore, we will see the Customer Journey Widget in action from an agent perspective and we will delve into all the API capabilities that the features offers.
Finally, we will become familiar with the JDS Use Case library that Cisco has created to showcase how JDS can help you take your customers’ journey to the next level.
Lab Objective
At the end of this lab, you will be able to:
- Enable JDS feature and the Customer Journey Widget in your tenant.
- Create and manipulate an end-user database with your customer information.
- Add the Customer Journey Widget to your Agent Desktop and take advantage of it during a customer interaction.
- Utilize the JDS APIs to enhance the customer journey experience with additional insights & actions.
Pre-requisites
- You have completed
Lab 1 - Admin Experience:- You are familiar with Control Hub and navigation within Control Hub, logging in as an administrator.
- You have completed
Lab 2 - IVR Contact Routing:- You are familiar with creating and modifying flows.
- You have completed
Lab 3 - Agent Desktop:- You are familiar with logging in as an Agent and accepting inbound interactions.
- You are familiar with creating a custom Desktop Layout.
- You have Webex Calling installed in your device and can make calls to the contact center.
Quick Links
Control Hub: https://admin.webex.com
Portal: https://portal.wxcc-us1.cisco.com/
Agent Desktop: https://desktop.wxcc-us1.cisco.com
Developer Portal: https://developer.webex-cx.com/documentation/getting-started
JDS Feature Overview
CJDS is an API-first service that enables organizations to:
Listen: Integrate with any data source or third-party applications to listen to disparate data sources (e.g. customer called Support).Identify: Create a dynamic customer profile capturing propensity drivers, such as a customer’s preferred mode of communication or preferred language (e.g. how many times has the customer contacted us in the last week in each channel?).Analyze: Apply different aggregation techniques to all customer data collected (e.g. What is the CSAT score of the customer interaction? Is he using telephony,chat or other channel to contact?).Act: Use the data and insights within CJDS to dynamically change the flow within Webex Contact Center Flow Control and personalize the customer experience at a granular level. These insights are visible to customer-facing teams in real time through Agent Desktop. (e.g. bypass normal queue when customer calls for the third time in 24 hours and offer premium support).
A comprehensive summary of the feature is available in the Developer Portal, where you can find all the vital information & step-by-step guide to enable JDS for the first time in your own tenant.
Provision JDS
-
Fill outthis form to have CJDS provisioned for your tenant enabled, as it not enabled by default. If applicable, please work together with your Customer Success Manager (CSM) to ensure a smooth process and enablement. Post the initial request, the Cisco team will provision the CJDS instance within 72 hours. -
When JDS is provisioned for the tenant,
Customer Journey Datatab appears in the Control Hub. -
You can set how long to retain data that’s captured for CJDS. We recommend that you keep a minimum of 180 days to make sure that there are sufficient end-user journey data. By default, data is retained for 365 days.
a. Sign in to Control Hub and go to
Customer Journey Data>Settings.b. Enter the number of days that you want to retain data in CJDS.
-
Click
Save.
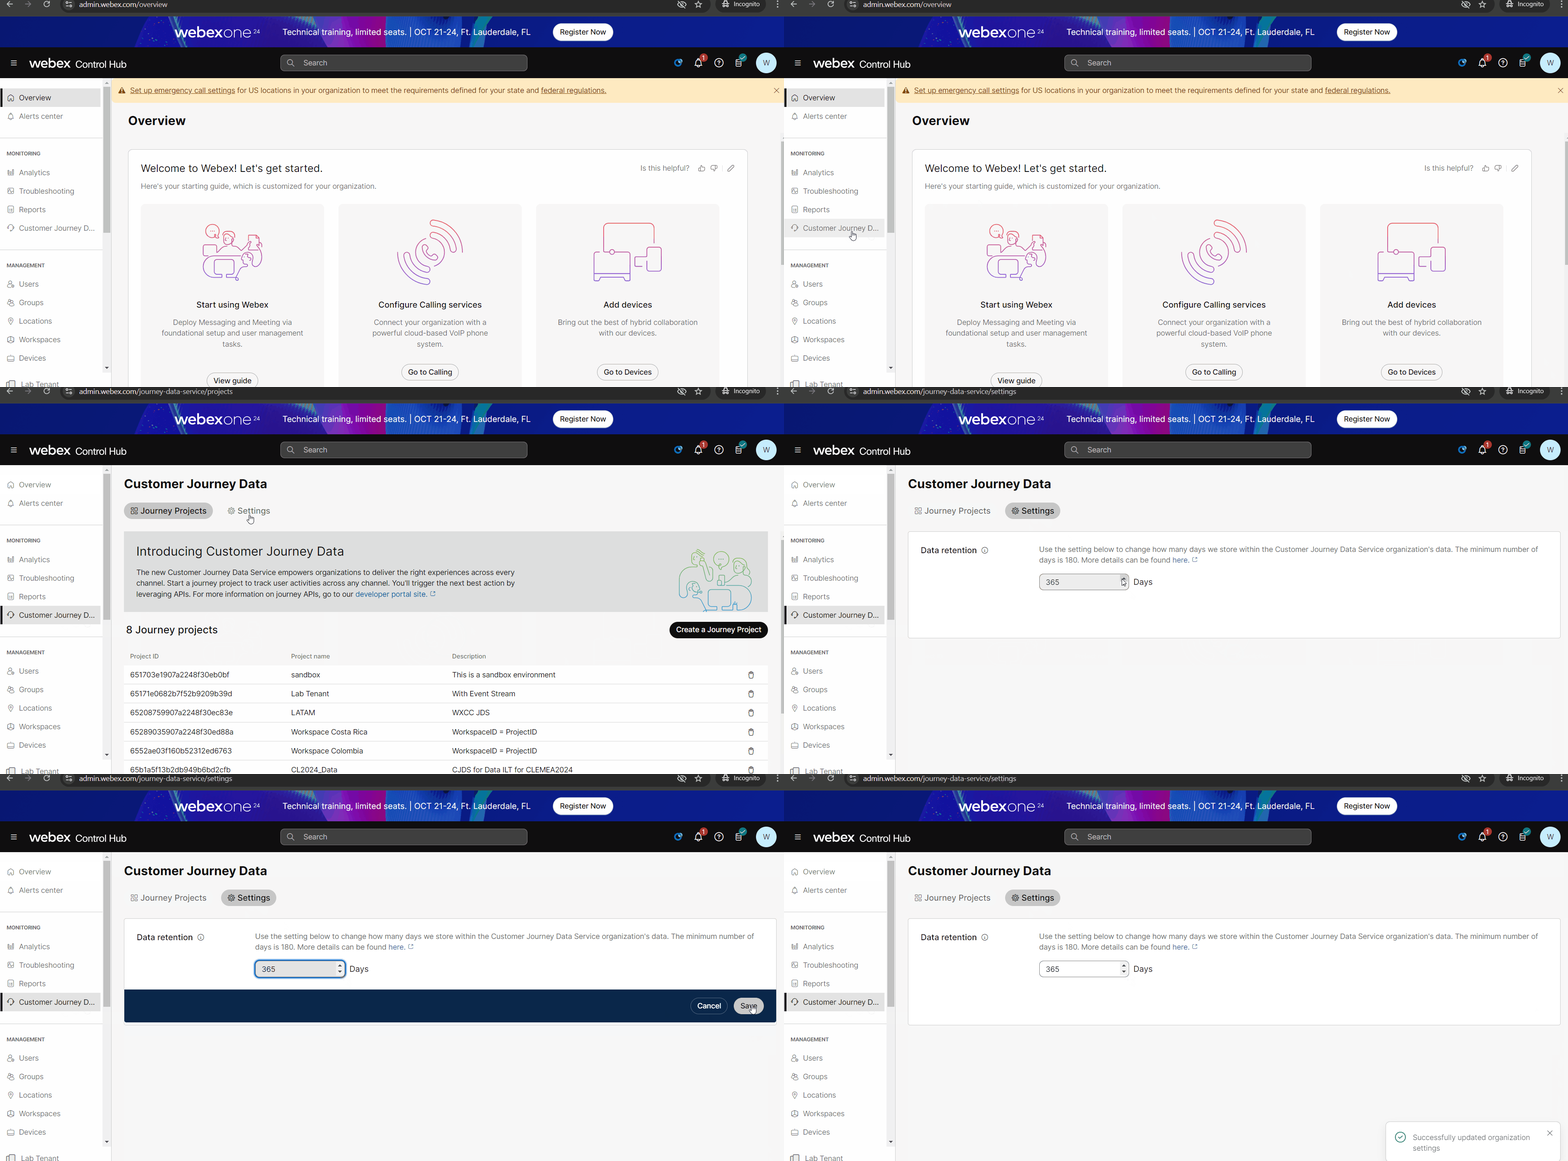
Note:JDS is already provisioned in the provided lab tenant, so you do not need to perform them. You may follow the above steps when provisioning for your own tenant.
Setup Desktop Customer Journey Widget
The customer Journey widget provides a single pane of glass view to the customer’s journey across all channels and applications, giving you the necessary contextual data for a more personalized customer experience and reducing average handling time.
Create a journey project and Activate Webex Contact Center connector
Journey projects help organizations manage multiple data sources. Each journey project has a unique identifier which is required to leverage CJDS APIs payloads. Note that project IDs in Control Hub are referred to as workspace IDs in APIs.
Jouney project may be activated with the Webex Contact Center connector. This allows the journey project to capture all customer events and send it to CJDS from Contact Center. Once the connector is activated in one project, it cannot be activated in another. At any point in time, it can be enabled for only one project.
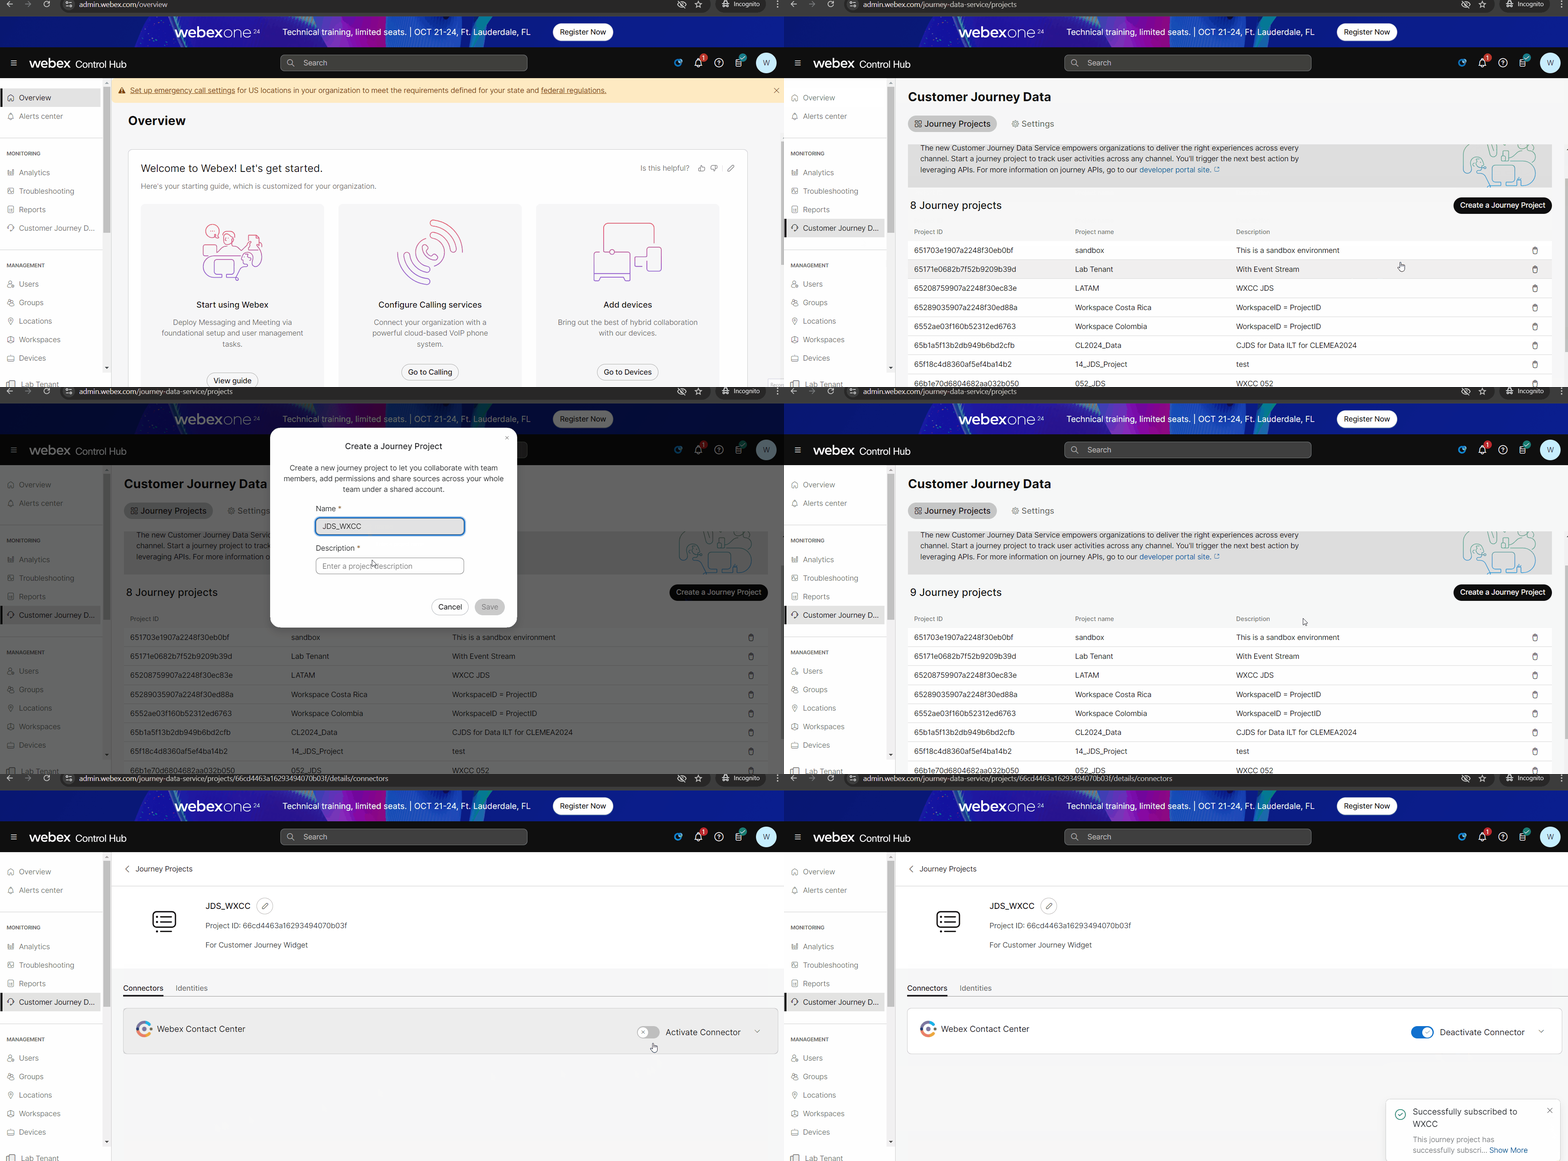
-
Sign in to Control Hub and go to
Customer Journey Data > Journey projects. -
You can use the default Sandbox Project or click
Create a Journey Project. -
Enter a name and a description for the journey project.
-
Select the journey
projectthat you created in previous step. -
Toggle the
Activateconnector in the Webex Contact Center section to ON.
Add User Identities to a Journey Project
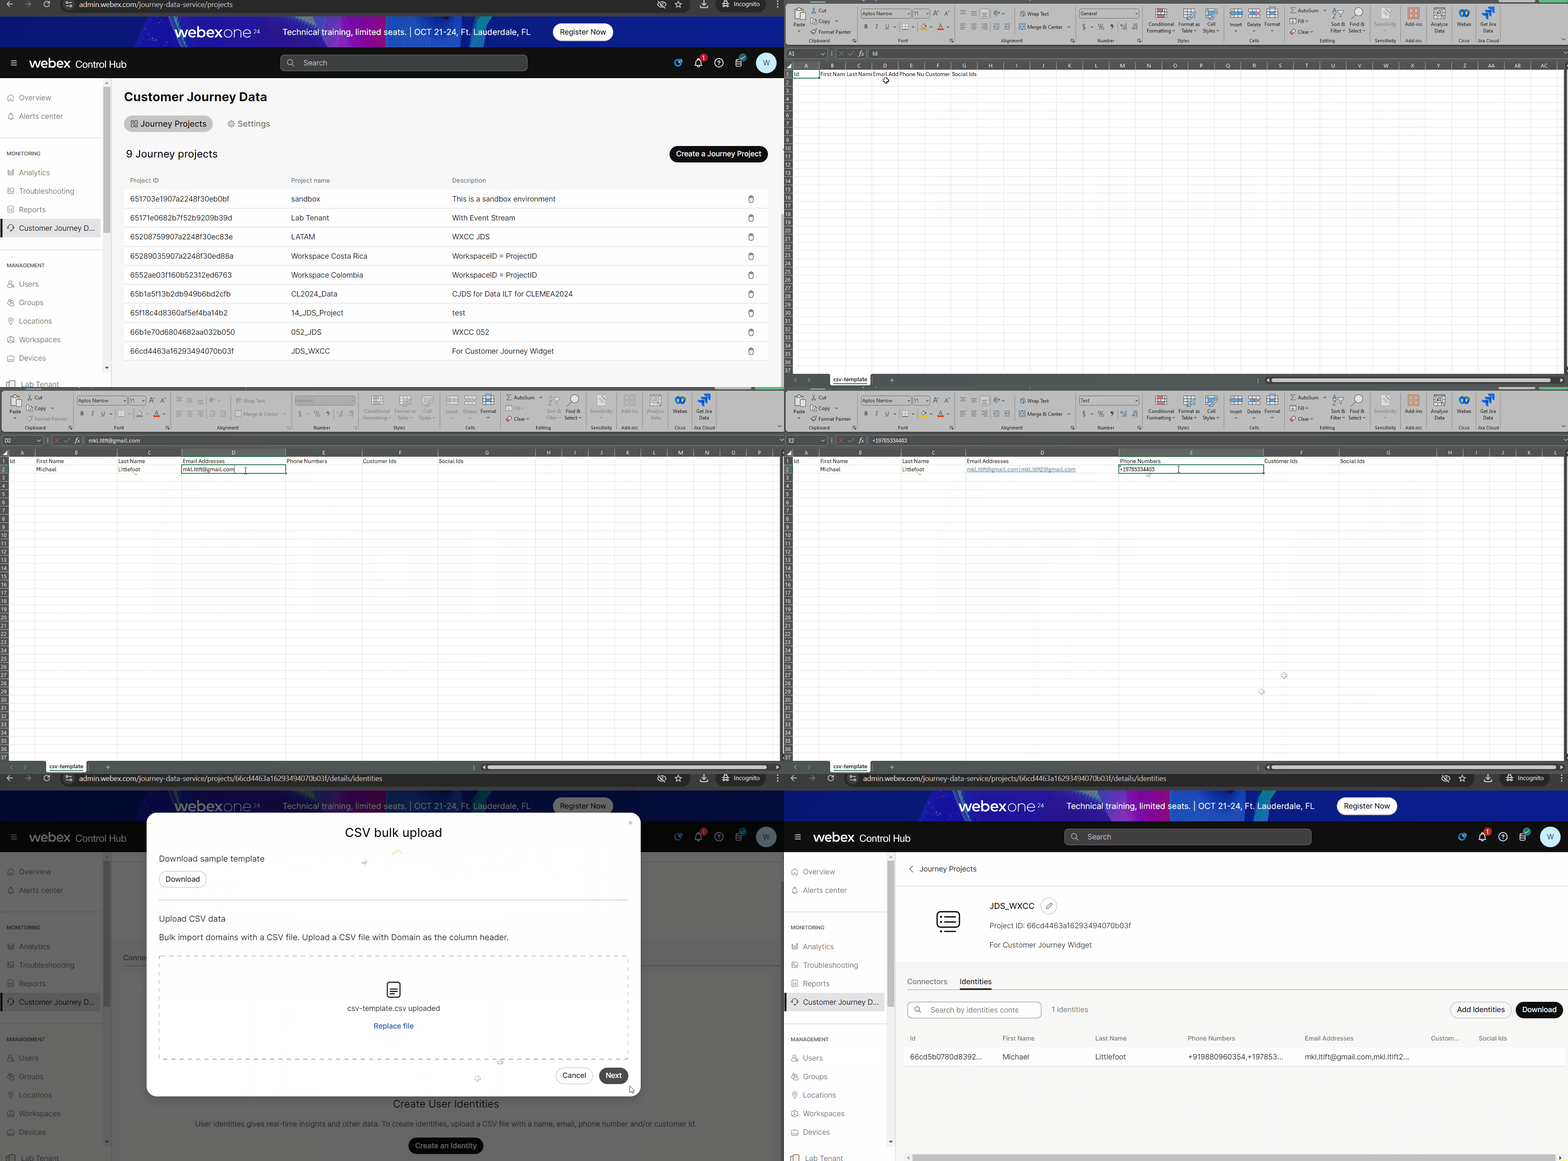
-
Select the journey
projectfor which connector was activated. -
Select
Identities. Click onAdd identities. -
Download the sample template.
-
In the downloaded CSV file, add the Customer identities [First Name,Last Name,Email Addresses,Phone Numbers,Customers Ids].
- Each customer identity must have at least an email address, phone number, or customer ID or else the CSV file will return an error.
-
If you want to add multiple email addresses, phone numbers or customer IDs, you need to **use the pipe “ ” delimiter** between them. For example, try to add your phone number both with and without a plus sign. - For the Id column, make sure to leave each row
empty. When you upload the CSV file, this field will auto-generate.

-
Upload the CSV file that you created for customer identities, and then click
Next. -
If the CSV file is valid, a window appears to show you if the import was successful. Once you’re done, select
Close. You should see a list of all the uploaded customer identities.
Enable Customer Journey Widget on an Agent Desktop
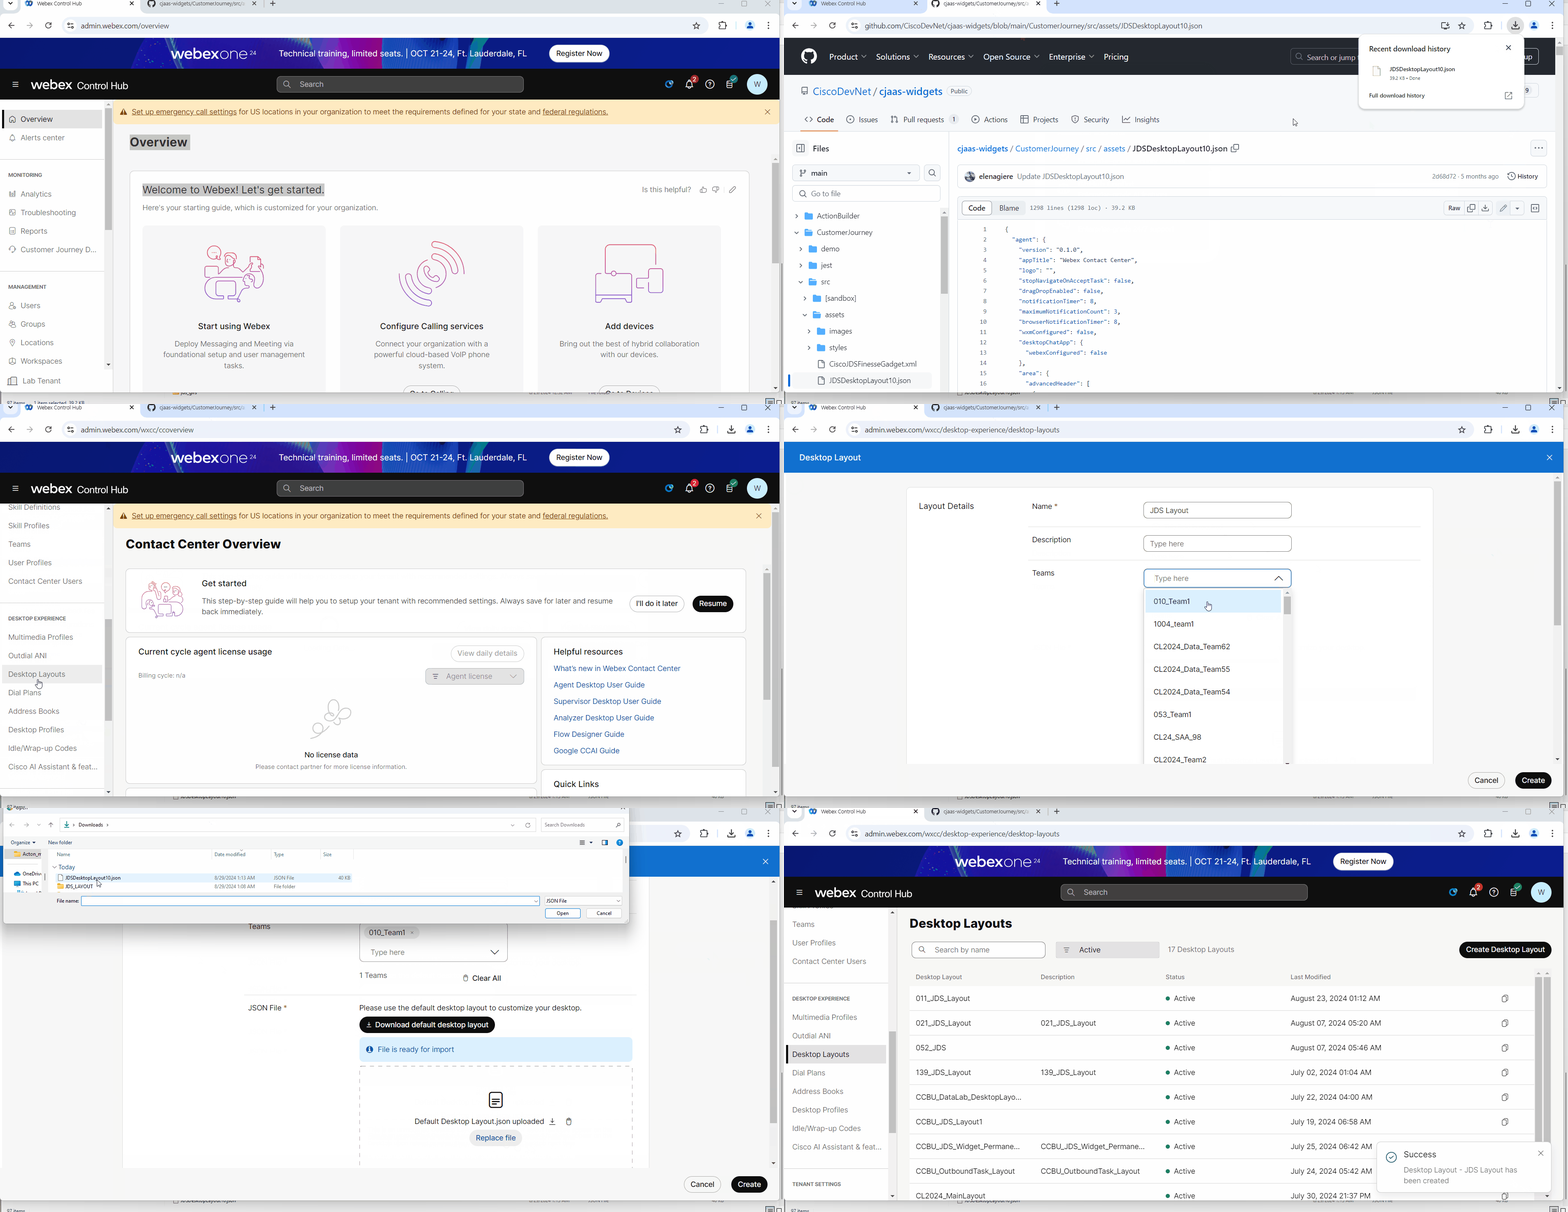
-
Download the following Desktop Layout JSON file JDSDesktopLayout.
-
Sign in to Control Hub and go to
Contact Center > Desktop Layouts. -
Create a
New Layout. -
Assign an
Agent Team. -
Upload the Desktop Layout JSON file that you downloaded in step 1.
-
Click
Save.
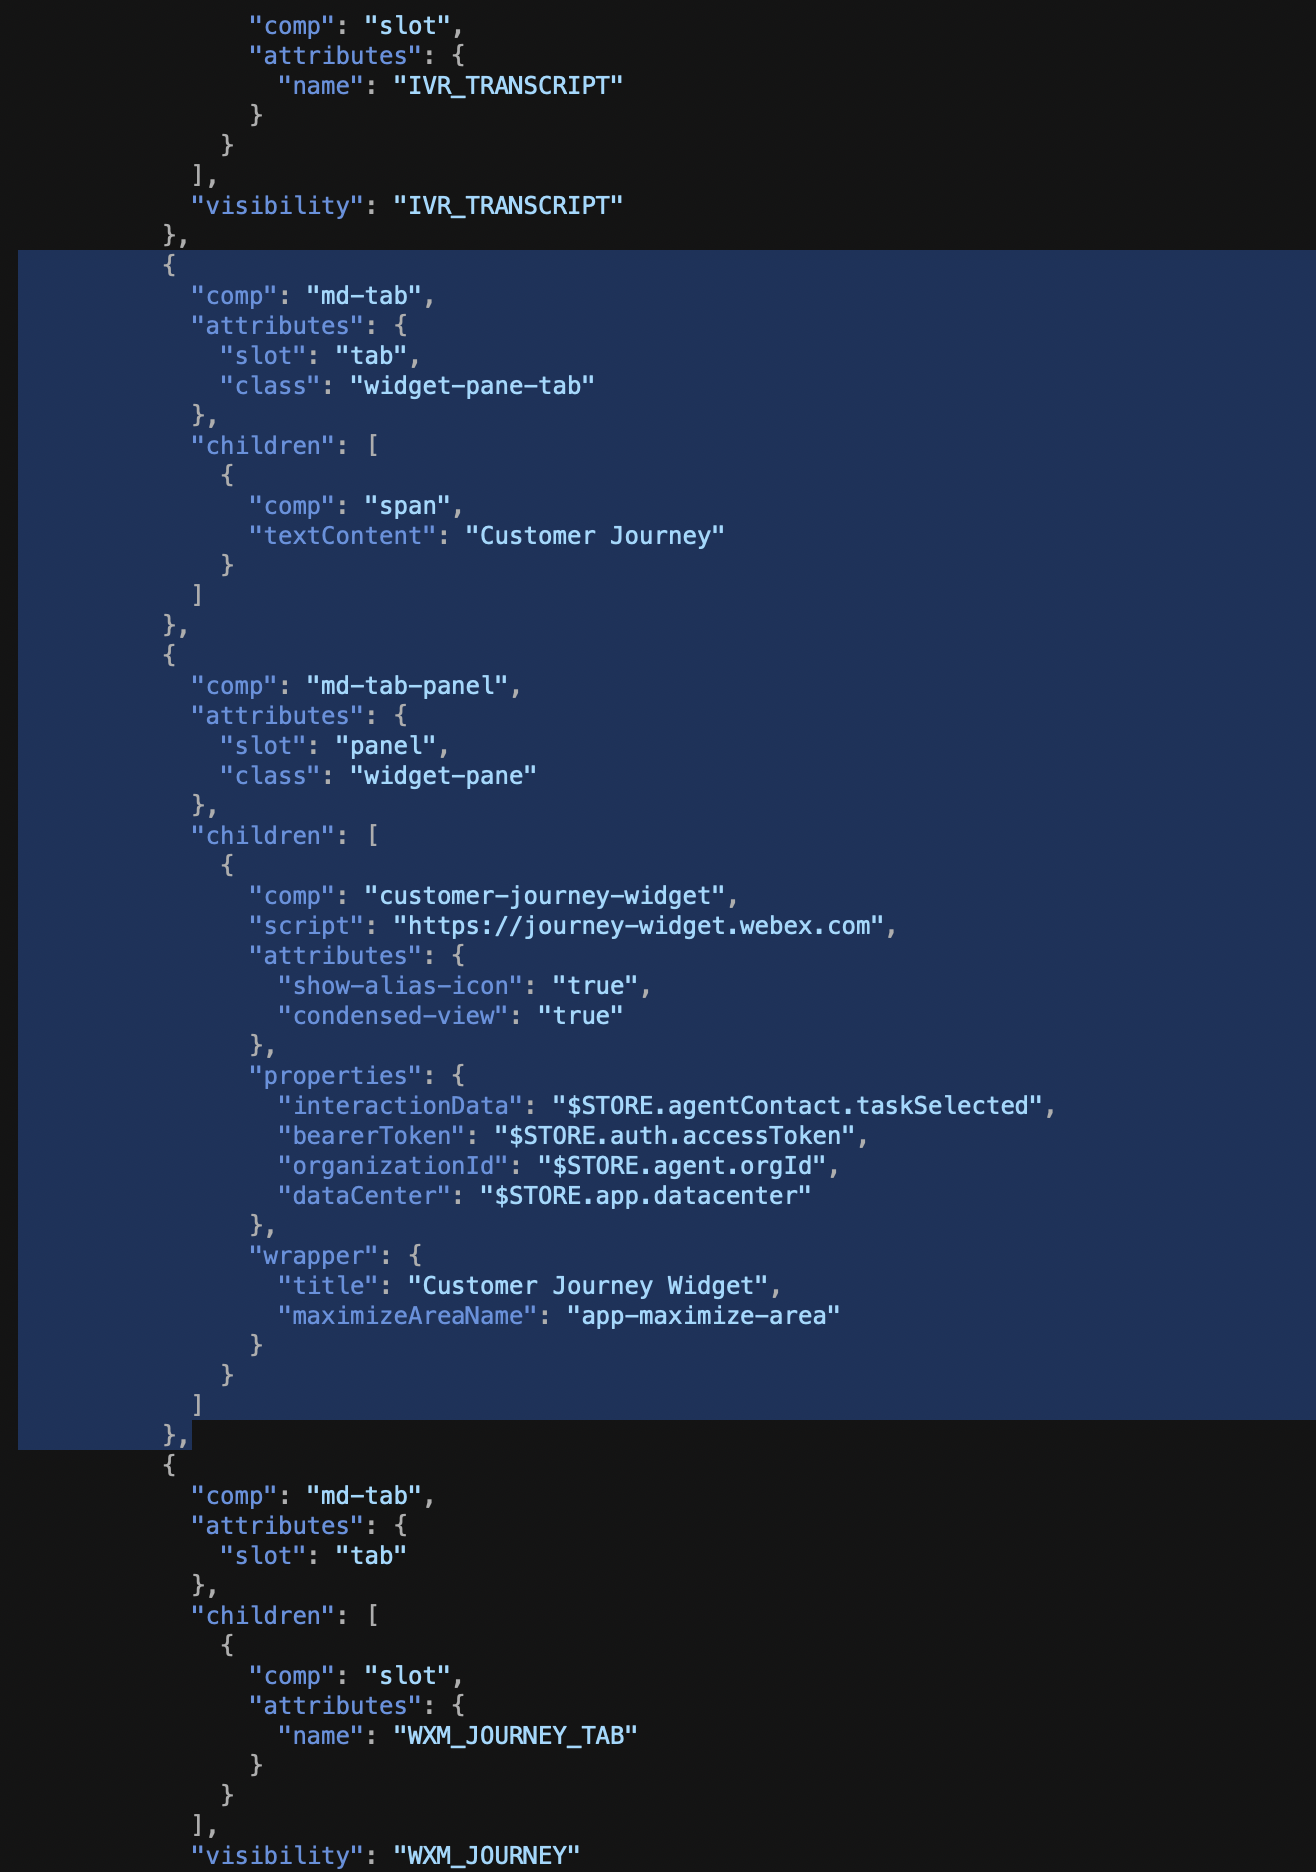
Note:If you are interested in adding the CJDS Widget to your existing desktop layout in your own tenant, use the below code snippet.
CJDS Widget Code Block
          {
            "comp": "md-tab",
            "attributes": {
              "slot": "tab",
              "class": "widget-pane-tab"
            },
            "children": [
              {
                "comp": "span",
                "textContent": "Customer Journey"
              }
            ]
          },
          {
            "comp": "md-tab-panel",
            "attributes": {
              "slot": "panel",
              "class": "widget-pane"
            },
            "children": [
              {
                "comp": "customer-journey-widget",
                "script": "https://journey-widget.webex.com",
                "attributes": {
                  "show-alias-icon": "true",
                  "condensed-view": "true"
                },
                "properties": {
                  "interactionData": "$STORE.agentContact.taskSelected",
                  "bearerToken": "$STORE.auth.accessToken",
                  "organizationId": "$STORE.agent.orgId",
                  "dataCenter": "$STORE.app.datacenter"
                },
                "wrapper": {
                  "title": "Customer Journey Widget",
                  "maximizeAreaName": "app-maximize-area"
                }
              }
            ]
          },
Here is a screenshot of the block in place (notice it is after IVR_TRASNCRIPT and before WXM_JOURNEY_TAB).
View Customer Journey Widget on an Agent desktop
-
Login as an Agent into
Agent Desktop. Ensure that the desktop layout of the Agent’s Team hasJDS Widgetconfigured as per the previous steps. -
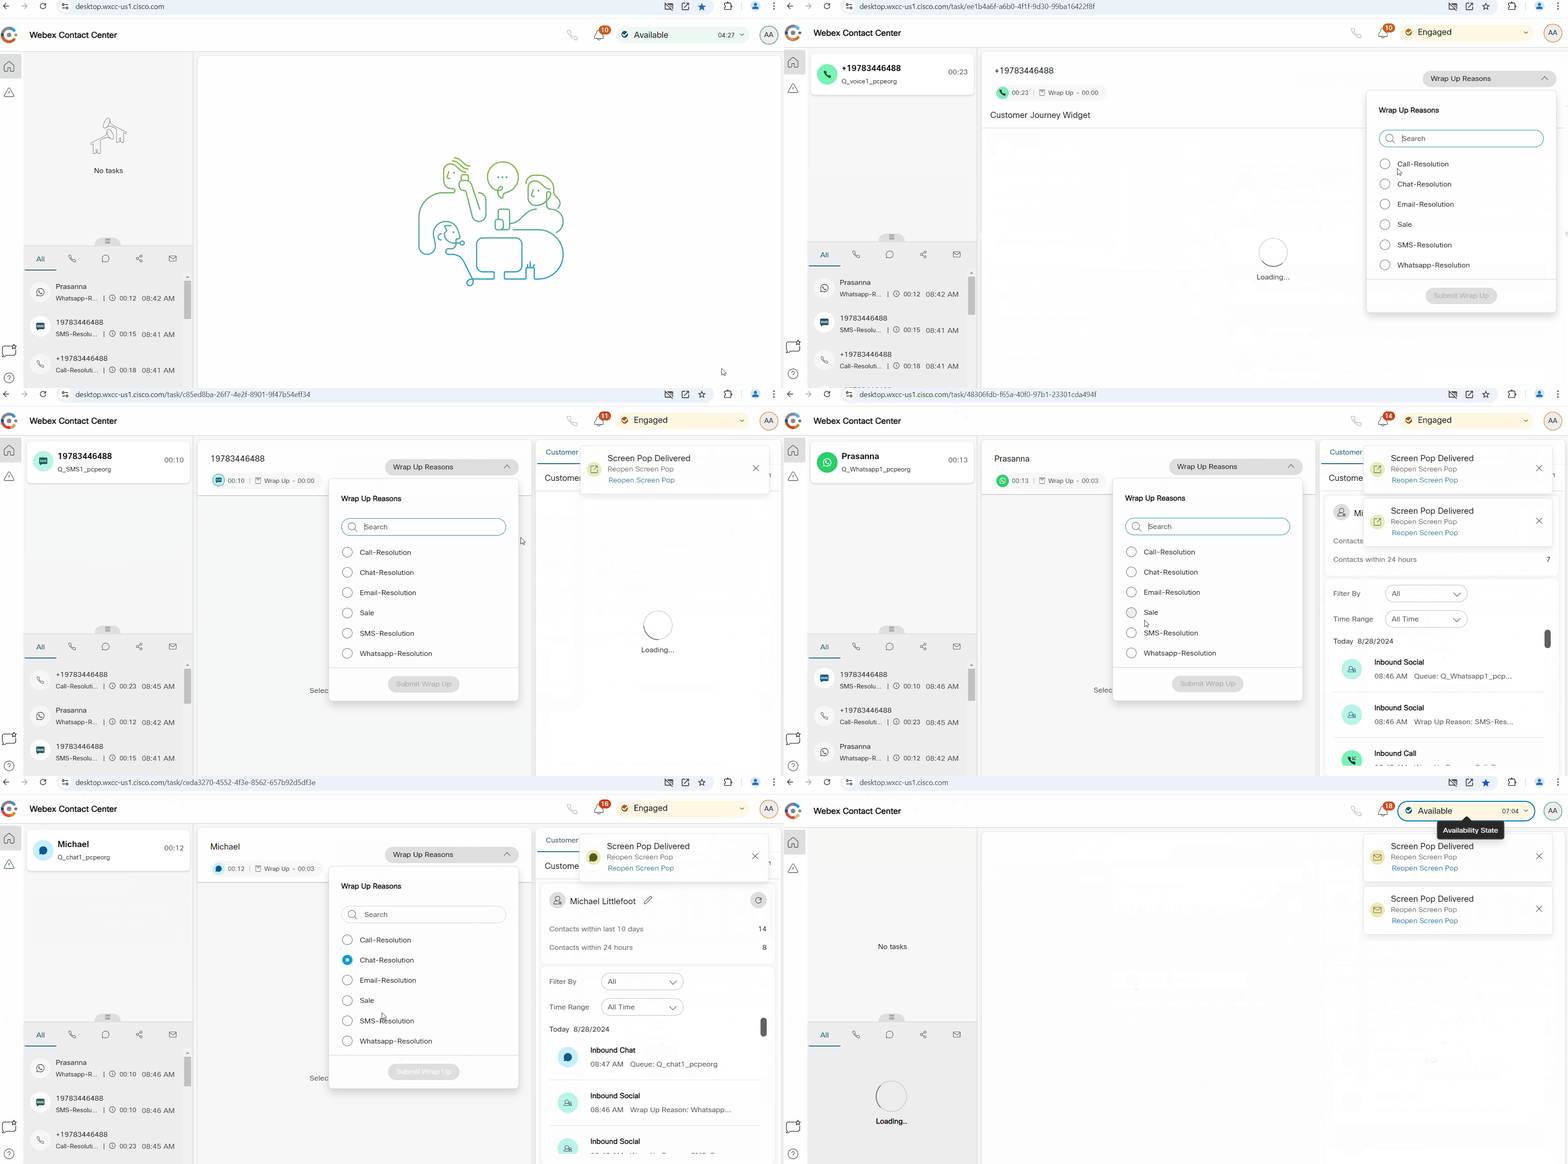
On Accepting an incoming request, the
CJDS Widgetwill appear in the desktop.
The widget displays insights such as the number of times the customer has called or was contacted across all channels during a given duration. It also displays the journey history with default information such as wrap-up code, queue name, agent ID etc., and also allows to customize the event history with options such as third-party (non Webex CC) events and custom icons.
The progressive profile allows for alignment of different phone numbers and emails under one profile, ensuring accurate and comprehensive interaction data.
JDS APIs
API Documentation & Definitions
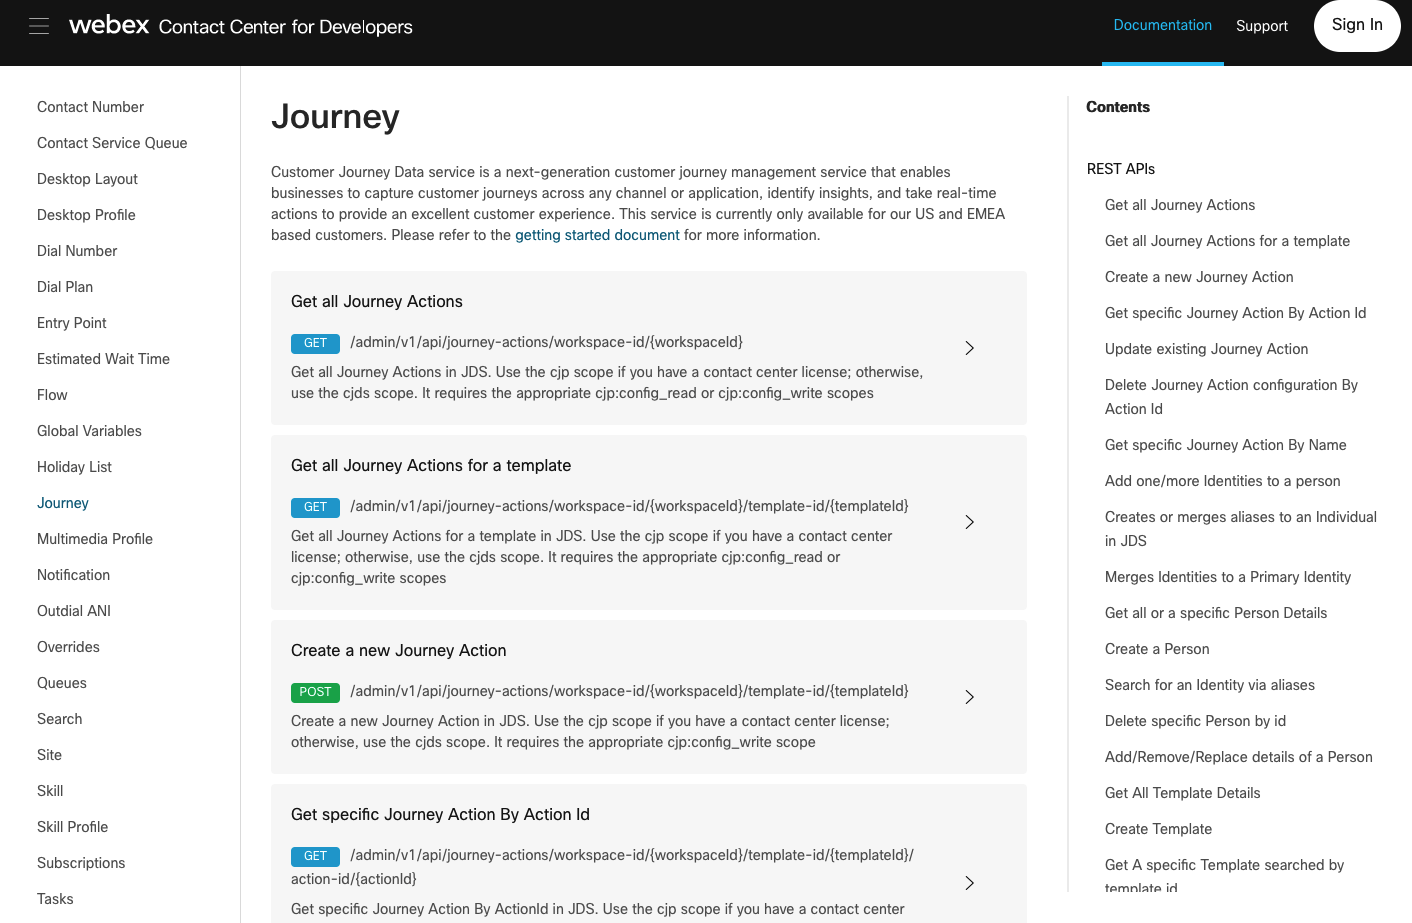
AS JDS is an API-first solution, there is a wide range of APIs available. All the APIs can be found in the Developer Portal, where -as with all APIs- there is information on how to create the API request, the path/query parameters, the expected response as well as a sample code example. For more information on Webex Contact Center APIs & Authentication, you can follow and the complete the API Lab - Lab 11.
To be able to understand all the capabilities these APIs offer, it is important to become familiar with a few terms used in them:
Project / Workspace: A uniquely identified entity that includes a specific set of JDS configurations and data sources.- At any given moment, only one project can be active per tenant (i.e. listen to events).
Subscription: The events that JDS listens on, e.g. all the agent activity state changes/logins/logouts are one default JDS subscription.Identity / Person: A unique customer, all the events that the same customer (e.g. call, chat, email, visit website) creates are marked under the same identity.Alias: Different ways we can identify the same customer/person (e.g. email, phone number, Customer ID). Customer must have at least one alias.Profile Template: A profile template defines the kind of aggregation technique we want to see for a customer (e.g. contacts within last 24 hours).Progressive Profile: The values that correspond to an identity’s profile template at that particular moment of time (e.g. contacts within last 24 hours = 10).Actions: Actions can mean two different things in the concept of JDS:- The logical concept of differentiating the experience based on the result of Analyze (e.g. Call priority for repeated callers).
- An automated programmatic response to events (e.g. send an SMS to a repeated caller).
JDS API Collection
As there a lot of different APIs available in JDS, to make the introduction to them easier, Cisco has created a JDS API Collection as a starting point. In this segment, we will download this collection and import it to Postman, but any other API design platform can be used.
-
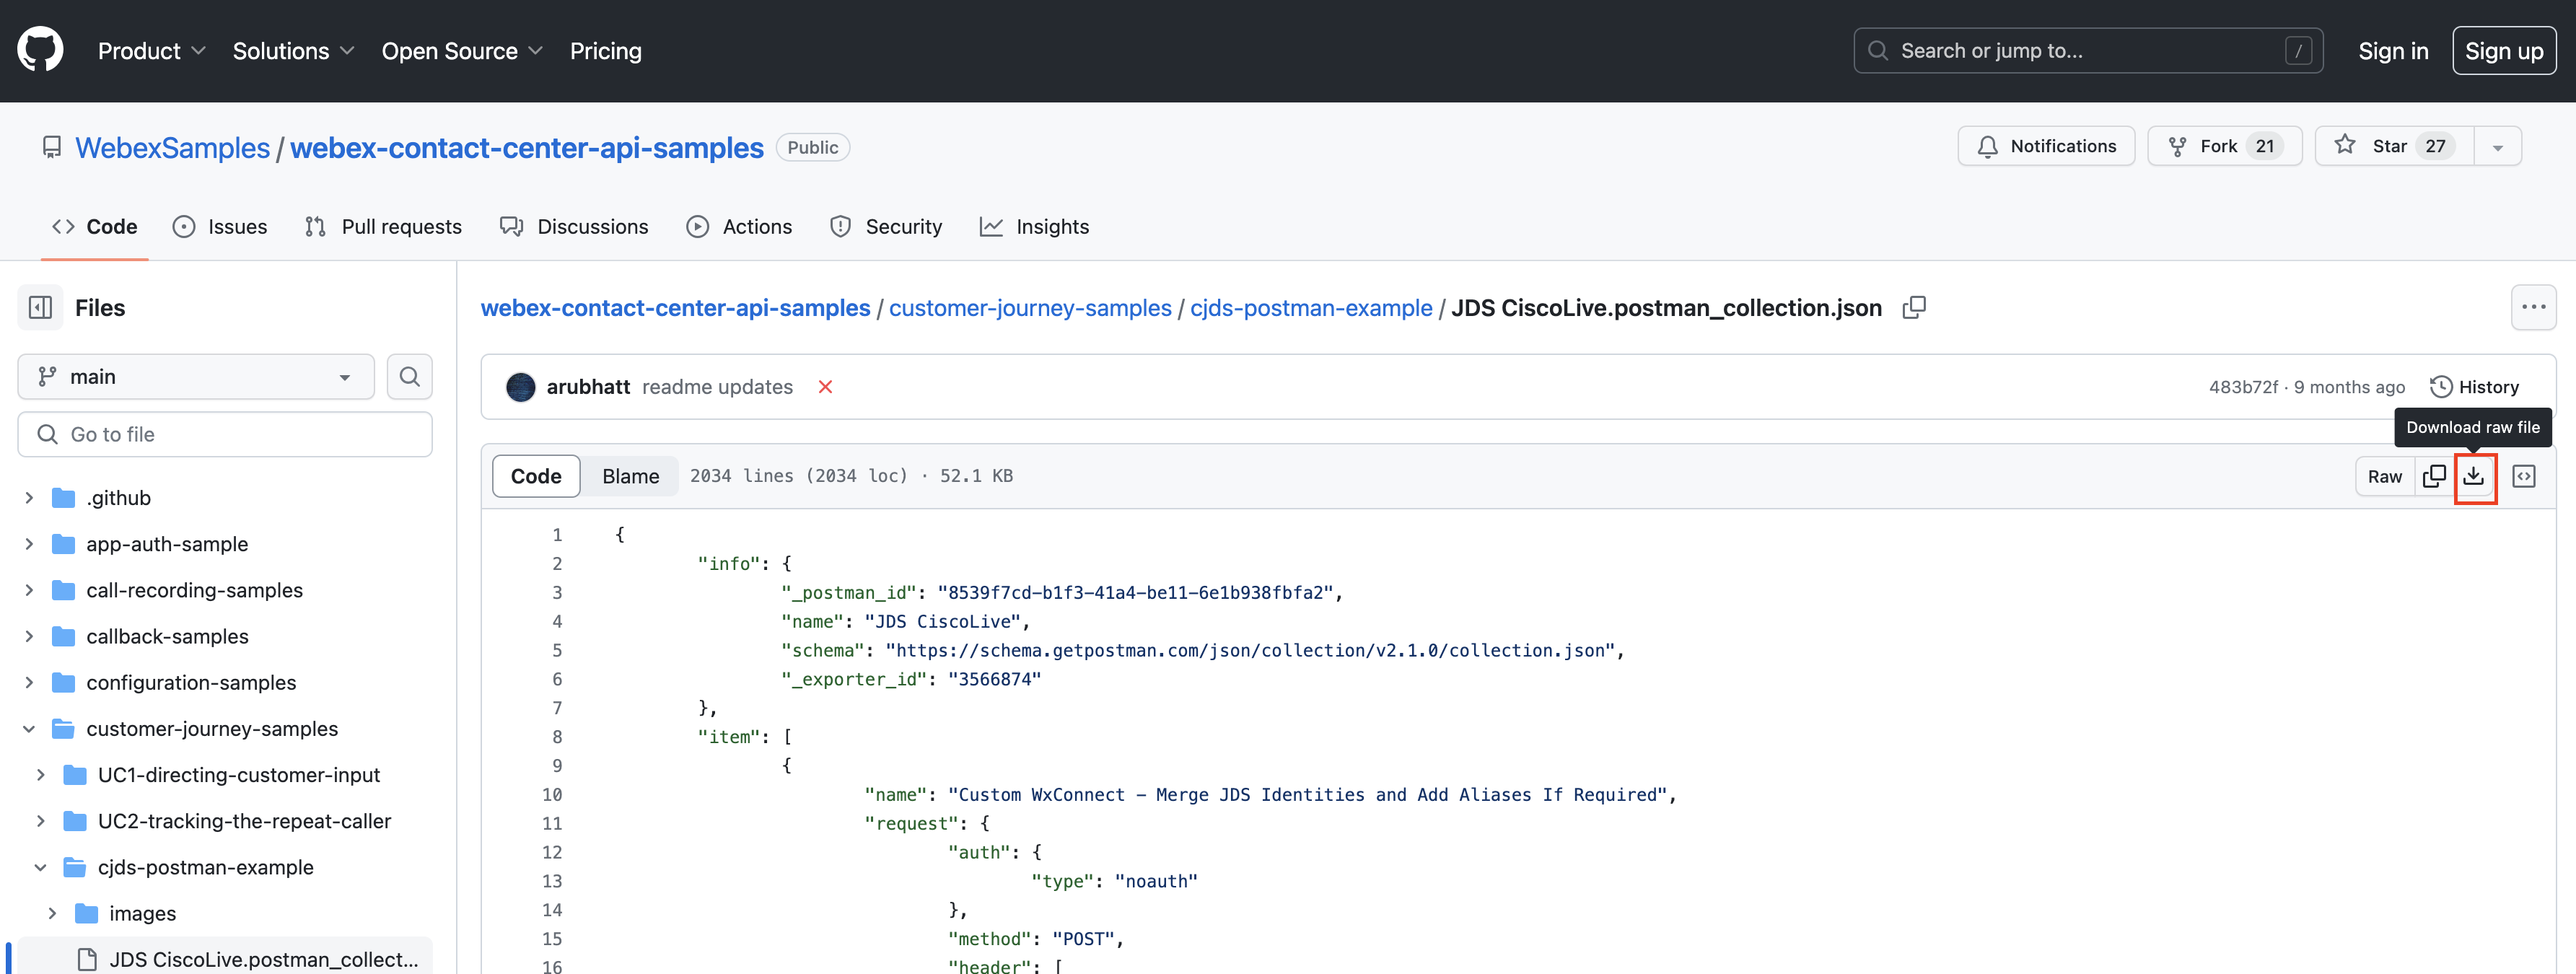
Download the JDS Postman collection, by going to the GitHub samples page.
-
Click on Download raw file.
-
Open the
Postmanapp and click on the Import button. -
Select the downloaded JSON file in the appeared window.
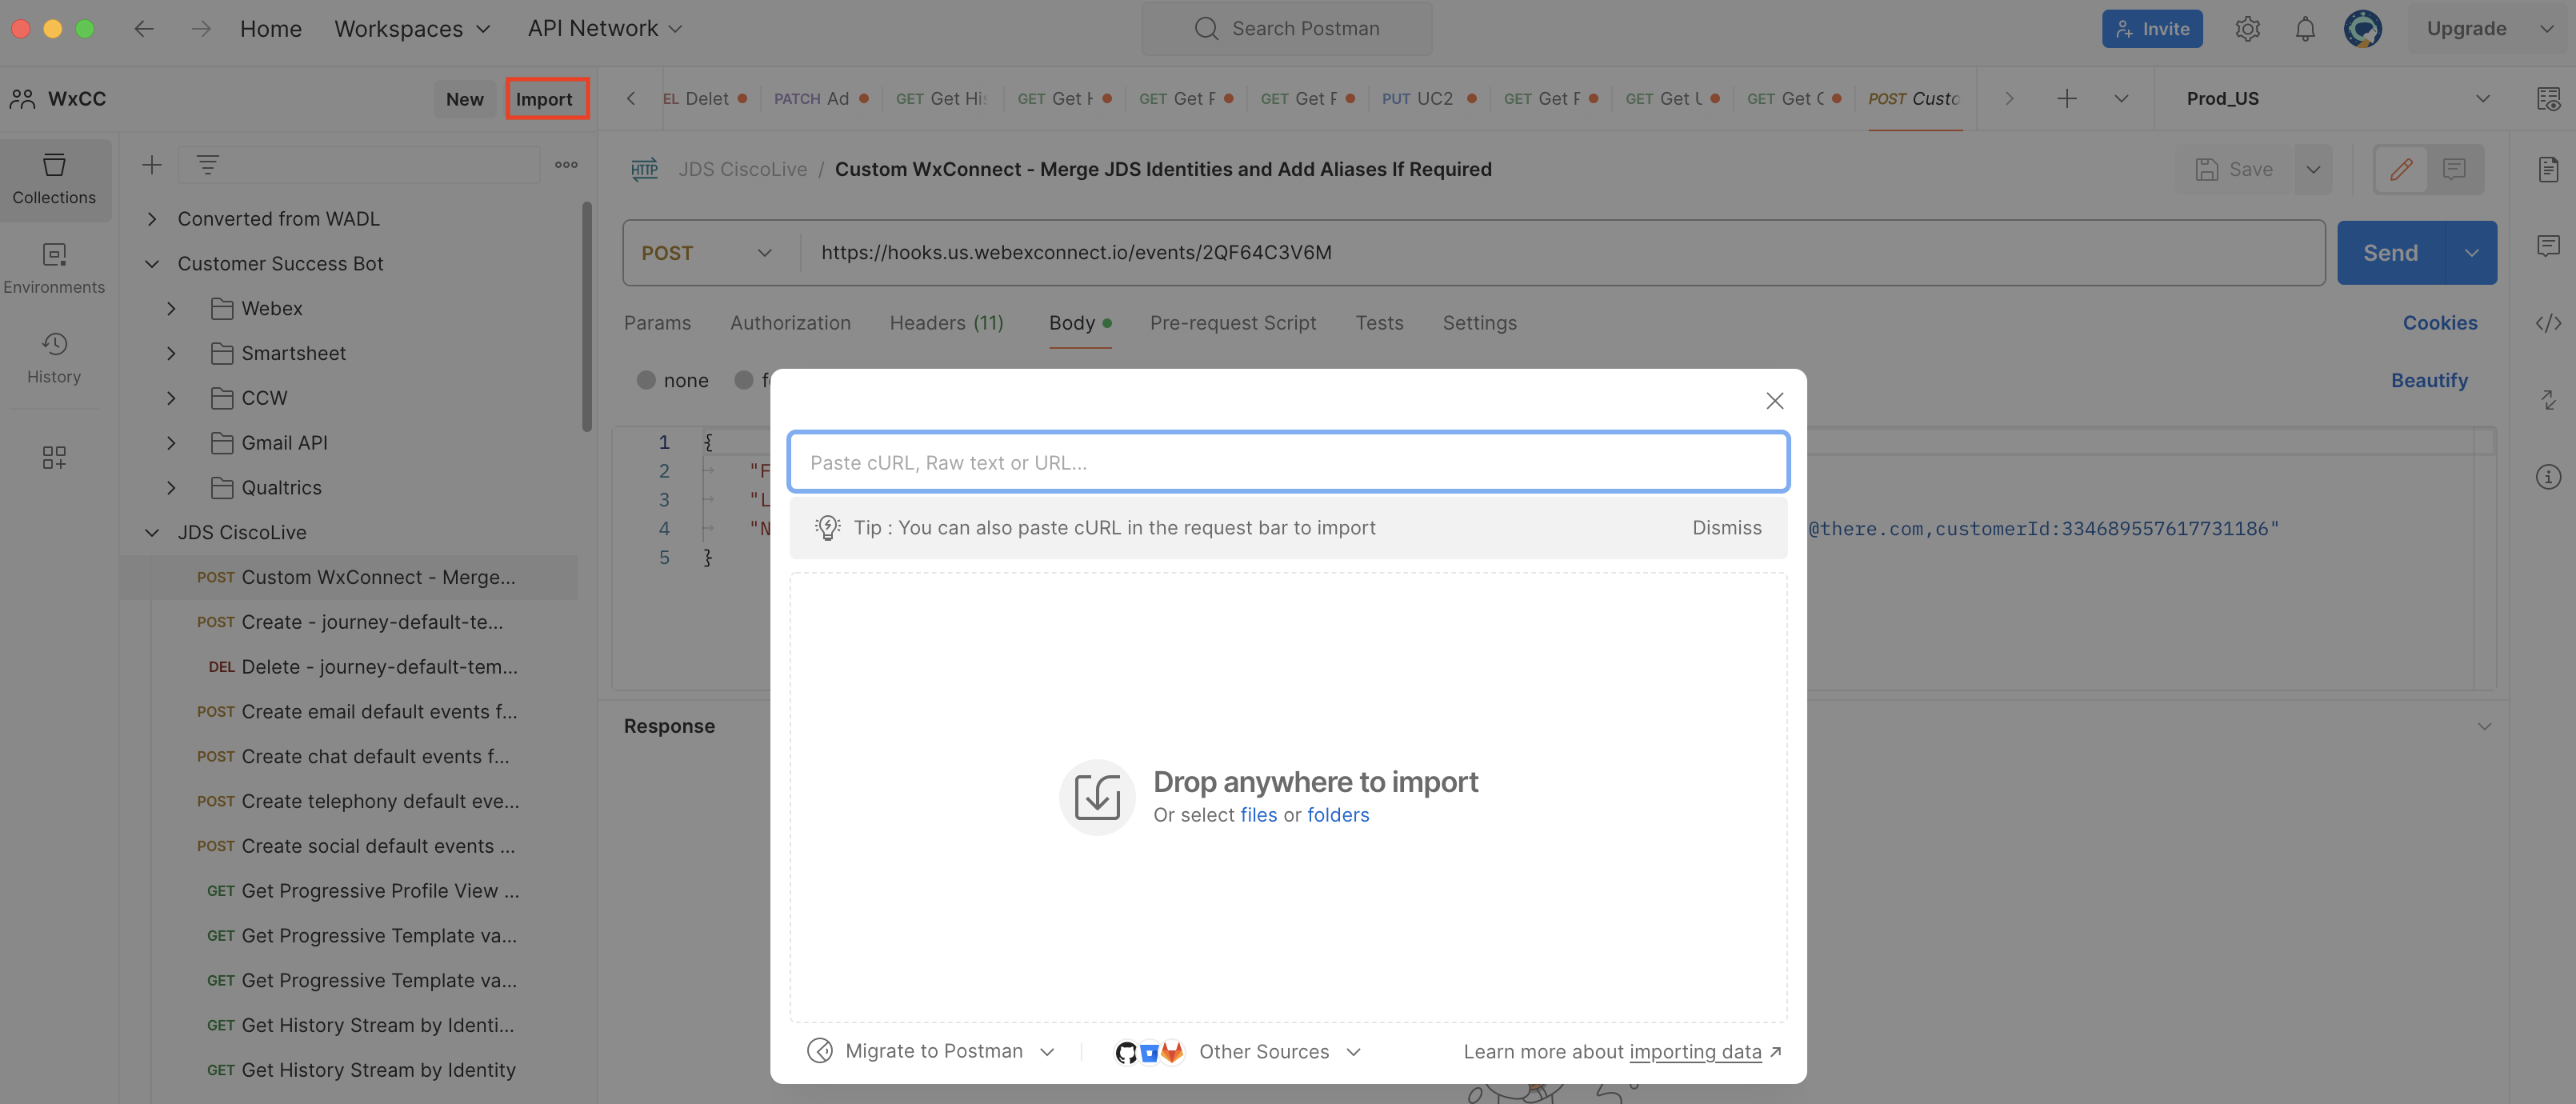
-
Once the JDS collection is imported, select the root folder of the imported collection in the left menu, then navigate to the Variables, and define the values.
-
Once the values are defined, click the Save button.
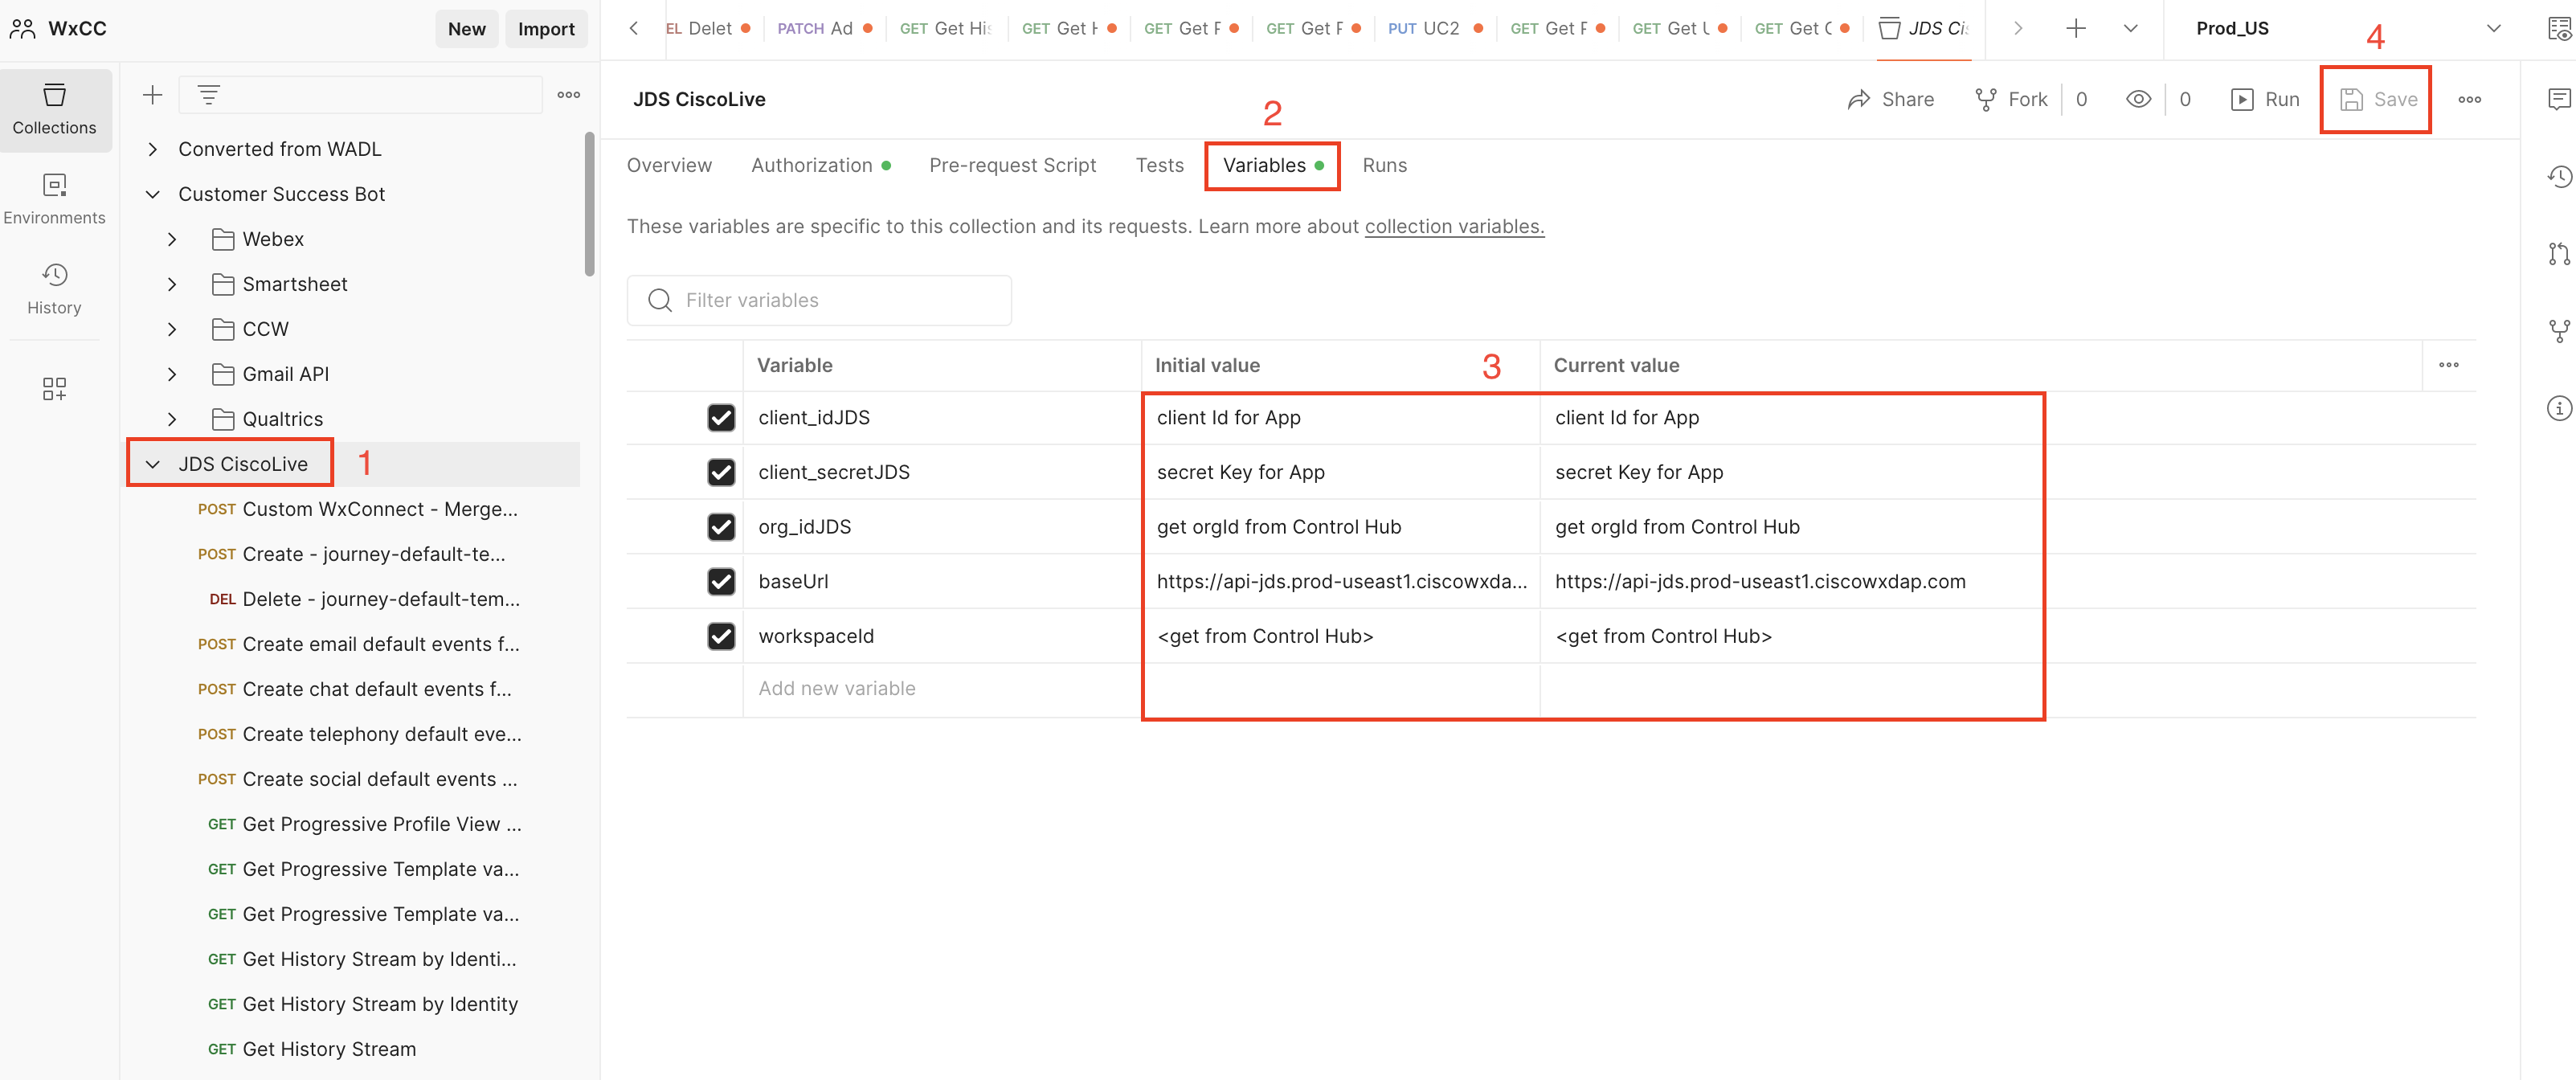
-
Go to Authorization and click on Get New Access Token button. The Postman will redirect you to the Auth page where you need to define your Admin account which was used for the App creation in the dev portal. As a result, you should get the message Authentication complete. Click Proceed and on the next page click on Use Token button.
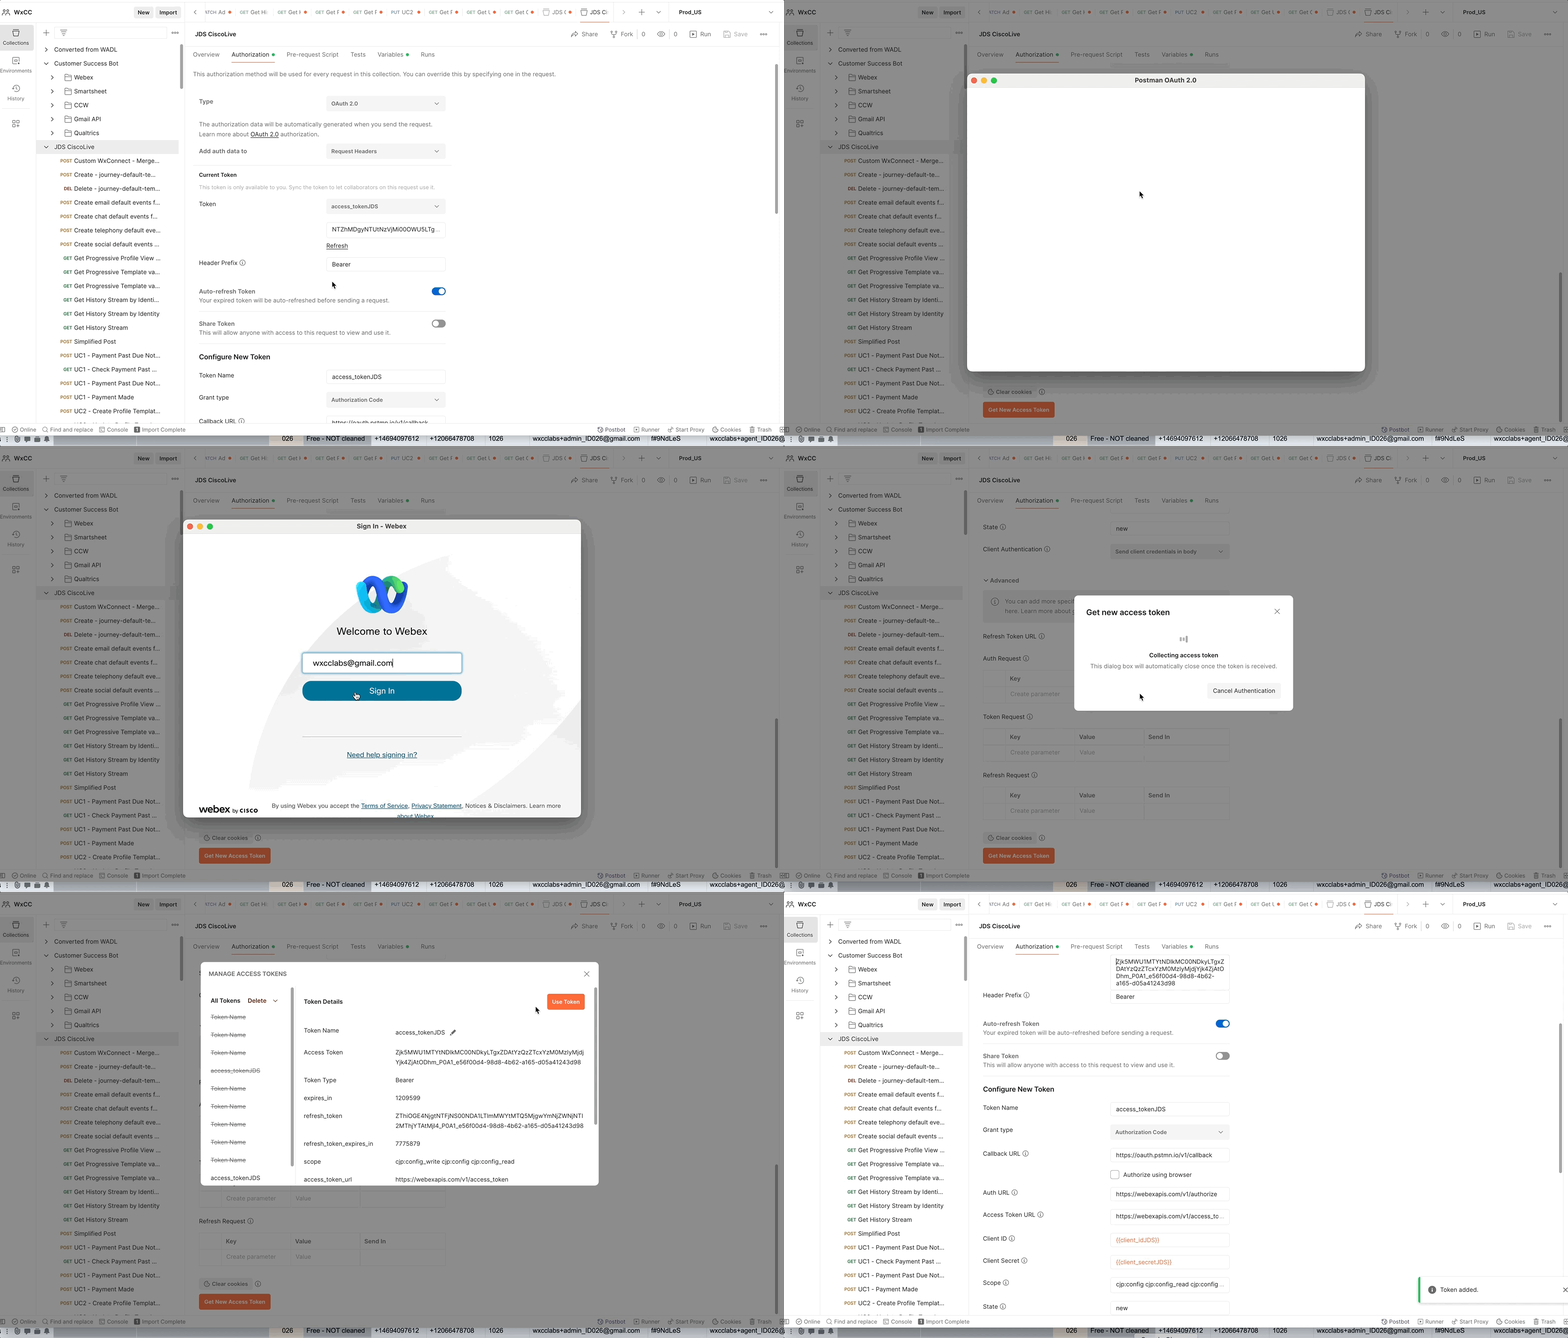
After successfully saving your JDS API collection in Postman, you can also check on the following video that shows how to use combinations of these APIs to manage your JDS profiles and templates.
JDS API Example
Most of the time, when we want to develop something in JDS (or any other API), we will use a dedicated tool such as Postman or a code editor. However, we can still take advantage of the Webex CC Developer Portal. In the portal, we can directly run some APIs by only needing to update a few parameters, which is a great way to quickly test an API and its output.
Firstly, we will try to add one more alias to a user we created previously.
-
Using the
Administratoruser, navigate to the Developer Portal, specifically to the Journey API page. -
To add an alias, we first would need to get the user’s
Person ID, as it is an input requirement for the API. -
We find the PersonID field either from the Control Hub (it is the automatically generated ID column) or we can use the Search Fro An Identity Via Aliases API, so we navigate to that API’s page.
-
On the top-right, click on Try Out.
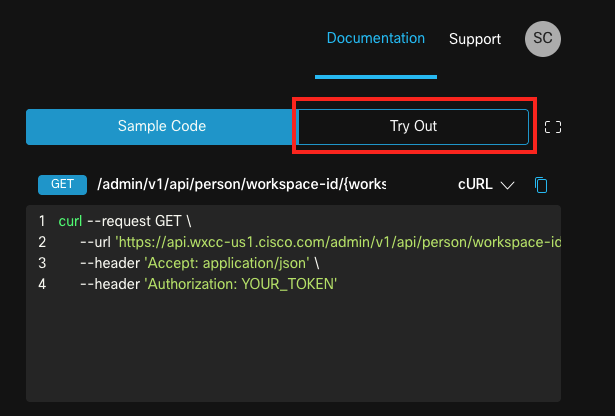
-
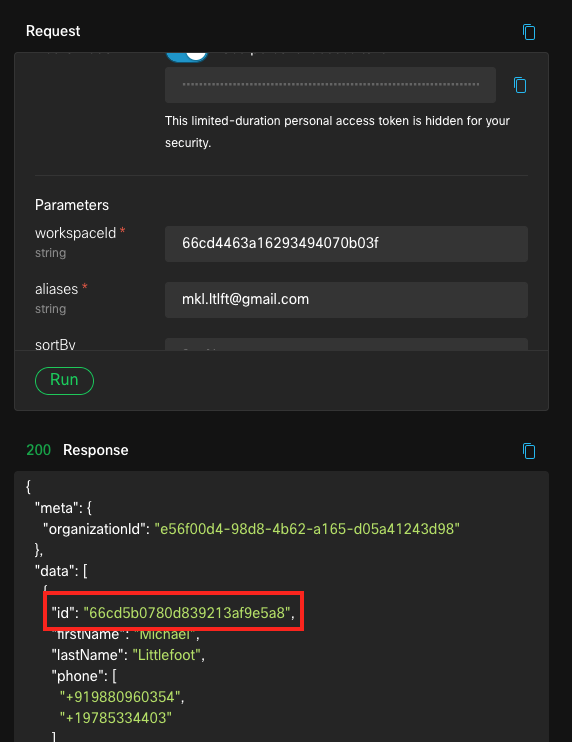
We can see that we need to fill some parameters to be able to run this API.
WorkspaceIDcan be retrieved from Control Hub.- For
aliases, you can use any of the aliases you added to your user, let’s use the e-mail for example.
-
Fill these parameters and click on
Run. Response should be like below:
-
As you can see, response has a lot of information. For now, we are interested in the ID only.
-
We can now go to the Add one/more Identities to a Person API page.
-
Click on
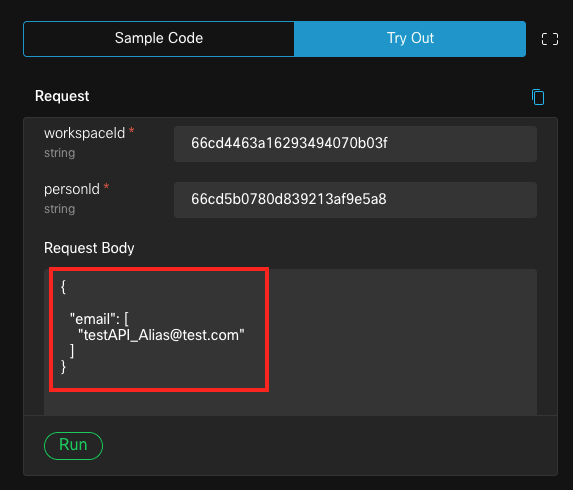
Try Out. In the parameters, add the WorkspaceID and personId we already have. -
In the Request Body,
deleteall the other parameters and only keep email (as per image). Add another email address to be linked with that person and click onRun. Output should be similar to below:
-
If you go back to the Customer Journey Data page in Control Hub, you should see the new email address added.
-
Lastly, let’s try to create a
new eventvia API. So far, we have only seen the default generated events (call, chat) but we can create any kind of Event and add it to the customer’s journey (e.g. customer visited our webpage). -
Navigate to the
Journey Event PostingAPI page. Click onTry Outand add the WorkspaceId. -
Add the below
Request Bodyand click onRun(you may need to change the ID to another random value):
{
  "id": "9ab65fdf-9643-417f-9974-ad72cae0e10f",
  "specversion": "1.0",
  "type": "task:new",
  "source": "web",
  "identity": "testAPI_Alias@test.com",
  "identitytype": "email",
  "datacontenttype": "application/json",
  "data": {
    "origin": "Webpage visited",
    "topic": "Support page access",
    "channelType":"Web"
  }
}
-
You should receive a
200 OK. Now, go back to your Agent Session and make a new contact from this identity to load the JDS widget. -
If you check the Journey now, you should also see the event we created above:

And this is where the true “power” of JDS API lies. We can customize this Event API as much as we want and track any kind of engagement we had with this customer and present it to the agent.
JDS Use Case Samples
Journey Based Queue Priority
A customer has contacted his travel service several times in the last couple of days. The next incoming call could be prioritized if a specific threshold is met (for example: the number of contacts on a particular reservation in the last 2 days greater than 2). For this exercise, we will be using the JDS API Postman Collection shared before.
NOTE: This is an example from a specific Lab Tenant, you may need to update the WorkspaceID, PersonID or aliases values for your own scenario to work properly.
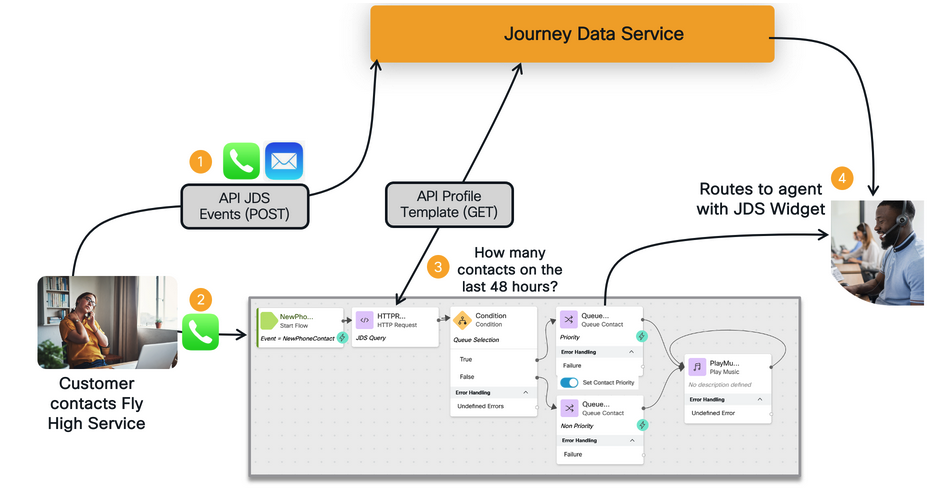
Task 1: Getting the total number of requests for the X days/hours
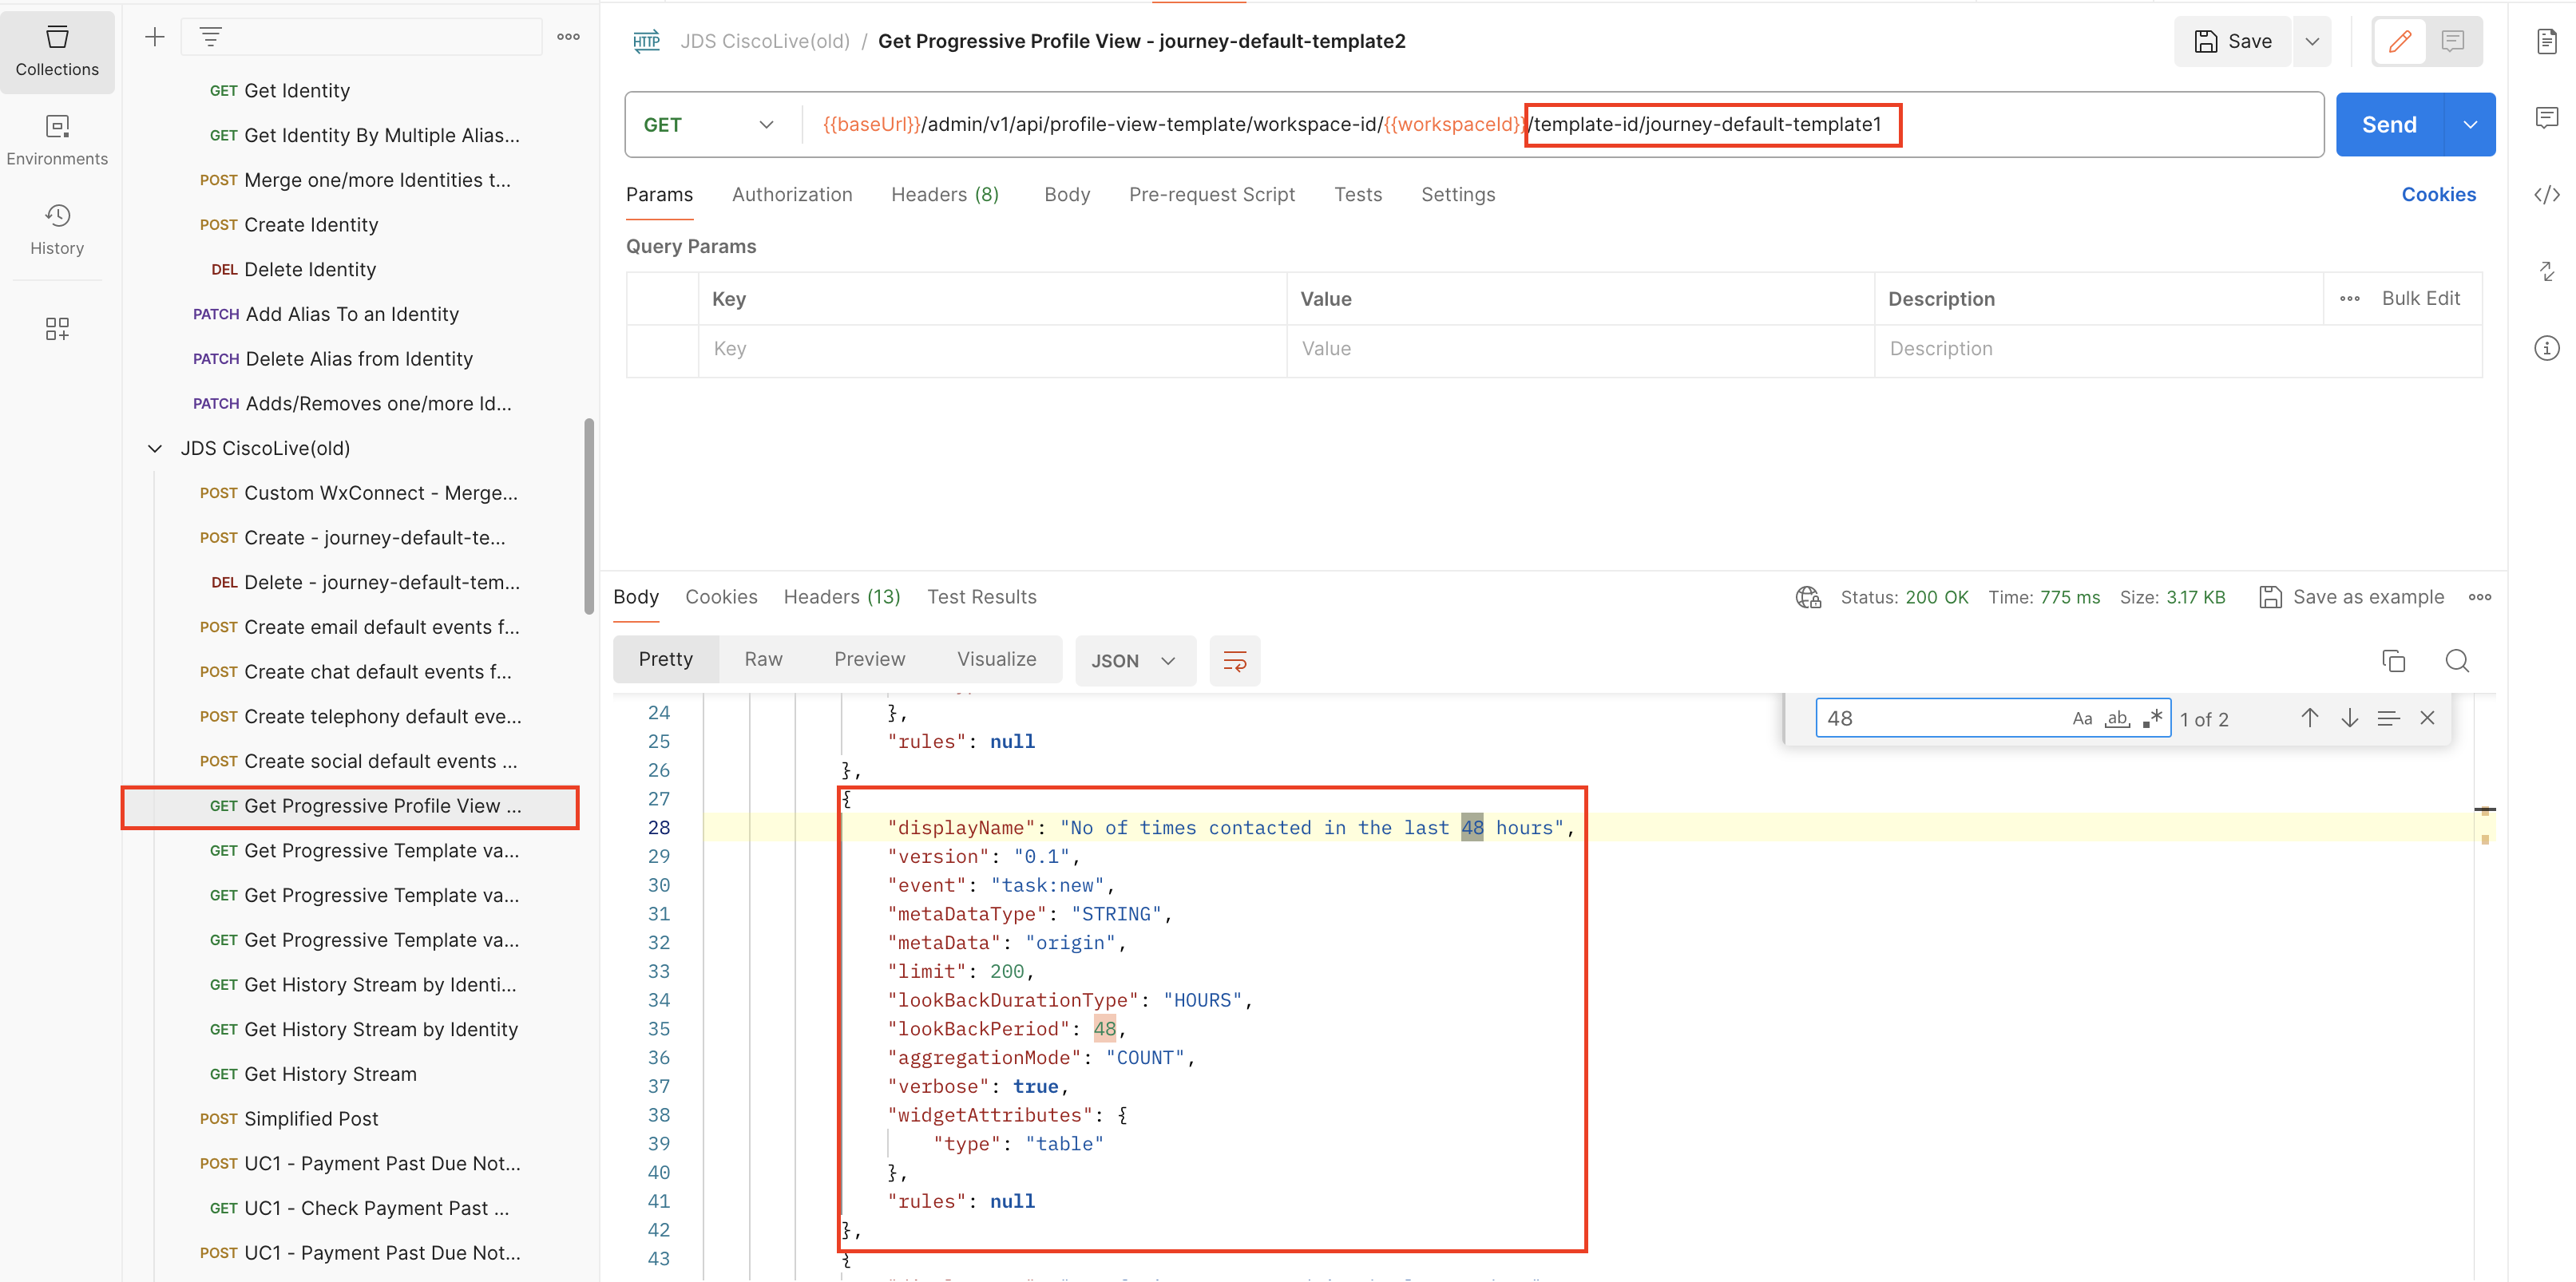
- The journey profile template aggregates the values and provides you with the total number of events for a specific time. Make sure that your journey profile template has the right view which includes lookBackPeriod for the last 48 hours. If you using the
Lab Tenant, you can use the already createdJDS_Layout_AdvancedLab. In the layout, we have already defined the template with the specific name:
"template-id": "journey-default-template1",
- For verifying the profile view go to the Postman API Get Progressive Profile View - journey-default-template2 and change the URL parameter from
journey-default-template2tojourney-default-template1. As the result you should get /admin/v1/api/profile-view-template/workspace-id//template-id/journey-default-template1.
- If you are using a different tenant, you need to create the template with the name defined in the layout. In order to do it, go to Create - journey-default-template2 API in Postman and replace the body with the following code:
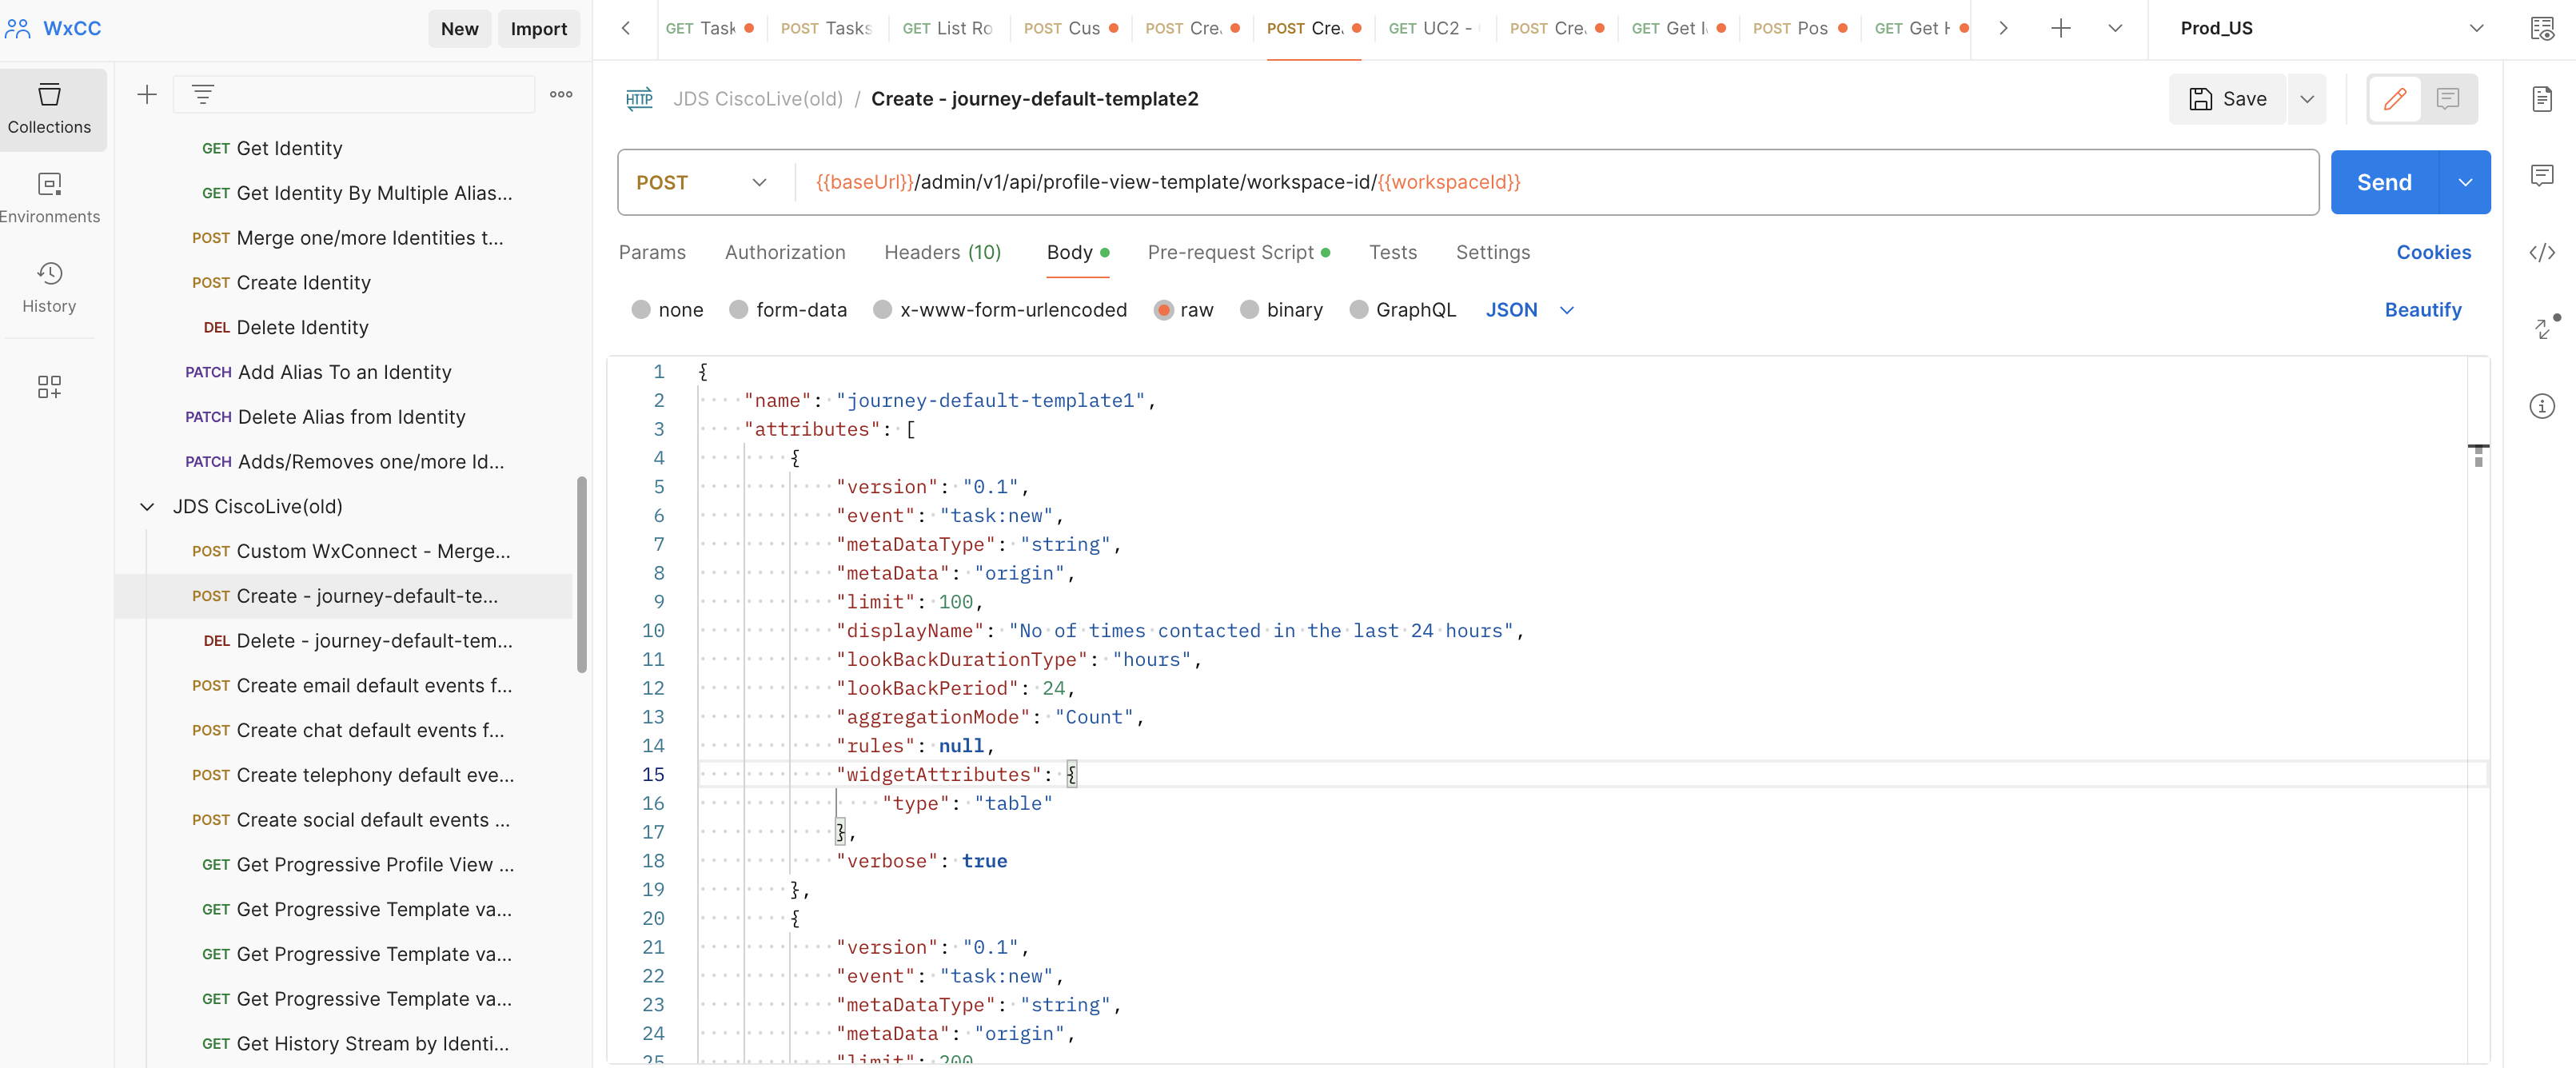
{
    "name": "journey-default-template1",
    "attributes": [
        {
            "version": "0.1",
            "event": "task:new",
            "metaDataType": "string",
            "metaData": "origin",
            "limit": 100,
            "displayName": "No of times contacted in the last 24 hours",
            "lookBackDurationType": "hours",
            "lookBackPeriod": 24,
            "aggregationMode": "Count",
            "rules": null,
            "widgetAttributes": {
                "type": "table"
            },
            "verbose": true
        },
        {
            "version": "0.1",
            "event": "task:new",
            "metaDataType": "string",
            "metaData": "origin",
            "limit": 200,
            "displayName": "No of times contacted in the last 48 hours",
            "lookBackDurationType": "hours",
            "lookBackPeriod": 48,
            "aggregationMode": "Count",
            "rules": null,
            "widgetAttributes": {
                "type": "table"
            },
            "verbose": true
        },
        {
            "version": "0.1",
            "event": "task:new",
            "metaDataType": "string",
            "metaData": "origin",
            "limit": 700,
            "displayName": "No of times contacted in the last 7 days",
            "lookBackDurationType": "days",
            "lookBackPeriod": 7,
            "aggregationMode": "Count",
            "rules": null,
            "widgetAttributes": {
                "type": "table"
            },
            "verbose": true
        },
        {
            "version": "0.1",
            "event": "task:new",
            "metaDataType": "string",
            "metaData": "origin",
            "limit": 100,
            "displayName": "No of times contacted in the last 7 days via email",
            "lookBackDurationType": "days",
            "lookBackPeriod": 7,
            "aggregationMode": "Count",
            "rules": {
                "logic": "SINGLE",
                "condition": "task:new,channelType,string,Value EQ email"
            },
            "widgetAttributes": {
                "type": "table"
            },
            "verbose": true
        },
        {
            "version": "0.1",
            "event": "task:new",
            "metaDataType": "string",
            "metaData": "origin",
            "limit": 100,
            "displayName": "No of times contacted in the last 7 days via chat",
            "lookBackDurationType": "days",
            "lookBackPeriod": 7,
            "aggregationMode": "Count",
            "rules": {
                "logic": "SINGLE",
                "condition": "task:new,channelType,string,Value EQ chat"
            },
            "widgetAttributes": {
                "type": "table"
            },
            "verbose": true
        },
        {
            "version": "0.1",
            "event": "task:new",
            "metaDataType": "string",
            "metaData": "origin",
            "limit": 100,
            "displayName": "No of times contacted in the last 7 days via telephony",
            "lookBackDurationType": "days",
            "lookBackPeriod": 7,
            "aggregationMode": "Count",
            "rules": {
                "logic": "SINGLE",
                "condition": "task:new,channelType,string,Value EQ telephony"
            },
            "widgetAttributes": {
                "type": "table"
            },
            "verbose": true
        }
    ]
}
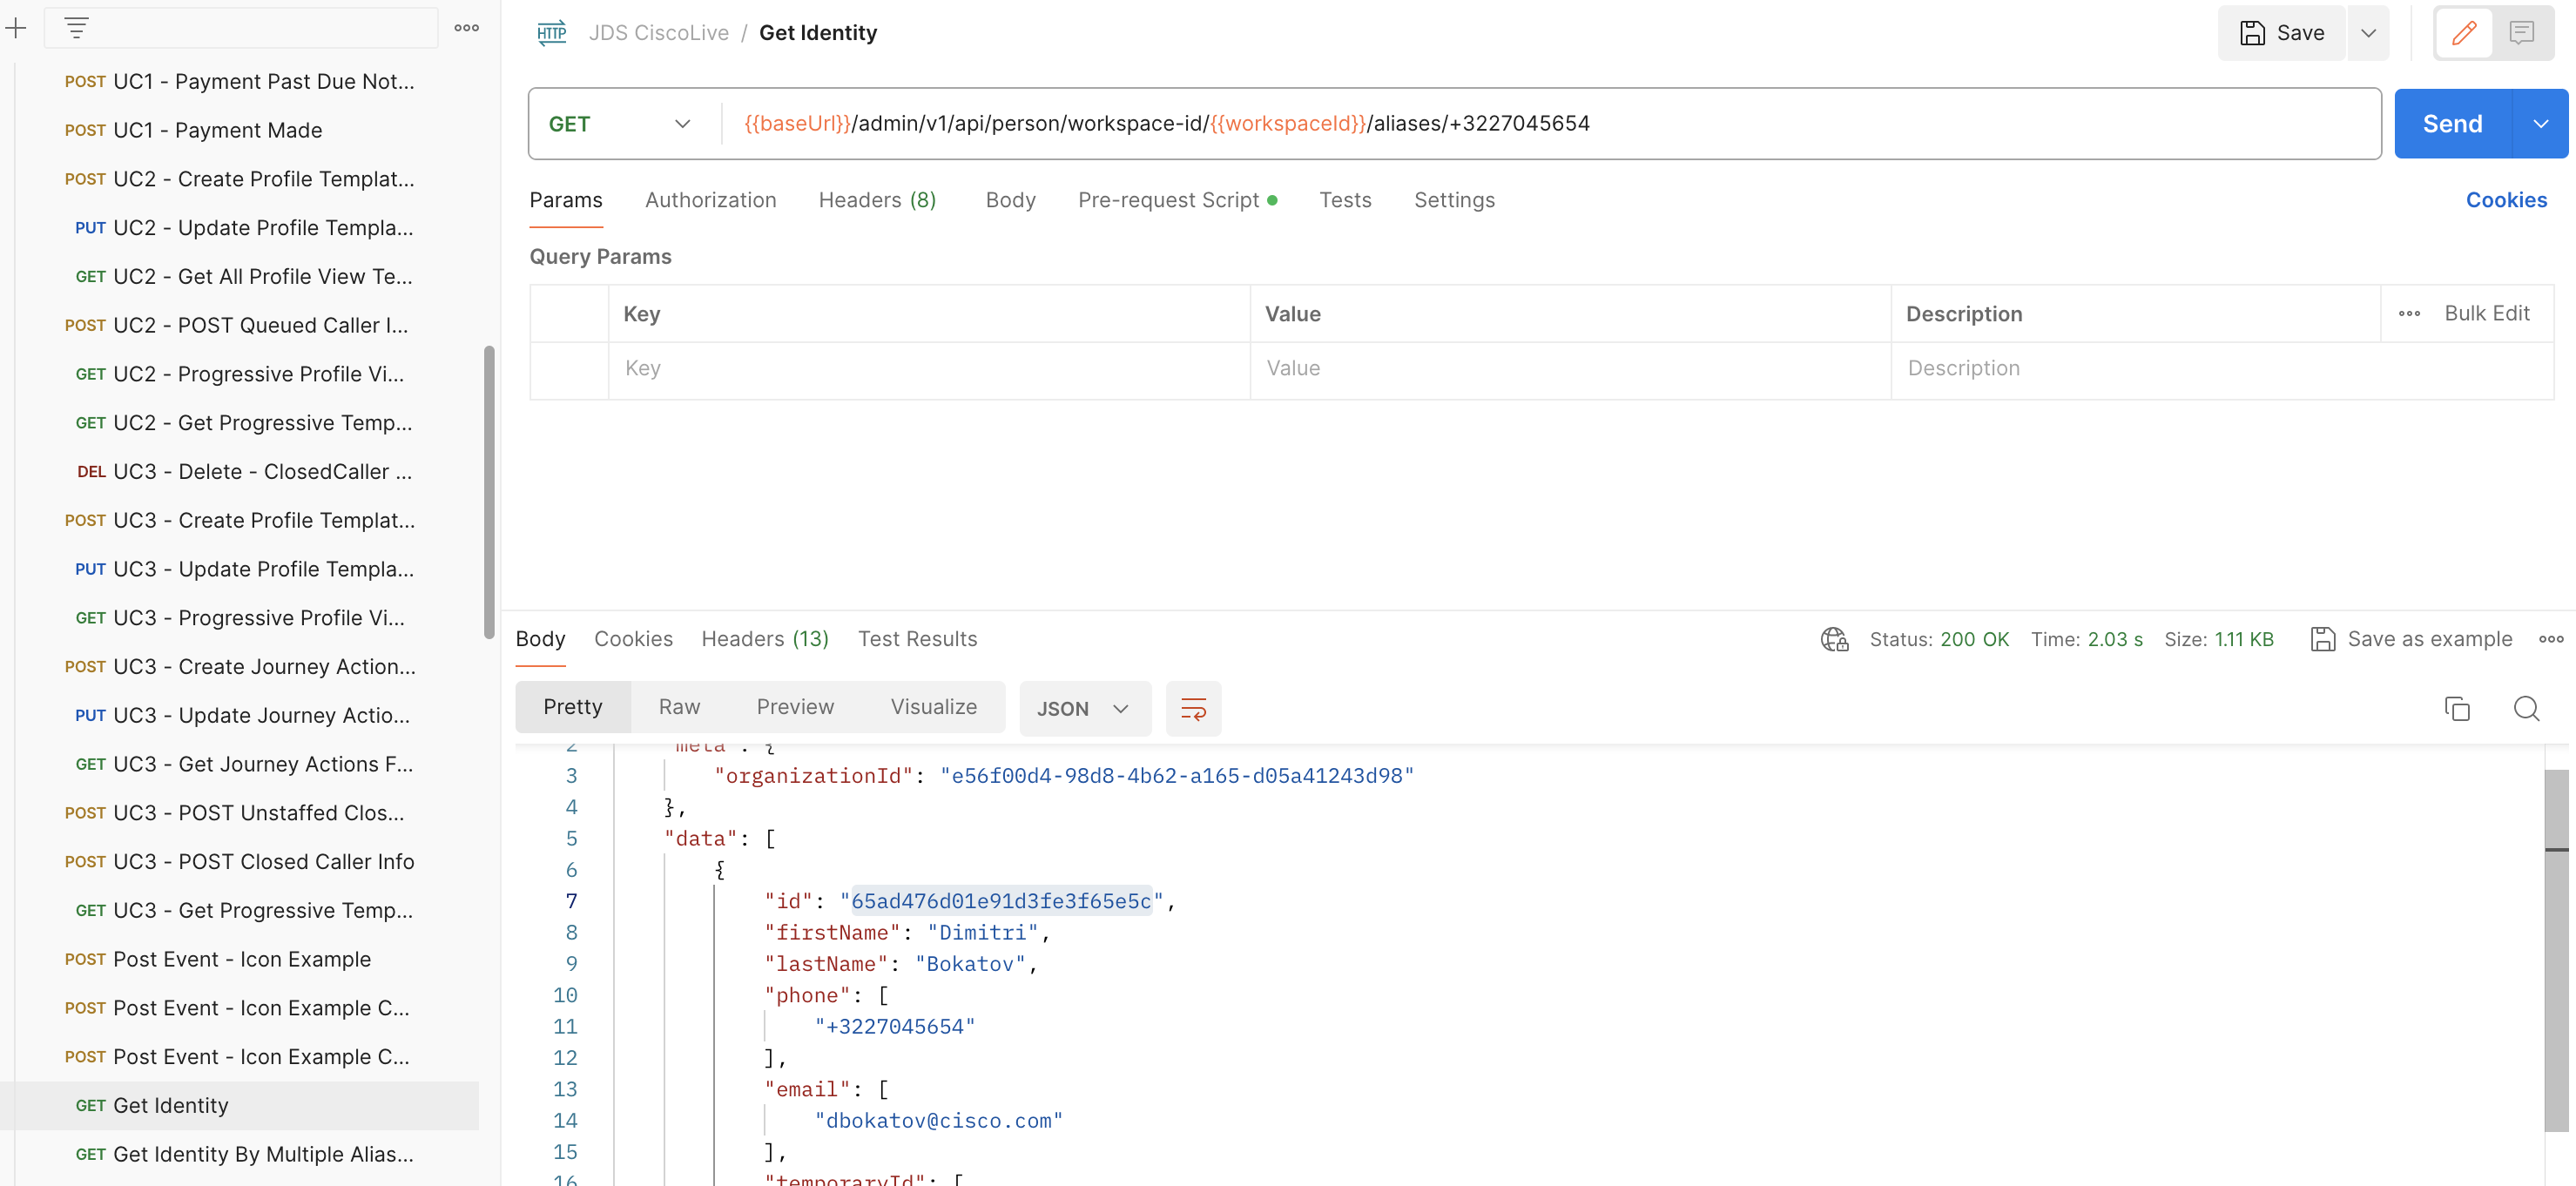
- Now let’s get the PersonID, by running the Search for an Identity via aliases API. Modify the URL in Postman and put the number +3227045654 after the alias. You should get
GET /admin/v1/api/person/workspace-id//aliases/3227045654
-
Save the person ID, which you will need for the next API.
-
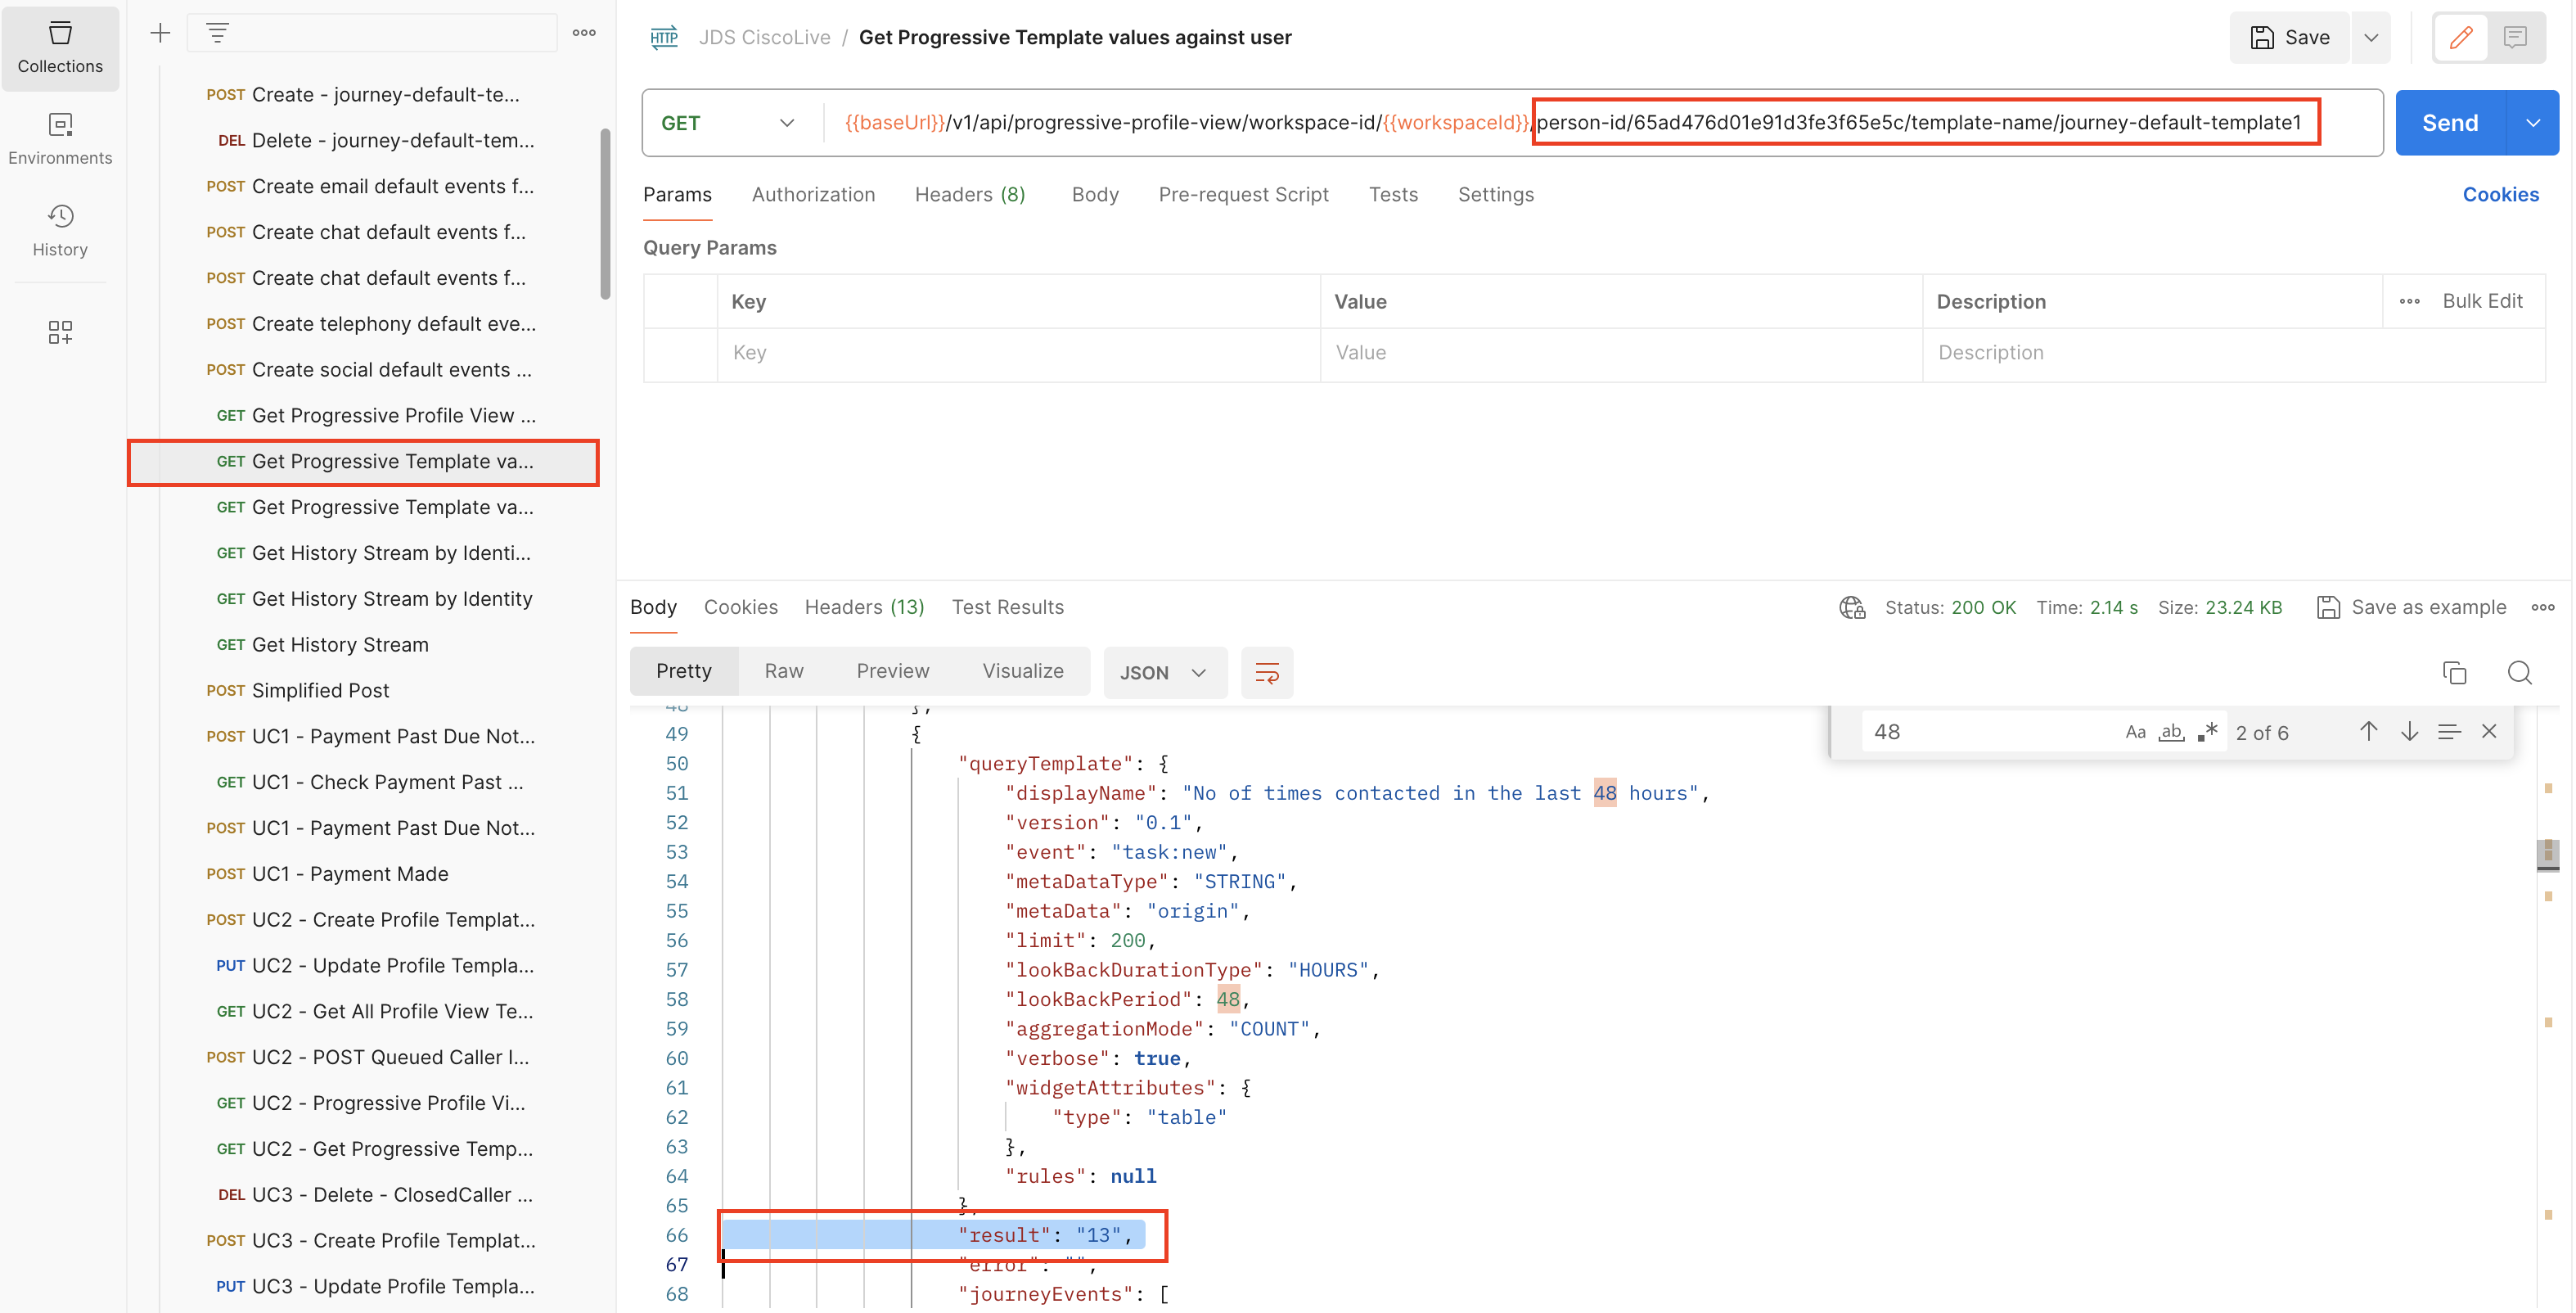
Go to Get Progressive Template values against user and modify the URL by defining the person-id and right template name. It should be:
/v1/api/progressive-profile-view/workspace-id//person-id/65ad476d01e91d3fe3f65e5c/template-name/journey-default-template1 -
Run the API and check the response for the last 48 hours. The result is the total number of events for the last 2 days. We will use that value for the routing decision in the next task.
Task 2: Adding JDS API Request to the Flow Designer
In order to achieve that use case, we will need to use 2 JDS APIs:
- Get the PersonID API
- Get Progressive Template values against user
To begin with:
-
By using your
admin account, go to the Control Hub -> Webex CC -> Flows -
Create a
new flow(keep in mind that you will need to map your Entry Point and DN to that Flow, as per previous labs). -
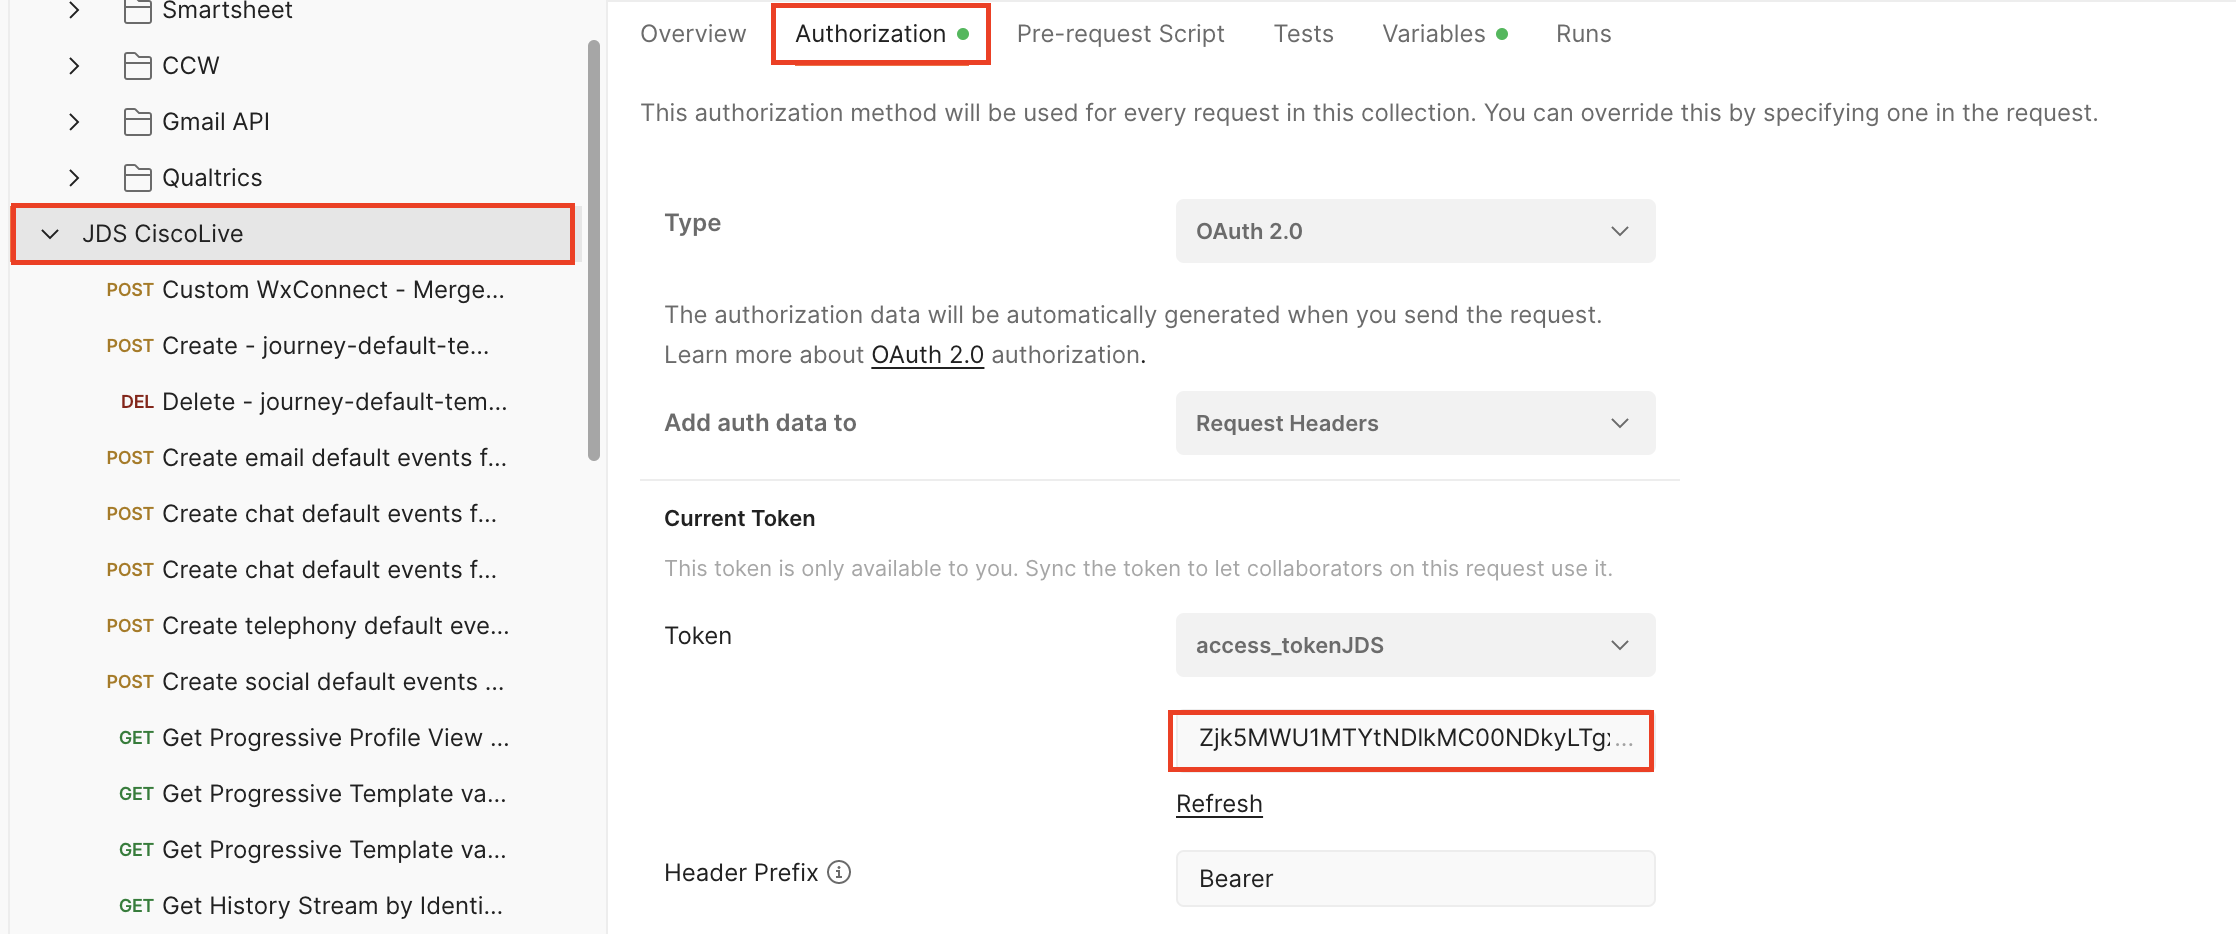
In Postman, go to the JDS root folder -> Authorization -> Token and
copythe access token to the notepad.
Note: For this example, we are using the temporary access tokens which will expire after 8-12 hours.
- Go back to the Flow Designer, you will need to create the following logic:
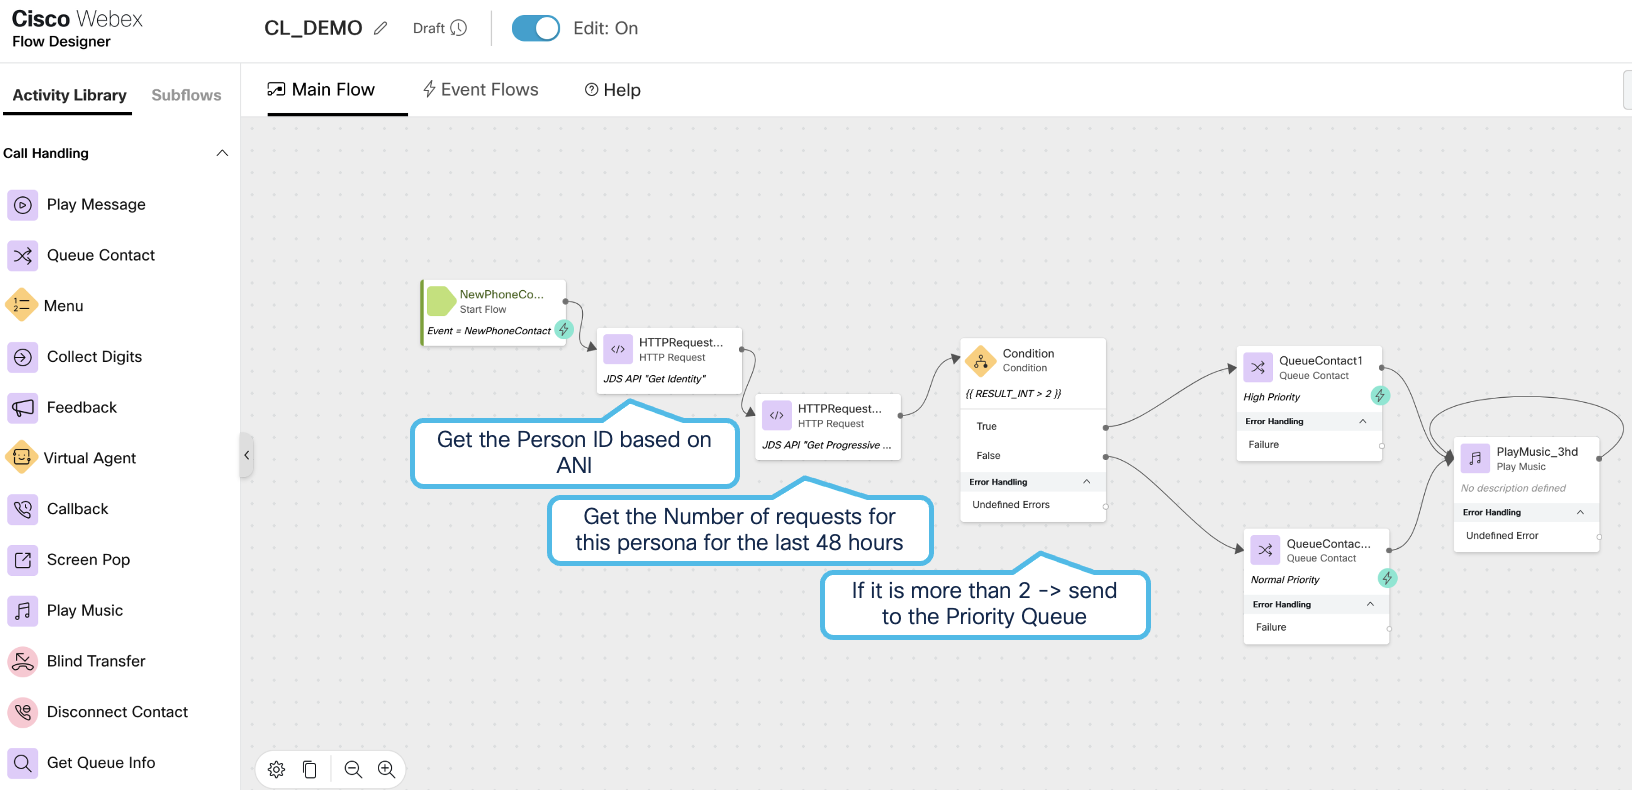
- Click on the main canvas and add 2 Flow Variables:
- Identity with type String
- Total_Requests with the type Integer
- Add the HTTPRequest_1 activity with the following Settings:
- Request URL: https://api-jds.prod-useast1.ciscowxdap.com/v1/api/person/workspace-id/65171e0682b7f52b9209b39d/aliases/{{NewPhoneContact.ANI}}
- Method: GET
- HTTP Request Headers Key: Authorization
- HTTP Request Headers Values: Bearer + Your access token from Postman
- Content Type: Application/JSON
- Parse Settings Content Type: JSON
- Parse Settings Output Variable: Identity
- Parse Settings Path Expression: $.data[0].id
- Add the HTTPRequest_2 activity with the following Settings:
- Request URL: https://api-jds.prod-useast1.ciscowxdap.com/v1/api/progressive-profile-view/workspace-id/65171e0682b7f52b9209b39d/person-id/{{Identity}}/template-name/journey-default-template1
- Method: GET
- HTTP Request Headers Key: Authorization
- HTTP Request Headers Values: Bearer + Your access token from Postman
- Content-Type: Application/JSON
- Parse Settings Content-Type: JSON
- Parse Settings Output Variable: Total_Requests
- Parse Settings Path Expression: $.data[0].attributes[1].result
- Add the Condition activity with the following Settings:
- Expression: {{ Total_Requests > 2 }}
-
Add 2 queue activities Queue Contact with different priorities in the General Settings (as shown in the screenshot above)
-
Publish the Flow by clicking on Validation toggle, Publish Flow button and selecting the Live tag.
Task 3: Making a Test Call and checking the results
-
Make your agent available for that queue.
-
Make 3 test calls to the agent.
-
Open DEBUG tool in the Flow Designer by clicking on DEBUG button and verify though which queue the 3rd call was delivered.

More Use Cases
More use case samples that utilize the Customer Journey Data Services (JDS) can be found in the Cisco Webex Contact Center samples GitHub page.
We highly suggest you bookmark this page as more use cases will be added in the future.
Congratulations, you have completed this lab! You can continue with the next one.
