Lab 12 - Digital Channels
Last modified: Tue, 20 Jun 2023
| Topic | Lab Type | Difficulty Level | Estimated length |
|---|---|---|---|
| Architecture Overview and Provisioning | Read & Understand + Practical Lab | EASY | 15 min |
| Connect GUI overview | Read & Understand | EASY | 15 min |
| Engage GUI overview | Read & Understand | EASY | 15 min |
| User Management in Connect | Read & Understand + Practical Lab | EASY | 10 min |
| Digital Channels Pre-configuration | Practical Lab | EASY | 15 min |
| Flow Builder | Read & Understand | EASY | 20 min |
| Email Channel Configuration | Practical Lab | EASY | 25 min |
| Chat Channel Configuration | Practical Lab | EASY | 30 min |
| Facebook Messenger Channel Configuration | Practical Lab | EASY | 25 min |
| SMS Channel Configuration | Practical Lab | EASY | 20 min |
| WhatsApp Channel Configuration | Practical Lab | EASY | 25 min |
| Connect Templates | Read & Understand | EASY | 20 min |
| Engage Templates | Read & Understand | EASY | 25 min |
| Introduction to BOTs | Read & Understand | MED | 20 min |
| Q&A BOTs | Practical Lab | MED | 25 min |
| Task BOTs | Practical Lab | HARD | 30 min |
| Event Scheduler | Read & Understand | MED | 15 min |
| Inbound Webhooks | Practical Lab | HARD | 35 min |
| Troubleshooting | Practical Lab | MED | 60 min |
| Creating Custom Nodes | Practical Lab | MED | 30 min |
| Events and Triggers | Practical Lab | MED | 30 min |
| Global and Flow variable support in Digital channels | Practical Lab | MED | 45 min |
| Providing Digital Channels feedback | Survey | EASY | 5 min |
Lab.12.1 - Architecture Overview and Provisioning
Table of Contents
| Topic | Lab Type | Difficulty Level | Estimated length |
|---|---|---|---|
| Webex Connect architecture | Read & Understand | EASY | 5 min |
| Webex Connect provisioning | Practical Lab | EASY | 5 min |
| Webex Connect provisioning verification | Practical Lab | EASY | 5 min |
Introduction
Lab Objective
This lab is designed to introduce the audience to the digital channels (Webex Connect) platform, its architecture and its provisioning. In addition this lab will provide the instructions to verify if Webex Connect has been provisioned successfully.
Pre-requisite
- Admin credentials to login to Control Hub and Webex Contact Center administration portal.
Quick Links
Control Hub: https://admin.webex.com
US Portal: https://portal.wxcc-us1.cisco.com/portal
US Agent Desktop: https://desktop.wxcc-us1.cisco.com
UK Portal: https://portal.wxcc-eu1.cisco.com/portal
UK Agent Desktop: https://desktop.wxcc-eu1.cisco.com
EMEA Portal: https://portal.wxcc-eu2.cisco.com/portal
EMEA Agent Desktop: https://desktop.wxcc-eu2.cisco.com
ANZ Portal: https://portal.wxcc-anz1.cisco.com/portal
ANZ Agent Desktop: https://desktop.wxcc-anz1.cisco.com
Webex Connect Documentation: https://help.imiconnect.io/
1. Webex Connect architecture
Webex Connect consists of 2 main components, Connect and Engage, which are directly integrated with the Webex Contact Center platform (as per the drawing).
The access to Webex Connect is restricted to Administrators only.
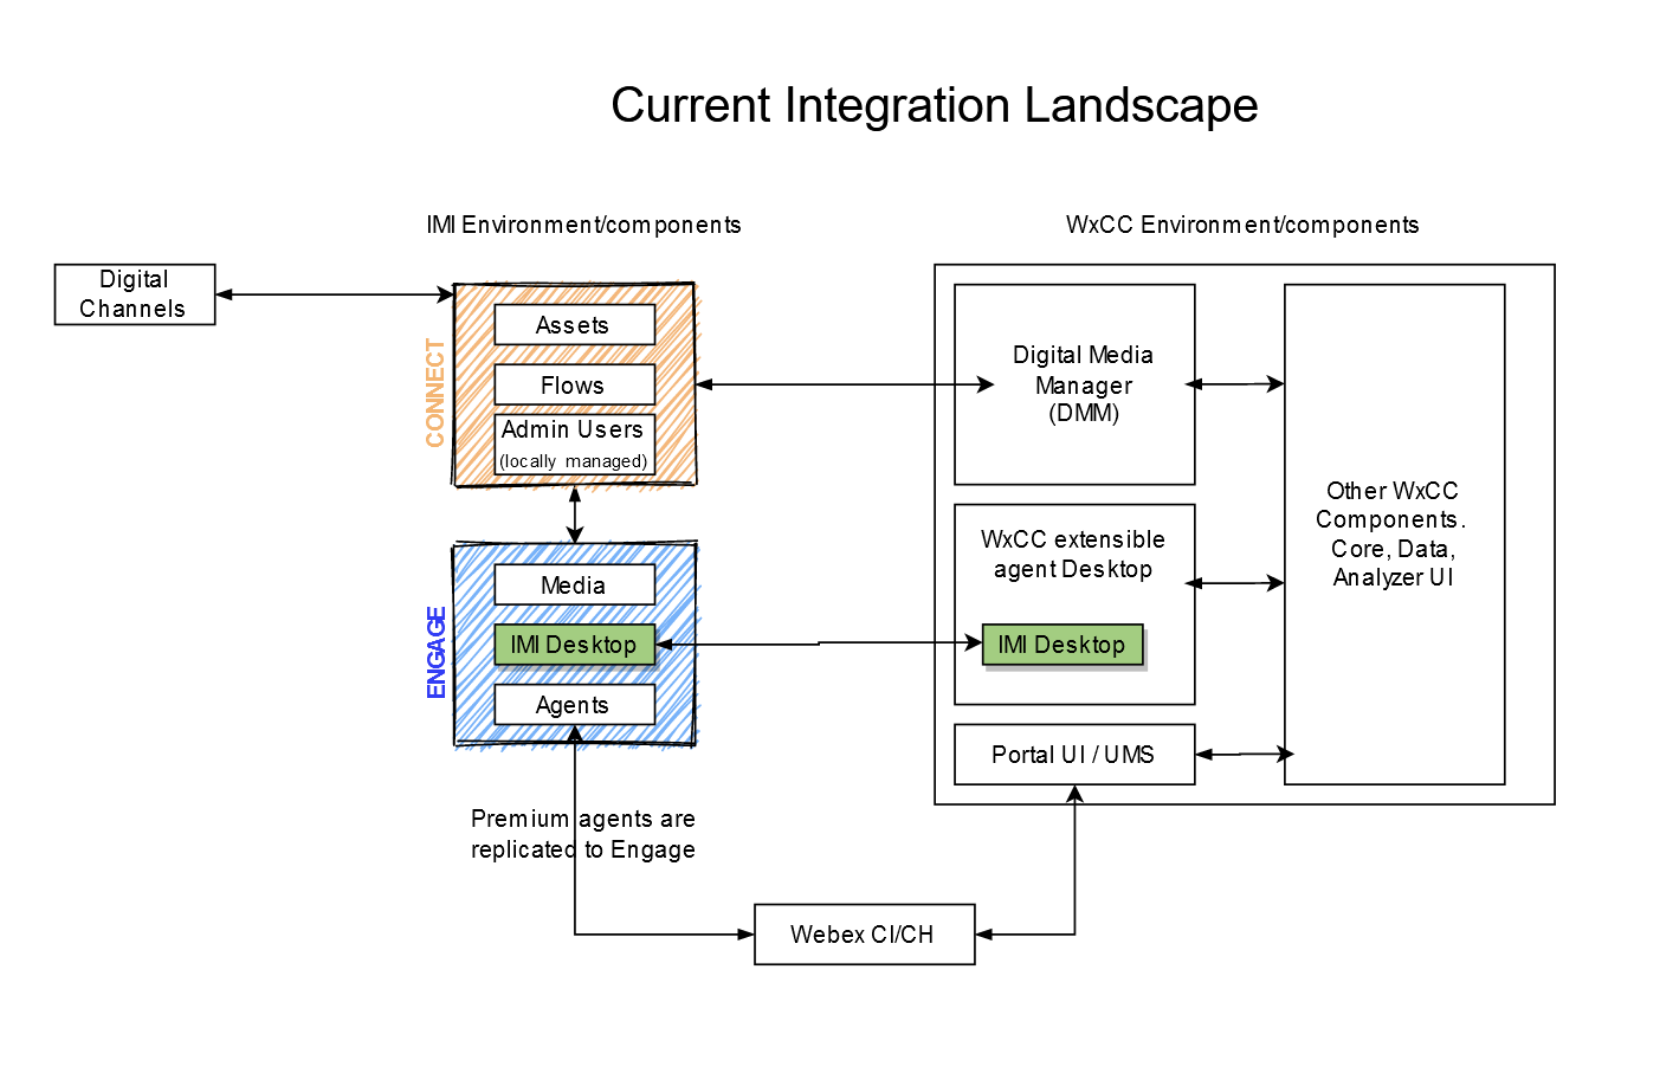
Connect serves as the entry point for all the messages received through any digital channel (email, chat, SMS, Messenger Facebook, WhatsApp) and as the intelligence for routing them. It hosts most of the configuration the Admin will create: flows, assets, bots, scheduled events and webhooks.
The access to Connect happens via a dedicated URL which is generated and provided to the administrator at the time of the initial provisioning.
Users in Connect are added and managed locally.
Engage serves as the host for media and agents. Agents which are configured in Webex Contact Center gets automatically synchronized with Engage. In CPaaS (the standalone version of Webex Connect) Engage provides a dedicated agent console solution, while with Webex Contact Center it leaves that control to the native Webex Agent Desktop. Within Engage the Admin can customize some cosmetics of each channel and create templated responses agents can select and use inside their Agent Desktop.
The access to Engage happens via a dedicated icon inside the Webex Contact Center Management Portal.
Users in Engage are automatically synchronized with Webex Control Hub.
2. Webex Connect provisioning
- Go to https://admin.webex.com
- Login with tenant administrator credentials
- Under ‘Services’ select ‘Contact Center’ > ‘Settings’ > ‘General’
- Verify under ‘Service Details’ > ‘Digital Channel’ is set to ‘IMI Digital’
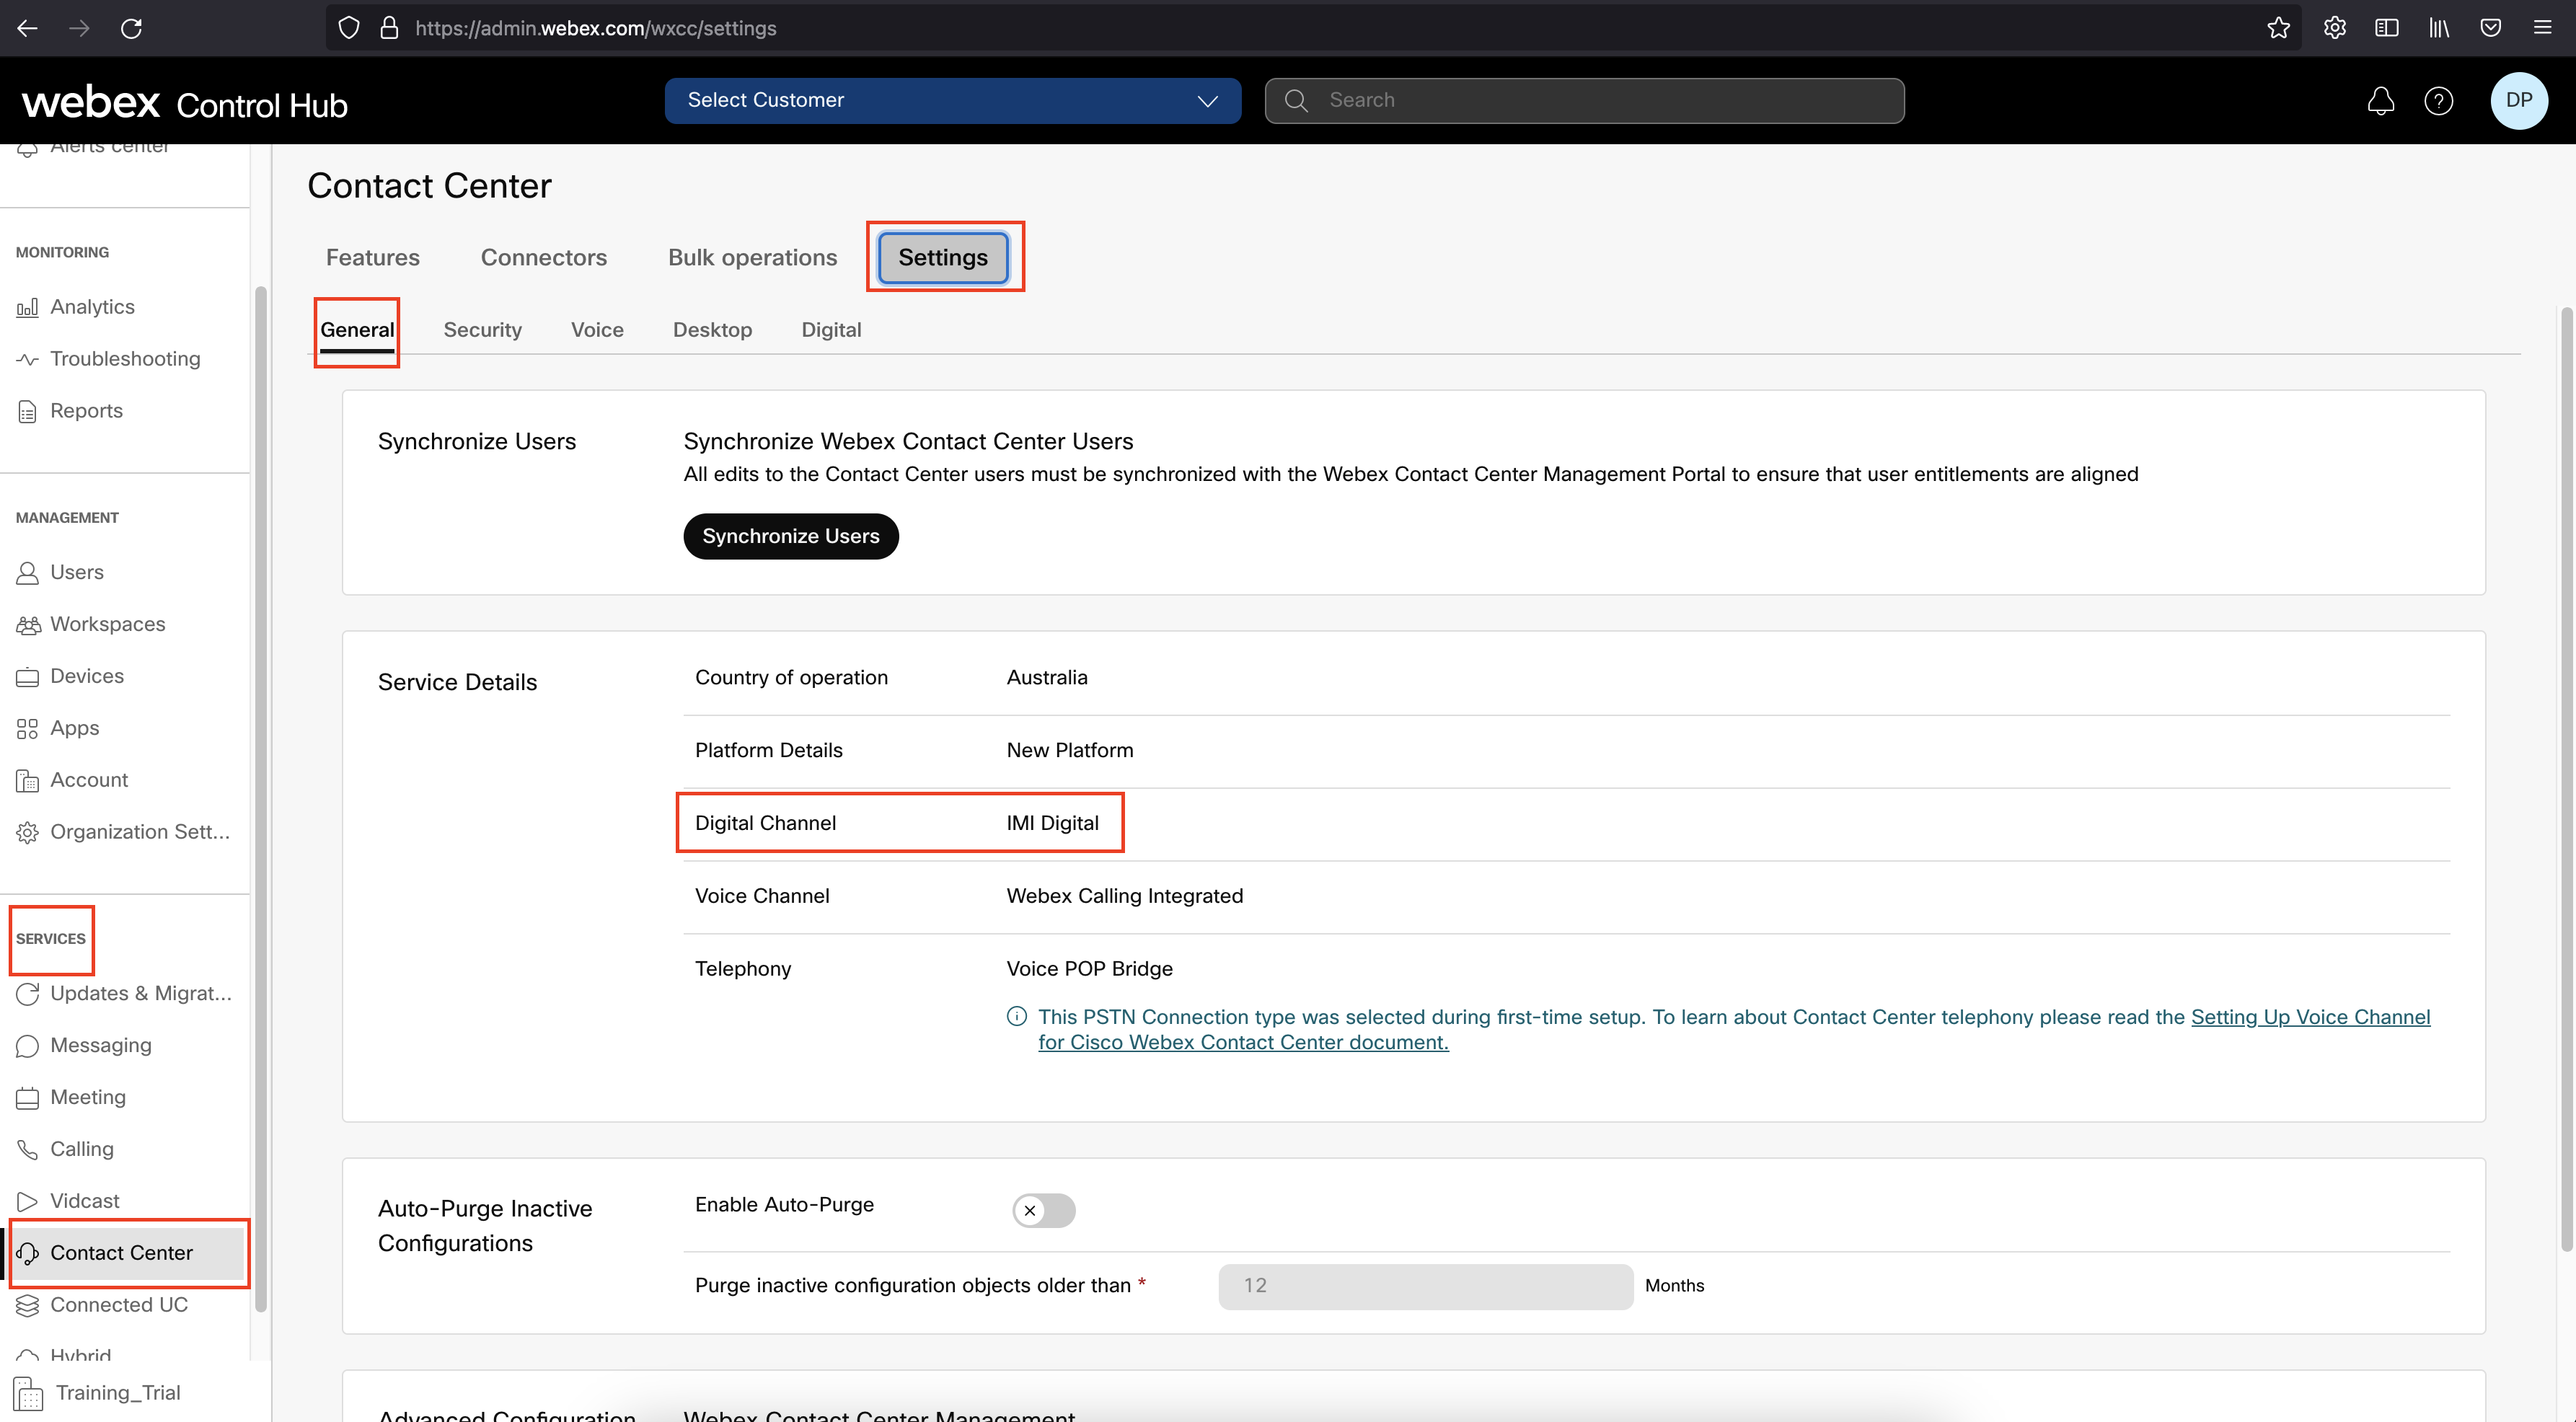
In case the ‘Digital Channel’ section prompts a different value you will need to reach out Cisco for support to get this setting corrected before proceeding further.
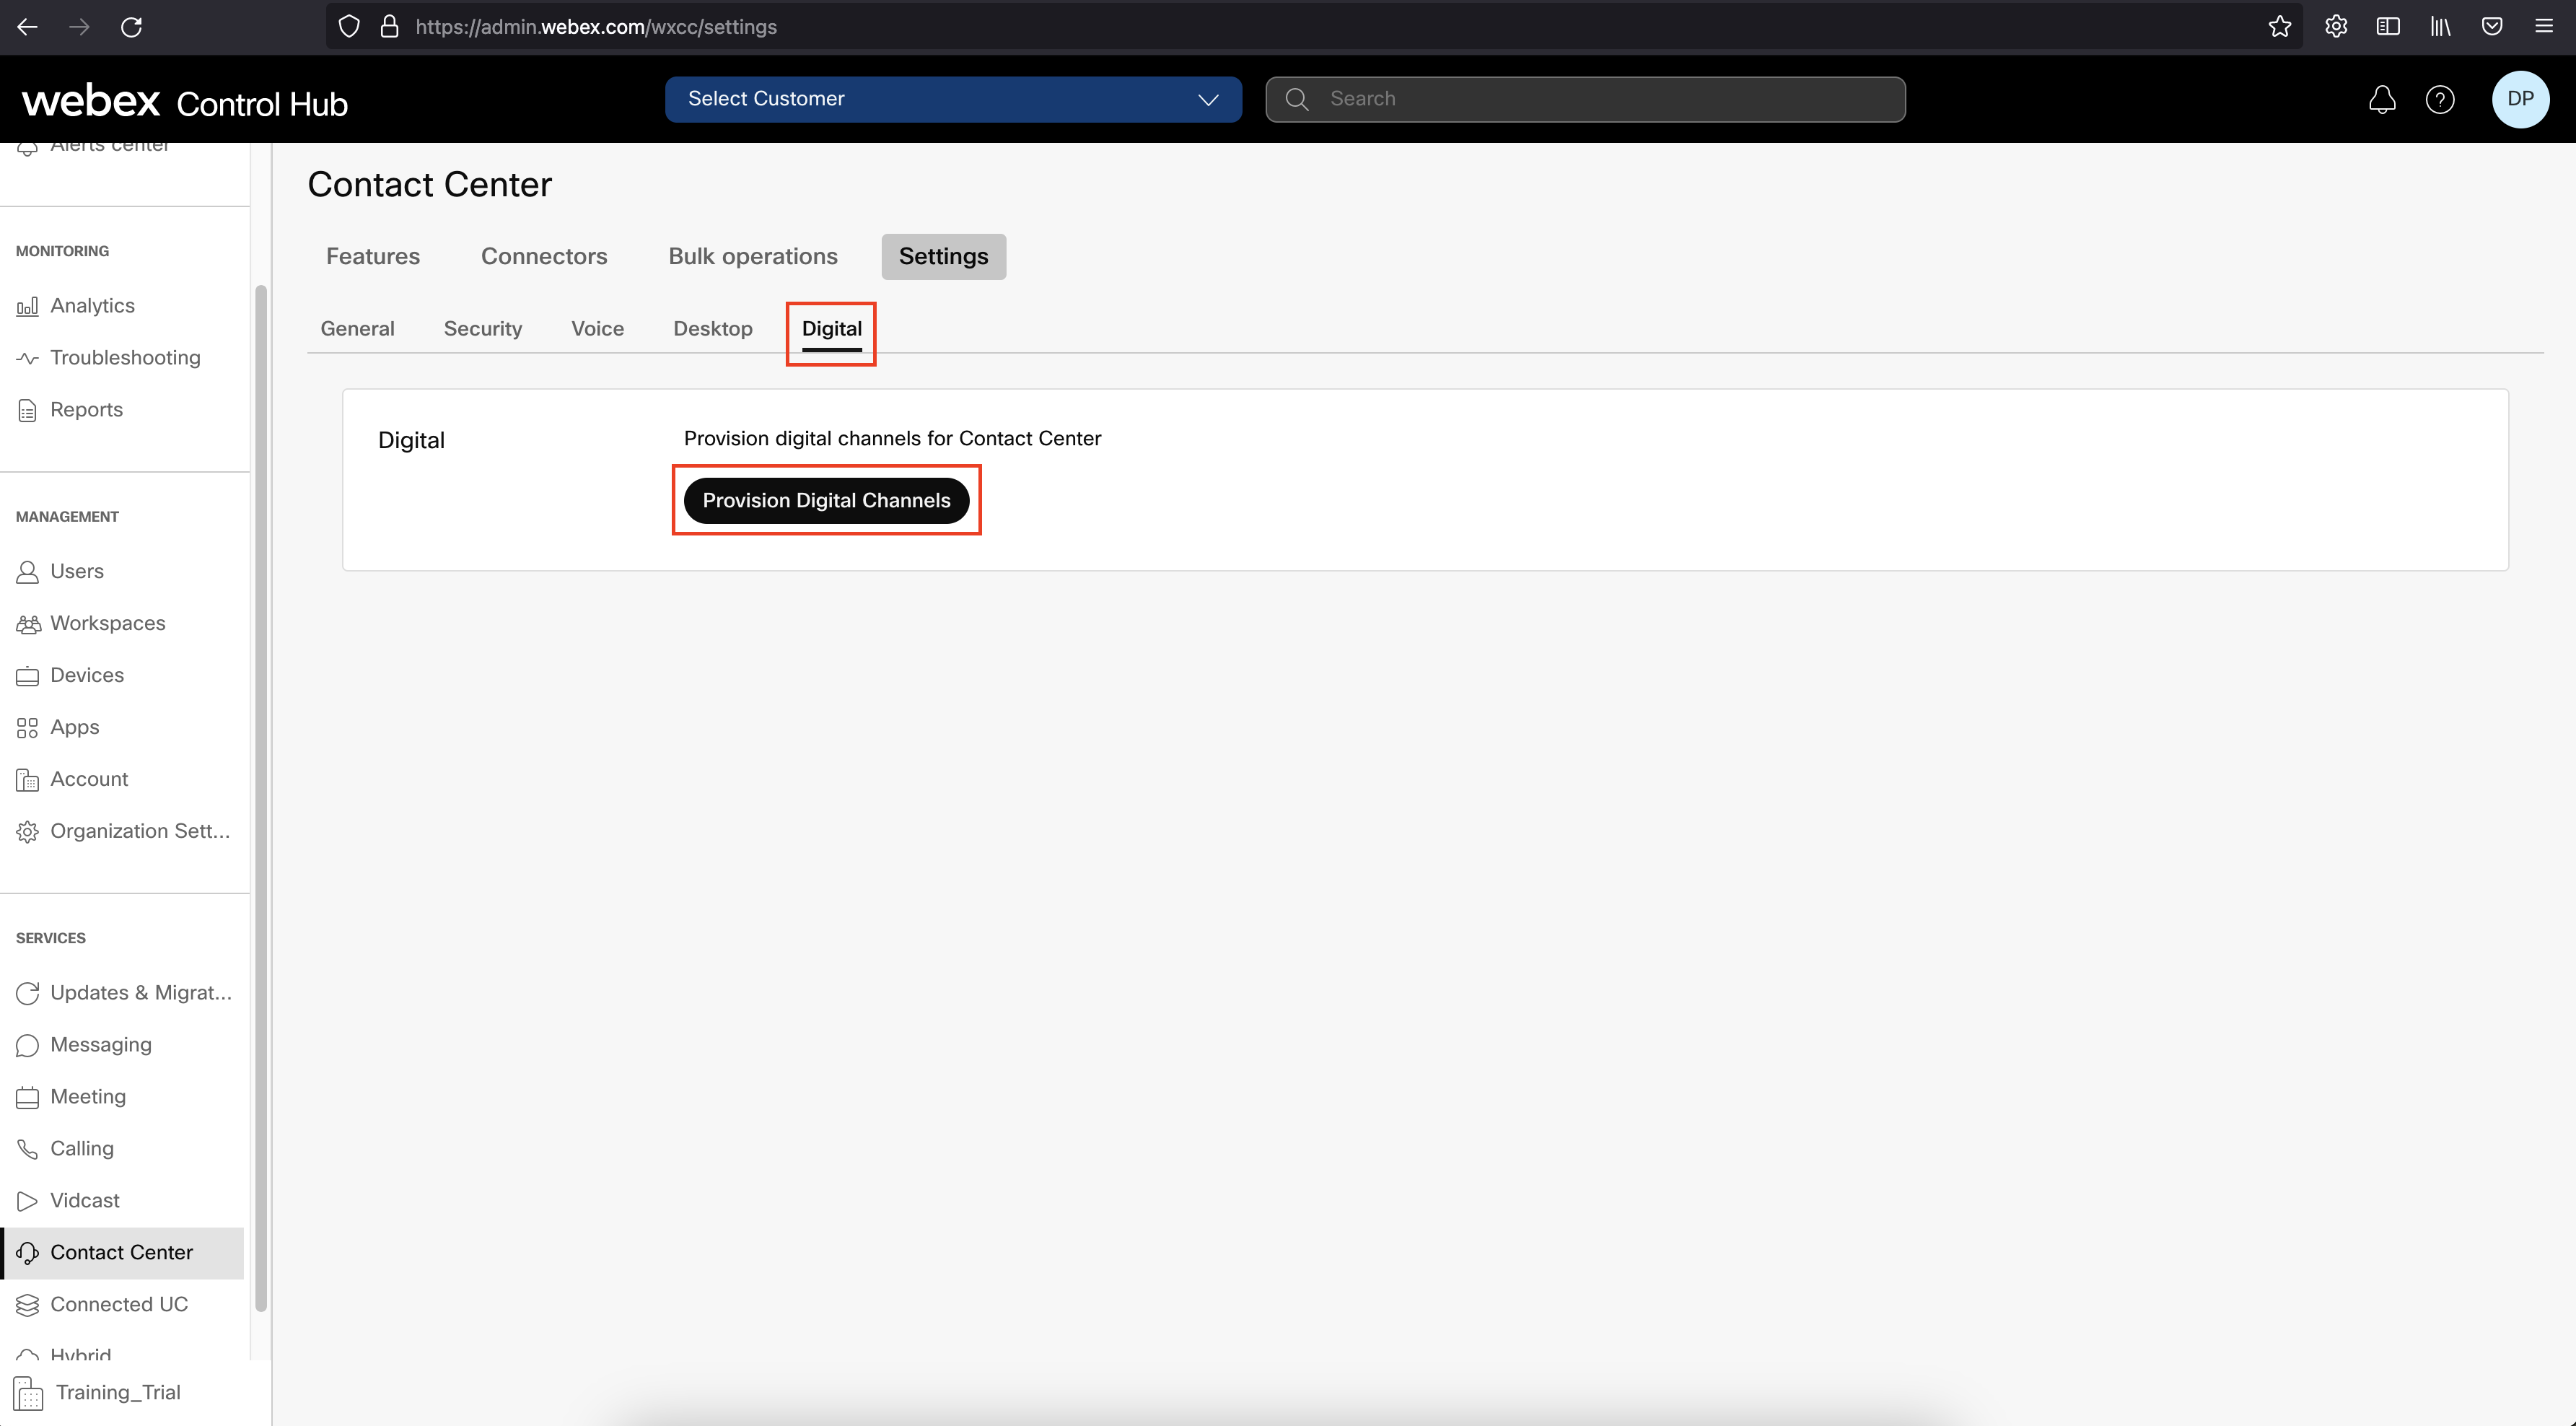
- Under ‘Services’ select ‘Contact Center’ > ‘Settings’ > ‘Digital’
- Select the button ‘Provision Digital Channels’
- Then select from the list of administrators the account who will become the Owner of the new Webex Connect Tenant > Click on ‘Select
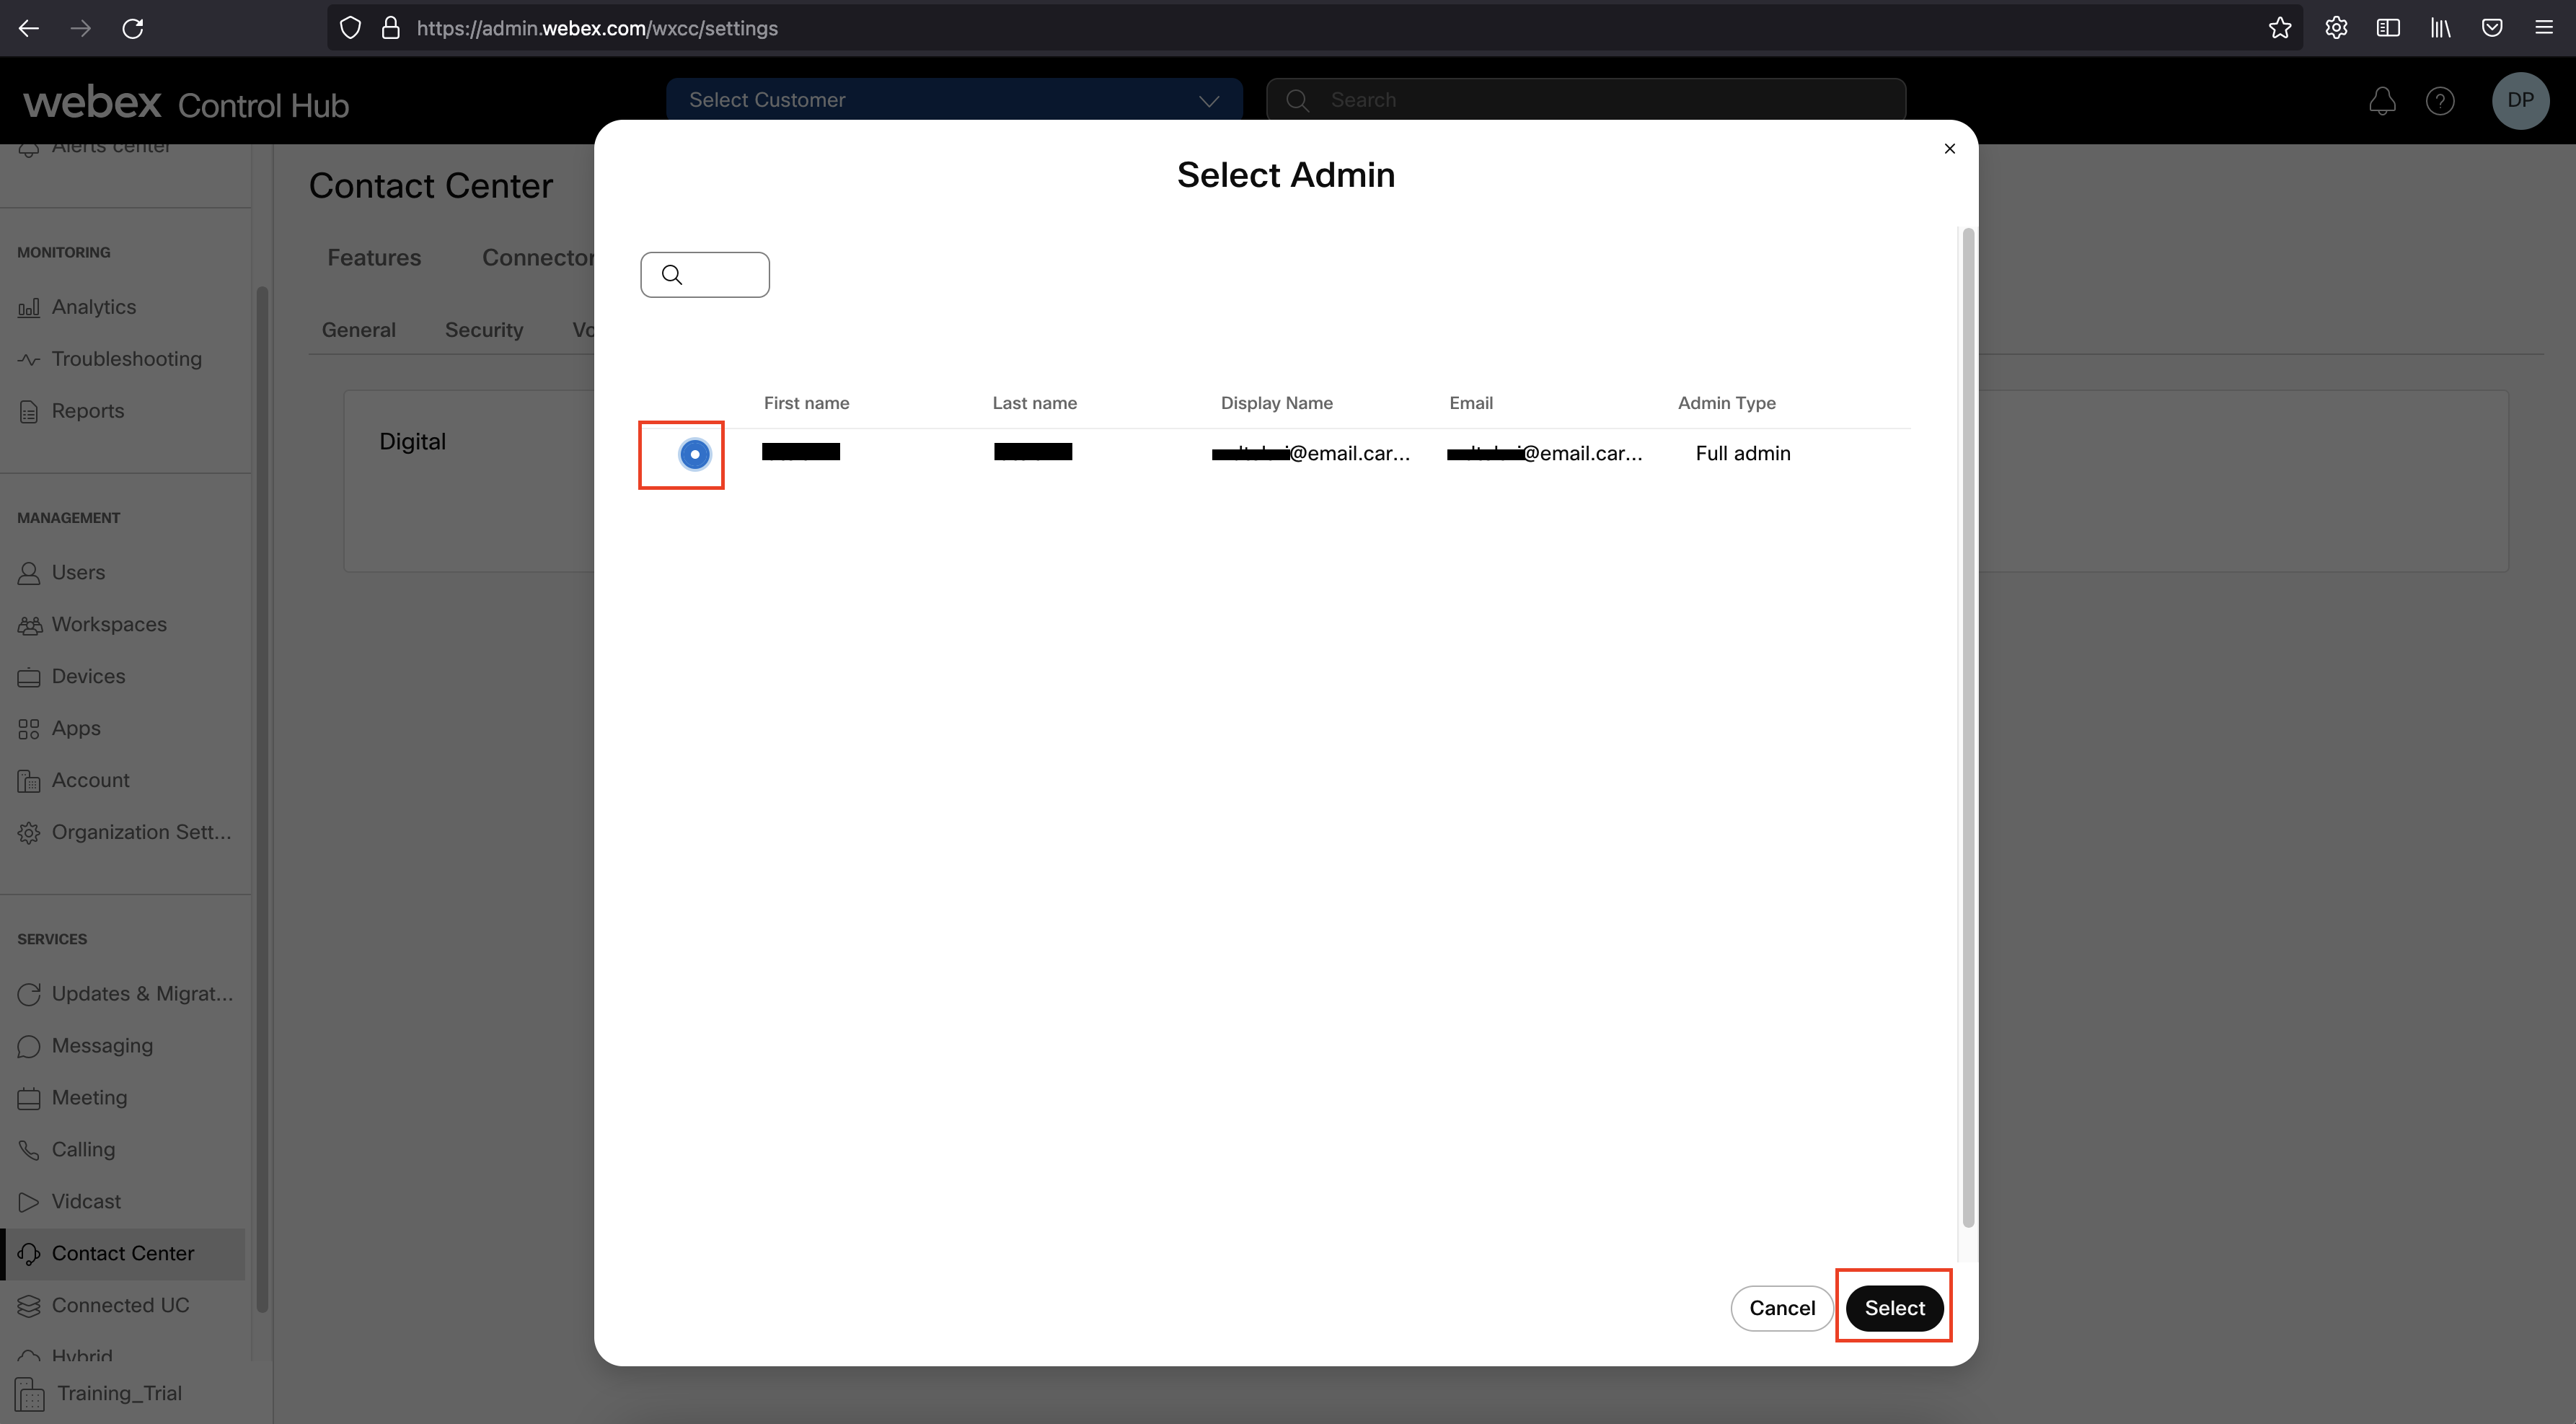
- Wait approximately 5 minute for the automated provisioning process to complete. After this time, the selected administrator will receive an activation email.
- Open the email and click on ‘JOIN THE TEAM’
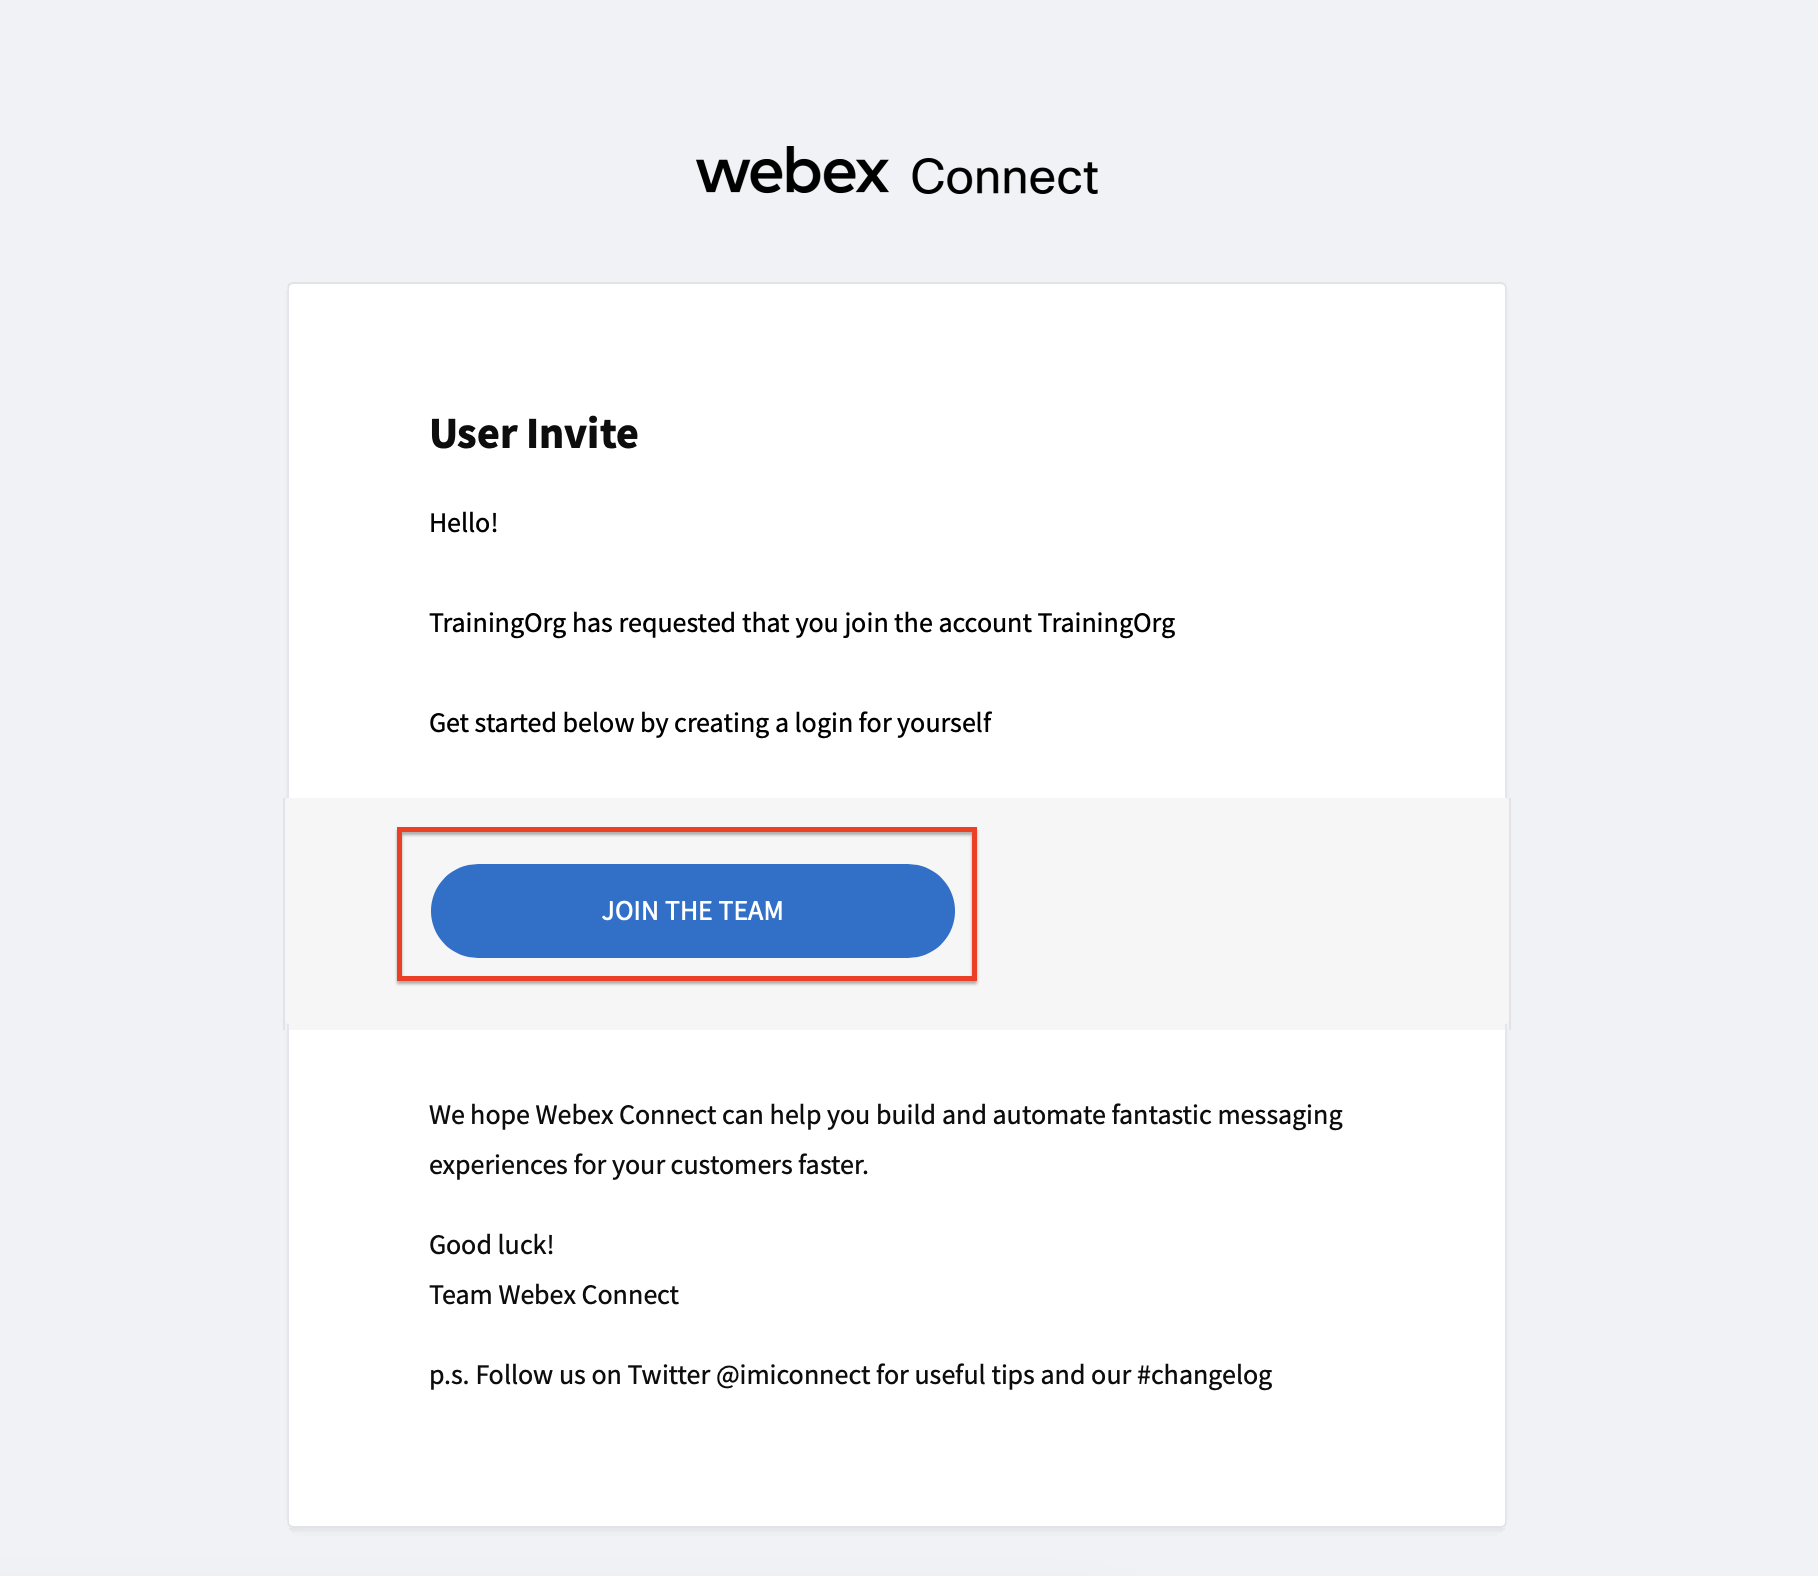
- Follow the instructions to activate your account and set a local password.
- Once the activation is completed you will access the Connect portal > bookmark the website URL
For security reason, the activation is only valid for 24 hours since its delivery. Please activate your account immediately. In case you don’t receive the activation email, or not use it within 24 hours, will need to reach out Cisco for support.
3. Webex Connect provisioning verification
- Go to https://admin.webex.com
- Login with tenant administrator credentials
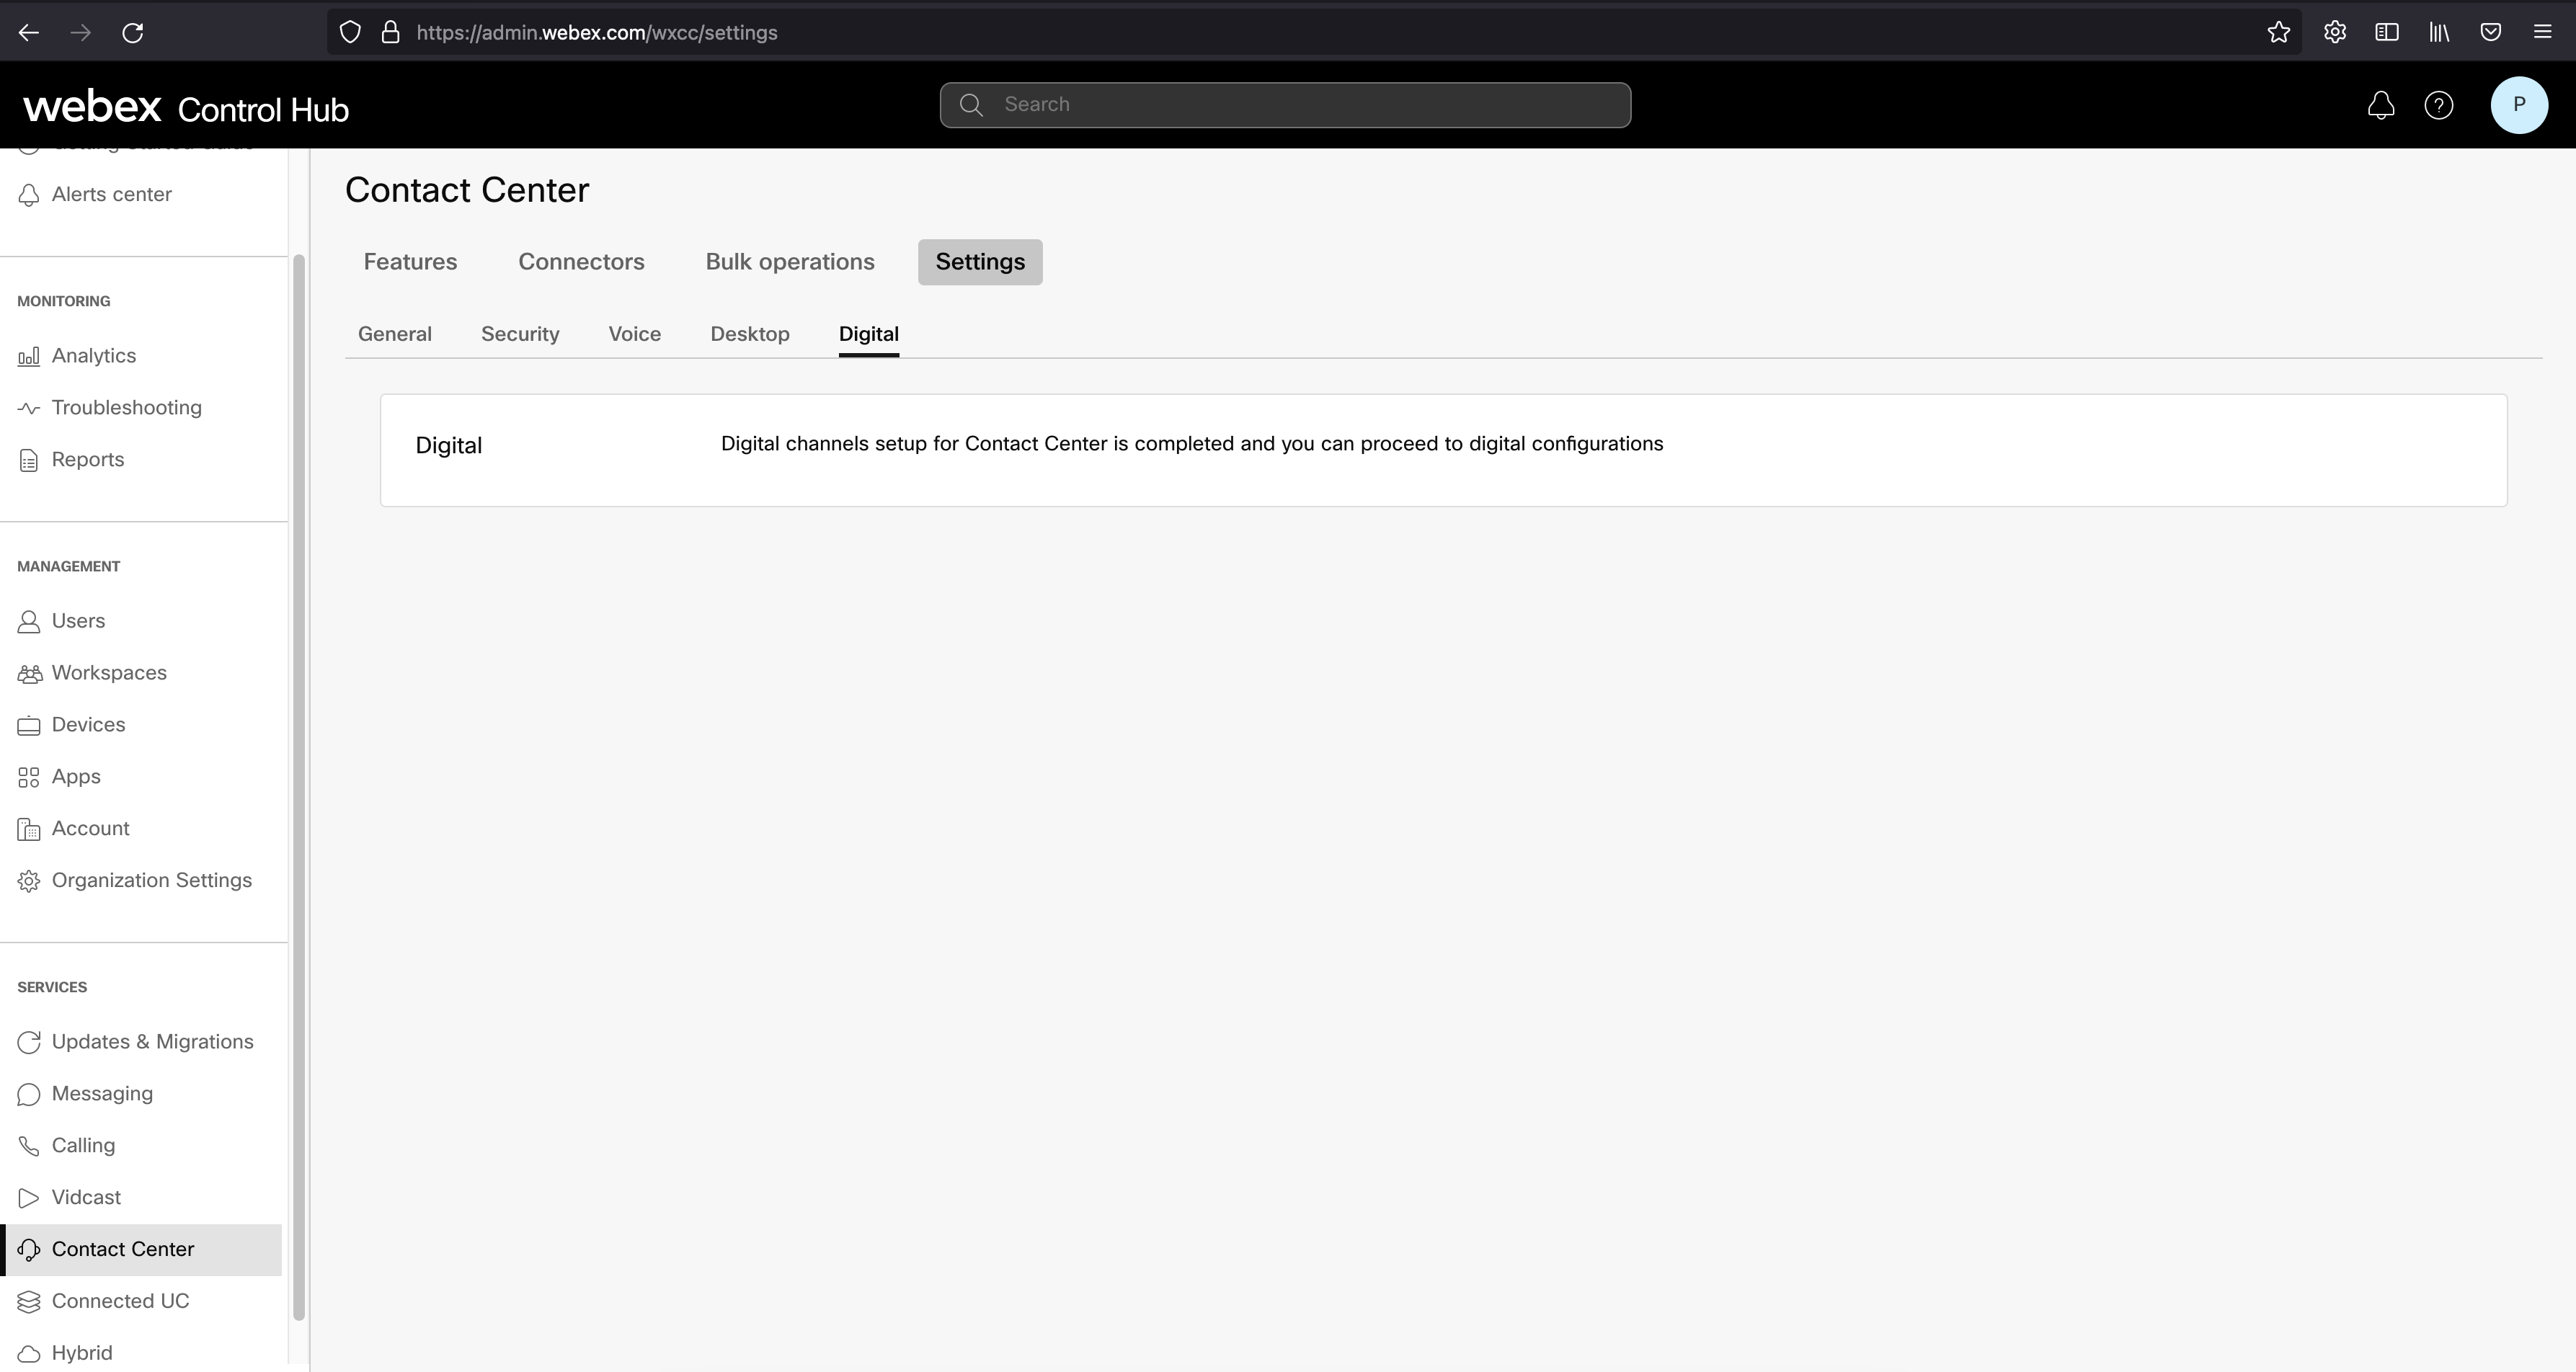
- Under ‘Services’ select ‘Contact Center’ > ‘Settings’ > ‘Digital’
- Verify Digital channels setup for Webex Contact Center is completed.
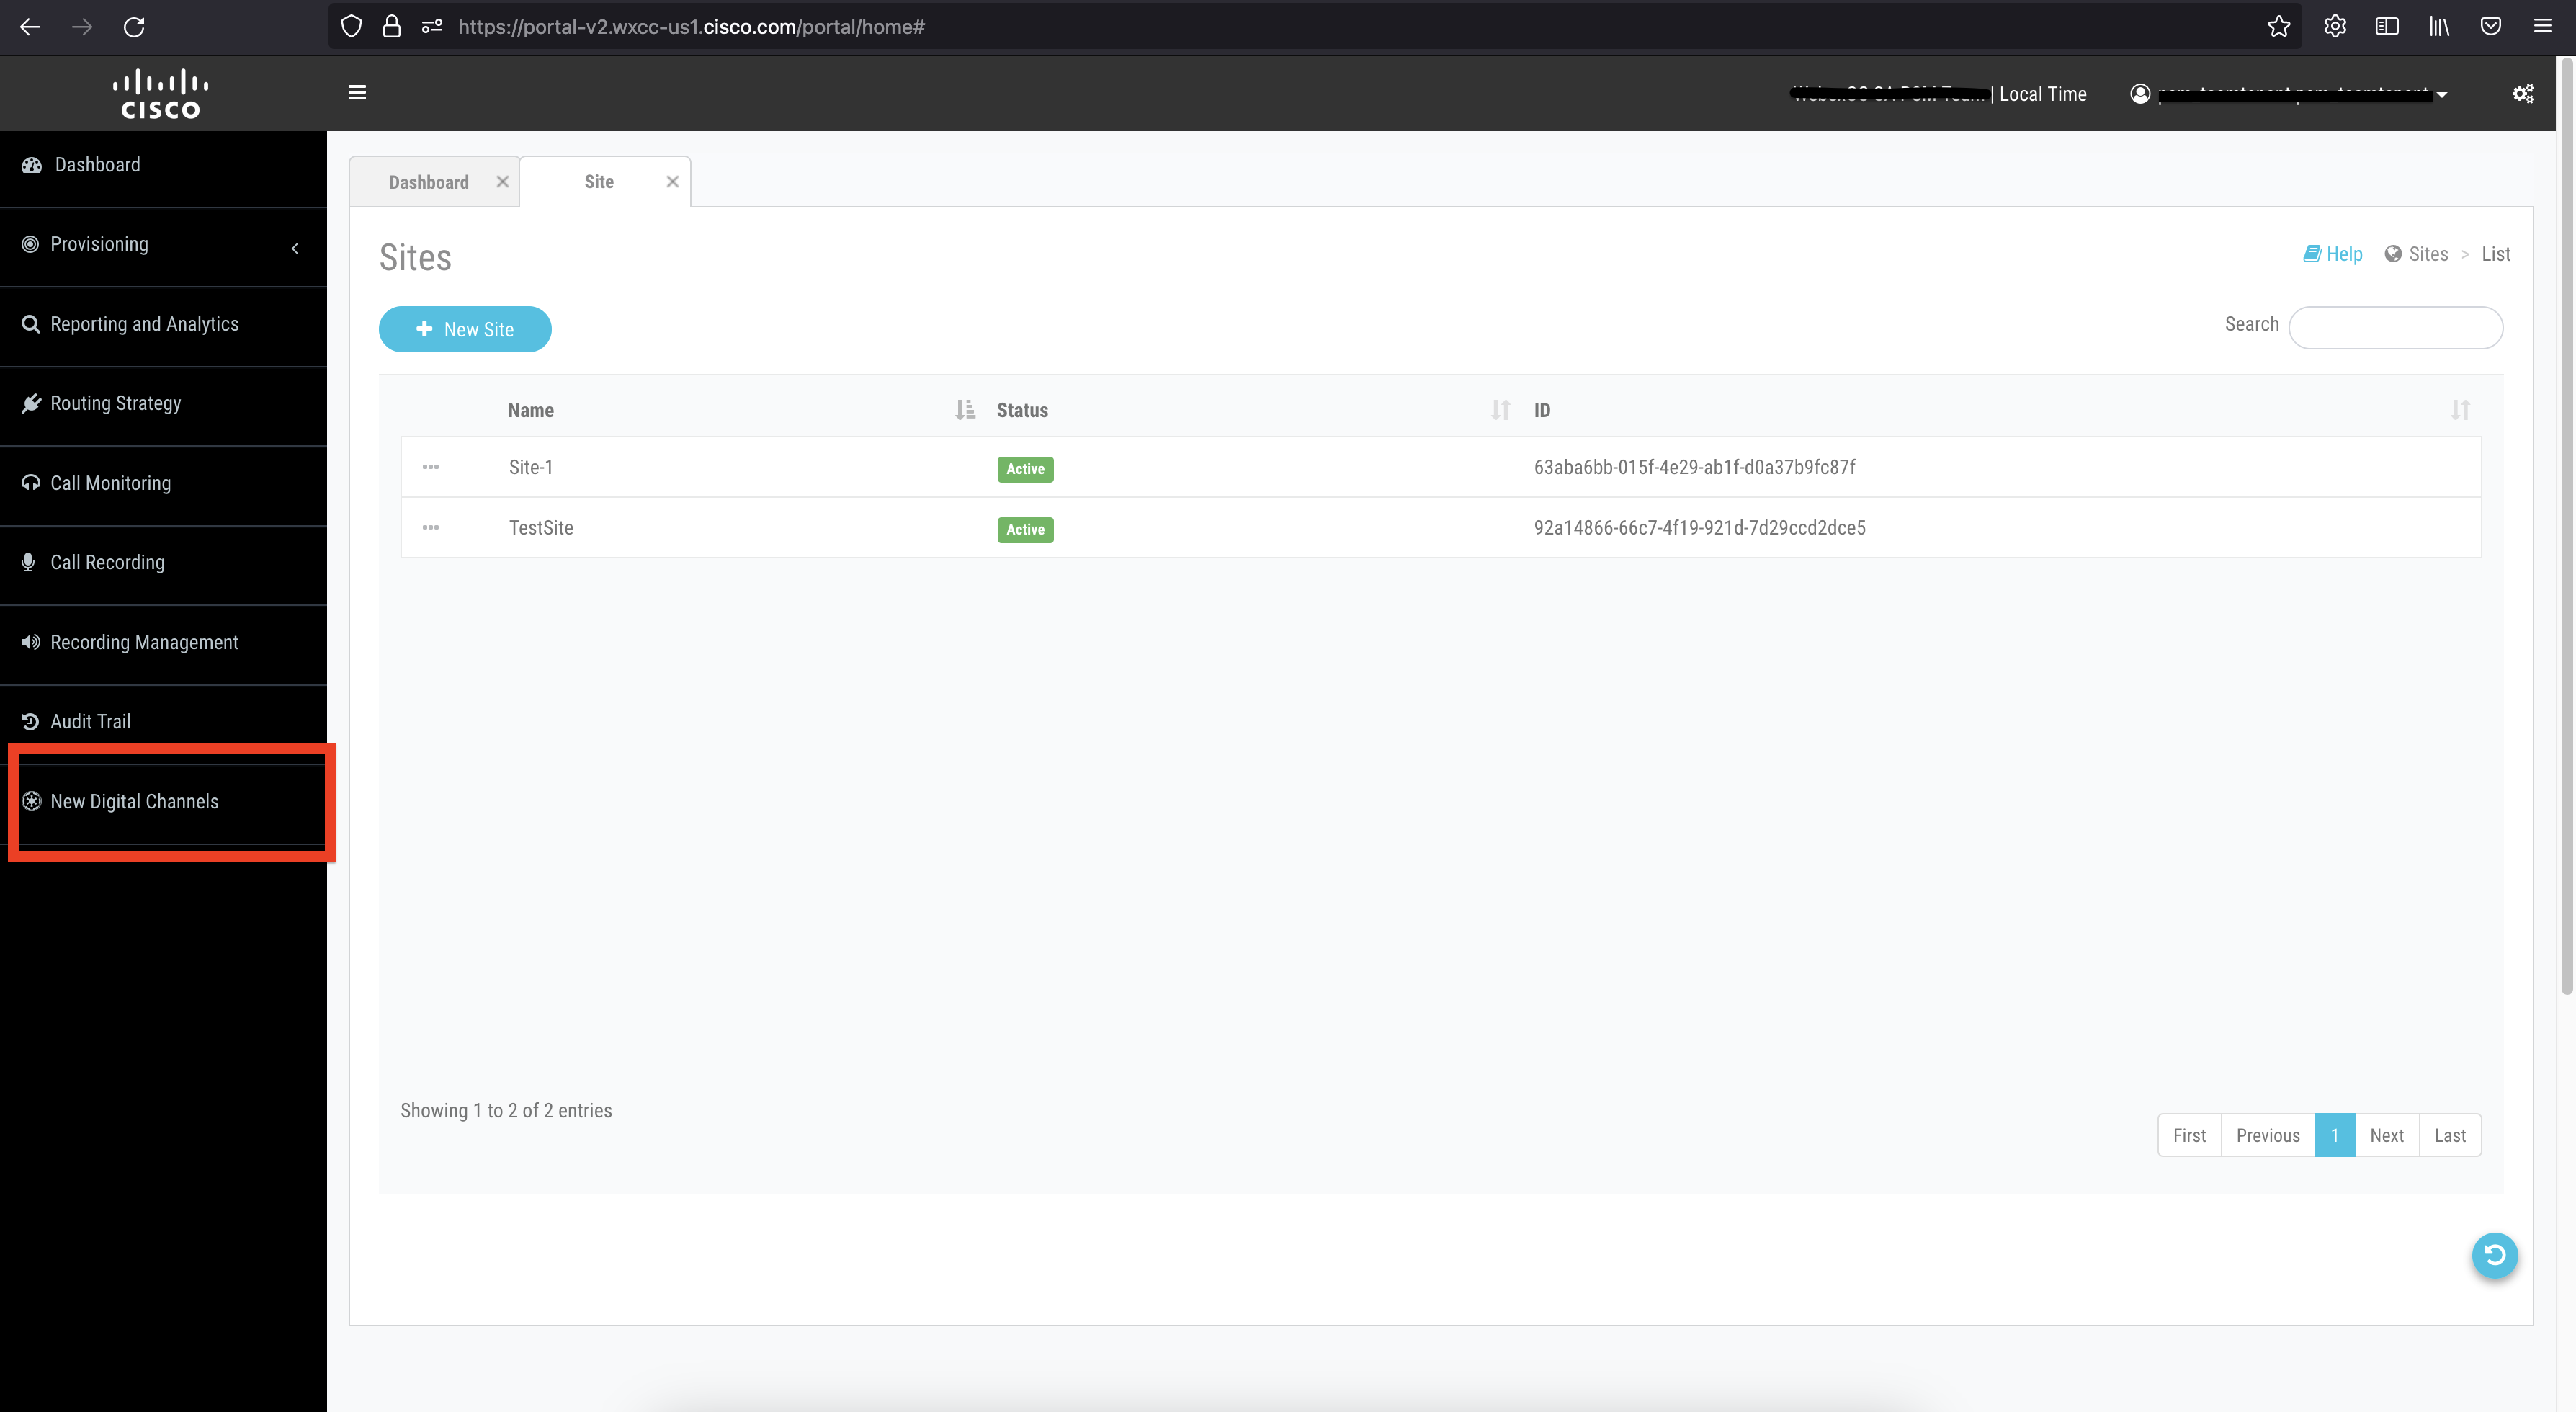
- Return to ‘Services’ select ‘Contact Center’ > ‘Settings’ > ‘General’ > ‘Advanced Configuration’ > Select ‘Go to Webex Contact Center Management Portal’ to cross launch to administration portal
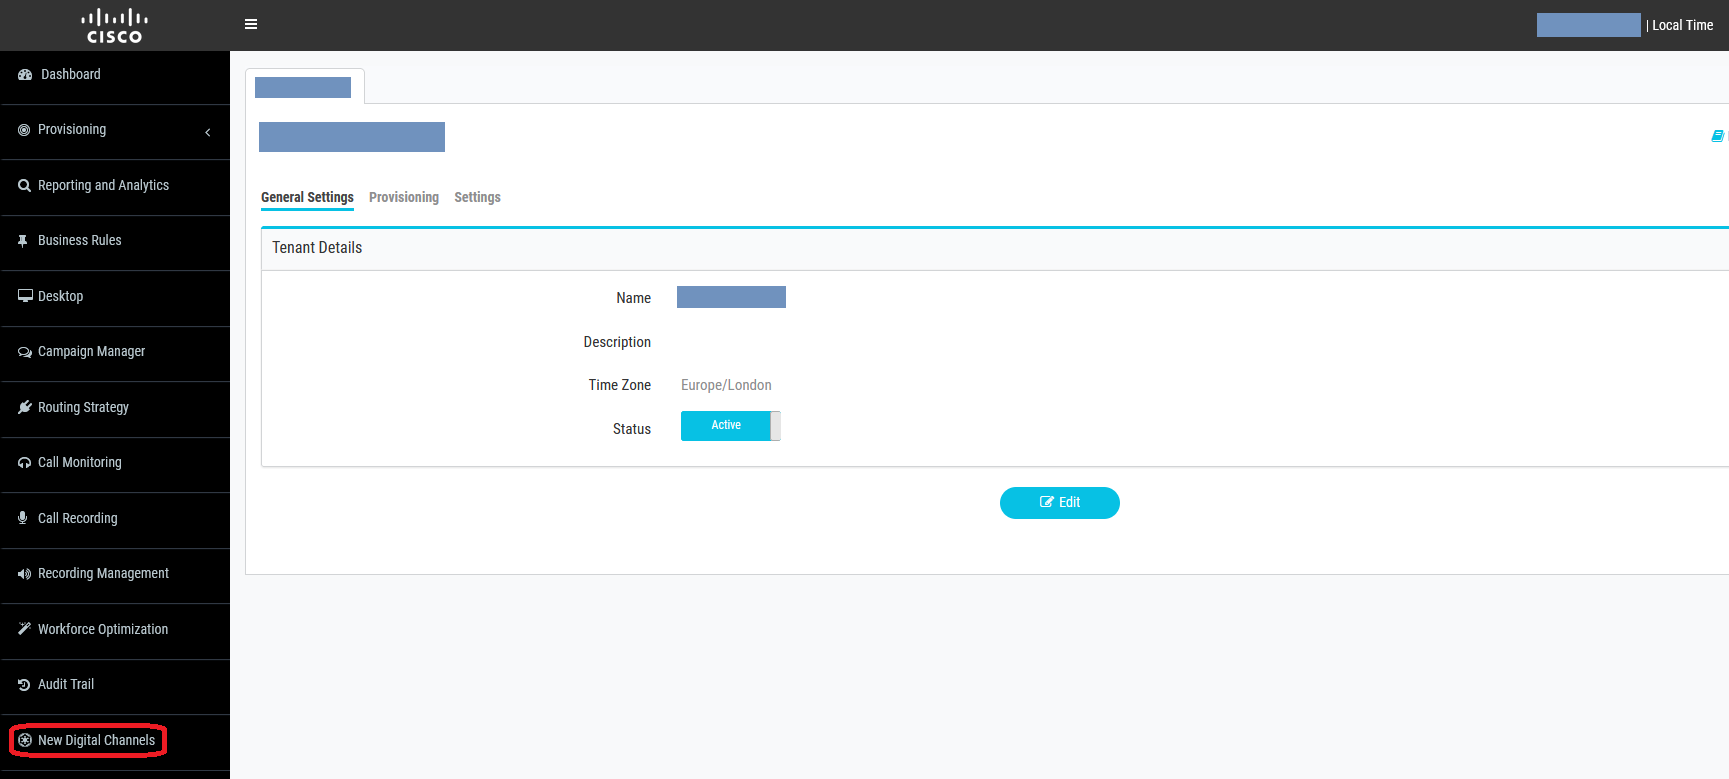
- In Administration portal, select ‘New Digital Channels’ to cross launch into the new component ‘Engage’
- No additional login(or credentials) are required. The login to Engage portal should be seamless
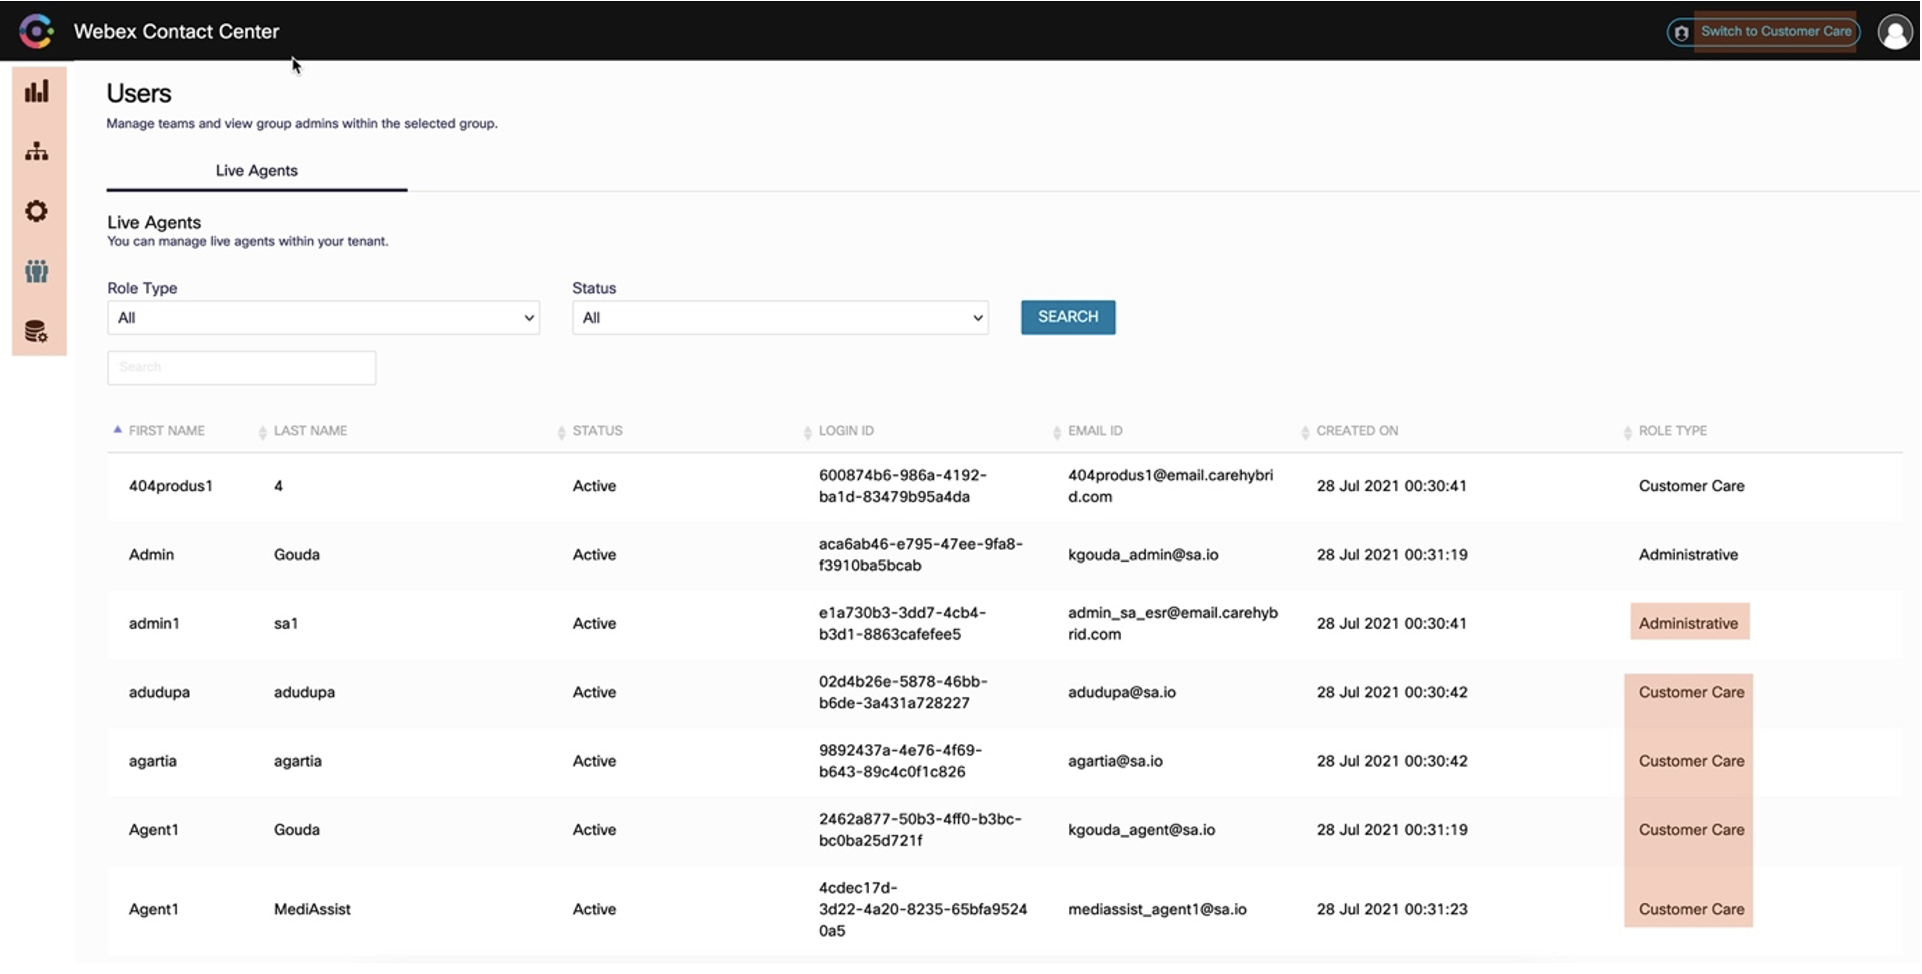
- In Engage portal, select Users > Search
- Verify that users with Administrator and Premium Agent previleges are replicated with role type ‘Administrative’ and ‘Customer Care’ roles
- Please note that the user account with which you have logged in will not show up in the engage user list. This is expected behaviour.
Congratulations, you have completed this section!
Lab.12.2 - Connect GUI overview
Table of Contents
| Topic | Lab Type | Difficulty Level | Estimated length |
|---|---|---|---|
| Overview of Connect menu items | Read & Understand | EASY | 15 min |
Introduction
Lab Objective
This lab is designed to introduce the Connect interface, which is used for the configuration and orchestration of all digital channels. In this lab you will not find configuration steps, the goal is to understand the purpose and use of each menu item.
Pre-requisite
- Connect URL for browser access.
- Admin credentials to login to Connect administration portal.
Overview of Connect menu items
Connect interface is divided in two main parts: the main menu on the left side and the configuration of the selected object in the center-right side.
Move your mouse pointer on each icon of the menu to see its name and the available options. Click on the ‘»’ icon in the left bottom of the menu to expand the menu and see the description of each item in addition to the shortcut icons.
This is the introduction video. It walks through the menu items and explains the purposes of each tab.
1. Services
Services are containers for all the flows the administrator will typically configure to orchestrate and route incoming messages from customers to agents. The administrators can create, name and arrange Services following their preferences.
- After login into Connect, Services will be automatically selected. You can click on any of the existing services to explore their content. Use the search toolbar on the top to navigate and filter the available services when there are many.
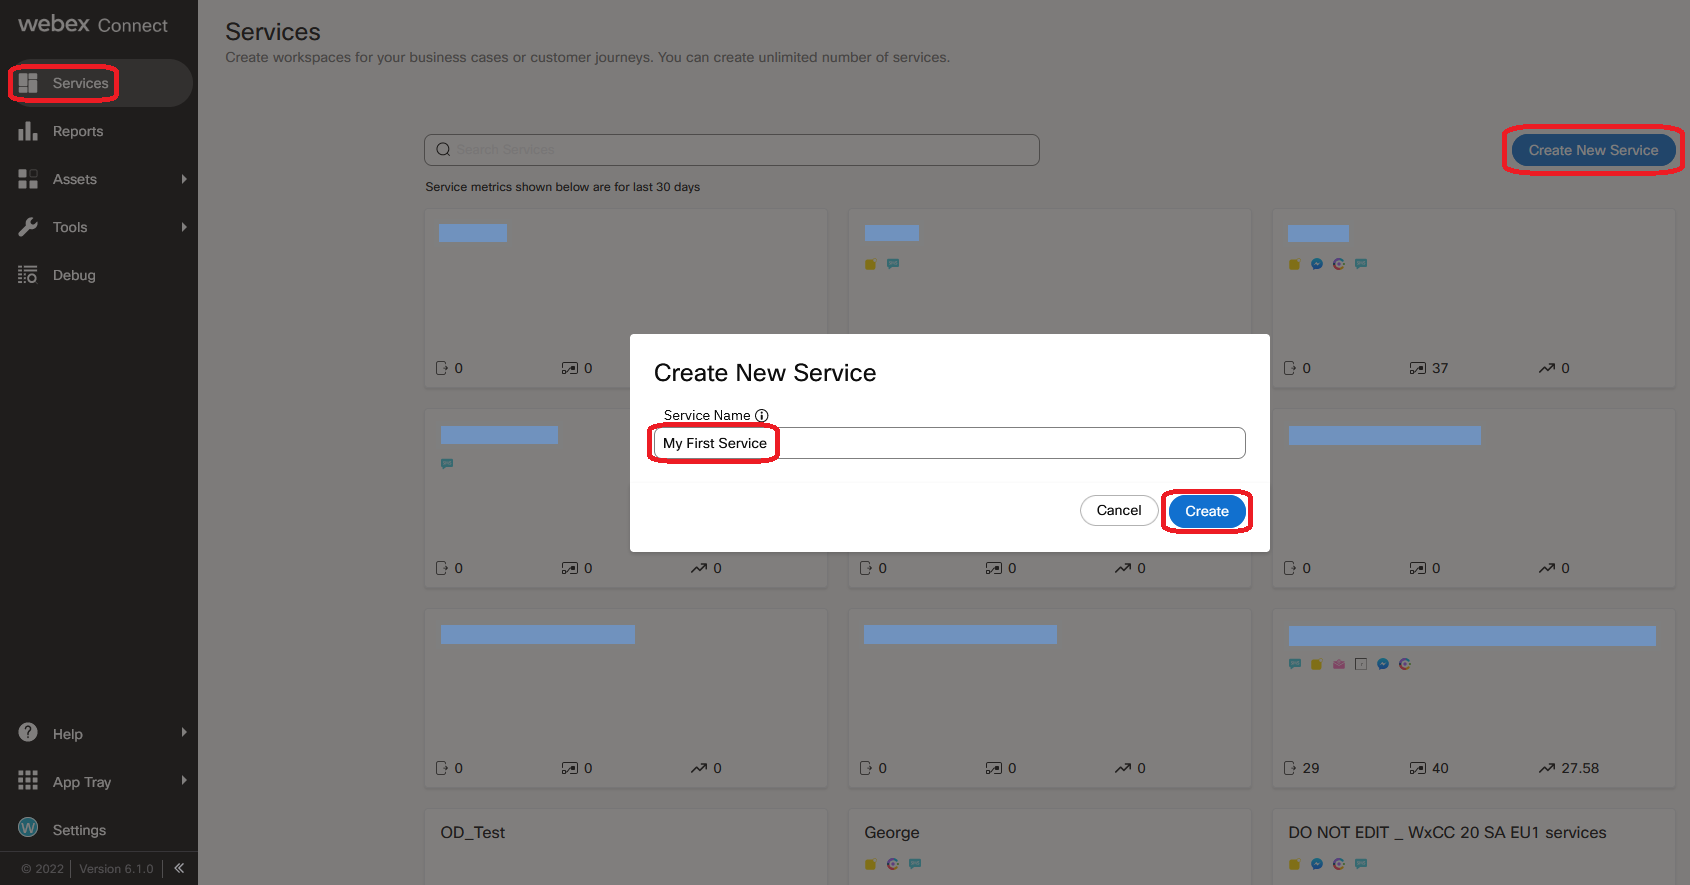
- To create your own service click on SERVICES > CREATE NEW SERVICE button. Please set the SERVICE NAME with a name of your choice.
- You will be redirected to your service configuration. In the DASHBOARD tab, at the right bottom, you can see the traffic statistic per each channel, flow execution, and Messaging API statistic.
- Click on a second tab FLOWS to see the list of all flows created for that service. You should not have any pre-built services right now.
- Click on the RULES tab to see which triggers are configured for which flows. Again, there are no triggers right now.
- Click on API tab. Here you can get the SERVICE ID and SERVICE SECRET which are needed for external applications which are using API that are meant to trigger flows within this service.
- Click on the SETTINGS tab. Here you can rename or delete the service. You can add a description for better organization and even select the checkbox under ‘Service Locking’ so to prevent other users to apply any uncontrolled changes to it.
2. Reports
While the official platform for the Contact Center solution remains Analyzer, Connect offers the possibility to generate historical utilization reports for the existing flows.
- Click on the next item in menu REPORTS > select the desired service in ENTITY (use the search bar on the top to navigate and filter the available services when there are many) > select one Channel (will collect data from all flows of the same kind) or one specific Flow > Select the desired Time Period > click on the “GET REPORTS” button. If there is no data, you will get a “No records found.” message. Later you can find here such data as numbers of Submitted, Rejected, Delivered, Read, and Failed messages.
3. Assets
Assets function as triggers and they are very similar to Entry Points in the Webex Contact Center Management Portal.
- Go to the next item in menu ASSETS > Numbers. This will show you the list of SMS numbers added to the platform. SMS numbers are provided upon request by Cisco. Admin is not required to apply any configuration here.
- Now click on ASSETS > Apps. This section allows the administrator to add and manage the ‘trigger’ for each channel (except SMS). Apps require dedicated configuration to function properly.
- Click on next item ASSETS > Integrations. This section contains the list of all integrations configured for different events, which allow Connect to communicate with other components. By default, you will find two integrations: Webex CC Task (which allows Connect to communicate with the Webex Contact Center backend) and Webex CC Engage (which allows Connect to communicate with the Engage backend)
4. Tools
The Tools section contains several additional capabilities, but just few of them are commonly used.
- Click on TOOLS > Download SDKs. Here you can download SDK if you want to build your own application.
- Go to TOOLS > Templates. Here you can create new templated messages that will be triggered inside the desired flows so to programmatically respond to customers and collect the desired information.
- Now go to TOOLS > Export Logs. This section allow the administrator to collect detailed logs for either Inbound or Outbound messages received/sent in a desired time frame. This option becomes very useful during troubleshooting. To consult the logs, select your Service name, select your Channel, time period, and click DOWNLOAD button. Wait few seconds for the report to be generated (the Status will change to ‘Ready for download’)
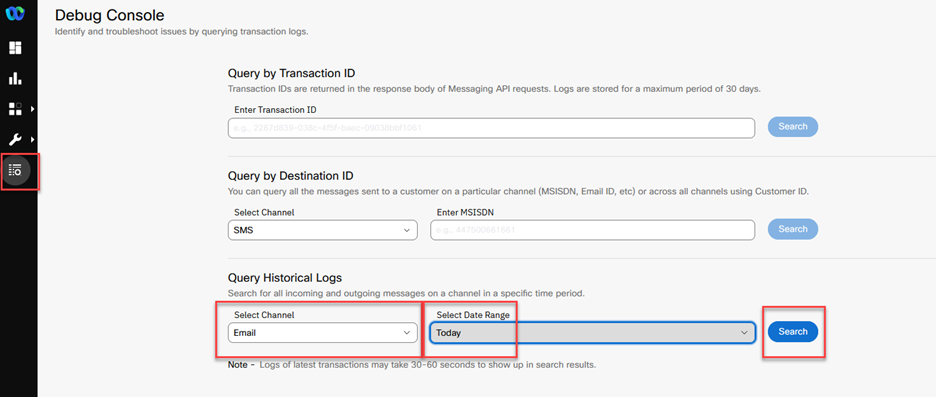
5. Debug
The Debug section is extremely useful when troubleshooting any ongoing issues. It offers the possibility to check some detailed information about incoming and outgoing messages, which can help the administrators to better understand what could be the root cause of occurring problems.
- Click on DEBUG.
- Use Query by Transaction ID when looking for a specific conversation (this ID is retrievable inside the flow designer, this will be covered in another lab).
- Use Query by Destination ID when looking for outbound messages (typically from agent to customer) toward a specific destination (i.e. number, email, etc).
- Use Historical Log for a more generic search, select the query Channel type and date range. Click on the SEARCH button and check if you have any data.
6. Help
The Help section provides access to the available documentation.
- Go to the next menu item by clicking on HELP > Documentation which redirects to the Webex Connect documentation portal. All menu items are documented in that documentation.
- Go to the second item in the HELP menu by clicking on API Reference. This will forward you to the API documentation portal.
- Now switch to the Change Log item in the same menu. Here you can find the updates of the product.
7. App Tray
Use the App Tray to access advanced platform capabilities.
- Click on the APP TRAY > Bot Builder. This will redirect you to the Bot Builder tool where you will create the bots to automate the customers interactions. This section is covered in detail in a dedicated lab.
- Click on the APP TRAY > Event Scheduler. This will redirect you to the Scheduler tool where you will create the events and related schedule to programmatically trigger flows. This section is commonly used for outbound campaign on digital channels, and it’s covered in detail in a separated lab.
8. Settings
The Settings session allows the administrator to review and manage users and team settings. More details on user management will be provided in a dedicated lab.
- Click on the next item Settings > Profile Settings and check the Profile settings.
- Go to SETTINGS > Tenant Settings and verify the configured Time Zone and Date Format.
- Open SETTINGS > Usage to see the general statistic of the entire tenant.
- Click on the next item SETTINGS > Contact Support. Here you can check the support contact details in case you need to escalate any query.
- Click on the next item SETTINGS > Teammates. From here you can add more users to Connect or change the permissions for existing users.
- Go to SETTINGS > Groups/Teams where you can create a new group or team. Please refer to “here” link to see the explanation of Groups and Teams.
- As the final step click on the Logout in the SETTINGS menu and make sure that you are signed out from the Connect.
Congratulations, you have completed this section!
Lab.12.3 - Engage GUI overview
Table of Contents
| Topic | Lab Type | Difficulty Level | Estimated length |
|---|---|---|---|
| Overview of Engage menu items | Read & Understand | EASY | 15 min |
Introduction
Lab Objective
This lab is designed to introduce the Engage interface, which is used for the configuration and orchestration of all digital channels. In this lab you will not find configuration steps, the goal is to understand the purpose and use of each menu item.
Pre-requisite
- Admin credentials to login to Control Hub and Webex Contact Center administration portal.
Overview of Engage menu items
Engage interface is divided in two main parts: the main menu on the left side and the configuration of the selected object in the center-right side.
In addition, Engage has two different ‘portals’: the Admin portal (which is automatically loaded when logging-in) and the Customer Care portal. Both are accessible by clicking on the user icon on the top-right of the browser window.
Move your mouse pointer on each icon of the menu to see its name and the available options.
Within Engage not all the options in the menus are required to be known and used: this lab will cover the commonly used settings.
This is the introduction video. It walks through the menu items and explains the purposes of each tab.
1. Engage login
- In order to access Engage, login to Webex Control Hub > Navigate to ‘Services’ select ‘Contact Center’ > ‘Settings’ > ‘General’ > ‘Advanced Configuration’ > Select ‘Go to Webex Contact Center Management Portal’ to cross launch to administration portal
- Once logged in, click on the ‘hamburger’ icon on left, go to the last section and click on ‘New Digital Channels’
- You will be automatically redirected to the Engage portal on a new browser tab.
2. Dashboard
The Dashboard provides a real-time view of all the ongoing chats.
- After login into Engage, Dashboard will be automatically selected. From the drop down menu on the top-right check the ‘Select All’ entry to display all the data available for all the agents.
- Customize the views and filters in the dashboard as per your need to review the desired information.
3. Settings
Within the setting section the administrator can control if and which type of attachments can be exchanged in every channel.
IMPORTANT: since Webex Connect is a PCI compliant application only text-based files are allowed to be transferred. In case a document contains images in addition to plain text, such document will be rejected and not attached to the conversation.
- In case you decide to do not allow any files to be exchanged, toggle the green switch ‘Enable Attachment’ > Click the Submit button to save the changes.
- If you would like to edit the support of attachments for a specific channel, click on the pencil icon under actions for your desired channel type > A pop-up window will appear > Edit the size and number of the attachments as needed > Add or Remove the extension type from the ‘Supported File Formats’ > Click the OK button to save the changes.
4. Users
The Users section lists all the licenses Contact Center Administrators and Agent users from Control Hub, except the user that is being used to login at that time.
- Use the Role Type, Status or search bar to filter the list of users. The list will show if the agents are currently logged in and their role.
-
In case any user is missing, return to Control Hub and verify the proper license is assigned to it.
- If the proper license is assigned > Temporarily remove the license to the affected user > Navigate to ‘Services’ select ‘Contact Center’ > ‘Settings’ > ‘General’ > Click on Synchronize Users > Return to the User and re-assign the license > Return to to ‘Services’ select ‘Contact Center’ > ‘Settings’ > ‘General’ > Click on Synchronize Users. The user will now re-appear in the Engage Users list.
5. Assets
Assets contains required and optional configuration for Assets and agents.
- Select Channel Assets > here you will see all the Assets that are configured in Connect which are automatically synced with Engage. This section will be used especially for the Web Chat widget configuration.
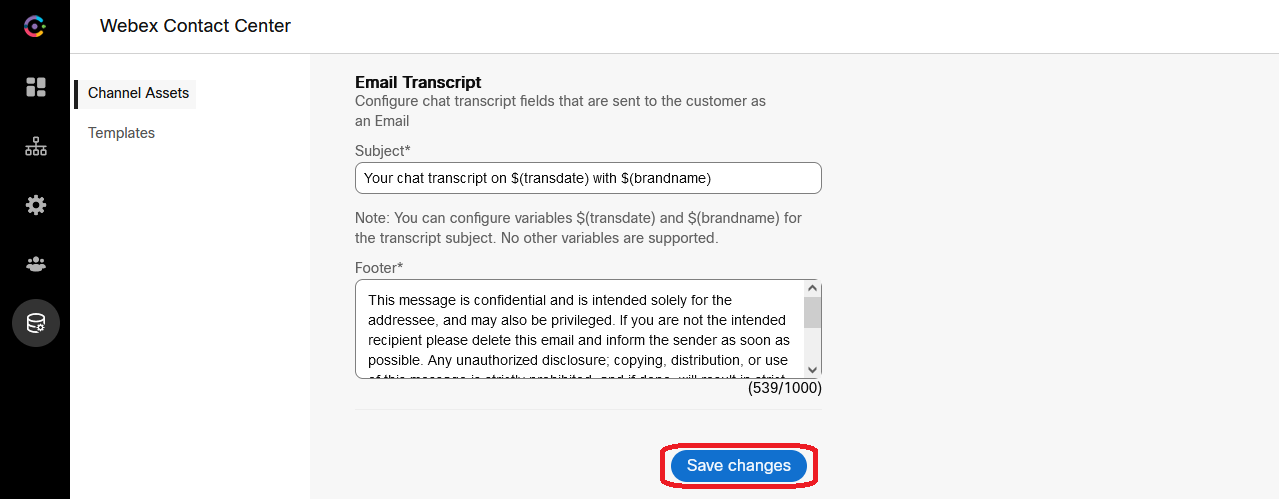
- Select Templates > here you can add and manage templated message the agents can select from their agent console to quickly reply to customers.
6. Customer Care portal
After logging into Engage Admin portal (from the Webex Contact Center Management Portal) click on the user icon on the top-right of the browser window and select Customer Care.
6.1. Dashboard
The Dashboard provides a real-time view of all the ongoing conversations and agents.
- After login into Engage, Dashboard will be automatically selected.
- You can retrieve and download a conversation transcript by searching for a specific conversation ID (such ID can be retrieved from Connect)
6.2. Settings
Within the setting section the administrator can control some additional useful settings.
- Select Settings > MANAGE > Template > You will see the same templates configured on the Admin view
- Select Settings > MANAGE > Blocklist > You can edit or add specific words which will be blocked from the conversation
- Select Settings > CONFIGURE > Working Hours > You can edit the ‘named’ operating hours of your service. This setting will have an actual impact only on the Chat widget layout (more details provided in the dedicated lab).
Congratulations, you have completed this section!
Lab.12.4 - User Management in Connect
Table of Contents
| Topic | Lab Type | Difficulty Level | Estimated length |
|---|---|---|---|
| User Roles and Permissions | Read & Understand | EASY | 4 min |
| Users organization | Read & Understand | EASY | 1 min |
| Login to Connect portal | Practical Lab | EASY | 1 min |
| Add new users with administrator role | Practical Lab | EASY | 2 min |
| New user activation | Practical Lab | EASY | 2 min |
Introduction
Lab Objective
This lab is designed to introduce the Connect User Management structure. Throughout this lab you will learn how to add new administrator users in Connect and how to arrange user accesses.
Pre-requisite
- Connect portal URL
- Tenant Owner credentials to login to IMI Connect portal
Quick Links
Control Hub: https://admin.webex.com
US Portal: https://portal.wxcc-us1.cisco.com/portal
US Agent Desktop: https://desktop.wxcc-us1.cisco.com
UK Portal: https://portal.wxcc-eu1.cisco.com/portal
UK Agent Desktop: https://desktop.wxcc-eu1.cisco.com
EMEA Portal: https://portal.wxcc-eu2.cisco.com/portal
EMEA Agent Desktop: https://desktop.wxcc-eu2.cisco.com
ANZ Portal: https://portal.wxcc-anz1.cisco.com/portal
ANZ Agent Desktop: https://desktop.wxcc-anz1.cisco.com
Webex Connect Documentation: https://help.imiconnect.io/
1. User Roles and Permissions
Connect allows its administrators to add local users and set the with different level of permissions. Here below the list of available roles:
- Owner - first configured users (is the account that has been indicated at the time of the provisioning of Webex Connect tenant). The Owner has full permissions in the tenant. Only 1 Owner can exist in a tenant.
- Full Access – this is the most commonly used role for all other administrators that need access to Connect.
- Limited Access
- Read Only
- Restricted
To review in details the permission assigned to each role please refer to the official documentation https://help.imiconnect.io/docs/user-roles-and-hierarchy
The Owner is the only role who can provide the permission to other users to Decrypt Log (which is an essential permission to view logs when troubleshooting).
If an Owner leaves your organization, please reach out to your support contact the Partner Success team (PSM) to request the Owner change.
Connect shall be accessed only by system administrators and not by agents or supervisors.
2. Users organization
Connect allows the Owner to create local users in containers called Groups and Teams. Users created within a Group or a Team will be able to access the configuration created within such container and below, but not to the configuration created at levels above. Users can be create in one of the following containers:
- Tenant level – can contain users and Groups
- Group – can contain users and Teams
- Team – can contain users only
To create new groups or teams go to ‘Settings’ > ‘Groups/Teams’
3. Login to Connect portal
- Access Connect URL (this is specific to the tenant you are using)
- Login the provided credentials
Please contact the Partner Success team (PSM) if there are any challenges identifying the Connect Owner details

4. Add new users with administrator role
- Once logged in to Connect, go to ‘Settings’ > ‘Teammates’
- Add a new user (must be a working emailID) and select ‘Full access’ role and click ‘Invite user’

5. New user activation
- Click ‘Join the team’ link in the welcome email to complete user registration.
- Provide your name and setup the passwords, click ‘Next’.
- Fill out additional details about yourself and click ‘Next’.
- The user will automatically login into the Connect portal.
- The user will have to inform the tenant Owner about the successful creation of the account > the Owner will go to ‘Settings’ > ‘Teammates’ > click ‘Edit’ for the specified user > mark the checkbox for Decrypt Logs > click ‘Save’

Congratulations, you have completed this section!
Lab.12.5 - Digital Channels Pre-configuration
Table of Contents
| Topic | Lab Type | Difficulty Level | Estimated length |
|---|---|---|---|
| Node Authorization for Webex CC Task and Engage nodes | Practical Lab | EASY | 5 min |
| Setup Agents in the Management Portal | Practical Lab | EASY | 5 min |
| Setup RONA timers | Practical Lab | EASY | 5 min |
Introduction
Lab Objective
In this Lab, we will go through the tasks that are required to complete the general pre-configuration of a tenant with Digital Channels. These tasks are to be undertaken by an administrator. By following each of the steps, you would have prepared your tenant to begin configuring different services offered by the platform. The lab contains multiple exercises to make you familiar with Control Hub, Management portal UI and Webex Connect. At the end of the lab, you should be able to log in to an agent interface.
Pre-requisites
- You have received the access credentials with a full admin access
- You have received the access to the agent and supervisor account.
Quick Links
Control Hub: https://admin.webex.com
US Portal: https://portal.wxcc-us1.cisco.com/portal
US Agent Desktop: https://desktop.wxcc-us1.cisco.com
UK Portal: https://portal.wxcc-eu1.cisco.com/portal
UK Agent Desktop: https://desktop.wxcc-eu1.cisco.com
EMEA Portal: https://portal.wxcc-eu2.cisco.com/portal
EMEA Agent Desktop: https://desktop.wxcc-eu2.cisco.com
ANZ Portal: https://portal.wxcc-anz1.cisco.com/portal
ANZ Agent Desktop: https://desktop.wxcc-anz1.cisco.com
Webex Connect Documentation: https://help.imiconnect.io/
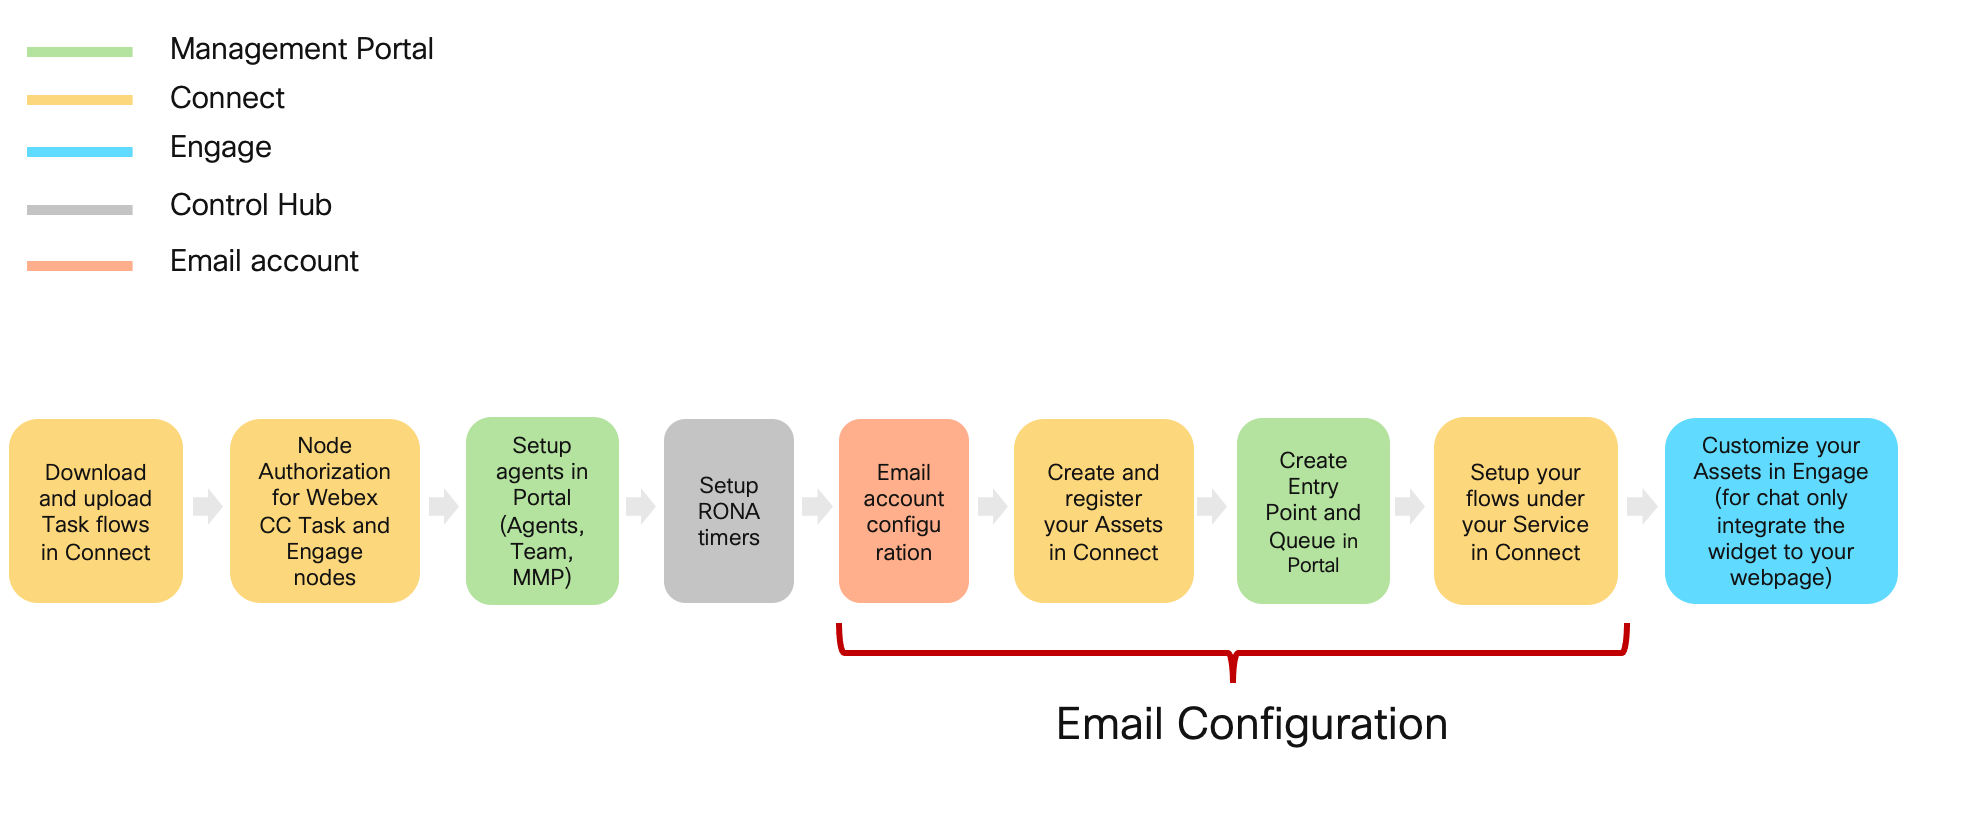
Configuration Order
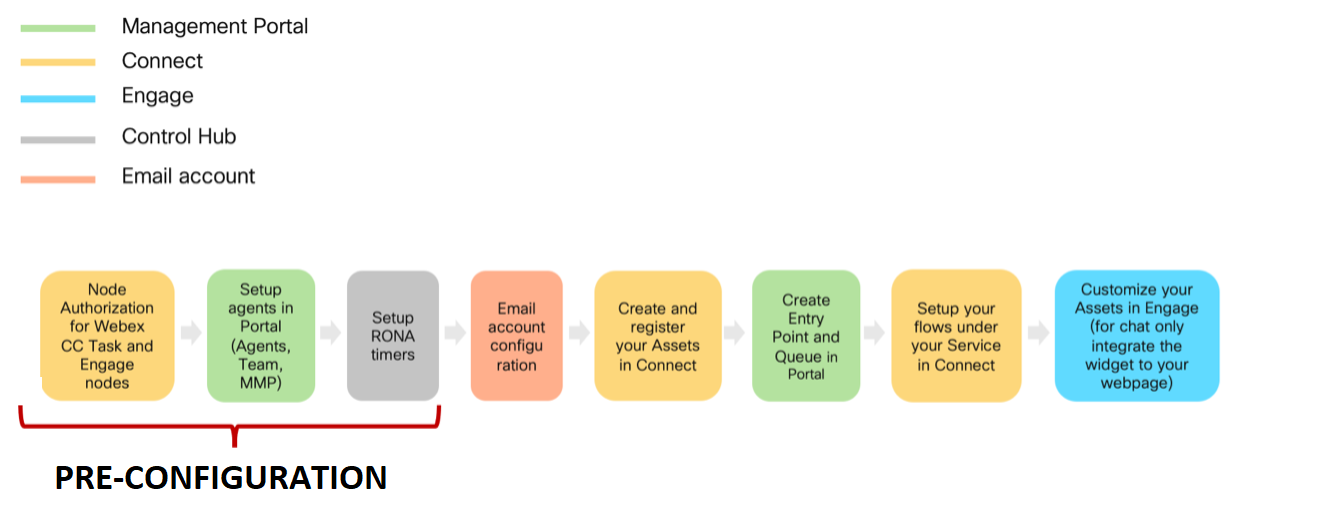
1. Node Authorization for Webex CC Task and Engage nodes
Webex Connect is required to provide a valid access token for using various Webex Contact Center and Webex Engage APIs. The access token is generated using the authorization details configured within the ‘Node Runtime Authorization’ field that Webex Contact Center users are required to provide during flow configuration.
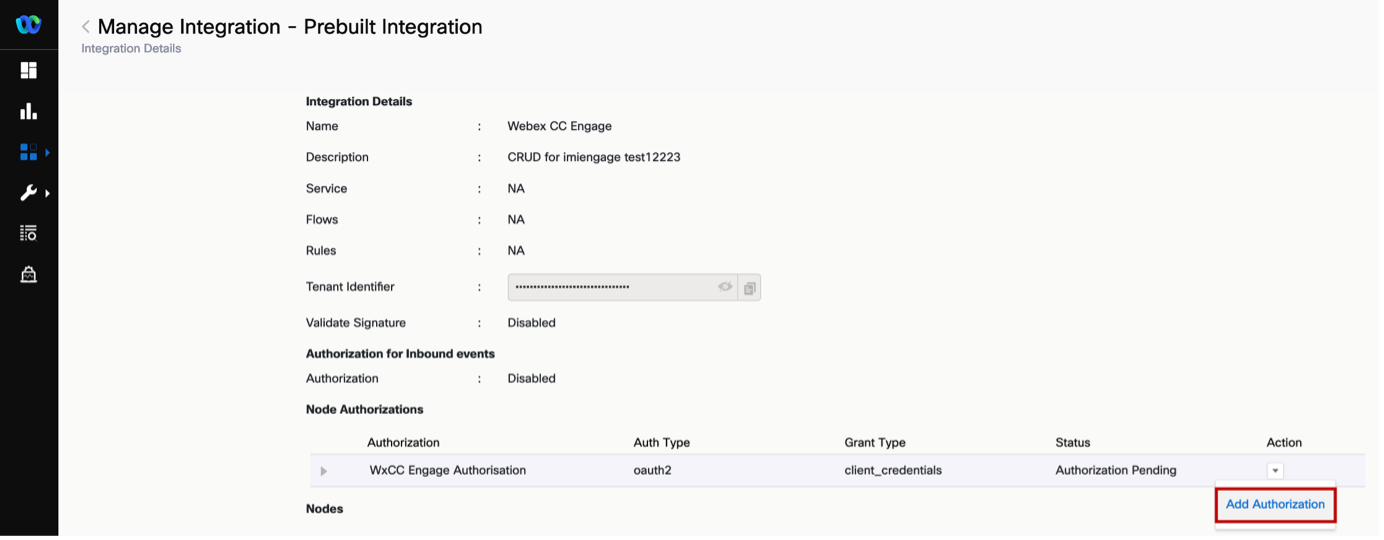
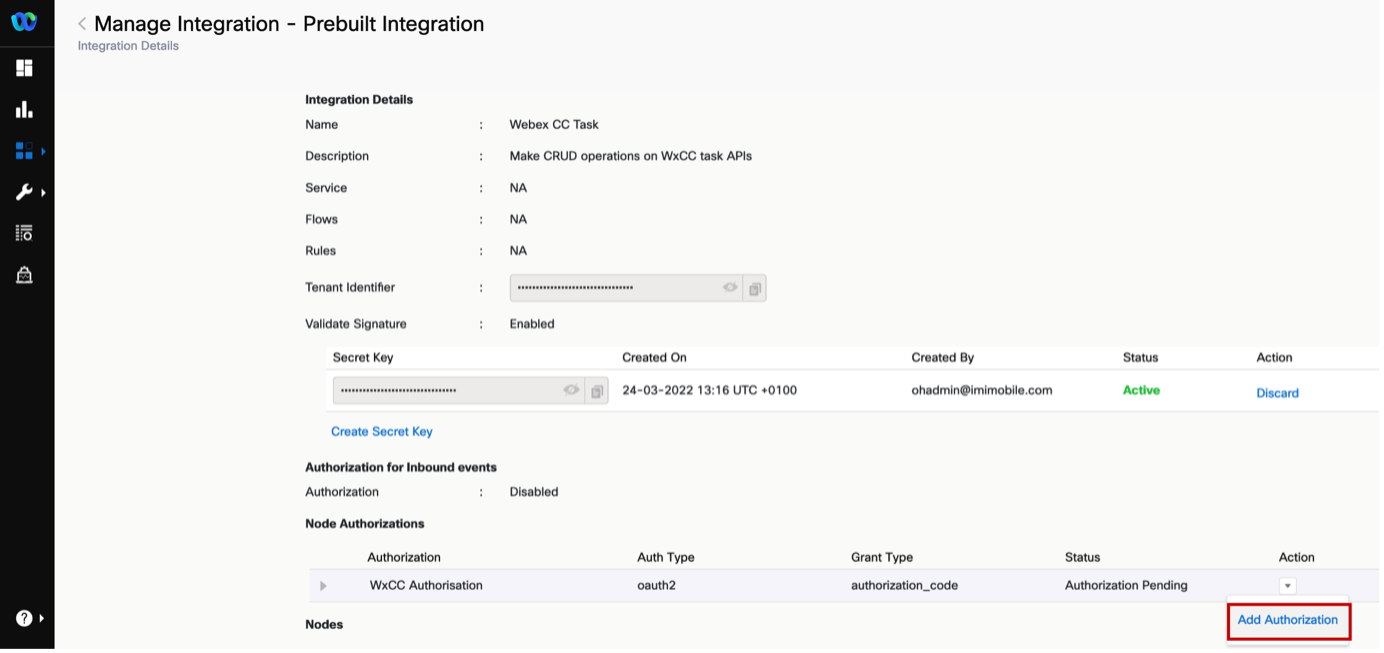
- To authorize a pre-built integration go to Assets -> Integrations. The integrations which are not yet authorized show the status as Authorization Pending.
- In front of Webex CC Engage Click Actions -> Manage.
- On the Manage Integrations page, scroll down to the Node Authorizations section. This section lists all the authorizations mapped to this integration.
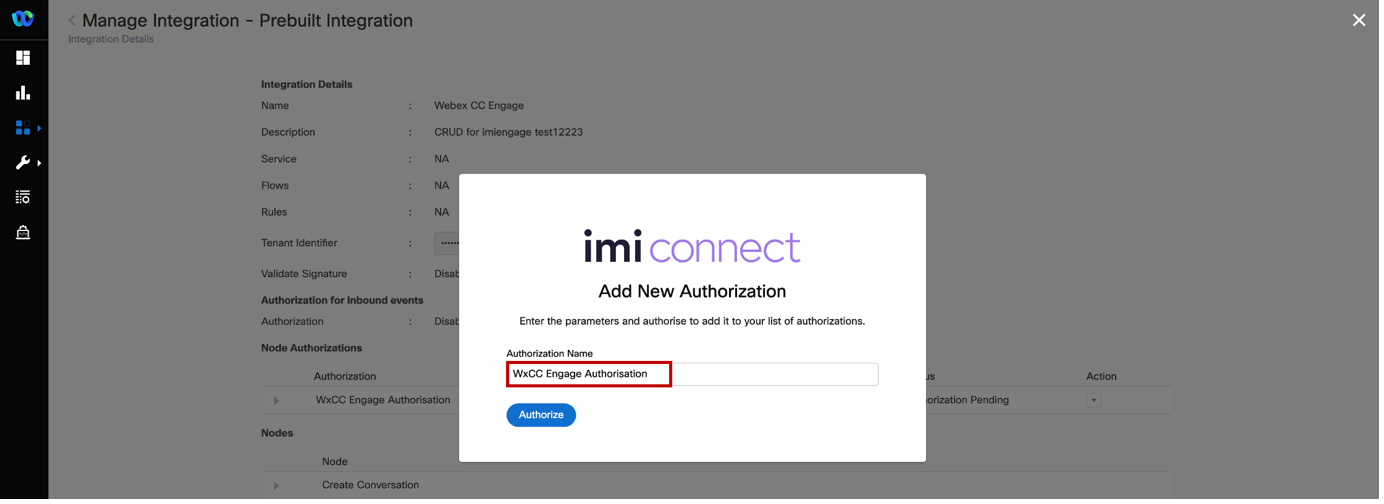
- Click Action → Add Authorization associated with the WxCC Engage Authorisation, where Auth Type is oauth2 and Status is Authorization Pending.
- Enter the Authorization Name and click Authorize. In that example we use WxCC Engage Authorisation.
- Click on the back button for being redirected back to Integrations page and in front of Webex CC Task Click Actions → Manage.
- On the Manage Integrations page, scroll down to the Node Authorizations section. This section lists all the authorizations mapped to this integration. Click Action → Add Authorization associated with the WxCC Authorisation, where Auth Type is oauth2 and Status is Authorization Pending.
- Enter the Authorization Name (for example: WxCC Authorisation) and click Authorize. As the result the pop-up appears where you need to enter your Cisco admin email address and click Sign In.
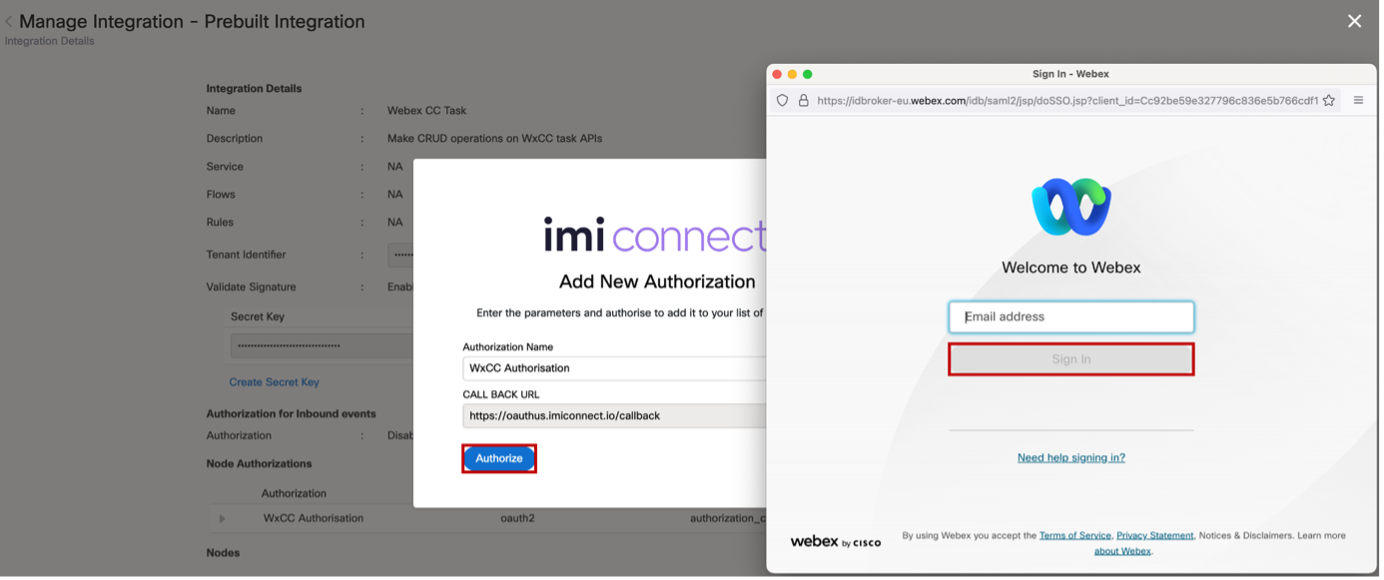
- Click back button for being redirected back to Integrations page. Verify that the status of the authorizations is changed to Authorized.
2. Setup Agents in the Management Portal
This step shows how to access the admin portal and navigate the different configuration menus to create a Site, Team, and Multimedia Profile that will be assigned to the Contact Center user.
Users The users have the following pre-configuration | User Role | User email | | ———- | ——————————– | | Agent | cl1agentXXX@email.carehybrid.com | | Supervisor | cl1supXXX@email.carehybrid.com |
Note: Your XXX was provided to you personally. XXX is the unique number equal to your POD.
User Settings | Entity | Name | | ——————- | —– | | Multimedia Profiles | MMP | | Site | Site | | Team1 | Team1 | | Team2 | Team2 |
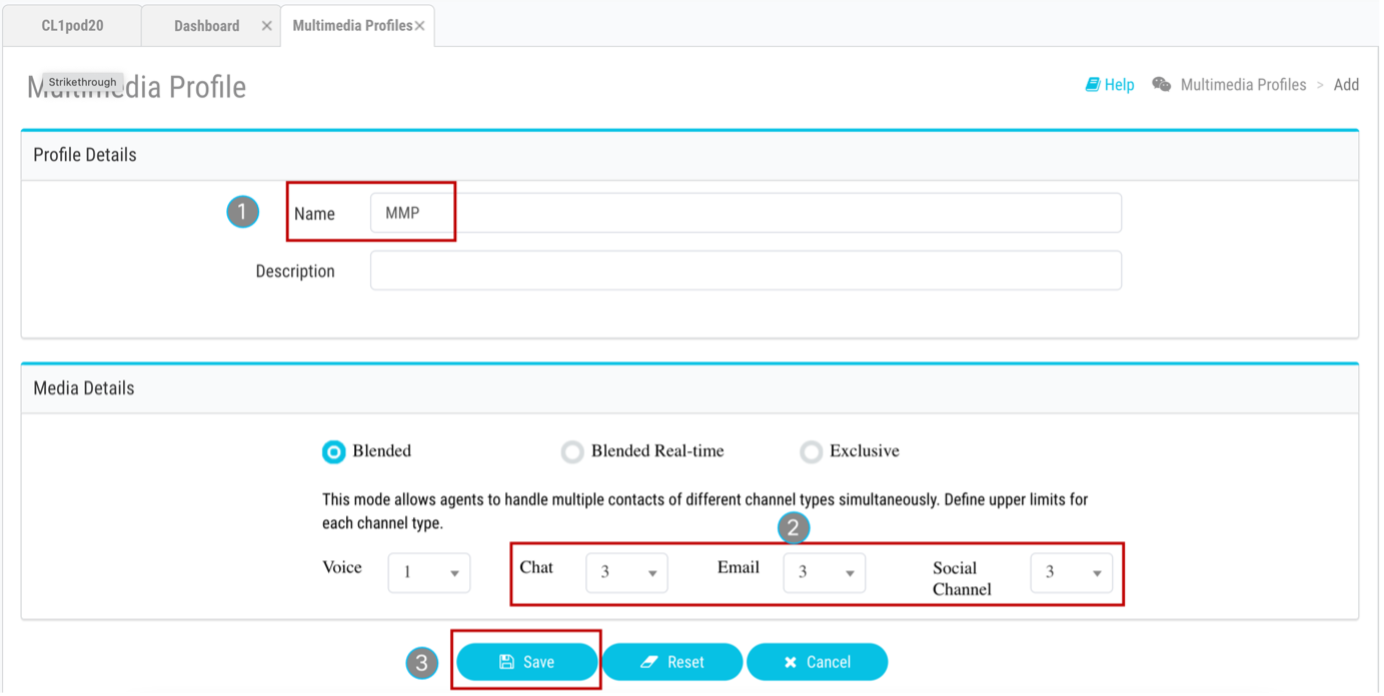
- Create new MultiMedia Profile
- Login to Management Portal (link provided in the Introduction section).
- Enter the Admin email address and click Sign in.
- Click on Provisioning and select Multimedia Profiles.
- Click on + New Multimedia Profile to open Multimedia Profile configuration page.
- Input Name as MMP.
- In the Media Details section, select the blended multimedia profile and input 1 for Voice, 3 for Chat, 3 for Email, , 3 for Social Channel and click on Save button.
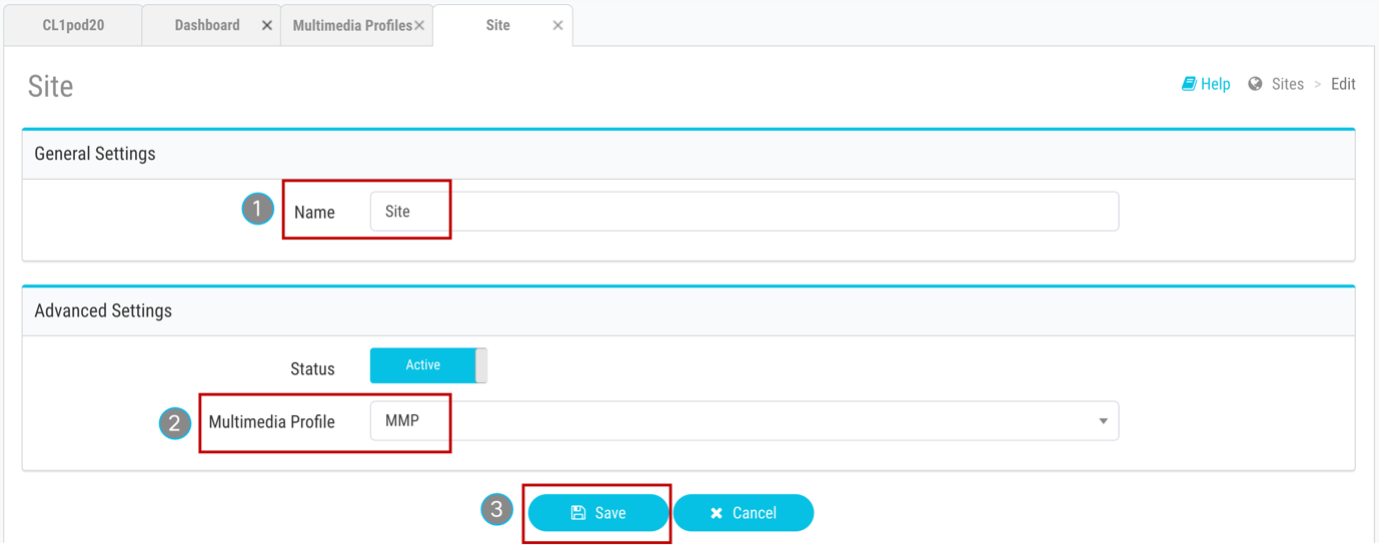
- Create new Site
- Navigate to Provisioning and select Site.
- Click on + New Site button and provide the Name as Site.
- Select MMP in the Multimedia Profile drop down and hit Save.
- Create new Teams
- Navigate to Provisioning and select Team.
- Click on + New Team.
- Select Site from the Site drop-down.
- Input Name as Team1.
- Use the default Type Agent Based.
- Select MMP in the Multimedia Profile drop-down.
- Left as a default value Global Layout in the Desktop Layout drop-down and hit Save.

- Please follow the same steps as above to add an extra Team as Team2.
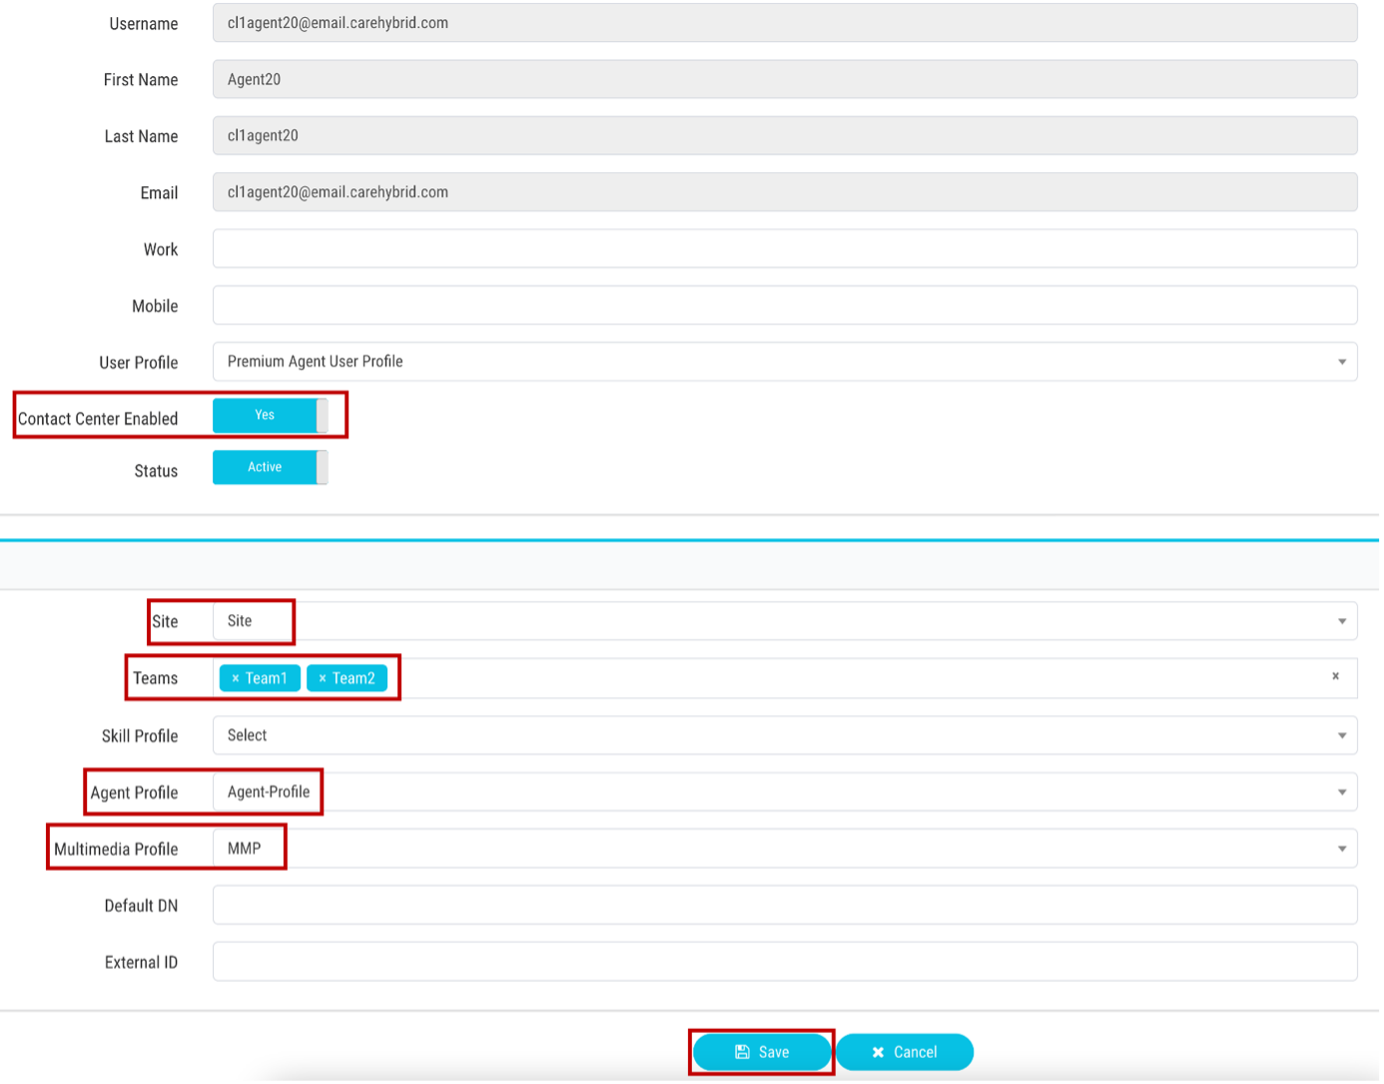
- User Configuration
- Click on Provisioning and select Users.
- Click on … for the Agent user, to launch the Edit view for a particular User configuration.
- Make sure that the User Profile is set as Premium Agent User Profile.
- Click on Contact Center Enabled toggle to move it to On.
- In the Agent Settings section, select Site in the Site drop-down.
- Click the Teams area and select Team1 and Team2.
- Select Agent Profile in the Agent Profile drop-down list.
- Select MMP in the Multimedia Profile drop-down and hit Save.
- Make sure that the user are now shown with the Contact Center Enabled flag as Yes and Status as Active.
- Please follow the same steps for Supervisor user.
3. Setup RONA timers
If an agent doesn’t answer a contact request, the contact request will return to the queue and the agent state will change to Redirection on No Answer (RONA). In this task, you will play with the feature that allows administrators to override the default RONA timeout values at the tenant level for every channel type to suit the business needs of the organization. The available channels are:
- Telephony
- Chat
-
Social (Facebook and WhatsApp)
- Log in to the Control Hub at https://admin.webex.com
- Navigate to Services -> Contact Center -> Settings -> Desktop -> RONA Timeouts.
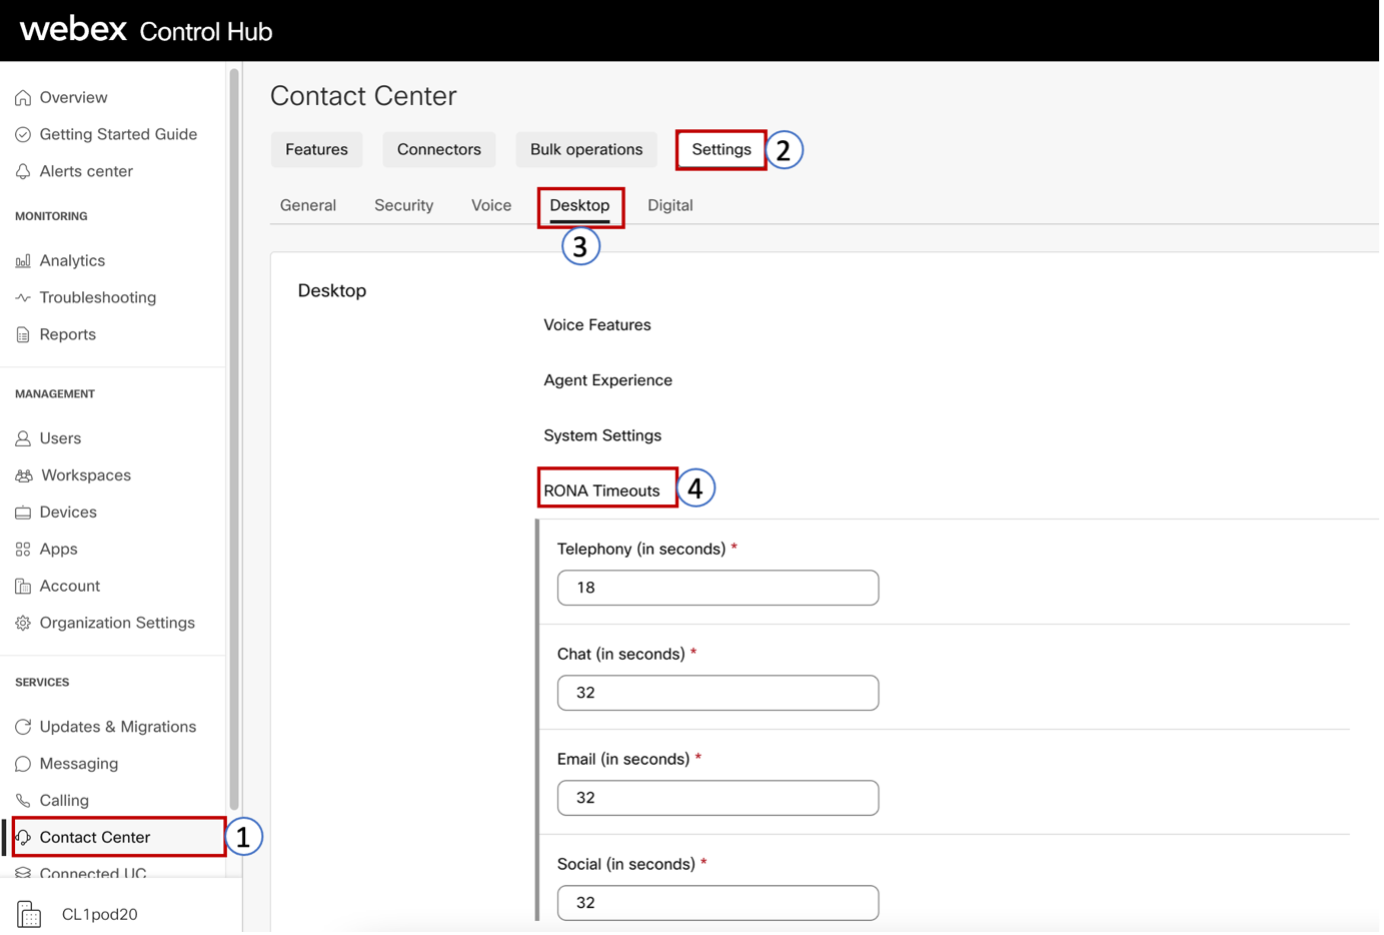
- Modify the existing timers by putting the values from the tables below: | Channel | New Values | Limitations | | ——— | ———- | —————- | | Telephony | 18 | 1 - 120 seconds | | Chat | 60 | 1 - 6000 seconds | | Email | 90 | 1 - 6000 seconds | | Social | 60 | 1 - 6000 seconds |
Verification: Access to the Agent Desktop
Note: To log in to the agent desktop, use either a separate web browser or a new incognito web page. This will prevent any browser caching issues with admin and agent credentials.
- Navigate to the Agent Desktop (link provided in the Introduction section) in a new browser or in incognito mode.
- Enter the agent’s email ID cl1agent<ID>@email.carehybrid.com.
- Enter the Password for the appropriate Username.
- In the Station Login pane, select “Extension” and put any number, for instance 1000. Note: The Webex Calling service is not activated at this tenant we need to set a dummy extension only once during the login.
- Select the Team1 and click Submit. Make sure that you are successfully logged in to the Agent Desktop. Now you can continue with the Next Lab.
—
Congratulations, you have completed this section!
Lab.12.6 - Flow Builder
Table of Contents
| Topic | Lab Type | Difficulty Level | Estimated length |
|---|---|---|---|
| Understanding Connect Flows | Read & Understand | EASY | 20 min |
Introduction
Lab Objective
This lab is designed to introduce the logic and methodology behind building flows that will handle incoming conversation via digital channels. Throughout this lab you will learn how to navigate the flow designer, understand how to read and configure nodes and how flows are being executed. In this lab you will not find configuration steps, the goal is to understand how to approach the build of a new flow.
Pre-requisites
- Connect URL for browser access.
- Admin credentials to login to Connect administration portal.
1. Understanding Connect Flows
1. Flows summary
Here below a brief list of key aspects of any flow in Webex Connect: - Flows can be freely build by the admin following customers’ requirement - Flows can be located in any Service, the Admin is free to organize Flows and Services following the desired order and naming convention. - Flows can be triggered by Assets, Events or Webhooks. - Flows are built using and connecting functional nodes to execute the desired behaviour - Every time a customer sends a new message, the associated Asset and then Flow are triggered from their starting node. - Connect flows introduce the concept of Conversation: whenever a user has to send multiple messages via a single channel, which have to be considered as part of the same thread, the system shall create a Conversation ID, so to map and present all the messages together (from the user and from the agent). - Flows do not automatically associate incoming messages from the same users/customers as part of the same thread, a dedicate node is required to check - As reference, sample flows for each digital channel can be imported from the GitHub page (links in channels specific labs).
2. Create new flows
You can create a new flow from scratch to explore the flow designer interface and its nodes. To create a new flow:
- Access your Connect tenant
- Navigate to Service > select or create your service > select the Flows tab > click on any of the two ‘Create Flow’ buttons
- Enter the a name inside the ‘Flow Name’ > under Type select ‘Work Flow’ > under Method select ‘New Flow’ > Select the ‘Start From Scratch’ icon > click on Create
- From the ‘Select Trigger Category’ select any of the channels (i.e. Email)
- You will be redirected to the flow canvas, already inside the first node in the flow > click on Cancel
3. Flow designer and node navigation
The flow designer is divided in three main section:
- Toolbar on top – containing the flow name and status, the settings, save and ‘make live’ buttons.
- Canvas in the middle – where the administrator can arrange the node to execute the desired workflow.
- Node menu on the left – containing all the nodes the admin can use (by dragging them inside the Canvas
Nodes are categorized between Utilities, Channels and Integrations depending on their use but they all follow the same structure. To check a node simply drag and drop it into the canvas and double click on it. Inside each node you will find the:
- Node Name – Can be edited by clicking on the pencil icon.
- Configuration tab – Every node needs to be properly configured to be executed. Each node has its own set of required Variables to be set. The details about how to configure each parameter can be found in the nodes’ specific documentation inside the Connect Help page.
- Transition Actions tab – use to configure additional activities before or after the node is executed (i.e. set desired values to additional variables).
- Node ID – Indicates the unique number identifier for this node.
- Input Variables section – Click on it to expand the section. You will see a list of all the Output and Custom Variables (grouped by node of origin) from the previously connected nodes.
- Output Variables section – Click on it to expand the section. You will see a list of variables (and their names) the node generates when successfully executed.
- Node Outcomes section – Click on it to expand the section. You will see a list of which and how many outcomes (exit connections) the node has. When closing the node configuration you will notice coloured dots on the right side of the node indicating the Outcomes. Drag those dots onto other nodes to connect them together, or into an empty point of the canvas if no further actions are needed.
When using nodes’ Output Variables inside the configuration of other nodes, administrator will have to use the following syntax: $(nX.outputvariablename), where X is the node ID that has generated that variable.
4. Building a new flow
As for any contact center flow, before proceeding building a new flow it’s always recommended to collect all the requirements as well as a draft of the intended workflow.
In addition to this, for the digital channels it’s crucial to distinguish the type of use for the flow: as mentioned in the chapter 1, Connect flows are executed from their starting node any time they are triggered
excepts when using a Receive Node inside the flow itself, beyond the scope of this lab.
For this reason the administrator should initially clarify if the flow shall be always triggered by distinct and unrelated sources or if multiple messages could come from the same source as part of a unique conversation. For most of the cases, when customers need to interact with your services, especially when expecting to connect with an agent, all their messages must be grouped into a uniquely identifiable thread. In Connect this is called Conversation ID.
For all the flows where you expect to have an ongoing conversation, your flow shall be built with an initial check, ideally after the starting node, where you will need to check if the incoming message is part, or not of an existing conversation, so to appropriately manage and route it accordingly. Here below a recommended flow structure:
- Accept incoming message via dedicated channel node.
- Use the Resolve Conversation node to verify if the incoming message shall trigger the creation of a new Conversation ID (“created” outcome) or if such message shall be appended to an existing Conversation ID (“appended” outcome). The Resolve Conversation node also offer two additional outcomes, which allow the administrators to further customize their flows: “accepted” is triggered when the node receive the message (it might allow admins to add a confirmation response the system has successfully received the query), “reopened” is triggered when the same customer was already in a conversation with the system in the past, but that conversation was terminated by one of the 2 sides (or timed out).
- Use the Queue Task node to queue the incoming message to the desired queue/team after the “created” and “reopened” outcomes only.
- Connect the Close Task node for any failure outcomes for any nodes connected after the Append Conversation node. This will ensure the Conversation ID you created is properly terminated even if your flow experience some issues.
When building a flow it is also recommend to appropriately handle the potential failure of each node by including messages back to the customer informing them about an ongoing issue.
5. Activating a flow
When a flow is being edited, its status appear as ‘Working Draft’ on the top-left of the browser window. Once the editing has been completed and you wish to start using the flow, you can click the Save button to save the latest changes. If there’s any missing or incorrect connection between nodes, a prompt will appear on the right side, listing all the occurring issue (misconfiguration inside each node won’t be detected here).
Once all the issues have been addressed, the Admin shall click on the ‘Make Live’ button to activate a flow in Working Draft status. A new pop-up will appear: select or modify the Application that will be triggering this flow, optionally add comments, and click ‘Make Live’.
Once a flow is set to go live, it will take approx. 2 minute before showing the correct ‘LIVE’ status on the top-left. In the meantime, it will show the ‘Publishing’ status, meaning that any messages received in the meantime will either be handled through the previous flow version or be rejected if no previous version is available.
Congratulations, you have completed this section!
Lab.12.7 - Email Channel Configuration
Table of Contents
| Topic | Lab Type | Difficulty Level | Estimated length |
|---|---|---|---|
| Gmail account configuration | Practical Lab | EASY | 5 min |
| Create Email Asset and Register to WebeXCC | Practical Lab | EASY | 5 min |
| Email Entry Point and Queue creation | Practical Lab | EASY | 5 min |
| Create/Upload Email flow | Practical Lab | EASY | 5 min |
| Verification: Send an Email and accept the task | Practical Lab | EASY | 5 min |
Introduction
Lab Objective
In this Lab, we will go through the tasks that are required to complete the basic email configuration. You will be able to initiate an email to the Contact Center and be able to accept/respond to the email by logging in as an agent.
In this lab you will be configuring Gmail Account settings, Email Assets, Entry Point and corresponding workflows. All those steps are required for connecting the Email account with our application.
Pre-requisite
- You received an admin credentials to configure in Management Portal and Webex Connect.
- You received Email account credentials.
- You have successfully completed the previous Lab12.5 Pre-configuration.
Quick Links
Control Hub: https://admin.webex.com
US Portal: https://portal.wxcc-us1.cisco.com/portal
US Agent Desktop: https://desktop.wxcc-us1.cisco.com
UK Portal: https://portal.wxcc-eu1.cisco.com/portal
UK Agent Desktop: https://desktop.wxcc-eu1.cisco.com
EMEA Portal: https://portal.wxcc-eu2.cisco.com/portal
EMEA Agent Desktop: https://desktop.wxcc-eu2.cisco.com
ANZ Portal: https://portal.wxcc-anz1.cisco.com/portal
ANZ Agent Desktop: https://desktop.wxcc-anz1.cisco.com
Webex Connect Documentation: https://help.imiconnect.io/
Configuration Order
1. Gmail account configuration
Starting from May 30 the Less Secure Apps feature was disabled on all Google accounts. As long as this setting was enabled, it was possible to send emails via Gmail SMTP. In this lab, we will be using new OAuth 2.0 authentication for outbound email functionality.
Note: For this lab, we have created a Gmail account. Optionally, use your own account for polling and handling the emails. It can be a Gmail account or Office 365 account or any account which has email forwarding. The instructions below are applicable only for the Gmail accounts.
1. Gmail forwarding activation (for incoming emails)
| User email |
|---|
| cl1webex<ID>@gmail.com |
Note: Your <ID> was provided to you personally. <ID> is the unique number equal to your POD.
- Login to the Gmail account with the credentials above https://mail.google.com. The password is the same as for Webex admin account. During first login select Turn off smart features.
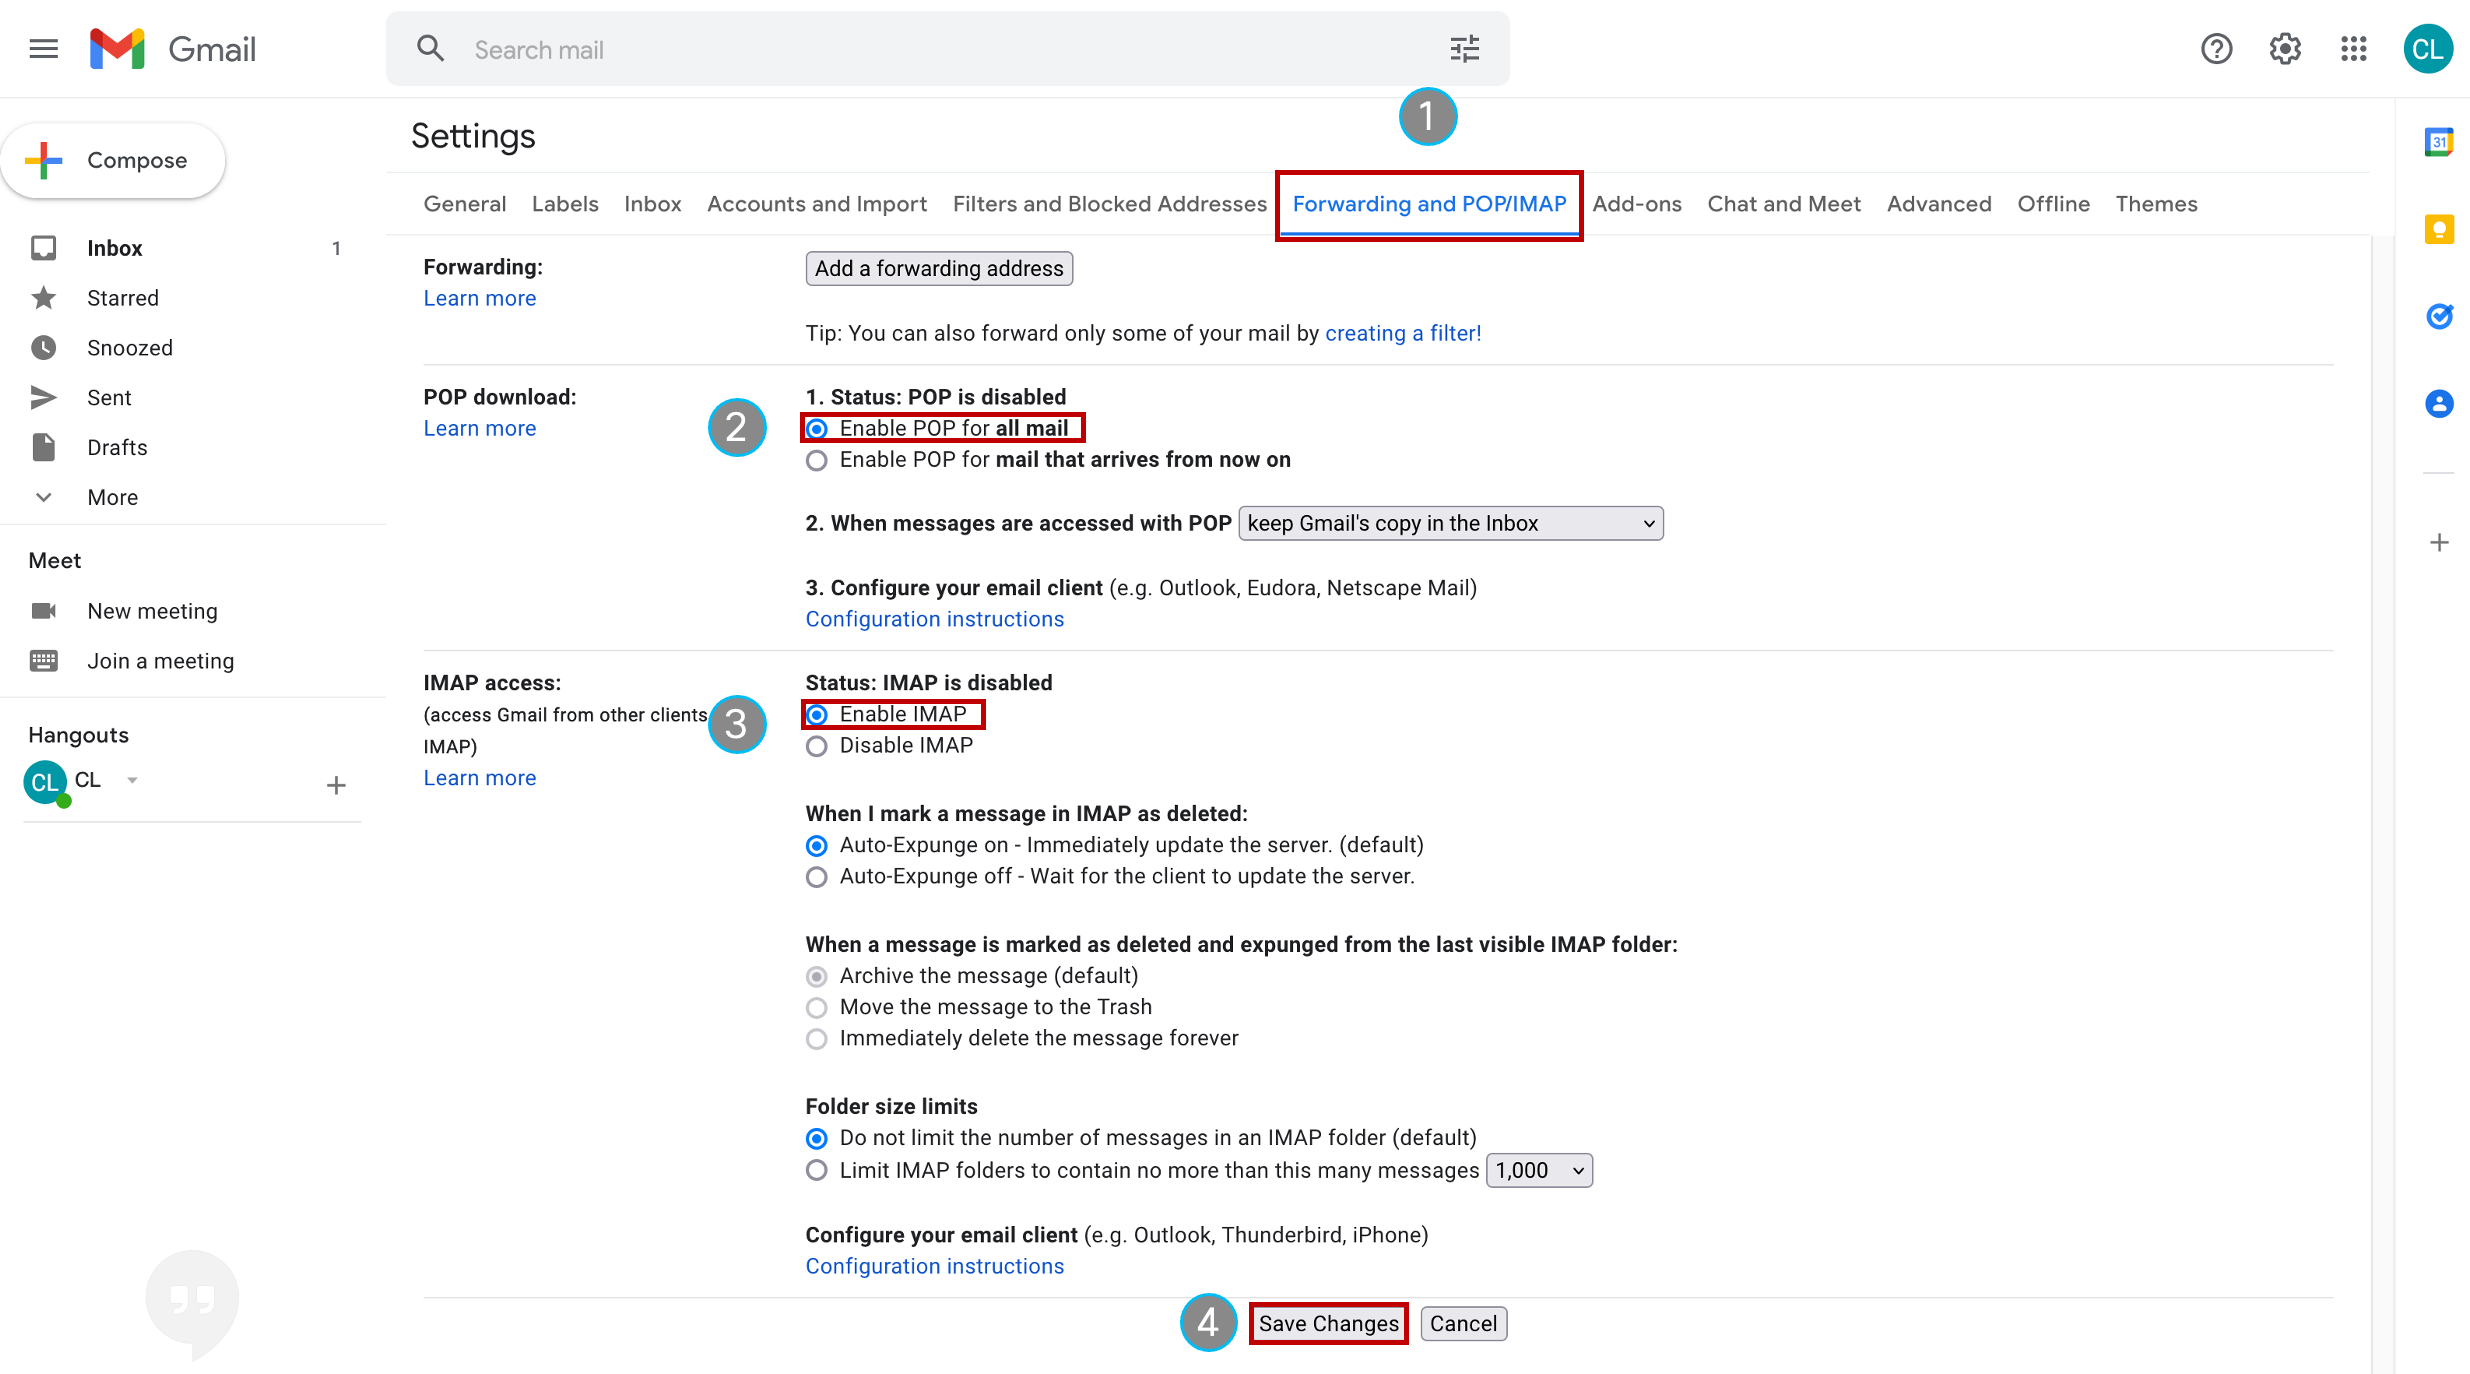
- Enable POP3/IMAP setting by clicking on settings icon on top right corner and selecting See all settings.

- Now Click on Forwarding and POP/IMAP, enable the
POP DownloadandIMAP accessthen click Save Changes.
2. Create a project at Google API Console
We need to activate API if we want to use Gmail account for outbound emails.
- Login to Google Developers Console with the credentials above. The password is the same as for Webex Contact Center admin account.
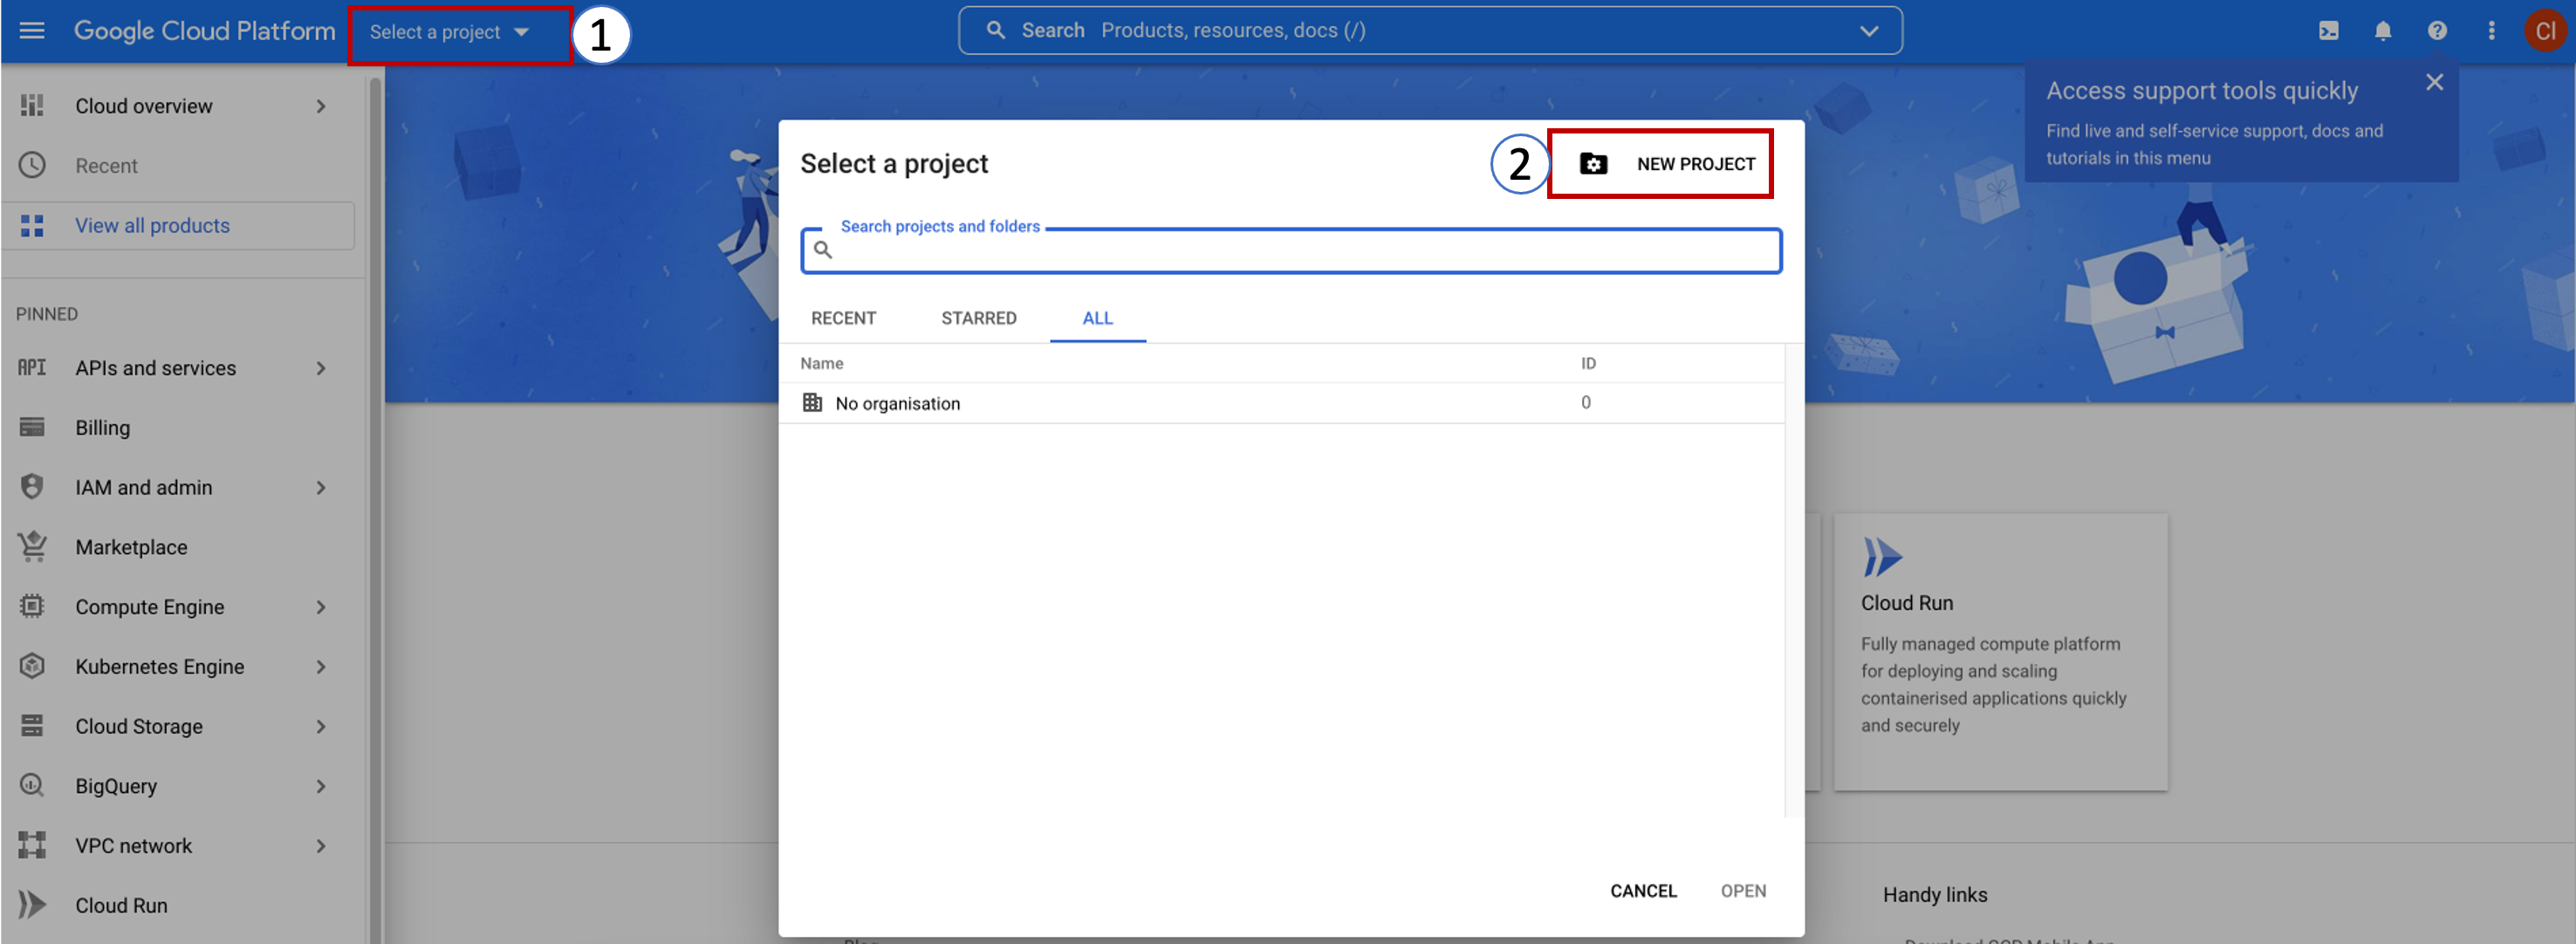
- You will have to agree with the Terms of Service and pick their Country of residence. Then click Select a project and create a NEW PROJECT.
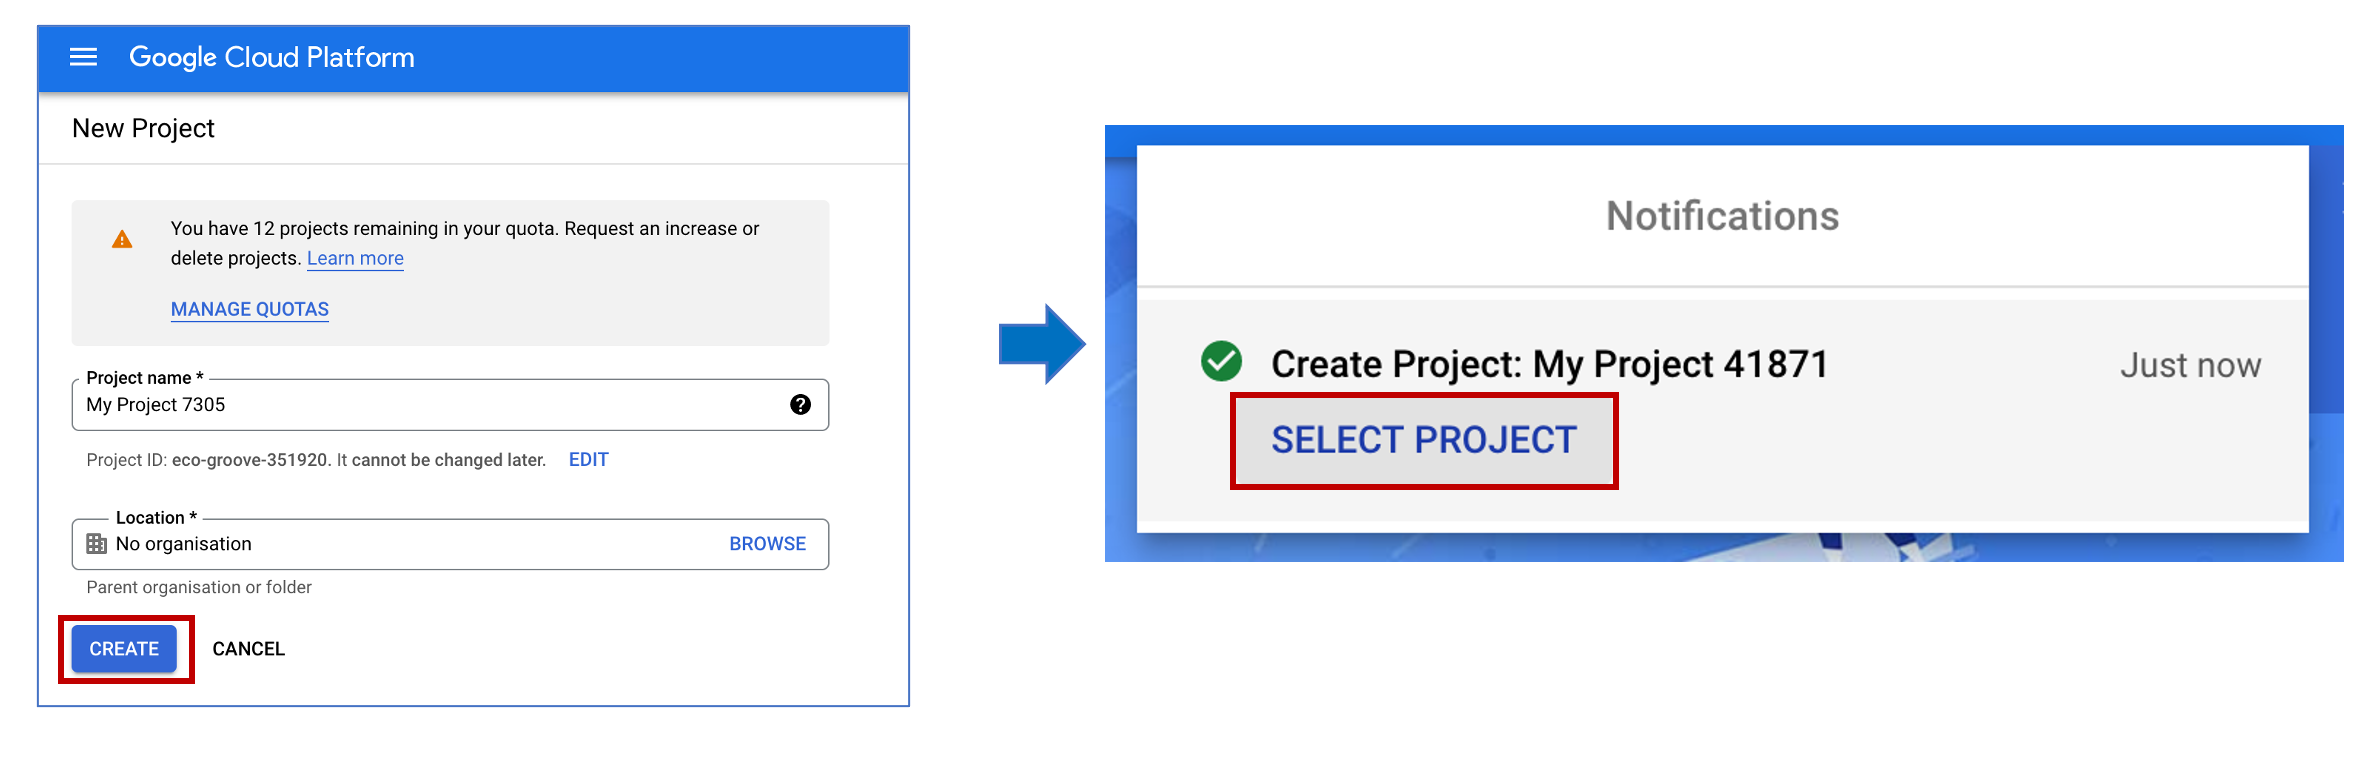
- Keep the default project’s name and press Create at the bottom. Make sure that now you have selected this project.
3. Enable Gmail API (for outgoing emails)
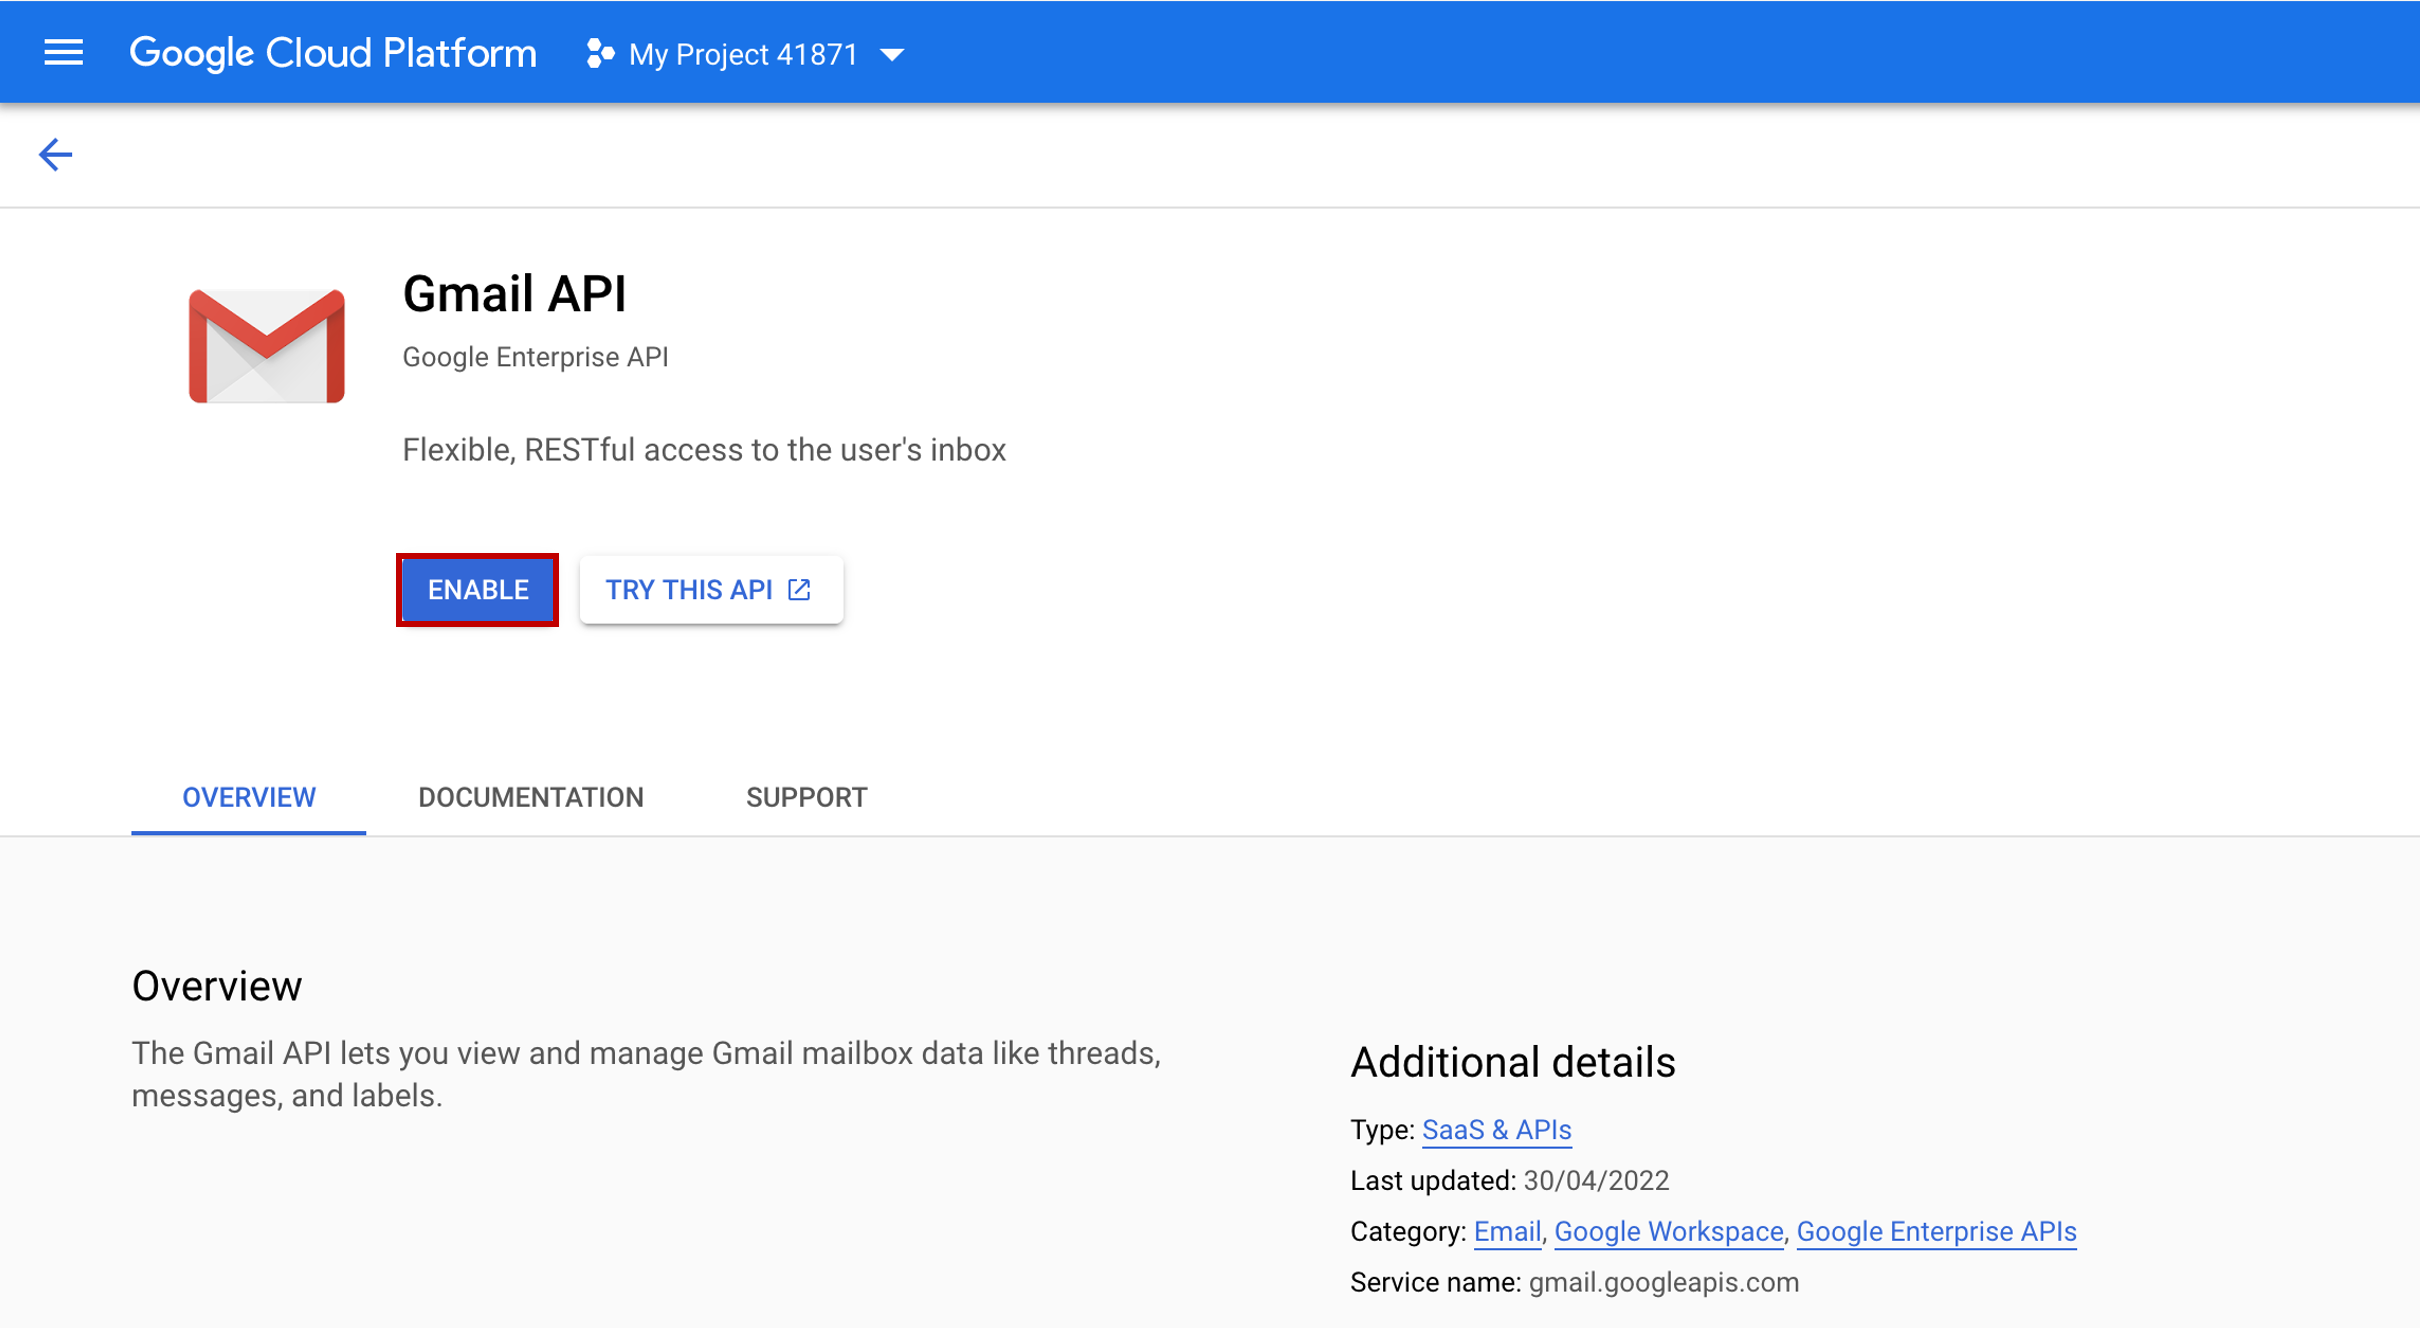
- Enter
Gmail APIin the search bar and click on it once found.
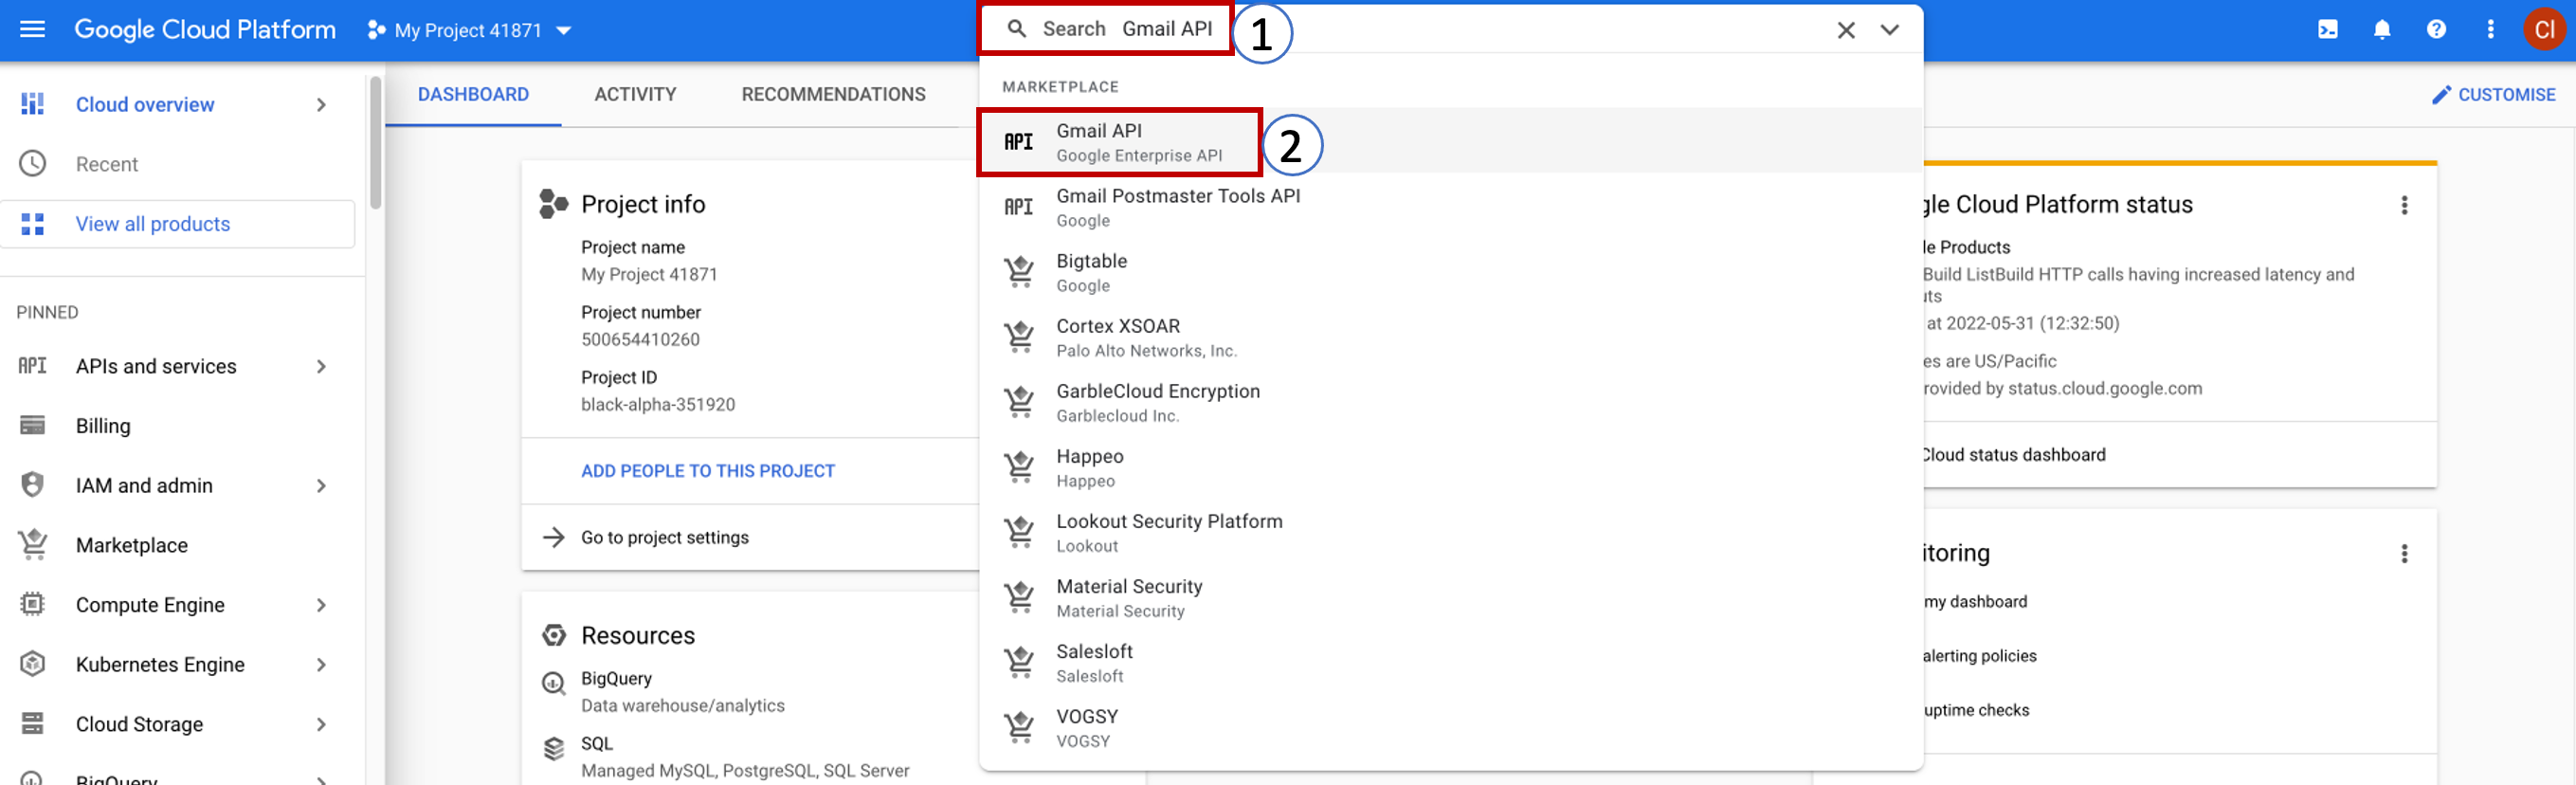
- You need to enable the API for your project by clicking on ENABLE button.
4. Configure OAuth Consent Screen and Scopes
- Once the API is enabled, you’ll be taken to a nice dashboard that says,
"To use this API, you may need credentials".
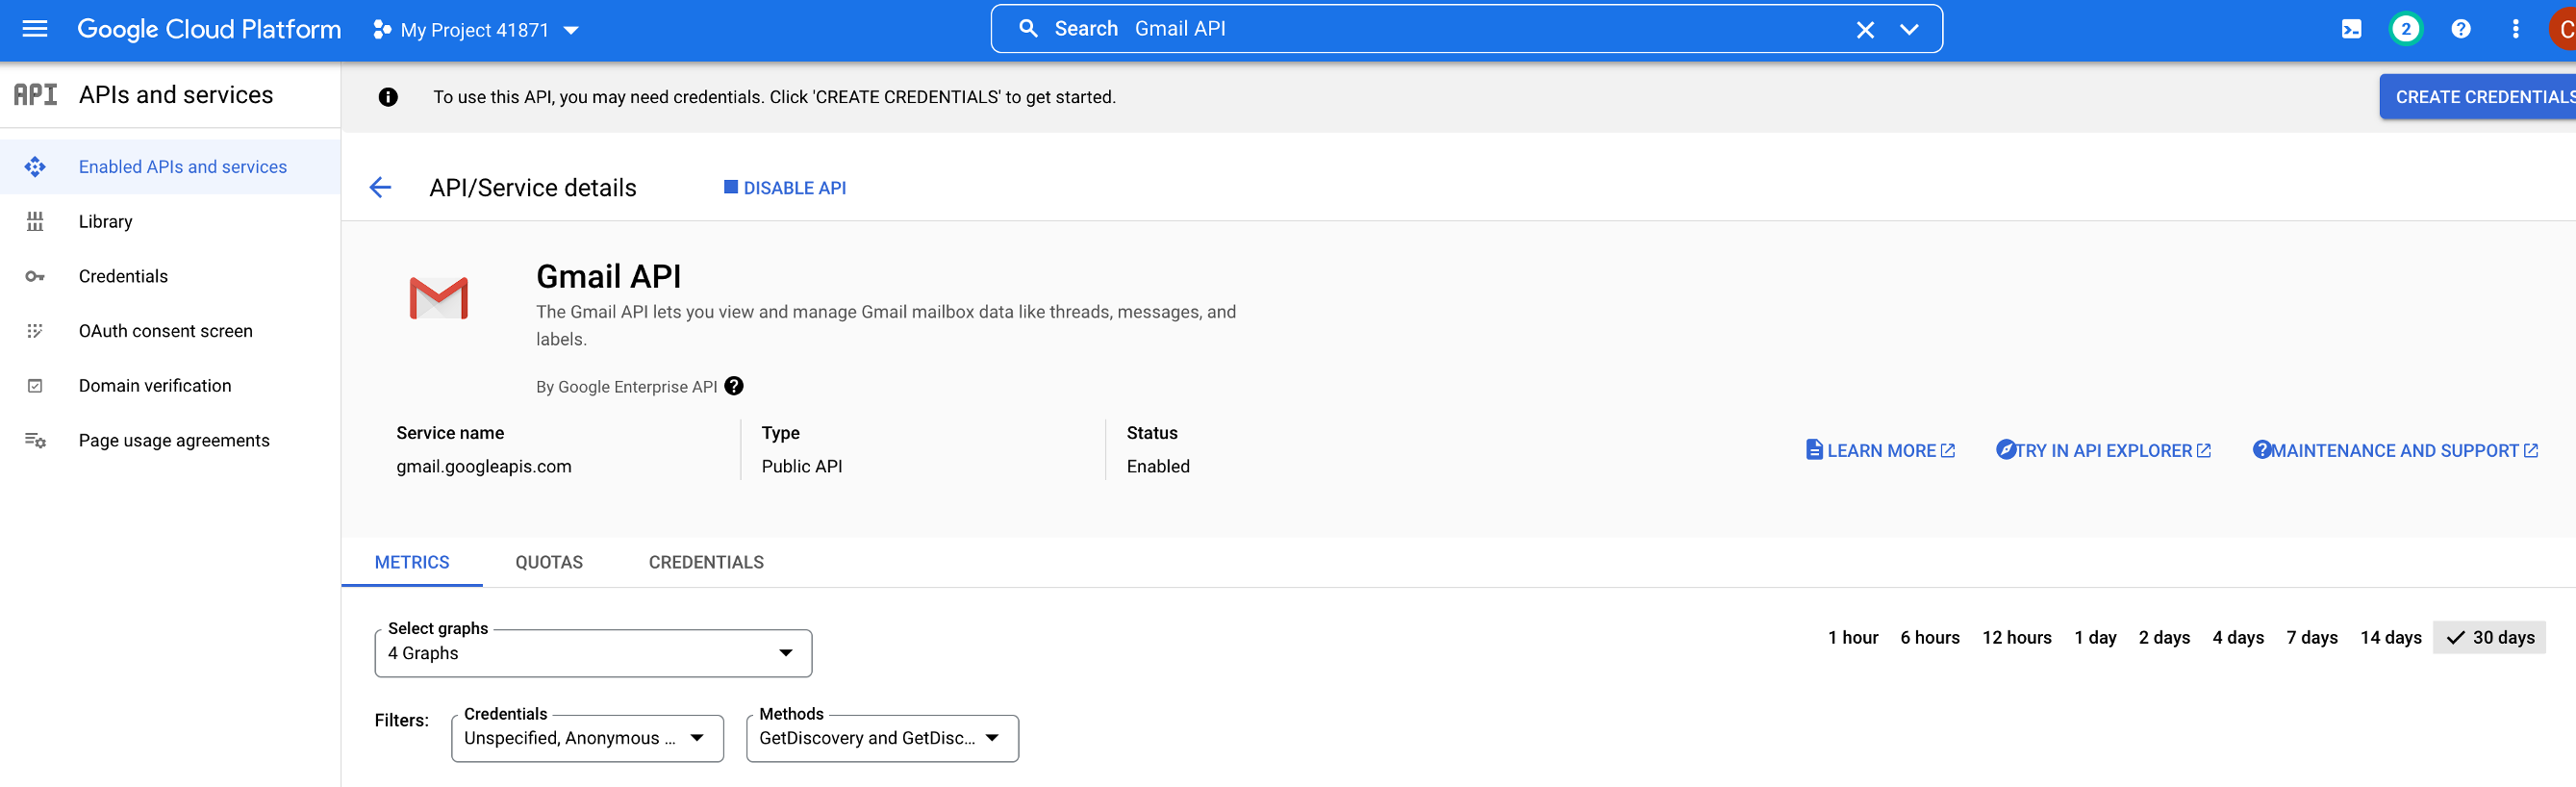
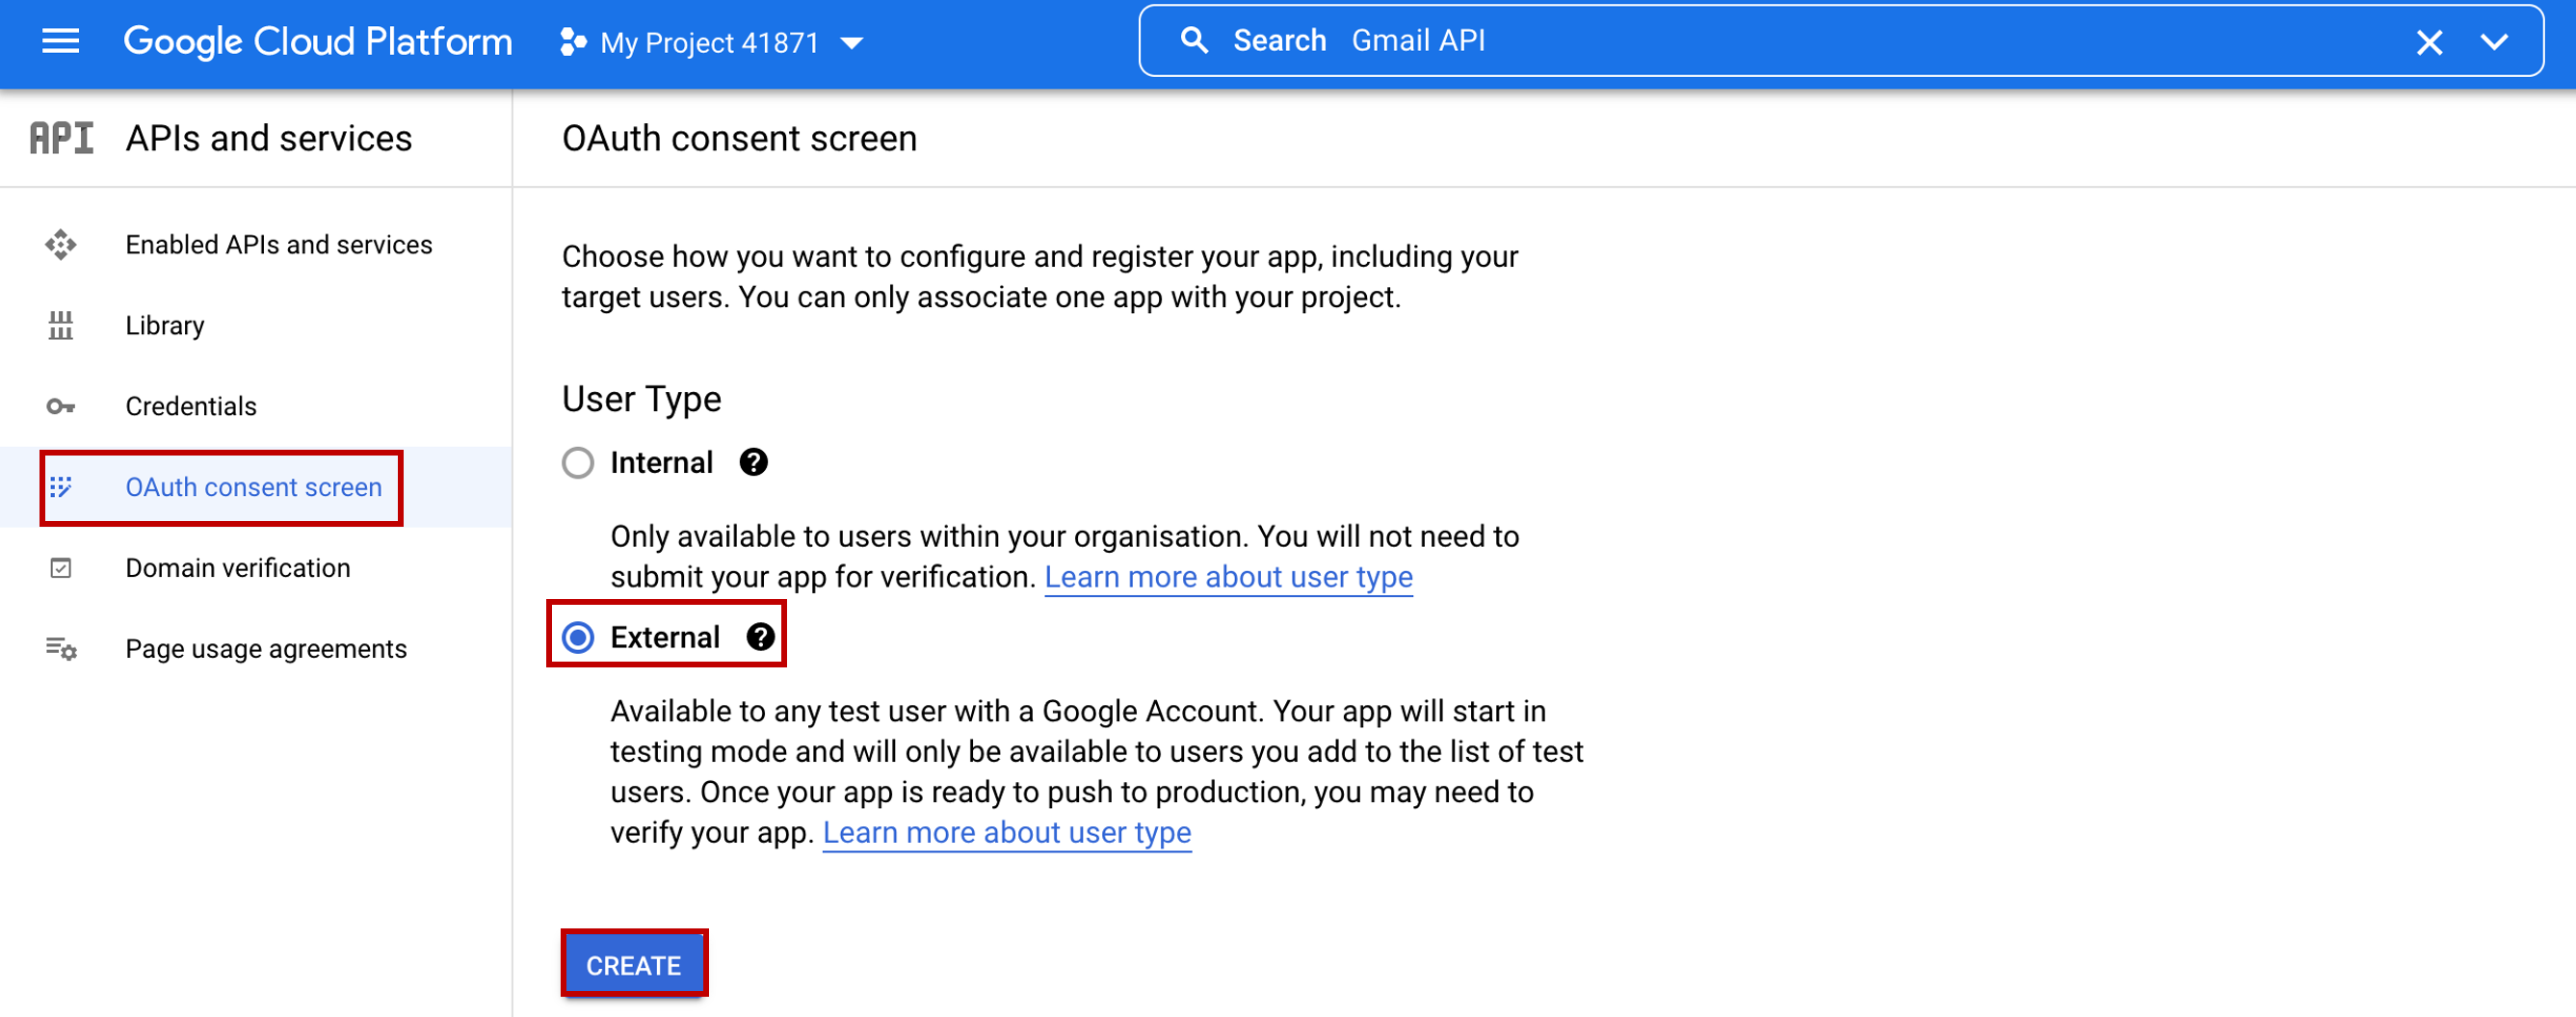
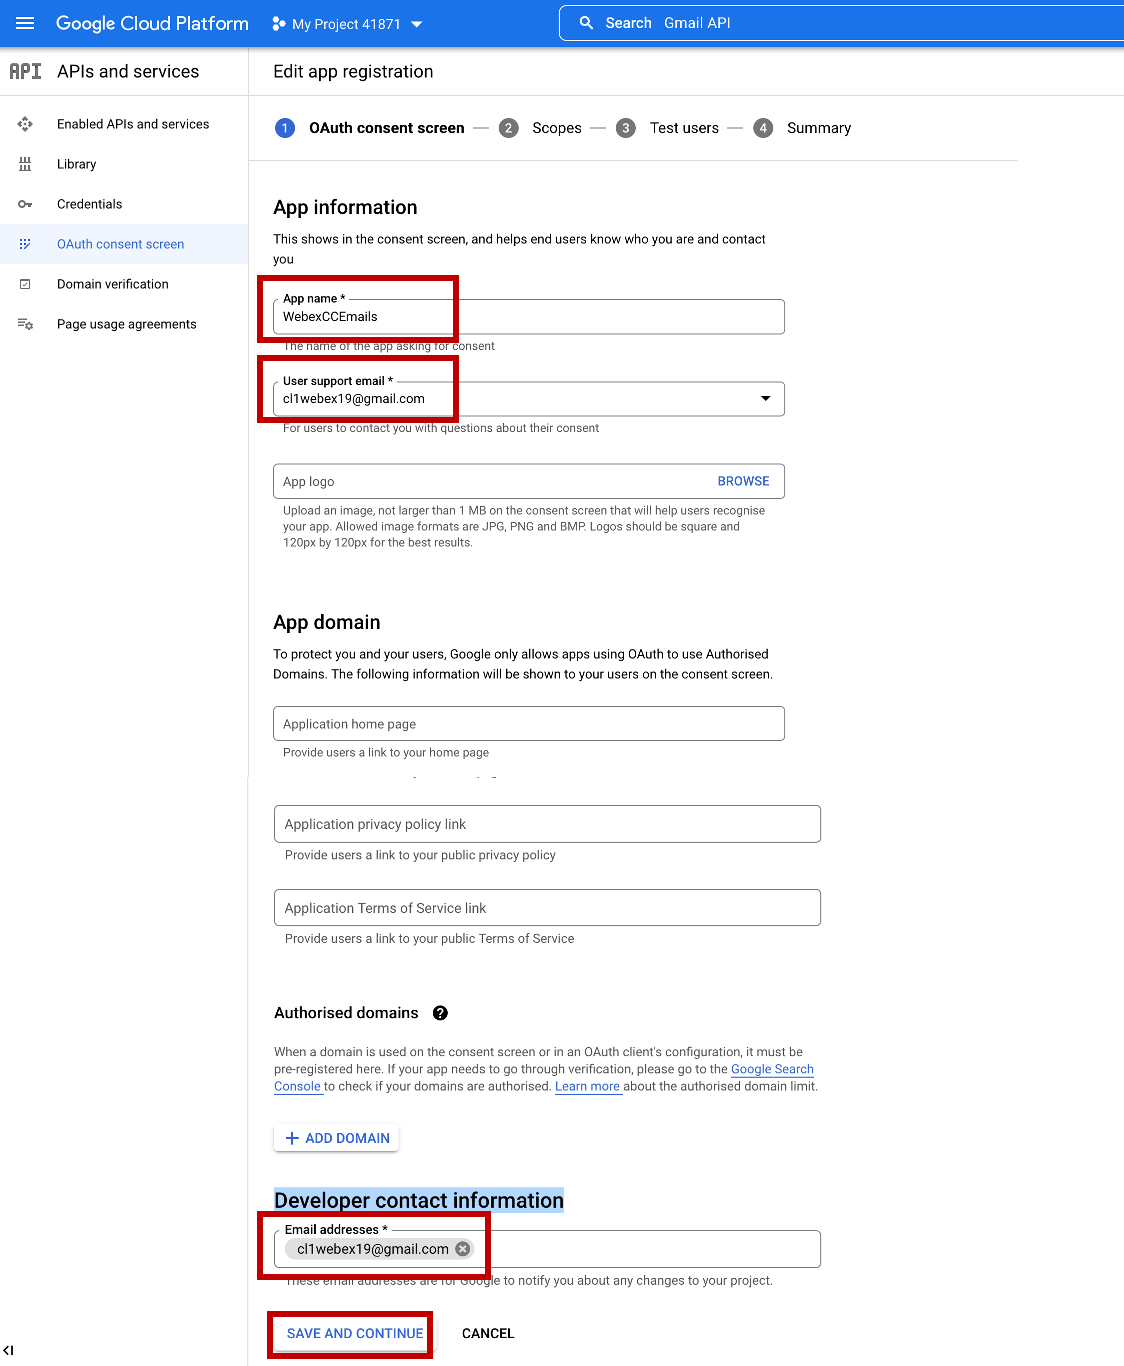
- To create an OAuth client ID, you must first configure your consent screen. Under the APIs and Services section, click on OAuth Consent Screen, set the user type as
Externaland click CREATE button.
- It will bring you to a page with many fields. Just enter the App name as
WebexCCEmails, choose your User support email and enter the same email in the Developer contact information. In the end press SAVE AND CONTINUE.
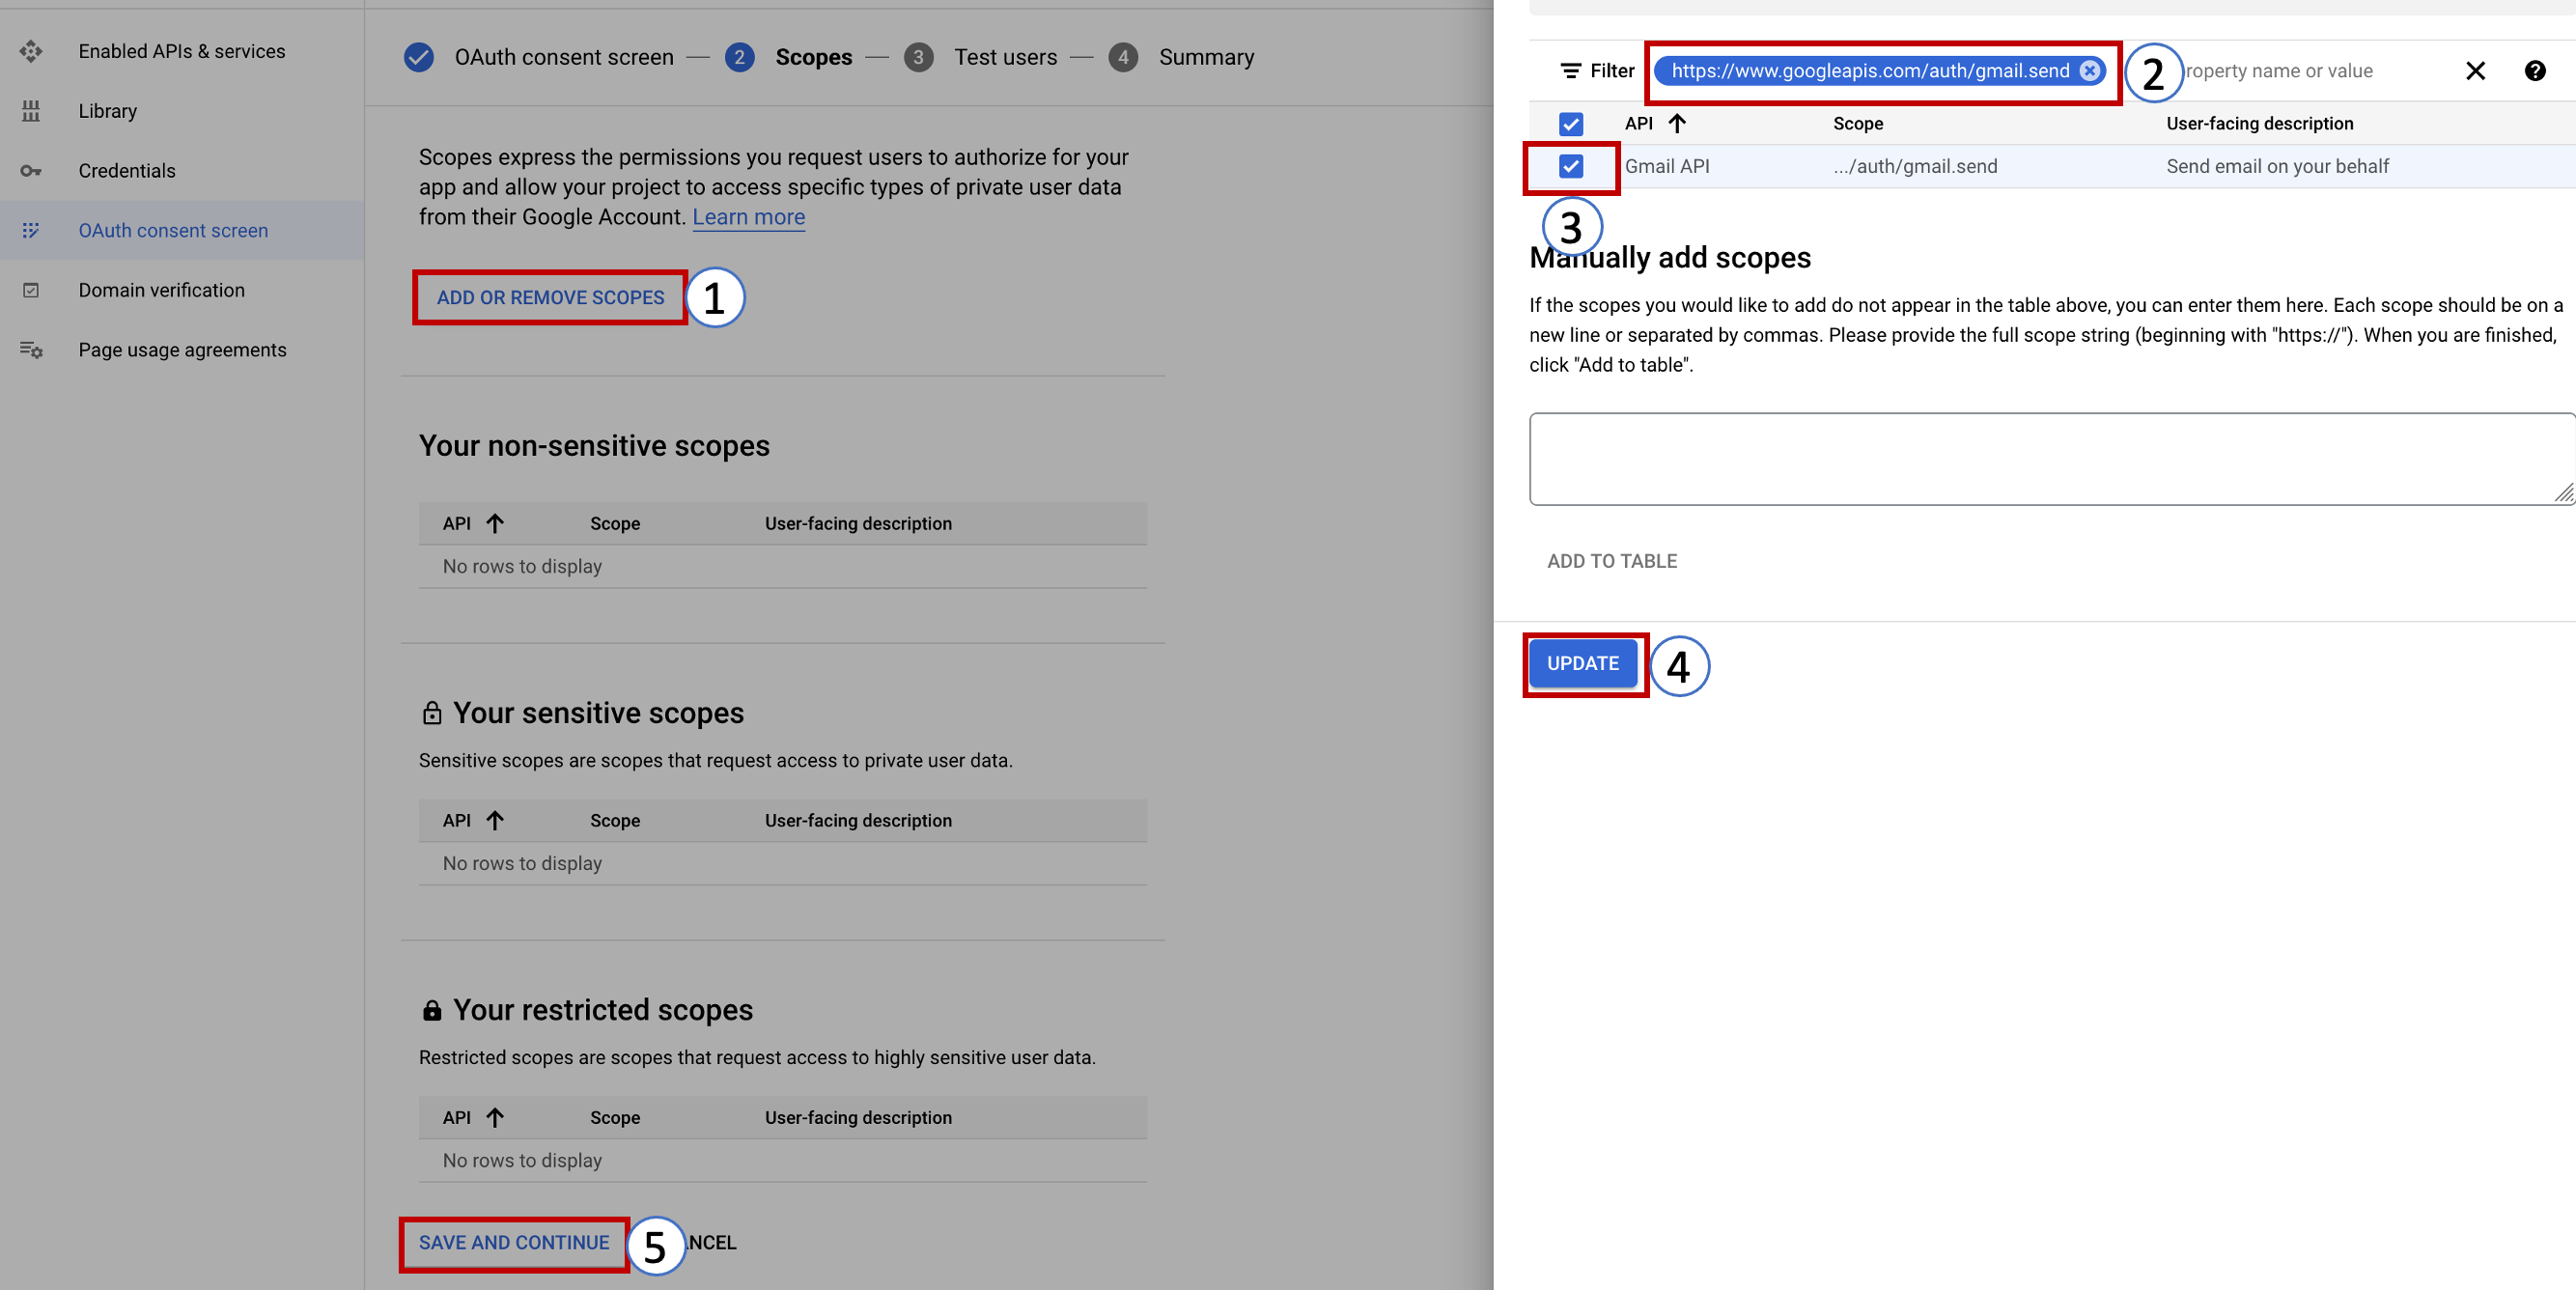
- On the next screen, you need to provide Auth 2.0 Scopes for Google APIs. Click the Add Or Remove Scopes button and add https://www.googleapis.com/auth/gmail.send to the list of scopes since we only want to send emails from Gmail and not read any user data. Click SAVE AND CONTINUE.
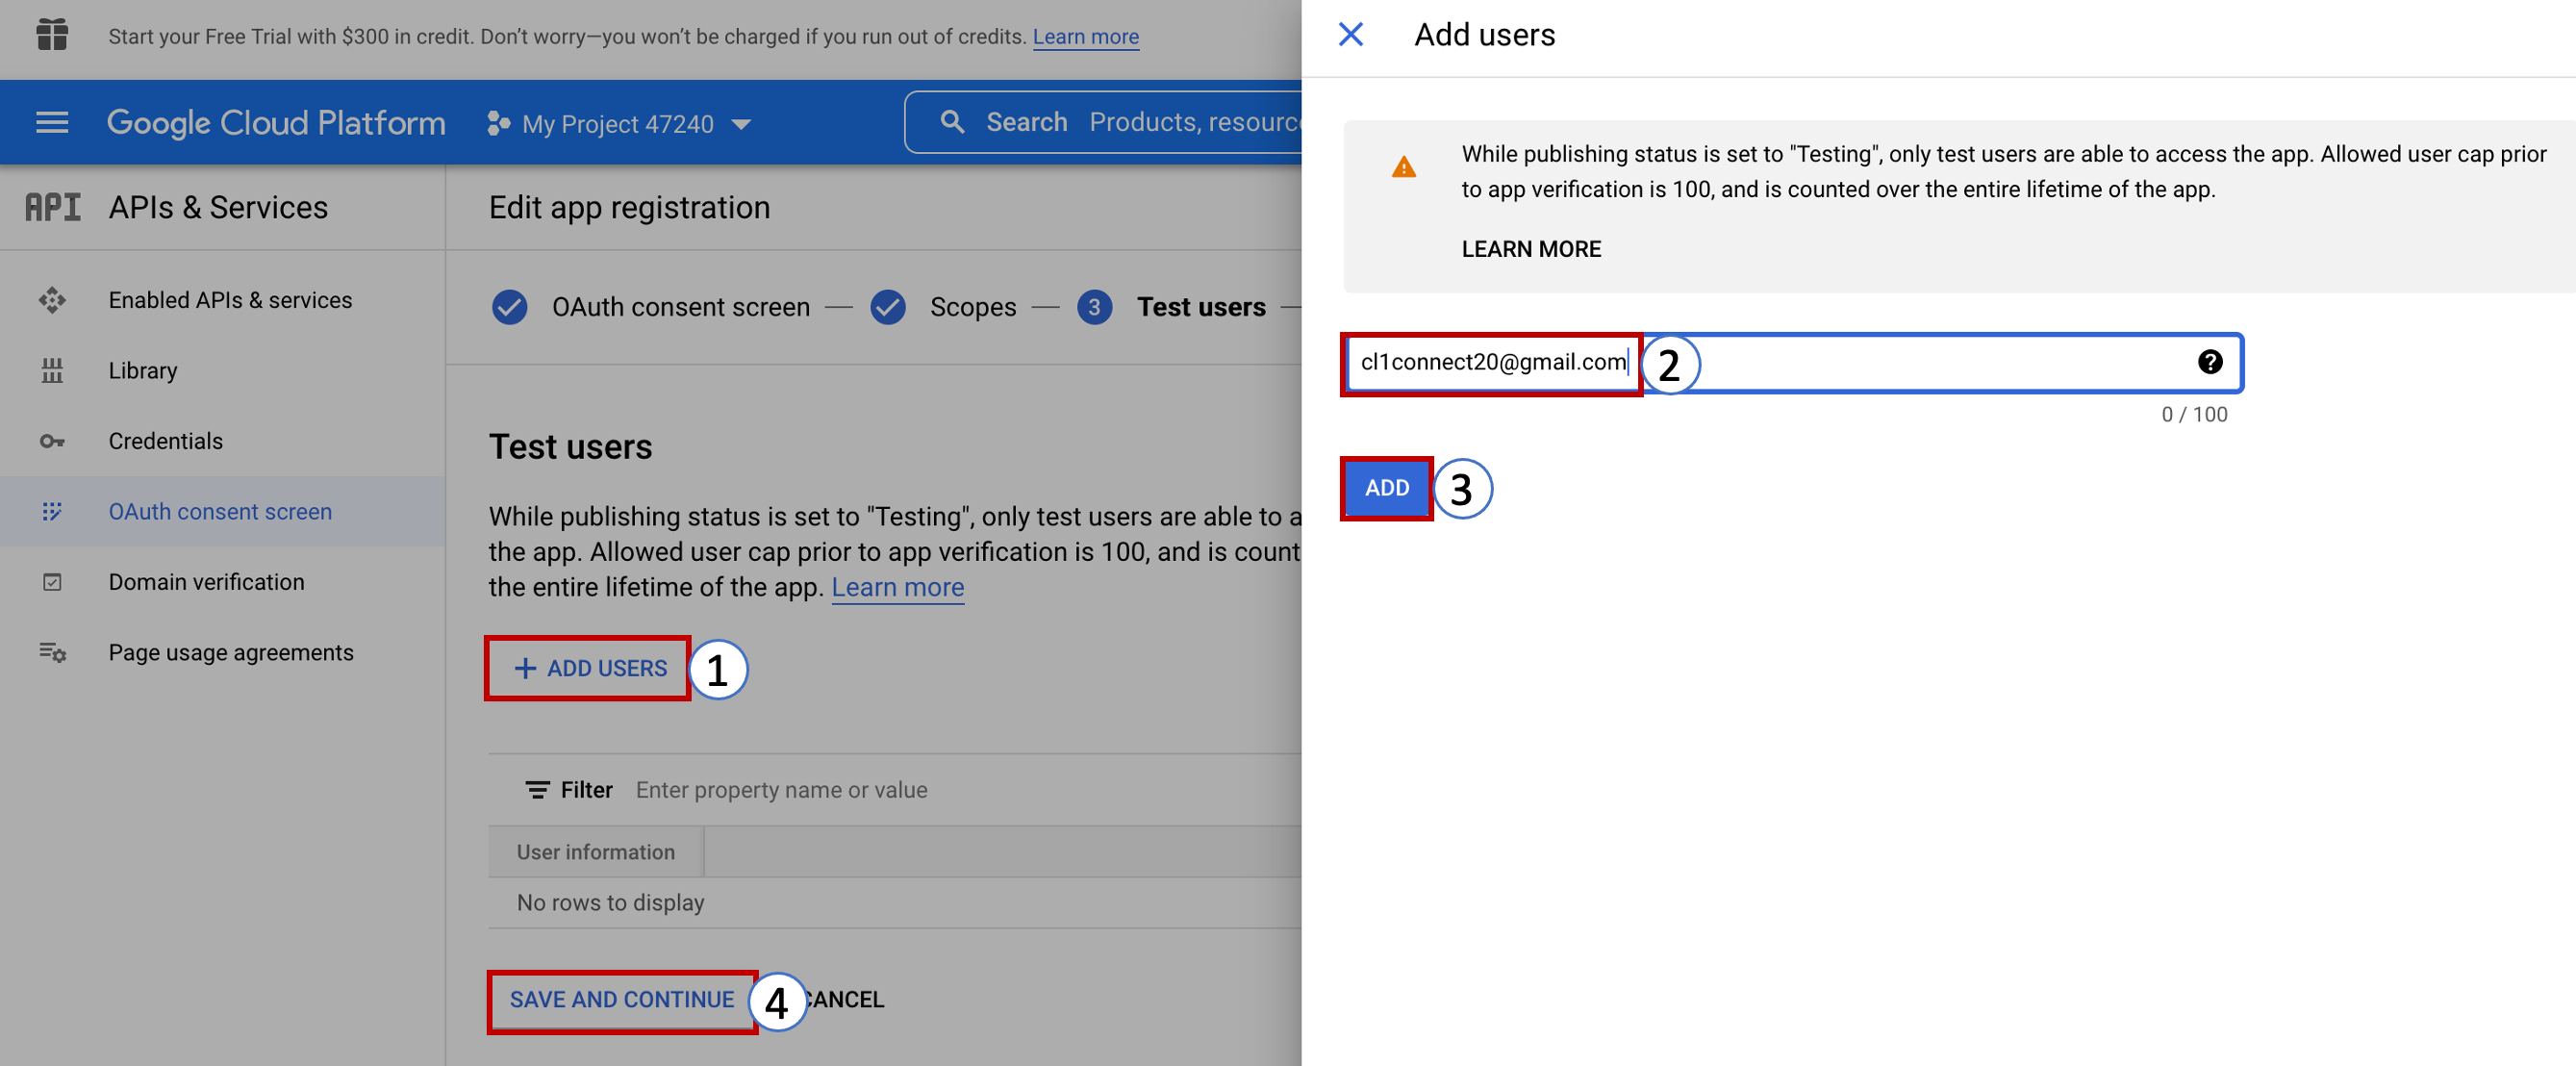
- On the test user page, click ADD USERS and enter your Gmail address. Click Save and Continue.
5. Credentials and authentication with OAuth 2.0
Now create a new client ID that will be used to identify your application to Google’s OAuth servers.
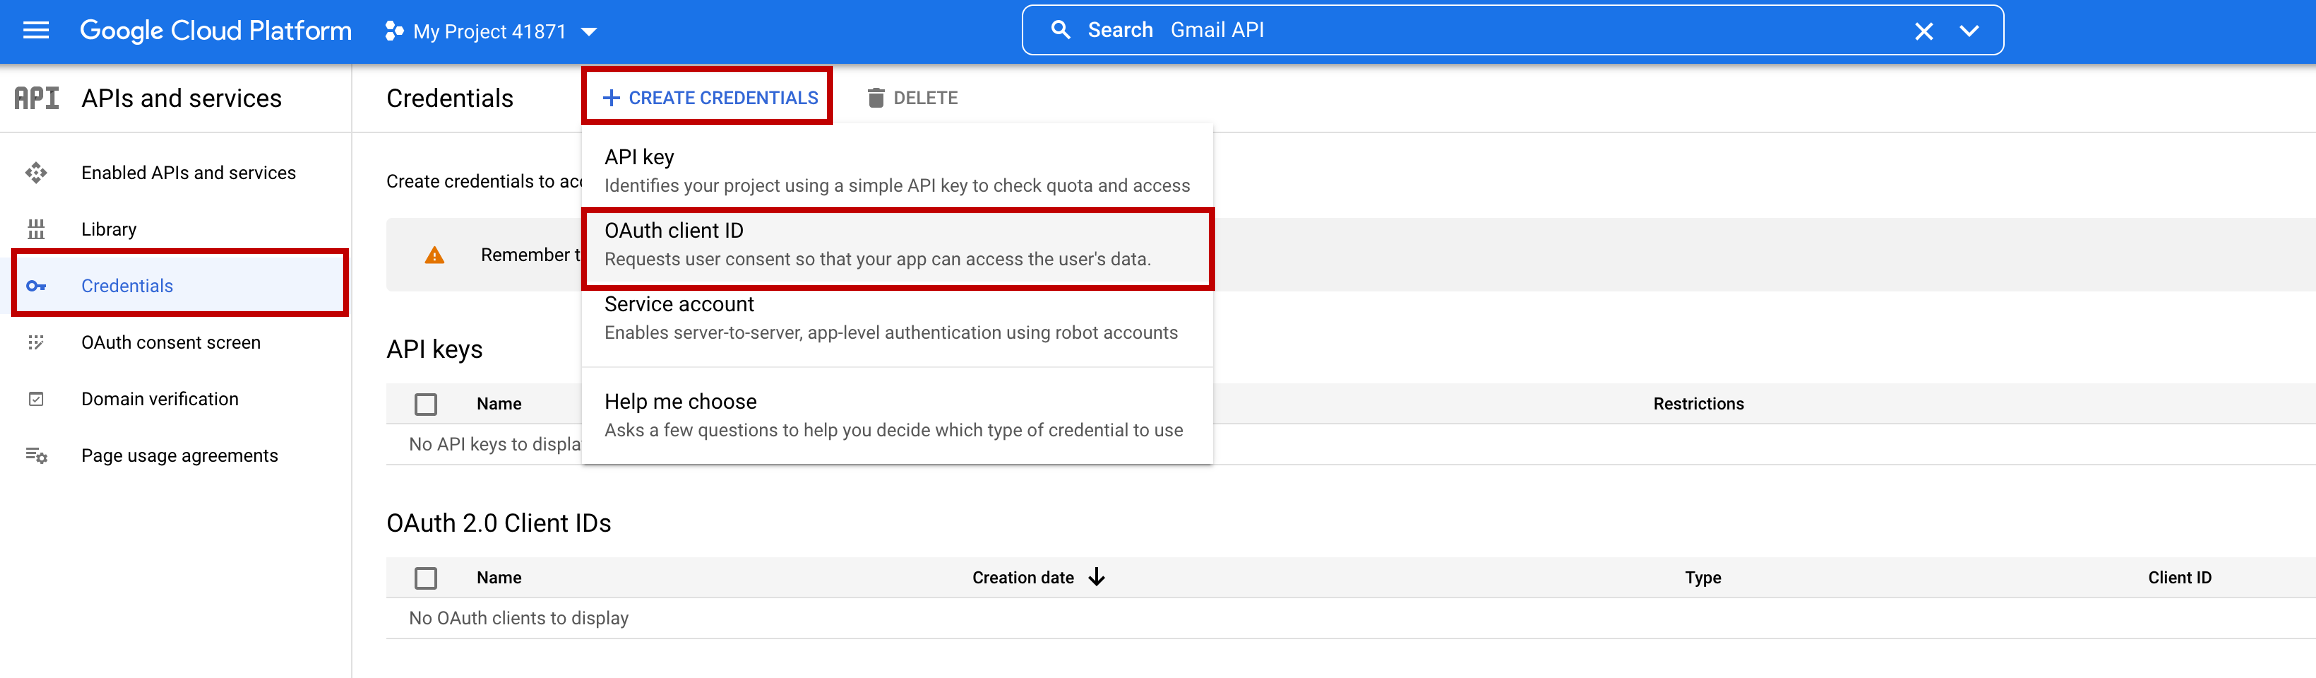
- In the APIs & Services section, click on Credentials and then pick OAuth client ID from the drop-down list of the CREATE CREDENTIALS button.
- Select
Web applicationin the Application type - You can leave the default name. The name of your OAuth 2.0 client is only used to identify the client in the Google Cloud console and will not be shown to application users.
- In the Authorized redirect URIs section click ADD URI button and set
https://cl1pod\<ID\>.webexconnect.io/callbackwhere <ID> is your tenant number. Click CREATE button in the end.
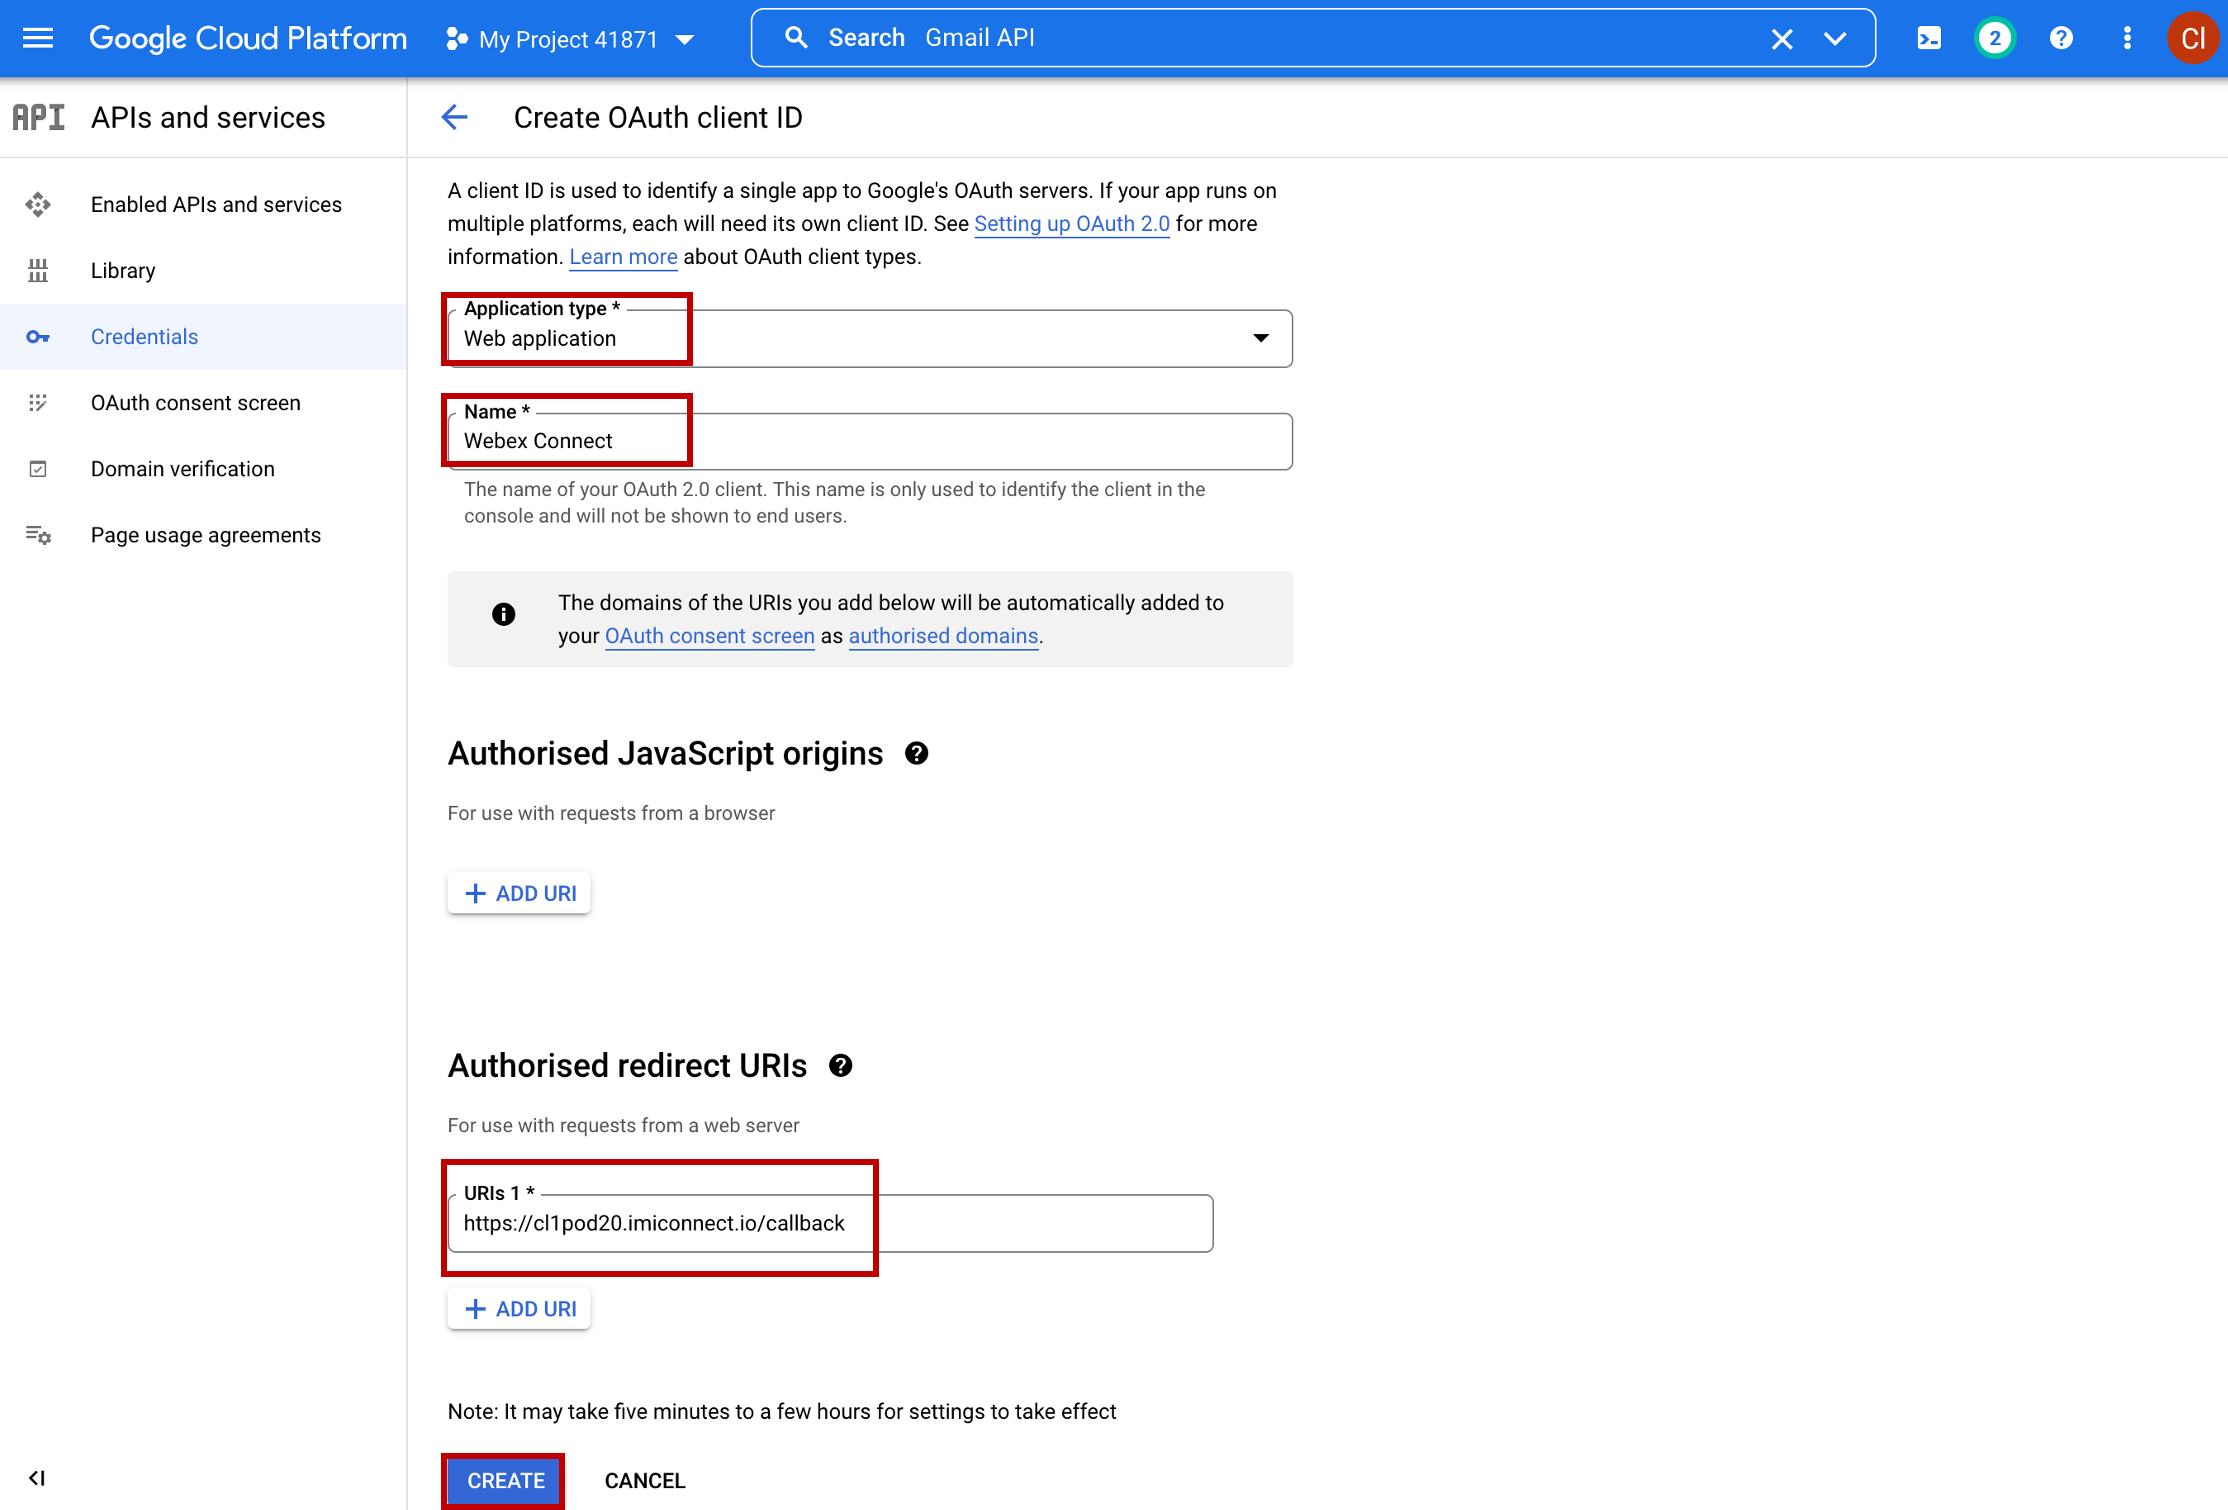
- Download a JSON file with your credentials – you’ll need it later.

2. Create Email Asset and Register to WebexCC
1. Create Email Asset
- As an admin, login to Webex Connect UI using the provided URL https://cl1pod<ID>.imiconnect.io/ (where <ID> is your POD number).
- Select Assets -> Apps -> CONFIGURE NEW APP -> Email.
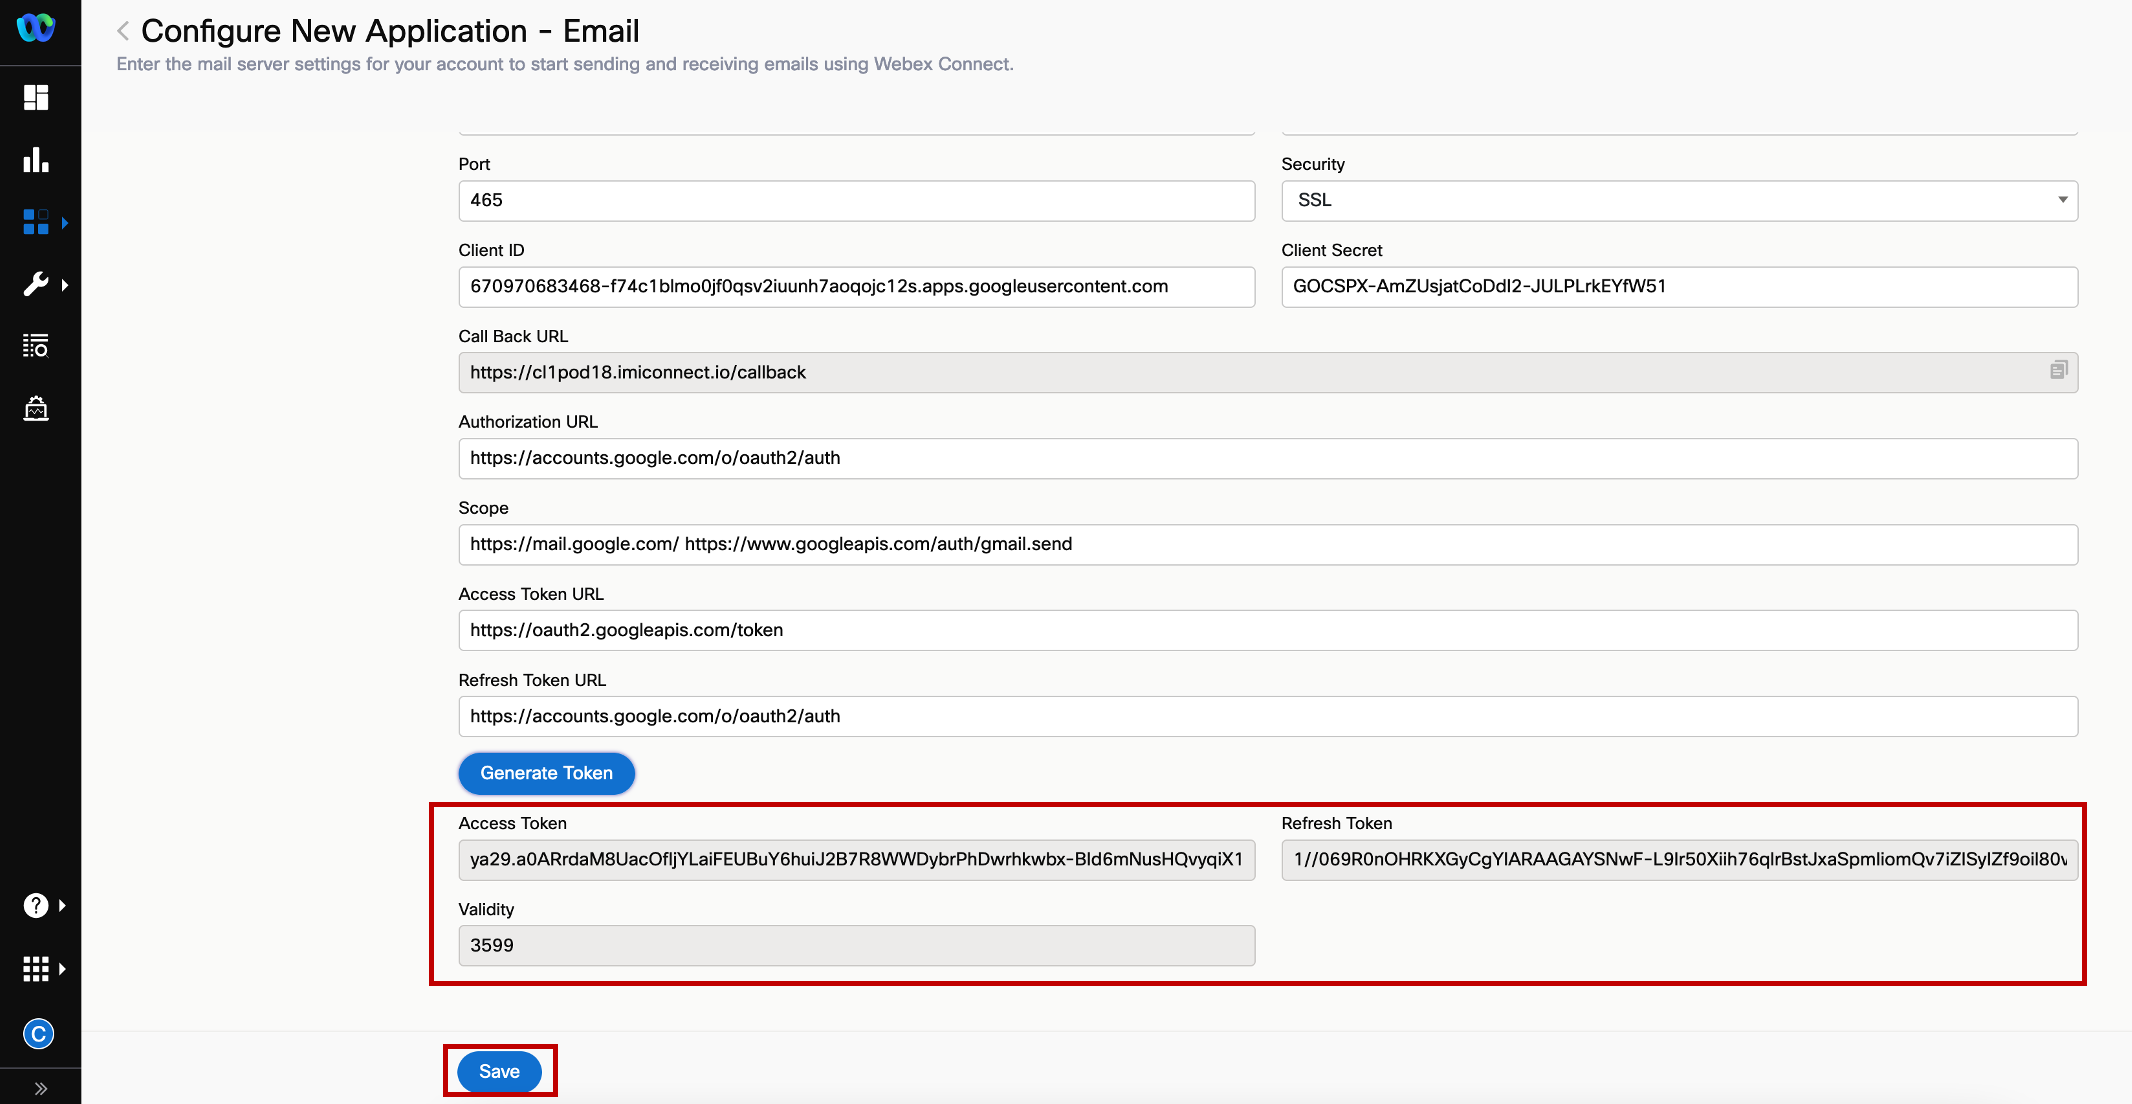
- Set the settings according to the table below:
| Entity | Name |
|---|---|
| Asset Name | EmailAsset |
| Email ID | cl1webex<ID>@gmail.com |
| Authentication Type | OAuth 2.0 |
| SMTP Server | smtp.gmail.com |
| Username | cl1webex<ID>@gmail.com |
| Port | 465 |
| Security | SSL |
| Client ID | <client_id from JSON file> |
| client Secret | <client_secret from JSON file> |
| Authorization URL | https://accounts.google.com/o/oauth2/auth |
| Scope | https://mail.google.com/ https://www.googleapis.com/auth/gmail.send |
| Access Token URL | https://oauth2.googleapis.com/token |
| Refresh Token URL | https://oauth2.googleapis.com/token |
where <ID> is your POD ID
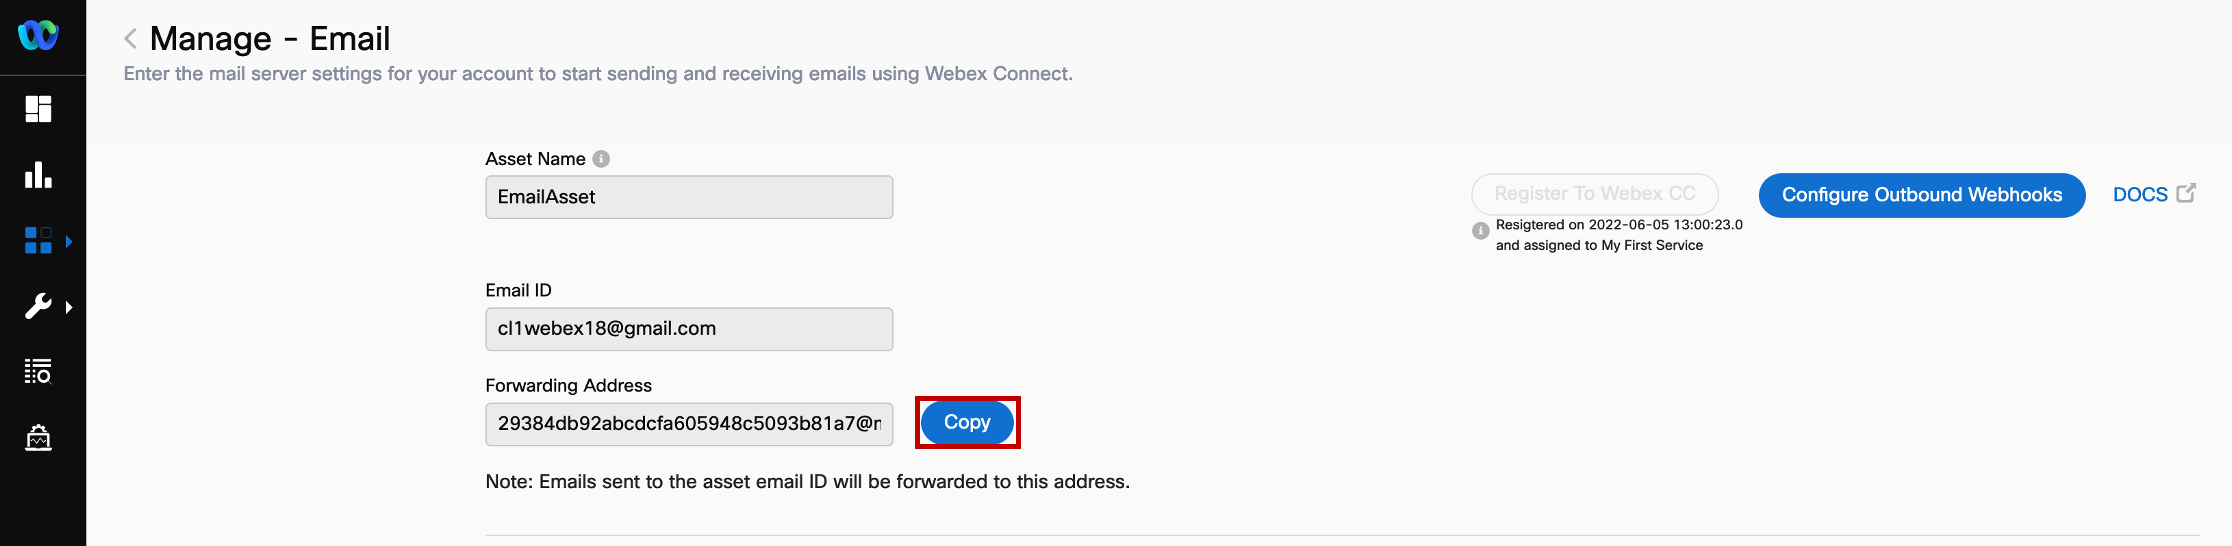
- Click GENERATE TOKEN and follow the step on the screenshot:
- Verify that the ACCESS TOKEN and REFRESH TOKEN are generated and click SAVE.
- Click on REGISTER TO WEBEX CC and Select the service My First Service. In the end click REGISTER.
2. Add forwarding Address
- Copy the forwarding address from the created asset in previous step and in Gmail account.
- Go back to the Gmail account and click on settings icon on top right corner -> Select See all settings.
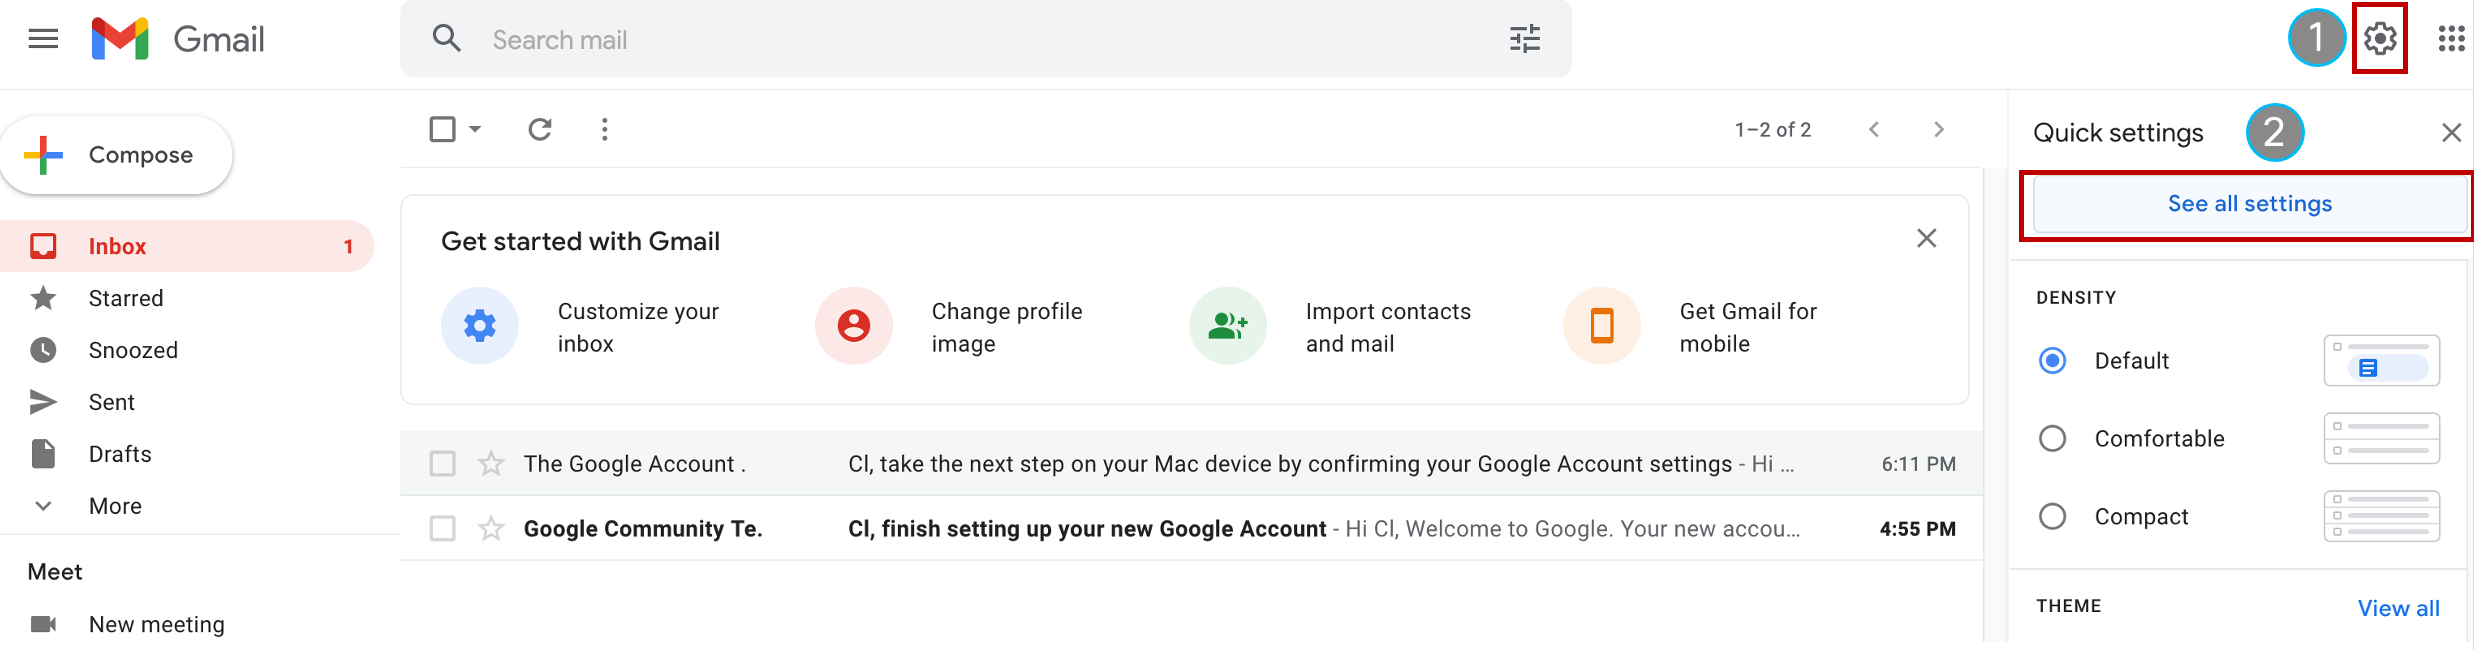
- Click on Forwarding and POP/IMAP -> click on Add a forwarding address -> Paste the copied forwarding address from the created asset. Then click on Next. In a new pop up tab click Proceed and then click OK when it prompts.
- In order to fetch the confirmation email, go back to Webex Connect and click on the Debug Console Menu on the left pane, select
Query Historical Logs–Channel = Email–Date Range = Today/Last Hour. Click the Search button.
- You should only have 1 transaction in your logs at this point. Click the Message ID Link for
Event Handled

- Click the decrypt logs button, then click the Trace Details link for that transaction. Click the copy button next to the Data entry in the lower right pane.
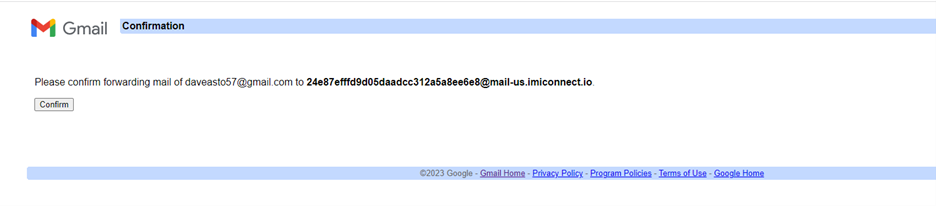
- Paste the copied data from the debug logs into the empty field below and press the Get URL button. This will pull out the forwarding verification URL that google sent you.
- Paste the URL into a new browser tab and hit Enter. Click the Confirm button to OK the forwarding.
- You will get a confirmation message
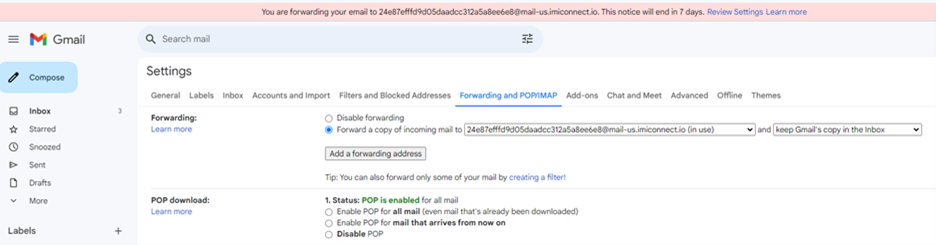
- Back in the settings of your Gmail account, forwarding should be reflected in the Forwarding and POP/IMAP tab.
3. Email Entry Point and Queue creation
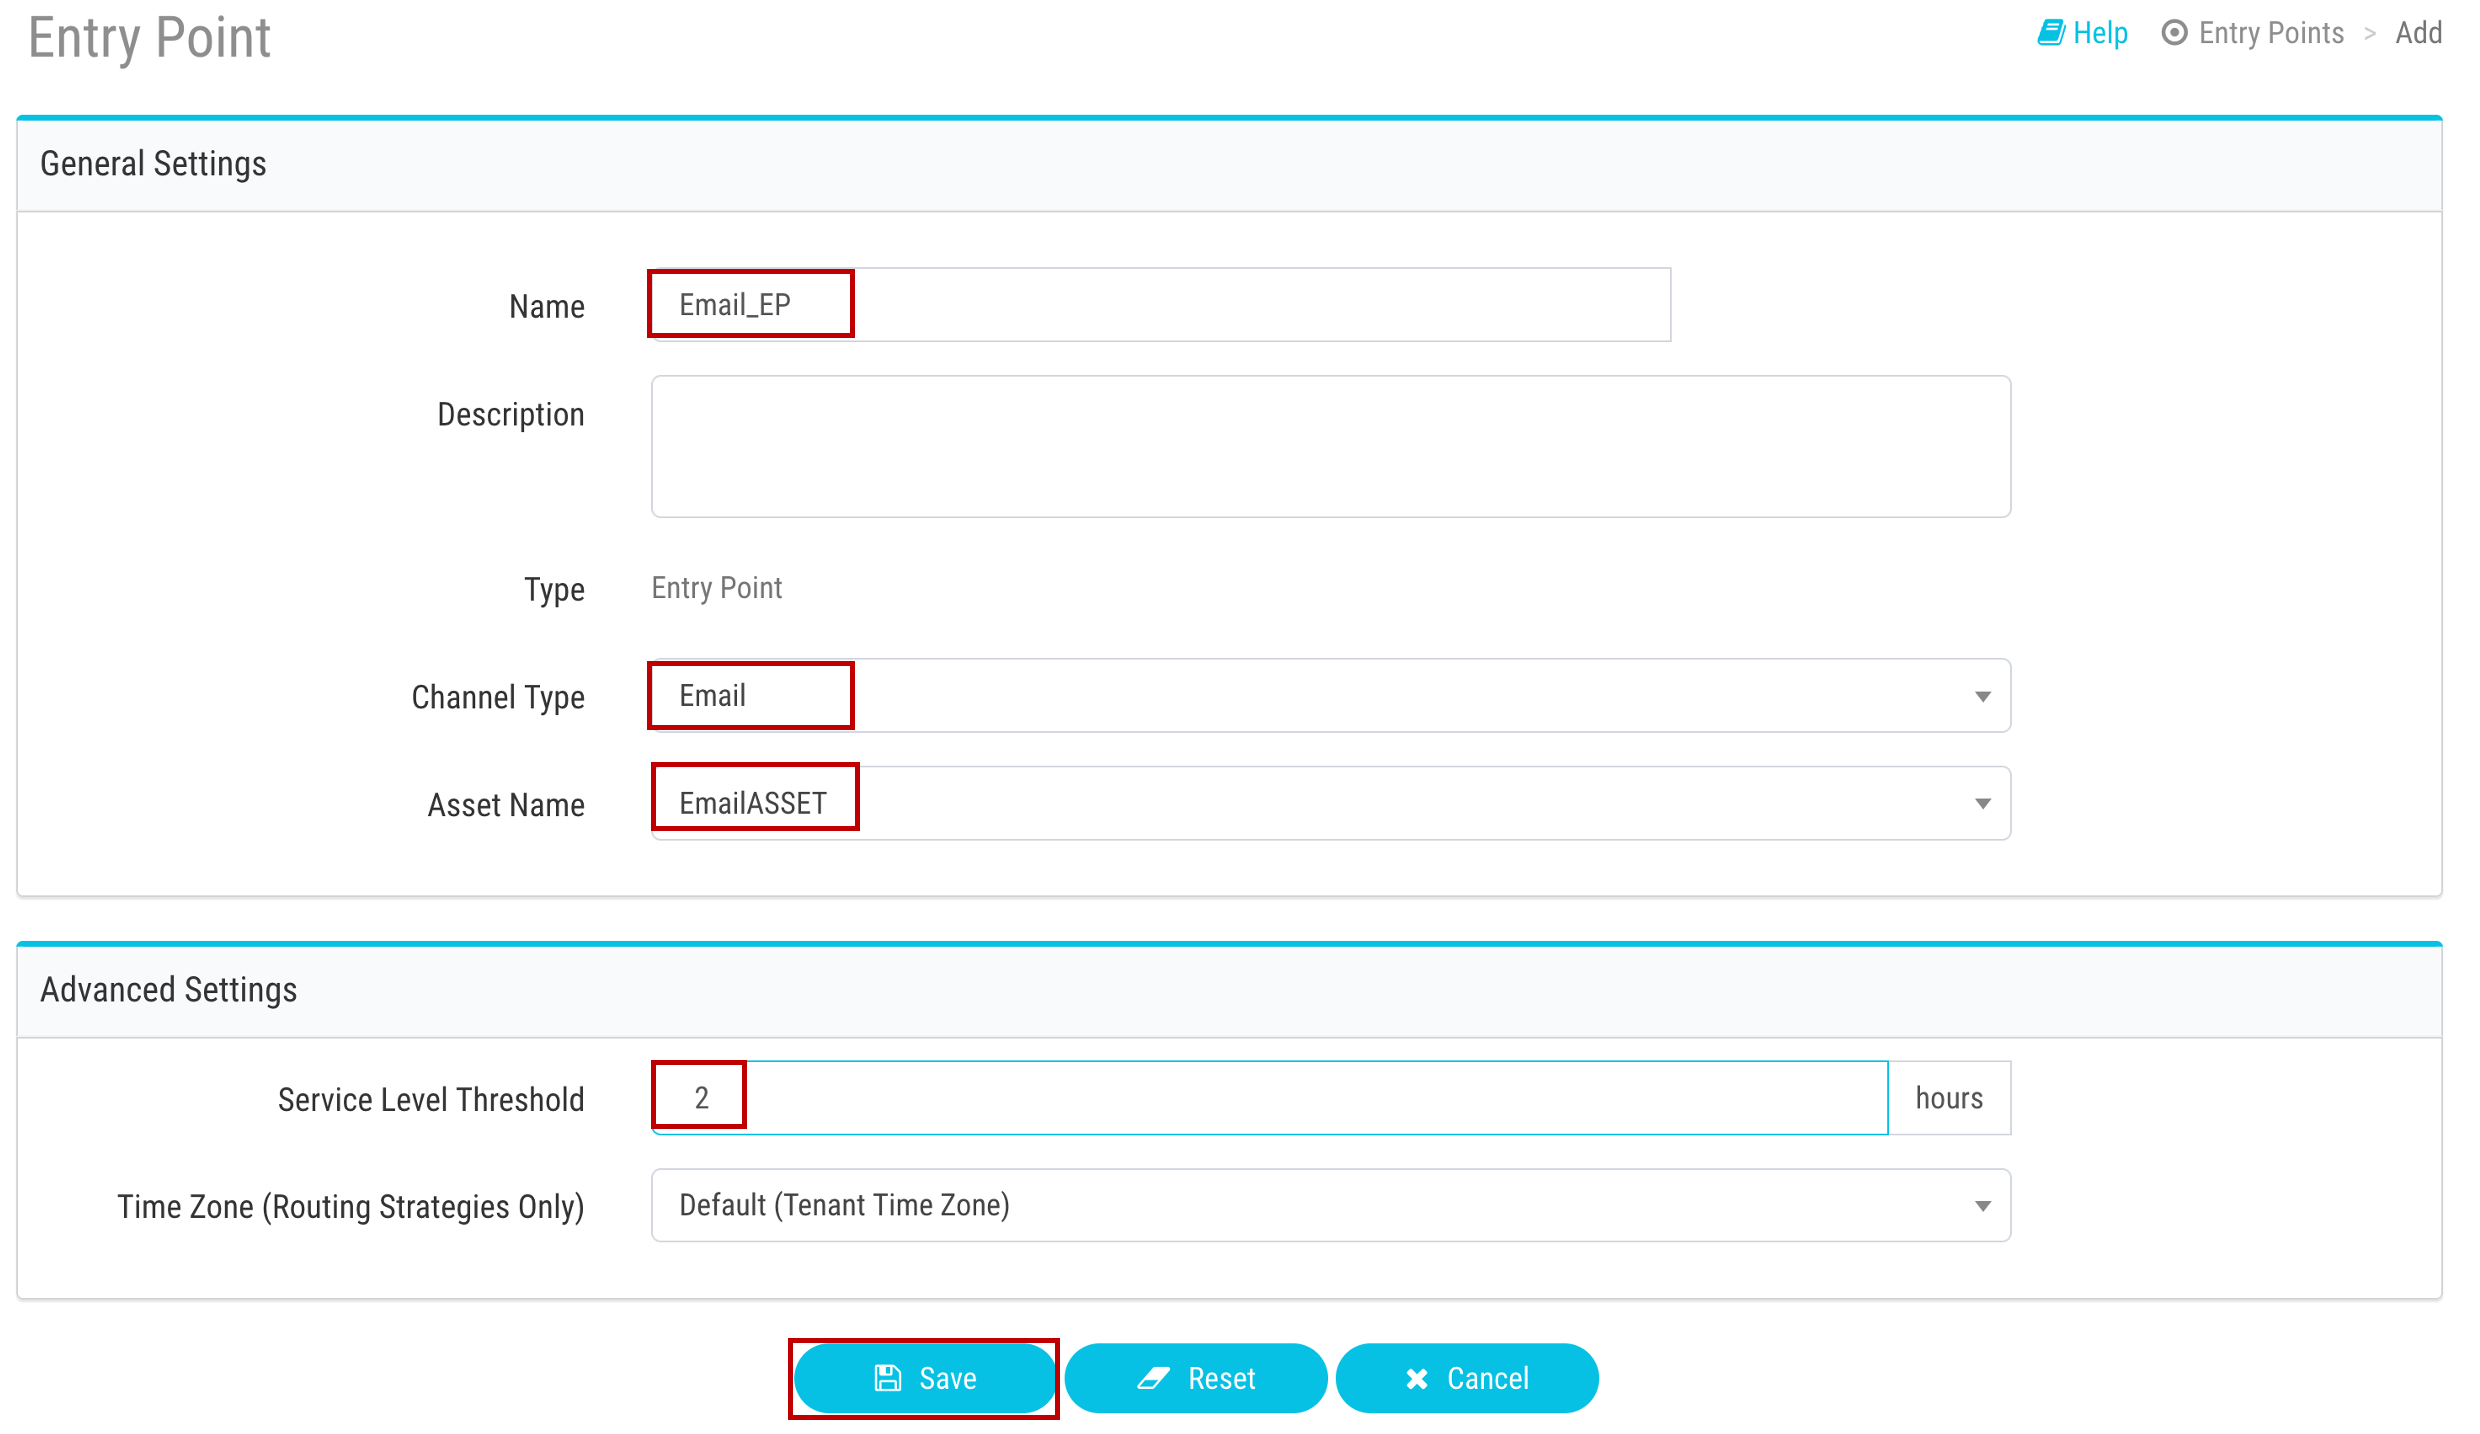
1. Create Entry Point in Management Portal
- Click on Provisioning and select Entry Points/Queues > Entry Point.
- Click on
New Entry Point. - Input Name as
Email_EP. - Select
Emailin the Channel Type section. - Leave the Asset Name as appeared value
EmailASSET. - Set Service Level Threshold as
2hours. - The Time Zone can stay as default value.
- Click on Save after comparing your values with the screenshot below.
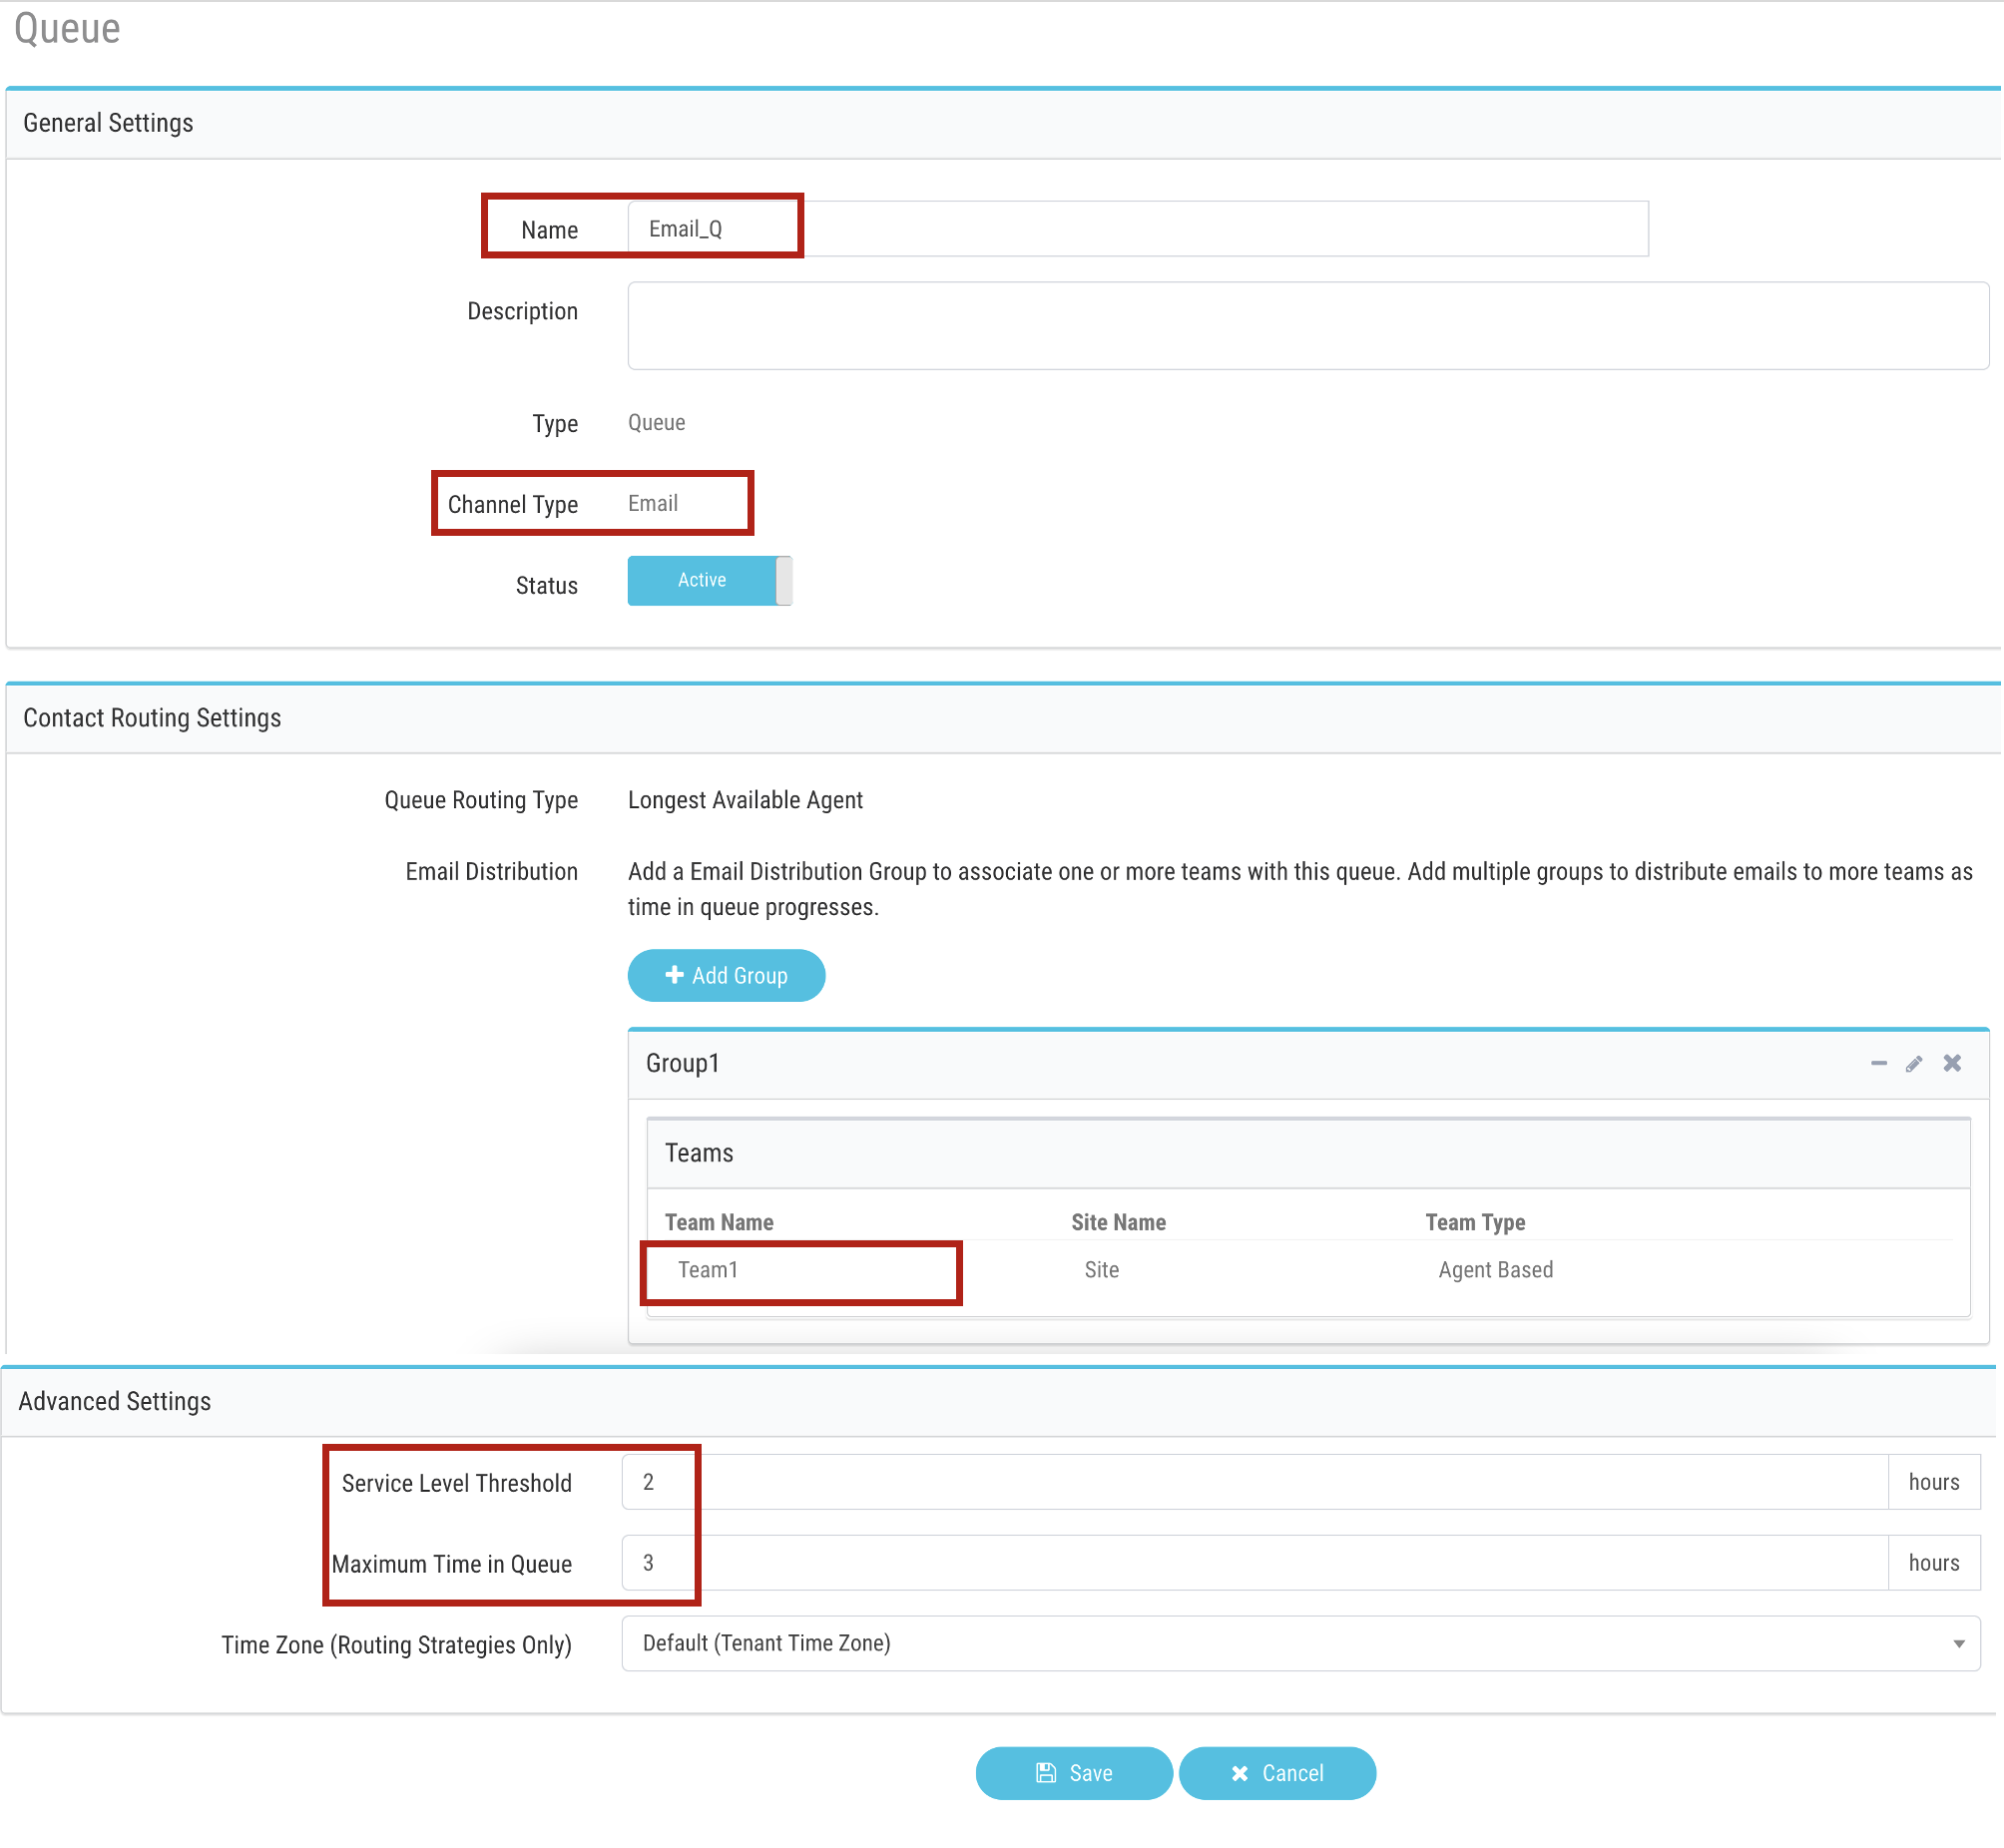
2. Create Two Queues in Management Portal
- Click on Provisioning and select Entry Points/Queues > Queue.
- Click on
New Queue. - Input Name as
Email_Q. - Select
Emailin the Channel Type section. - Leave the Queue Routing Type as default value
Longest Available Agent. - In the Email Distribution click on Add Group and select
Team1. - Set Service Level Threshold as
2hours. - Set Maximum Time in Queue as
3hours. - The Time Zone can stay as default value.
- Click on Save after comparing your values with the screenshot below.
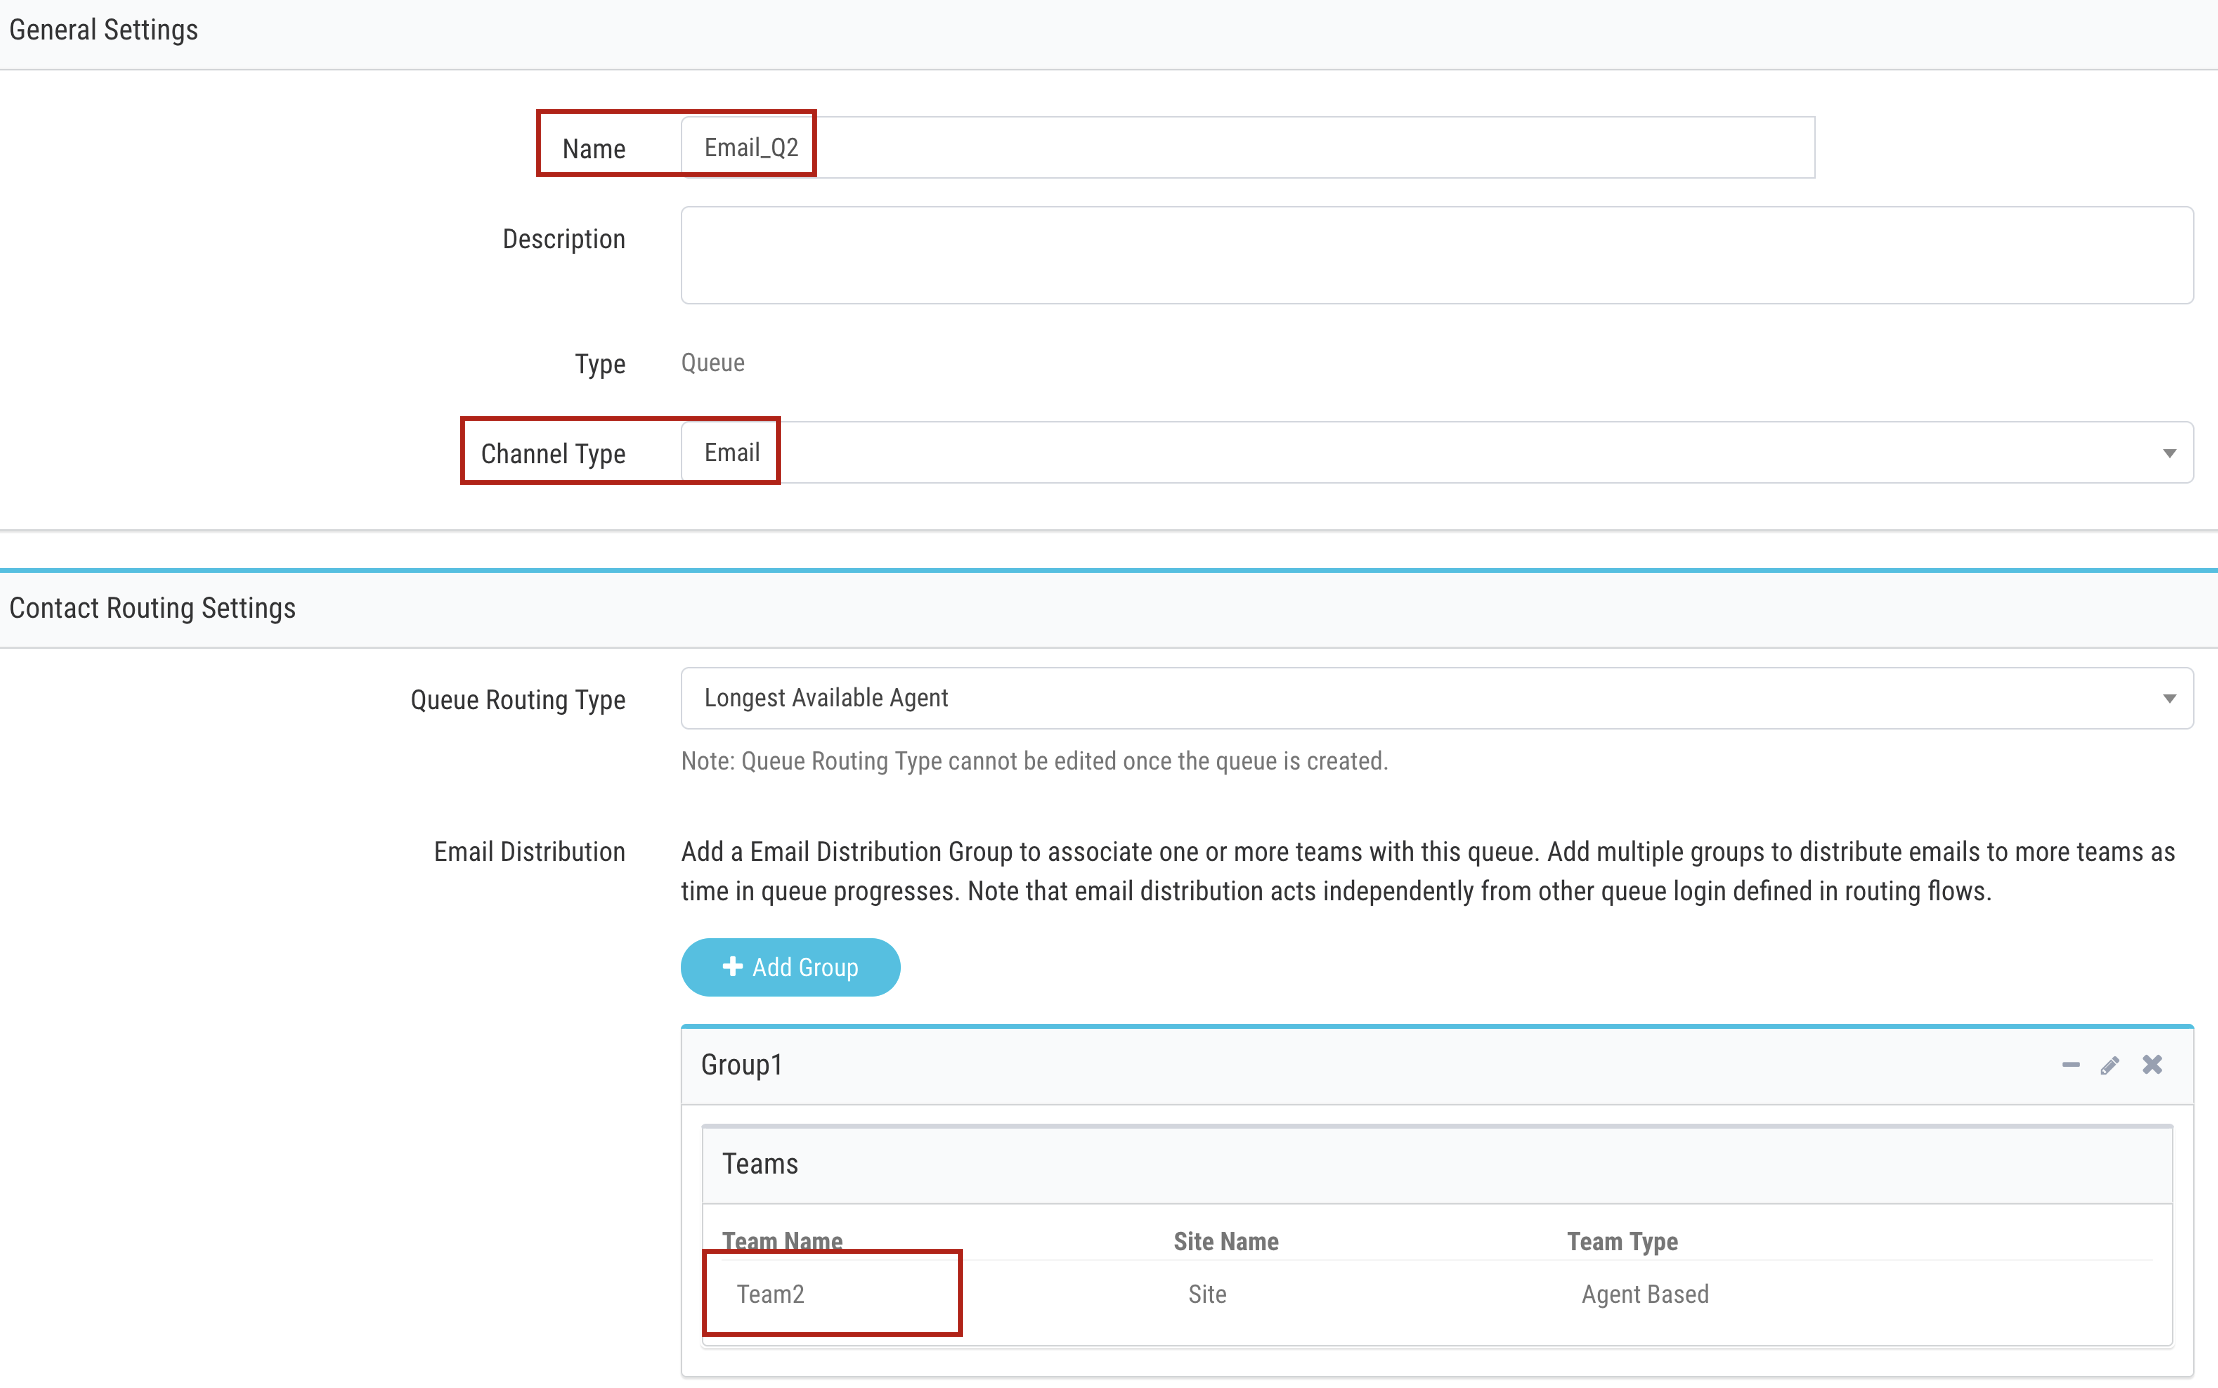
- Create a second queue by repeating the same steps as above.
- Input Name as
Email_Q2. - Select
Emailin the Channel Type section. - In the the Email Distribution click on Add Group and select
Team2.
4. Create/Upload Email flow
- Download the email flow from the GitHub page.
- Navigate to Webex Connect Flows -> v3.0 ->Template -> Media Specific Workflows -> Email Inbound Flow.workflow.zip, select the zip file and click download.
- Unzip the downloaded file.
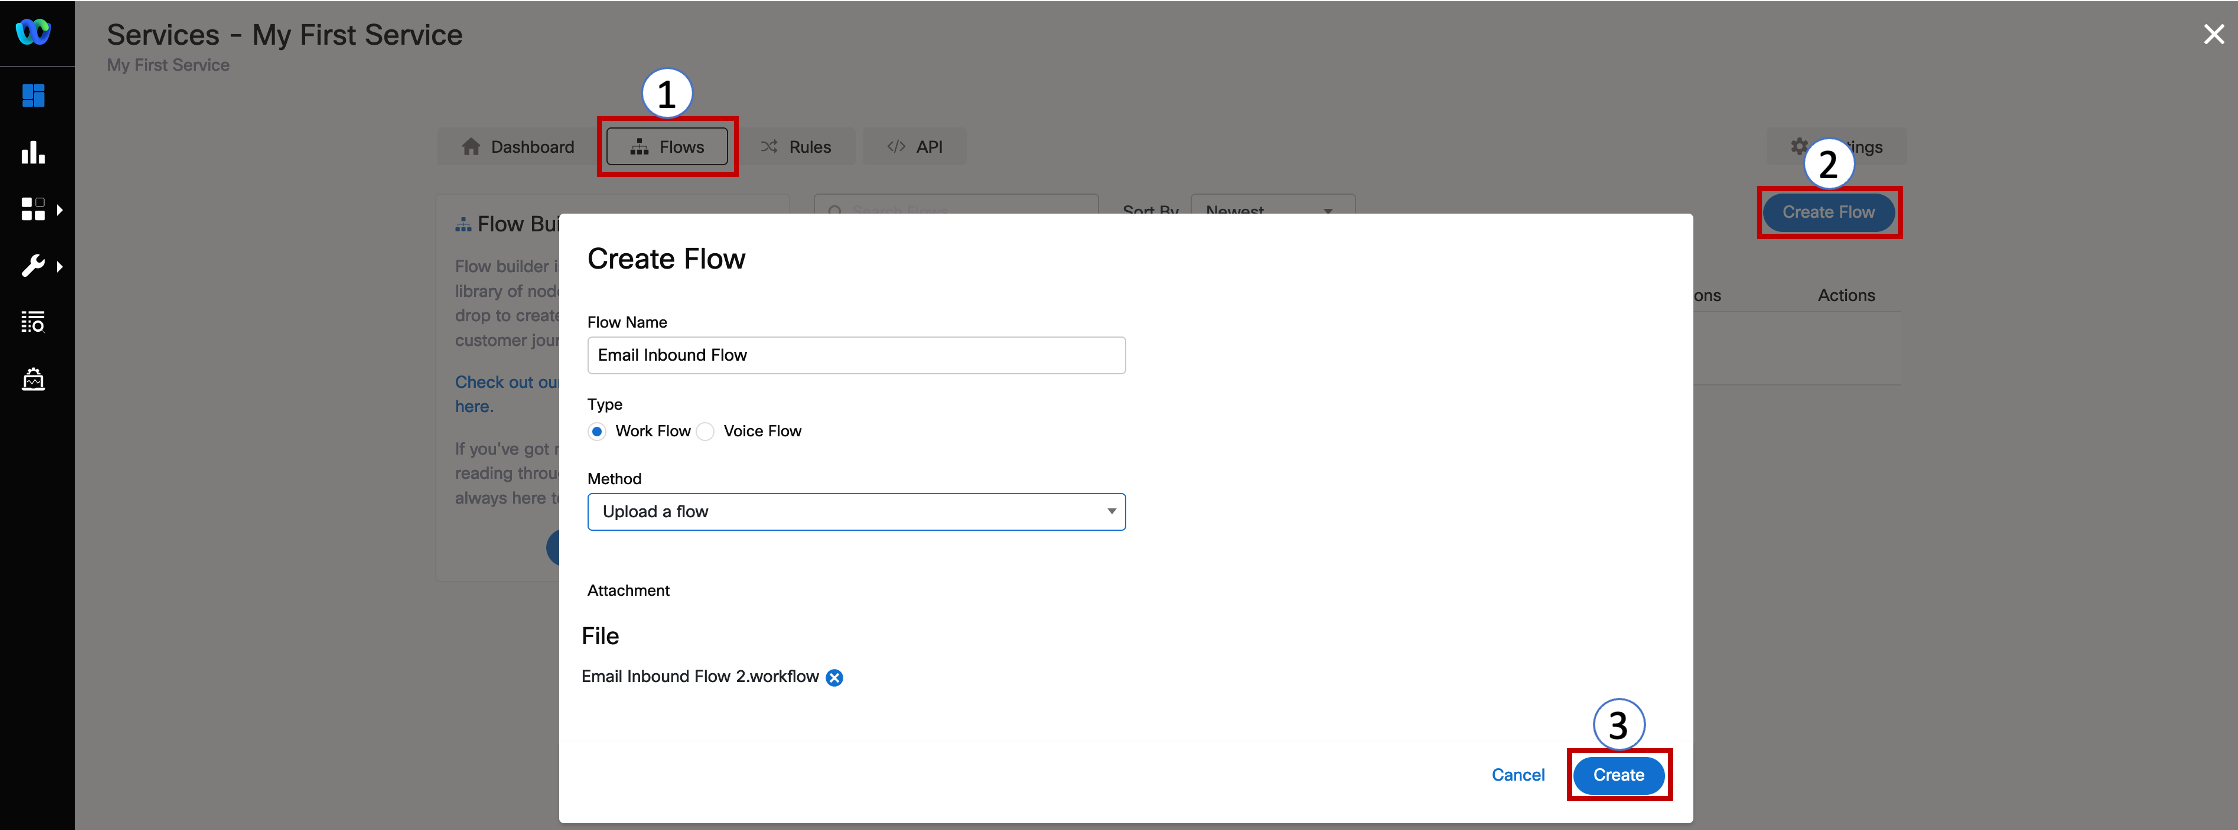
- Go to Webex Connect, click on Services and select the service in which the Asset is created in step 2. It should be My First Service
- In the service click on FLOWS -> CREATE FLOW .
- Enter the FLOW NAME as Email Inbound Flow, select the TYPE as Work Flow and under METHOD select Upload a flow.
- Drag and drop the Email Inbound Flow.workflow flow that is downloaded in zip file, click CREATE and then click SAVE.
- Click Save and in the created workflow find the Queue Task, click twice, select the QUEUE NAME as Email_Q and click on SAVE.

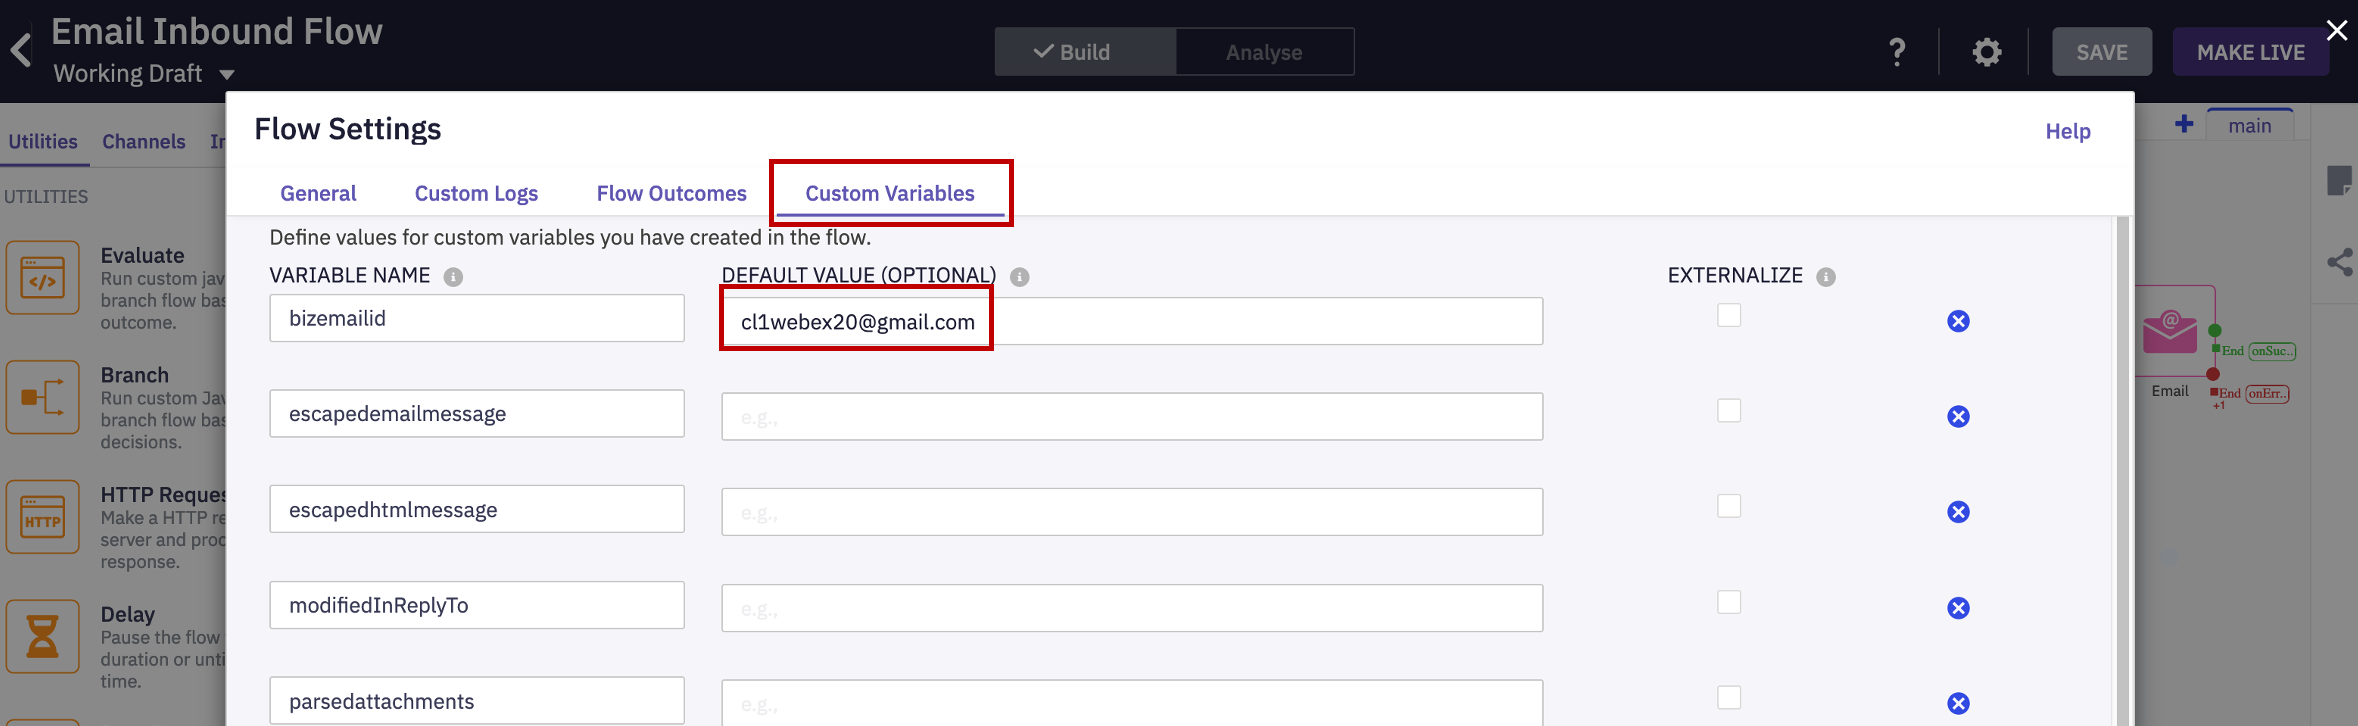
- Click Settings on top right corner and switch to Custom variables tab. Here in the bizemailid row, update the default value with your email address of the Gmail account. Click SAVE.
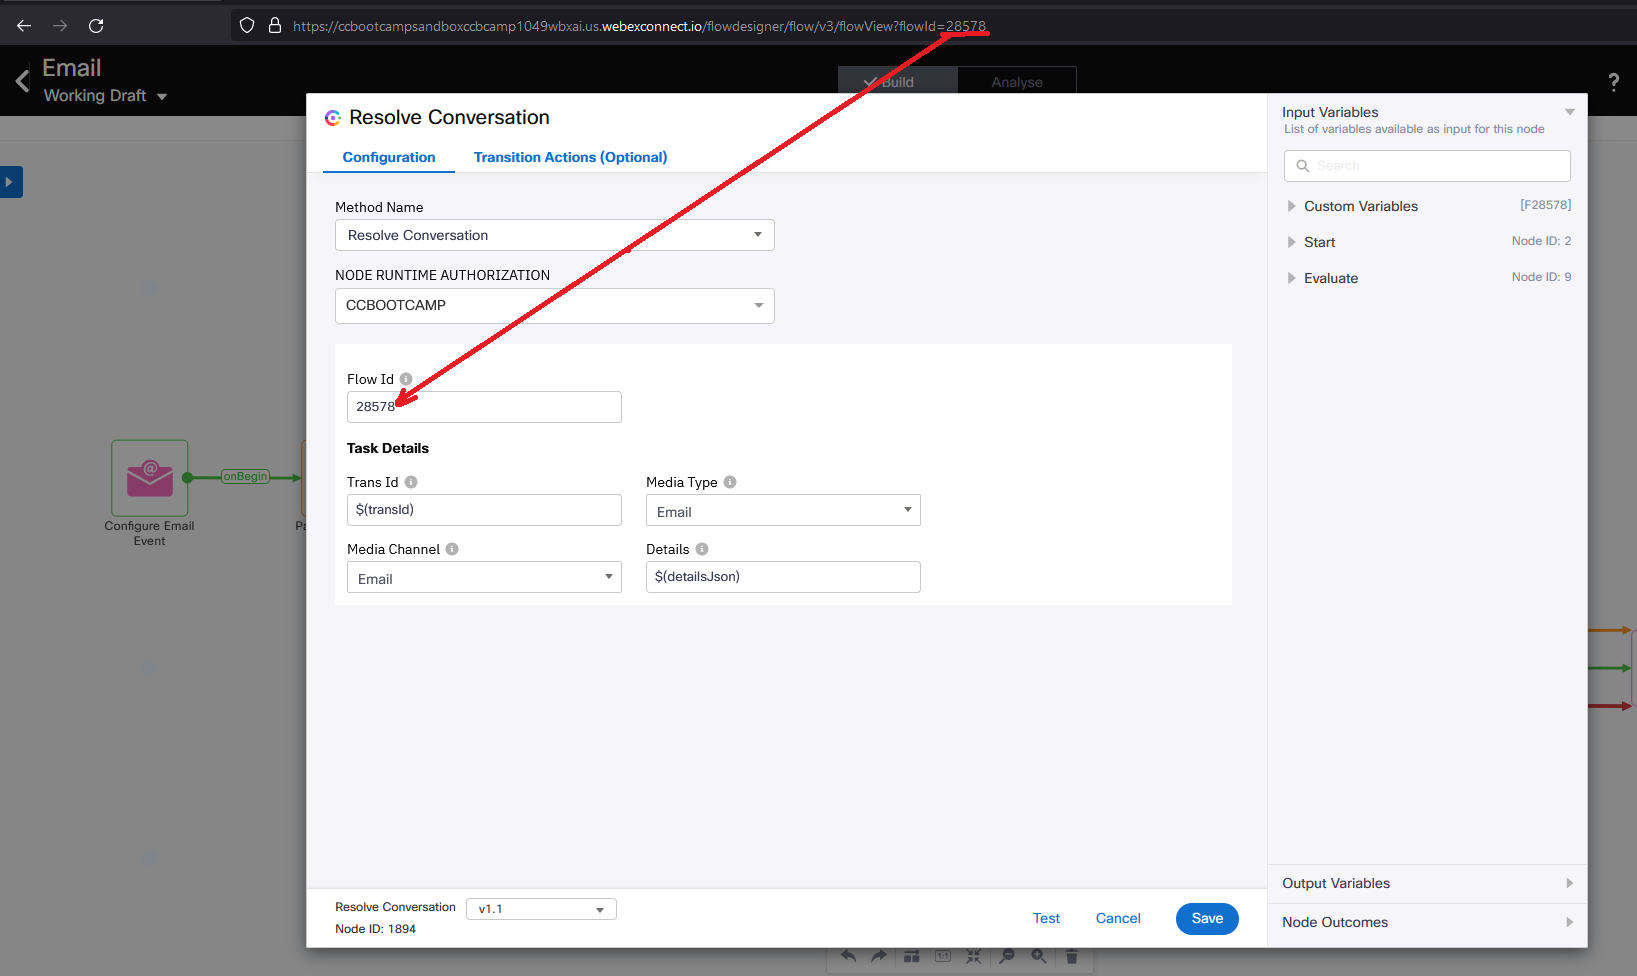
- Go to Resolve Conversation node and fill in Flow Id field with flowId value copied from the address bar of web browser. Then save changes.
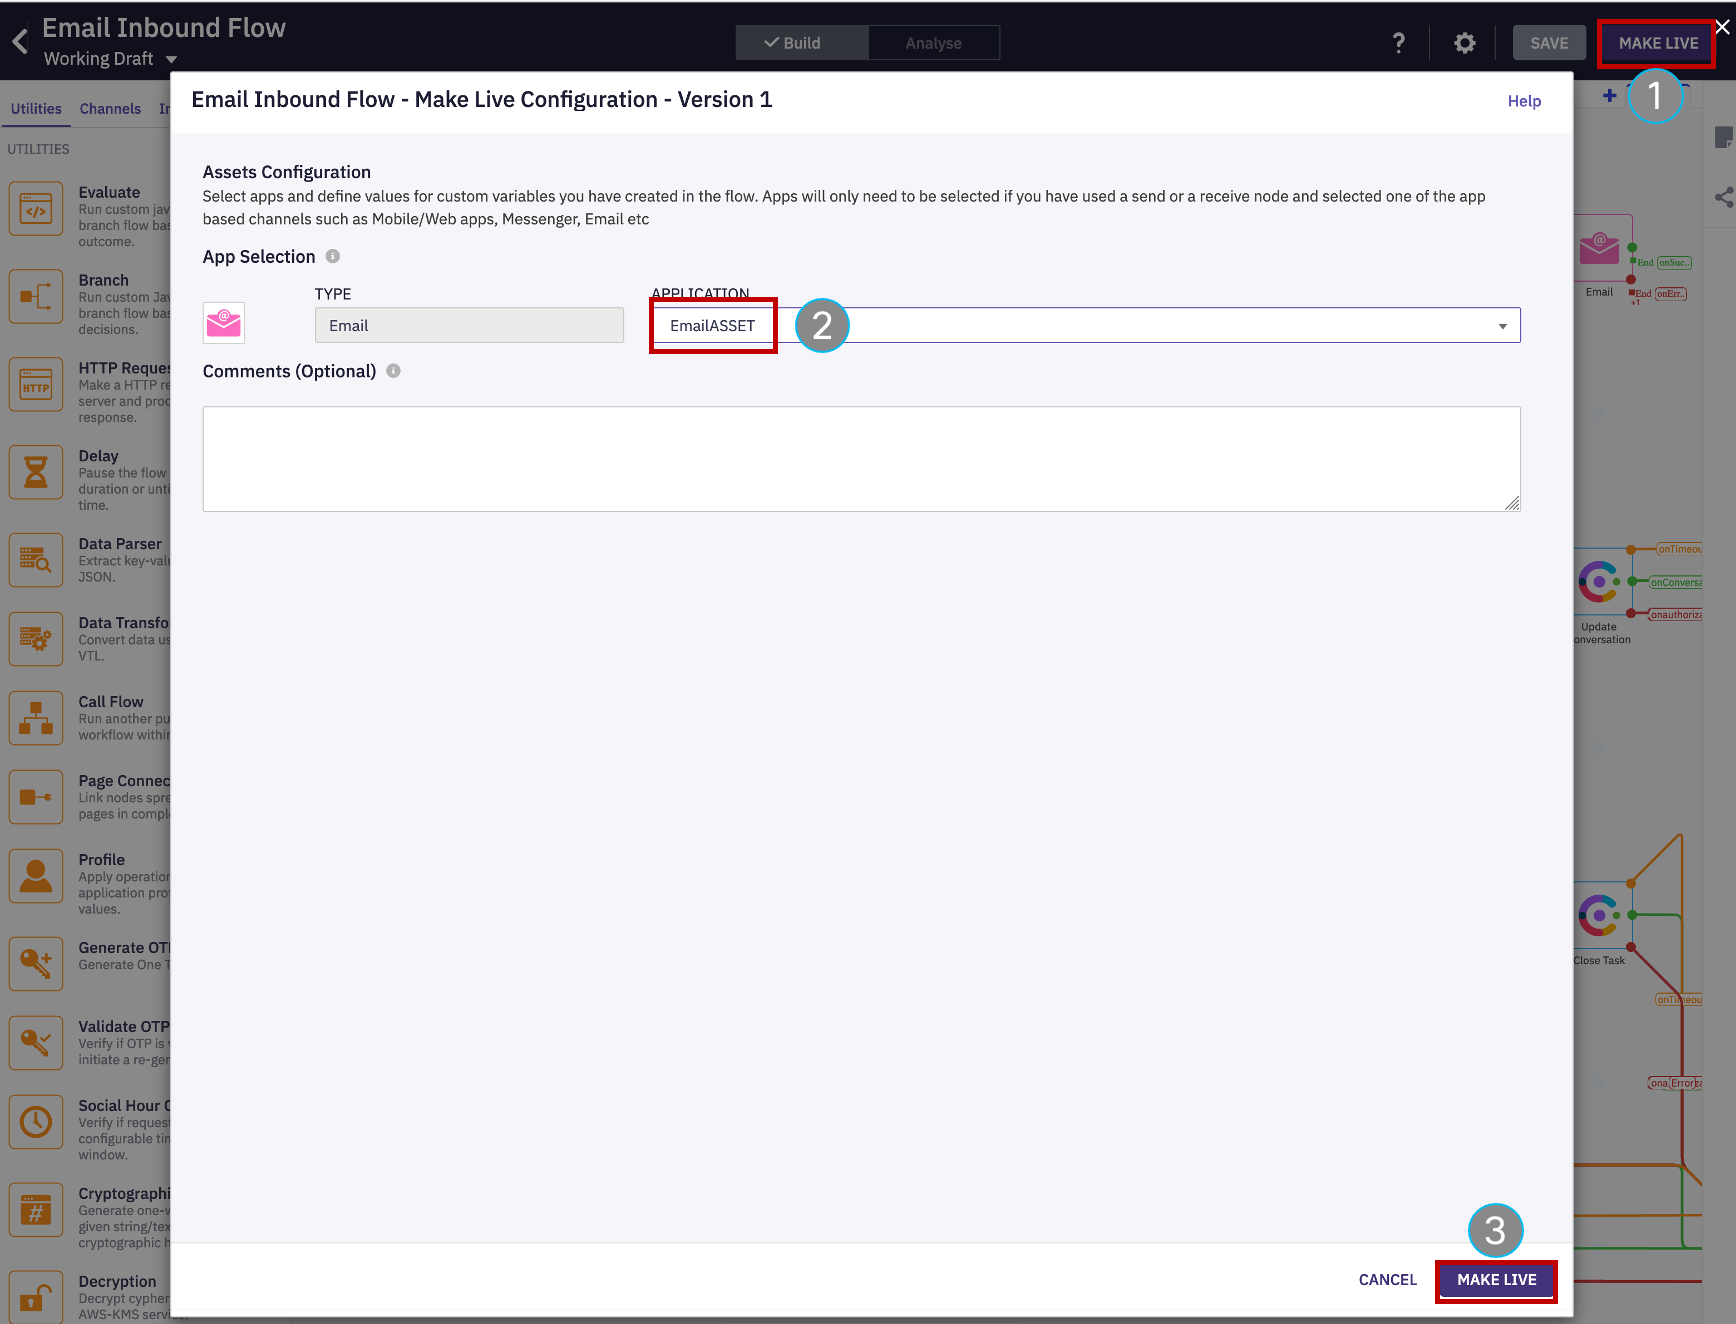
- Finally click on Make Live on top right corner -> Select the Application/Asset that we have created and click Make Live.
5. Verification: Send an Email and accept the task
- Go to personal email account and send an email to the support email address that was initially configured in the Email Asset.
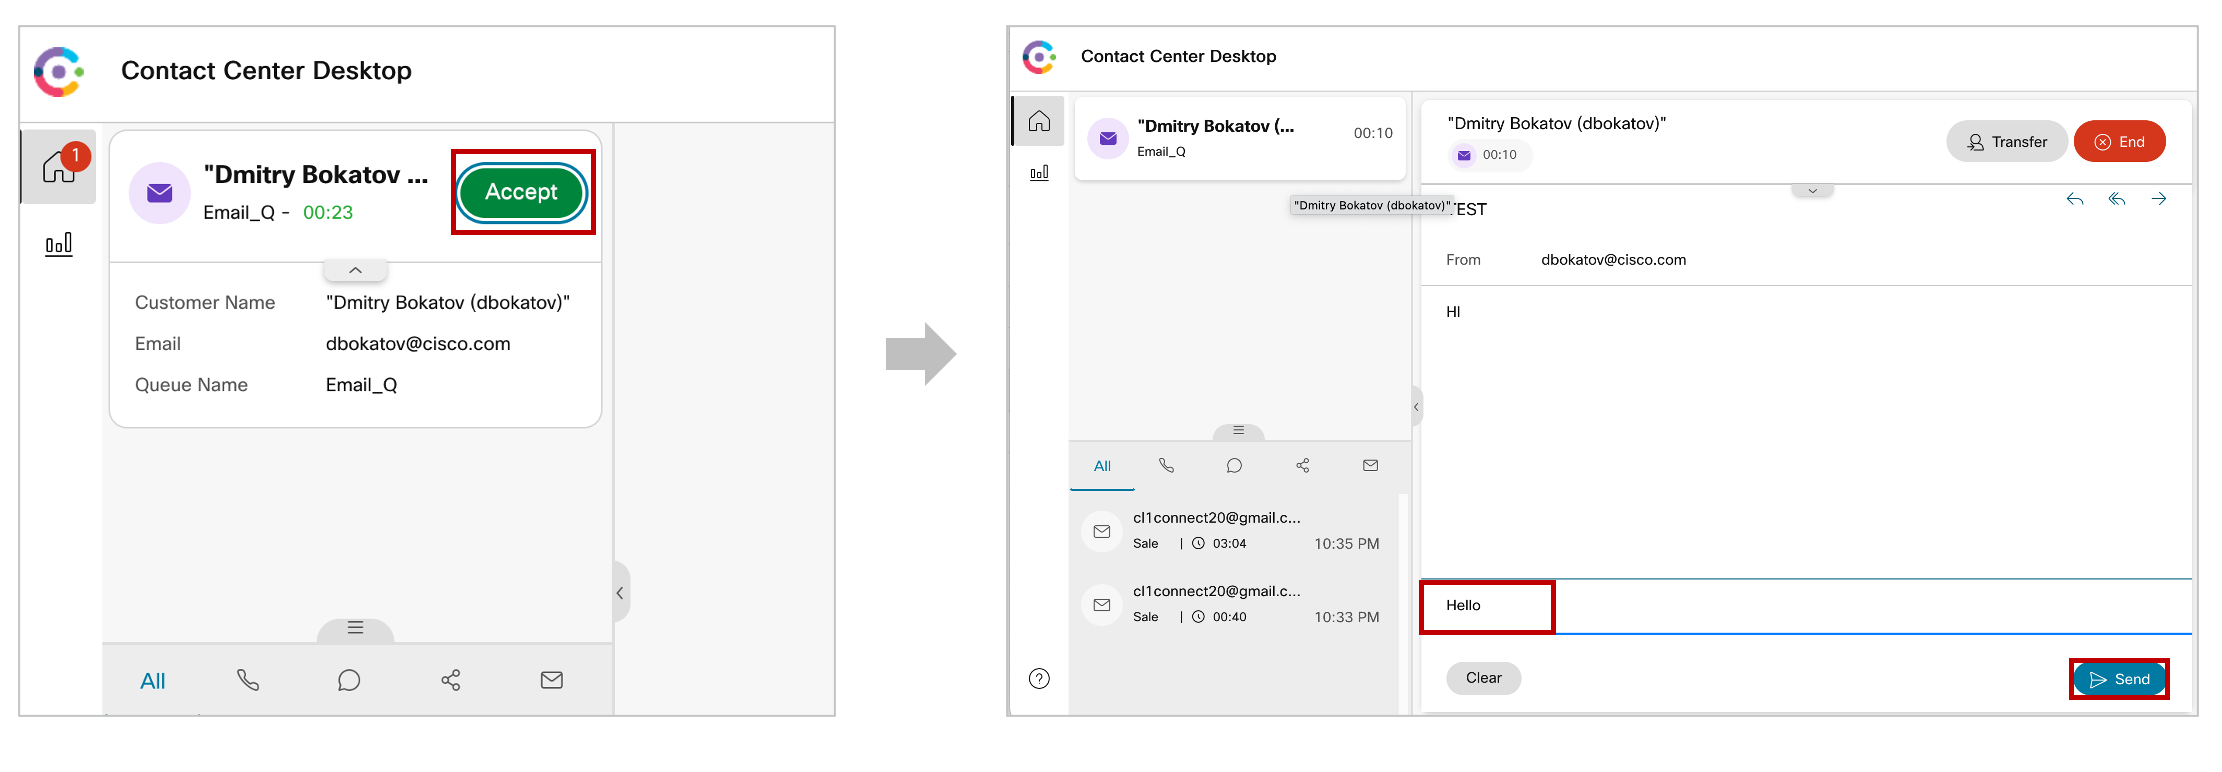
- Go to the Agent Desktop and make the agent Available.

- The Email will be offered to the agent. Click Accept to handle the email. Click “Reply” or Reply All” to the email and hit send button.
- Add wrap up and close the task.
Congratulations, you have completed this section!
Lab.12.8 - Chat Channel Configuration
Table of Contents
| Topic | Lab Type | Difficulty Level | Estimated length |
|---|---|---|---|
| [Optional] Create a service | Practical Lab | EASY | 3 min |
| Configure and Register Chat Asset | Practical Lab | EASY | 3 min |
| Create Entry Point for Chat | Practical Lab | EASY | 3 min |
| Create Queue for Chat | Practical Lab | EASY | 3 min |
| Create Chat Template | Practical Lab | EASY | 3 min |
| Website Widget Configuration | Practical Lab | EASY | 3 min |
| Create Chat Inbound Flow | Practical Lab | EASY | 3 min |
| Create Chat Close Flow | Practical Lab | EASY | 3 min |
| Publish Chat Widget | Practical Lab | EASY | 3 min |
| Verification: Initiate and Accept the Chat | Practical Lab | EASY | 3 min |
Introduction
Lab Objective
In this Lab, we will go through the tasks that are required to complete the basic web chat configuration. You will be able to initiate a chat to the Contact Center and be able to accept/respond to the chat by logging in as an agent.
We will be configuring Service, Chat Assets, Entry Point, Queue, Chat Template, Website Settings, and corresponding workflows.
Pre-requisite
- You received Webex CC Portal, Agent Desktop and Webex Connect URL .
- You have admin credentials to complete configurations in Webex CC Management Portal and Engage Portal.
- You have admin credentials to complete configurations in Connect Portal.
- You have agent Credentials to handle the Chat.
- You have successfully completed the previous Lab12.5 Preconfiguration.
Quick Links
Control Hub: https://admin.webex.com
US Portal: https://portal.wxcc-us1.cisco.com/portal
US Agent Desktop: https://desktop.wxcc-us1.cisco.com
UK Portal: https://portal.wxcc-eu1.cisco.com/portal
UK Agent Desktop: https://desktop.wxcc-eu1.cisco.com
EMEA Portal: https://portal.wxcc-eu2.cisco.com/portal
EMEA Agent Desktop: https://desktop.wxcc-eu2.cisco.com
ANZ Portal: https://portal.wxcc-anz1.cisco.com/portal
ANZ Agent Desktop: https://desktop.wxcc-anz1.cisco.com
Webex Connect Documentation: https://help.imiconnect.io/
1. [Optional] Create a service
Note: This step should be performed only if My First Service does not exist in Connect Portal.
- Login to Connect Portal using provided URL https://cl1pod<ID>.imiconnect.io/ (where <ID> is your POD number).
- Go to Services and press Create New Service button ar the right top corner.
- Input the name
My First Serviceand press Create button.
2. Configure and Register Chat Asset
- Login to Connect Portal.
- Go to Assets -> Apps, press Configure New App and select Mobile / Web option.

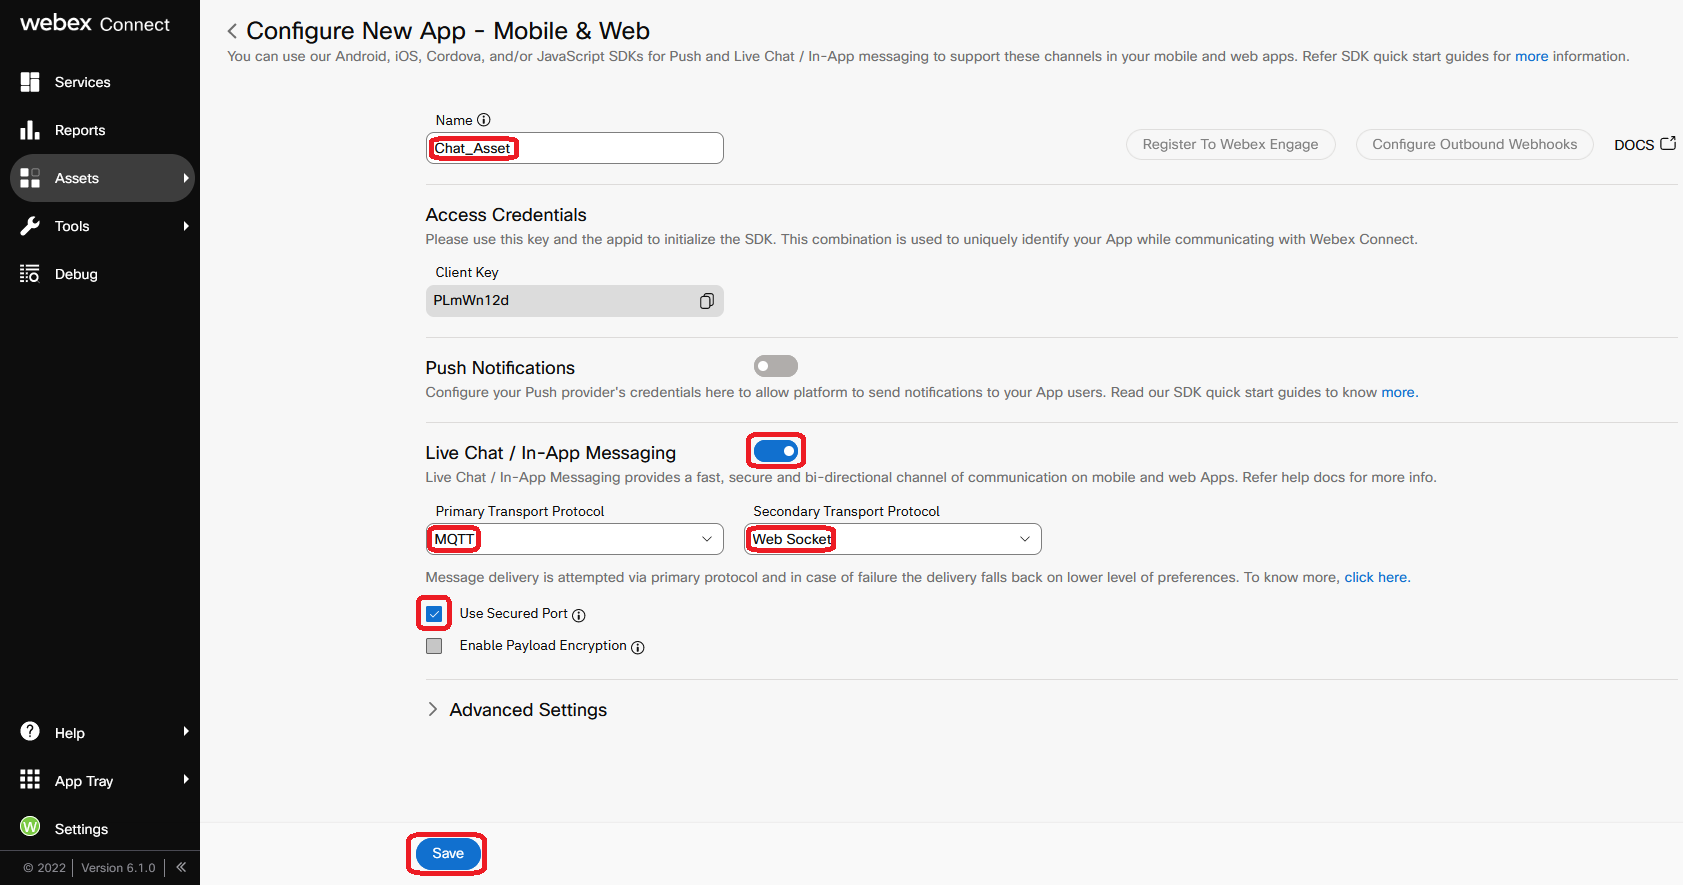
- Input Name as
Chat_Asset. - Toggle/enable Live Chat / In-AppMessaging to ON and choose Primary Transport Protocol as
MQTT& Secondary Transport Protocol asWeb Socketthen tick Use Secured Port checkbox and press Save button.
Note: If there is an error that your request cannot be processed, please press Save button one more time.
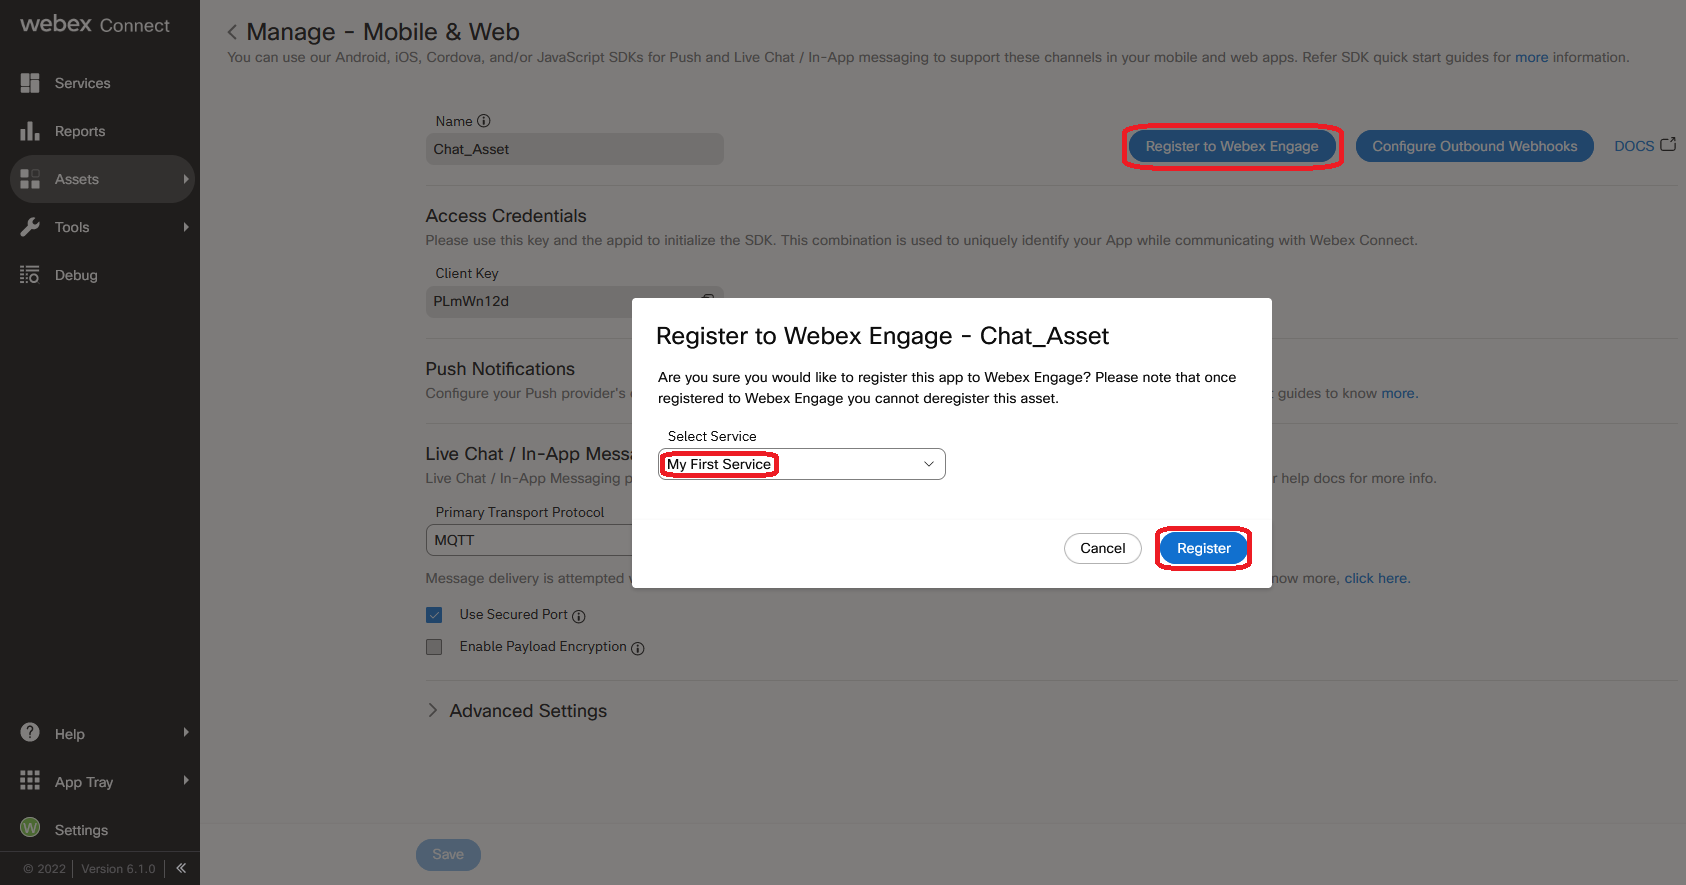
- Once asset is saved, press Register To Webex Engage at the top, choose My First Service from the drop-down list and press Register button.
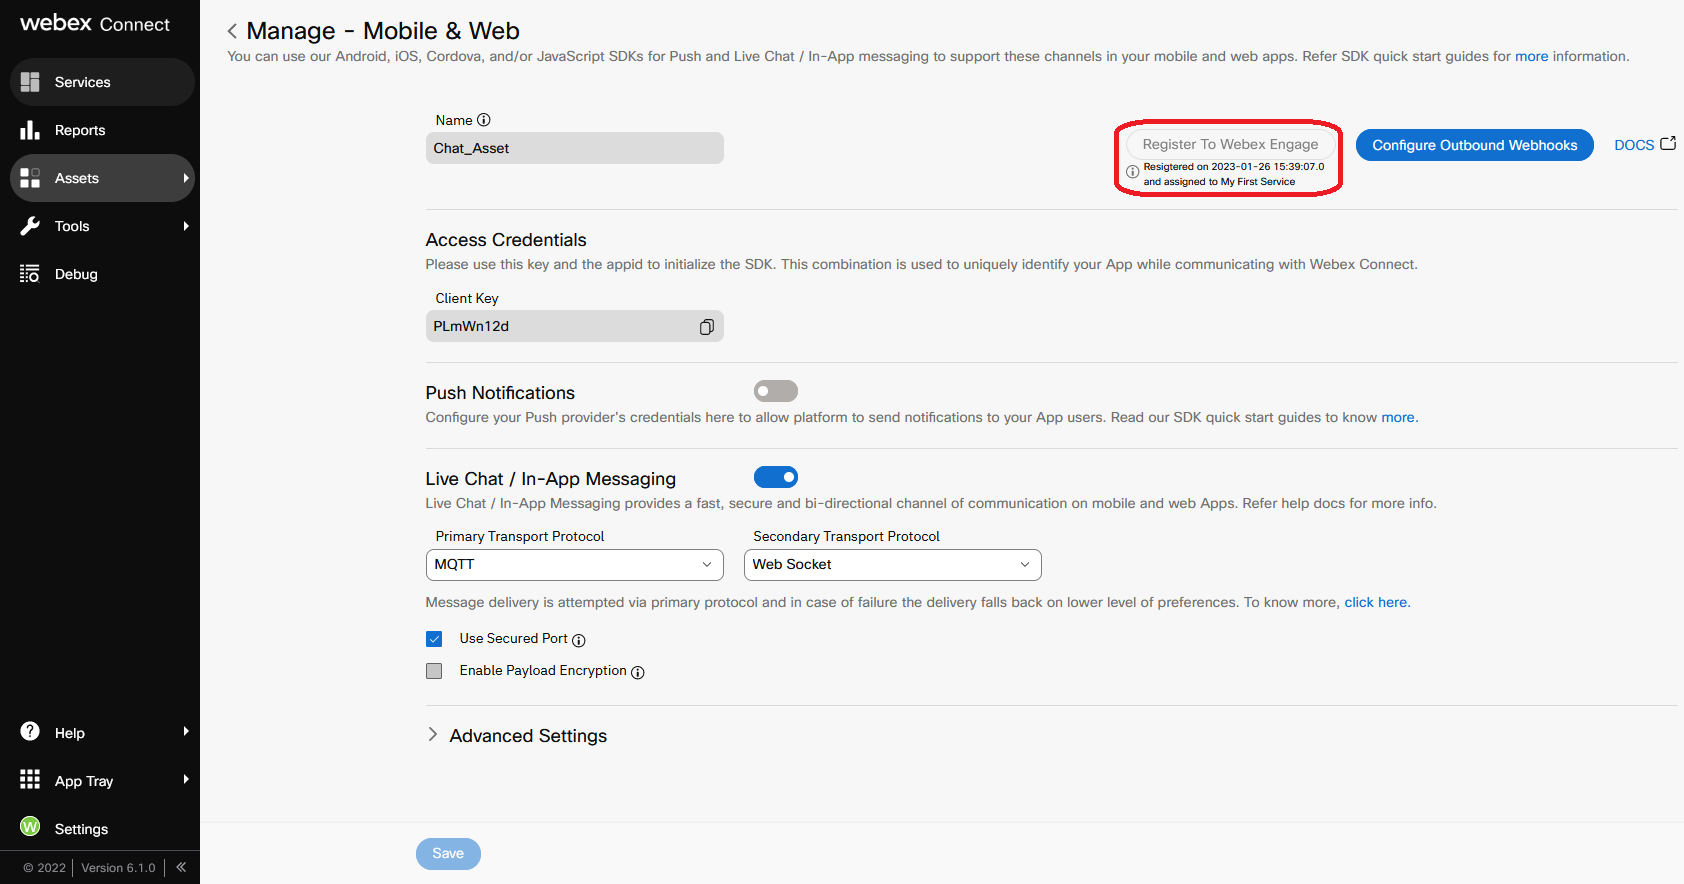
- Check and make sure the asset has been succesfully registered to the service and Register To Webex Engage button has been greyed out.
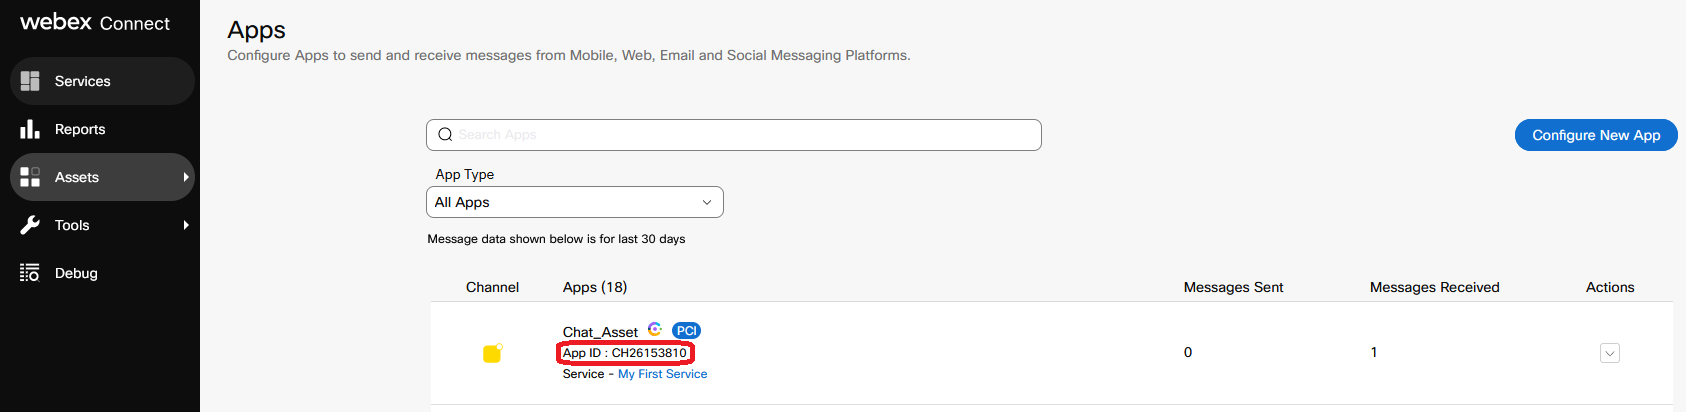
- Return to Assets -> Apps, find ChatAsset, copy App ID, paste it into the text file and save. We will use it when configuring chat flow later.
3. Create Entry Point for Chat
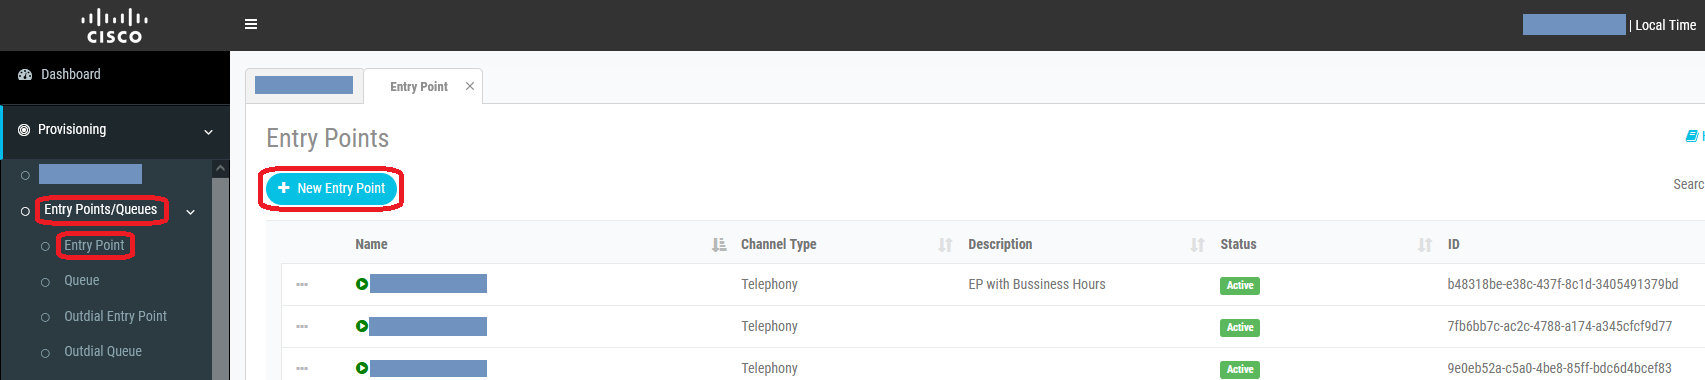
- Login to Webex CC Management Portal URL with the credentials and access the menu Provisioning -> Entry Point/Queues -> Entry Point.
- Press New Entry Point button.
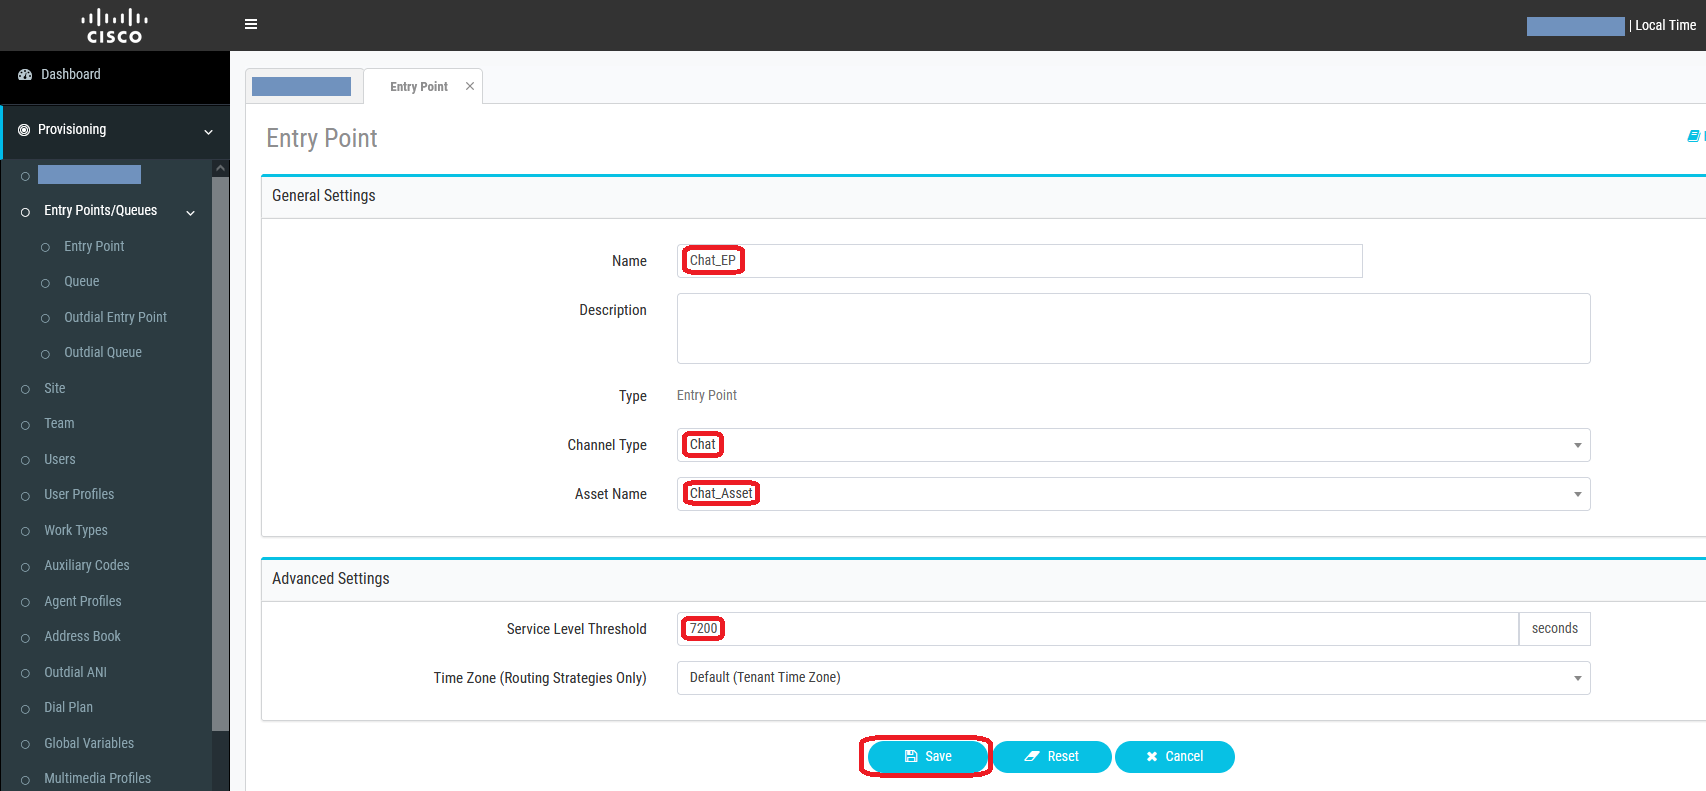
- Input Name as
Chat_EP. - Select
Chatfrom the Channel Type drop-down list. - Select
Chat_Assetas an Asset Name. - Set Service Level Threshold as
7200seconds (2 hours). - The Time Zone can stay as default value.
- Click on Save after comparing your values with the screenshot below.
4. Create Queue for Chat
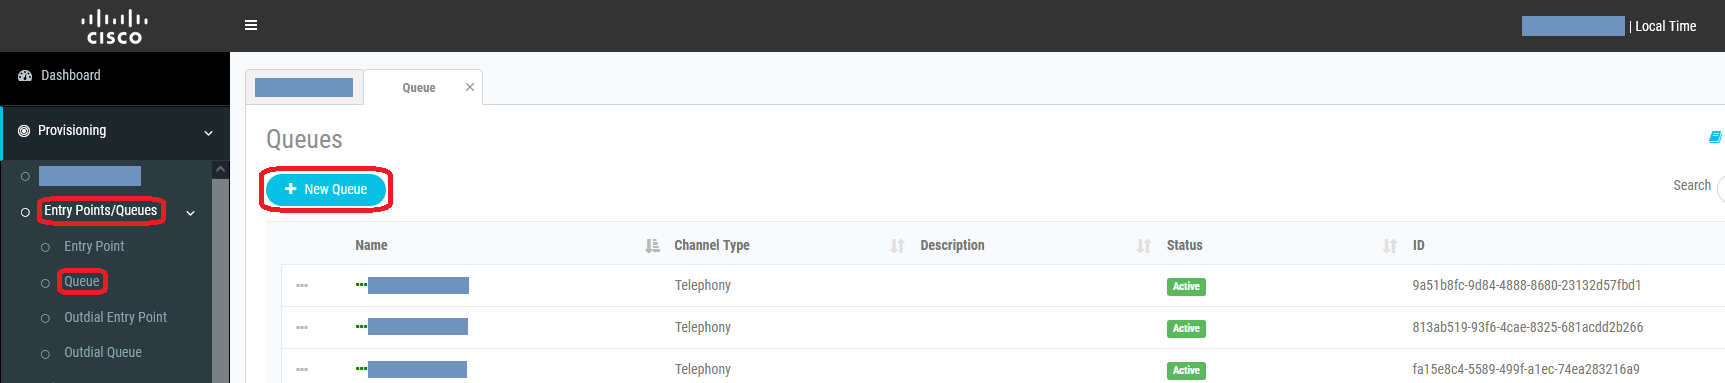
- On Webex CC Management Portal access the menu Provisioning -> Entry Point/Queues -> Queue.
- Click on New Queue.
- Input Name as
Chat_Q. - Select
Chatin the Channel Type section. - Leave the Queue Routing Type as default value
Longest Available Agent. - In the Chat Distribution click on Add Group and select
Team1.
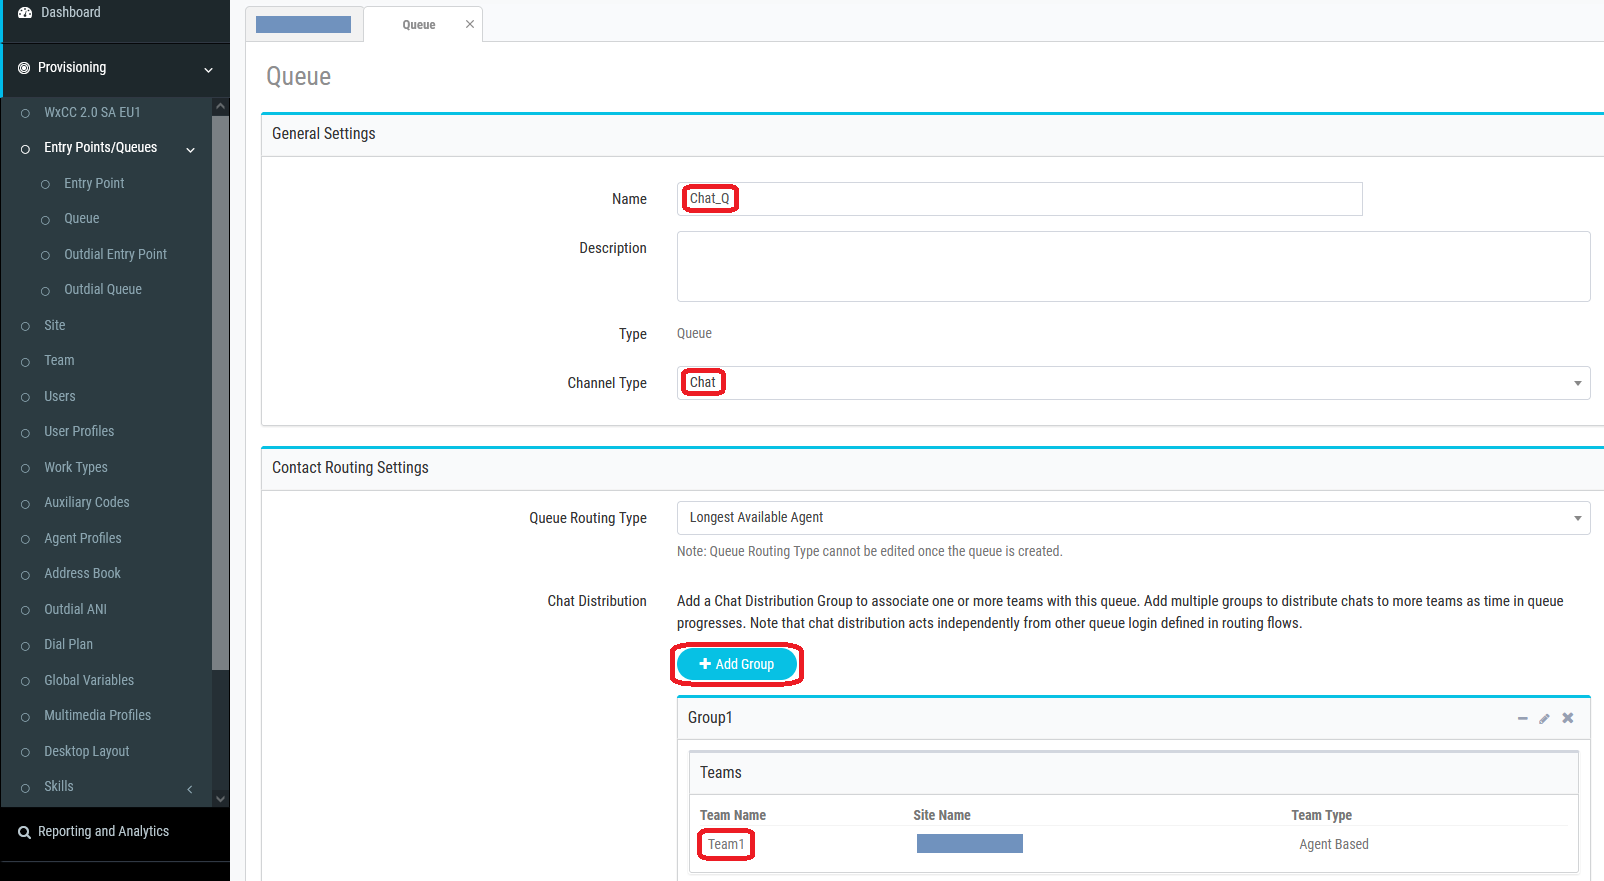
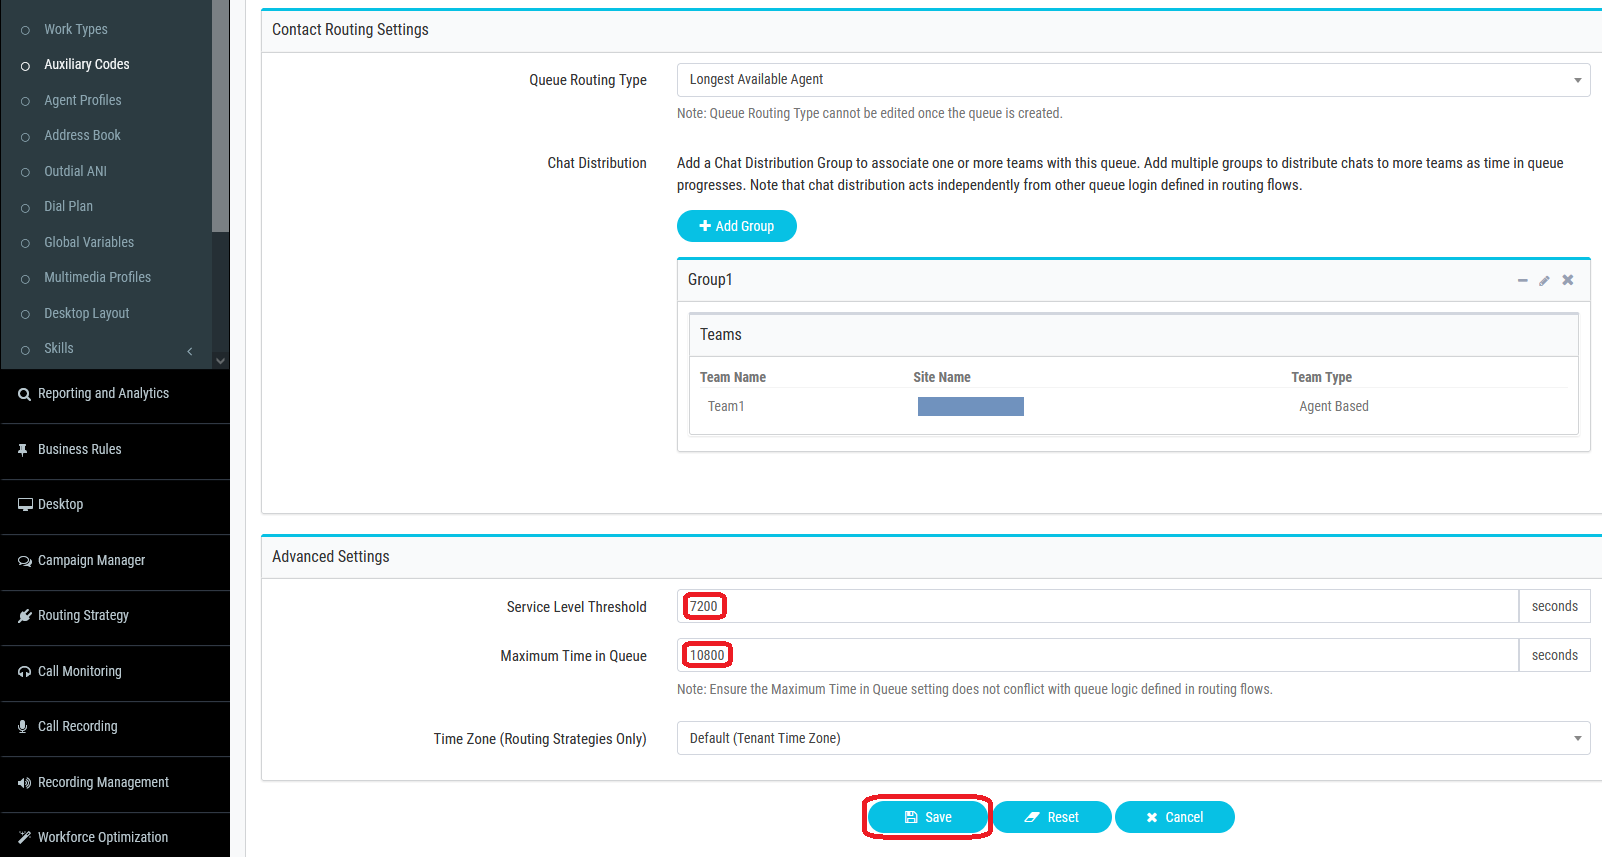
- Set Service Level Threshold as
7200seconds (2 hours). - Set Maximum Time in Queue as
10800seconds (3 hours). - The Time Zone can stay as default value.
- Click on Save after comparing your values with the screenshot below.
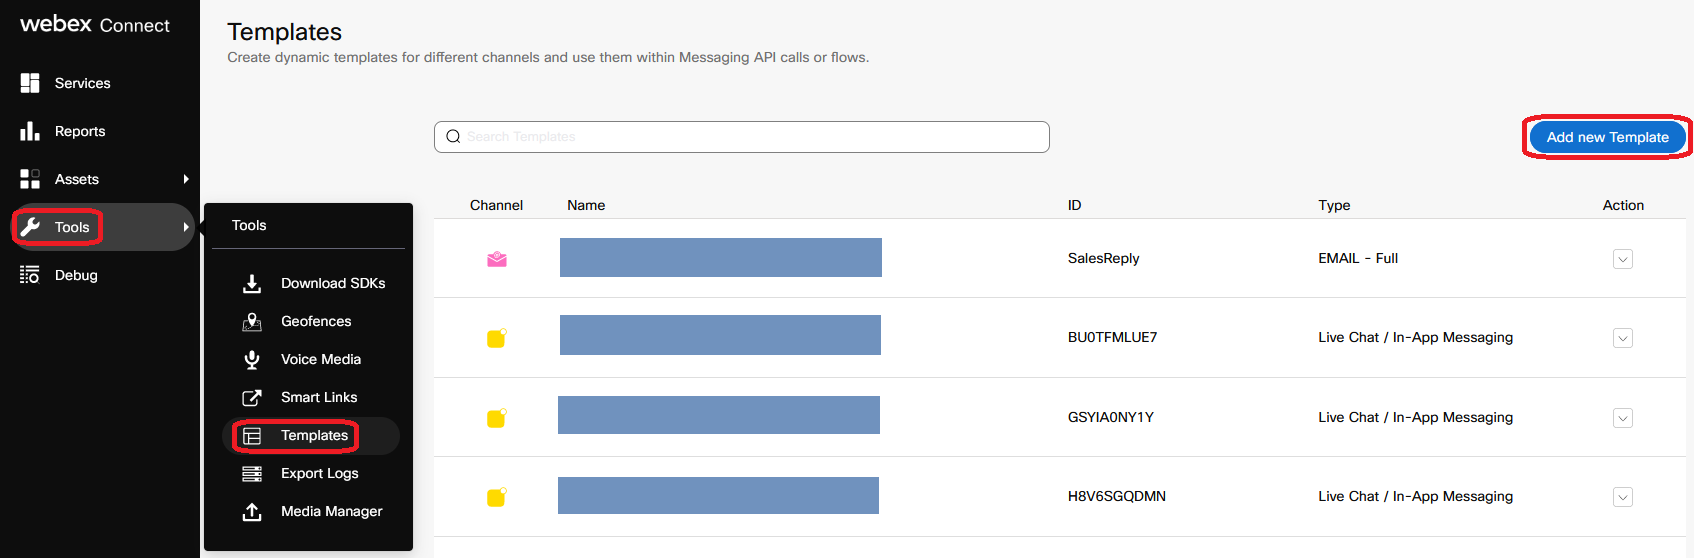
5. Create Chat Template
- Login to Webex Connect UI.
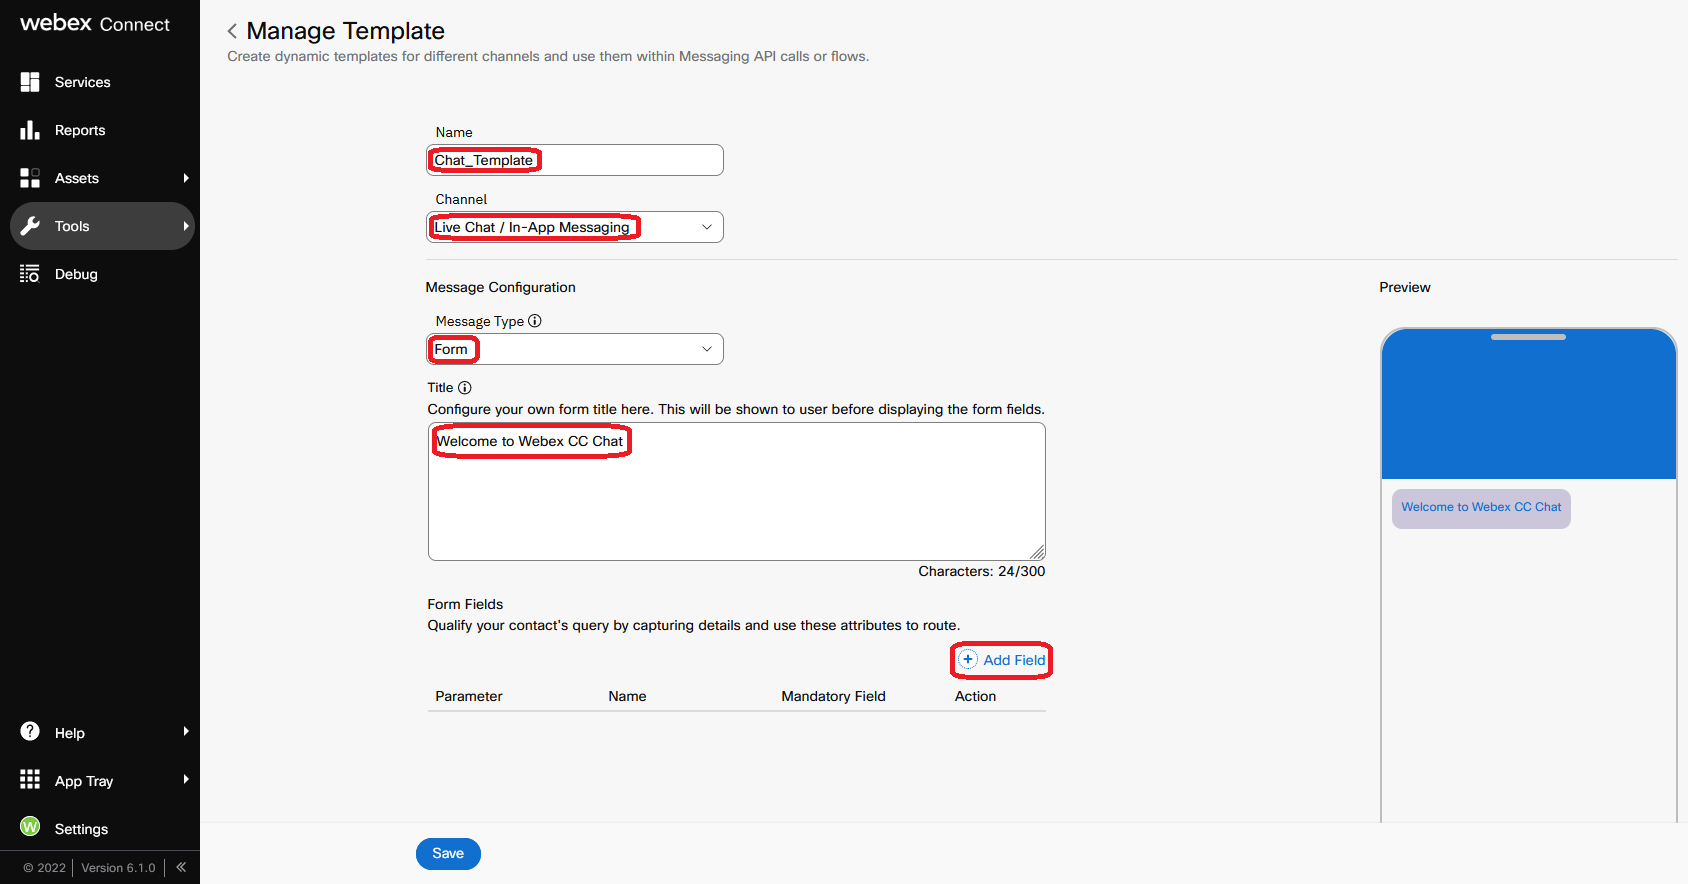
- Go to Tools -> Templates and press Add new Template button.
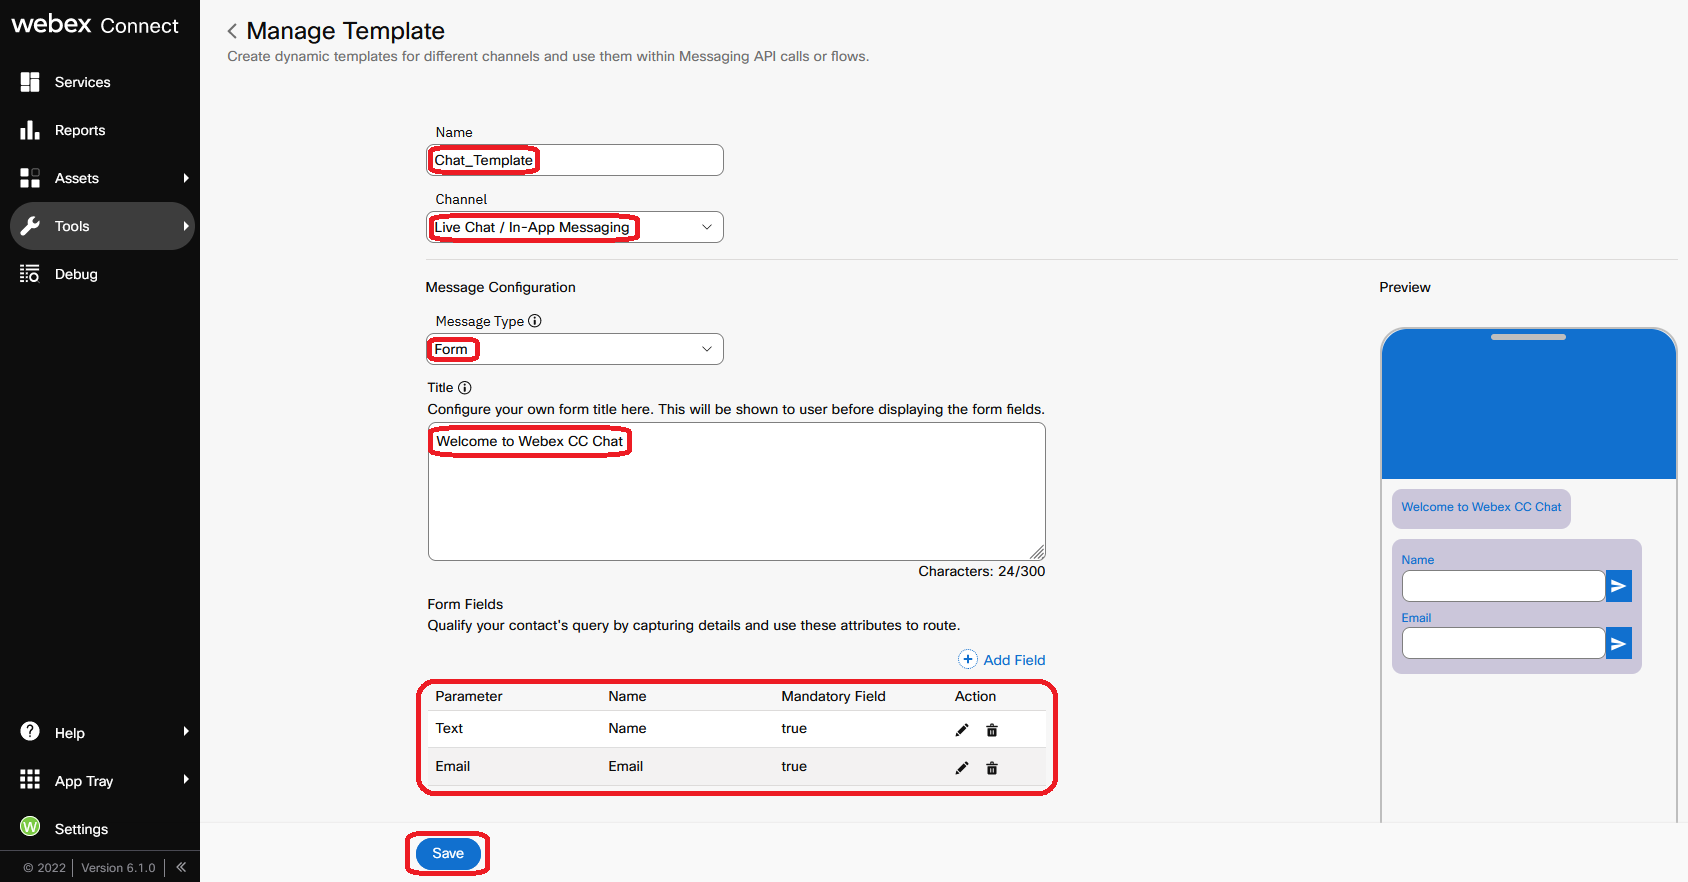
- Provide Name as
Chat_Templateand choose Channel as Live Chat / In-App Messaging - Select Message Type as Form*.
- Provide the Title as
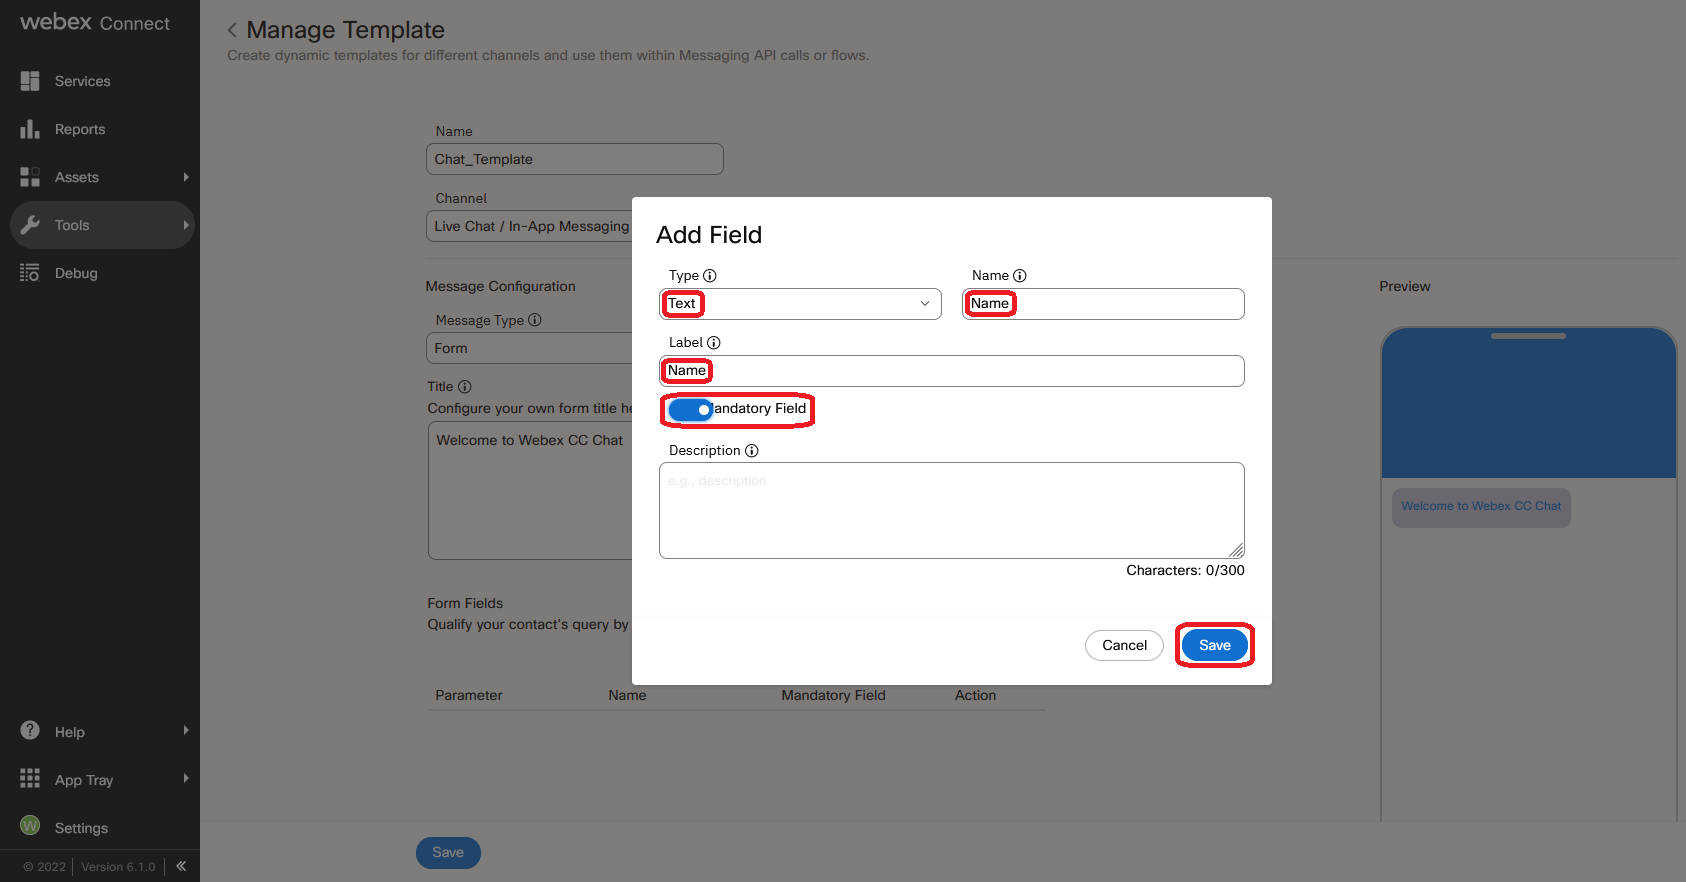
Welcome to Webex CC Chatand this will be the welcome message. - Click on Add Field to start adding the fields into the template.
- Add Name field with the following parameters into the form:
| Parameter Name | Parameter Value |
|---|---|
| Type | Text |
| Name | Name |
| Label | Name |
| Mandatory Field | On |
- Click on Add Field button and add Email field with the following parameters into the form:
| Parameter Name | Parameter Value |
|---|---|
| Type | |
| Name | |
| Label | |
| Mandatory Field | On |
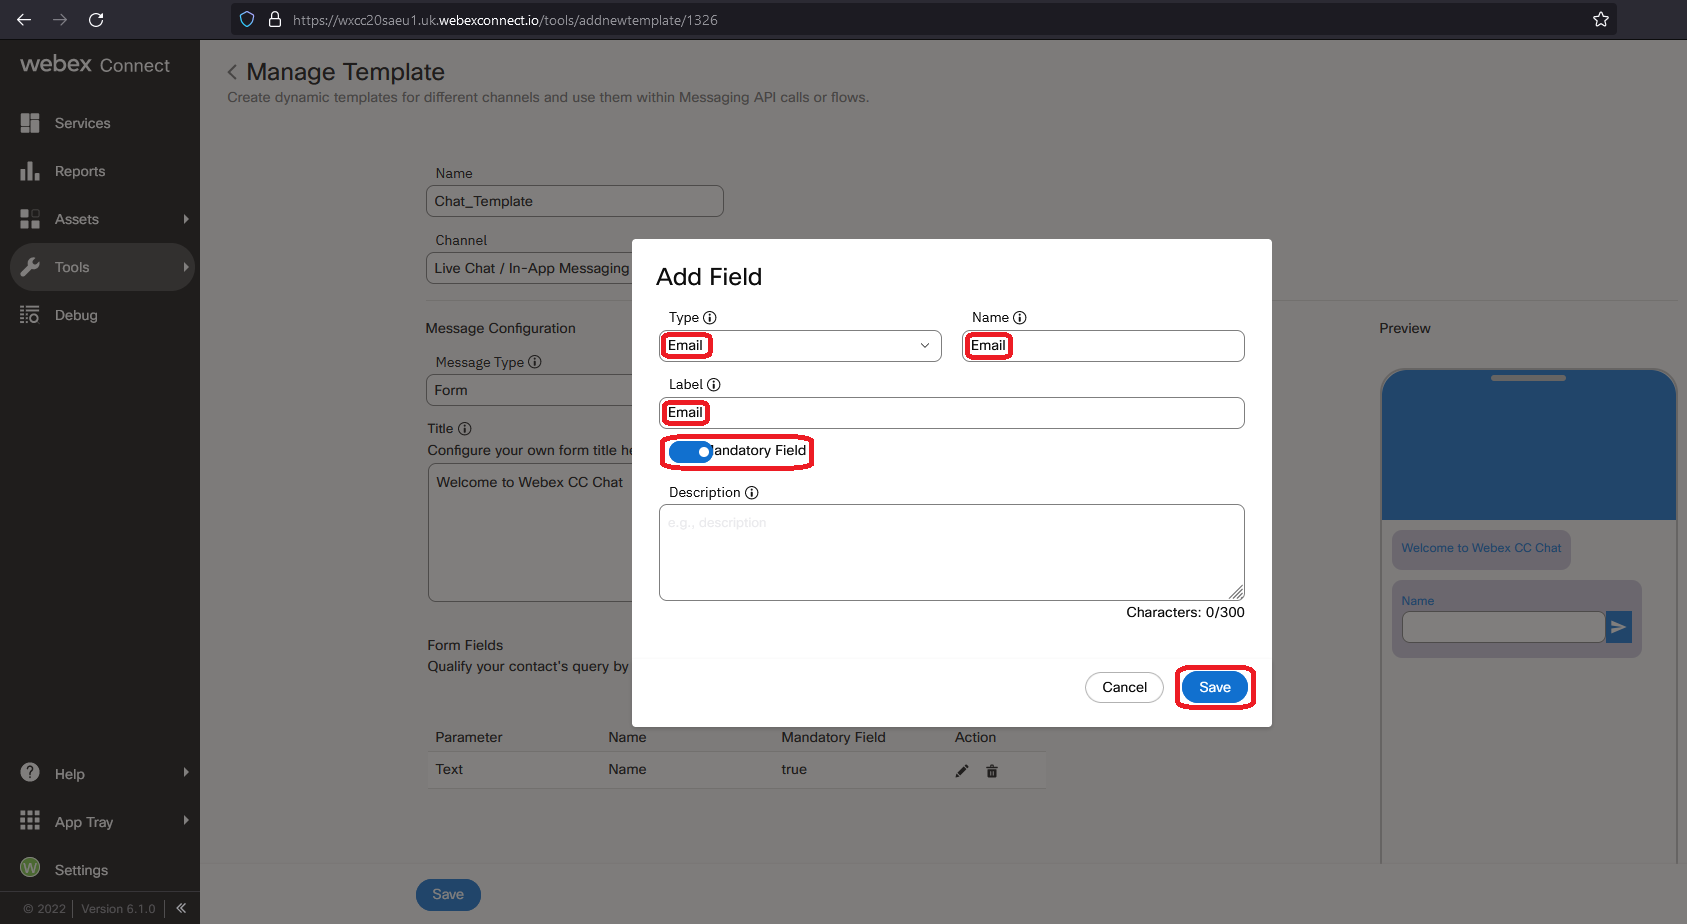
- Click on Save after comparing your values with the screenshot below.
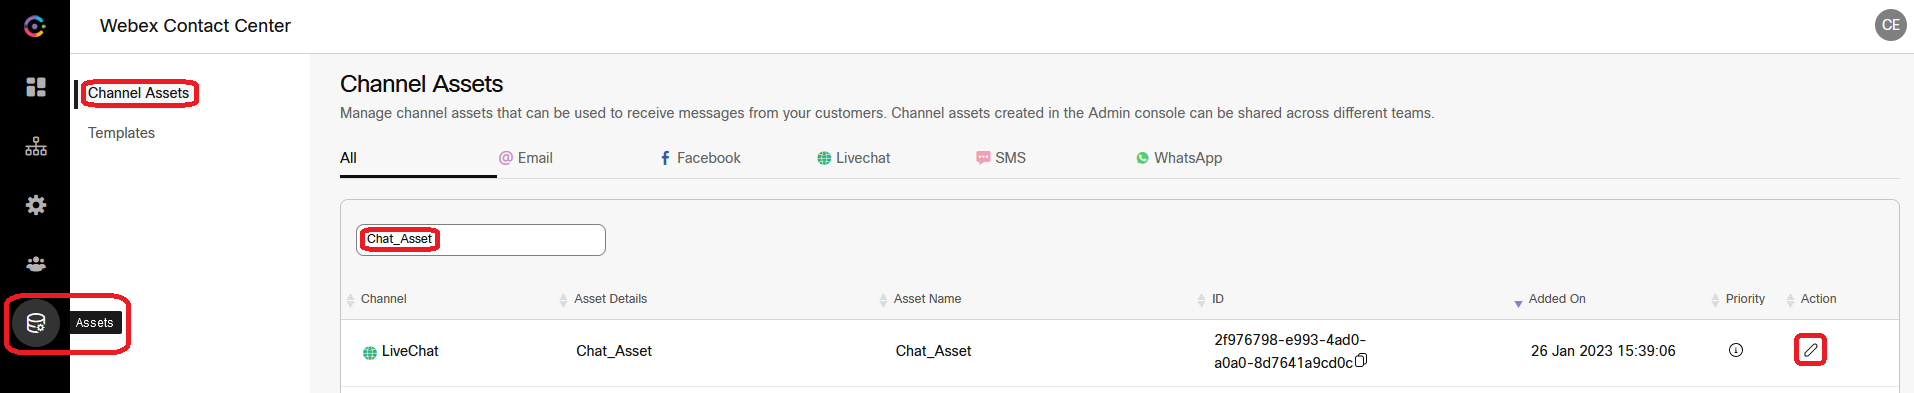
6. Website Widget Configuration
- Login to WxCC Management Portal access the menu and cross launch Engage Portal by choosing New Digital Channels.
- Go to Assets -> search and edit Chat_Asset which you have created in Connect Portal.
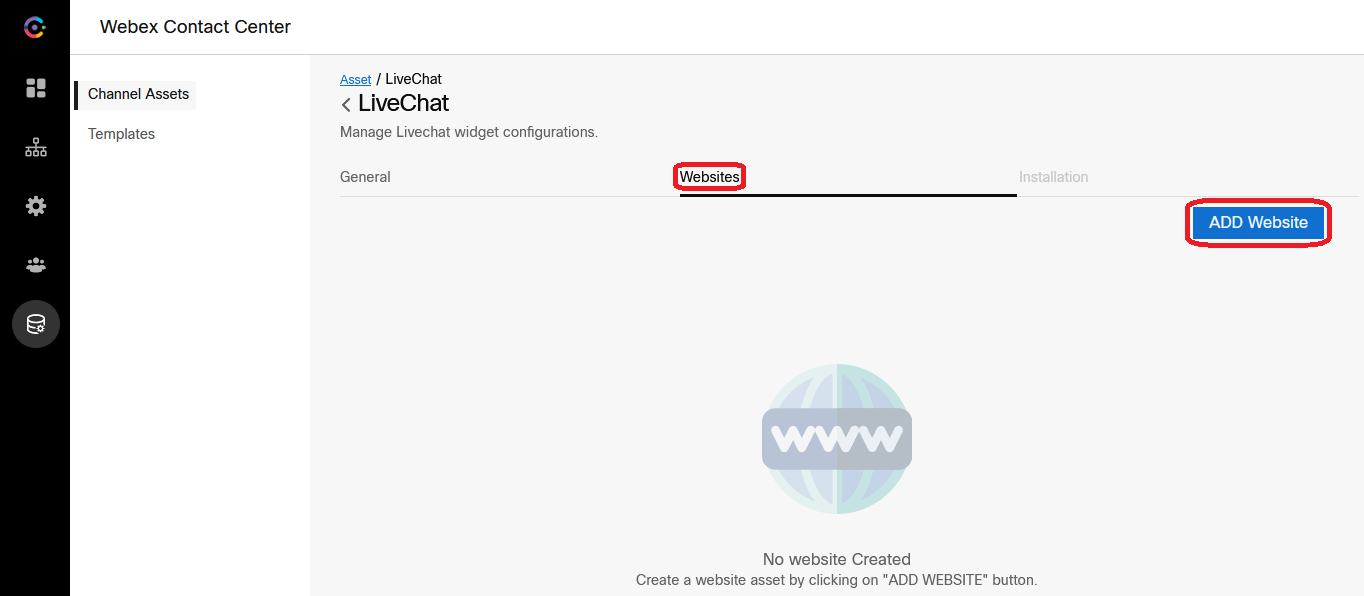
- Scroll down and click on Save Changes button.
- Scroll to top of the page and choose Websites tab.
- Click on ADD Website.
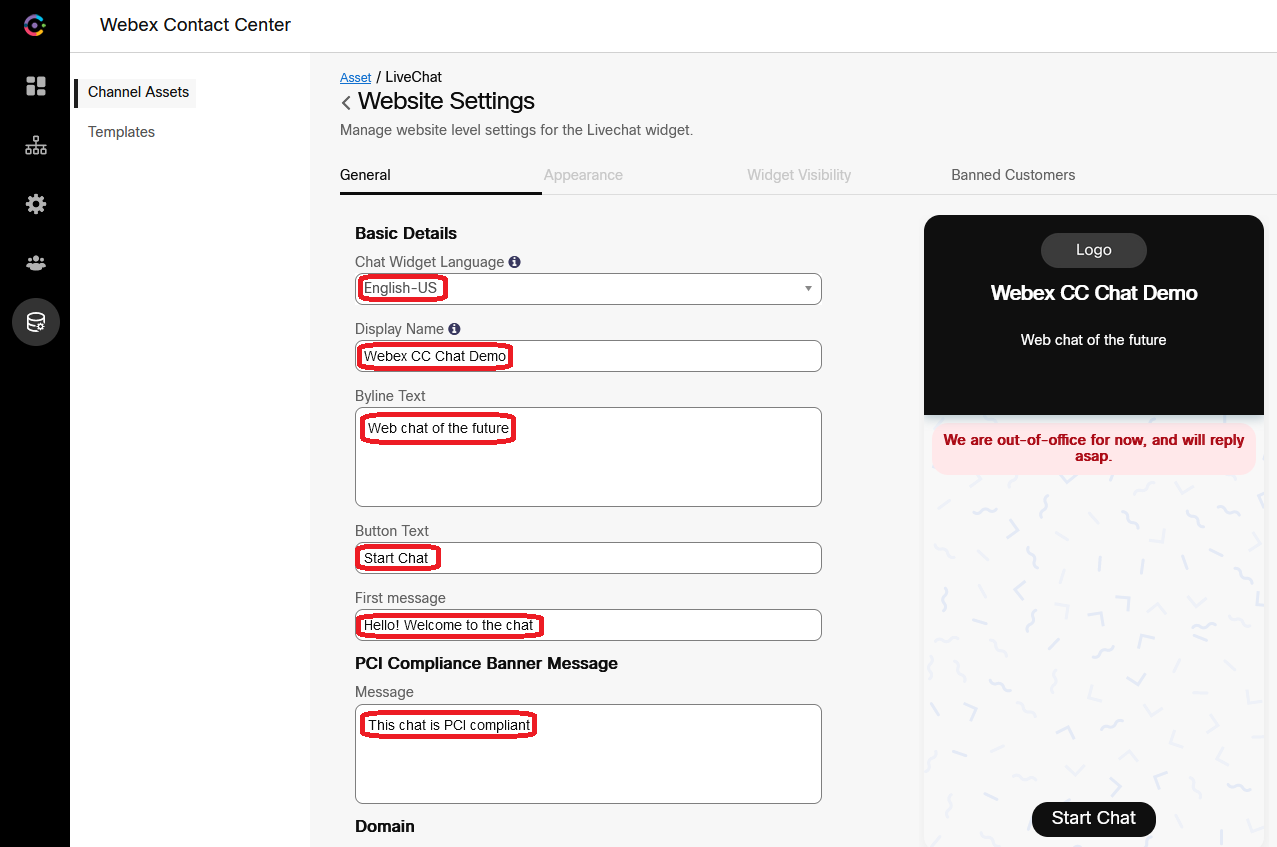
- Fill in the respective fields as per the table below:
| Parameter Name | Parameter Value |
|---|---|
| Chat Widget Language | English-US |
| Display Name | Webex CC Chat Demo |
| Byline Text | Web chat of the future |
| Button Text | Start Chat |
| First message | Hello! Welcome to the chat |
| PCI Compliance Banner Message | This chat is PCI compliant |
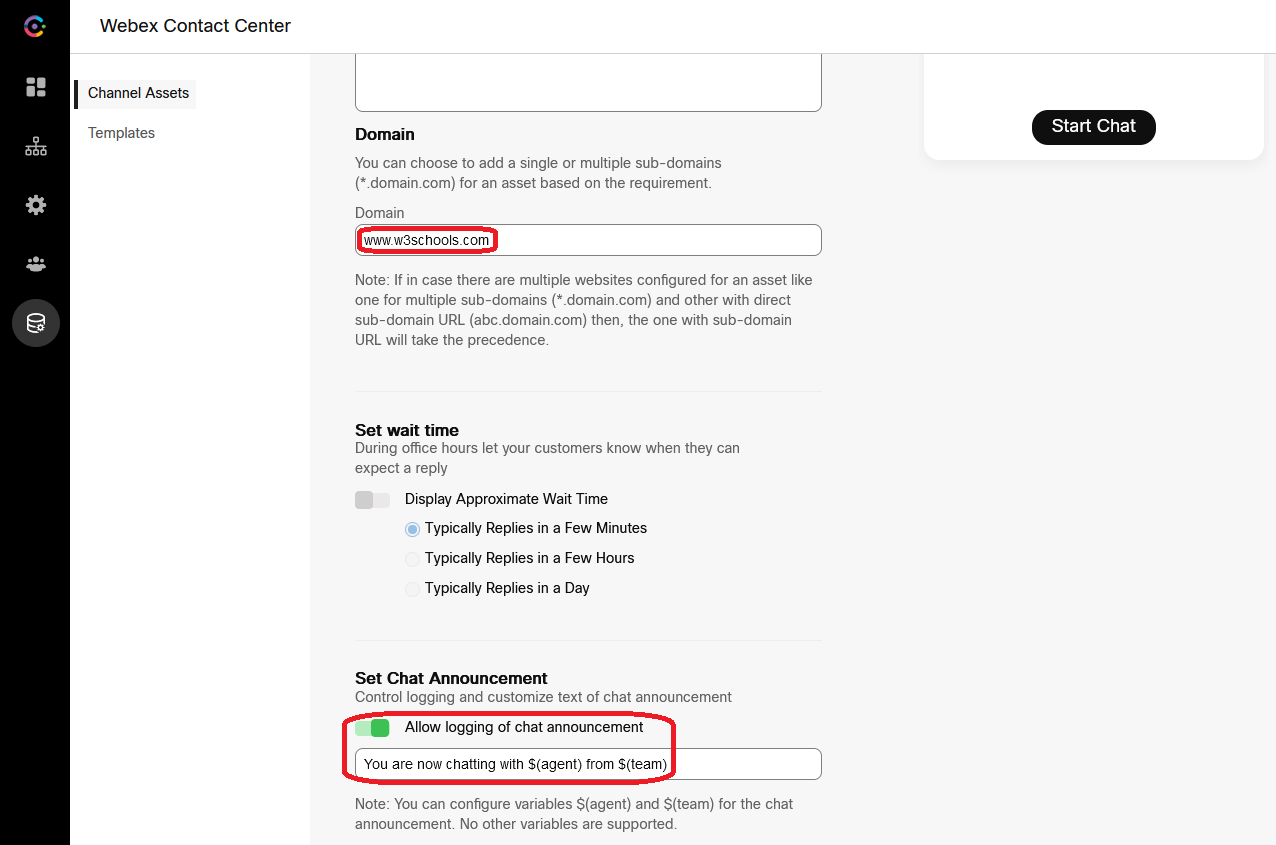
| Domain | www.w3schools.com |
| Set wait time | Disabled |
| Set Chat Announcement | Enabled |
- Scroll down and click on Save changes button after comparing your values with the screenshot below.
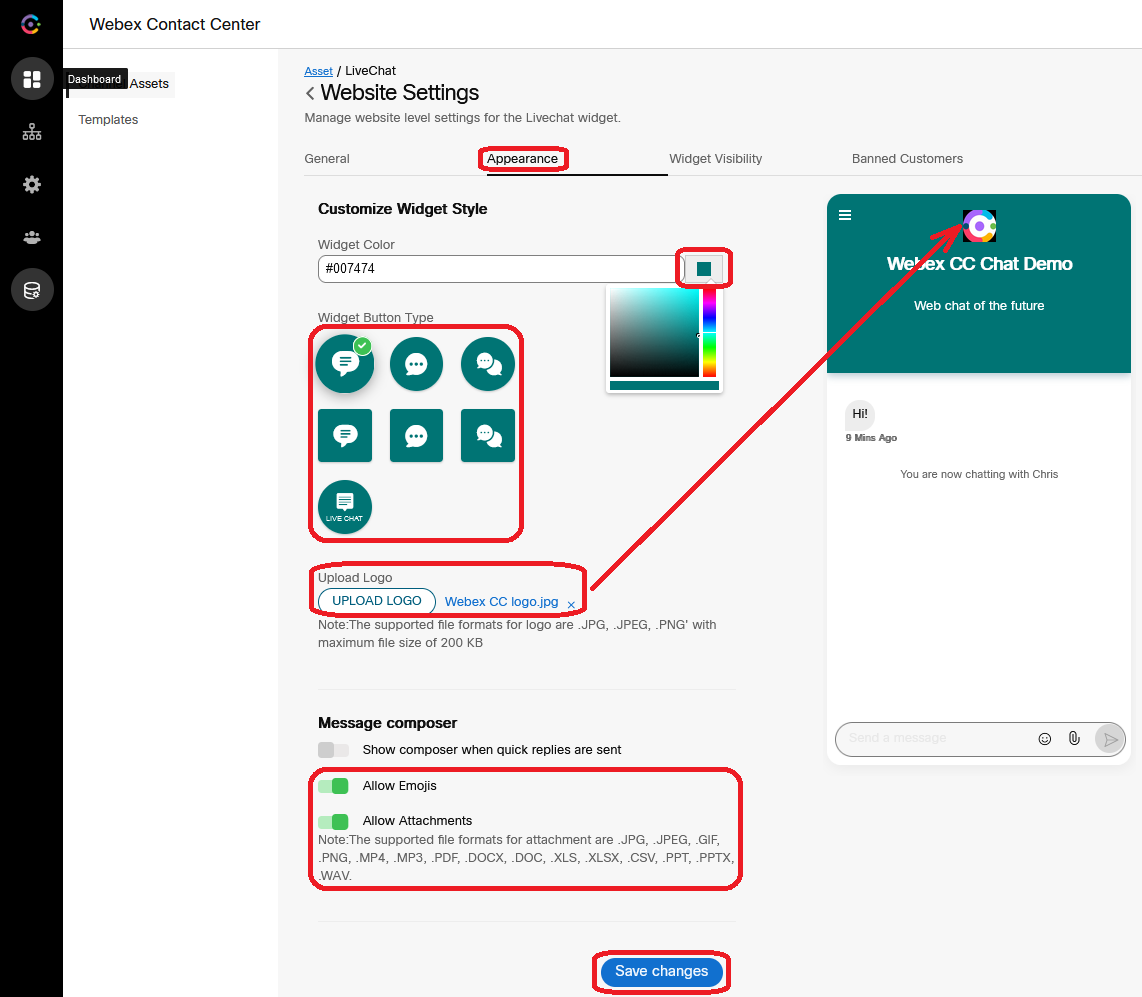
- Scroll up, select Appearance and change the settings:
- [Optional] Widget Color
- [Optional] Widget Button Type
- [Optional[ Logo
- Enable Emojis
- Enable Attachments
- Press Save changes button at the bottom of the page.
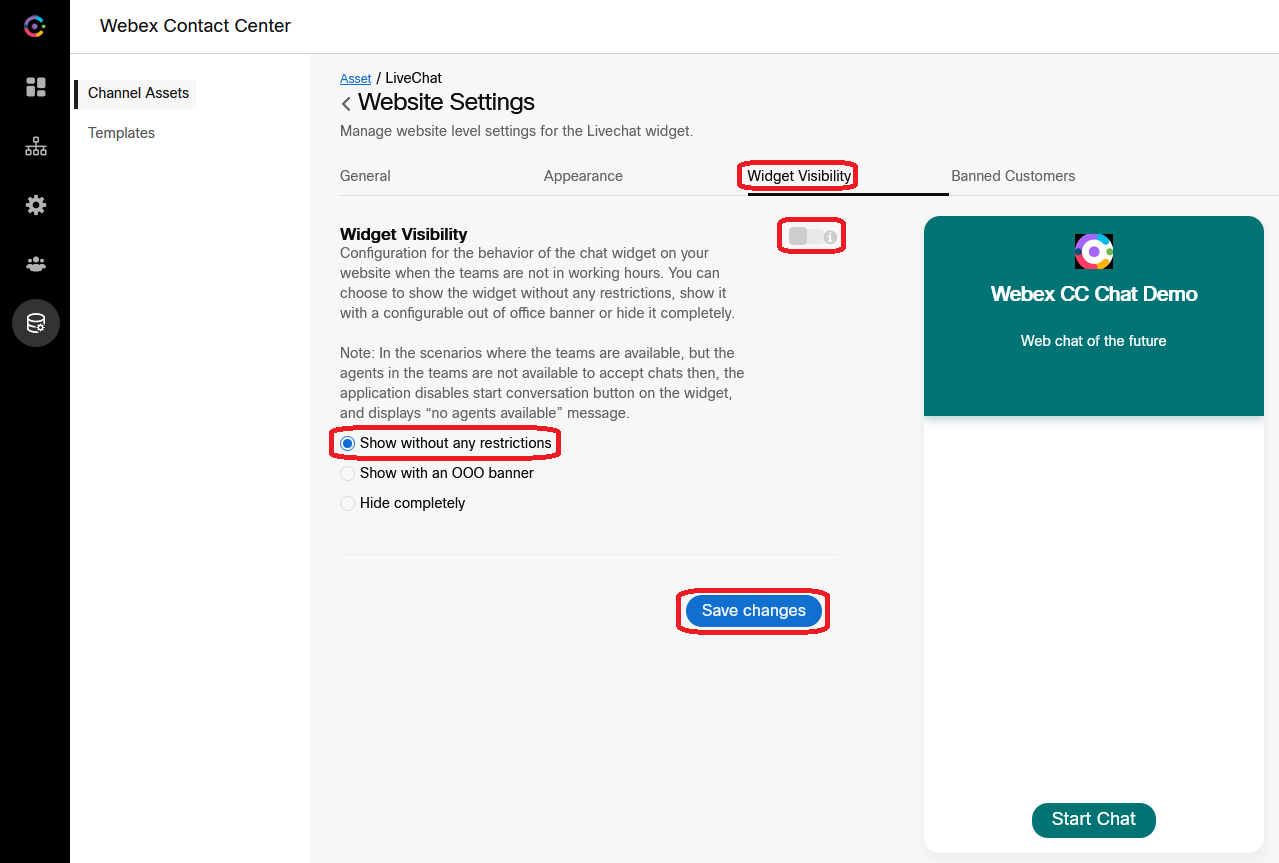
- Scroll up, select Widget Visibility tab and make sure that Force Turn Off Widget switch is disabled. Then select Widget Visibility as Show without any restrictions and save changes.
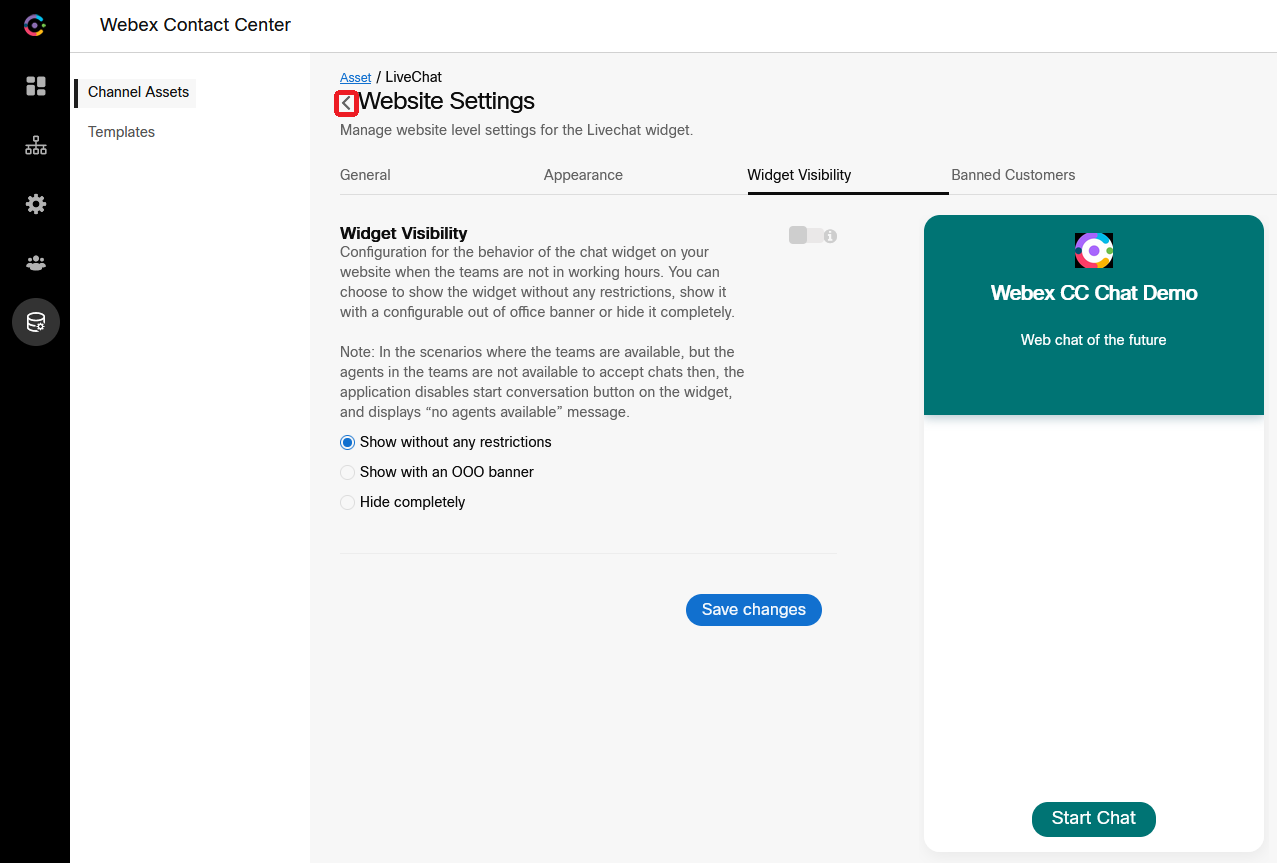
- Now click on < arrow near Website Settings and go-back to edit your chat asset.
- Select Installation then click on Copy to copy the chat script to clipboard.
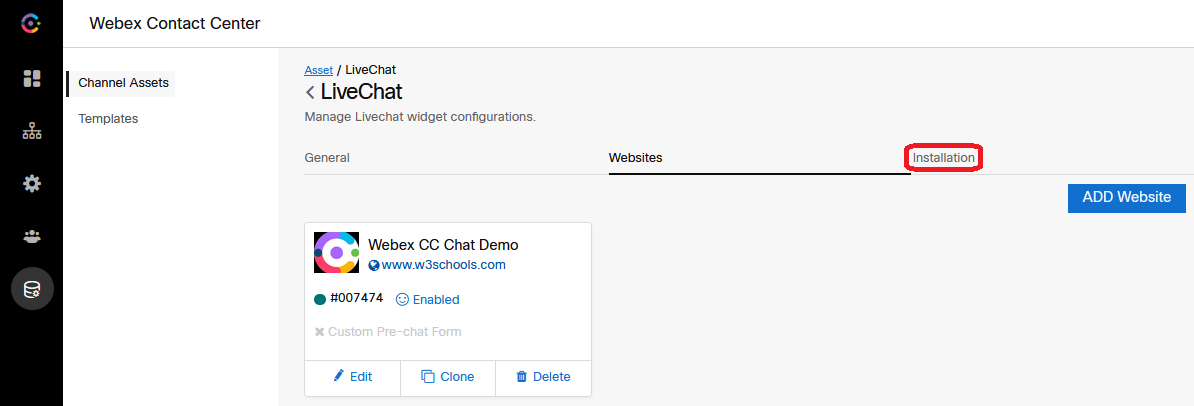
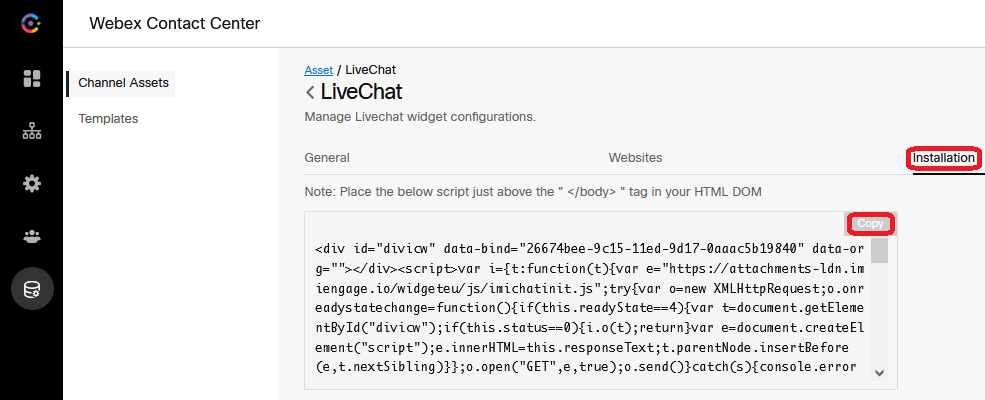
- Paste copied script into a text editor and save it. We will paste it on web site later.
7. Create Chat Inbound Flow
Note: Chat Inbound Flow is triggered whenever end user started new chat session or sent a message via existing one.
- Navigate to GitHub page with Webex Connect Flows - GitHub page.
- Goto to Webex Connect Flows -> v3.0 -> Template -> Media Specific Workflows -> Live Chat Inbound Flow.workflow.zip and click Download.
- Unzip the file.
- Go to Connect Portal, click on Services and select the service in which the Asset is created in step 2 above. It should be My First Service.
- In the service click on Flows -> Create Flow .
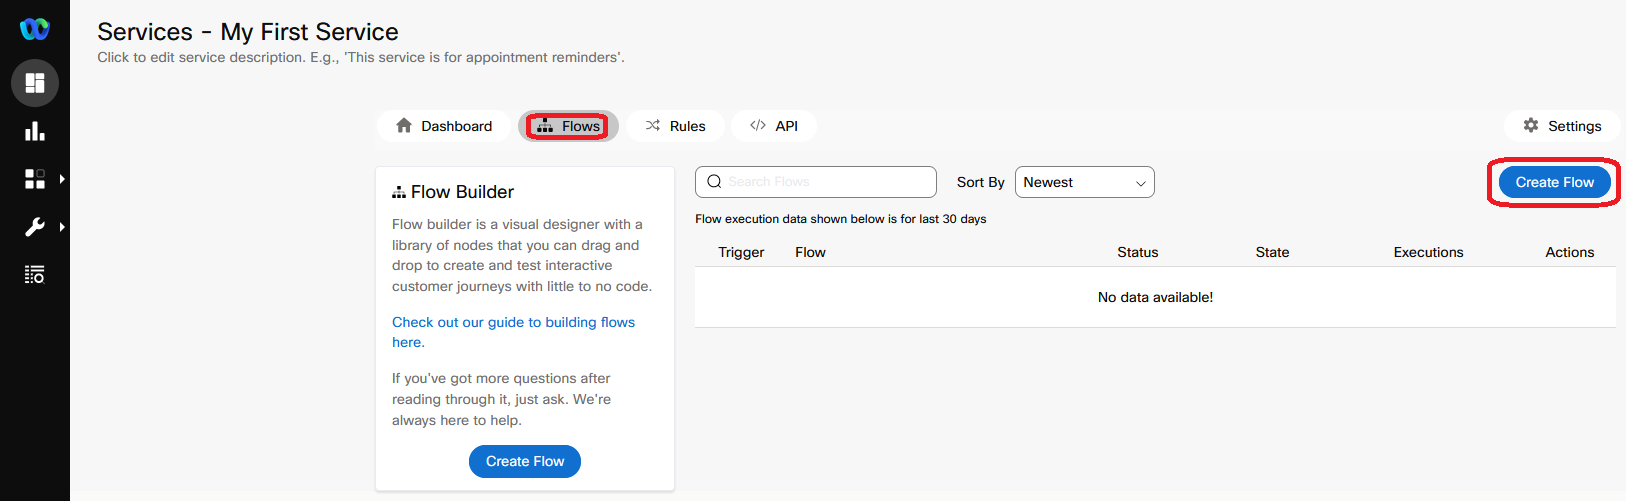
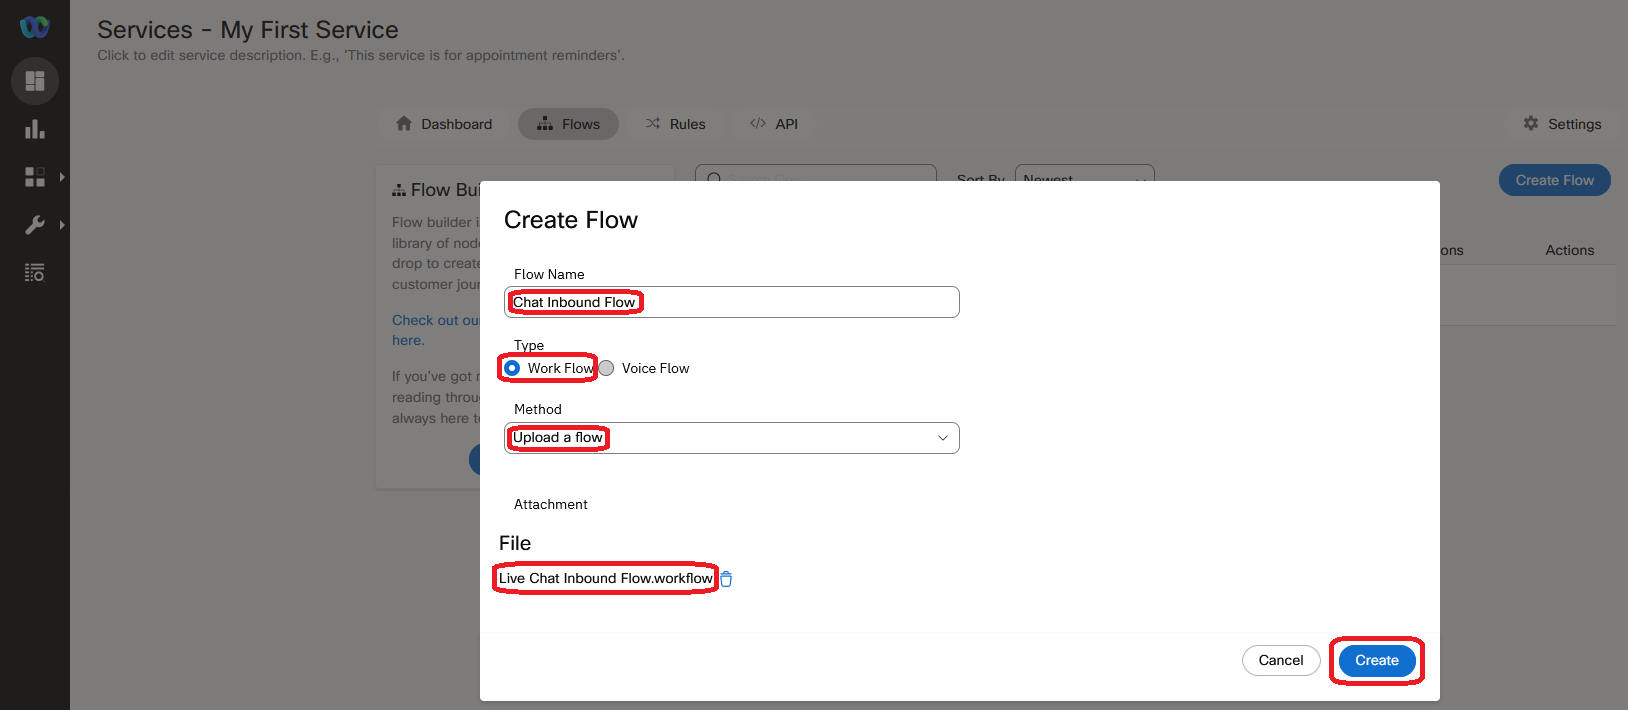
- Enter the Flow Name as
Chat Inbound Flow, select the Type as Work Flow and under Method select Upload a flow. - Drag and drop unzipped Live Chat Inbound Flow.workflow flow, click Create.
- You will be redirected to the new flow opened in the flow builder. Click Save to save the changes.
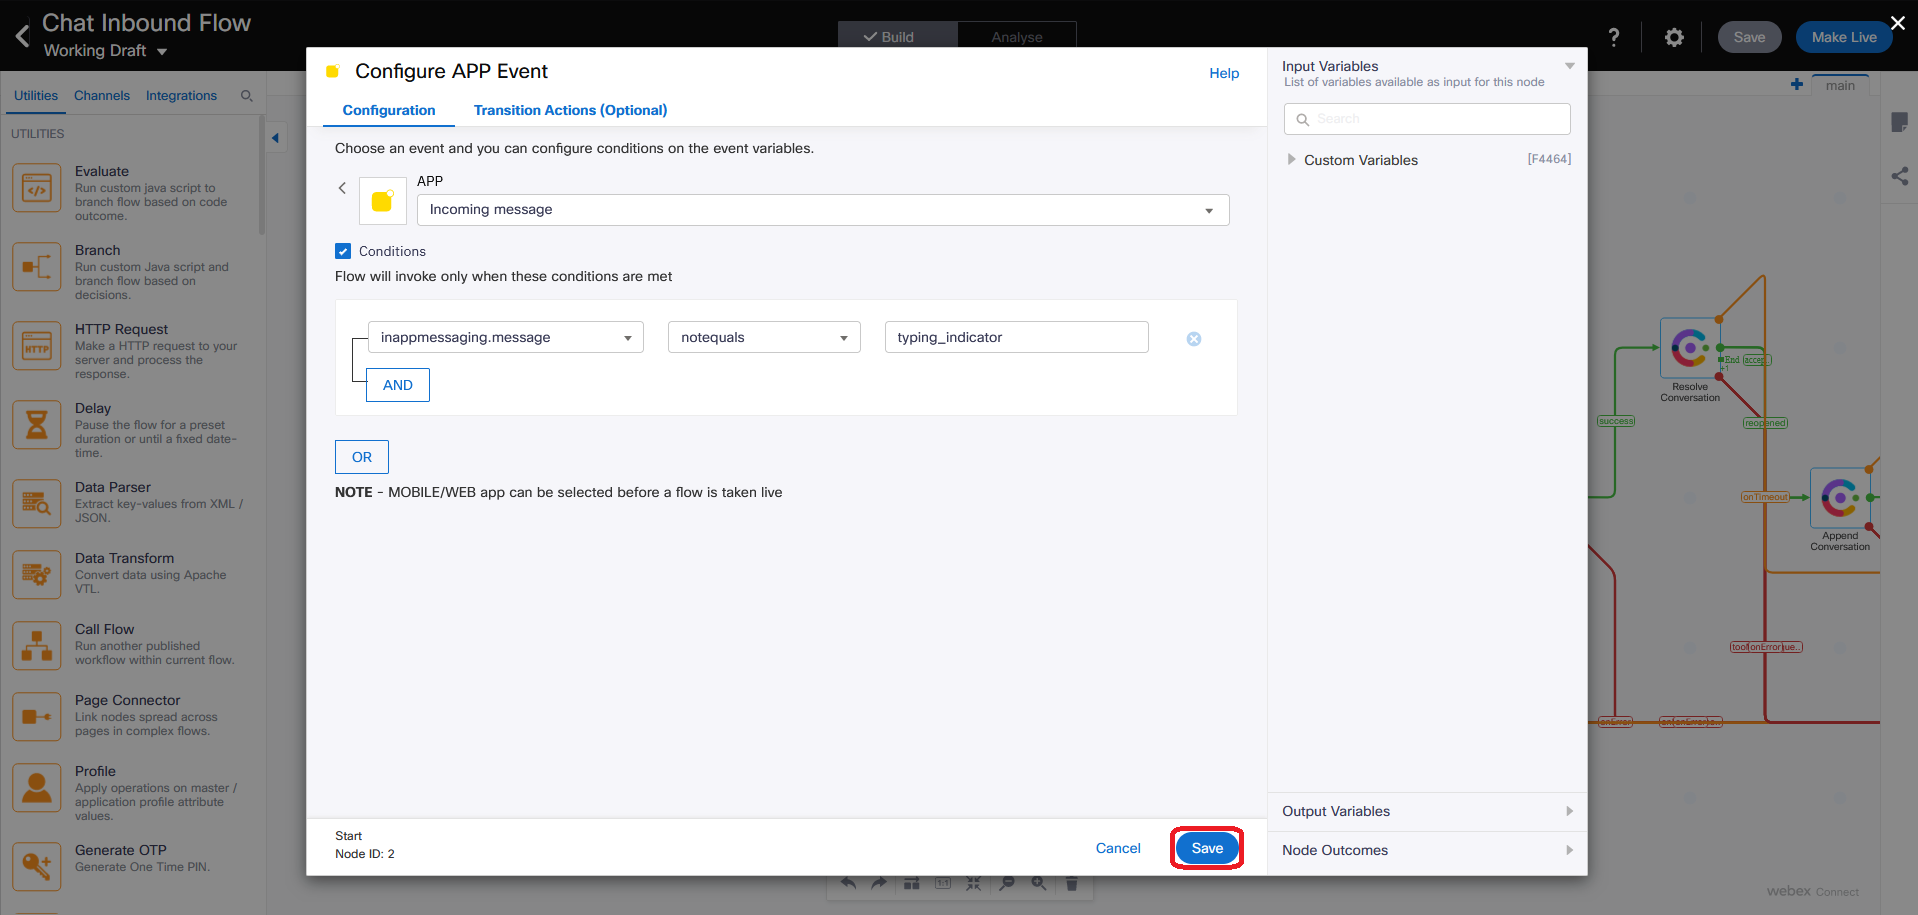
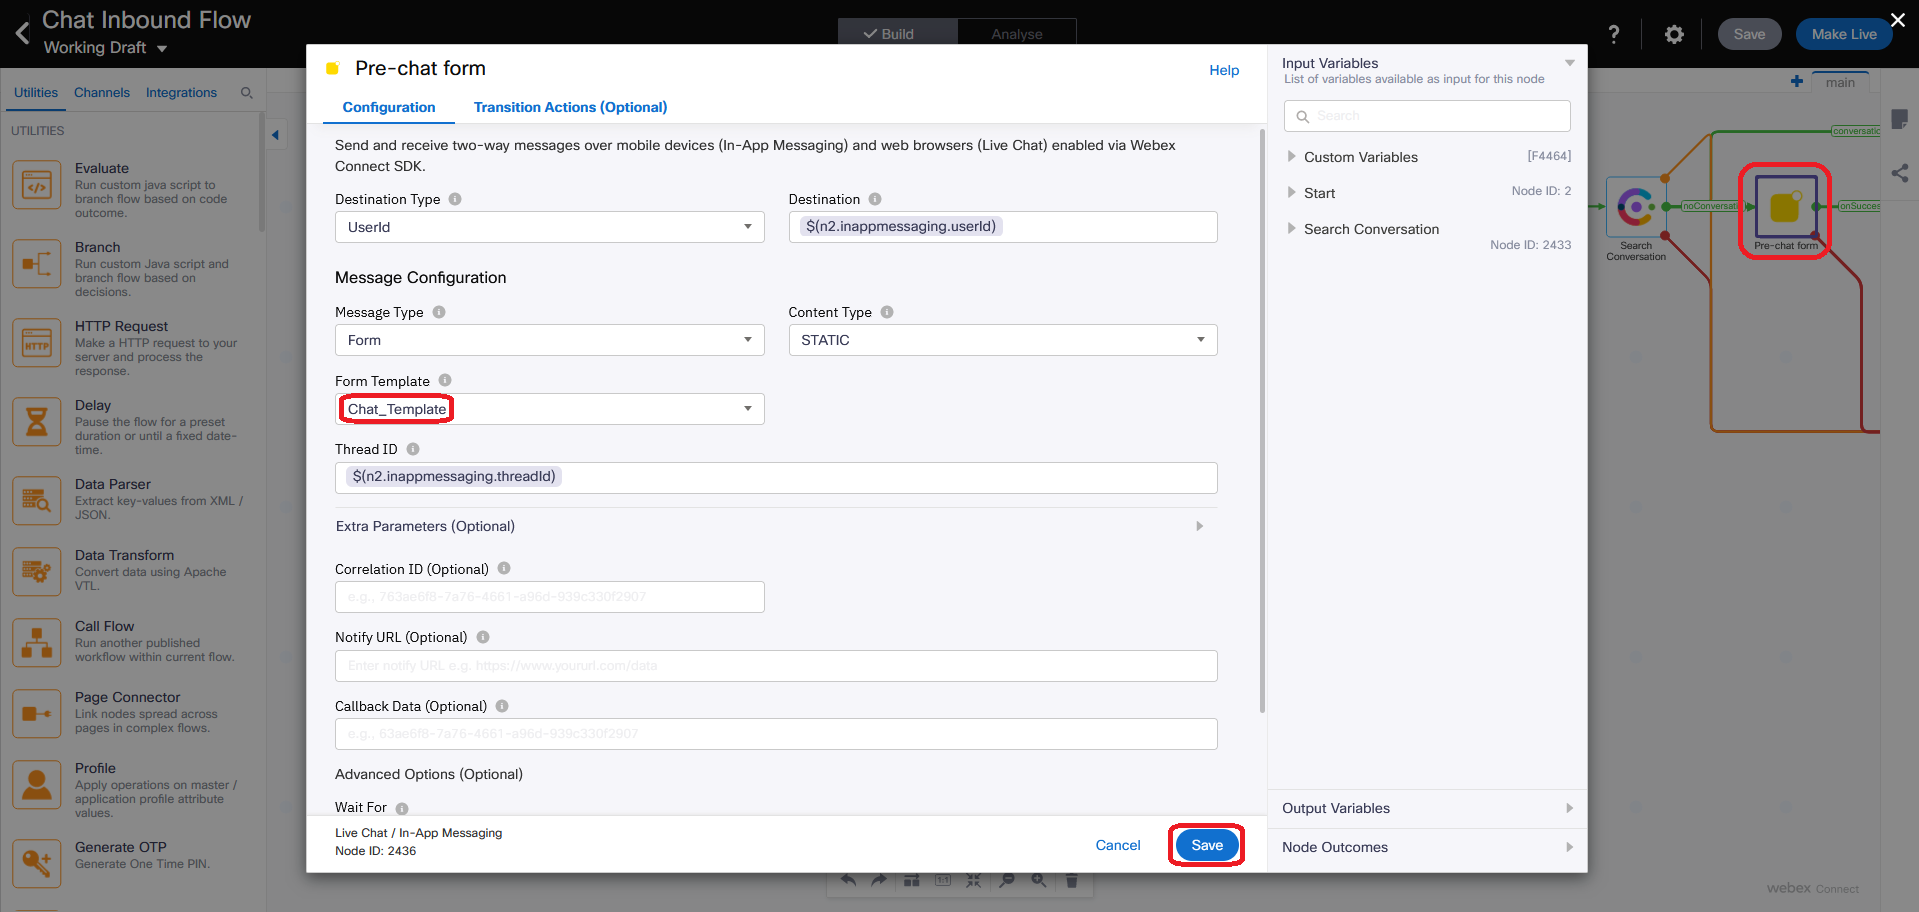
- In the Pre-chat form node the Form Template needs to be selected as Chat_Template created in step 5 above. Press Save button to save changes in node configuration.
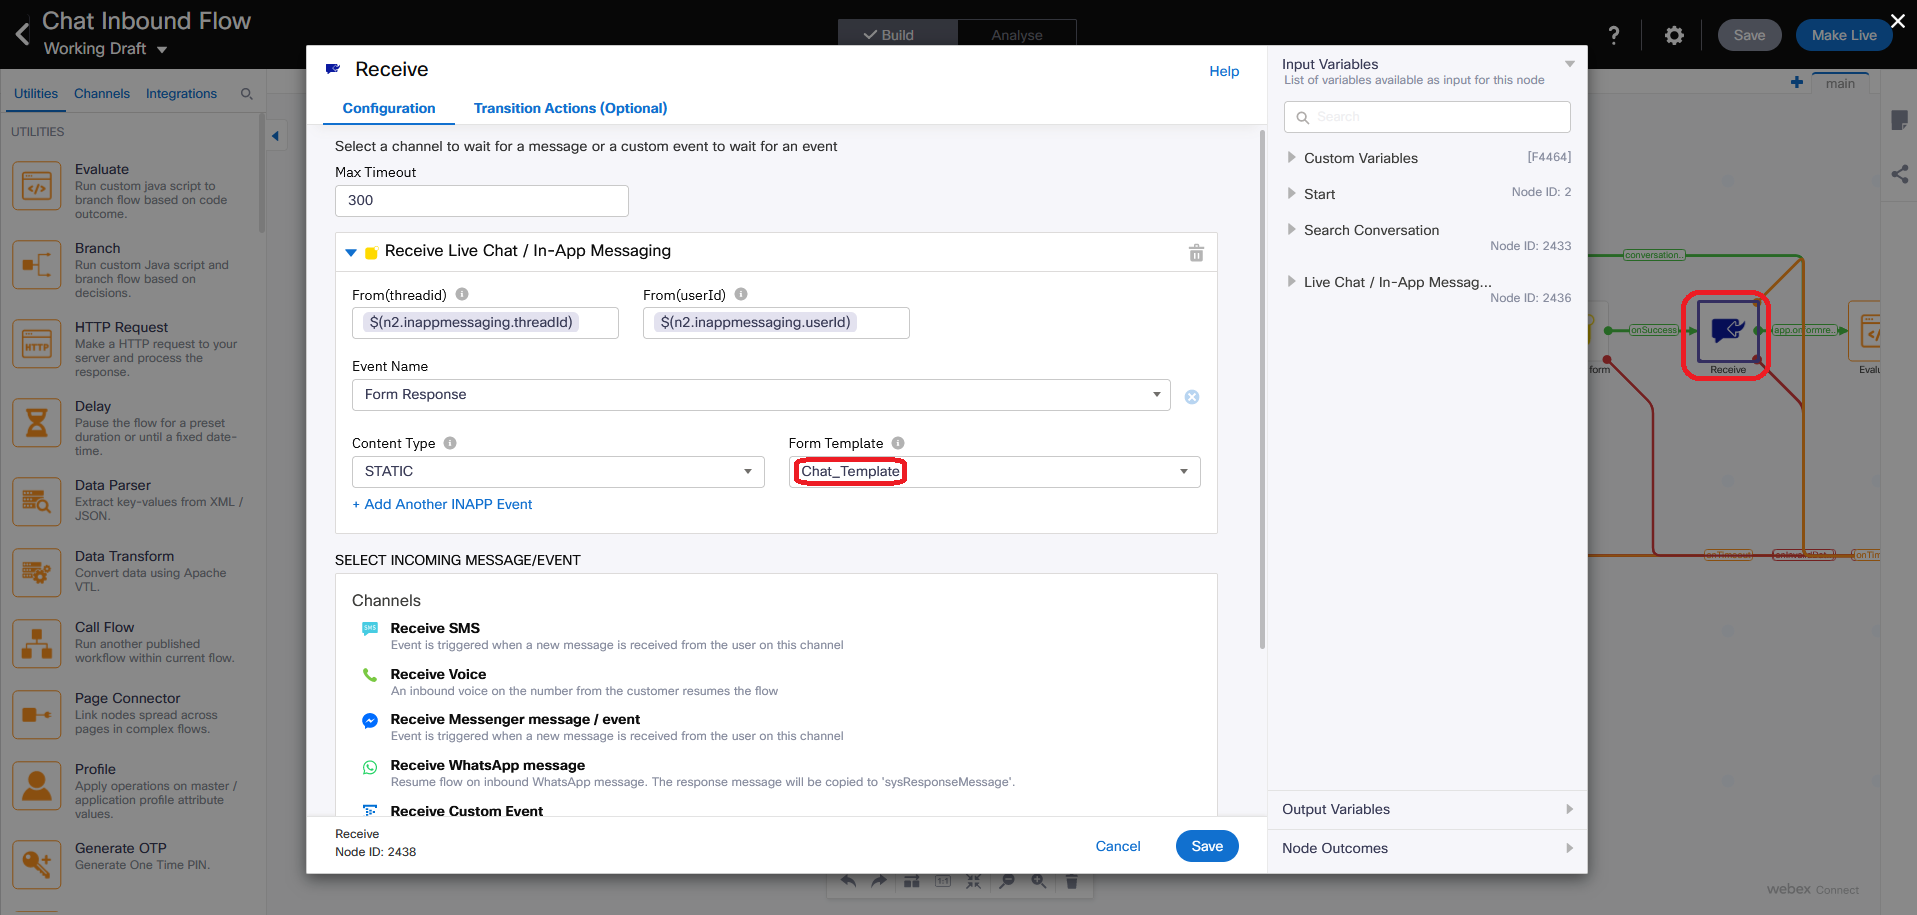
- In the Receive node also, select the same Chat_Template in Form Template drop-down list.
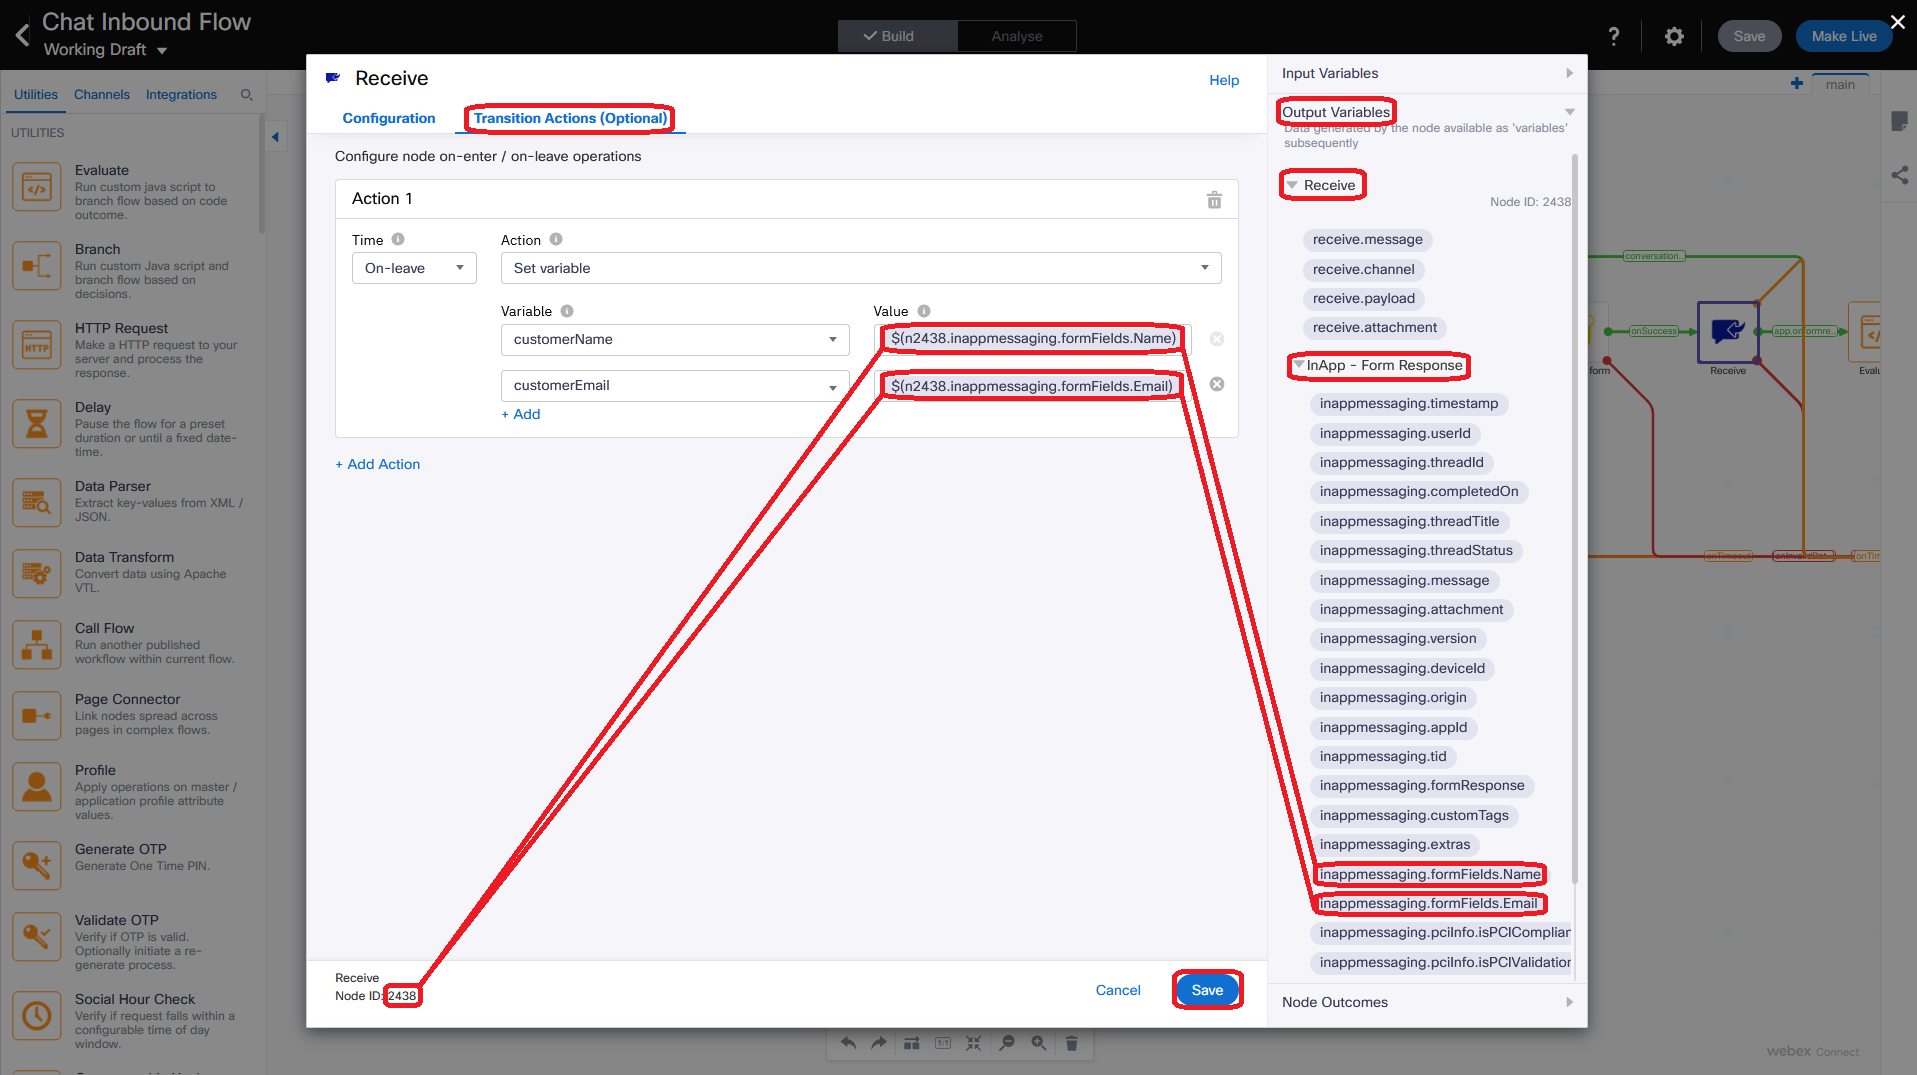
- Go to Transition Actions (Optional) tab of Receive node, check and make sure the values of customerName and customerEmail variables corresponds to the names of web chat template fields in Output Variables -> Receive -> InApp - Form Response section on the right pane. Correct the values if needed and save the node.
Note: The value of each variable has the following format: $(NodeID.OutputVariableName). In our case NodeID is 2438 (you can find it in the left bottom corner of Receive window), OutputVariableName is just exact name from Output Variables -> Receive -> InApp - Form Response section on the right pane.
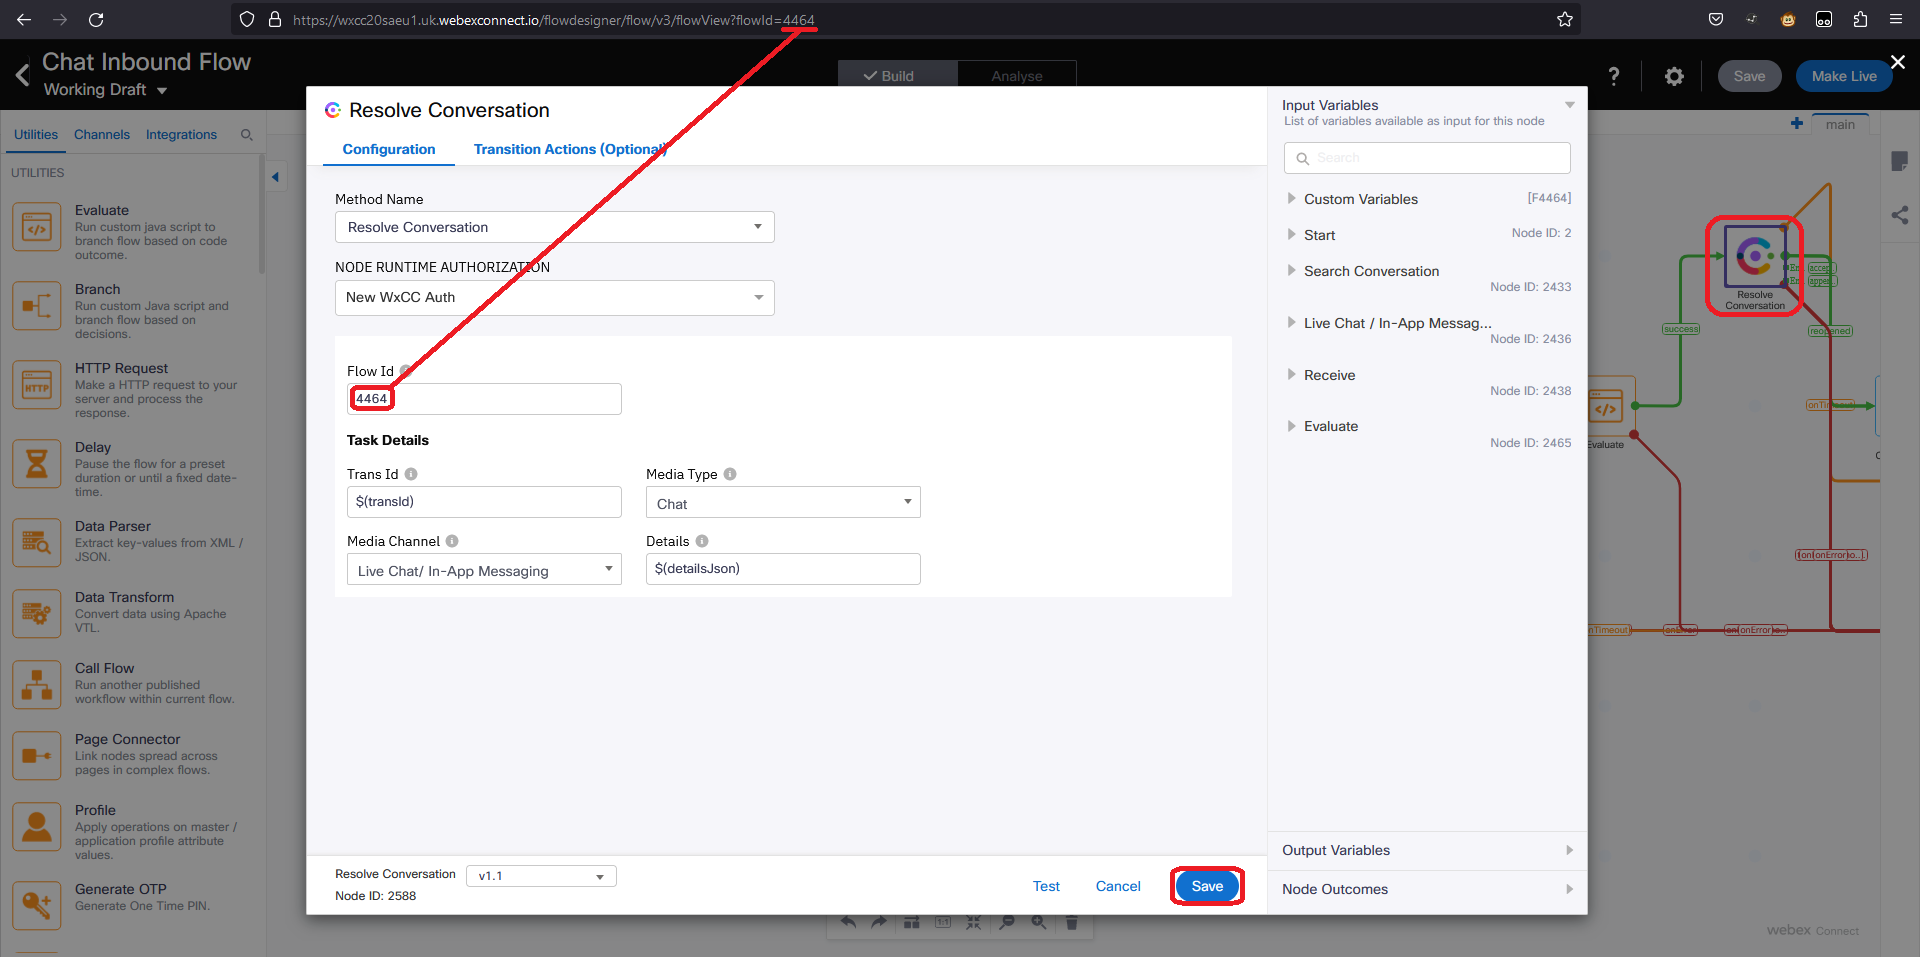
- Go to Resolve Conversation node and fill in Flow Id field with flowId value copied from the address bar of web browser tab. In this example, Flow Id is 4464. Then save changes.
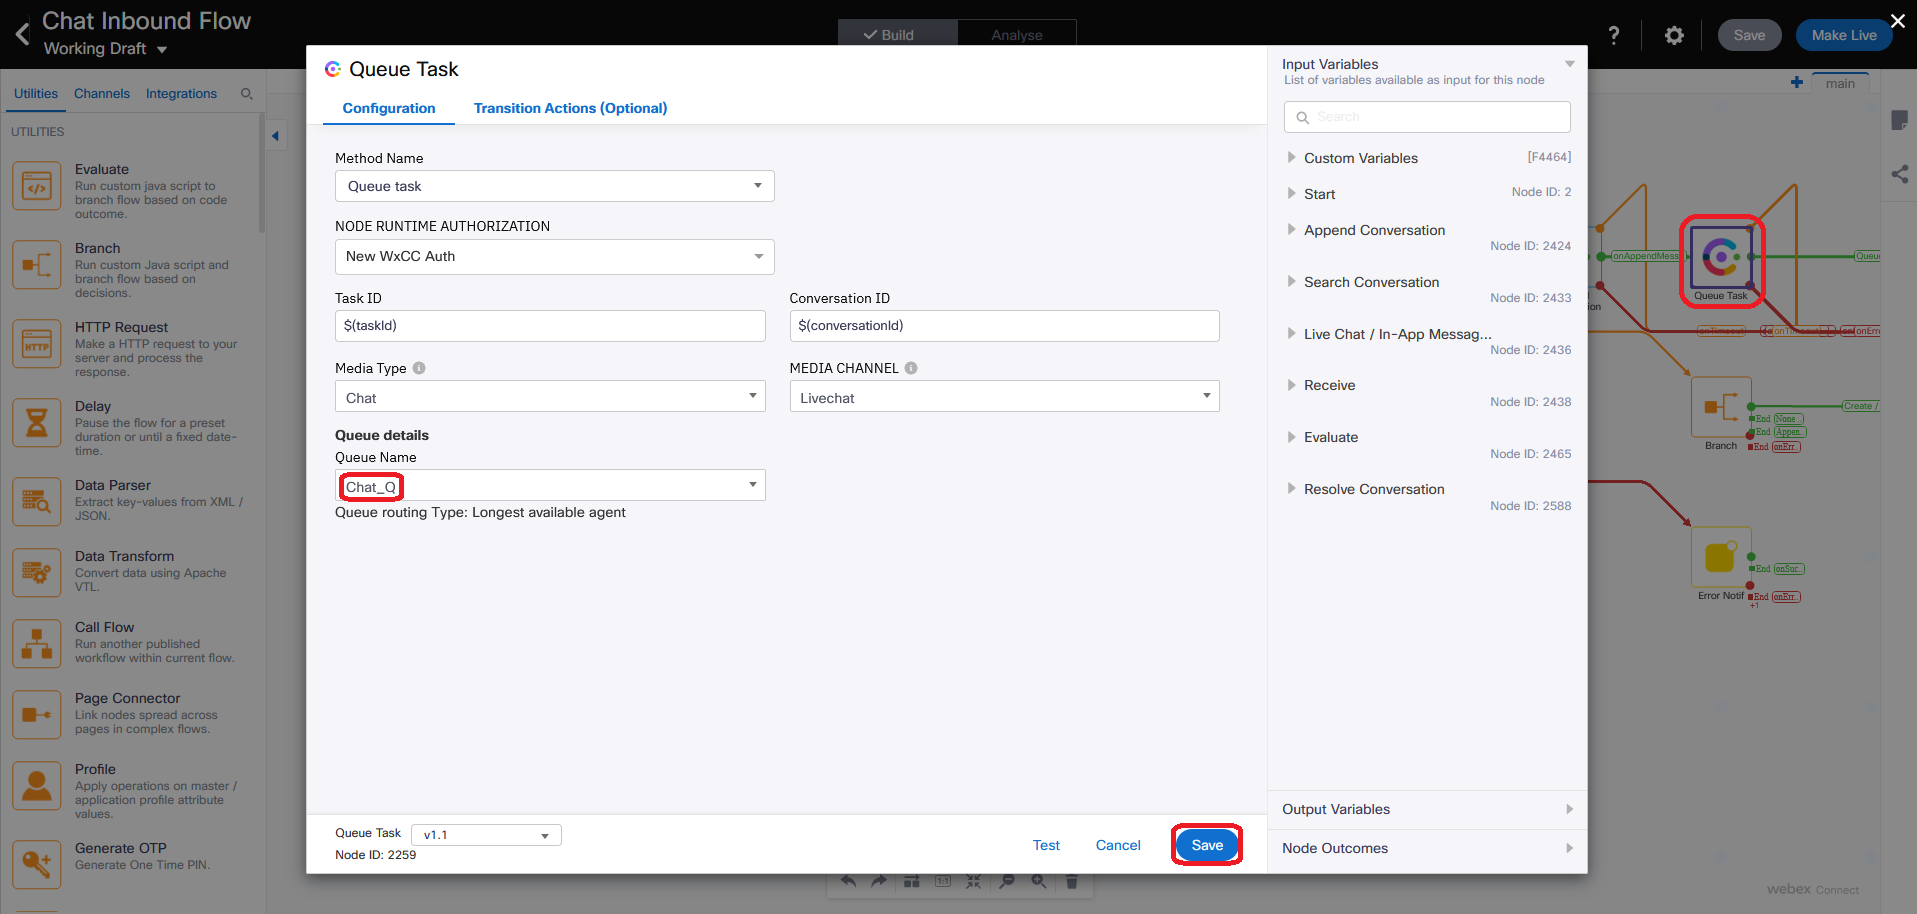
- In Queue Task node select Queue Name as Chat_Q created in Webex CC Management Portal in step 4 above and save changes.
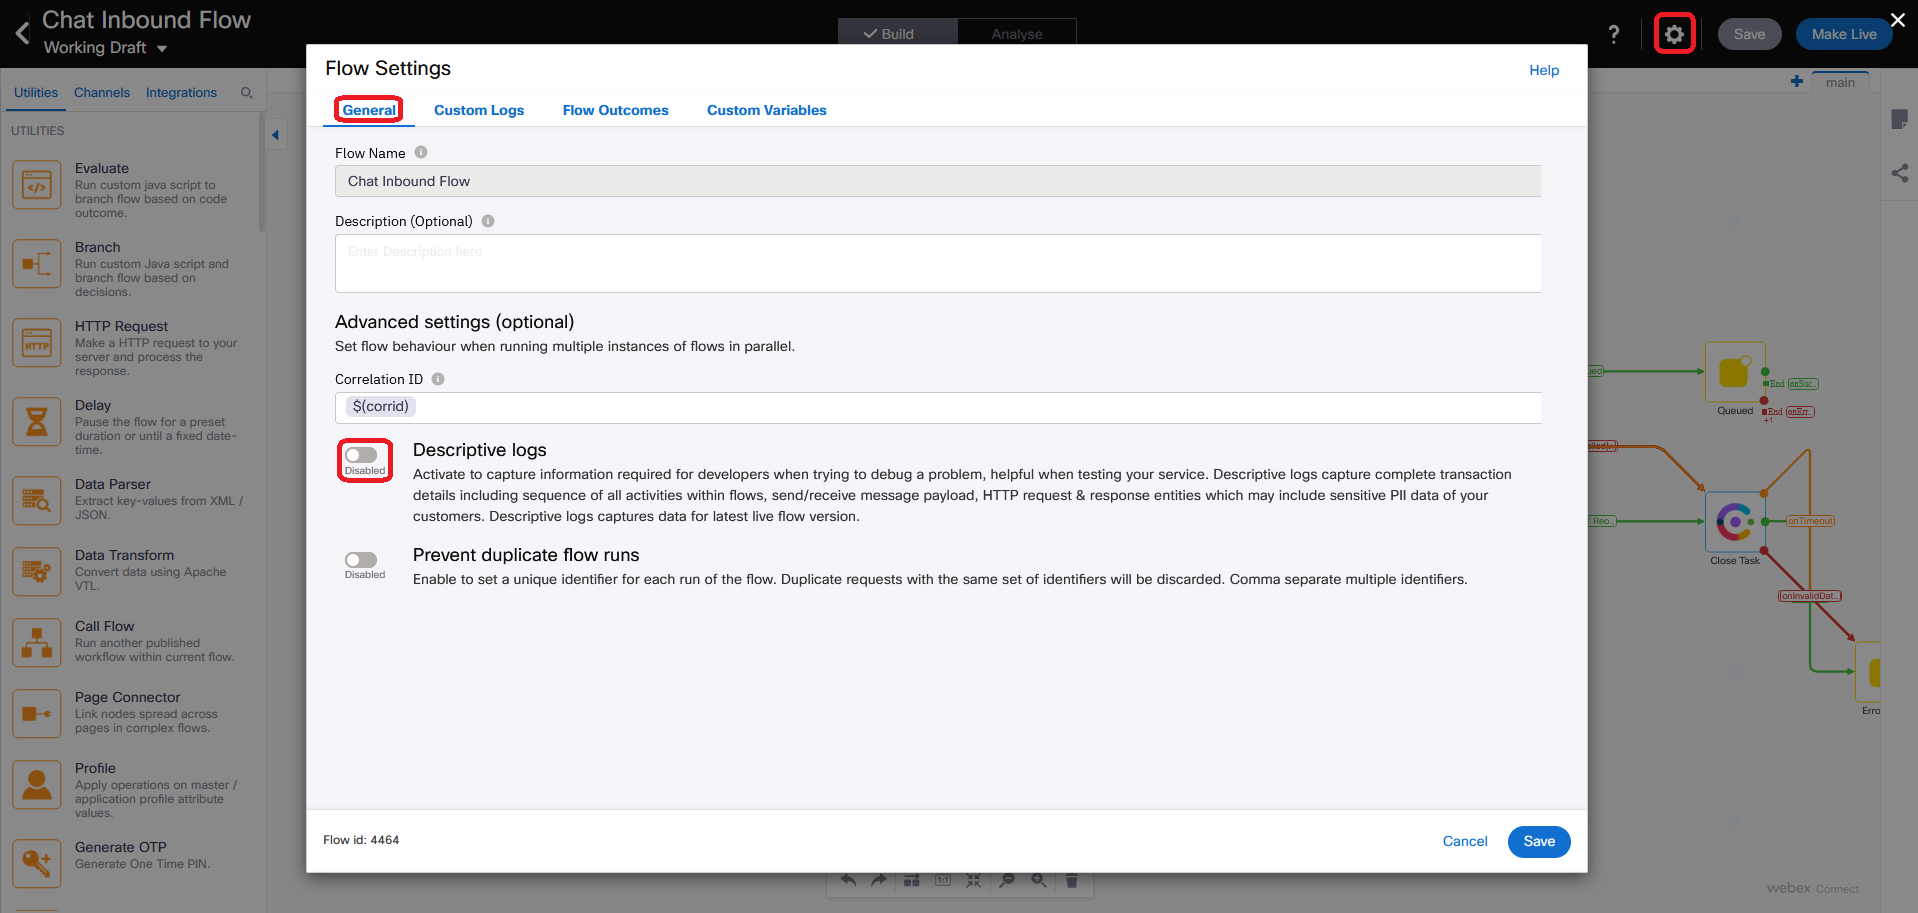
- Click on Settings (gear icon) on top right corner of flow builder window and disable Descriptive logs on General tab.
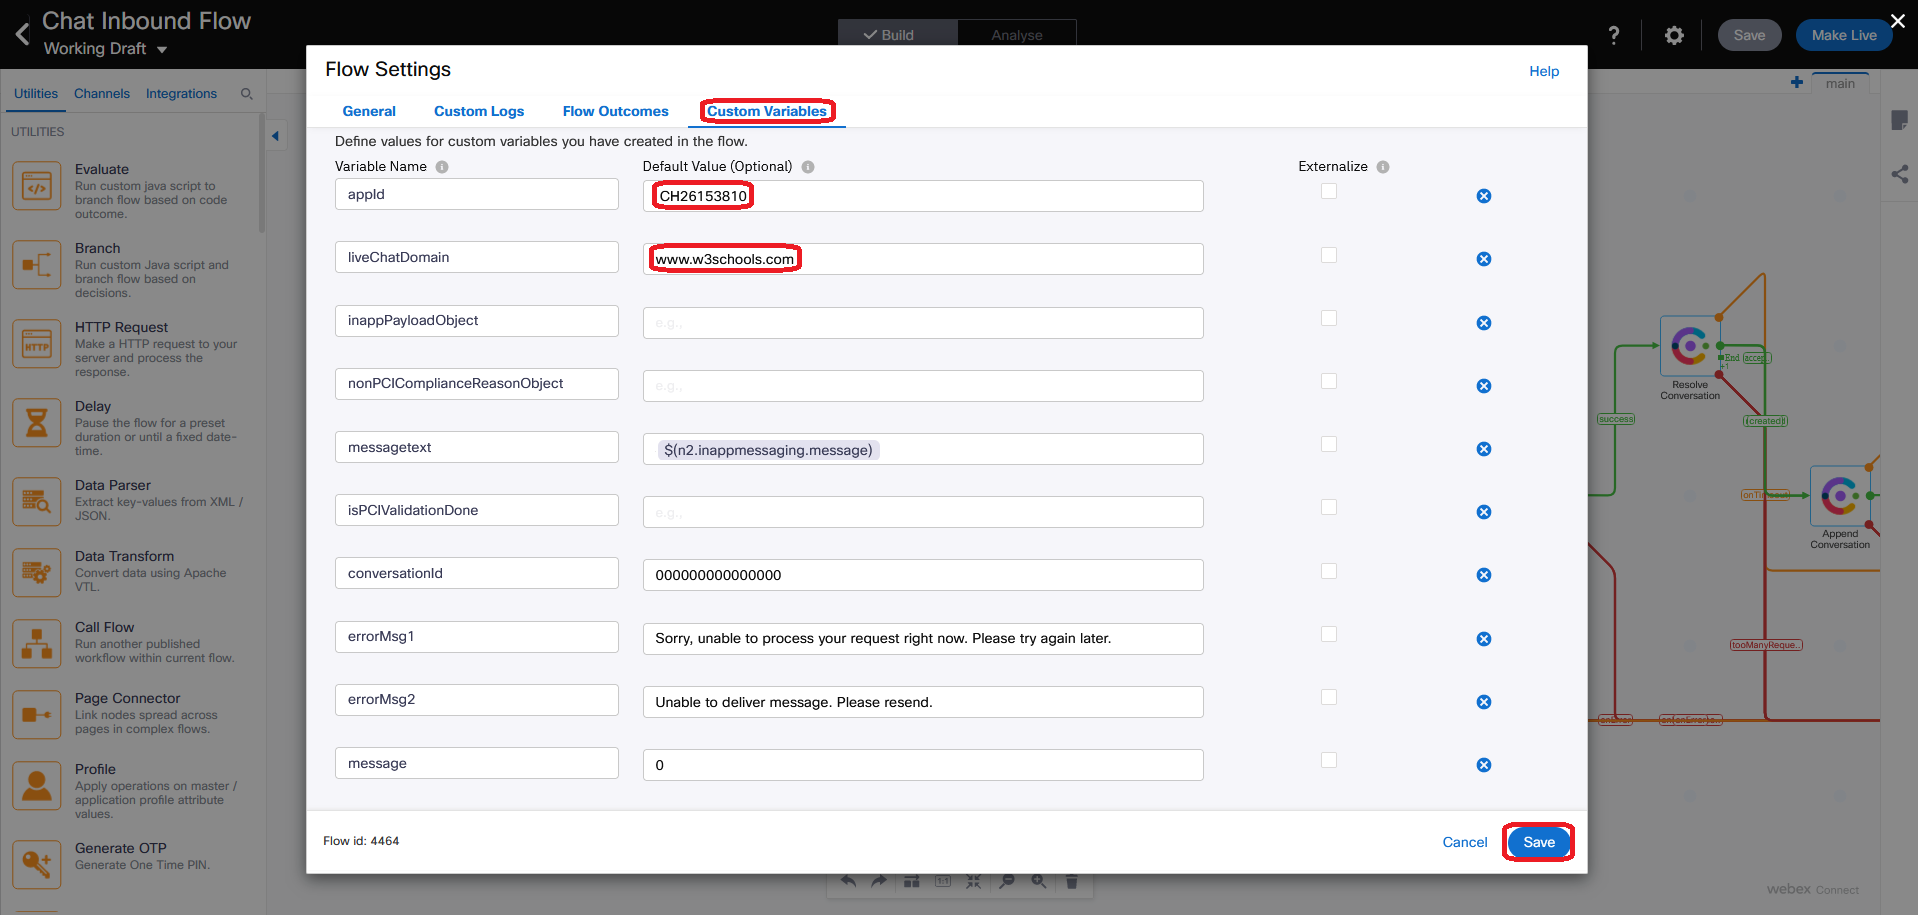
- Then go to Custom variables tab. Here enter appId as the App ID of the asset created in step 2 above. In addition. enter liveChatDomain as
www.w3schools.comand save changes.
- Click on Save button on top right corner to save the entire flow.
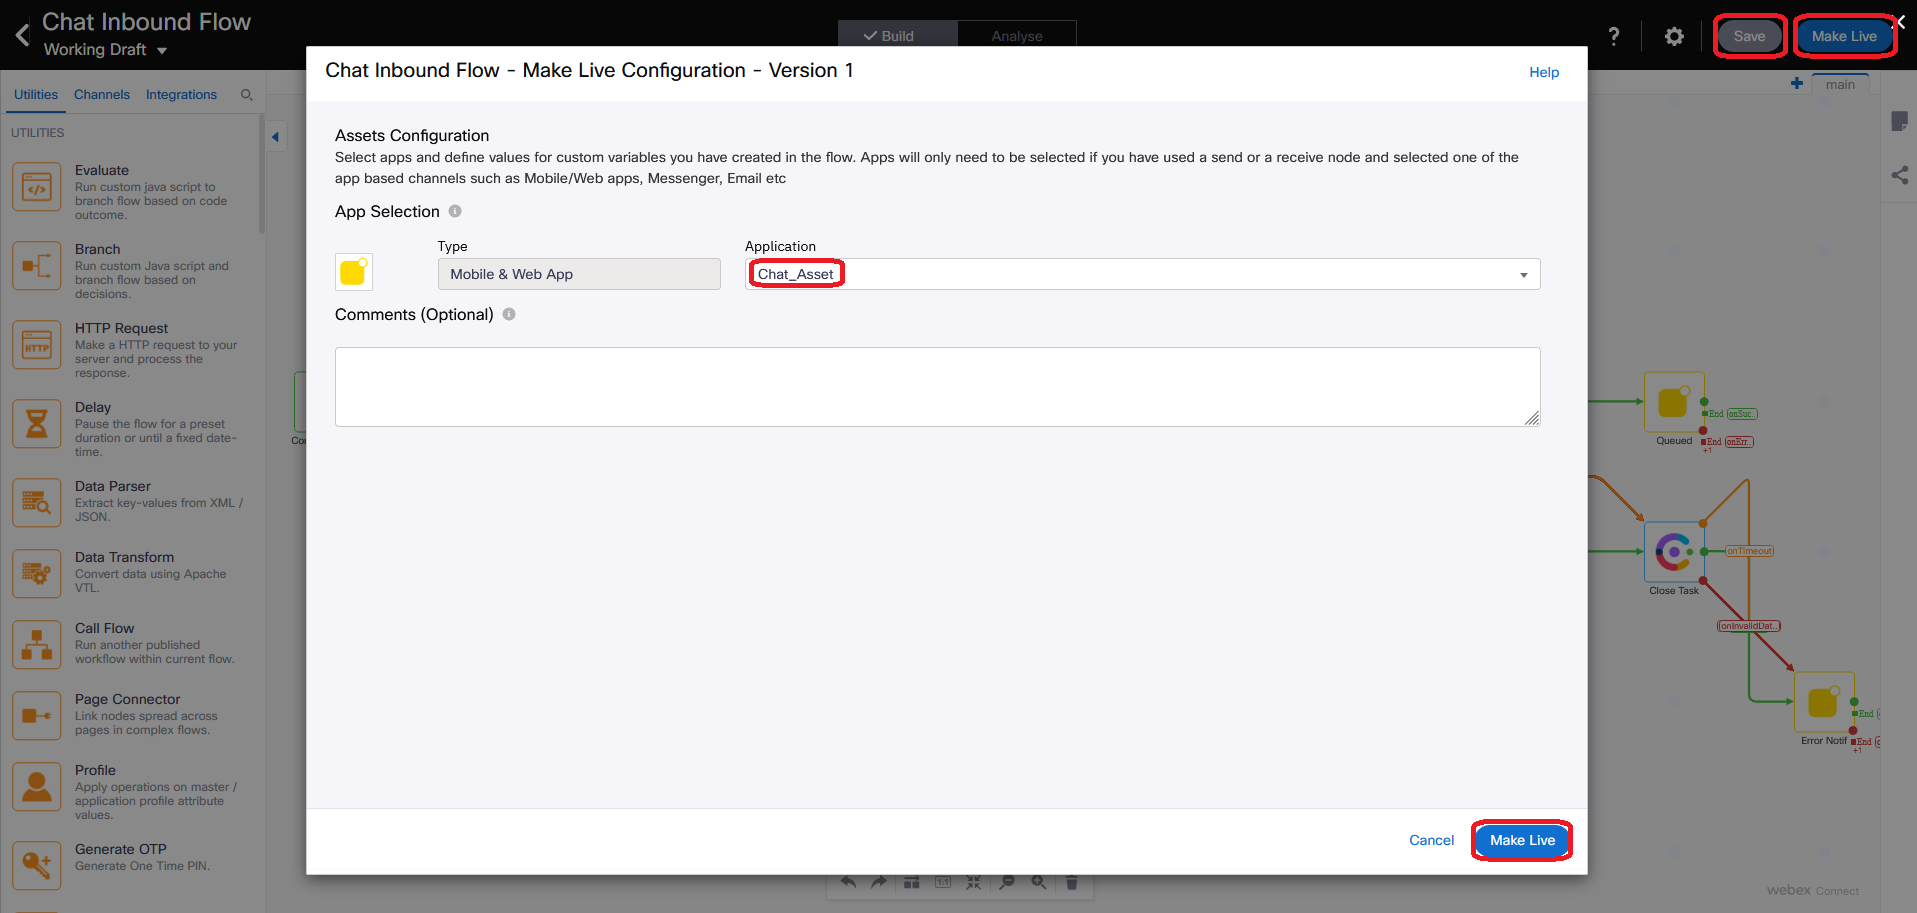
- Click on Make Live on top right corner (near Save button) then select the Application as Chat_Asset in pop-up window and click Make Live. Wait around 2-3 minutes until flow goes live.
Note: If there is Forbidden message after you pressed Make Live button, please close Make Live window, open it one more time, select the asset again and press Make Live button one more time.
8. Create Chat Close Flow
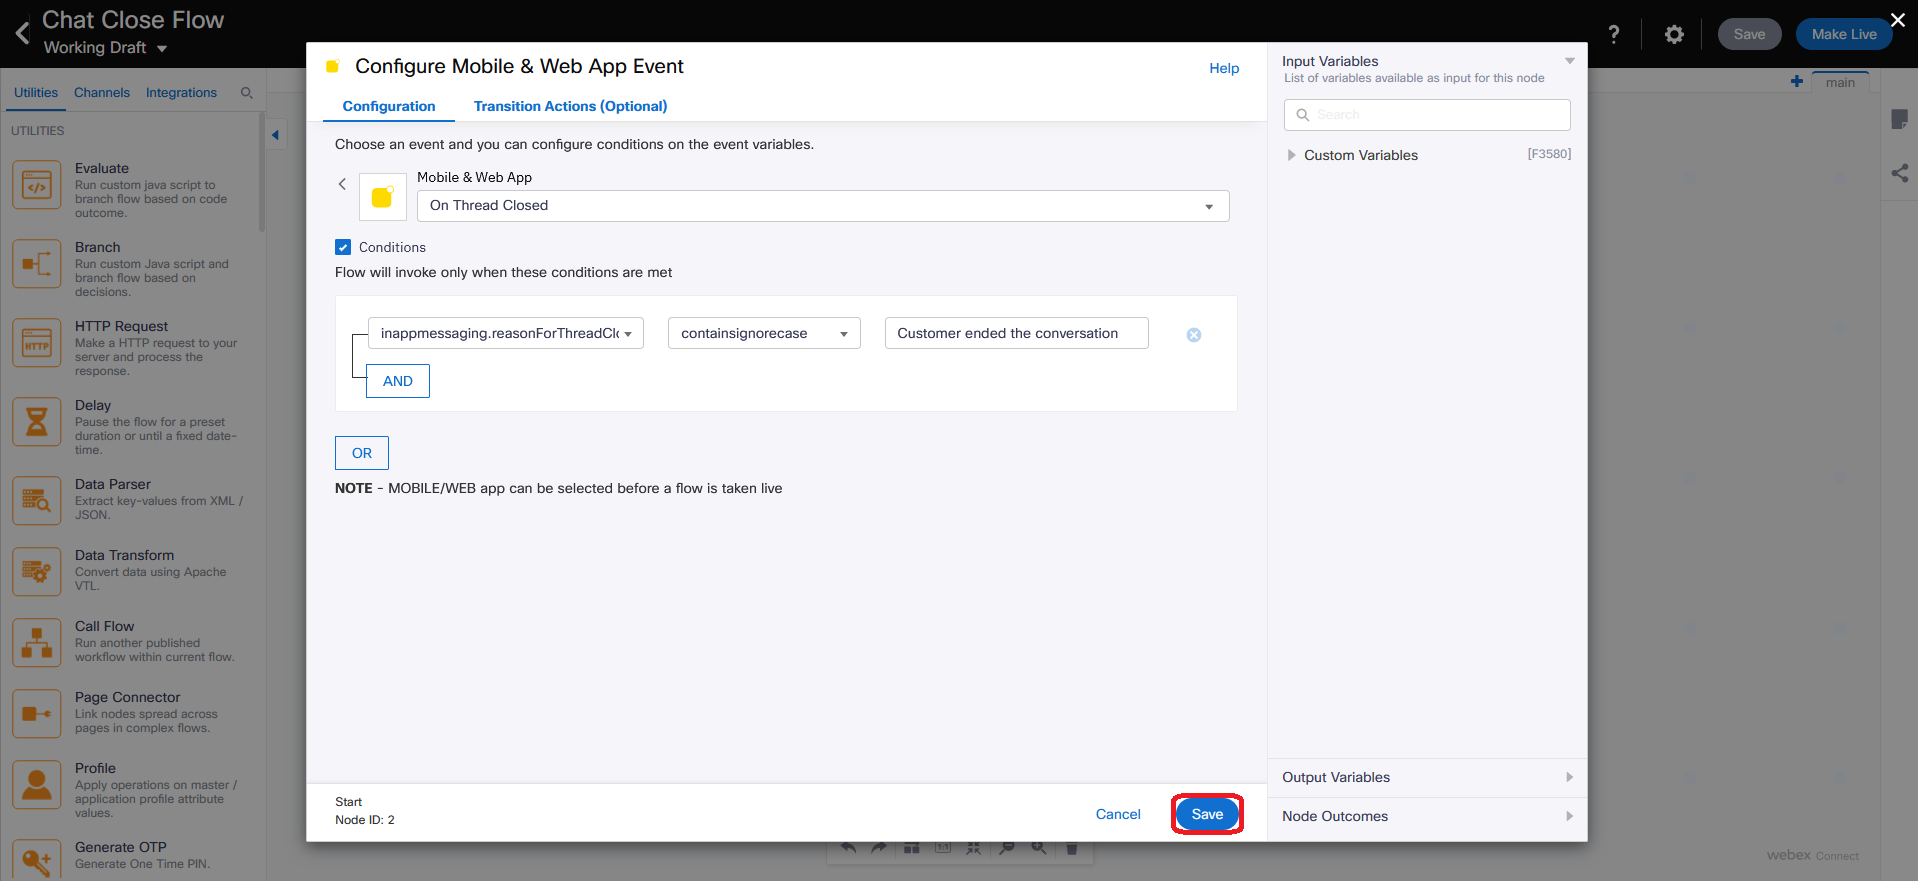
Note: Chat Close Flow is triggered every time whenever the end user closed the conversation thread from the widget.
- Navigate to GitHub page with Webex Connect Flows - GitHub page.
- Go to Webex Connect Flows -> v3.0 -> Template -> Media Specific Workflows -> Live Chat Close Flow.workflow.zip and click Download.
- Unzip the file.
- Go to Connect Portal, click on Services and select the service in which the Asset is created in step 2 above. It should be My First Service.
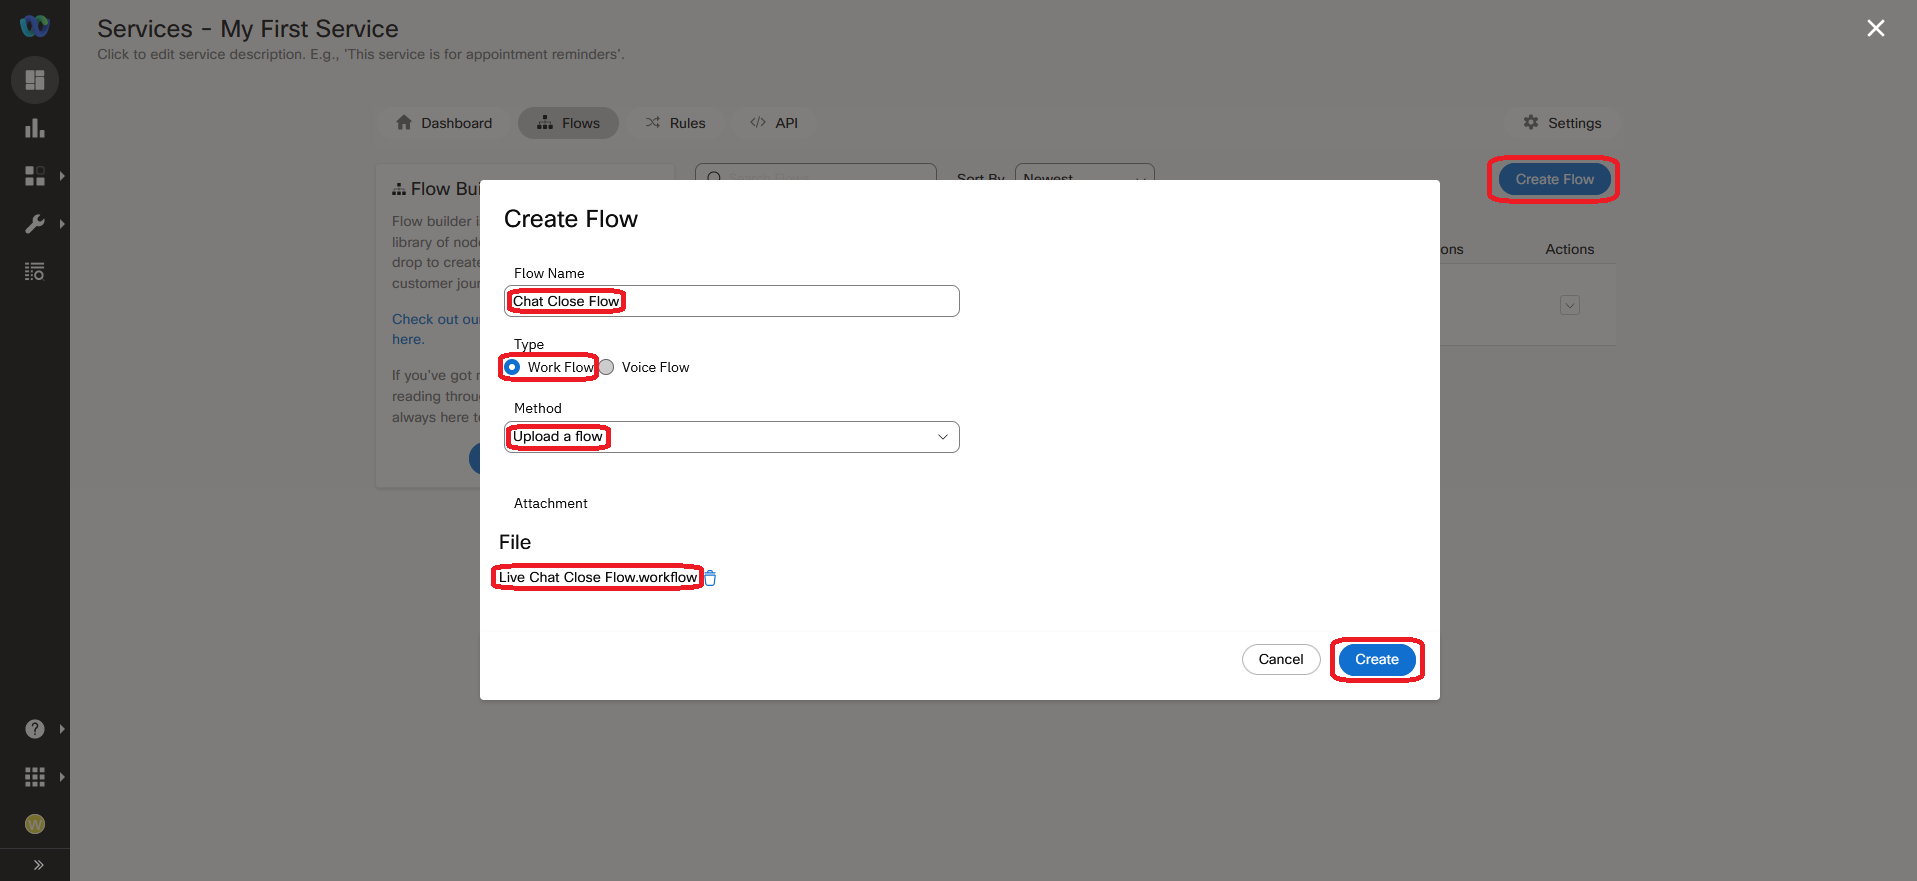
- In the service click on Flows -> Create Flow.
- Enter the Flow Name as
Chat Close Flow, select the Type as Work Flow and under Method select Upload a flow. - Drag and drop unzipped Live Chat Close Flow.workflow flow, click Create.
- You will be redirected to the new flow opened in the flow builder. Click Save to save the changes.
- Click on Save button on top right corner to save the entire flow.
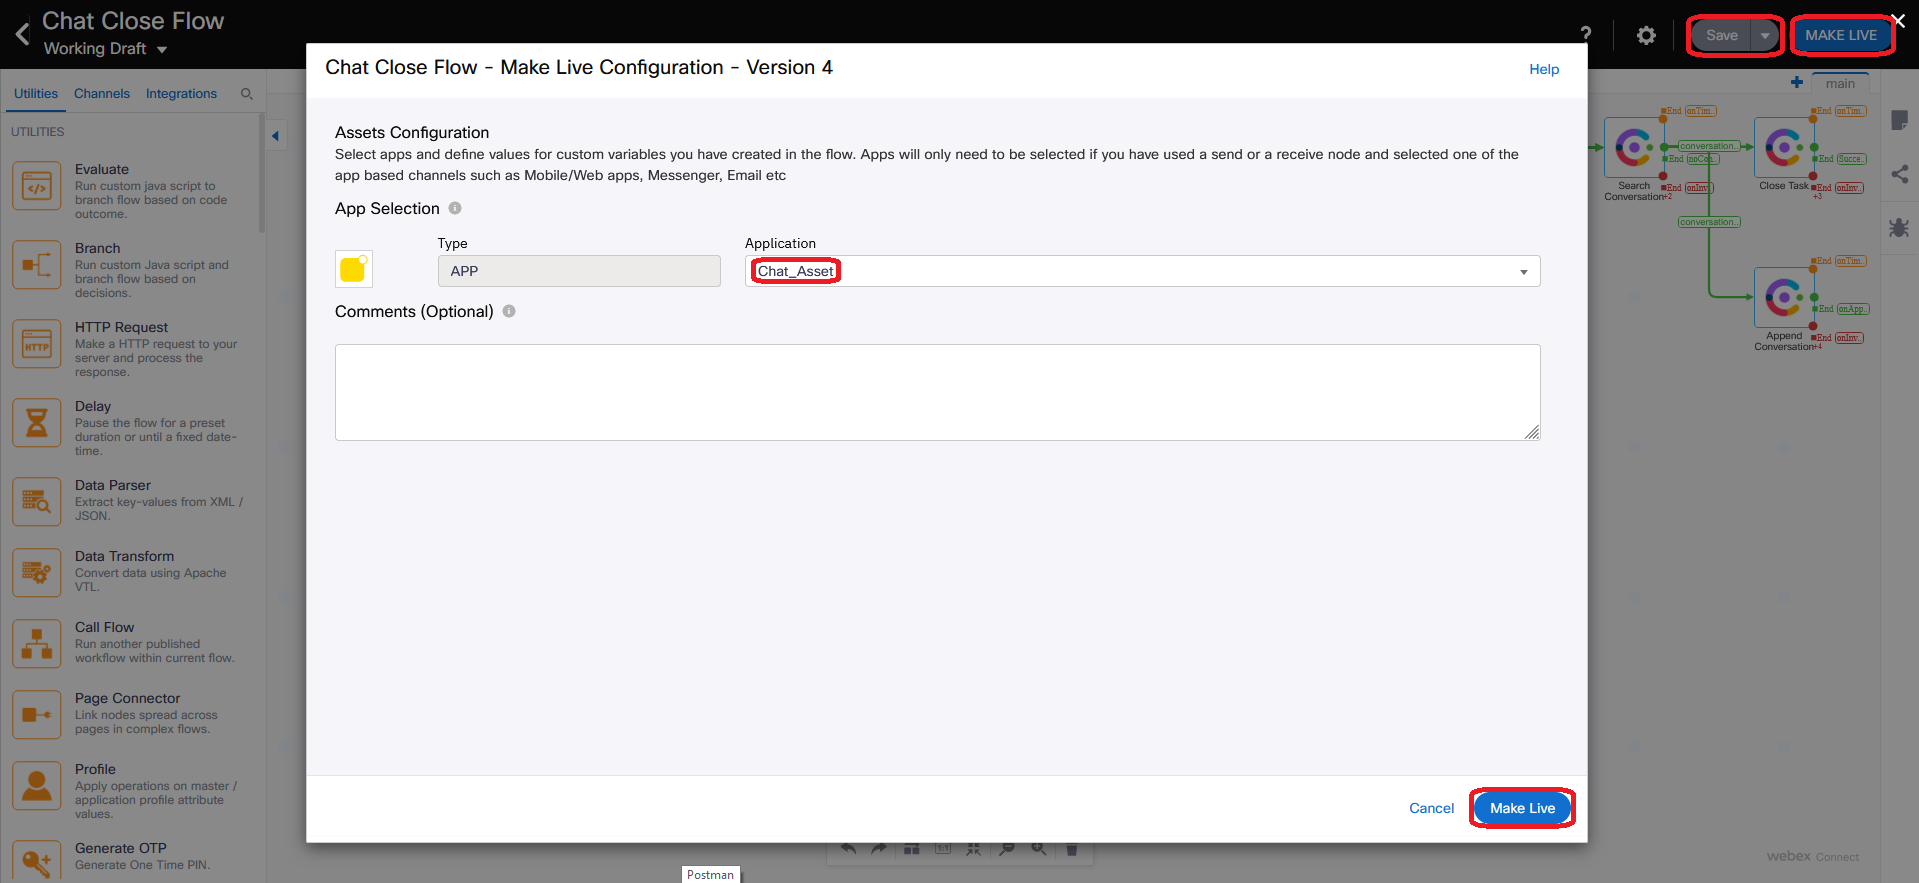
- Click on Make Live on top right corner (near Save button) then select the Application as Chat_Asset in pop-up window and click on Make Live. Wait around 2-3 minutes until flow goes live.
Note: If there is Forbidden message after you pressed Make Live button, please close Make Live window, open it one more time, select the asset again and press Make Live button one more time.
9. Publish Chat Widget
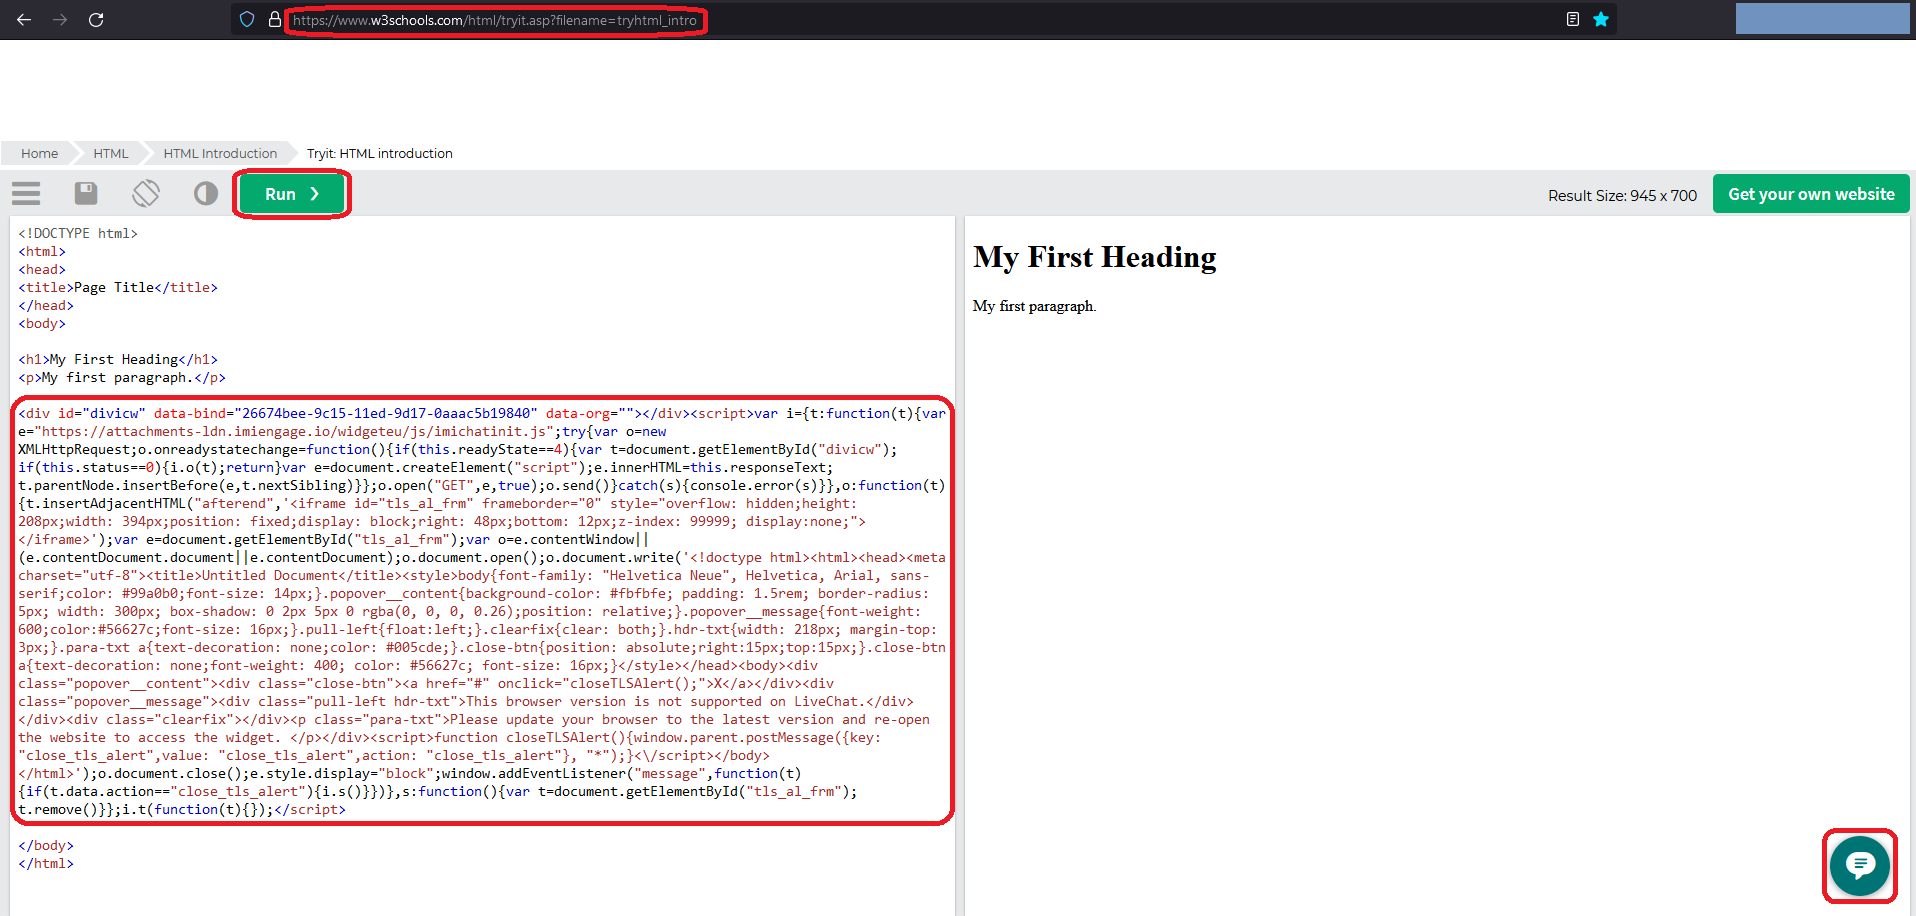
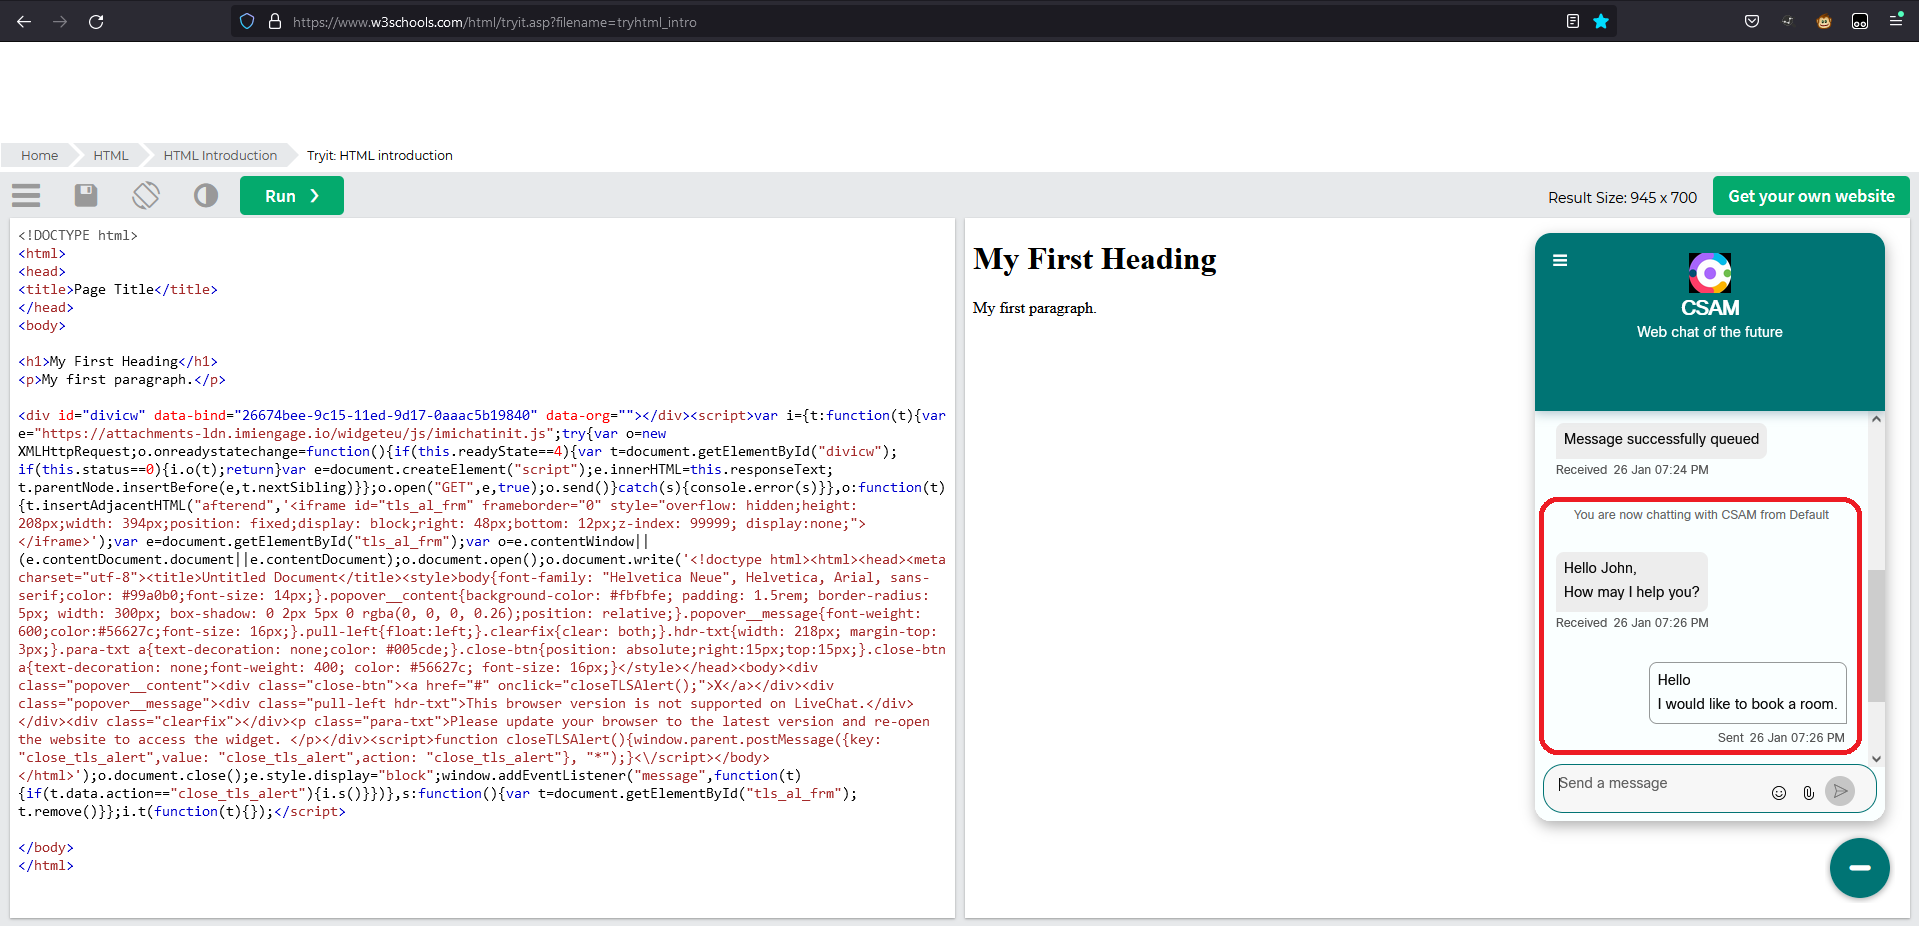
- Go to HTML w3school Editor
- Paste the script which you copied in step 6 just above the
</body>tag in the left window and click on Run. You should see chat widget icon in the right bottom corner of the window.
10. Verification: Initiate and Accept the Chat
- Login to the Agent Desktop and make the agent Not Ready.
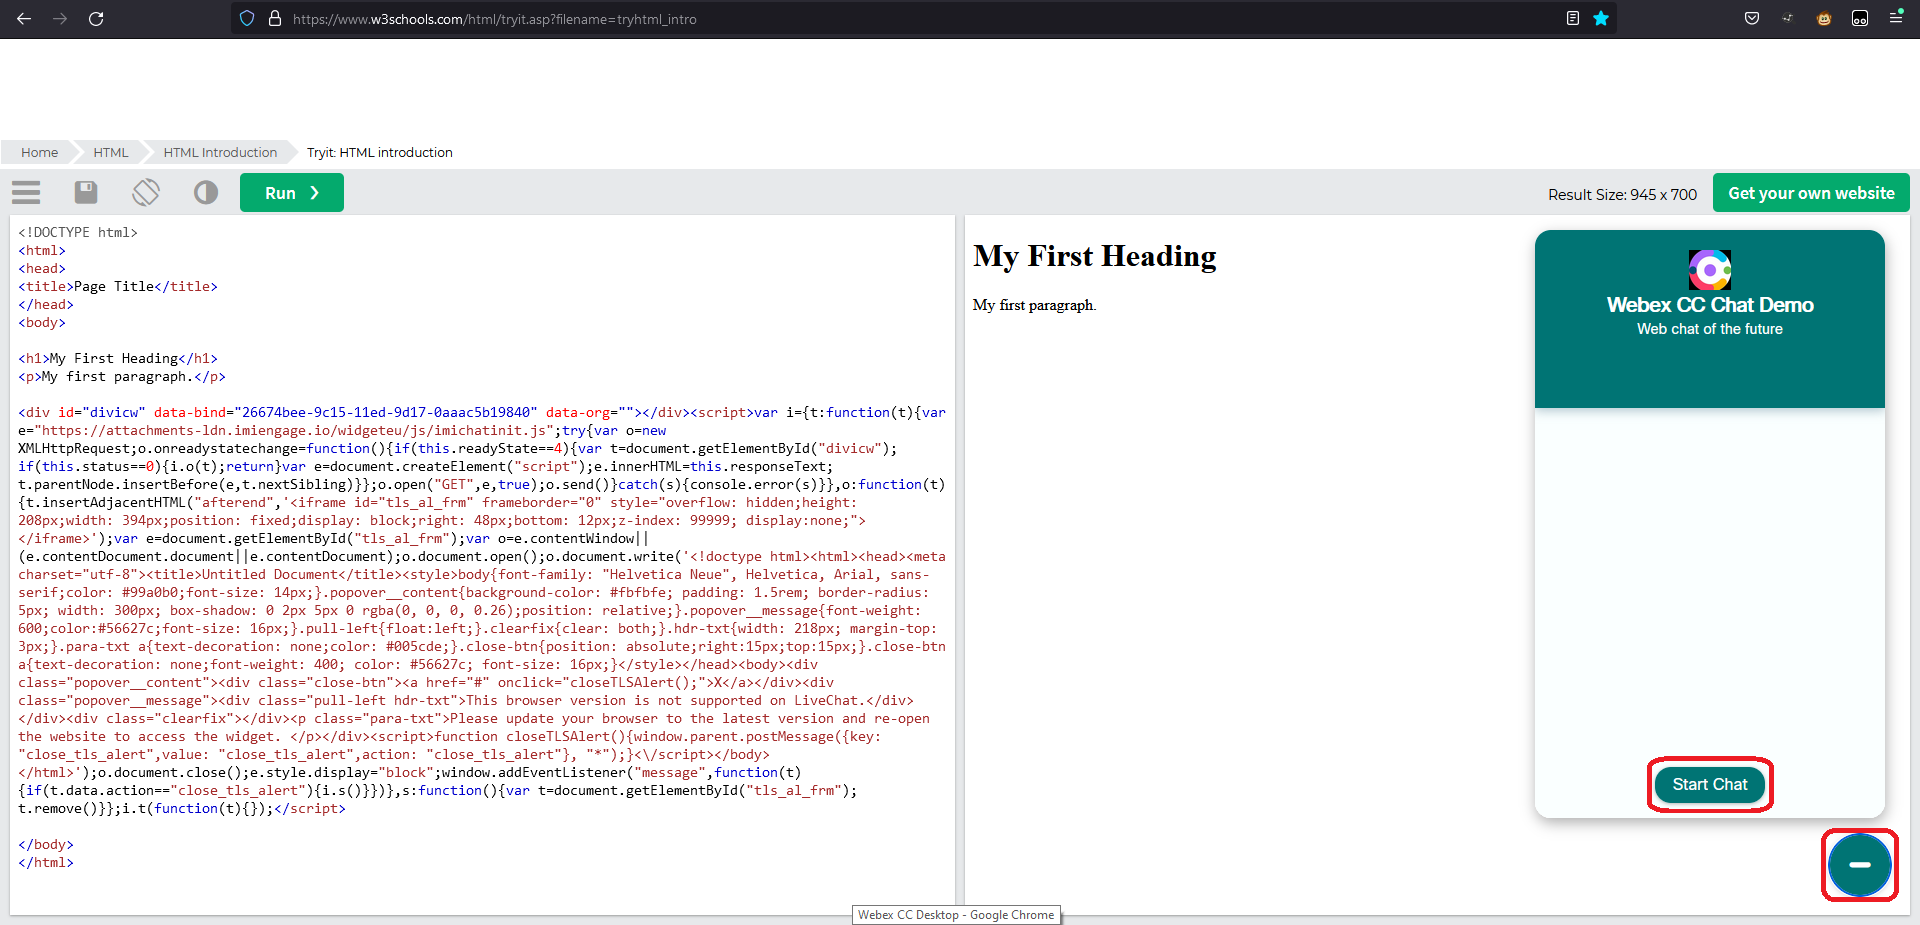
- Click on chat widget icon in the right bottom corner of HTML TryIt Editor window and press Start Chat button.
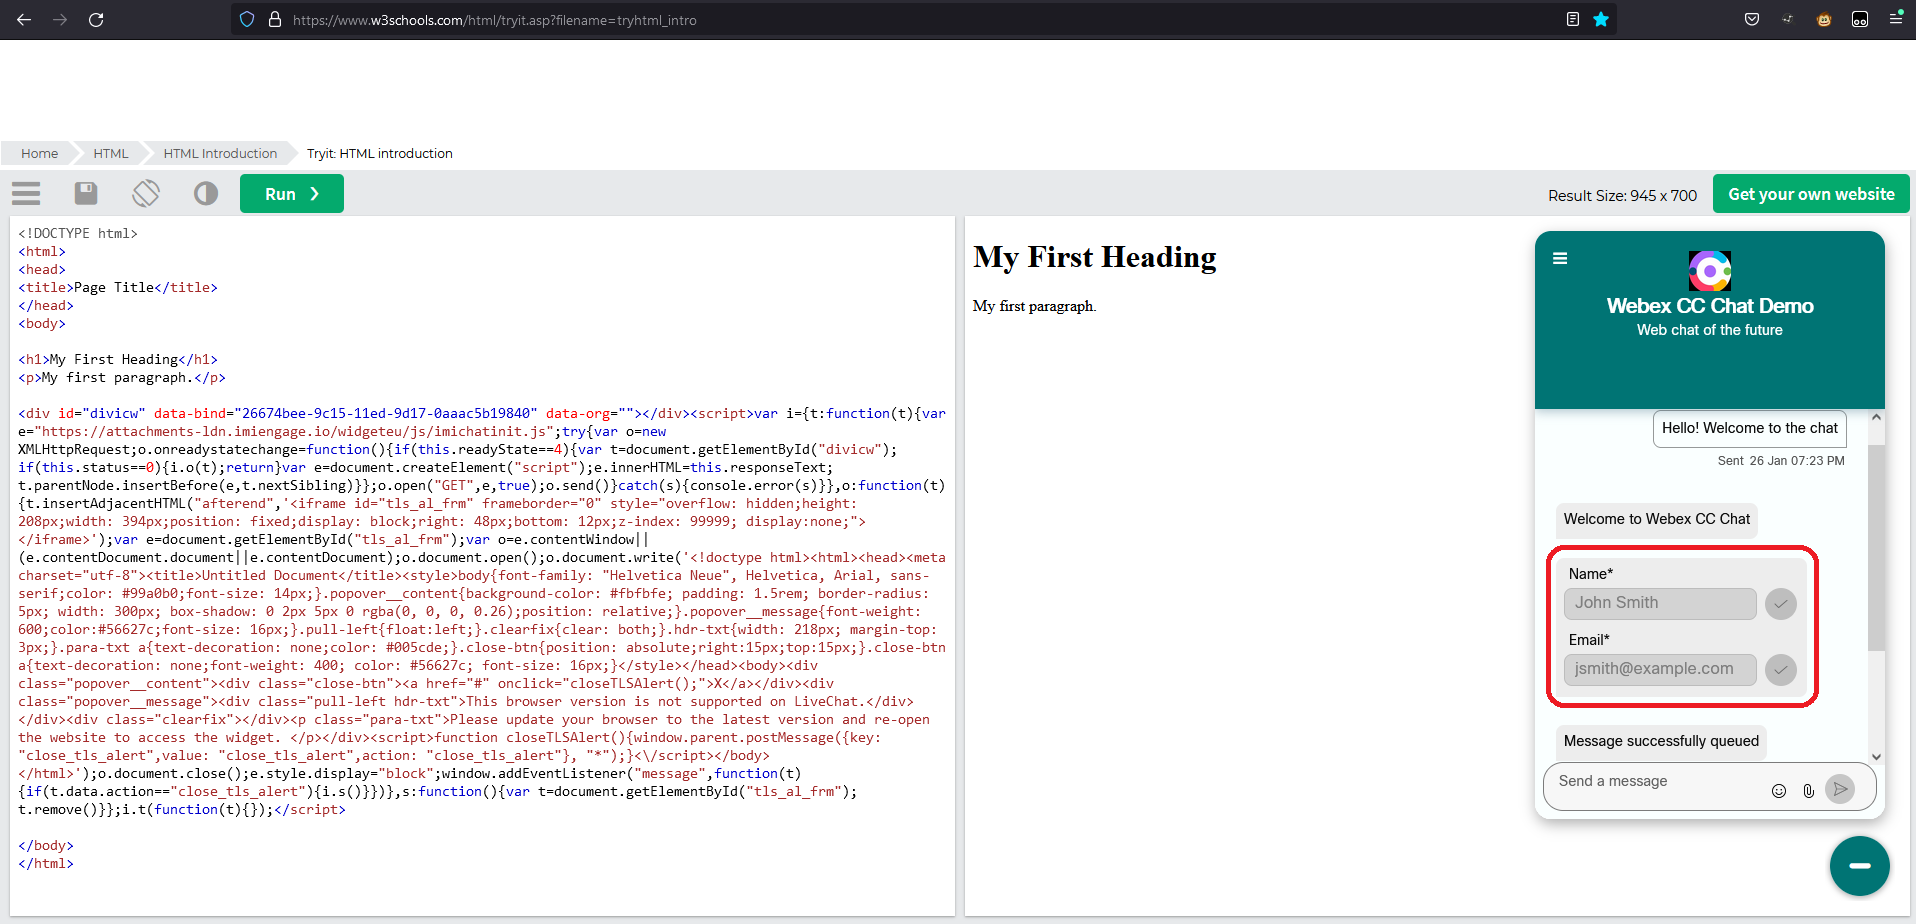
- Provide Name and Email to start chat.
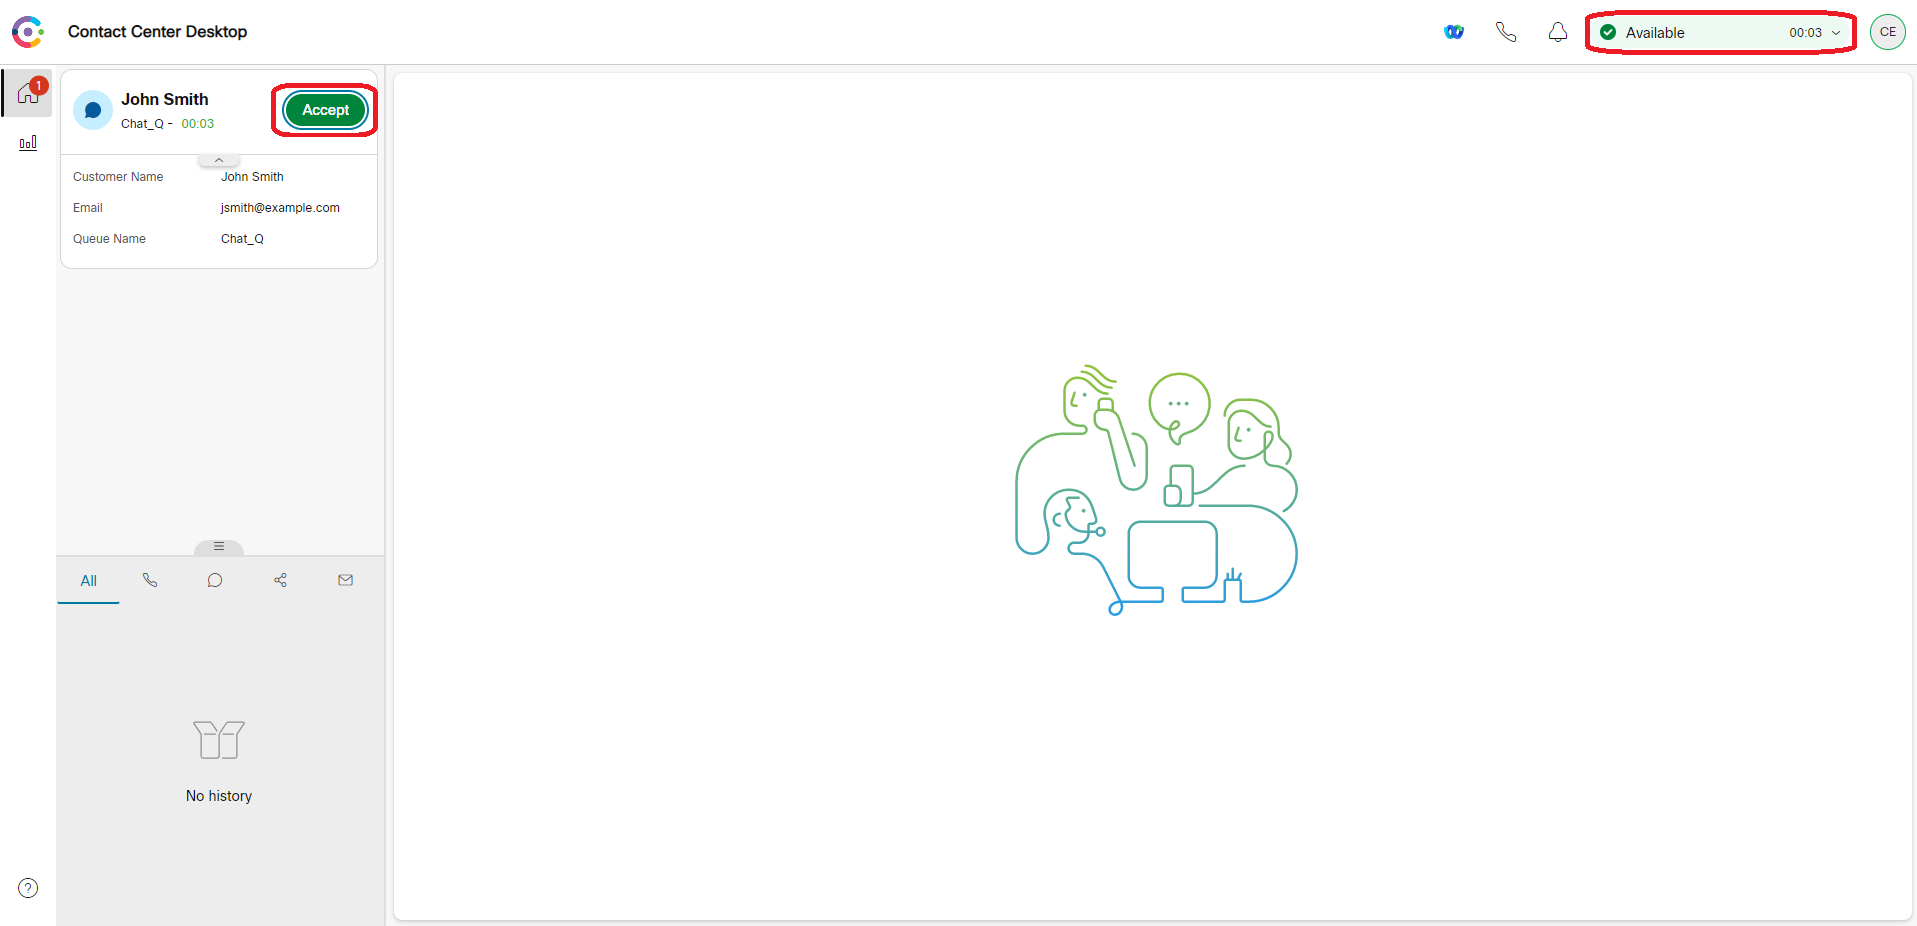
- Go to the Agent Desktop and make the agent Available. Then accept incoming chat conversation by pressing Accept button on the chat card on the left pane.
- Make sure end user and agent are able to exchange messages with each other. Then you can close the chat.

Congratulations, you have completed this section!
Lab.12.9 - Facebook Messenger Channel Configuration
Table of Contents
| Topic | Lab Type | Difficulty Level | Estimated length |
|---|---|---|---|
| Facebook Page configuration | Practical Lab | EASY | 5 min |
| Facebook Messenger Asset creation and Register to Webex CC | Practical Lab | EASY | 5 min |
| Create Entry Point and Queue | Practical Lab | EASY | 5 min |
| Create/Upload Facebook Messenger flow | Practical Lab | EASY | 5 min |
| Verification - start Facebook Chat and accept the request | Practical Lab | EASY | 5 min |
Introduction
Lab Objective
In this Lab, we will go through the tasks that are required to complete the basic Facebook Messenger (FBM) integration. You will be able to initiate a Facebook contact to the Contact Center from Facebook Messenger and be able to accept/respond to the contact by logging in as an agent.
In this lab you will be configuring Service, Chat Assets, Entry Point, Queue, Chat Template, Website Settings, and corresponding workflows.
Pre-requisite
- You received an admin credentials to configure in Management Portal and Webex Connect.
- You have successfully completed the previous Lab12.5 Preconfiguration
- You have a Facebook Account
Quick Links
Control Hub: https://admin.webex.com
US Portal: https://portal.wxcc-us1.cisco.com/portal
US Agent Desktop: https://desktop.wxcc-us1.cisco.com
UK Portal: https://portal.wxcc-eu1.cisco.com/portal
UK Agent Desktop: https://desktop.wxcc-eu1.cisco.com
EMEA Portal: https://portal.wxcc-eu2.cisco.com/portal
EMEA Agent Desktop: https://desktop.wxcc-eu2.cisco.com
ANZ Portal: https://portal.wxcc-anz1.cisco.com/portal
ANZ Agent Desktop: https://desktop.wxcc-anz1.cisco.com
Webex Connect Documentation: https://help.imiconnect.io/
1. Facebook Page configuration
-
Customer/Partner should have a Facebook account to create a Facebook Business page
-
Login to Facebook and create a business page that can be used in Webex Contact Center for polling and handling the messenger chats Additional details of Facebook page setup is available here: Facebook Business page setup
-
Click on
Create a Pagebutton
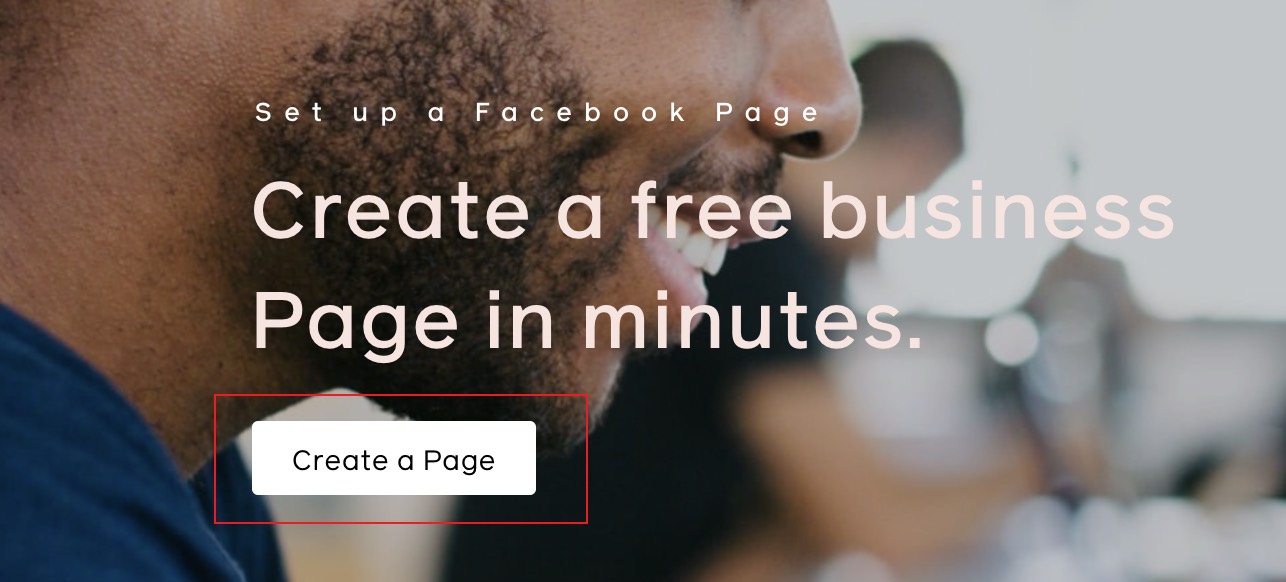
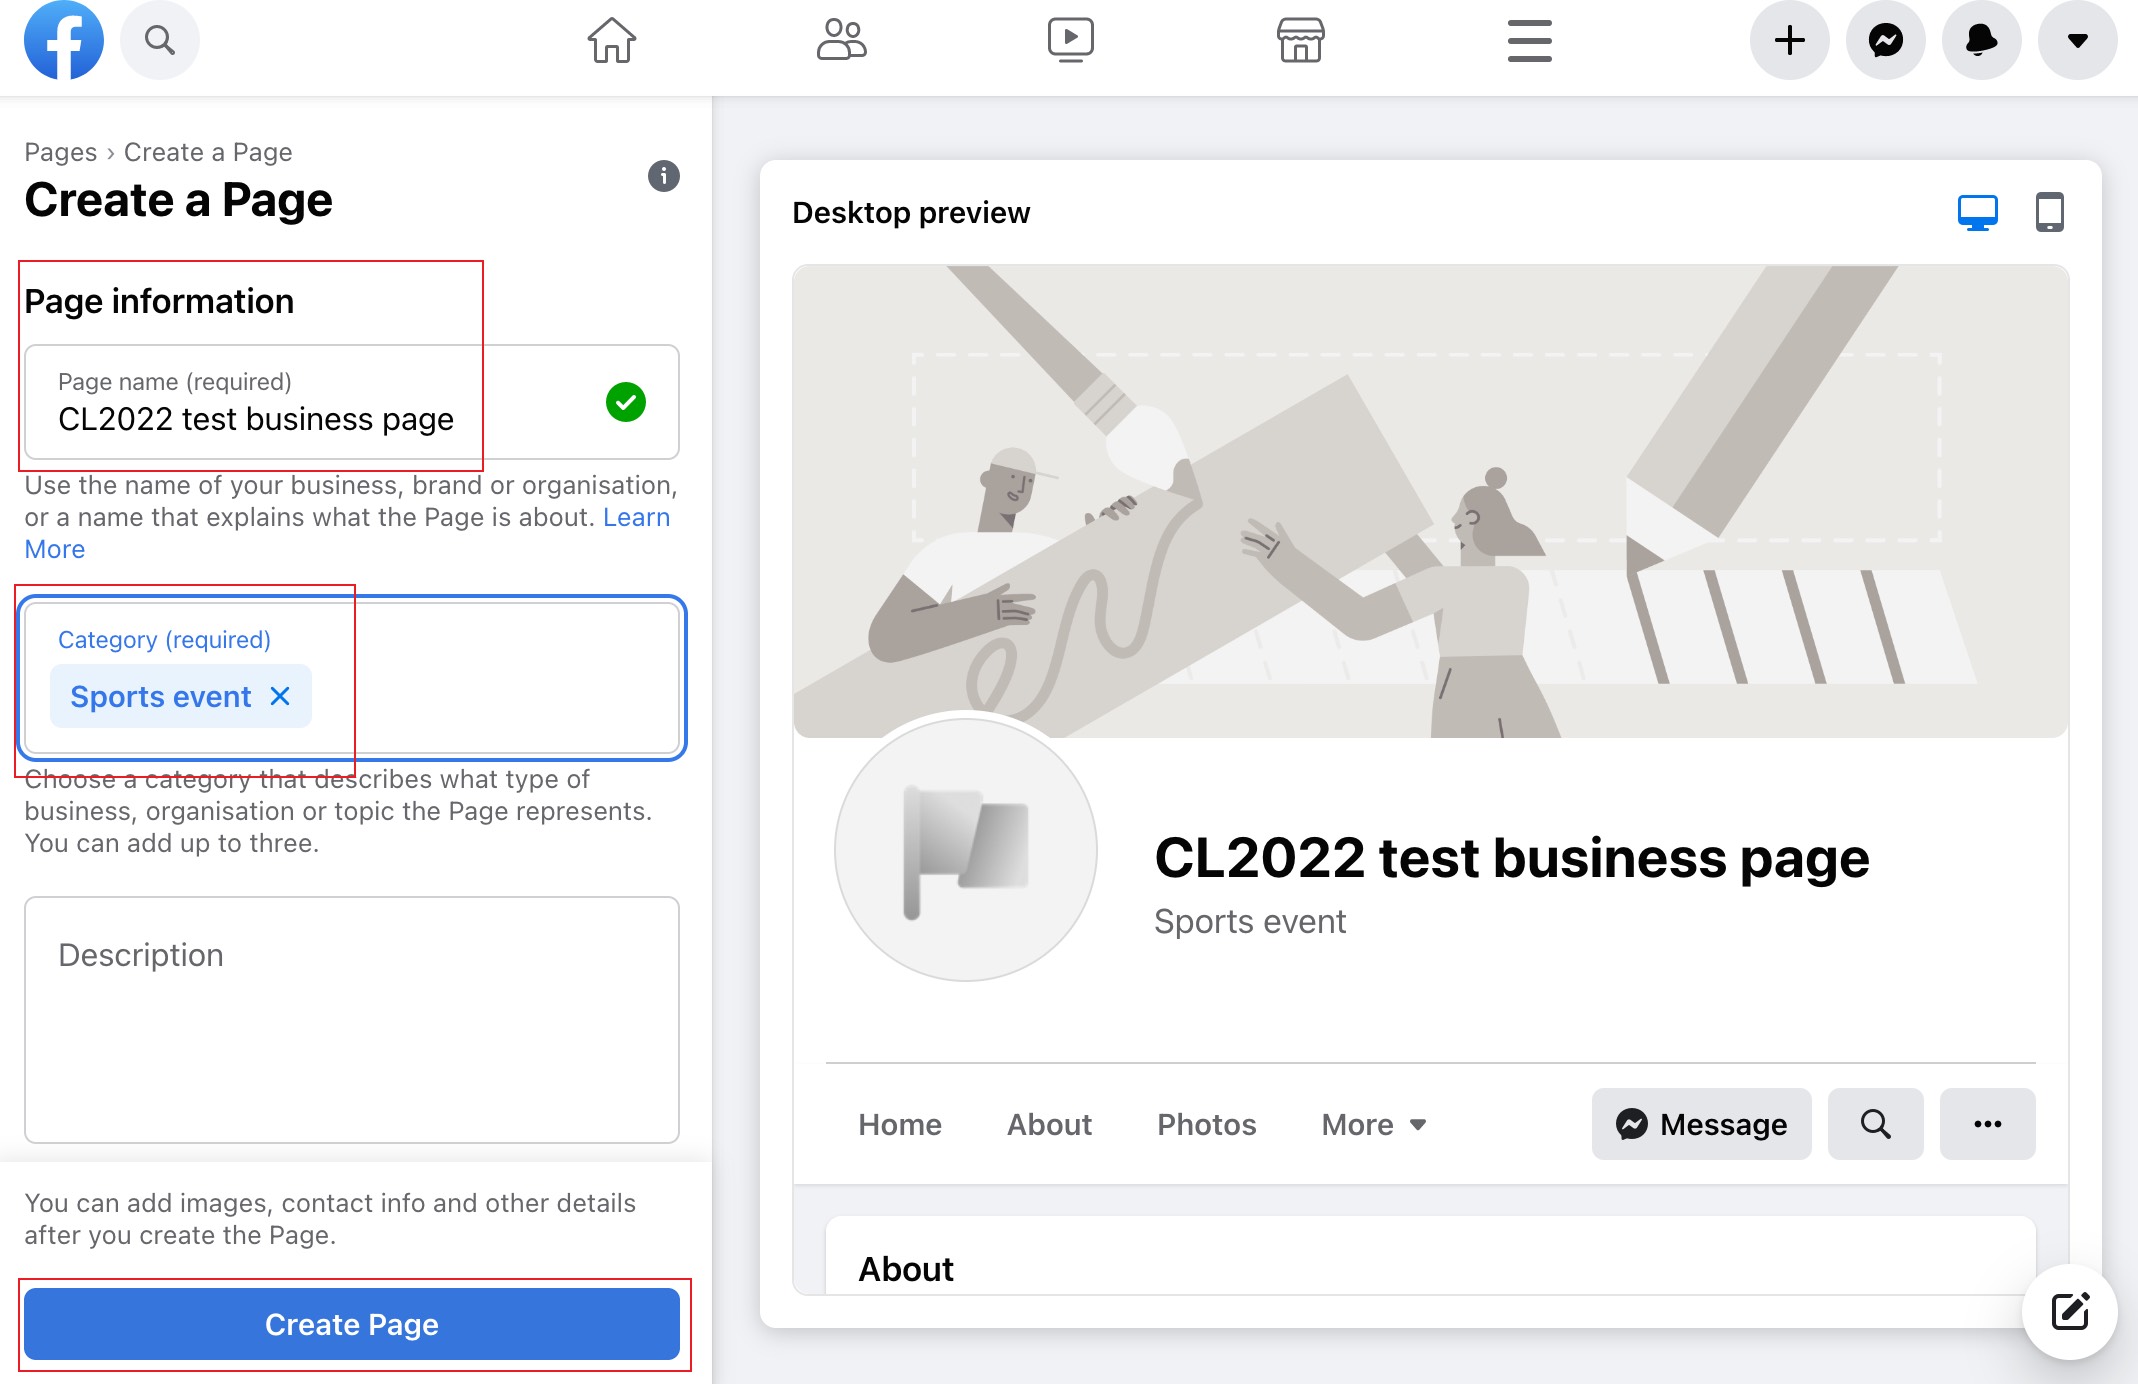
- If you are logged in already to Facebook, you will be presented with the Business Page creation tool. Simply give the page a Name and a Category then Click
Create Pagebutton
2. Facebook Messenger Asset creation and Register to Webex CC
-
Login to your respective Webex Connect UI using the provided URL https://cl1podX.imiconnect.io/ (where X is your POD number).
-
Navigate to
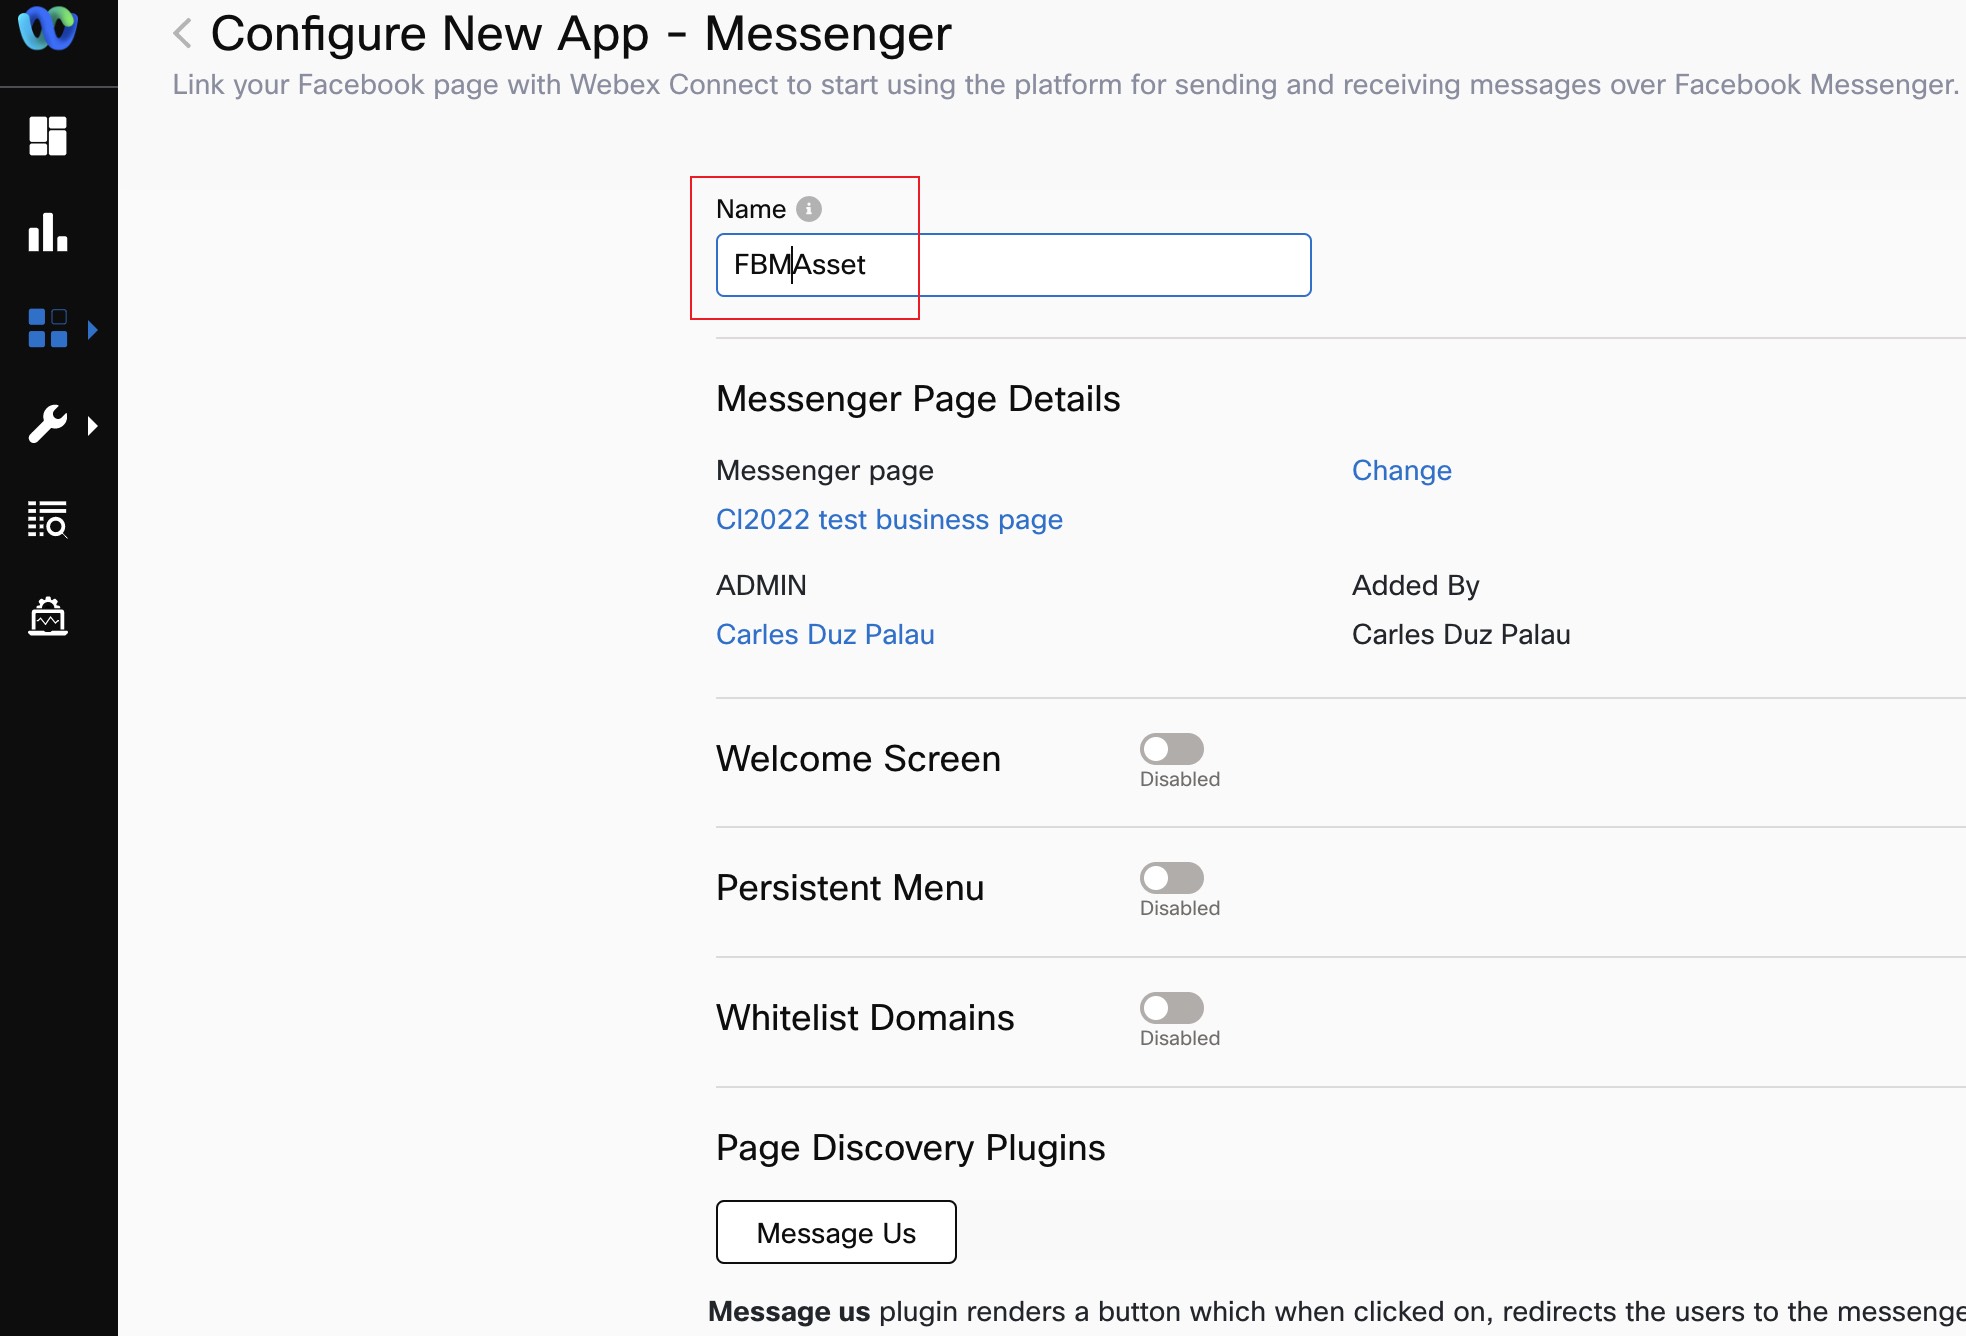
Assets>Apps>Configure New App>Messengerand Click onAdd Messenger Pagebutton
- If you haven’t done already, authenticate with your FB account where you have a page already created. Then select the respective page that you want to integrate
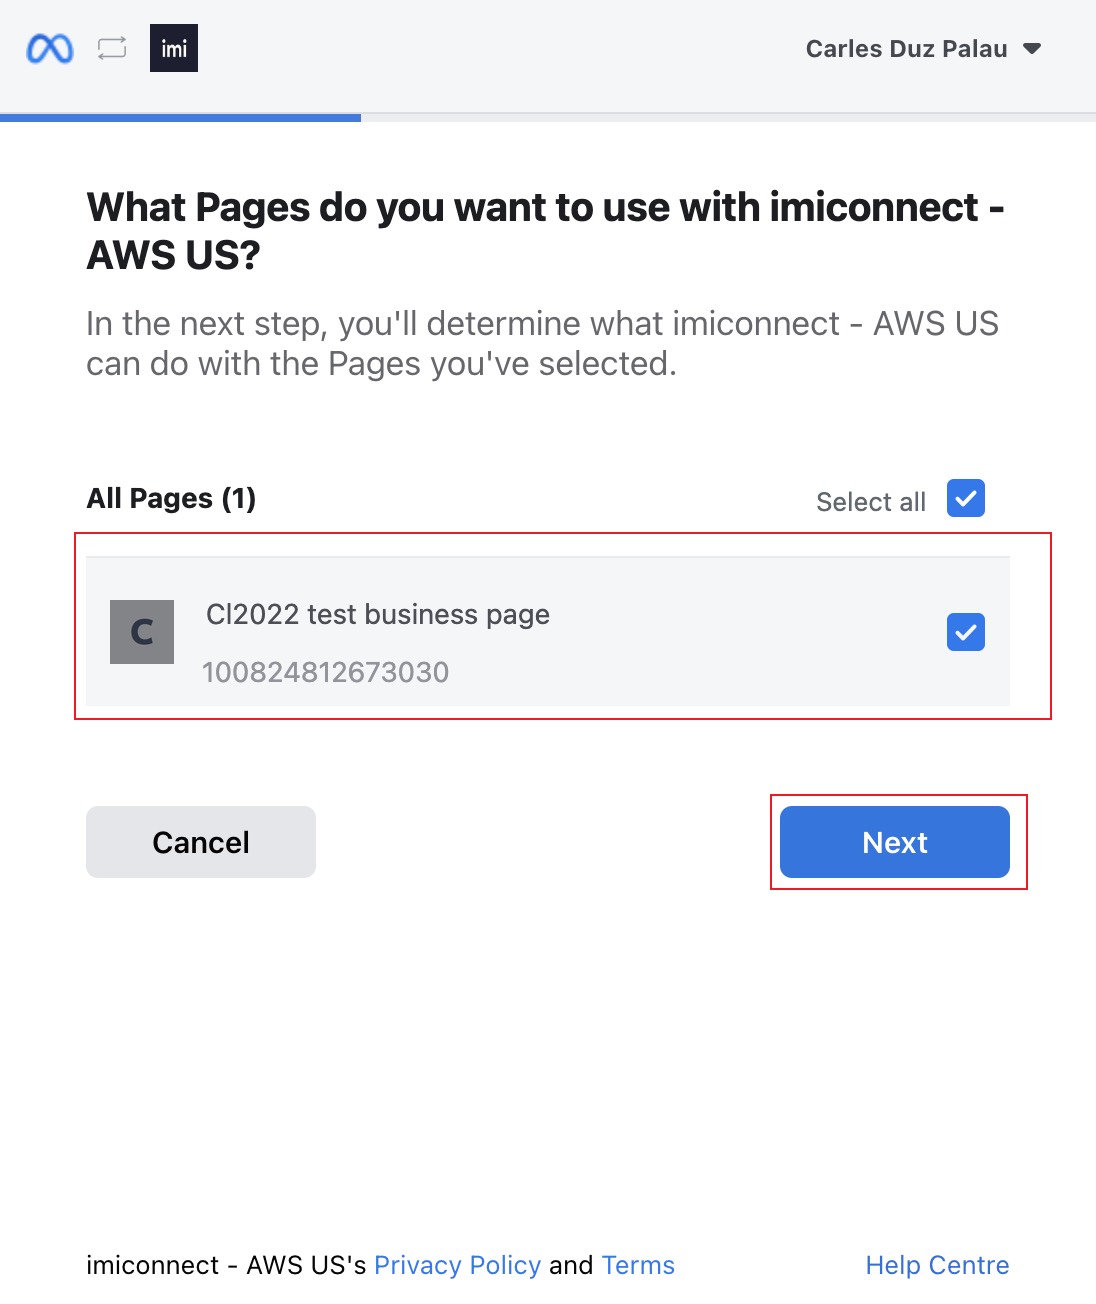
- Accept all default permissions
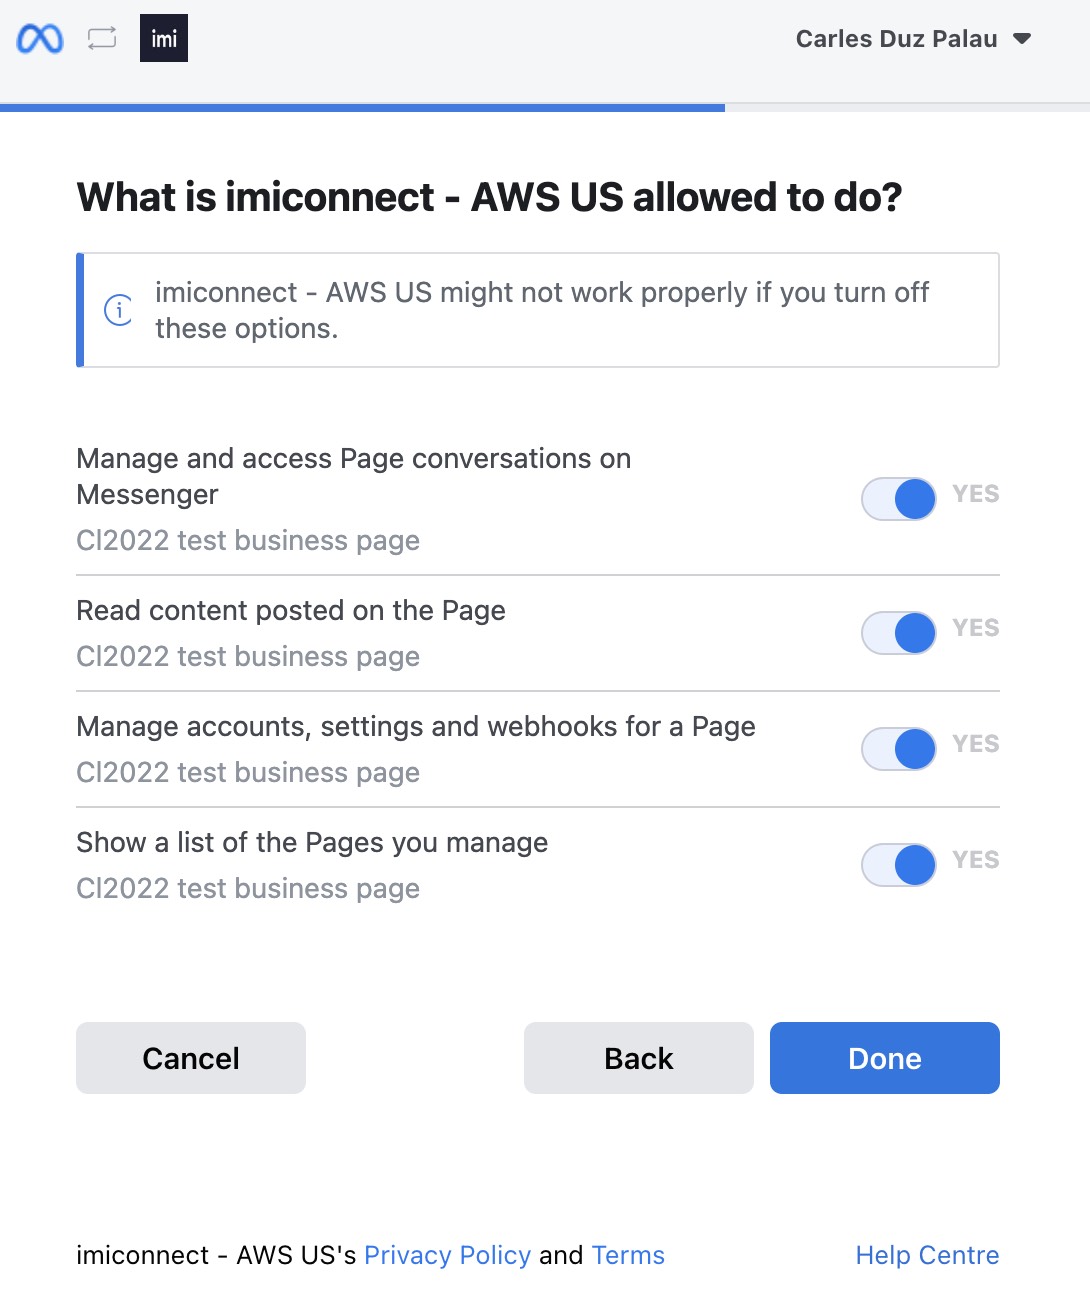
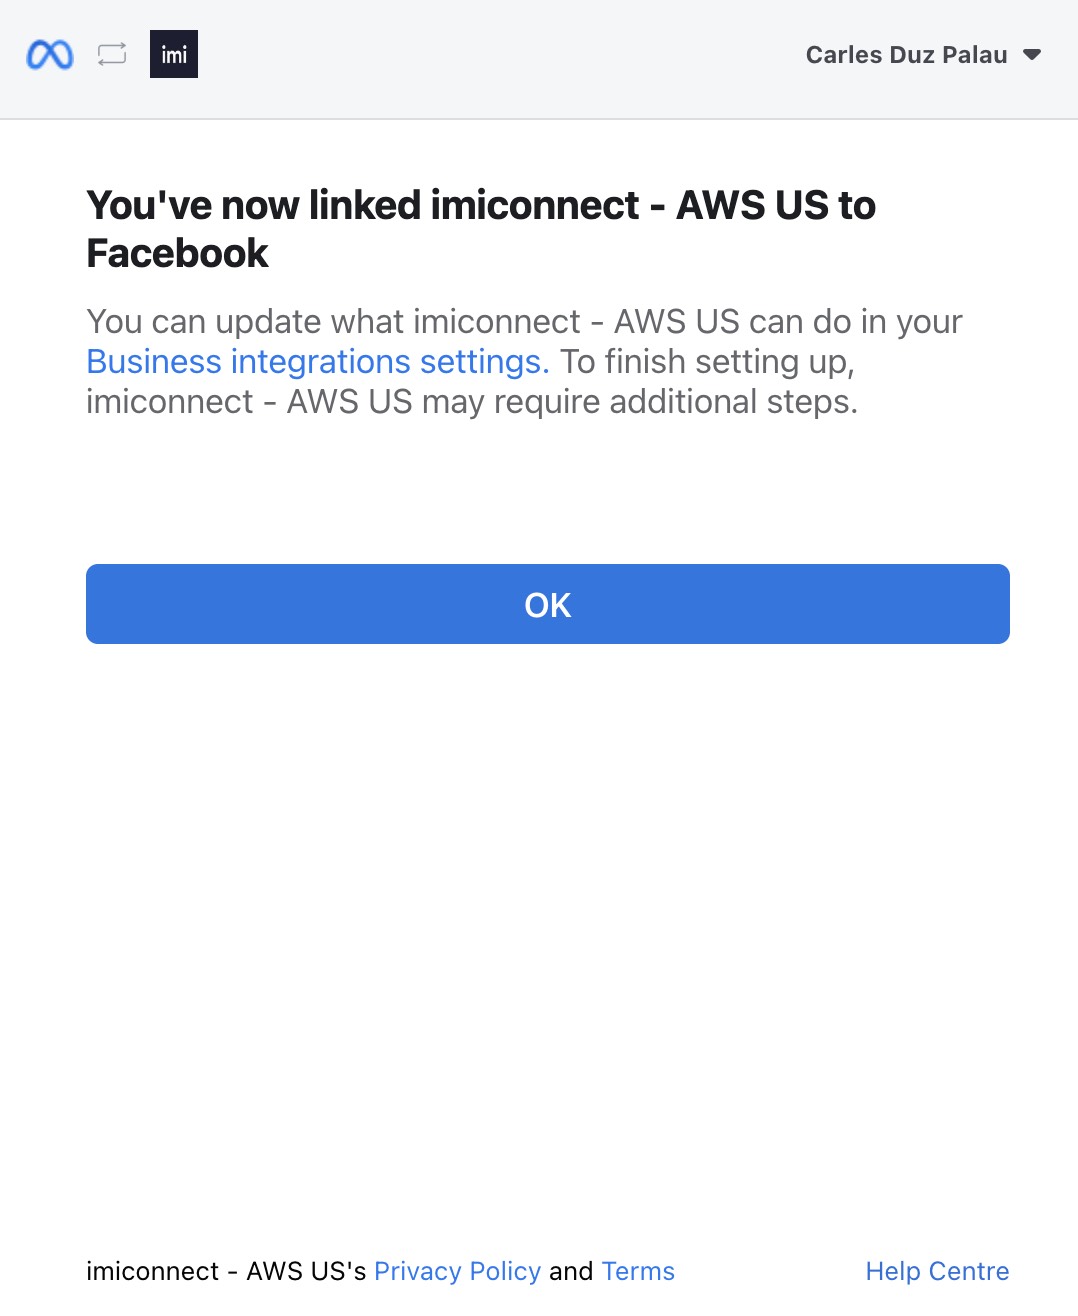
- That completes the linking of the Facebook connect with Webex Connect
- Finally select the Business Page you want to link to the Asset
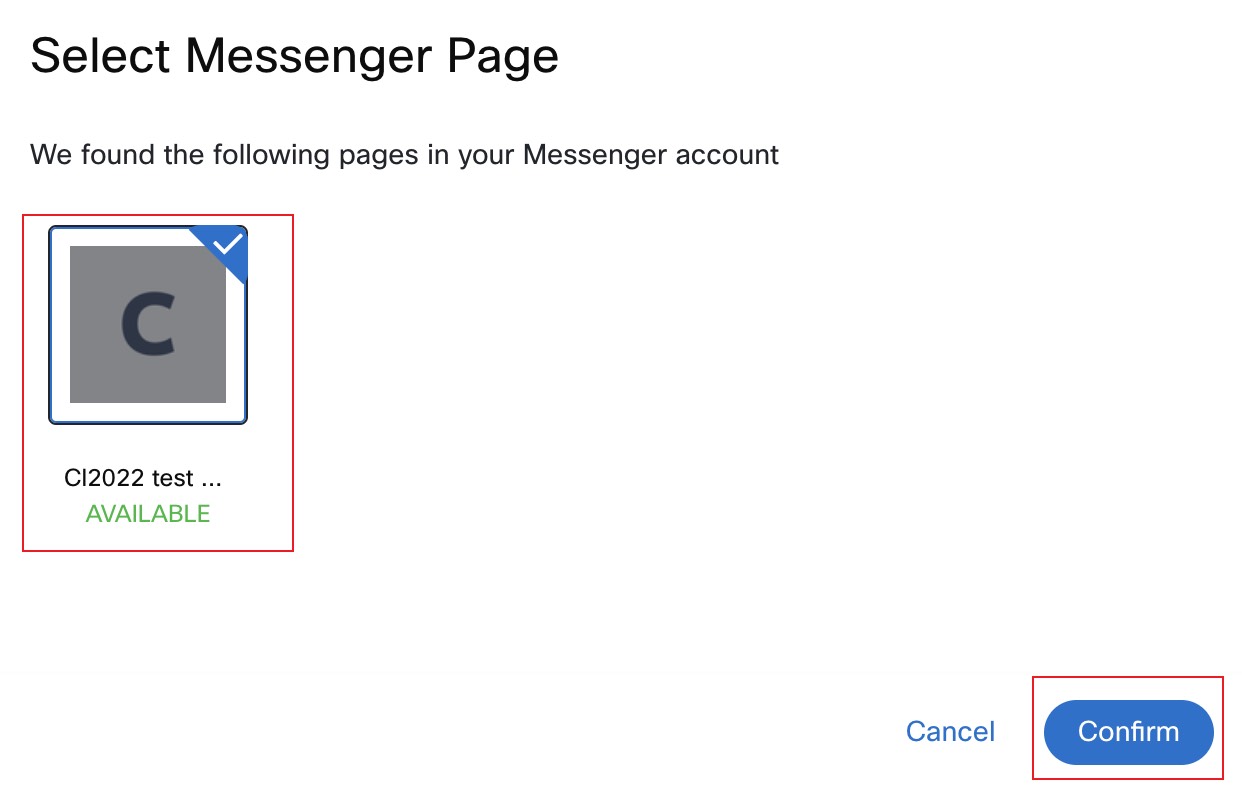
- Provide the name and click
Save
- Click
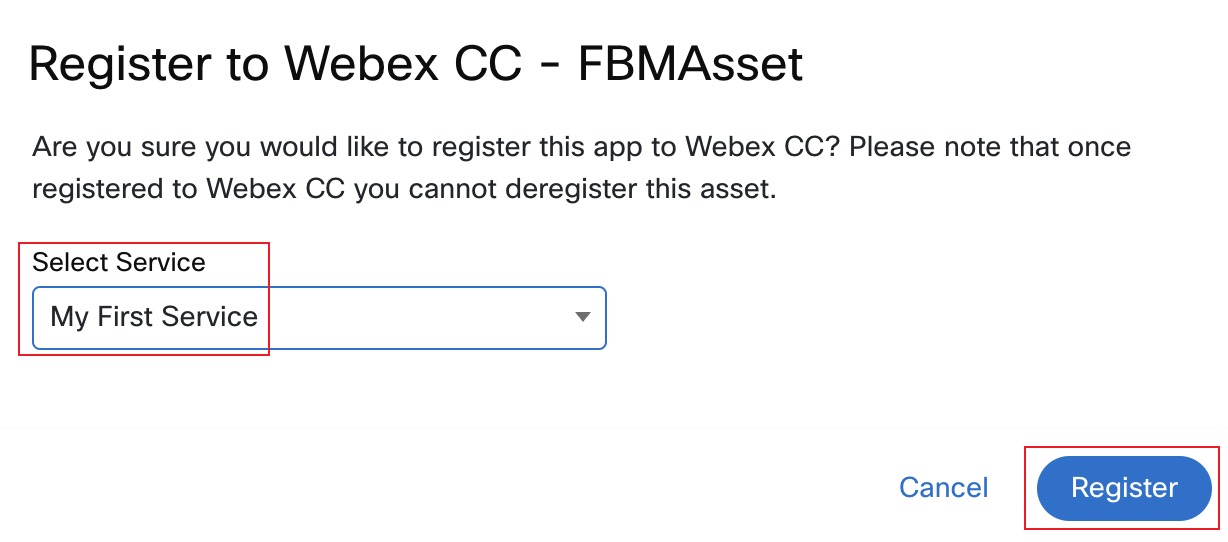
Register to Webex Engagein the ‘Configure New App-Messenger’ window -> In the resulting window select the service and clickRegister.
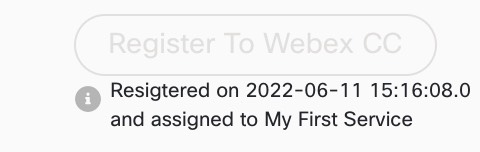
- Confirm that registration with Webex CC completed successfully
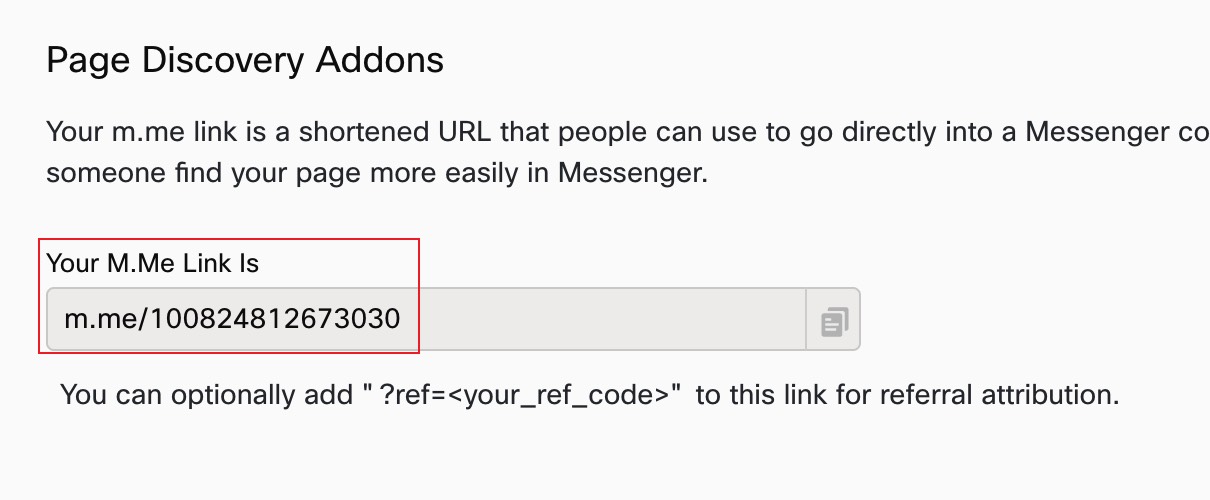
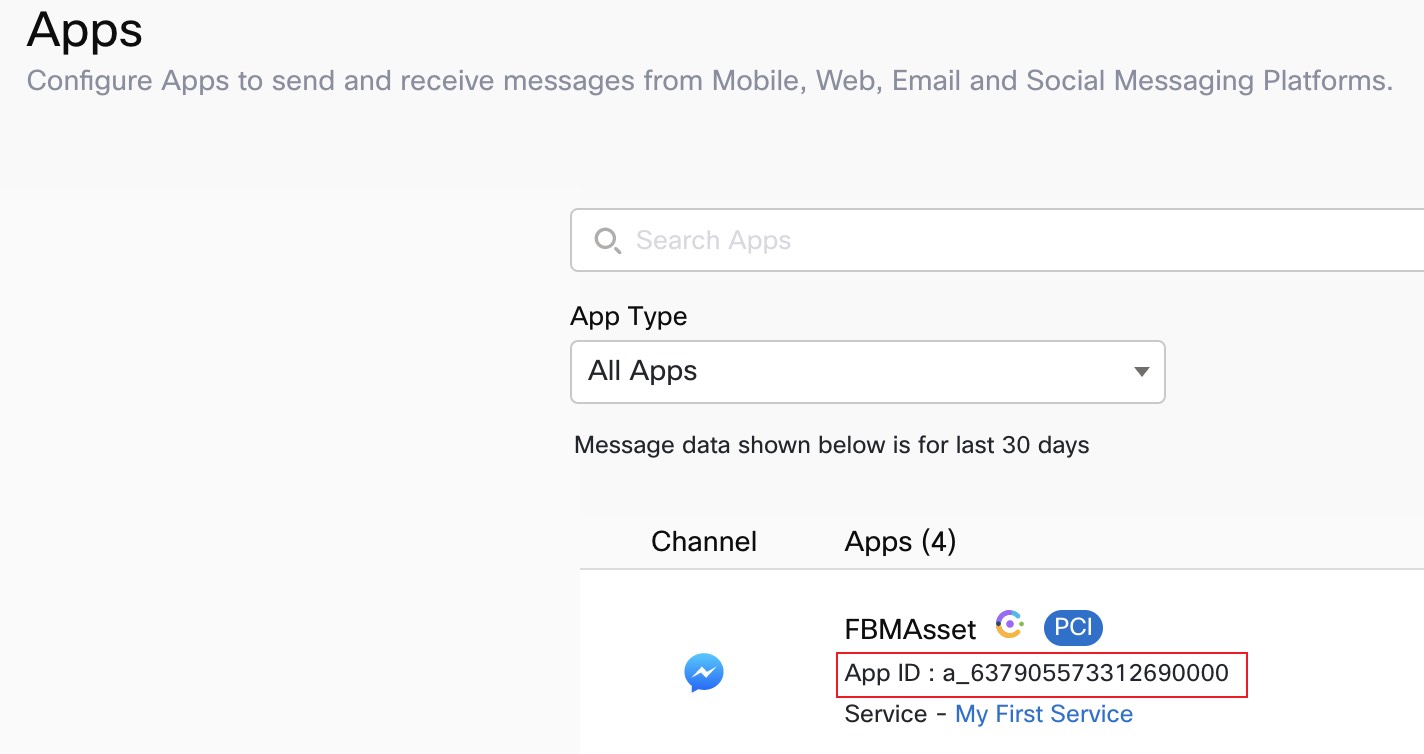
- Scroll down and take note of the M.Me link in the
Page Discovery Addonssection. We will use that link to trigger the Facebook Messenger interaction from the Customer end. Also take note of the numeric string parameter in the M.Me link. That’s theFacebook Page IDwhich we will also need later when configuring the flow.
- Click on the back arrow to go back to the list of Assets Apps. Then take note of the application ID (app id) we just created. We will also need that app ID in the flow
3. Create Entry Point and Queue
1. Create Entry Point in Management Portal
-
Click on Provisioning and select Entry Points/Queues > Entry Point.
-
Click on
New Entry Point. -
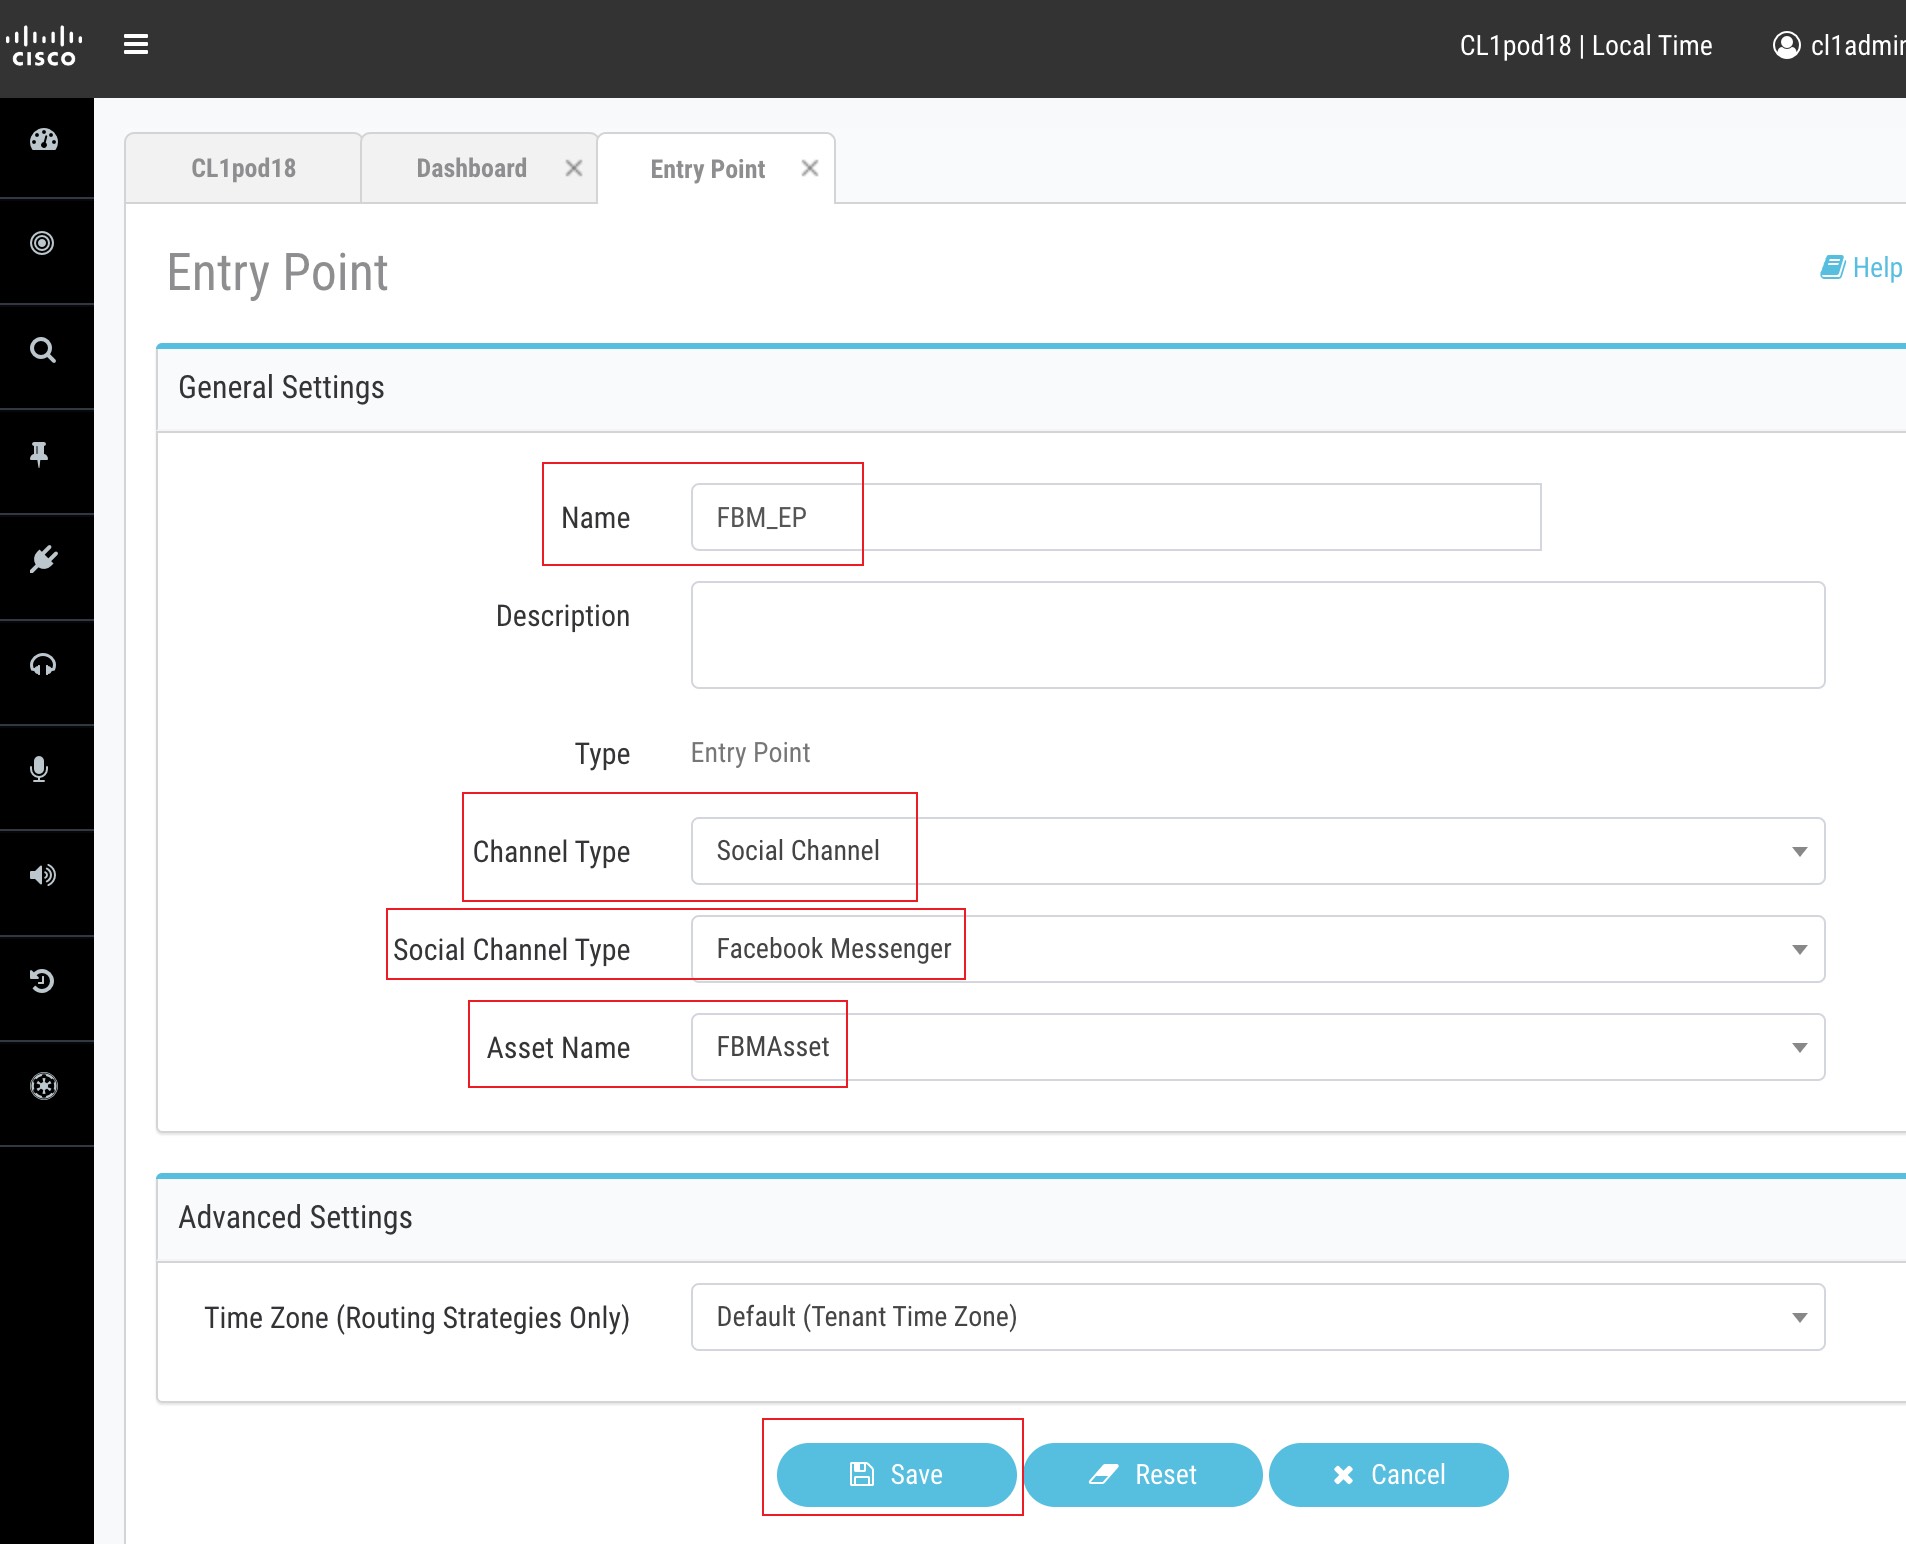
Input Name as
FBM_EP. -
Select
Social Channelin the Channel Type section. -
Select
Facebook Messengerin the Social Channel Type section. -
Leave the Asset Name as the configured value earlier.
-
The Time Zone can stay as default value.
-
Click on Save after comparing your values with the screenshot below.
2. Create Queue in Management Portal
-
Click on Provisioning and select Entry Points/Queues > Queue.
-
Click on
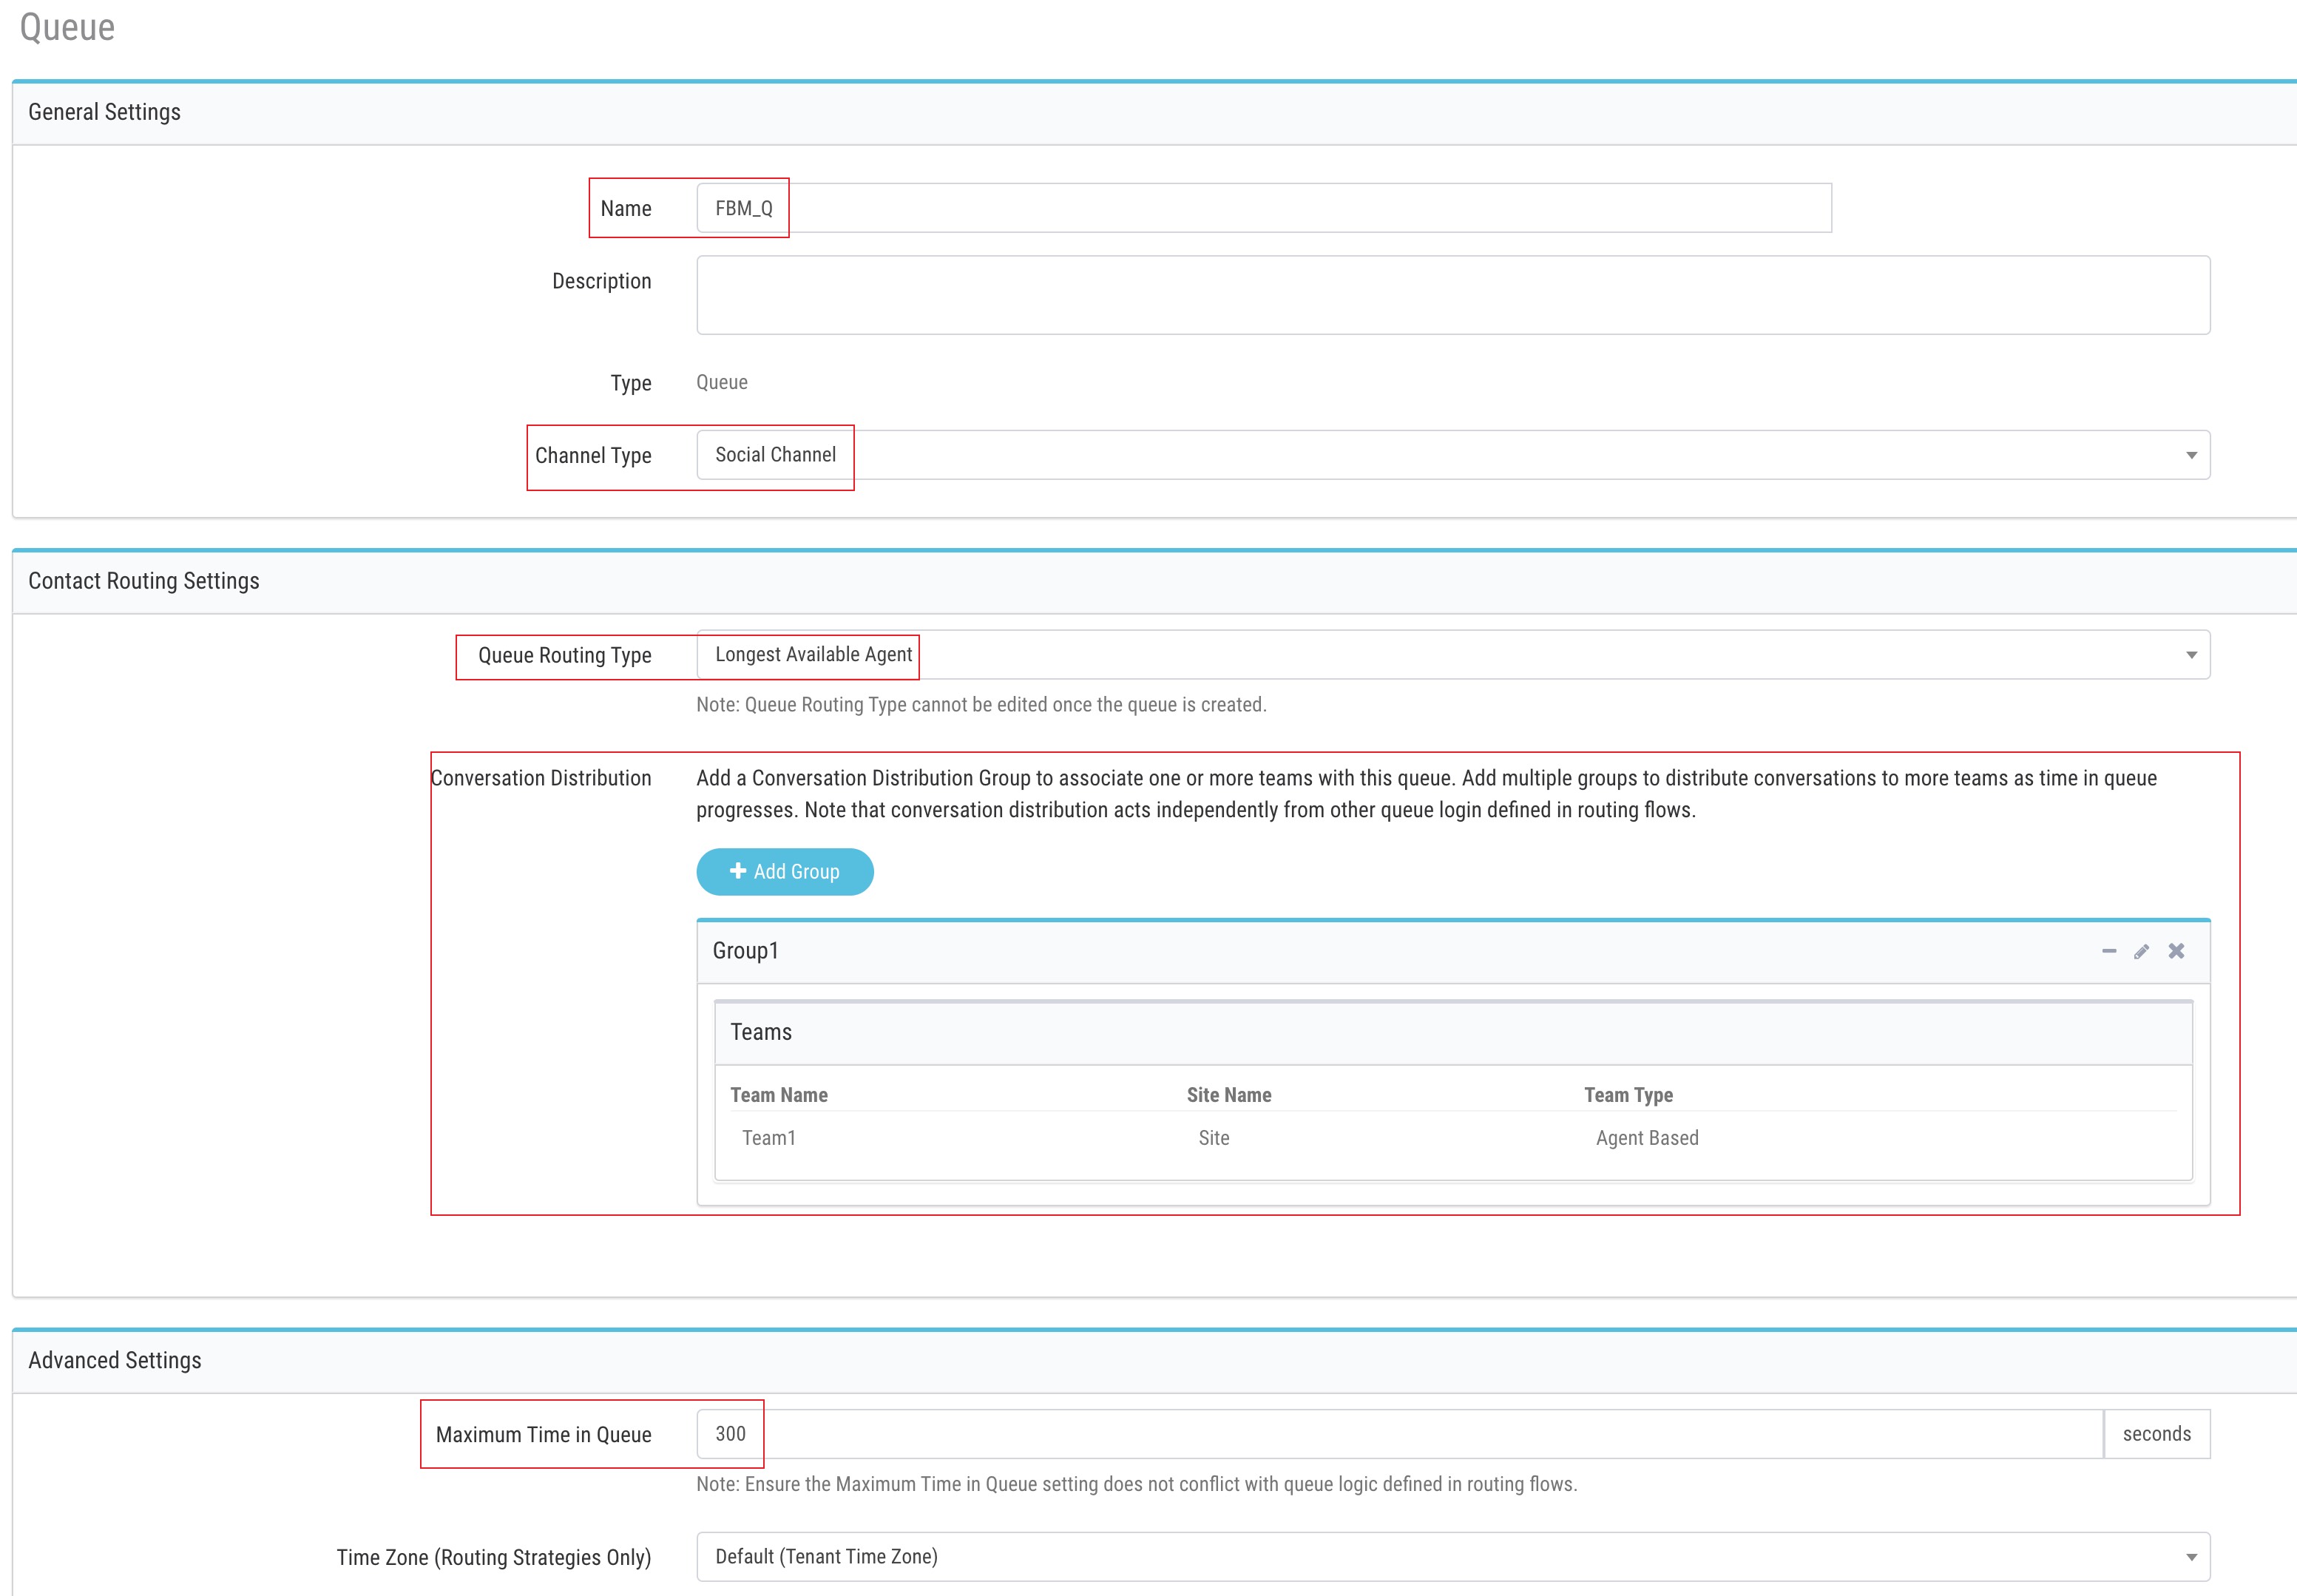
New Queue. -
Input Name as
FBM_Q. -
Select
Social Channelin the Channel Type section. -
Set Queue Routing Type to Longest Available Agent
-
Click
Add Groupin the Conversation distribution section. -
Select the Agent based teams created in the previous lab and click
Save. Once saved, clickCloseto exit this window. -
Input Maximum Time in Queue as
300. -
The Time Zone can stay as default value.
-
Click on Save after comparing your values with the screenshot below.
4. Create/Upload Facebook Messenger flow
1. Initial flow loading
-
Download the default Facebook Inbound flow from the GitHub page.
-
Navigate to Webex Connect Flows -> v3.0 ->Template -> Media Specific Workflows -> Facebook Inbound Flow.workflow.zip, select the zip file and click download.
-
Unzip the downloaded file.
-
Go to Webex Connect, click on Services and select the service in which the Asset is created in step 2. It should be My First Service
-
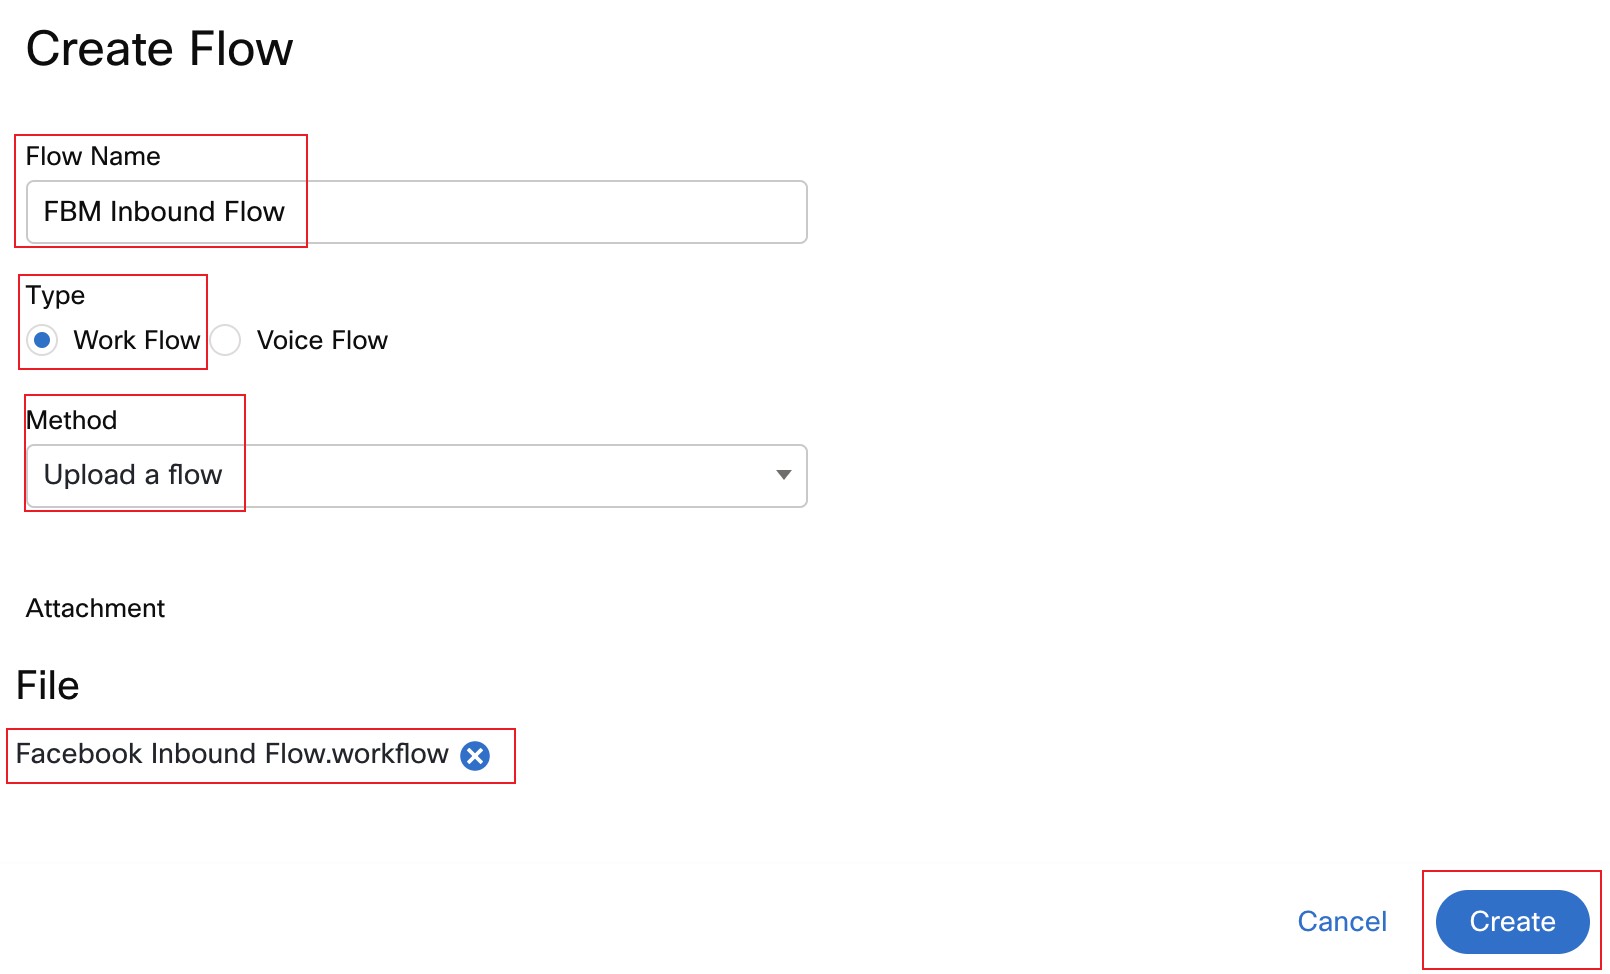
In the service click on FLOWS -> CREATE FLOW .
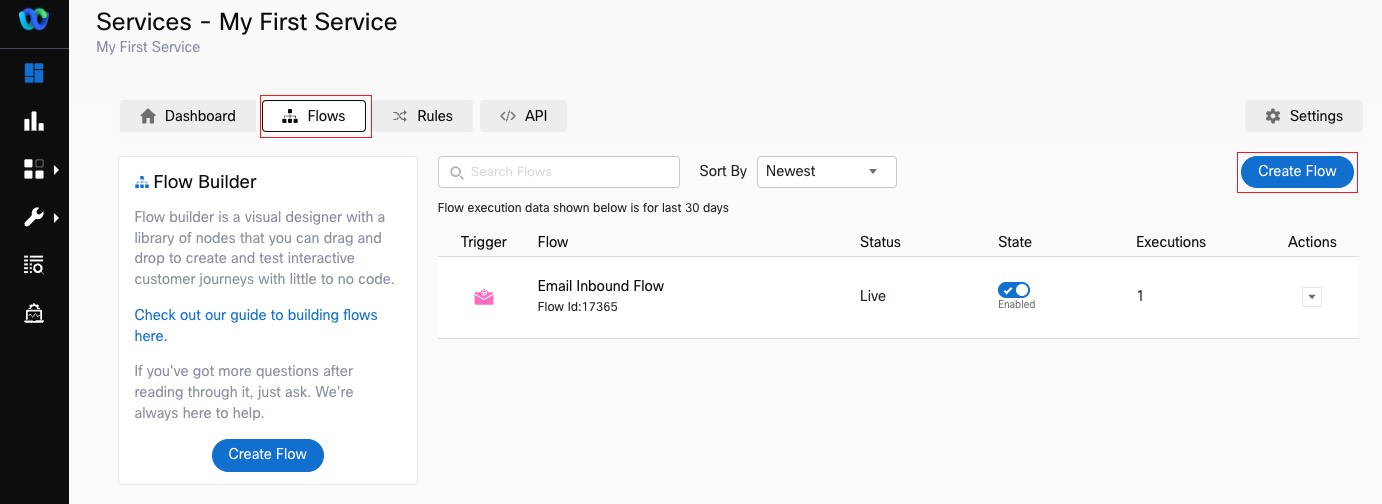
-
Enter the FLOW NAME as FBM Inbound Flow, select the TYPE as Work Flow and under METHOD select Upload a flow.
-
Drag and drop the Facebook Inbound Flow.workflow flow file that you unzipped, click CREATE and then click SAVE.
2. Start node and Custom Variables
-
A page will load with the imported workflow. We must make some changes to the default inbound flow based on our setup.
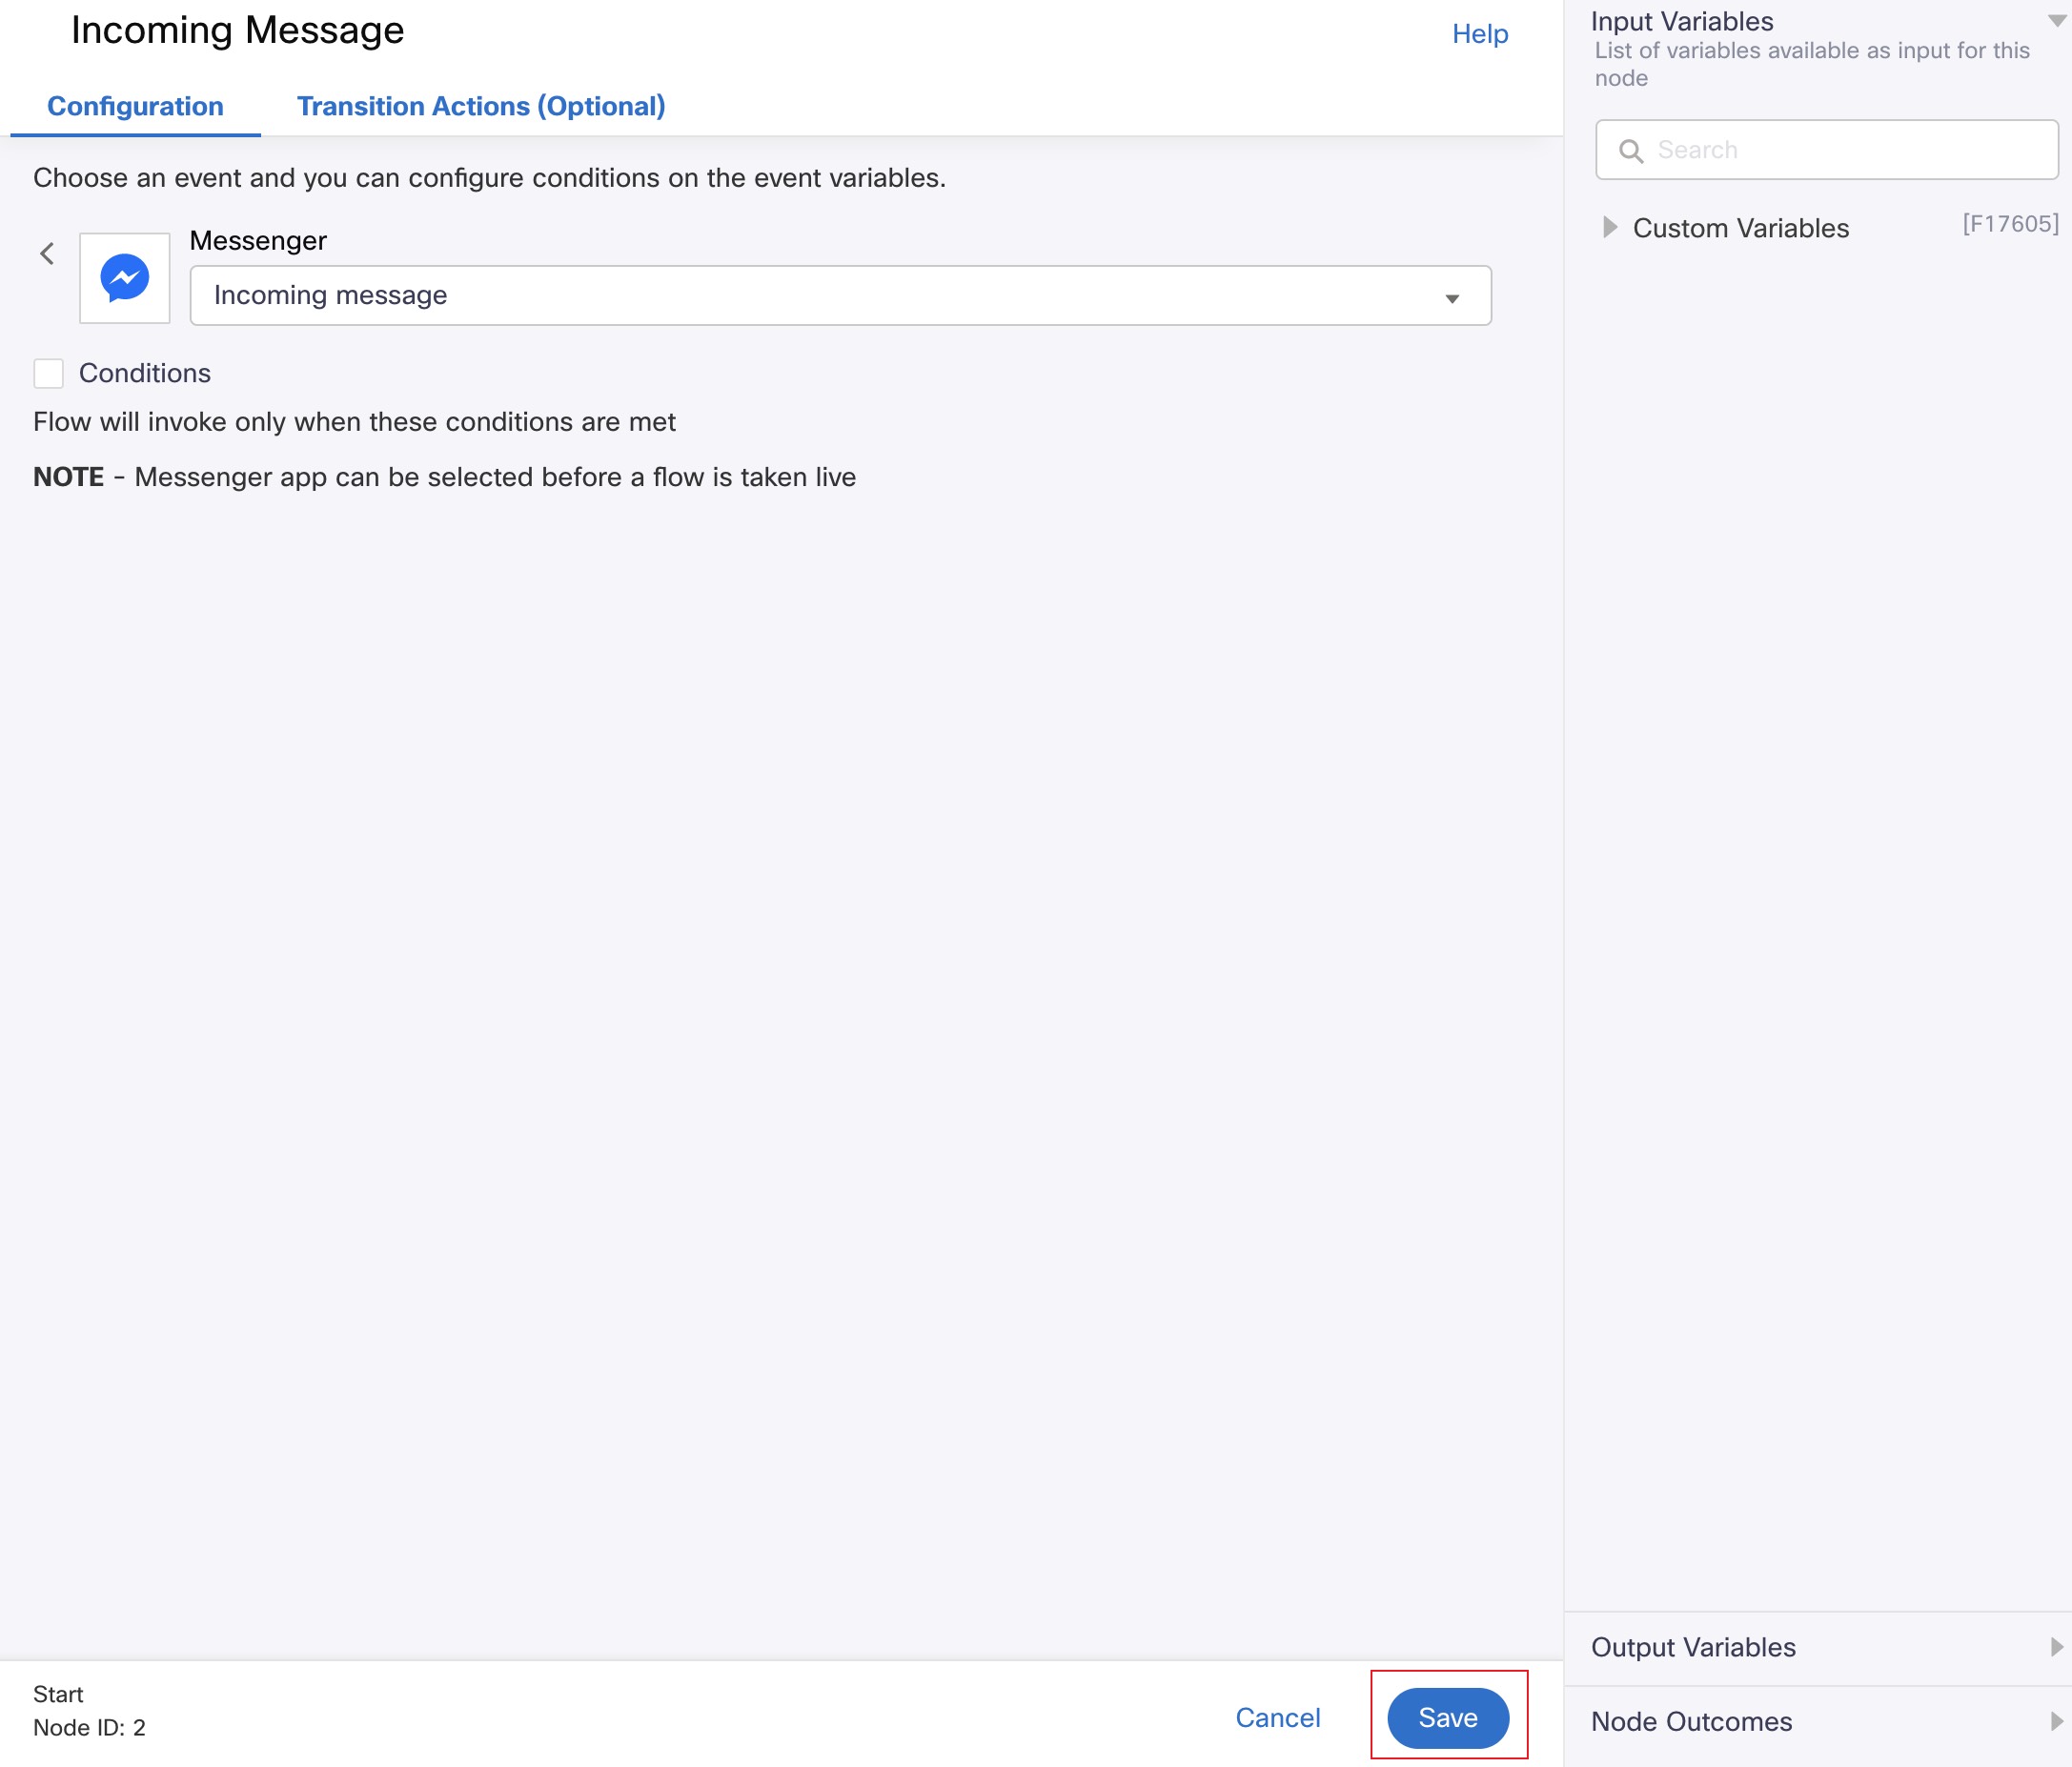
-
First Click
Savein theConfigure APP Eventpage that loaded, this defines what will trigger the flow and the default settings are already good.
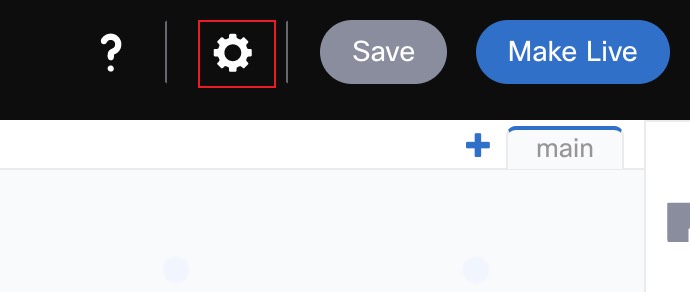
- Click on the gear button on the top right to load the flow settings dialog
- Select the Custom Variables tab and set the following Default Values:
FBPageID: to the numeric string in the M.Me link we saved earlier in Step 2. appid: Application ID (appID) from the FBM Asset from Step 2
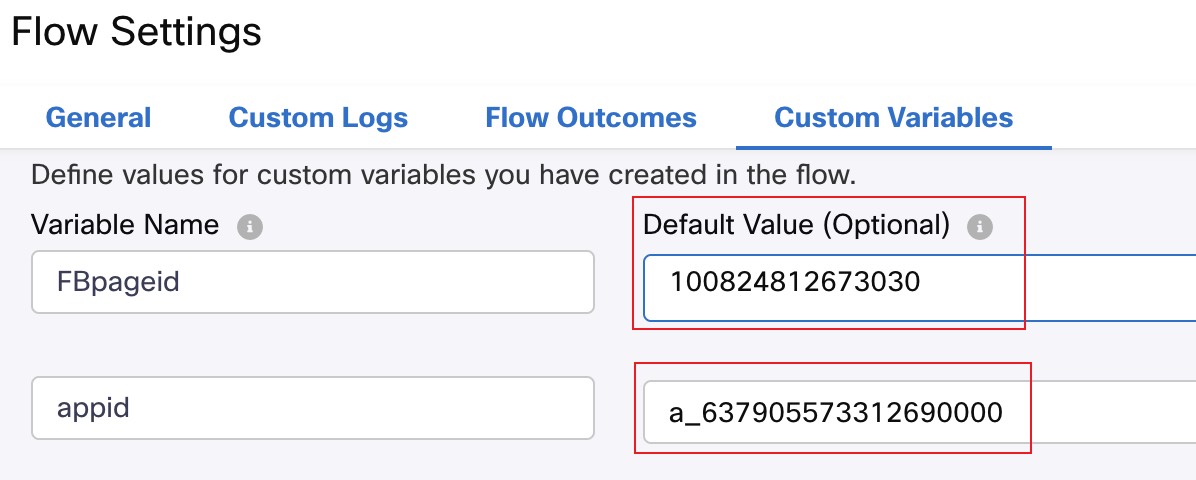
- Click
Save
3. Edit Queue Task node
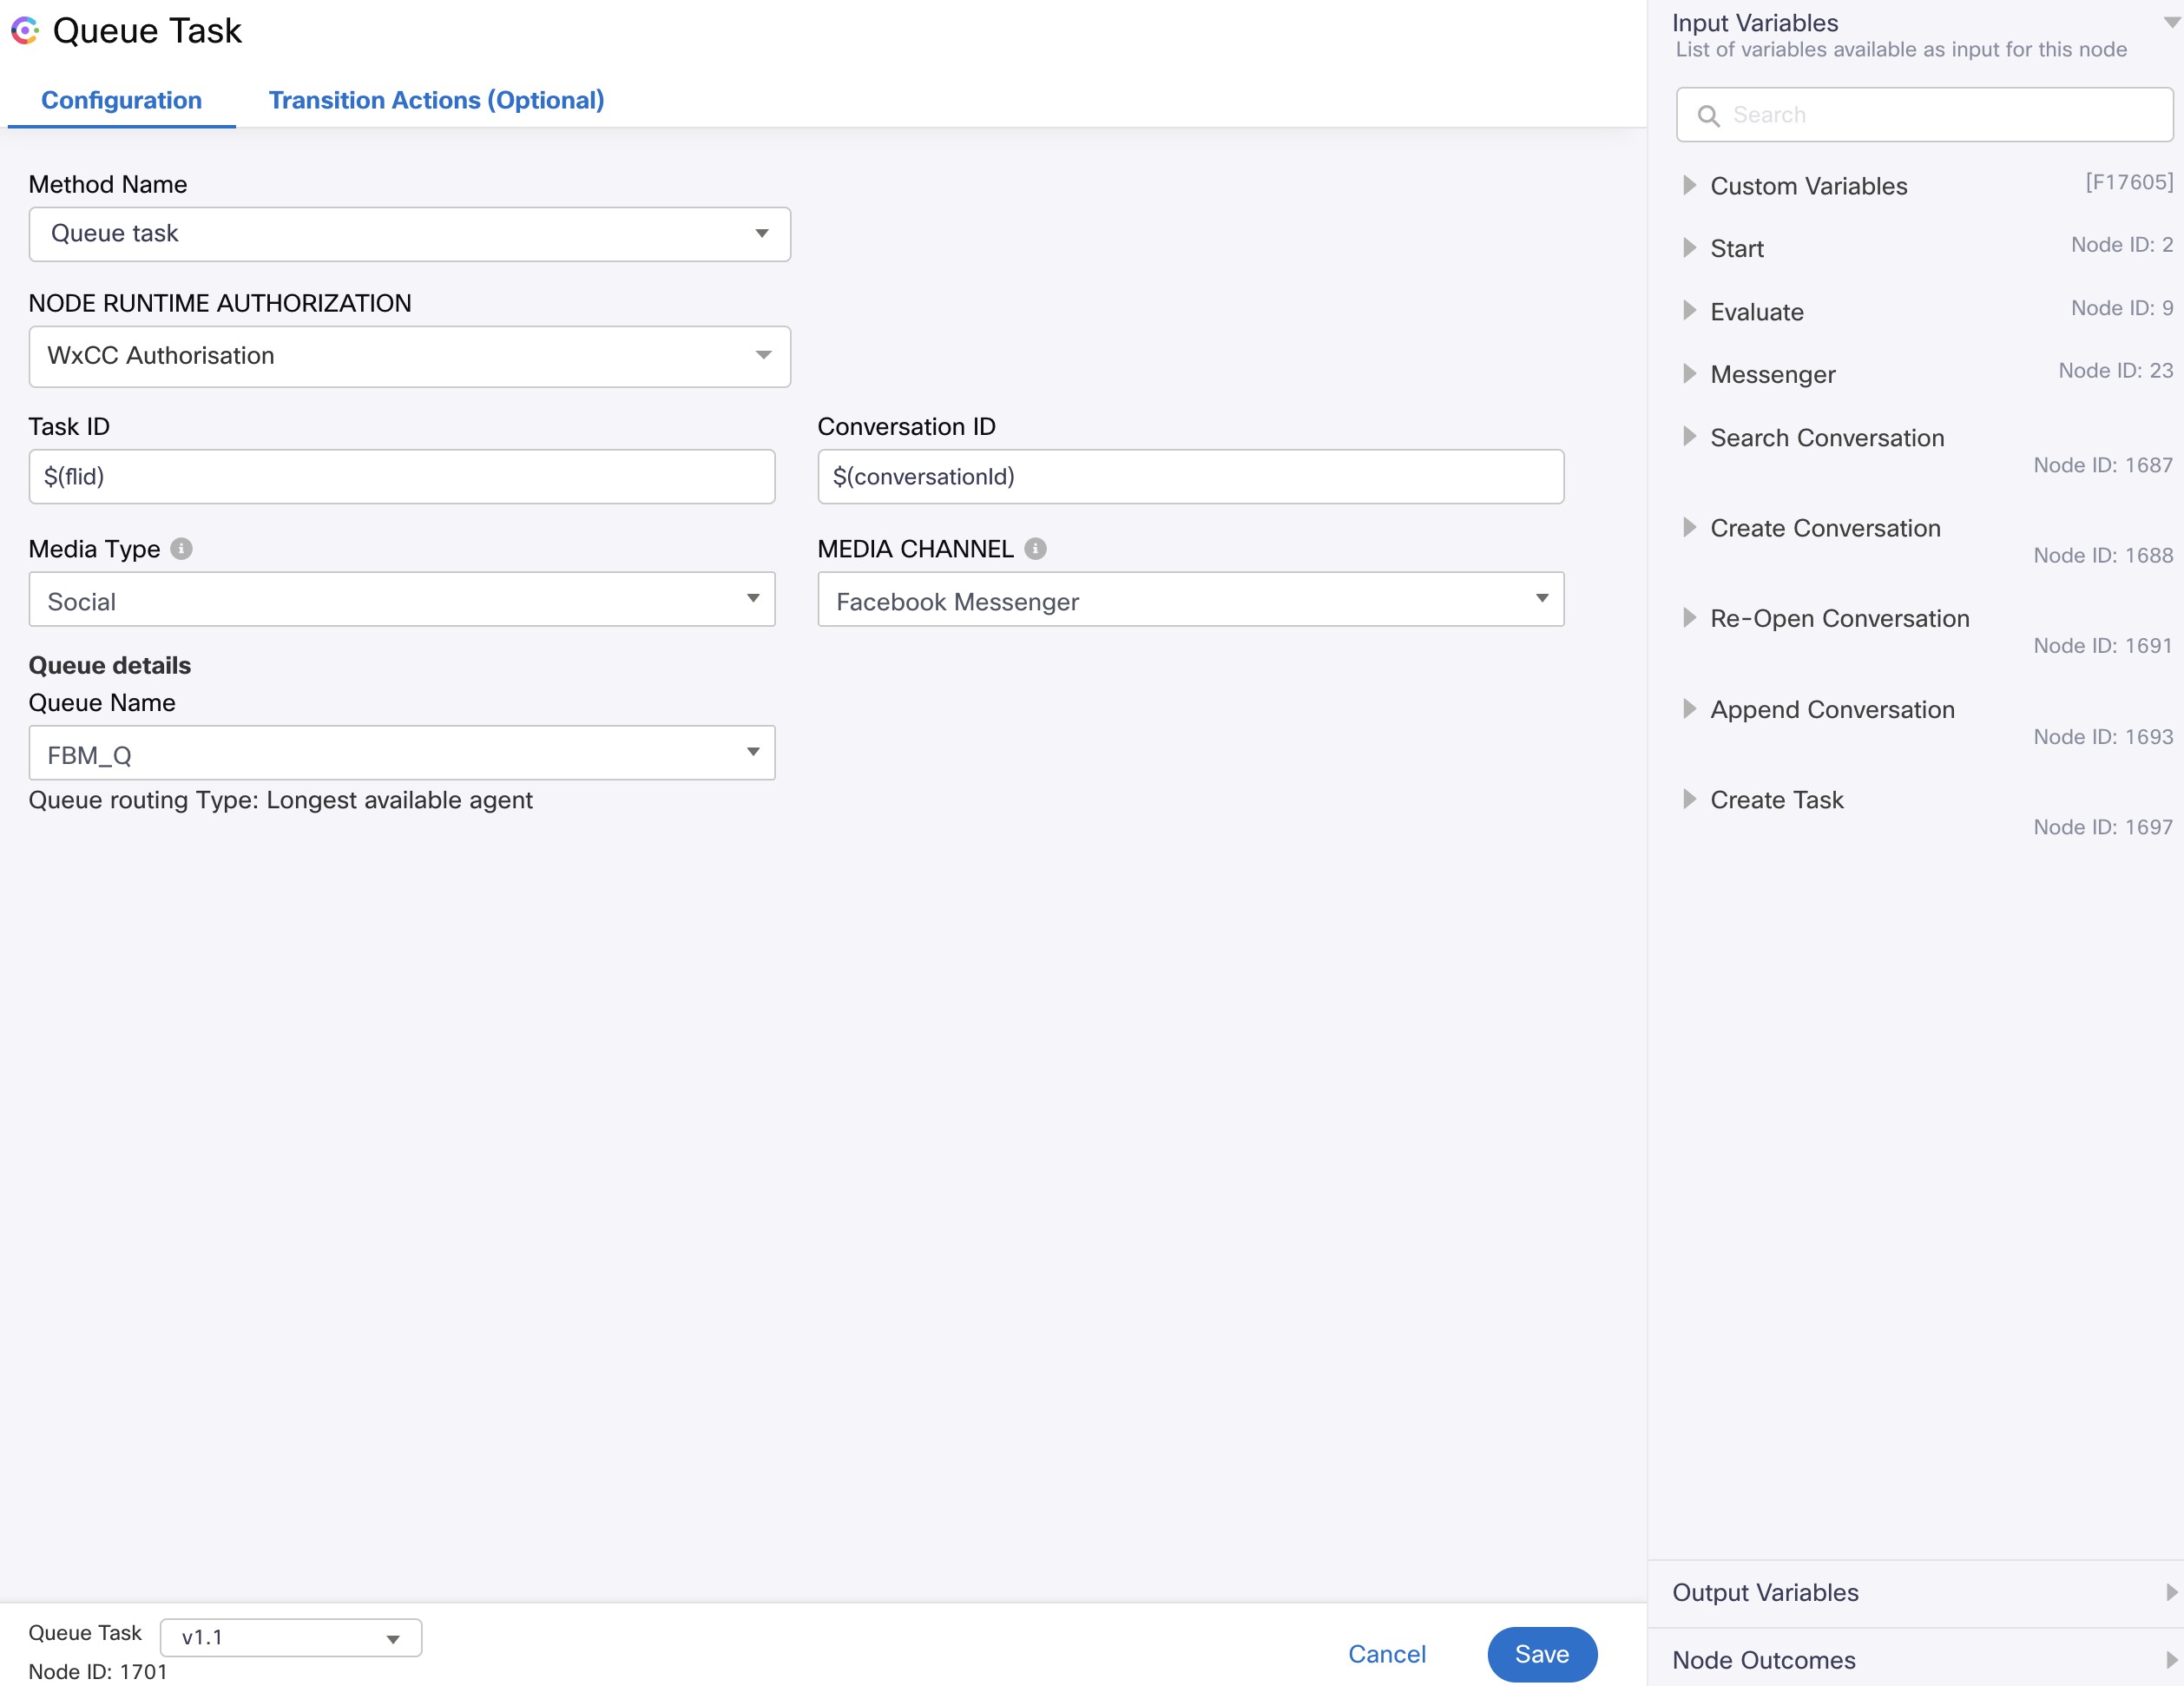
- In the created workflow find the Queue Task, click twice, select the QUEUE NAME as FBM_Q and click on SAVE.
-
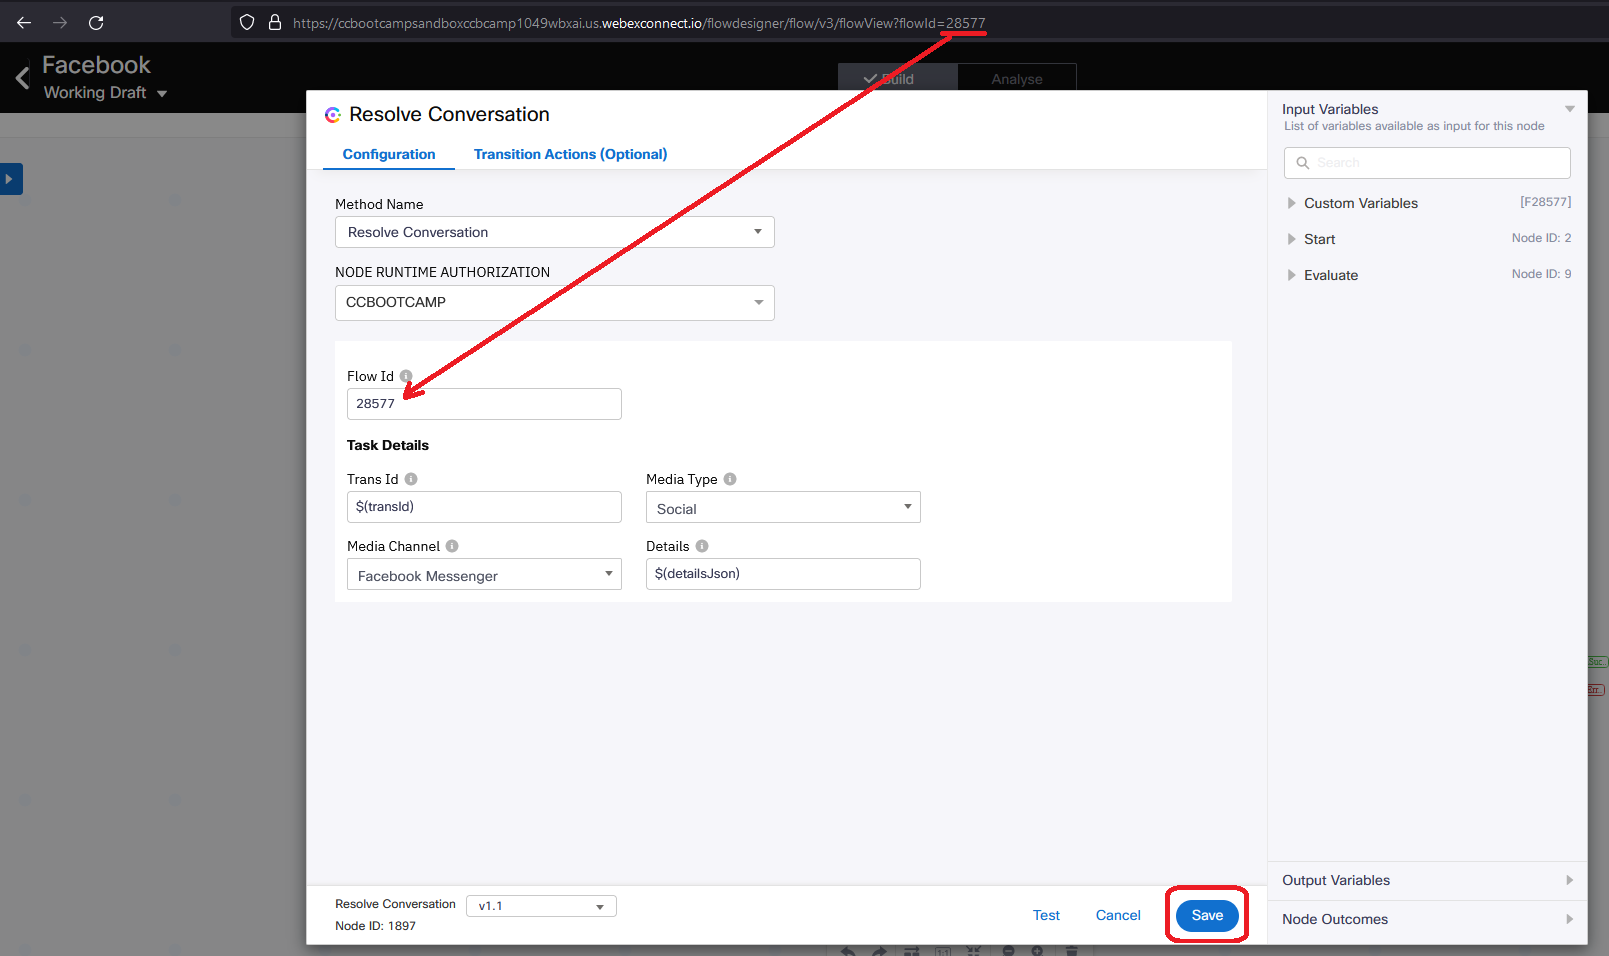
Go to Resolve Conversation node and fill in Flow Id field with flowId value copied from the address bar of web browser tab. Then save changes.
-
Finally click on Make Live on top right corner
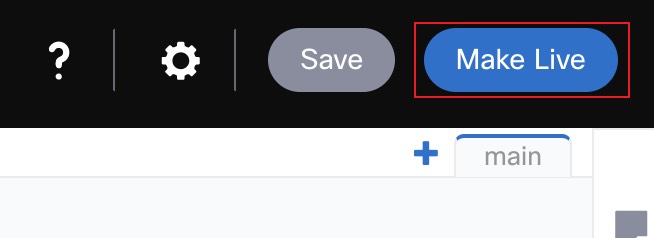
- Select the Application/Asset that we have created and click
Make Live.
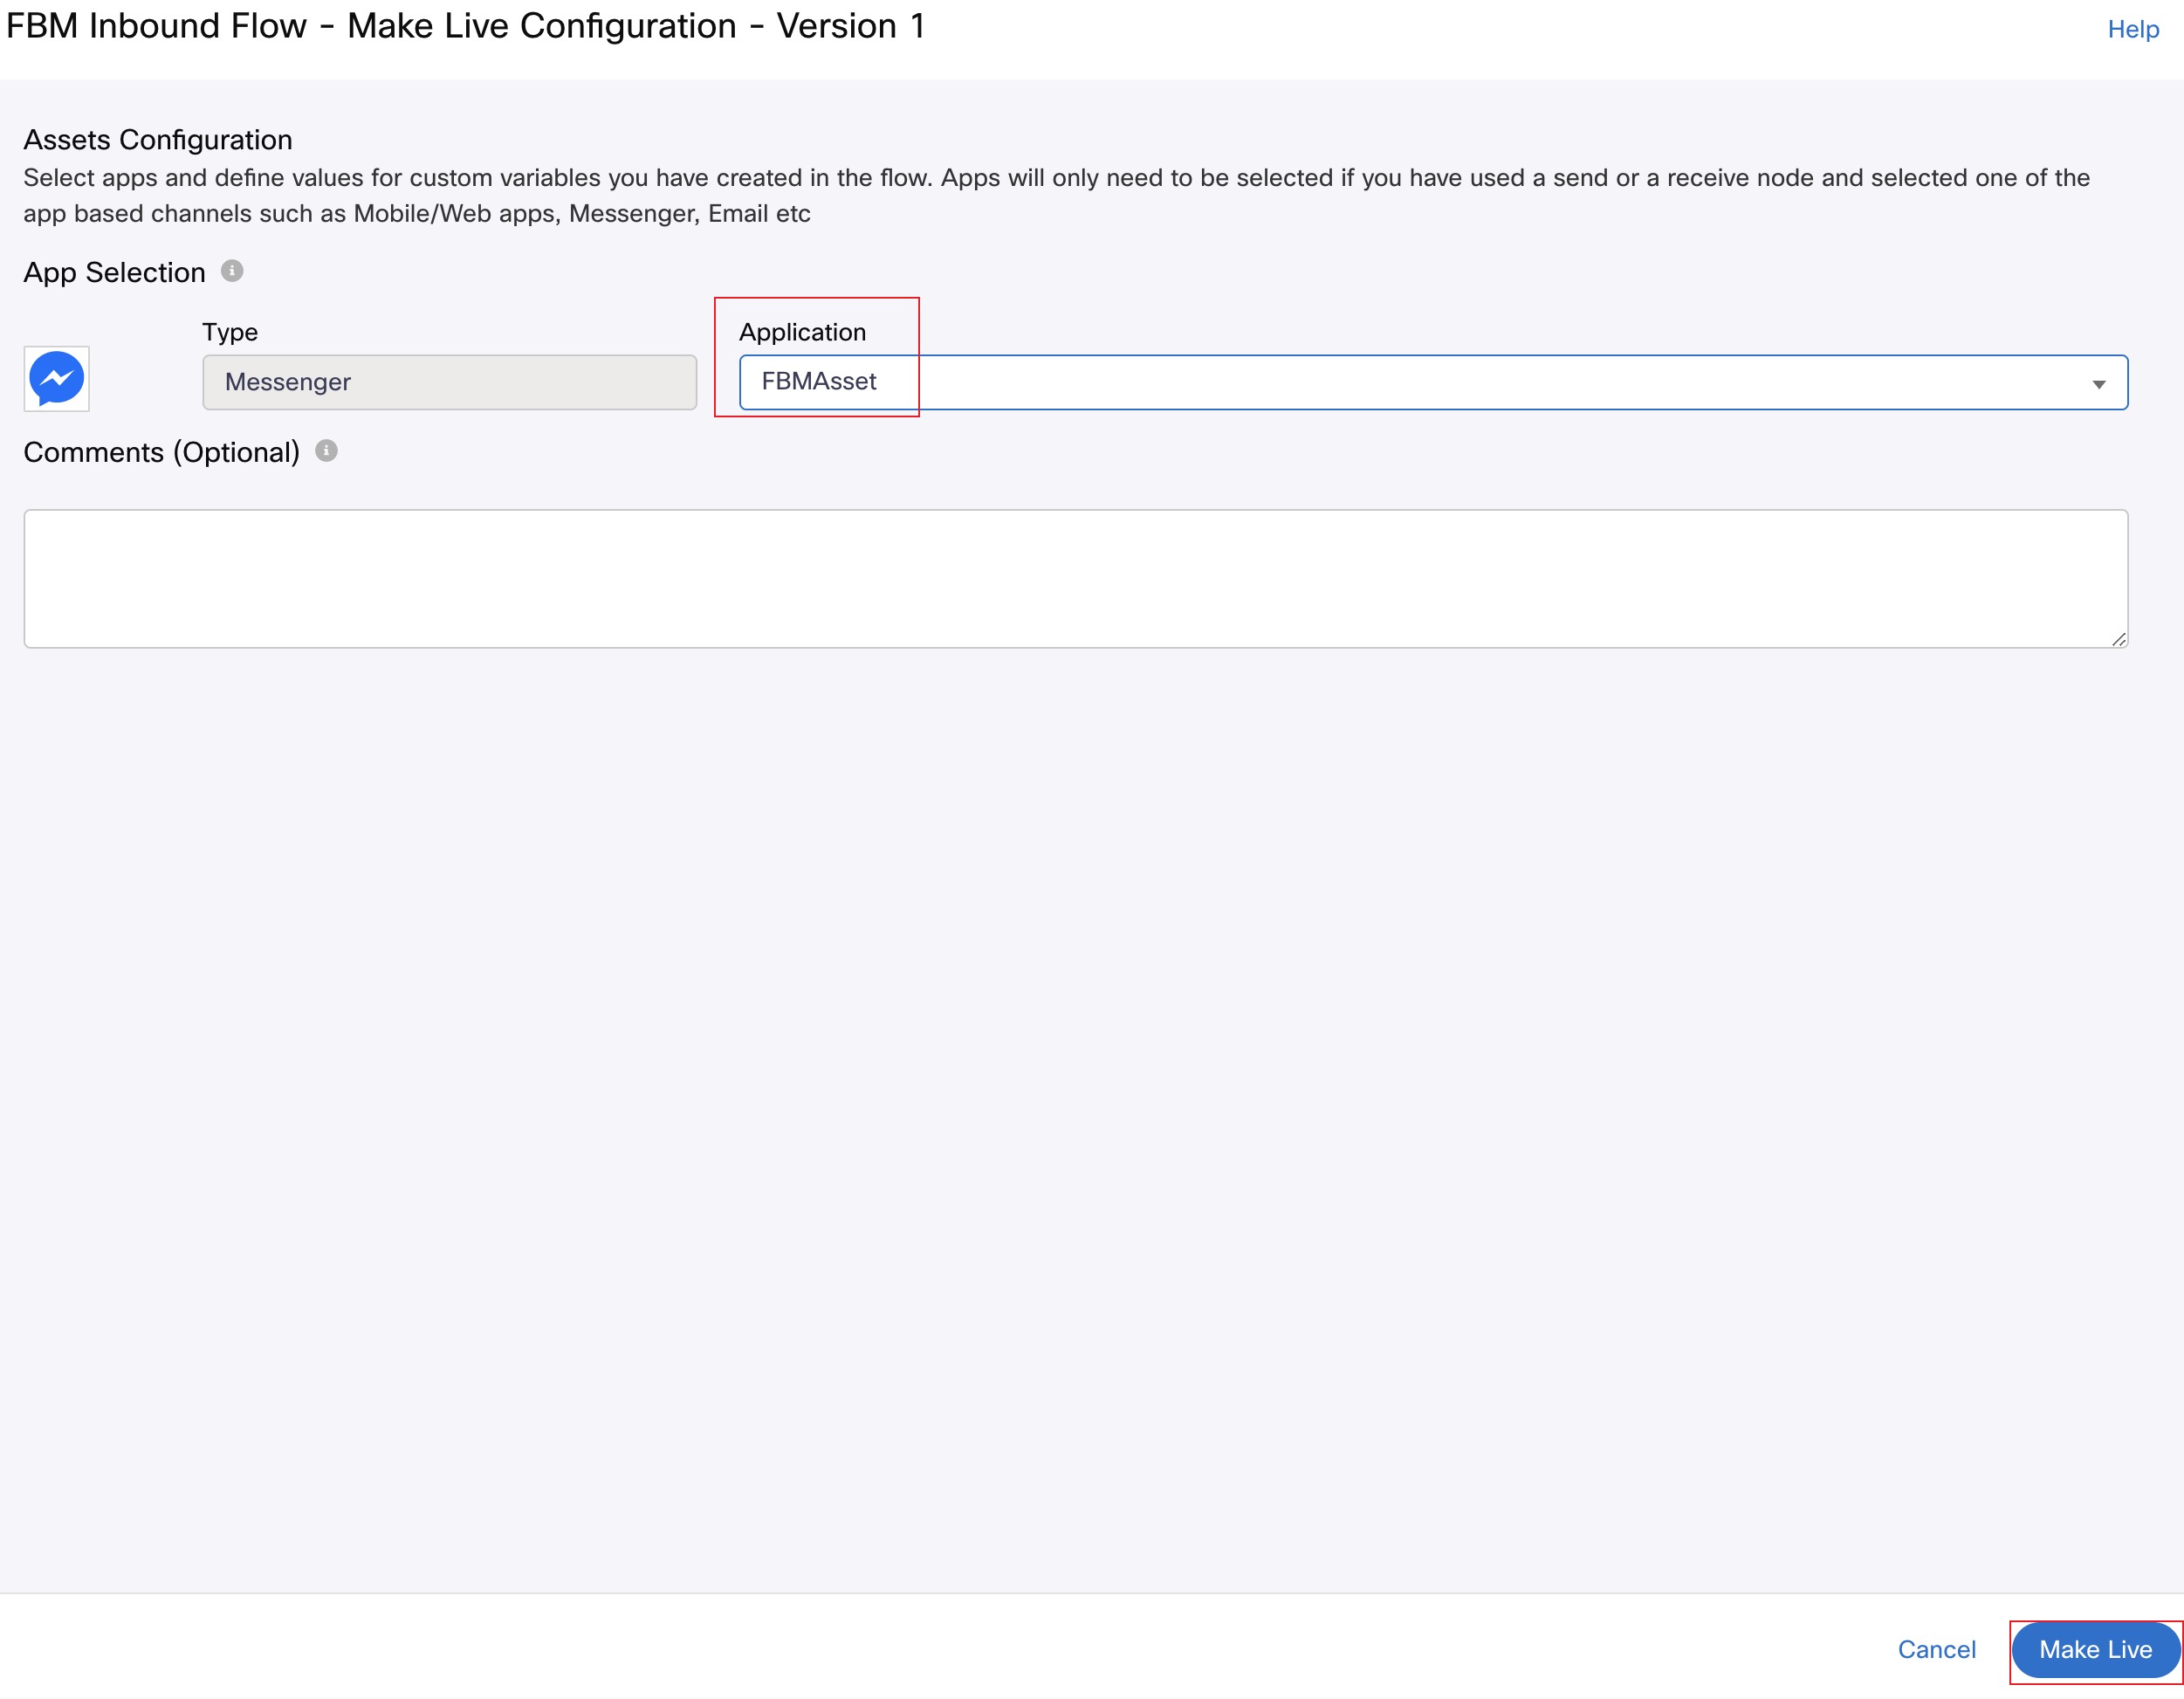
- Wait for 2 minutes and verify that the flow is published successfully.
5. Verification - start Facebook Chat and accept the request
- Open a new tab and login to the Agent Desktop if you haven’t done already and make the agent Available (if you haven’t done already in Lab2).

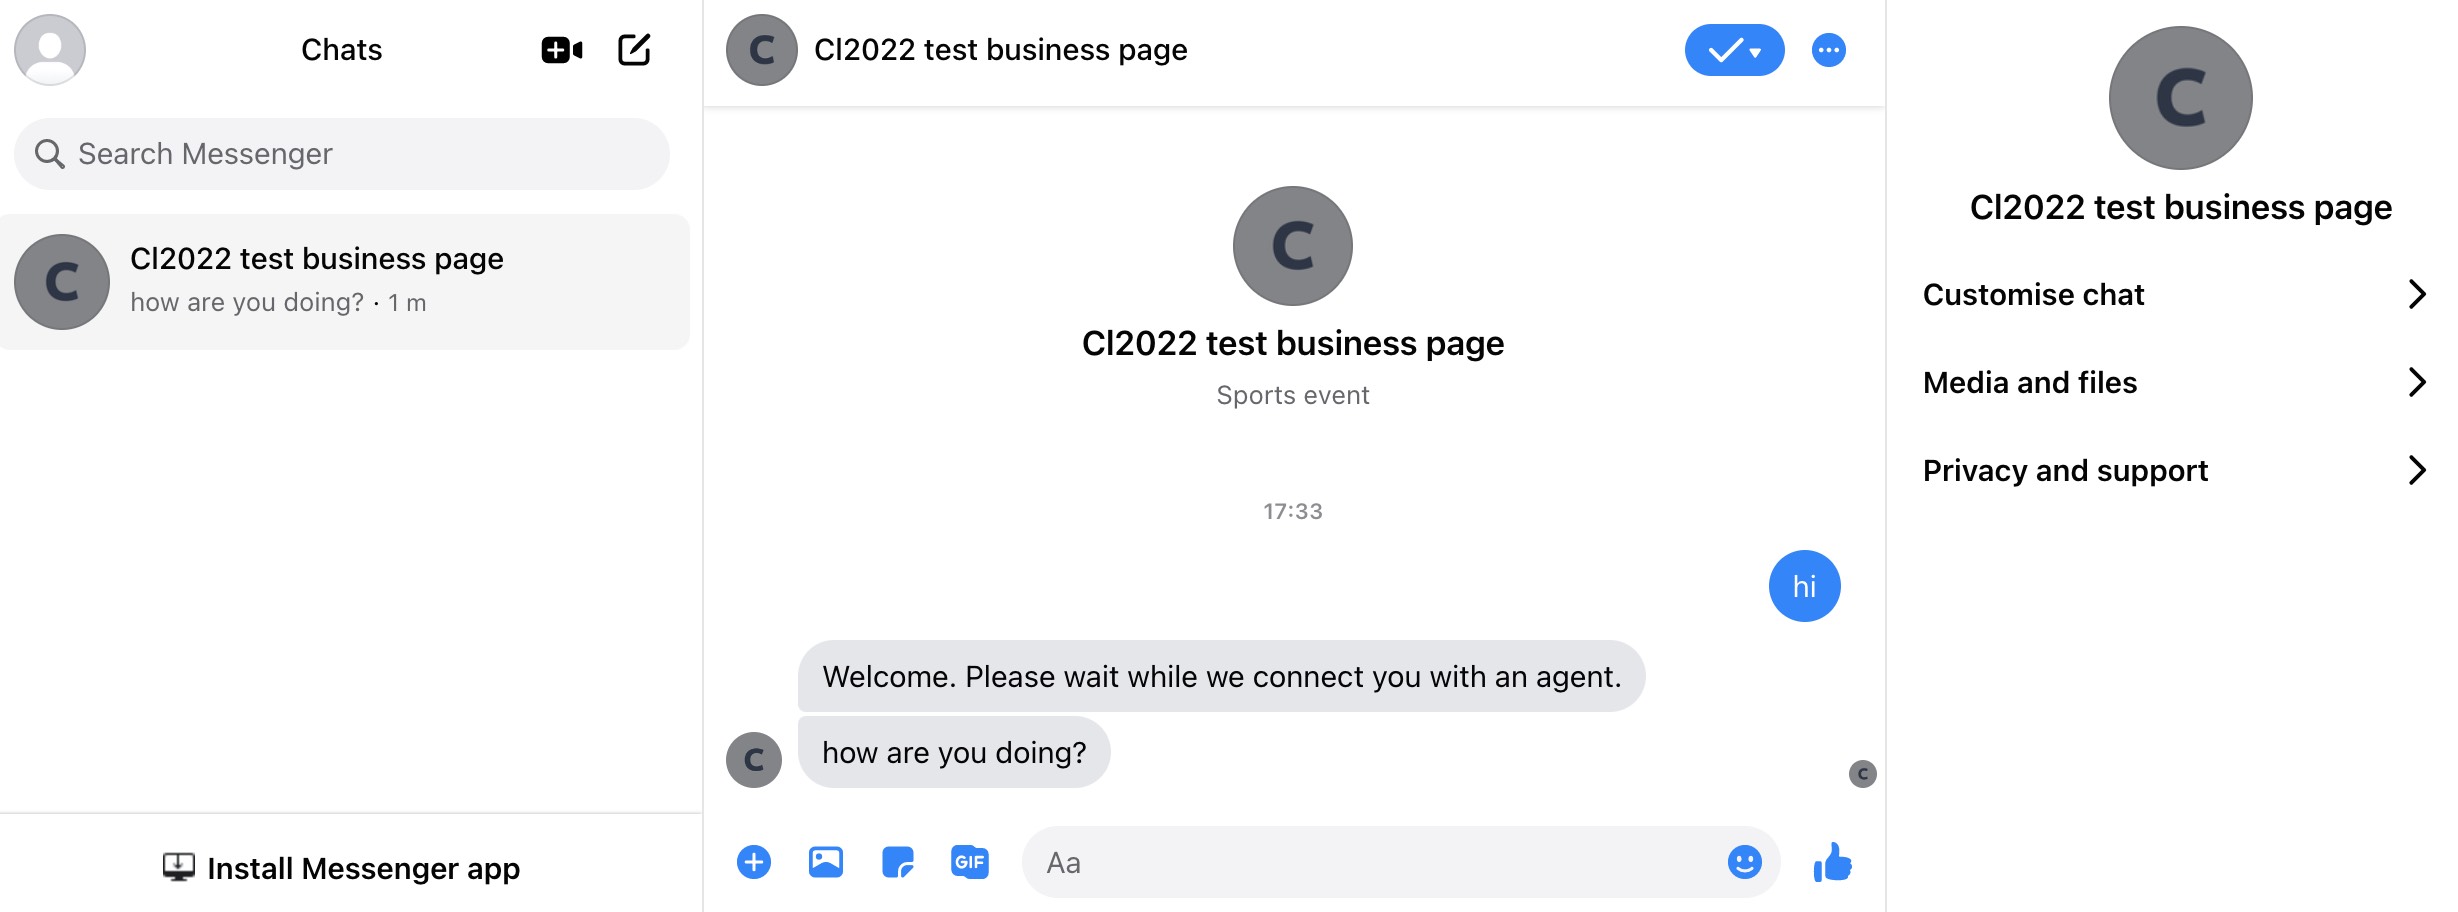
- Open a new tab on the same browser session to make sure you are still authenticated to Facebook. Go to the M.Me URL you copied in Step 2 and the following FBM page should load with the Facebook Business page chat you created earlier
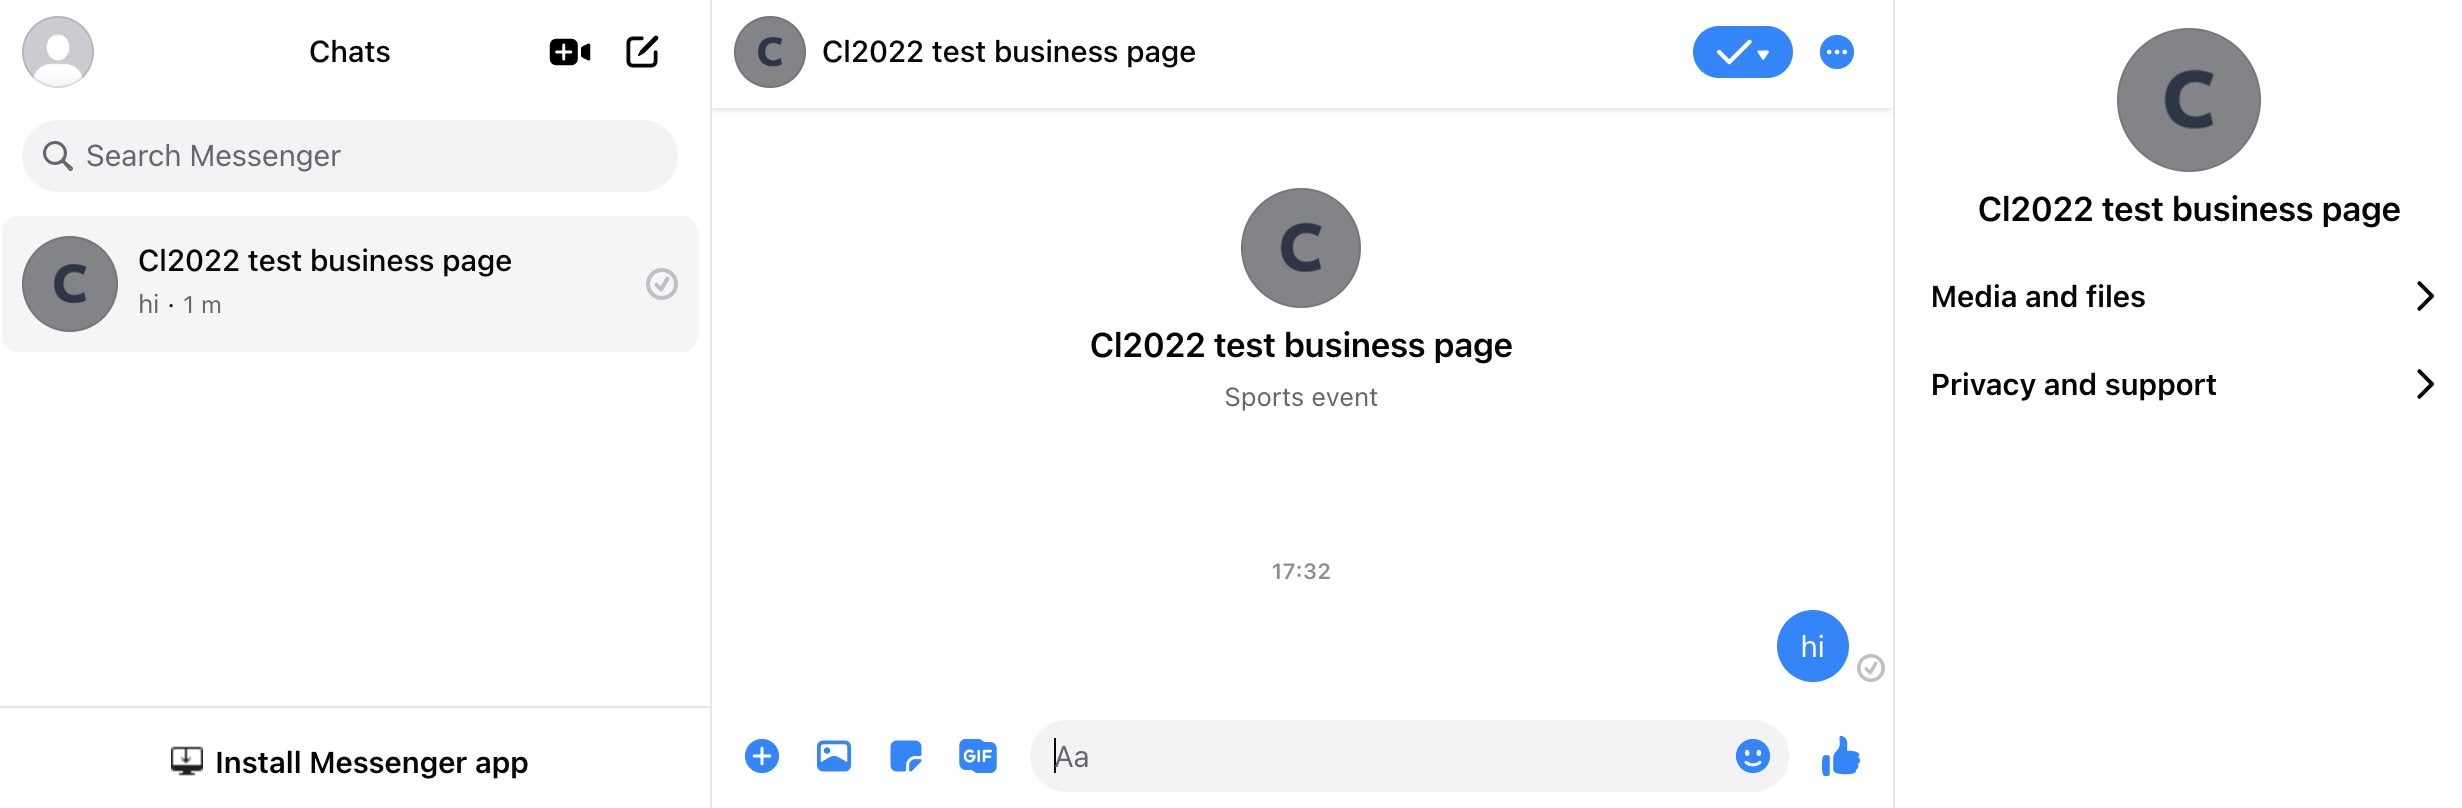
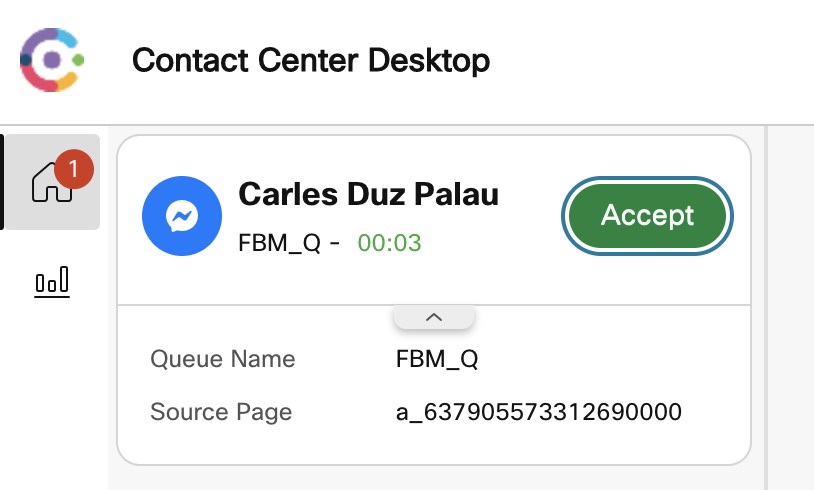
- Start chatting and that should trigger a contact into Webex Contact Center that will get routed according to the flow we configured in Step 4. A notification should appear that should help you switch to the agent desktop tab to accept the contact
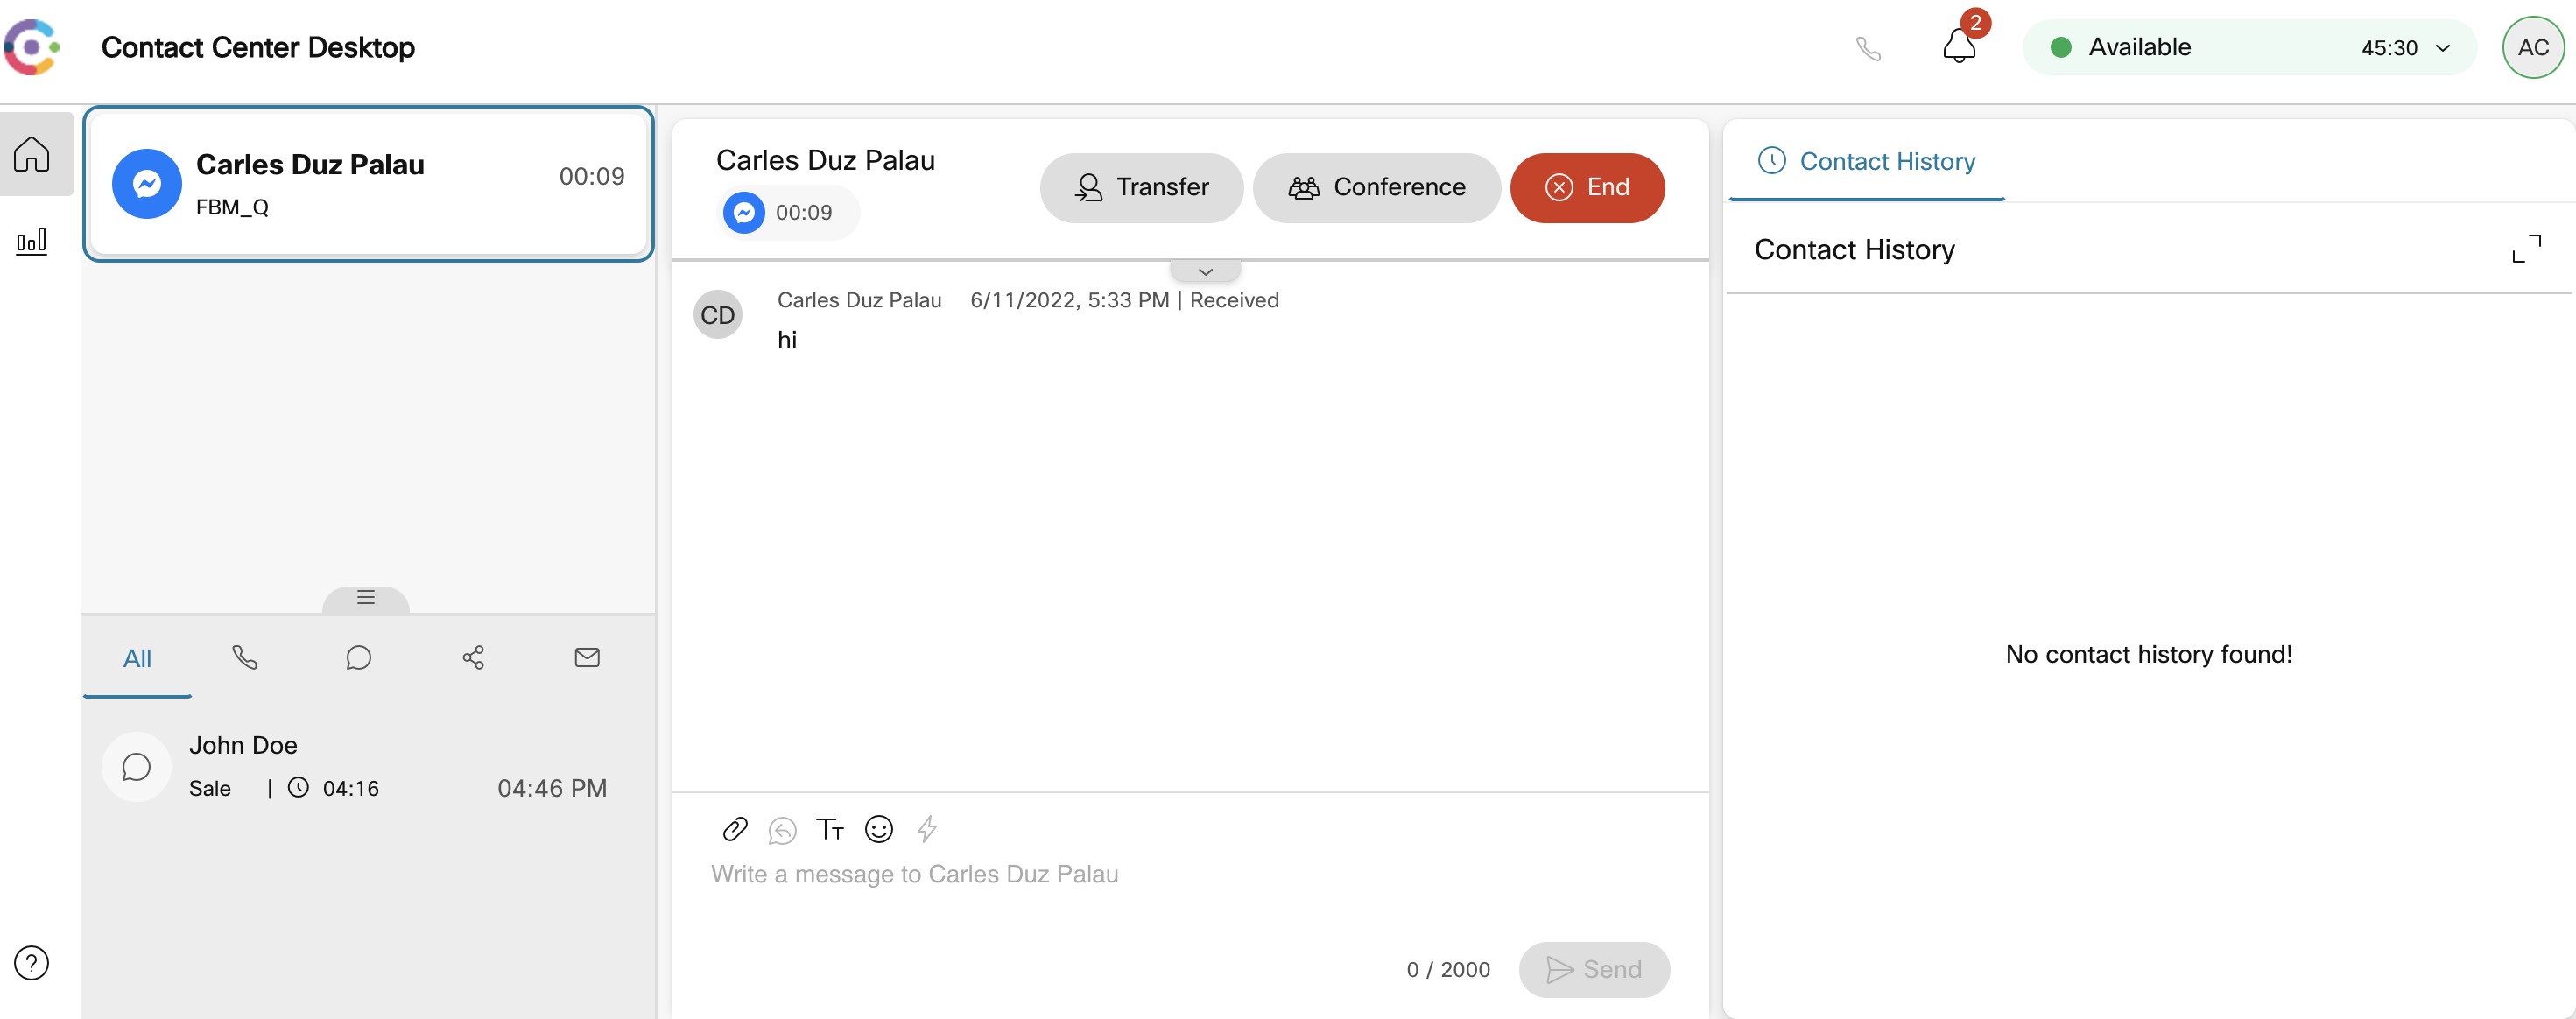
- Type a response and hit send button.
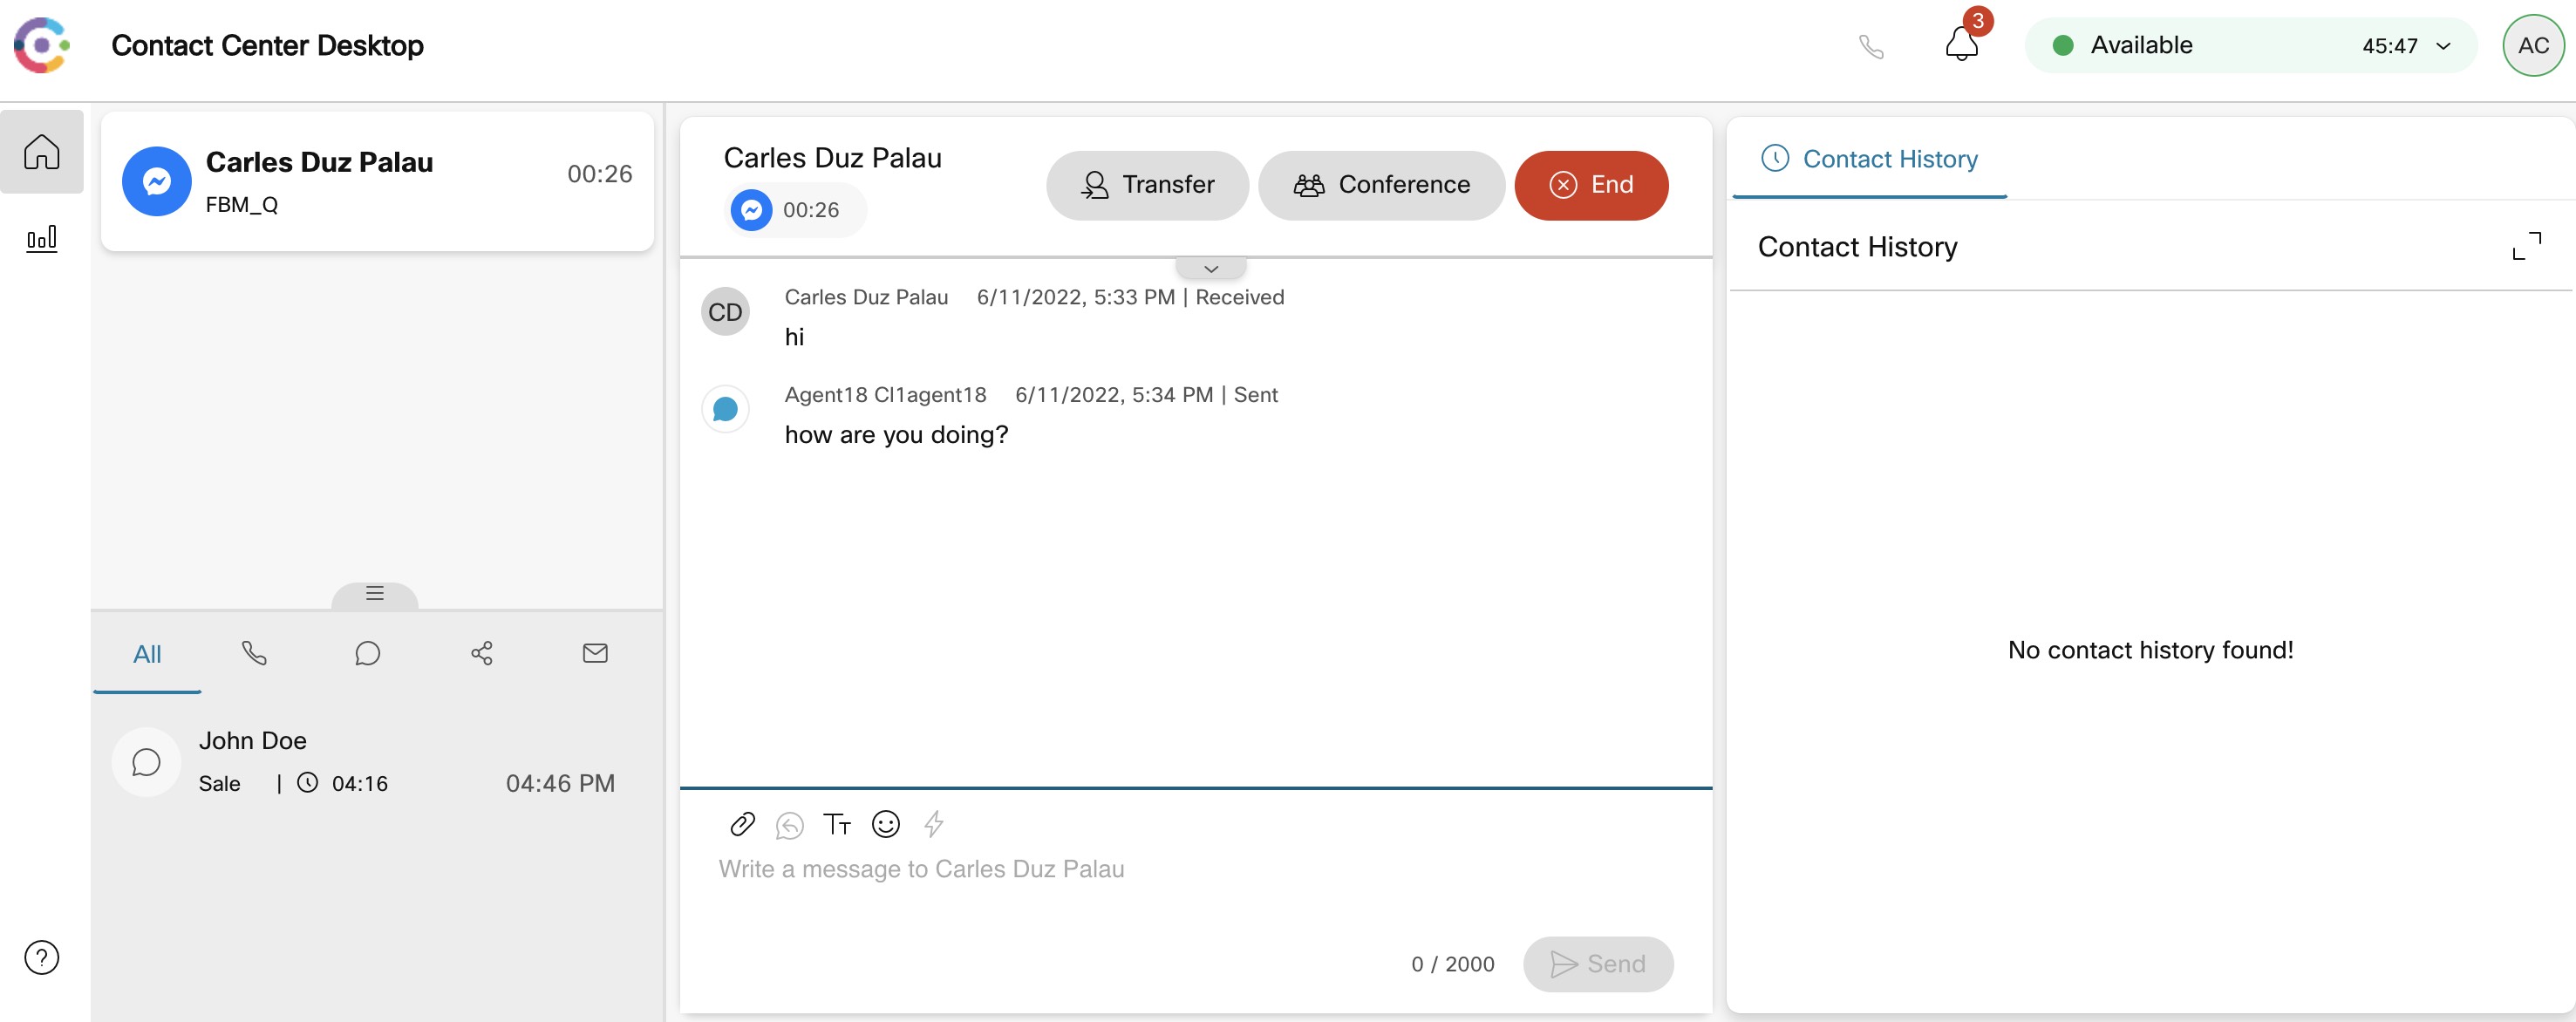
- Response will be received in the other tab where the FBM page is:
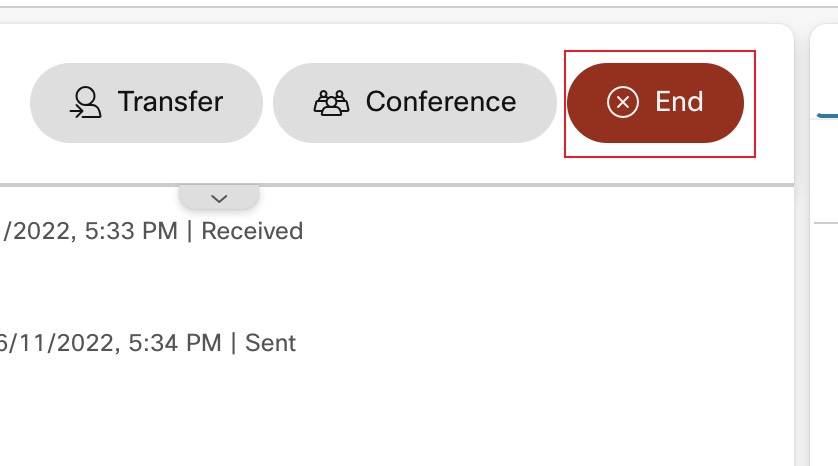
- End the contact
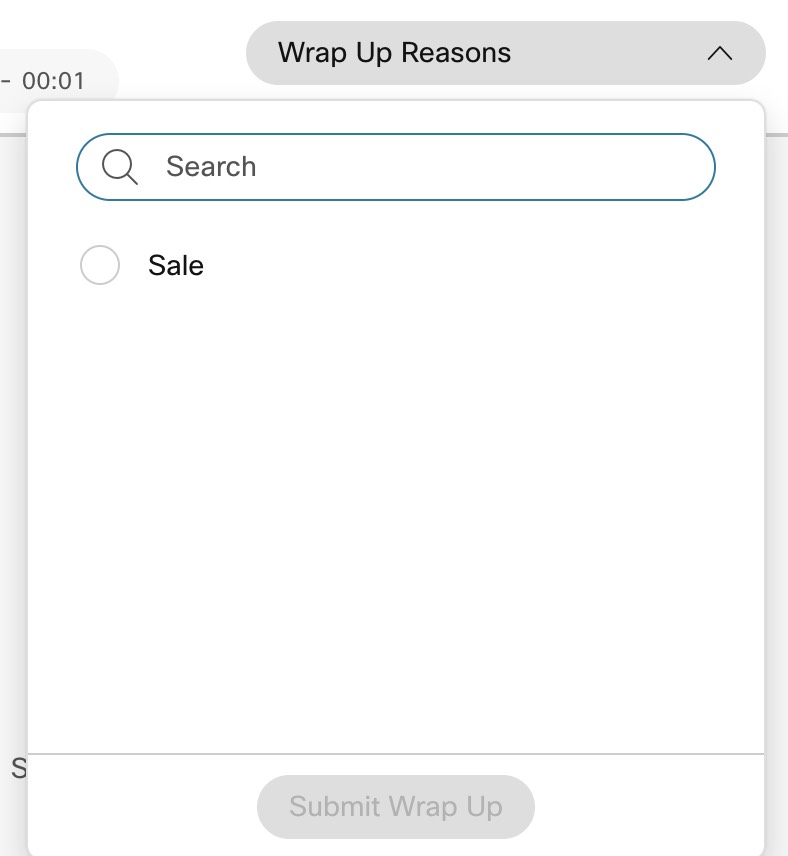
- Add wrap up and close the task.
Congratulations, you have completed this section!
Lab.12.10 - SMS Channel Configuration
Table of Contents
| Topic | Lab Type | Difficulty Level | Estimated length |
|---|---|---|---|
| SMS number procurement | Practical Lab | EASY | 5 min |
| Create SMS Asset and Register to WebexCC | Practical Lab | EASY | 5 min |
| Workflow Association | Practical Lab | EASY | 5 min |
| Modifying the Flow | Practical Lab | EASY | 5 min |
Lab Objective
This lab is designed to complete required SMS configurations in Webex Connect. You will be able to initiate a contact from a mobile number (SMS) and will be able to accept and respond to the SMS contact by logging in as an agent.
Pre-requisite
- WxCC Portal, Agent Desktop and Webex connect URL
- Admin credentials to complete configurations in WxCC portal and Webex connect.
- Agent Credentials to Handle the Chat
- SMS number procurement process should be completed (Please work with your PSM)
- SMS number should be assigned in your Webex Conenct tenant
Quick Links
Control Hub: https://admin.webex.com
US Portal: https://portal.wxcc-us1.cisco.com/portal
US Agent Desktop: https://desktop.wxcc-us1.cisco.com
UK Portal: https://portal.wxcc-eu1.cisco.com/portal
UK Agent Desktop: https://desktop.wxcc-eu1.cisco.com
EMEA Portal: https://portal.wxcc-eu2.cisco.com/portal
EMEA Agent Desktop: https://desktop.wxcc-eu2.cisco.com
ANZ Portal: https://portal.wxcc-anz1.cisco.com/portal
ANZ Agent Desktop: https://desktop.wxcc-anz1.cisco.com
Webex Connect Documentation: https://help.imiconnect.io/
1. SMS number procurement
- SMS Numbers cannot be procured directly from the WxCC integrated Webex Connect tenant
- SMS Numbers are not assigned by default to any of the WxCC tenants.
- Please note that Partners have to go through a procurement process and work with your respective PSM to enable SMS and get numbers assigned to the gold tenant
- Once the procurement process is completed, SMS Numbers are assigned to the tenant by the backend operations team
- Please complete this step before proceeding further.
2. Create SMS Asset and Register to WebexCC
- Login to Webex Connect tenant using your credentials.
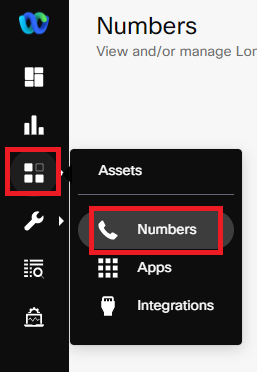
From the left side pane, click on Assets —> Numbers
- Select the number from the list. Click on Manage and Register to Webex Engage.In the subsequent window select the service and click register.

- Login to the Contact Centre Management Portal . Click on Provisioning —> Entry Points. Click on New entry Point.
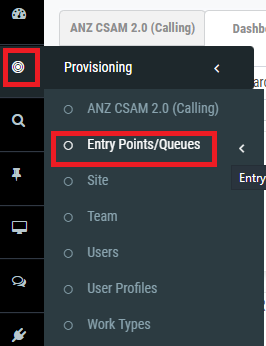
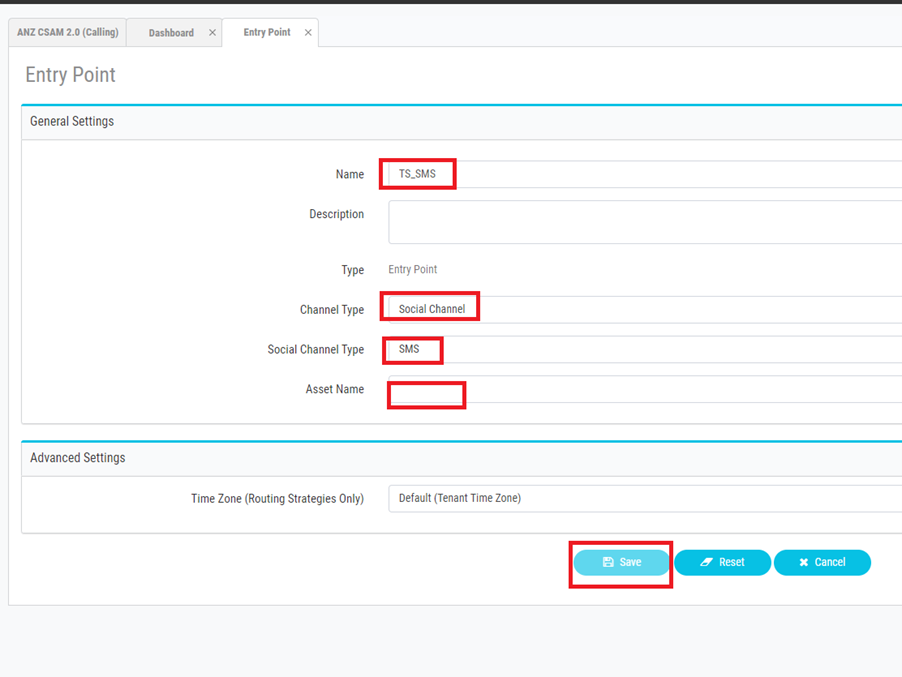
- Enter a unique name, select the channel type as social, Social Channel Type as SMS and select the Asset that was created in Webex Connect as the Asset name. Click Save.
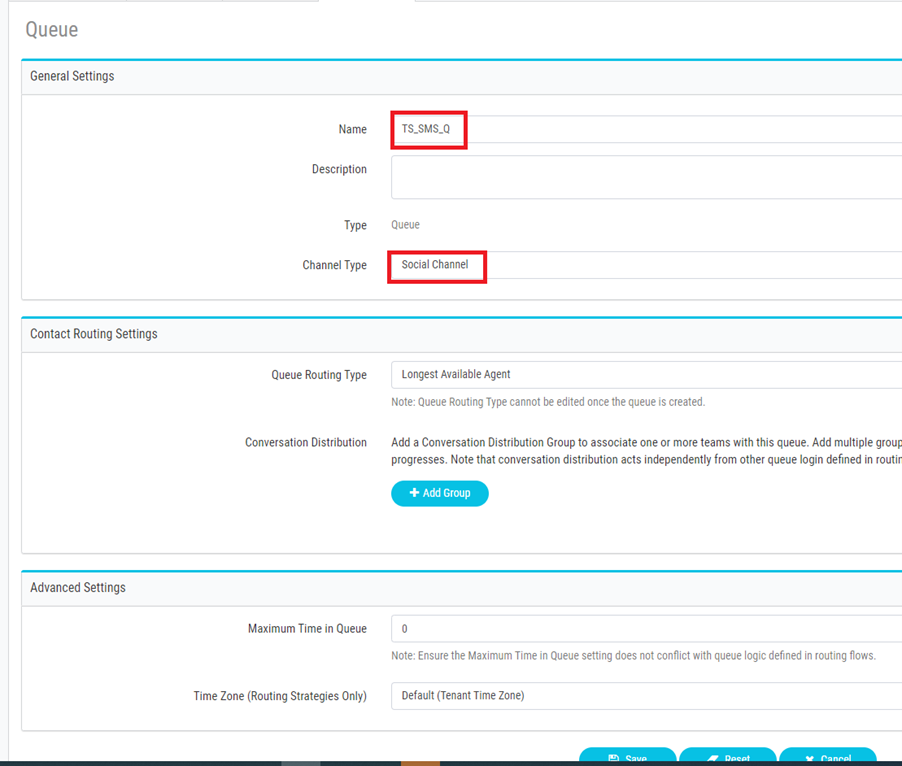
- Click on Provisioning—->Queue’s from the Left pane and click New Queue.Enter a unique name and select the Channel Type as Social Channel. Add the other required details and click Save.
3. Workflow Association
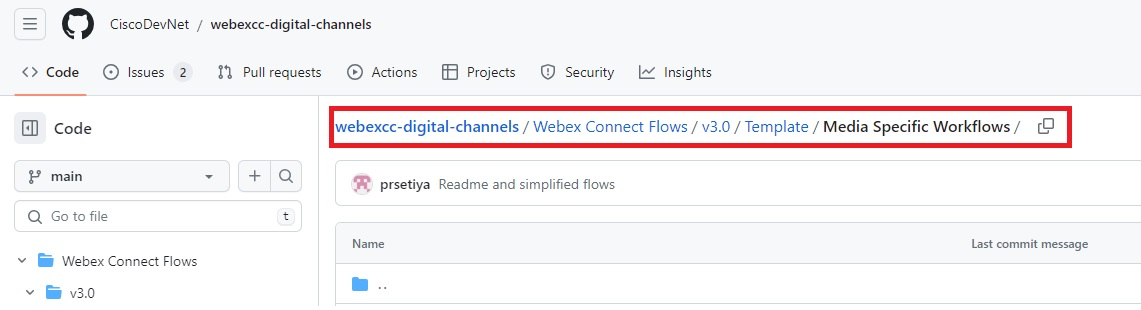
- Download the SMS flow from the GitHub page
- Navigate to webexcc-digital-channels/Webex Connect Flows/v3.0/Template/Media Specific Workflows/SMS Inbound Flow.workflow.zip select the zip file and click download
- Unzip the downloaded file.
- Go to Webex Connect, click on Services and select the service in which the Asset is created in.
- In the service click on FLOWS -> CREATE FLOW
- Enter the FLOW NAME as SMS Inbound Flow, select the TYPE as Work Flow and under METHOD select Upload a flow.
- Drag and drop the SMS Inbound Flow.workflow flow that is downloaded in zip file, click CREATE
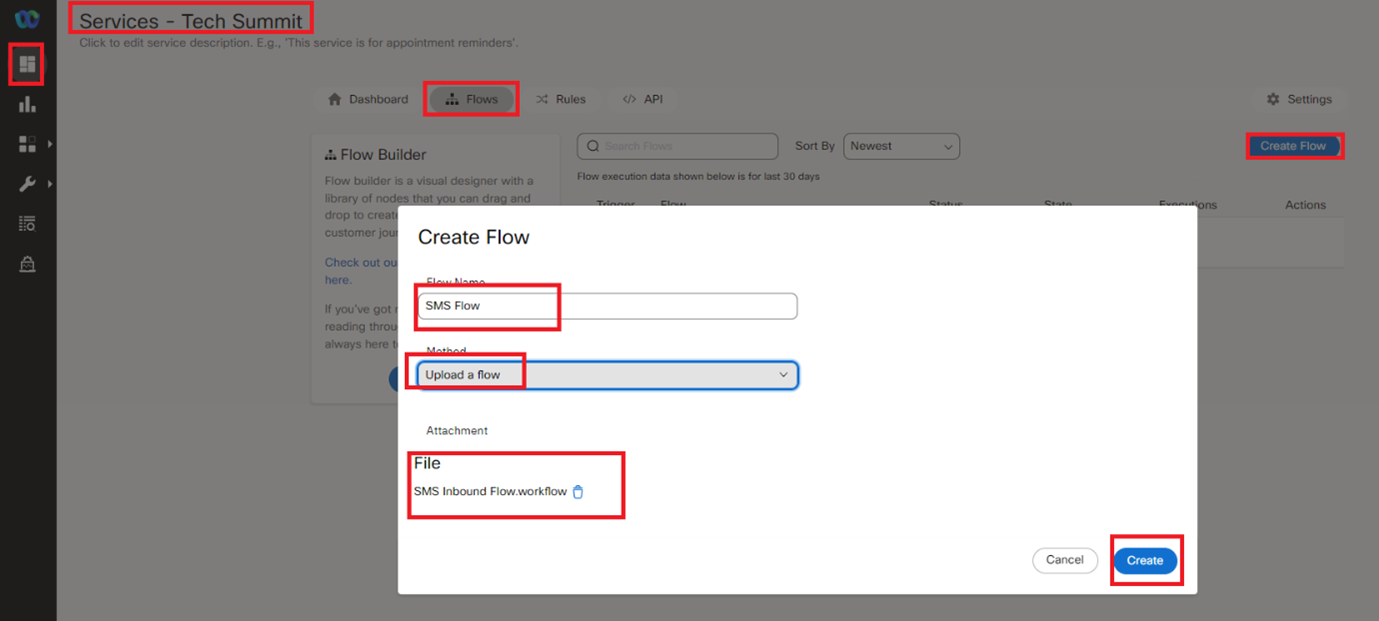
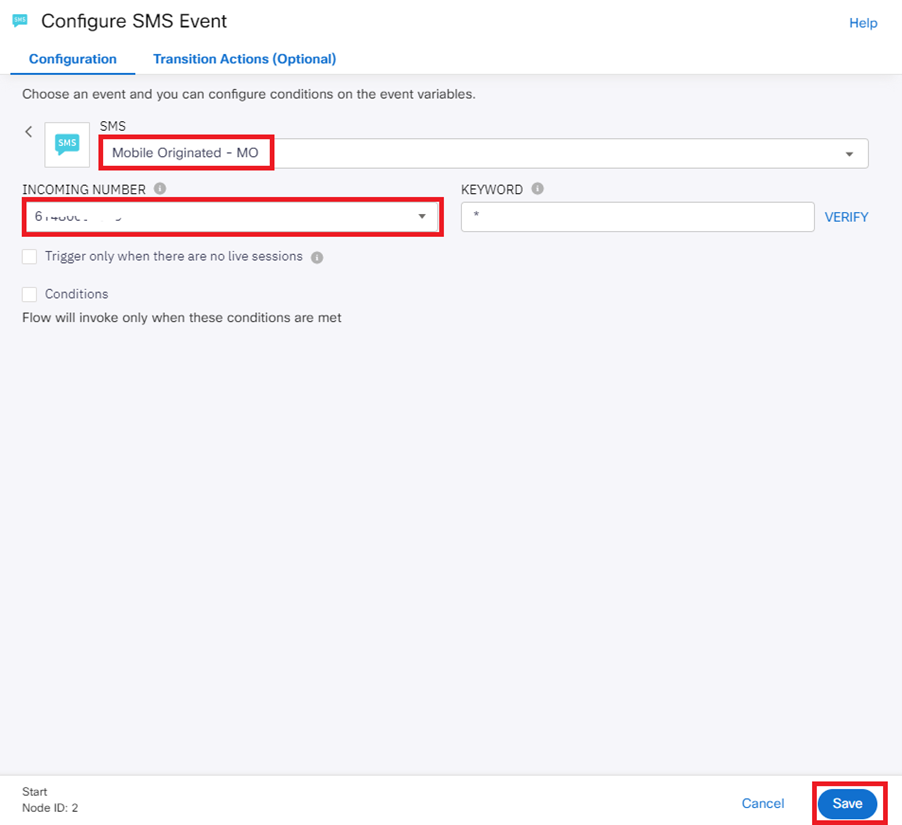
- In the resulting window select the Incoming number from the dropdown list and click Save
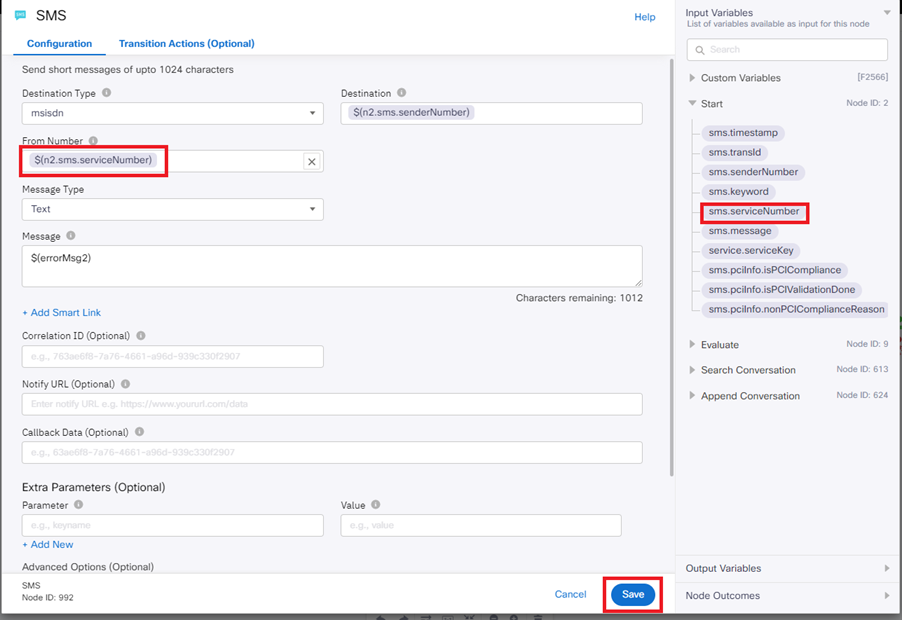
4. Modifying the Flow
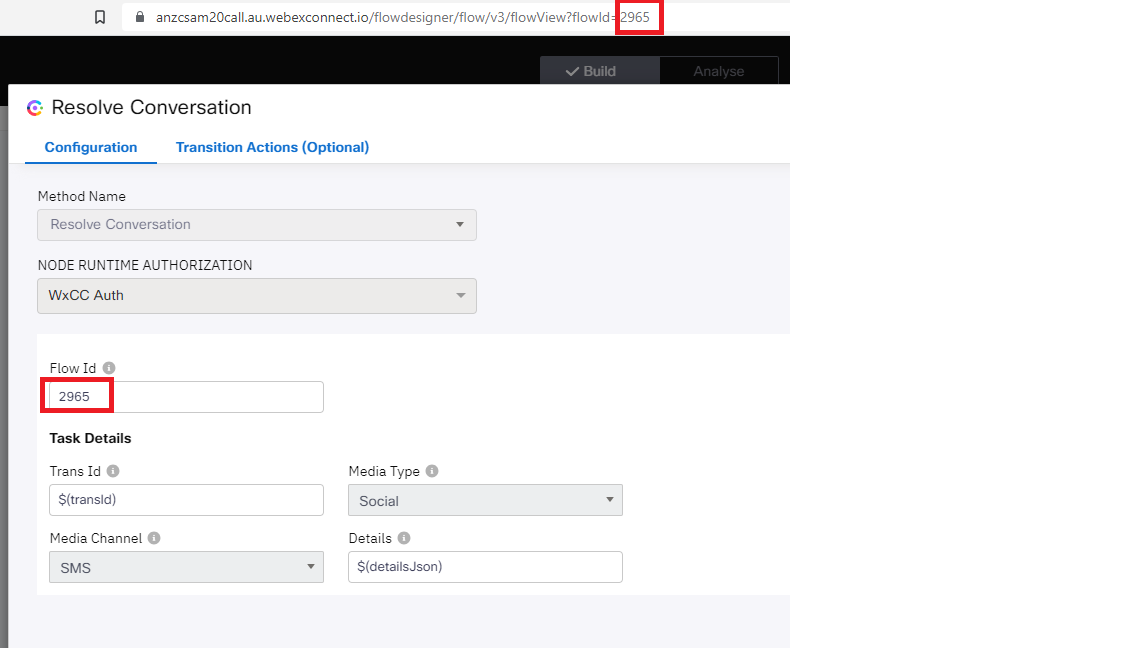
-
Open the Resolve Conversation Node in the flow. Select the flow id from the URL and enter it in the Flow ID box and click Save.
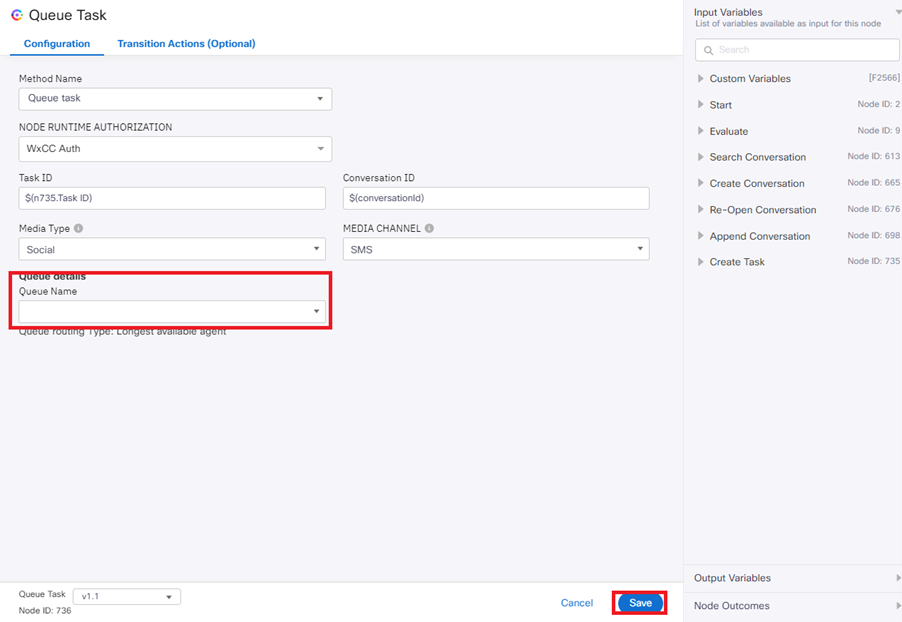
-
Open the Queue Task Node in the flow. Select the Queue that you created in an earlier step and click Save.
- Open up an SMS node in the flow and enter the from Number variable selected from the right side pane as shown below.Click Save
- Repeat the above step for all the SMS nodes in the flow.
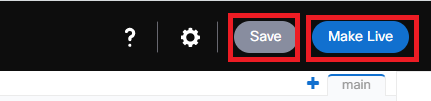
- Save the flow and Make Live
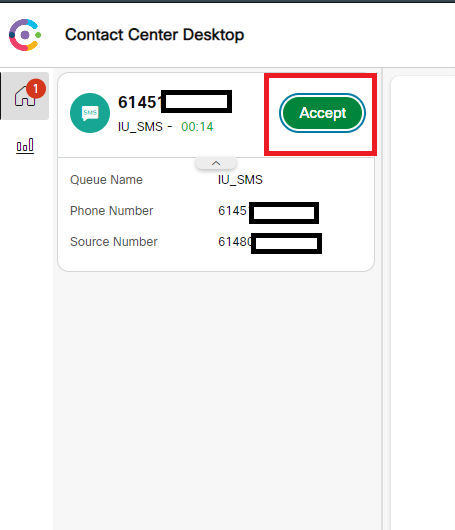
- Login to the agent desktop, initiate an SMS to the configured number. Once the interaction pops up on the agent desktop, accept the conversation
- Test the conversation between the agent and the customer.
- End the conversation and add a Wrapup Code.
Congratulations, you have completed this section!
Lab.12.11 - WhatsApp Channel Configuration
Table of Contents
| Topic | Lab Type | Difficulty Level | Estimated length |
|---|---|---|---|
| Verify WhatsApp Number Assignment | Practical Lab | EASY | 5 min |
| WhatsApp Asset registration to WebexCC | Practical Lab | EASY | 5 min |
| WhatsApp Entry Point and Queue creation | Practical Lab | EASY | 5 min |
| Create/Upload WhatsApp flow | Practical Lab | EASY | 5 min |
| Verification - send WhatsApp message and accept the request | Practical Lab | EASY | 5 min |
Introduction
Lab Objective
In this Lab, we will go through the tasks that are required to complete the basic WhatsApp integration. You will be able to initiate a WhatsApp contact to the Contact Center and be able to accept/respond to the contact by logging in as an agent.
In this lab you will be configuring WhatsApp number settings, Assets, Entry Point and corresponding workflows. All these steps are required for integrating WhatsApp with our application.
Pre-requisite
- You received an admin credentials to configure in Management Portal and Webex Connect.
- You received the WhatsApp number associated with your tenant.
- You have successfully completed the previous Lab12.5 Pre-configuration
- WhatsApp Numbers cannot be procured directly from the Webex Contact Center integrated Webex Connect tenant (please work with your PSM). Note: For production use, please note that customers will have to work with Partners to go through a procurement process to enable WhatsApp and get numbers assigned to the tenant.
Quick Links
Control Hub: https://admin.webex.com
US Portal: https://portal.wxcc-us1.cisco.com/portal
US Agent Desktop: https://desktop.wxcc-us1.cisco.com
UK Portal: https://portal.wxcc-eu1.cisco.com/portal
UK Agent Desktop: https://desktop.wxcc-eu1.cisco.com
EMEA Portal: https://portal.wxcc-eu2.cisco.com/portal
EMEA Agent Desktop: https://desktop.wxcc-eu2.cisco.com
ANZ Portal: https://portal.wxcc-anz1.cisco.com/portal
ANZ Agent Desktop: https://desktop.wxcc-anz1.cisco.com
Webex Connect Documentation: https://help.imiconnect.io/
1. Verify WhatsApp Number Assignment
- Login to your respective Webex Connect UI using the provided URL https://cl1podX.imiconnect.io/ (where X is your POD number).
- Navigate to Assets > App and verify that the tenant you are using has a SMS number assigned
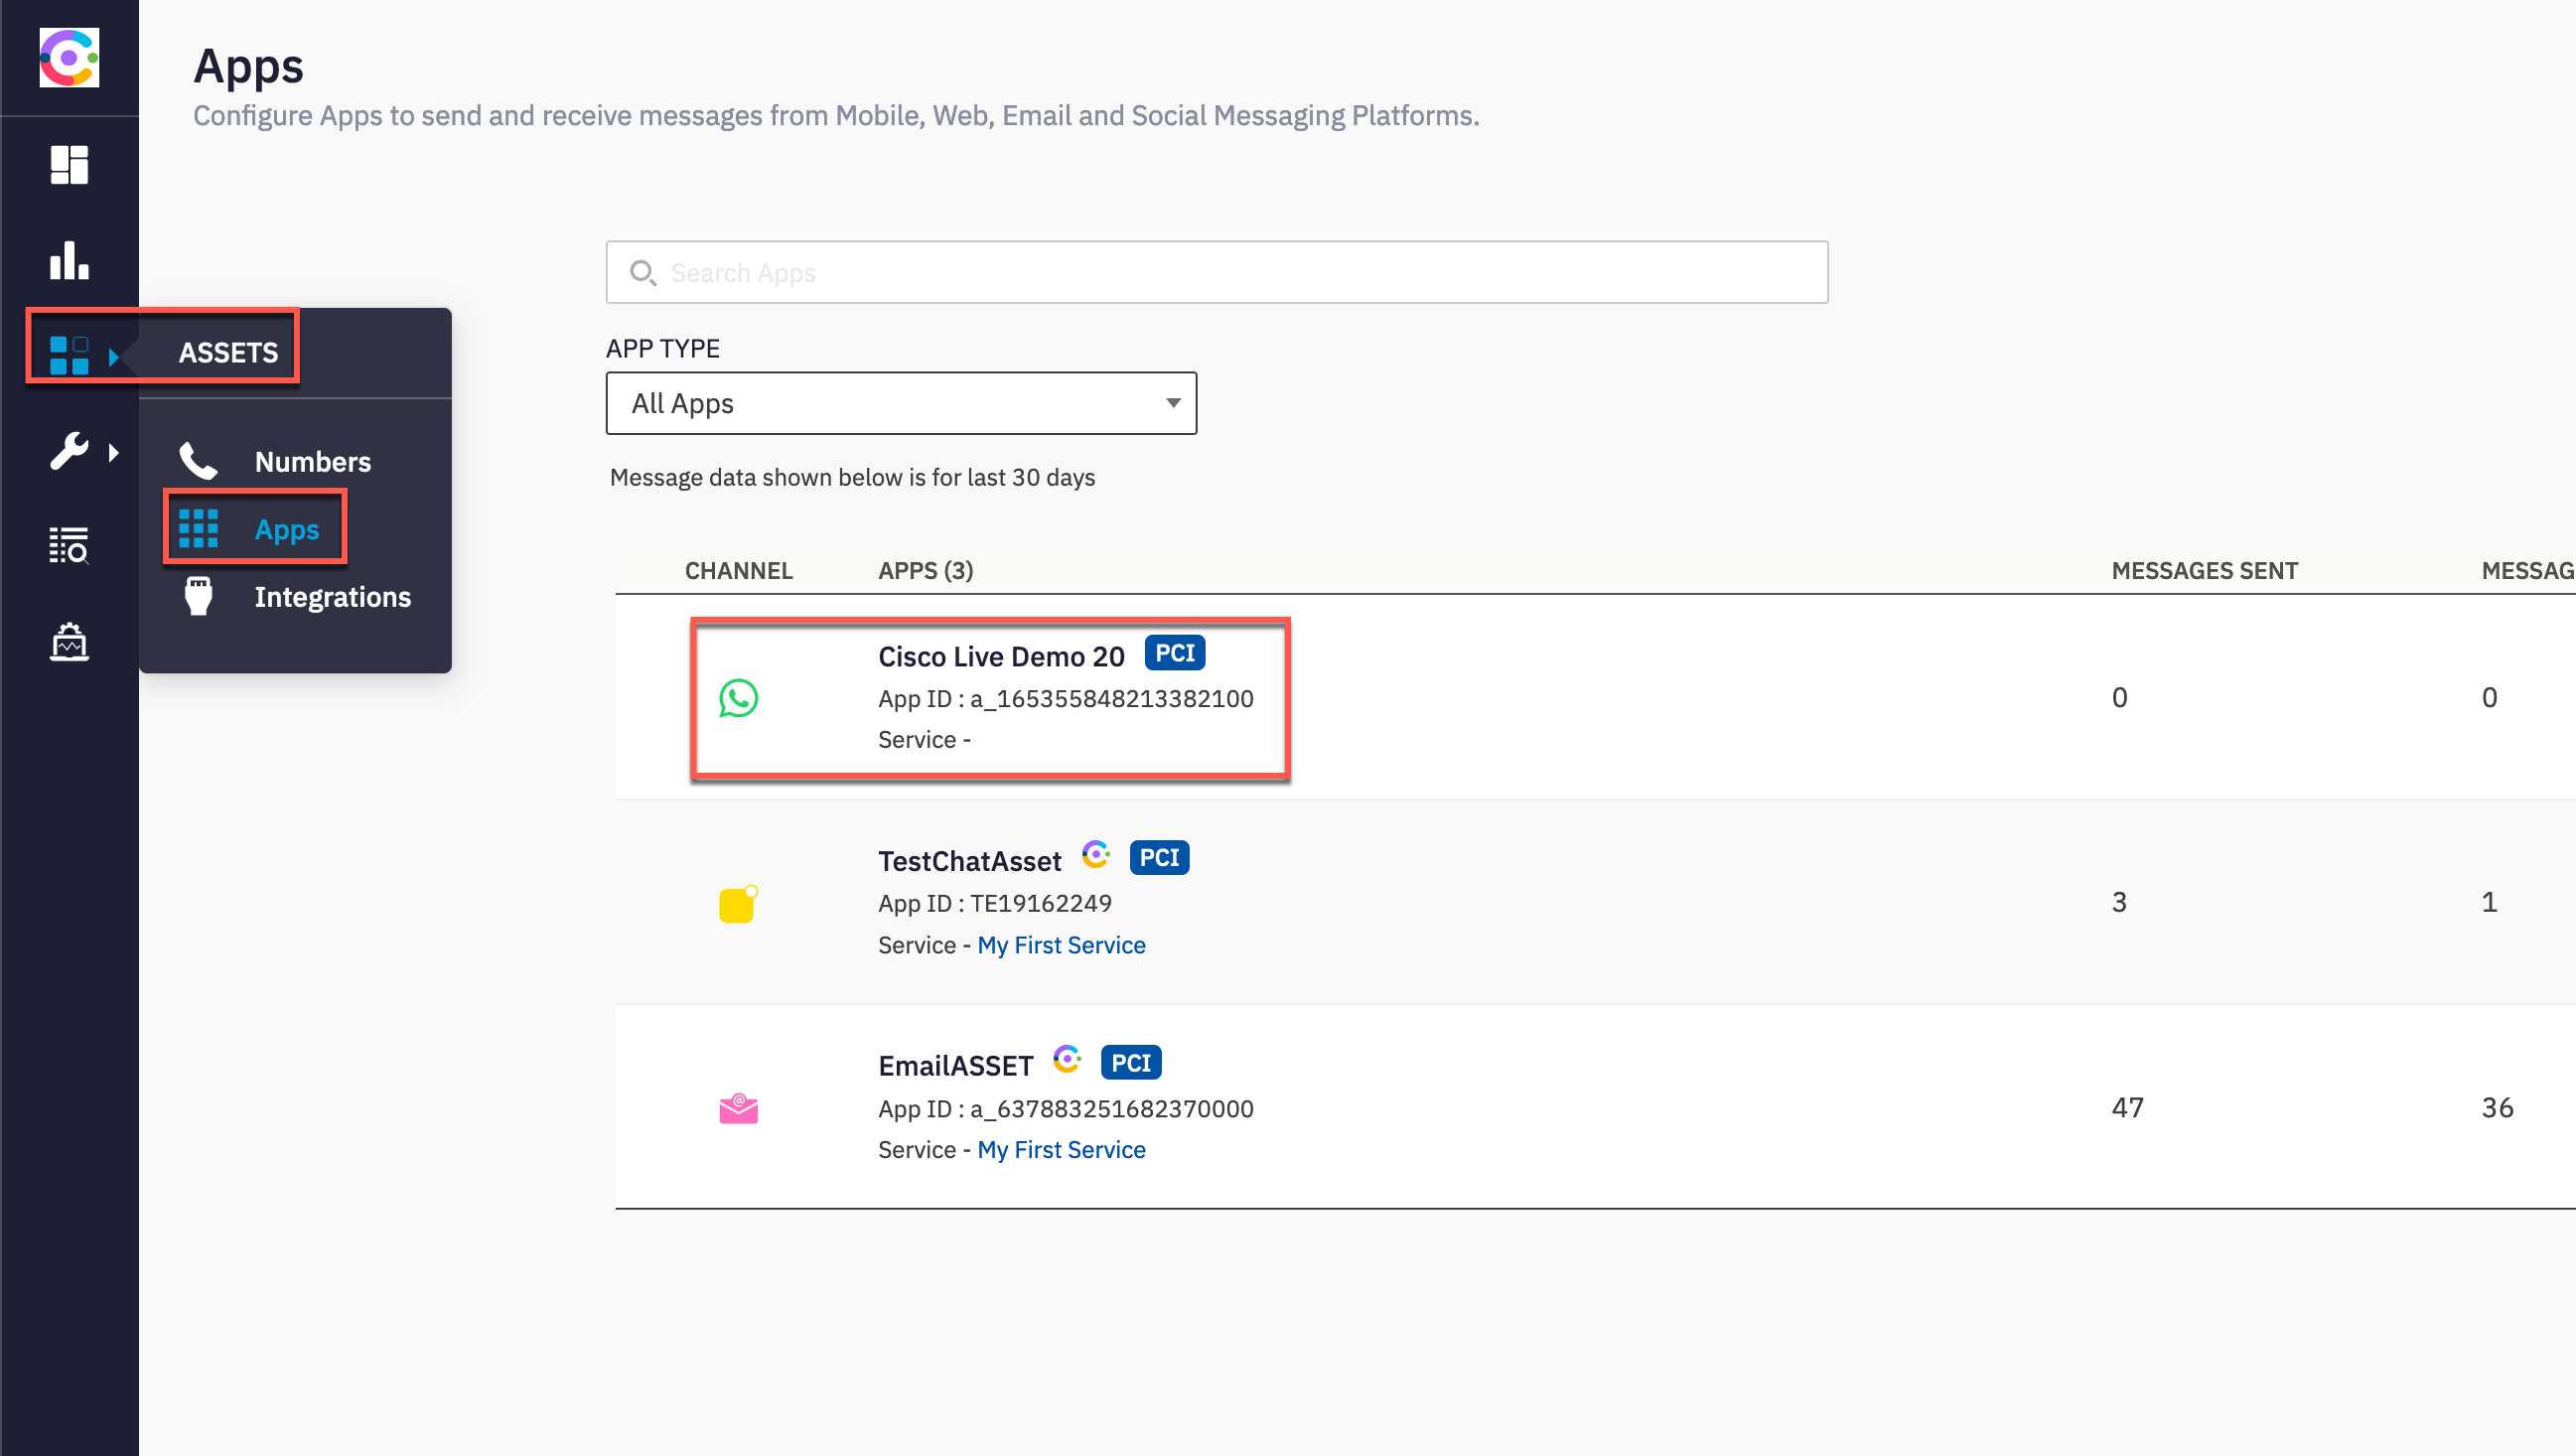
- Identify and make note of the APP ID (We will need this later in the flow configuration)
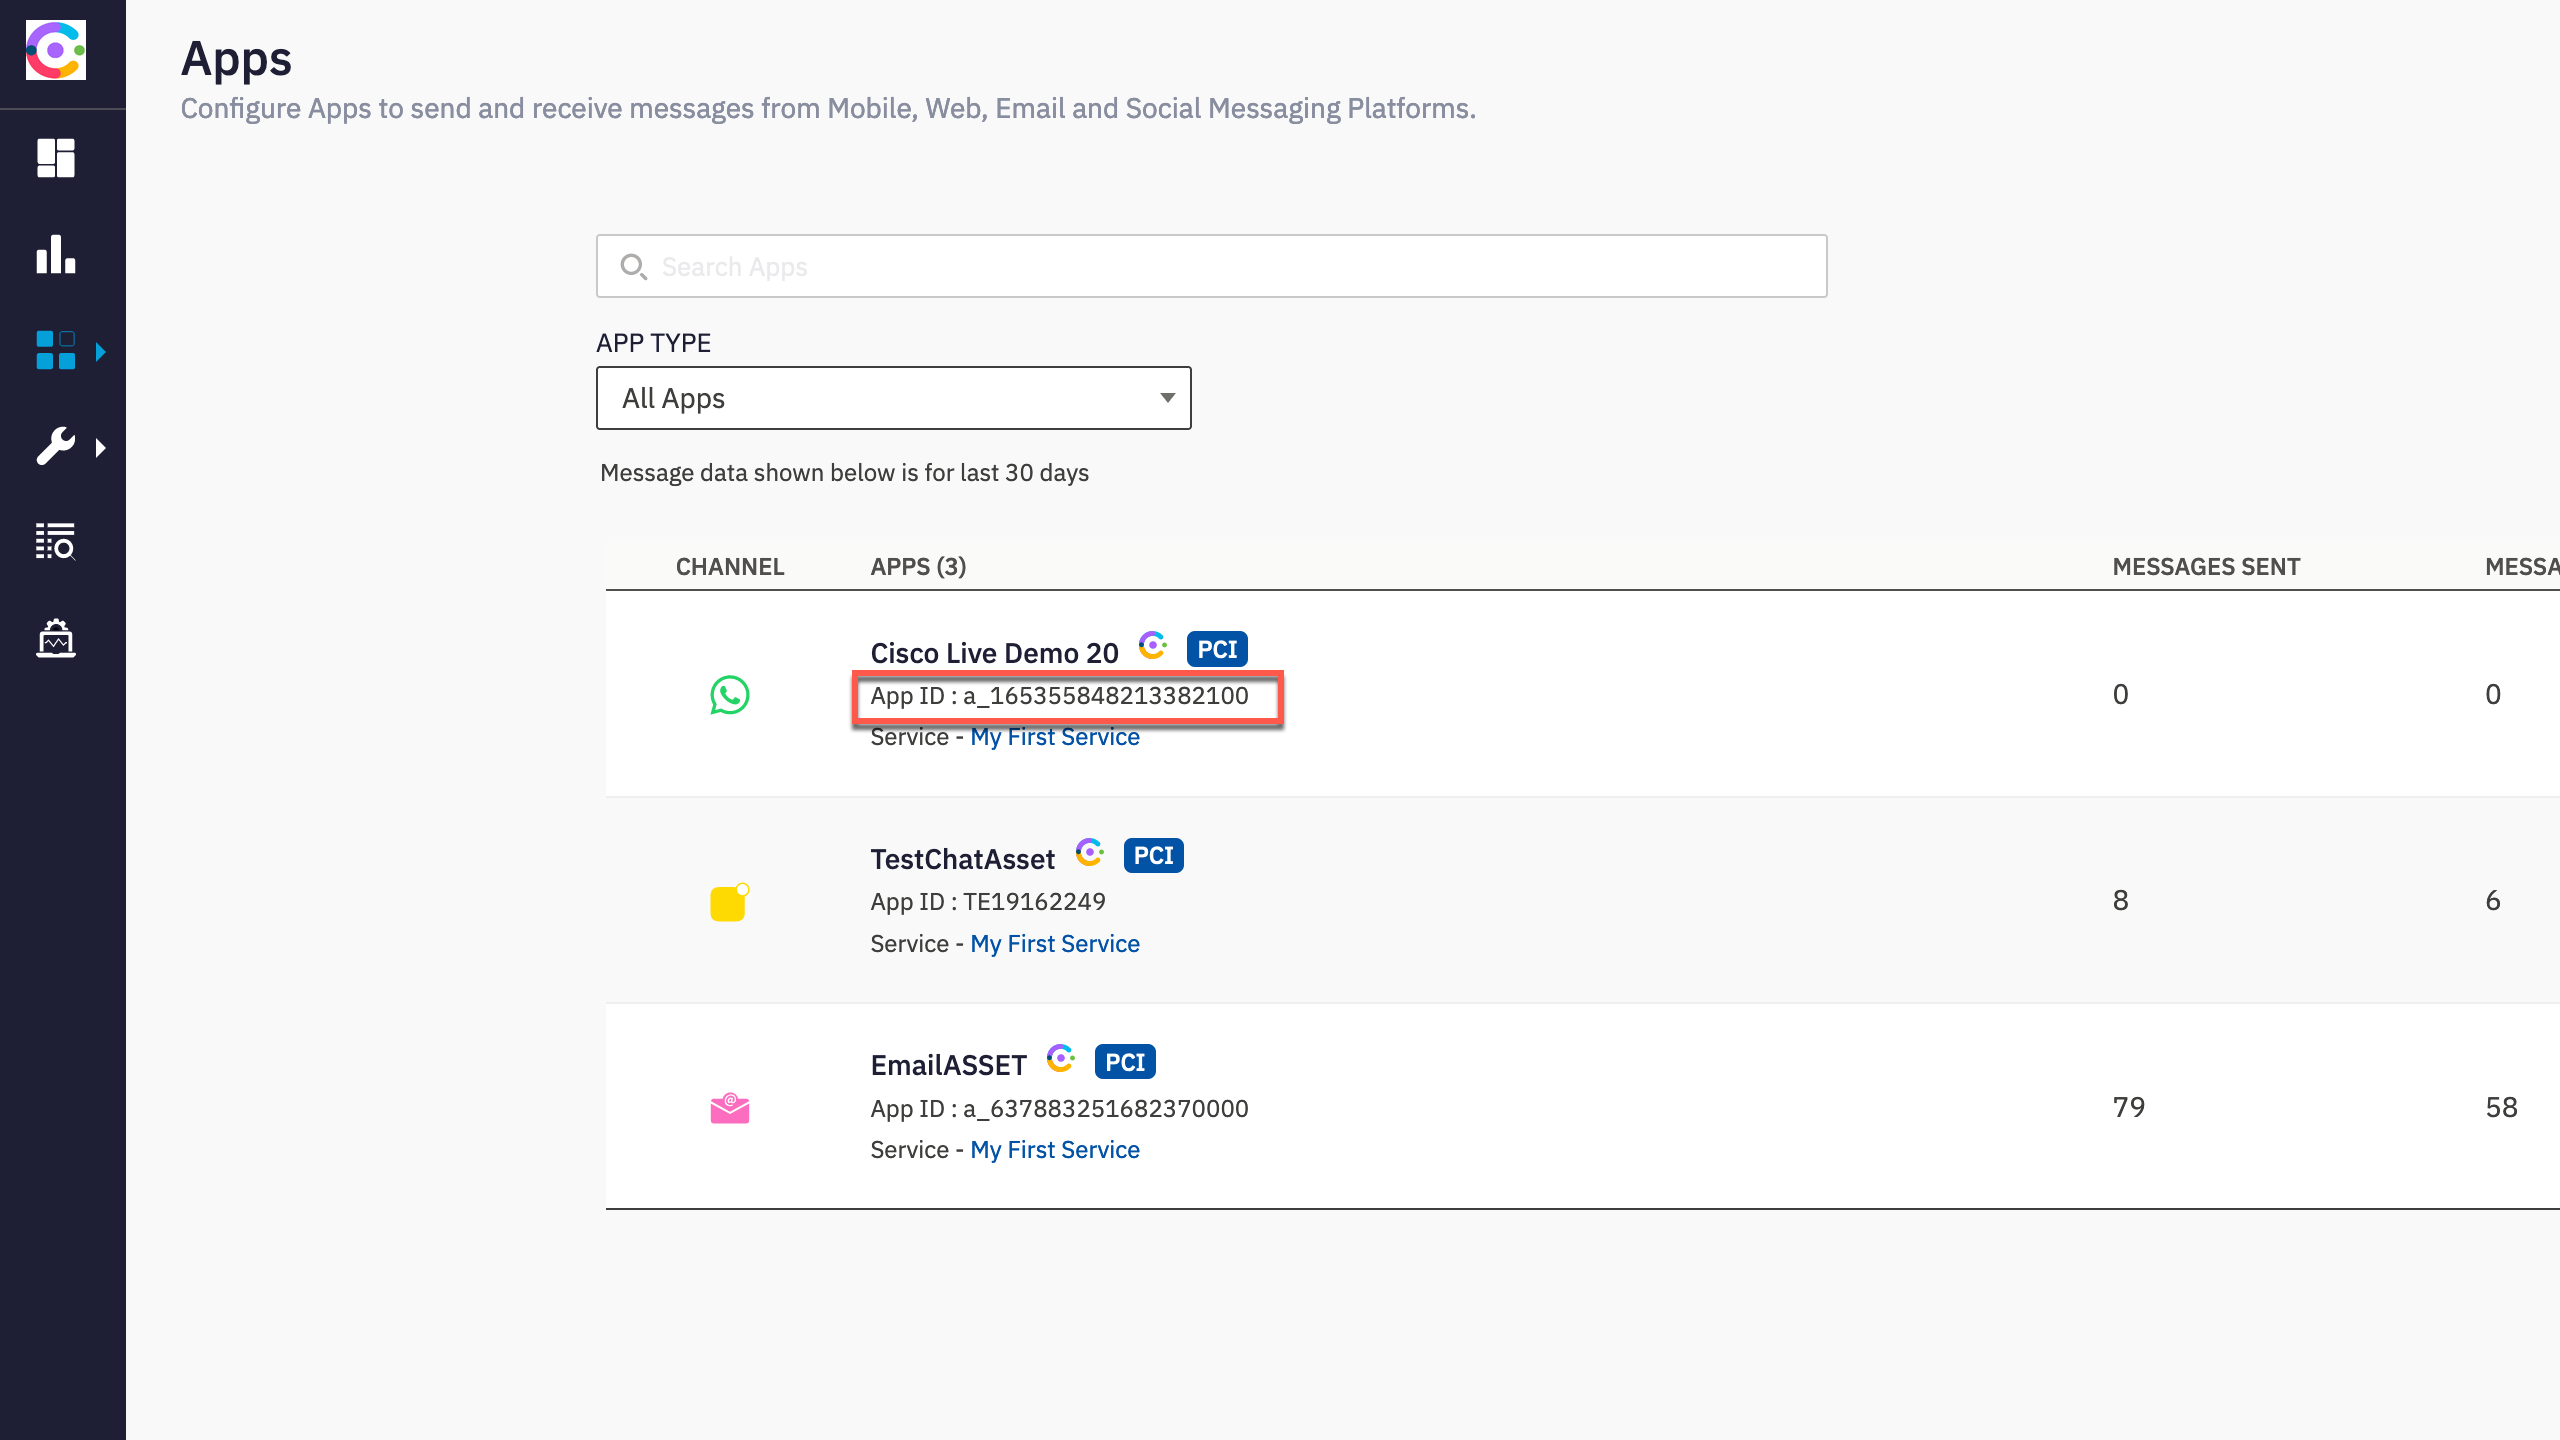
- Select actions and click Manage
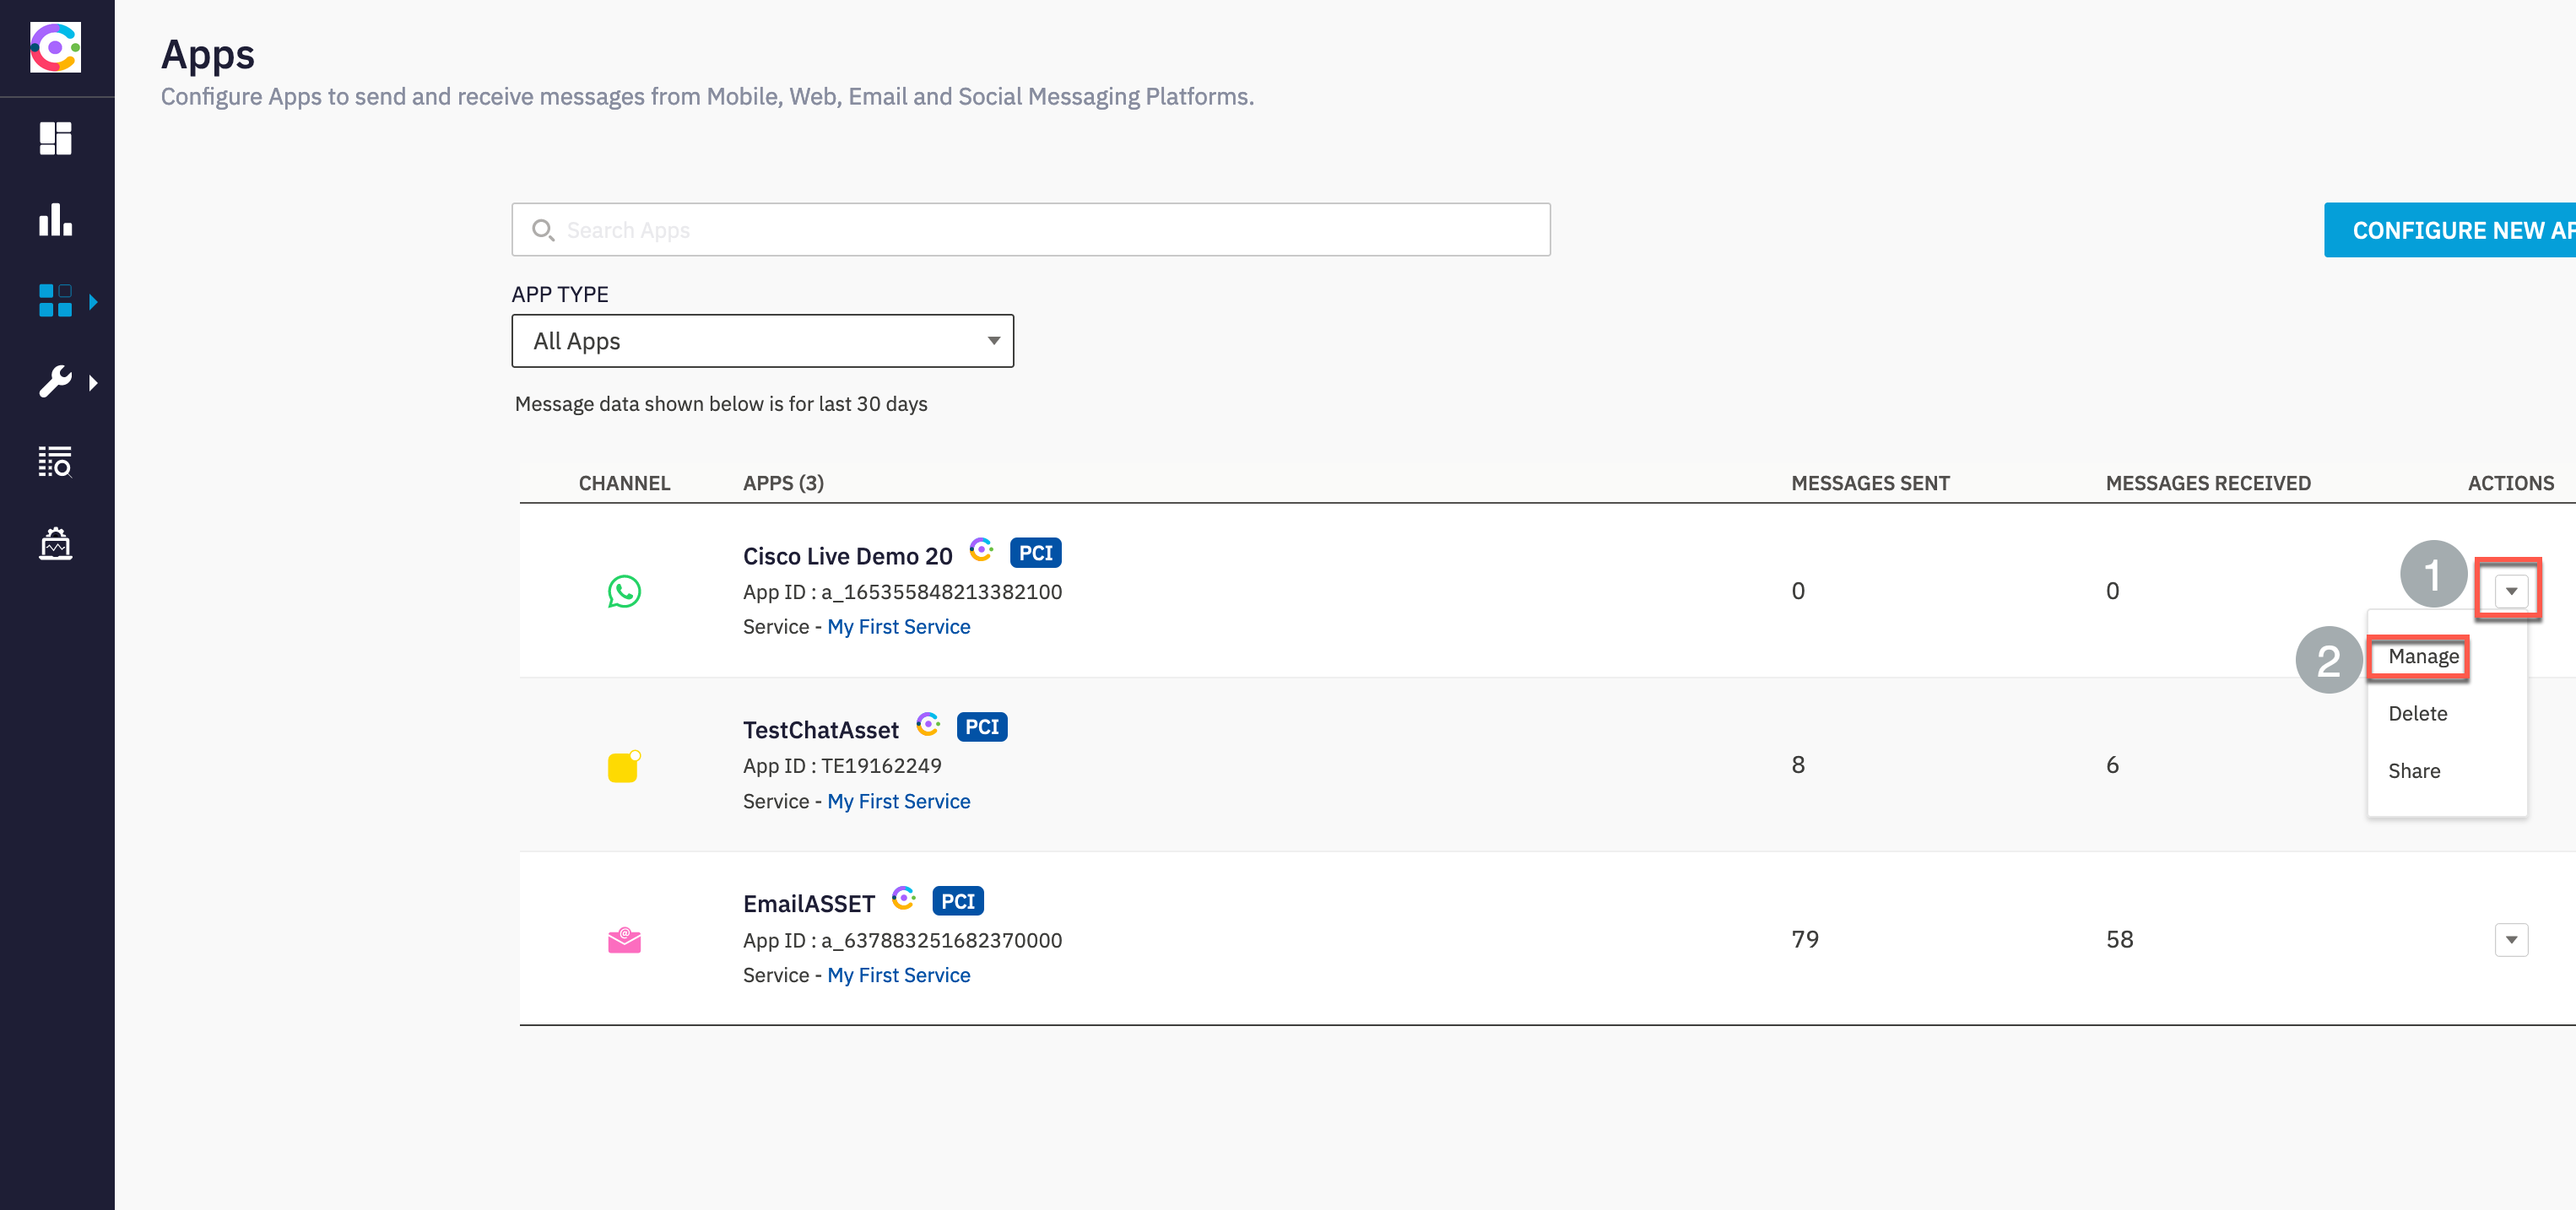
- Identify and make a note of the Number and WABA ID (We will need this later in the flow configuration)
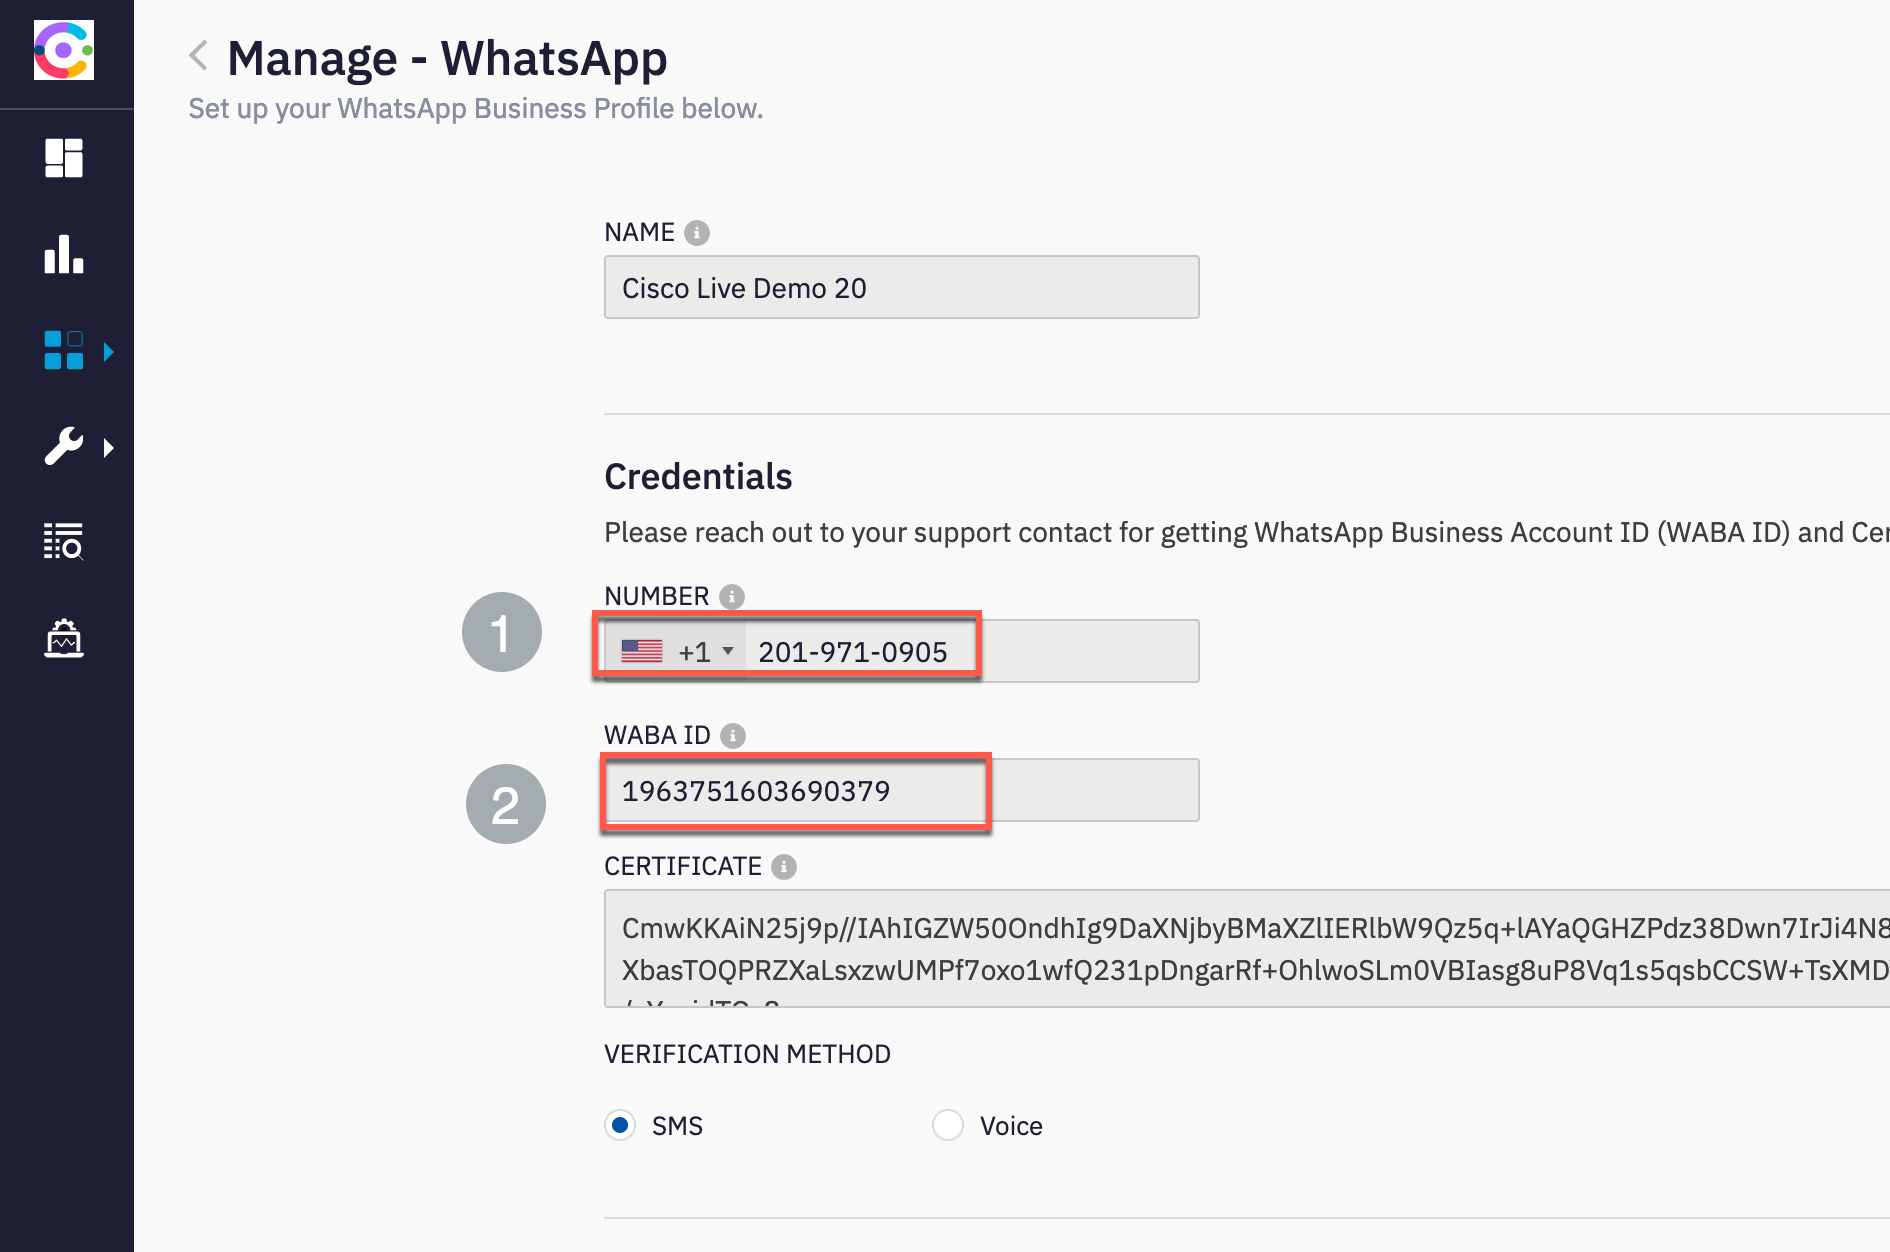
2. WhatsApp Asset registration to WebexCC
- In the WhatsApp number assigned, under actions select the ‘Manage’ option
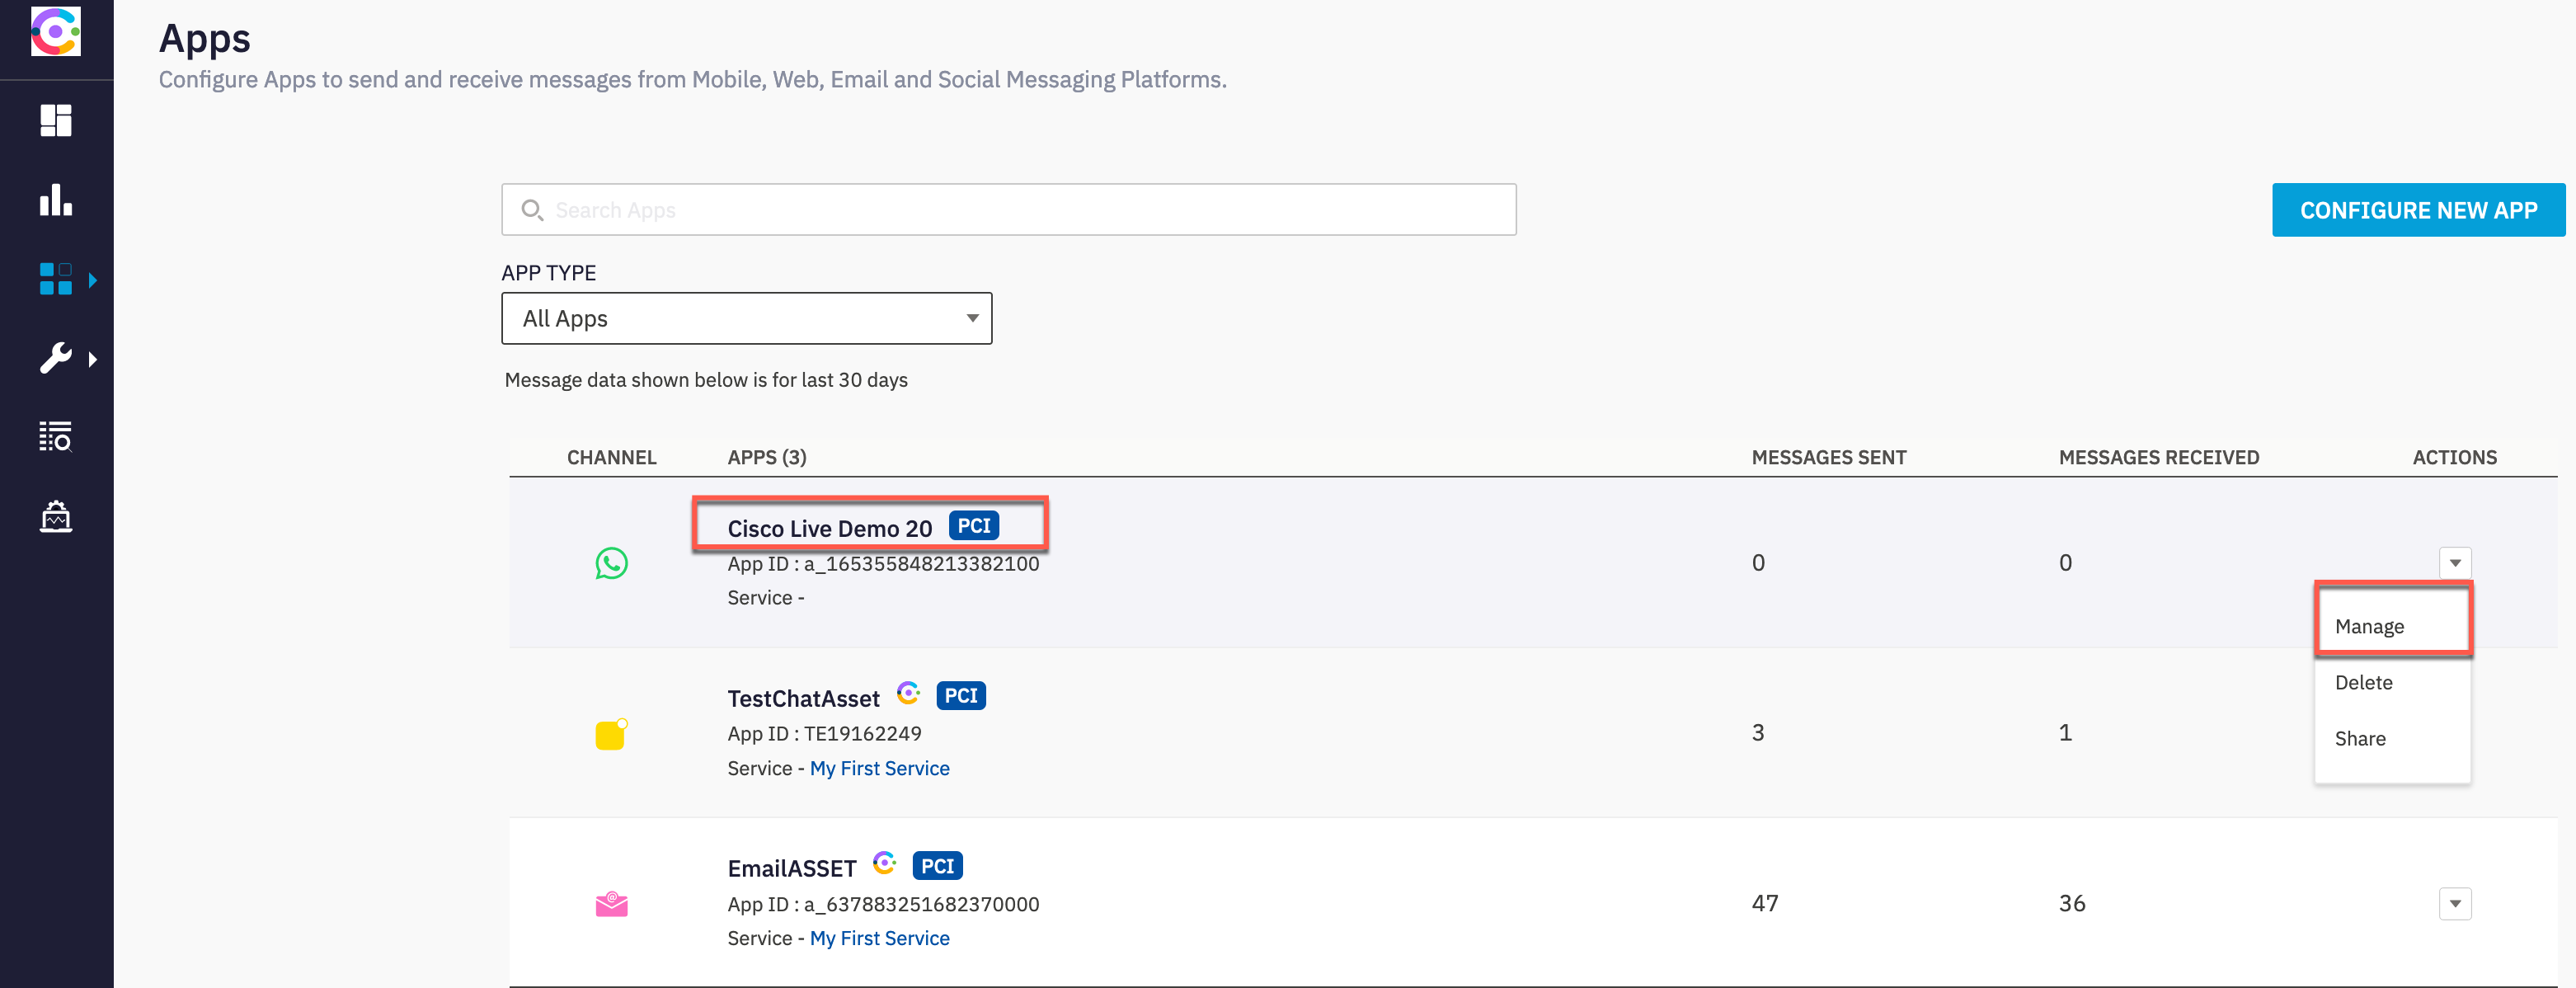
- Click ‘Register to WebexCC option’
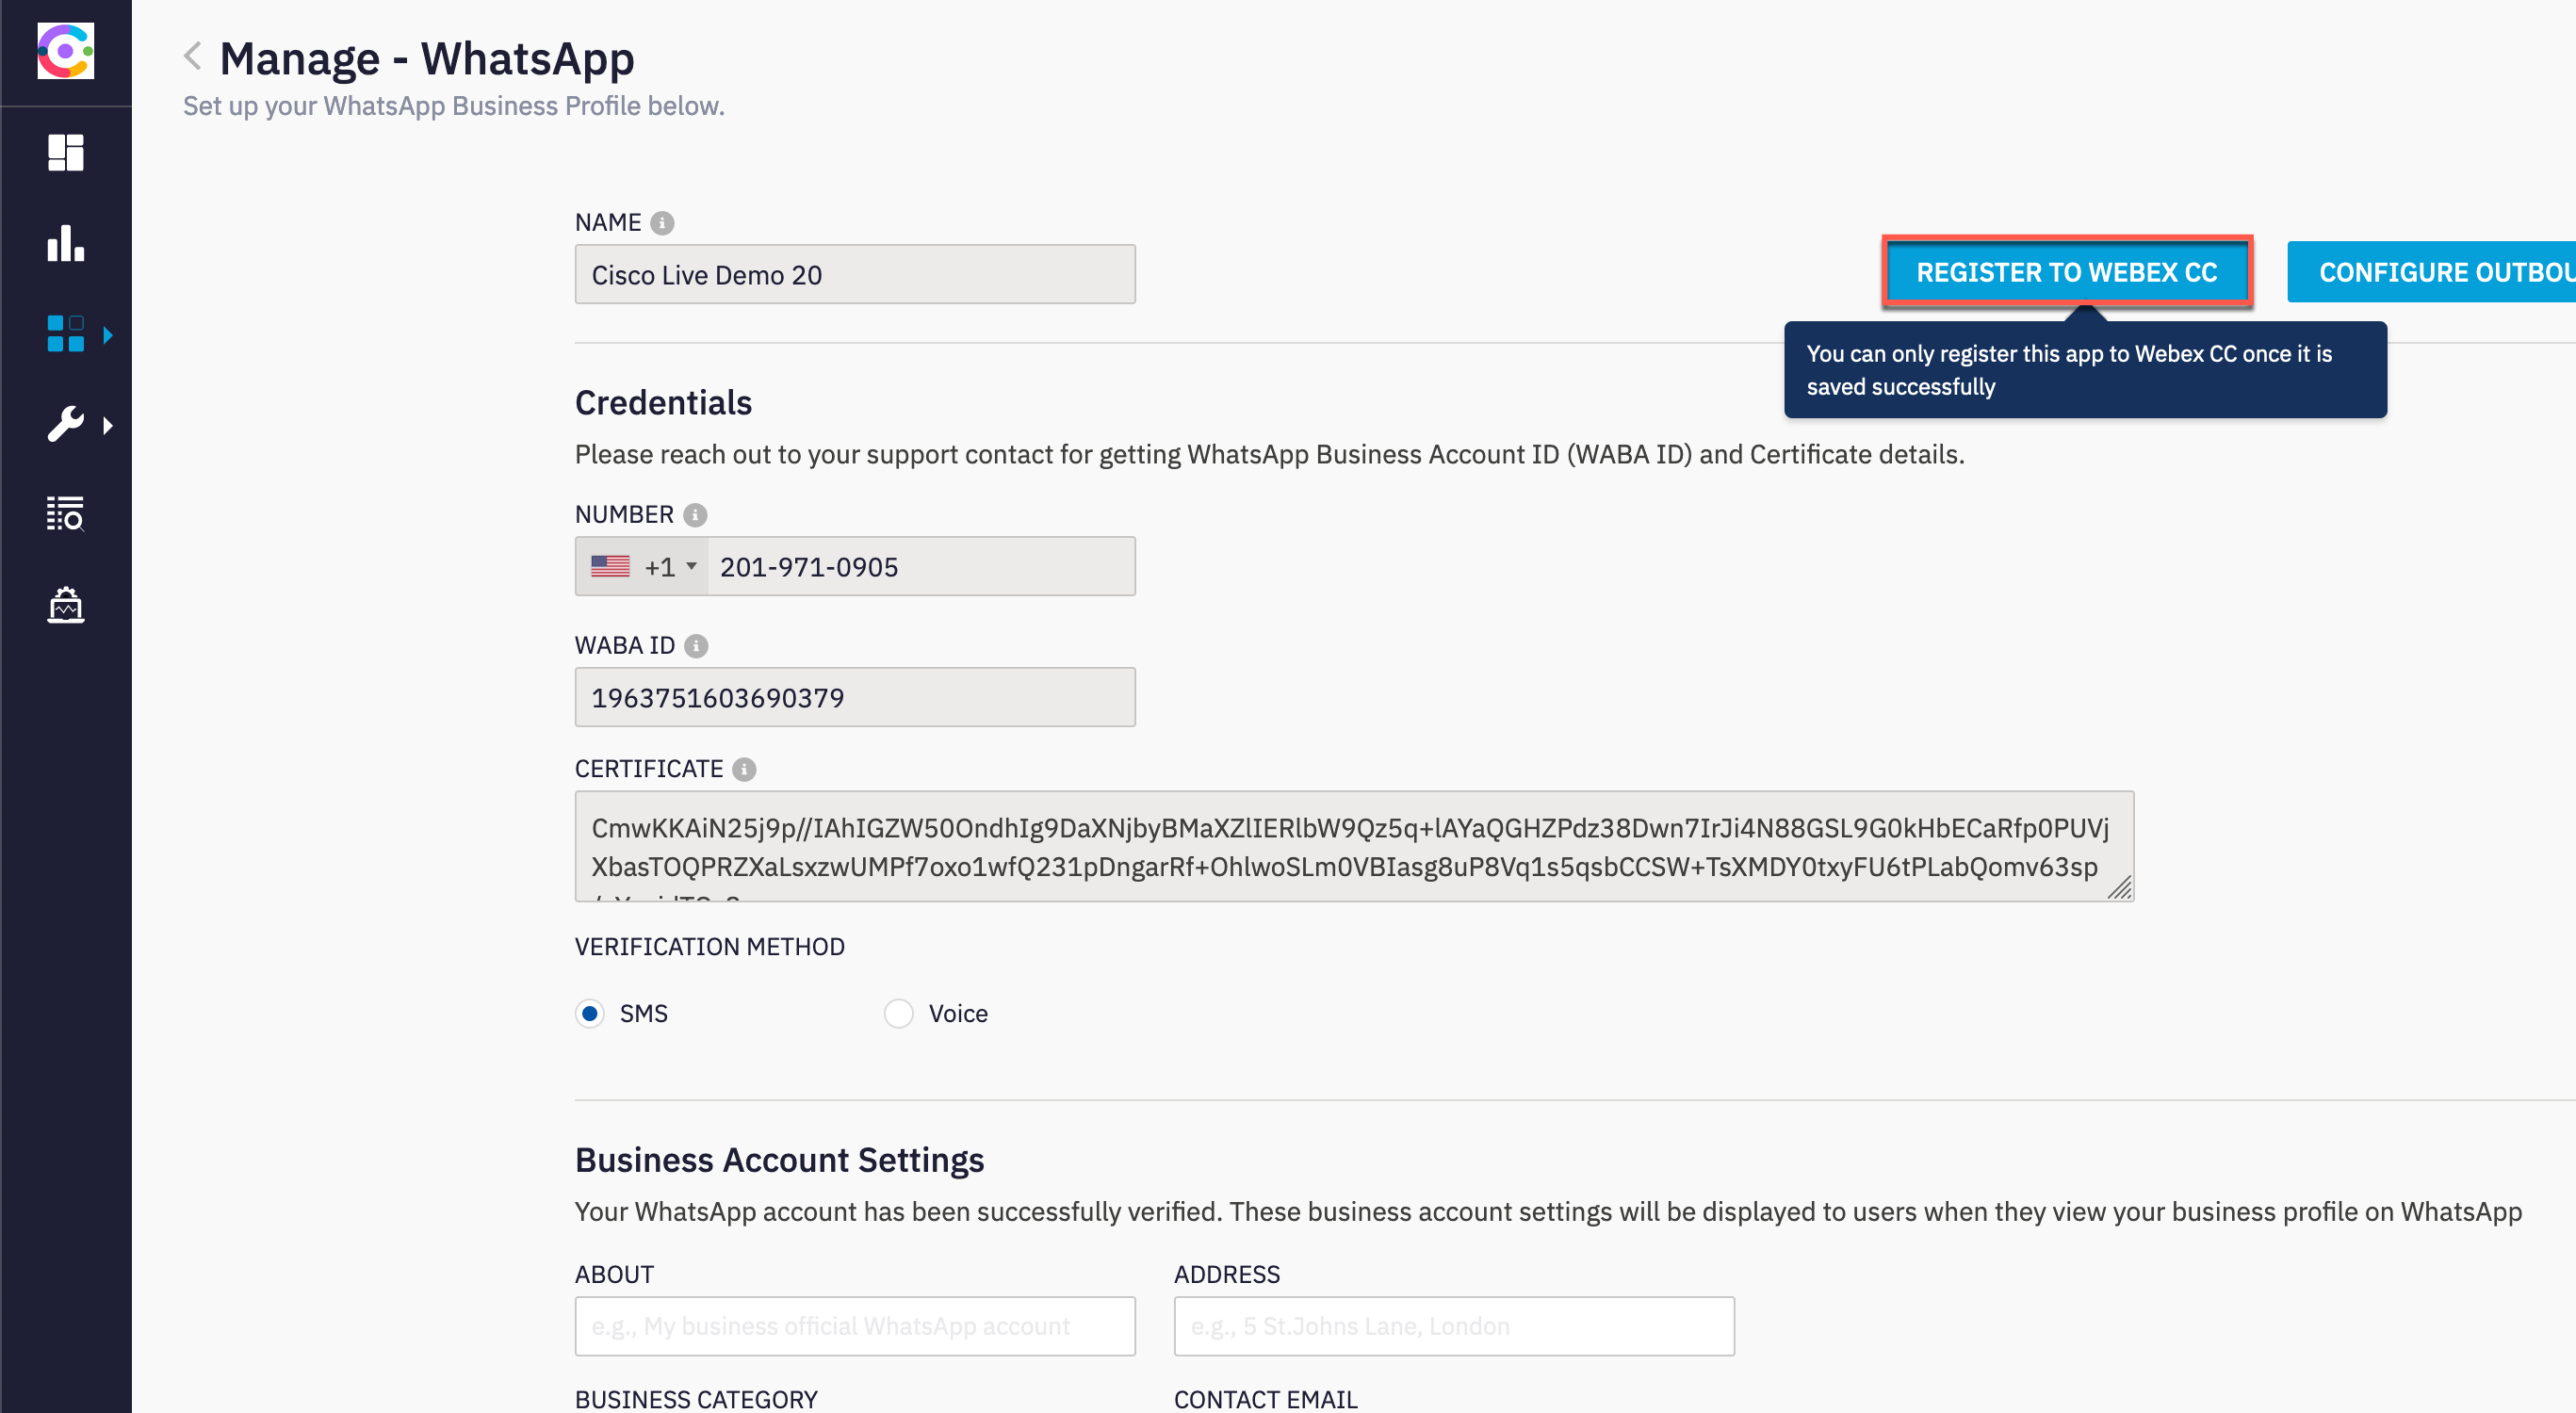
- In the resulting window, select a service under which this asset would be managed
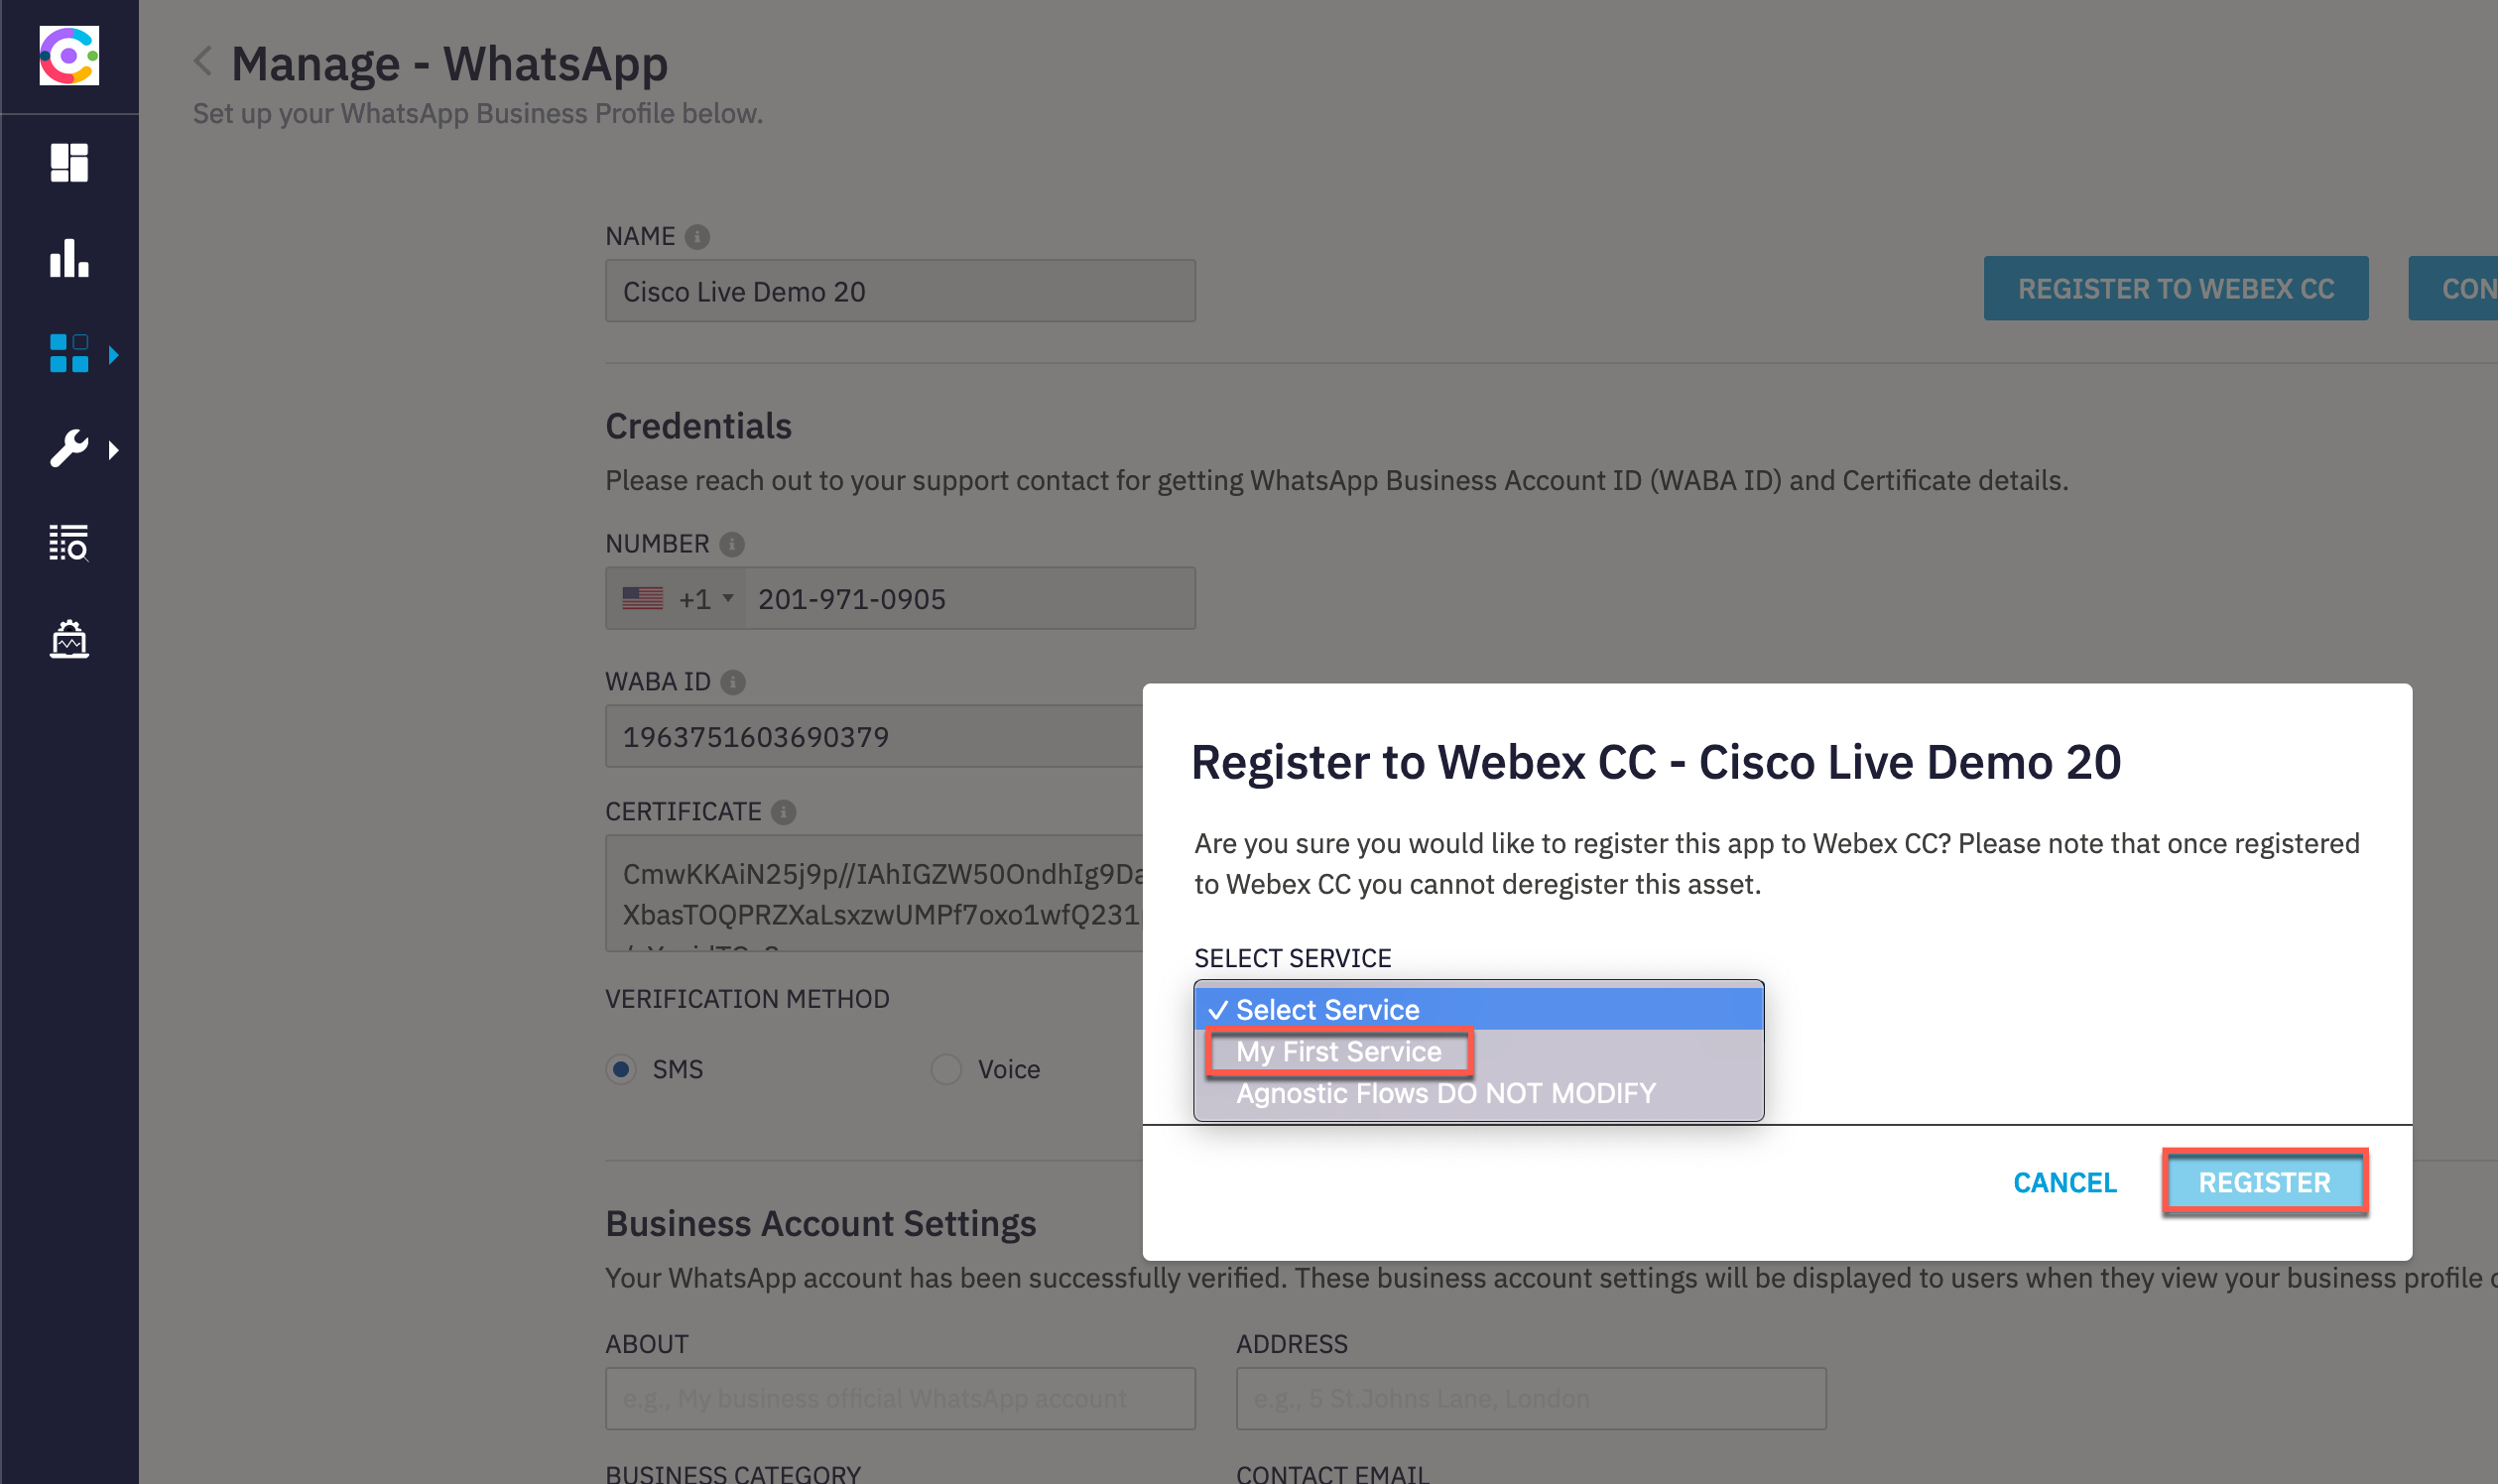
- Verify that the ‘Register to Webex CC’ option is now disabled and there is a message indicating the time when the asset was registered along with the service to which it is assigned.
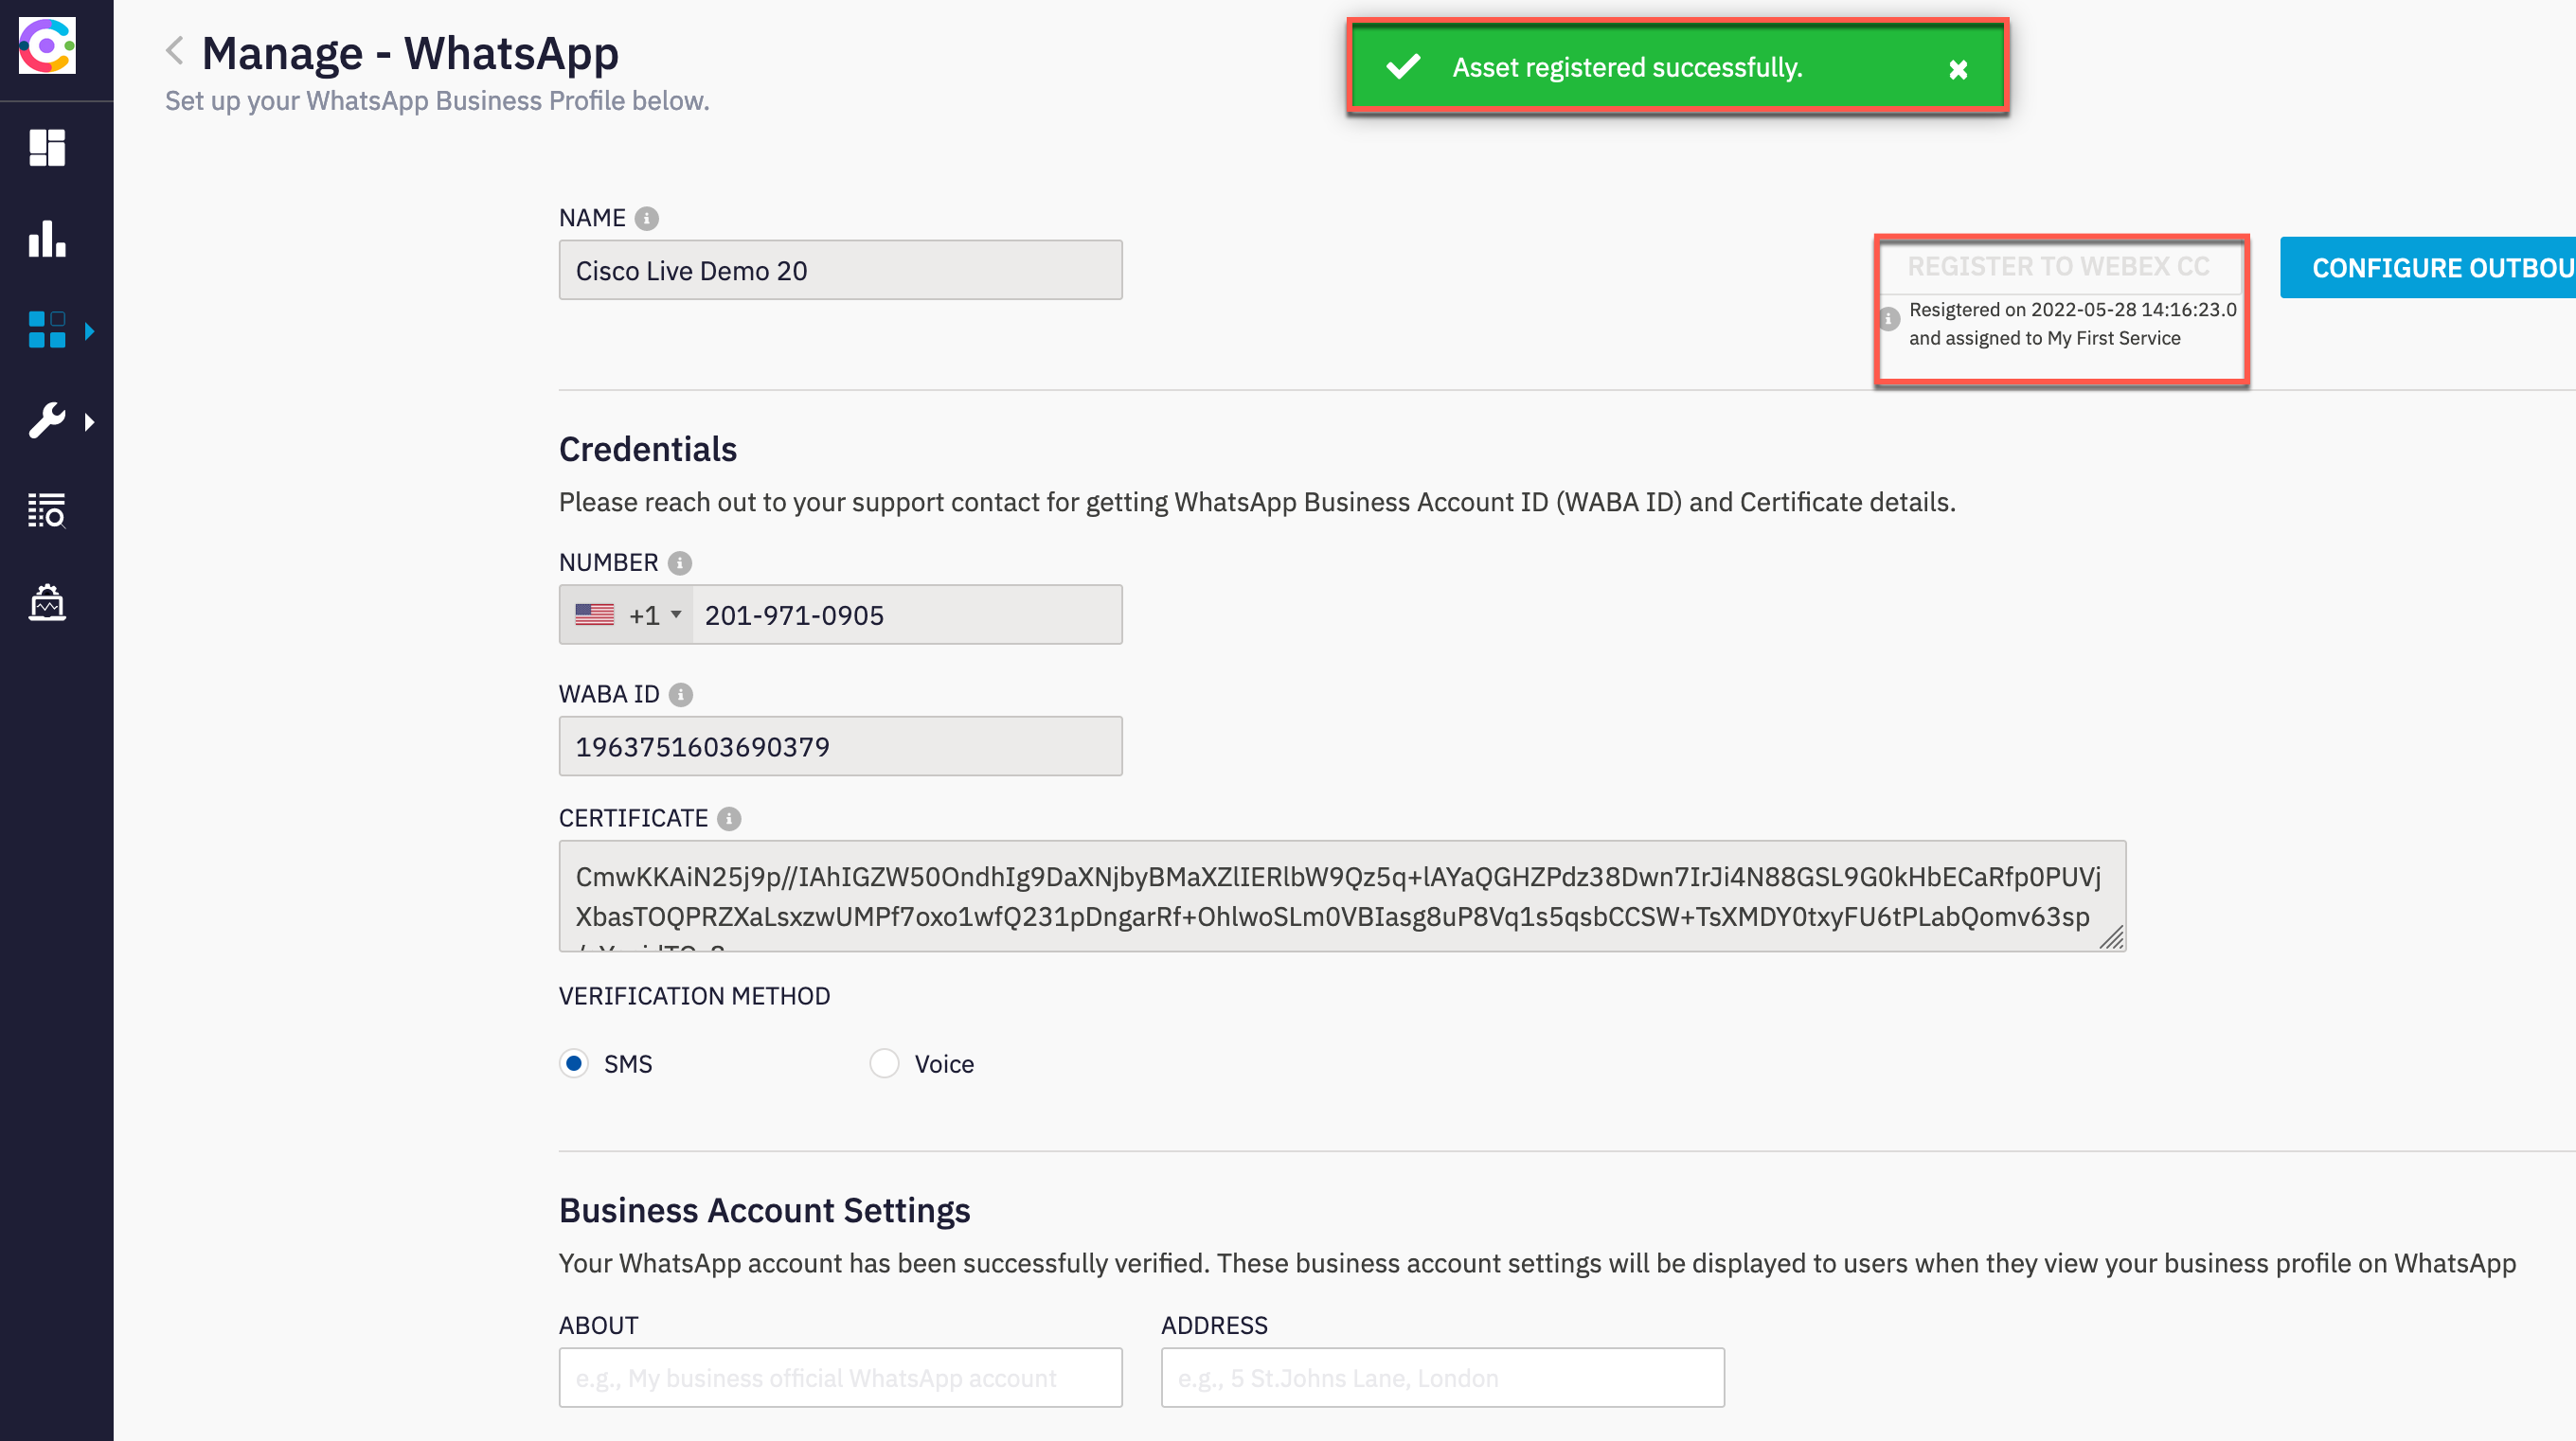
3. WhatsApp Entry Point and Queue creation
- Login to Webex Contact Centre administration portal
- Click on Provisioning and select Entry Points/Queues > Entry Point.
- Click on
New Entry Point.

- Input Name as
WhatsApp_EP. - Select
Social Channelin the Channel Type section. - Select
WhatsAppin the Social Channel Type section. - Leave the Asset Name as appeared value
WhatsApp Asset assigned in your Connect tenant. - The Time Zone can stay as default value.
- Click on Save after comparing your values with the screenshot below.
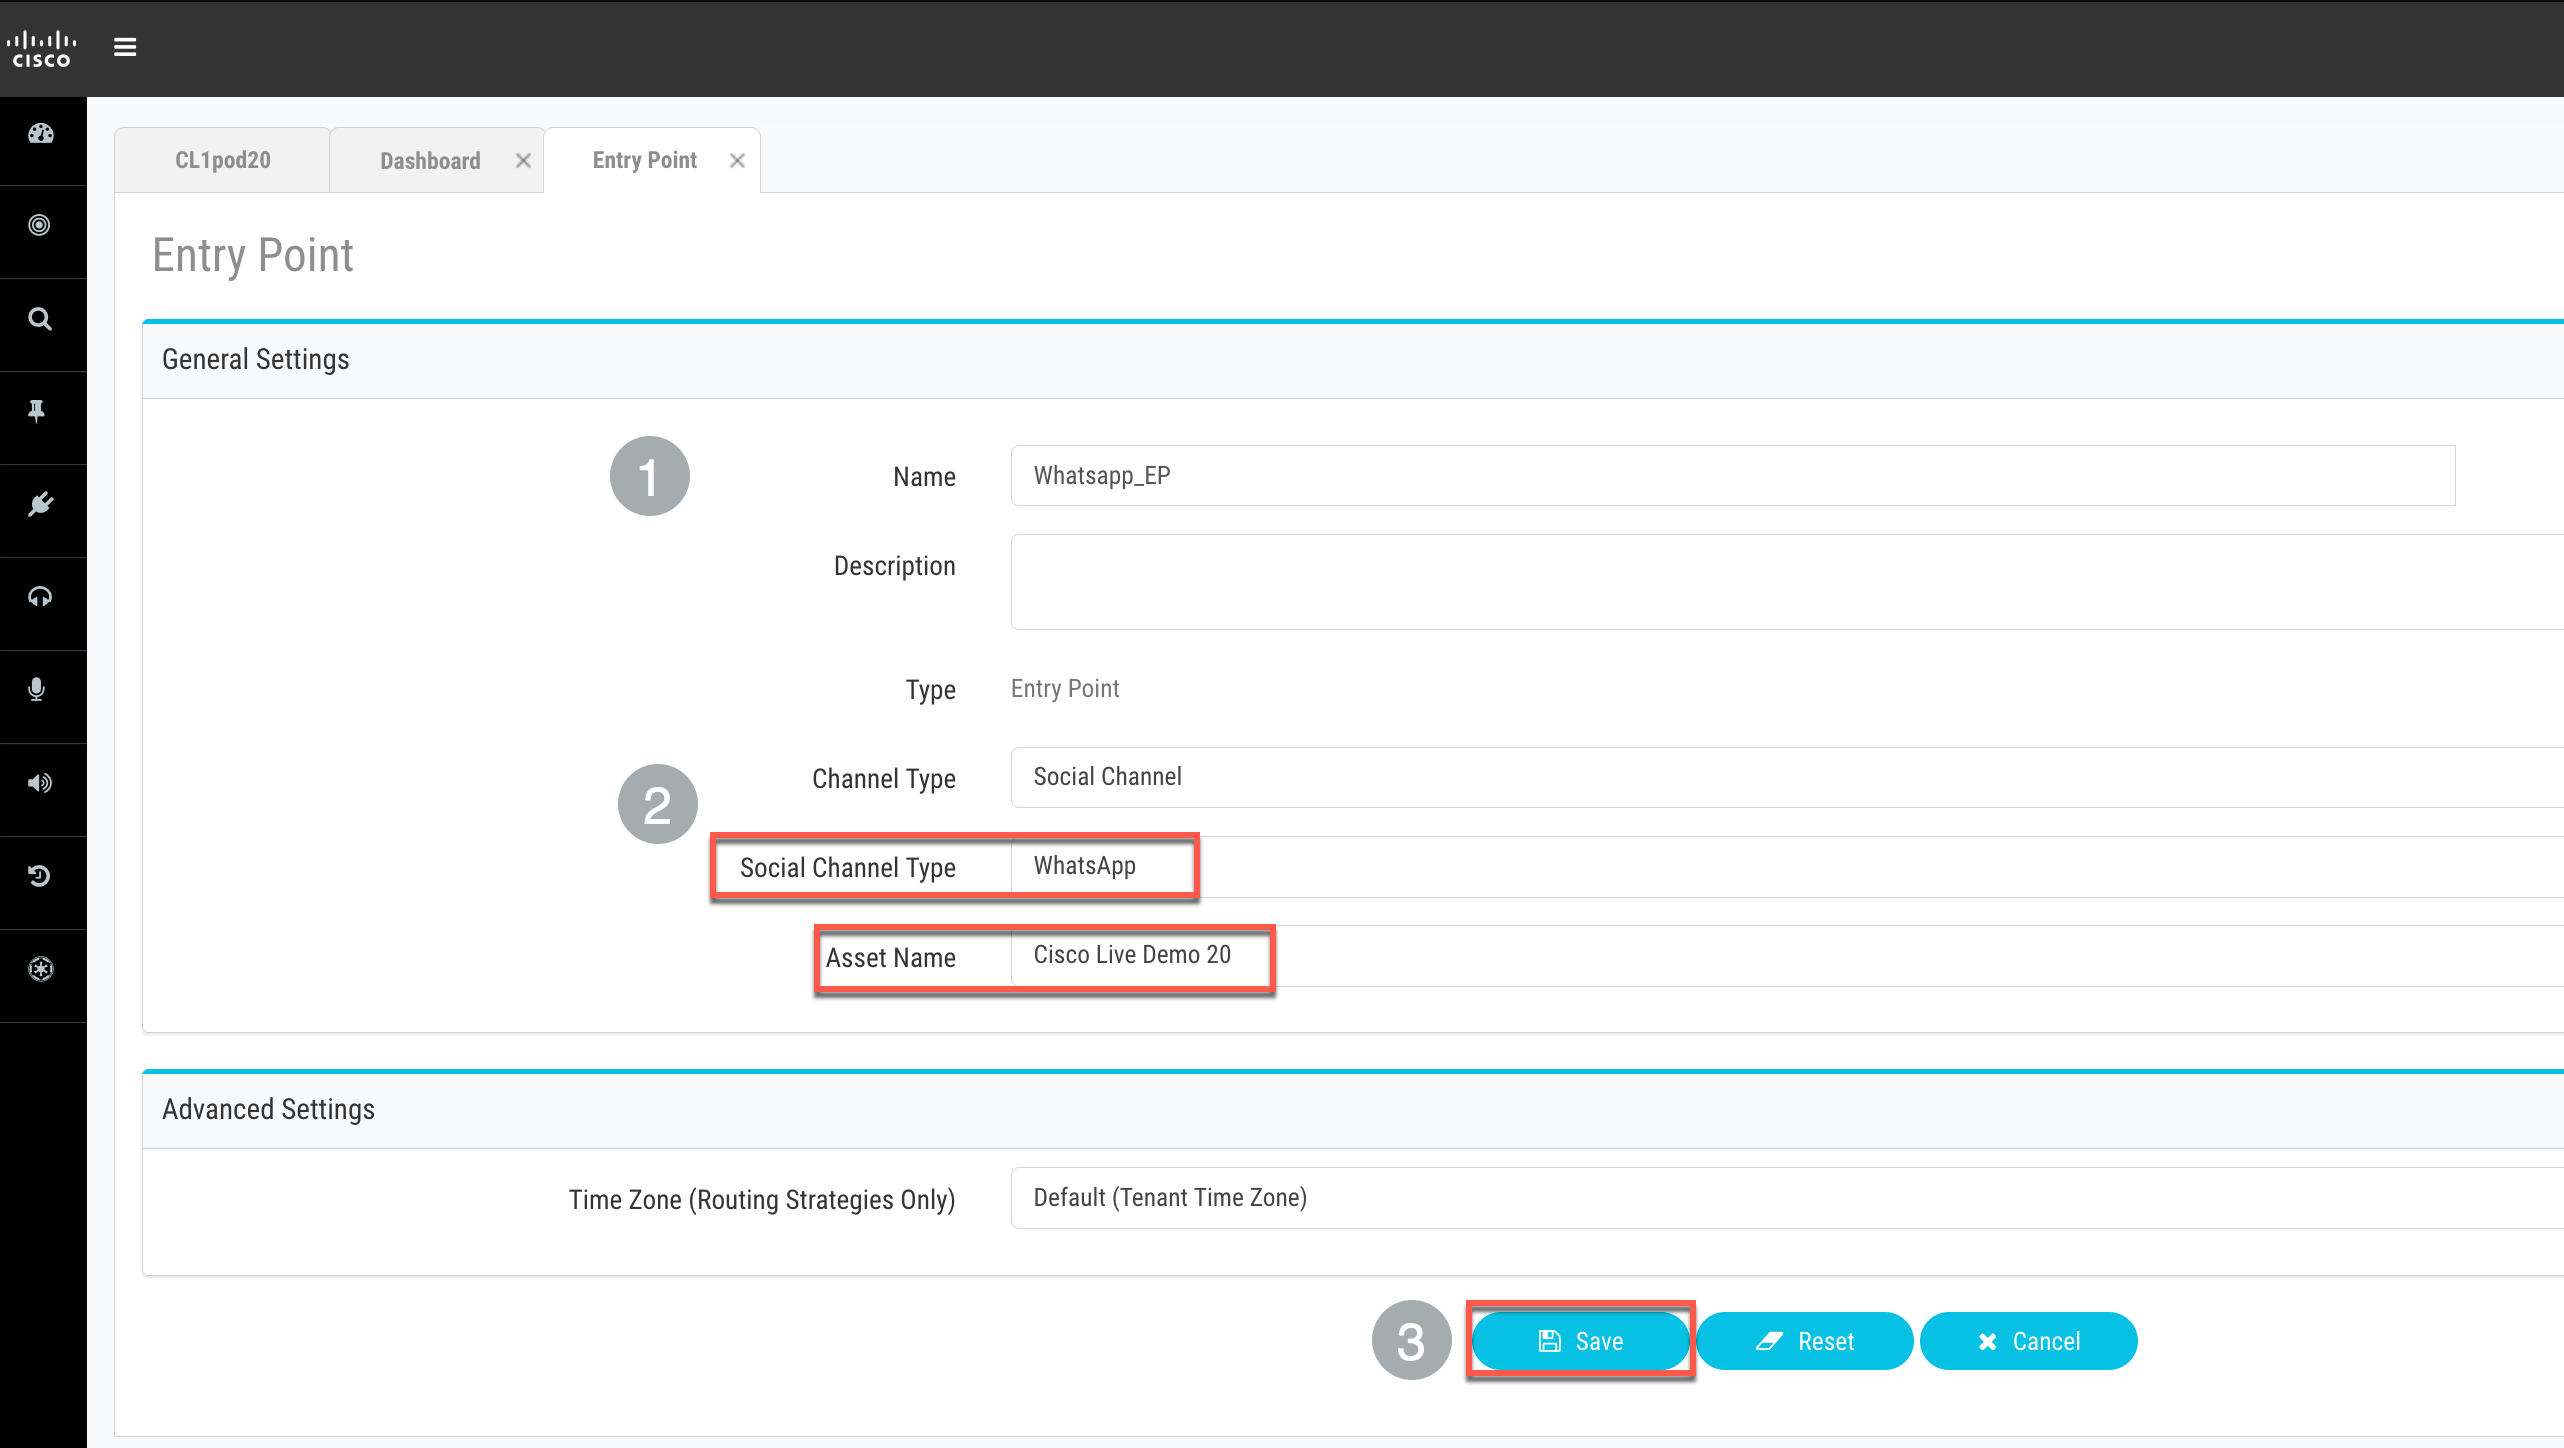
- Click on Provisioning and select Entry Points/Queues > Queue.
- Click on
New Queue.
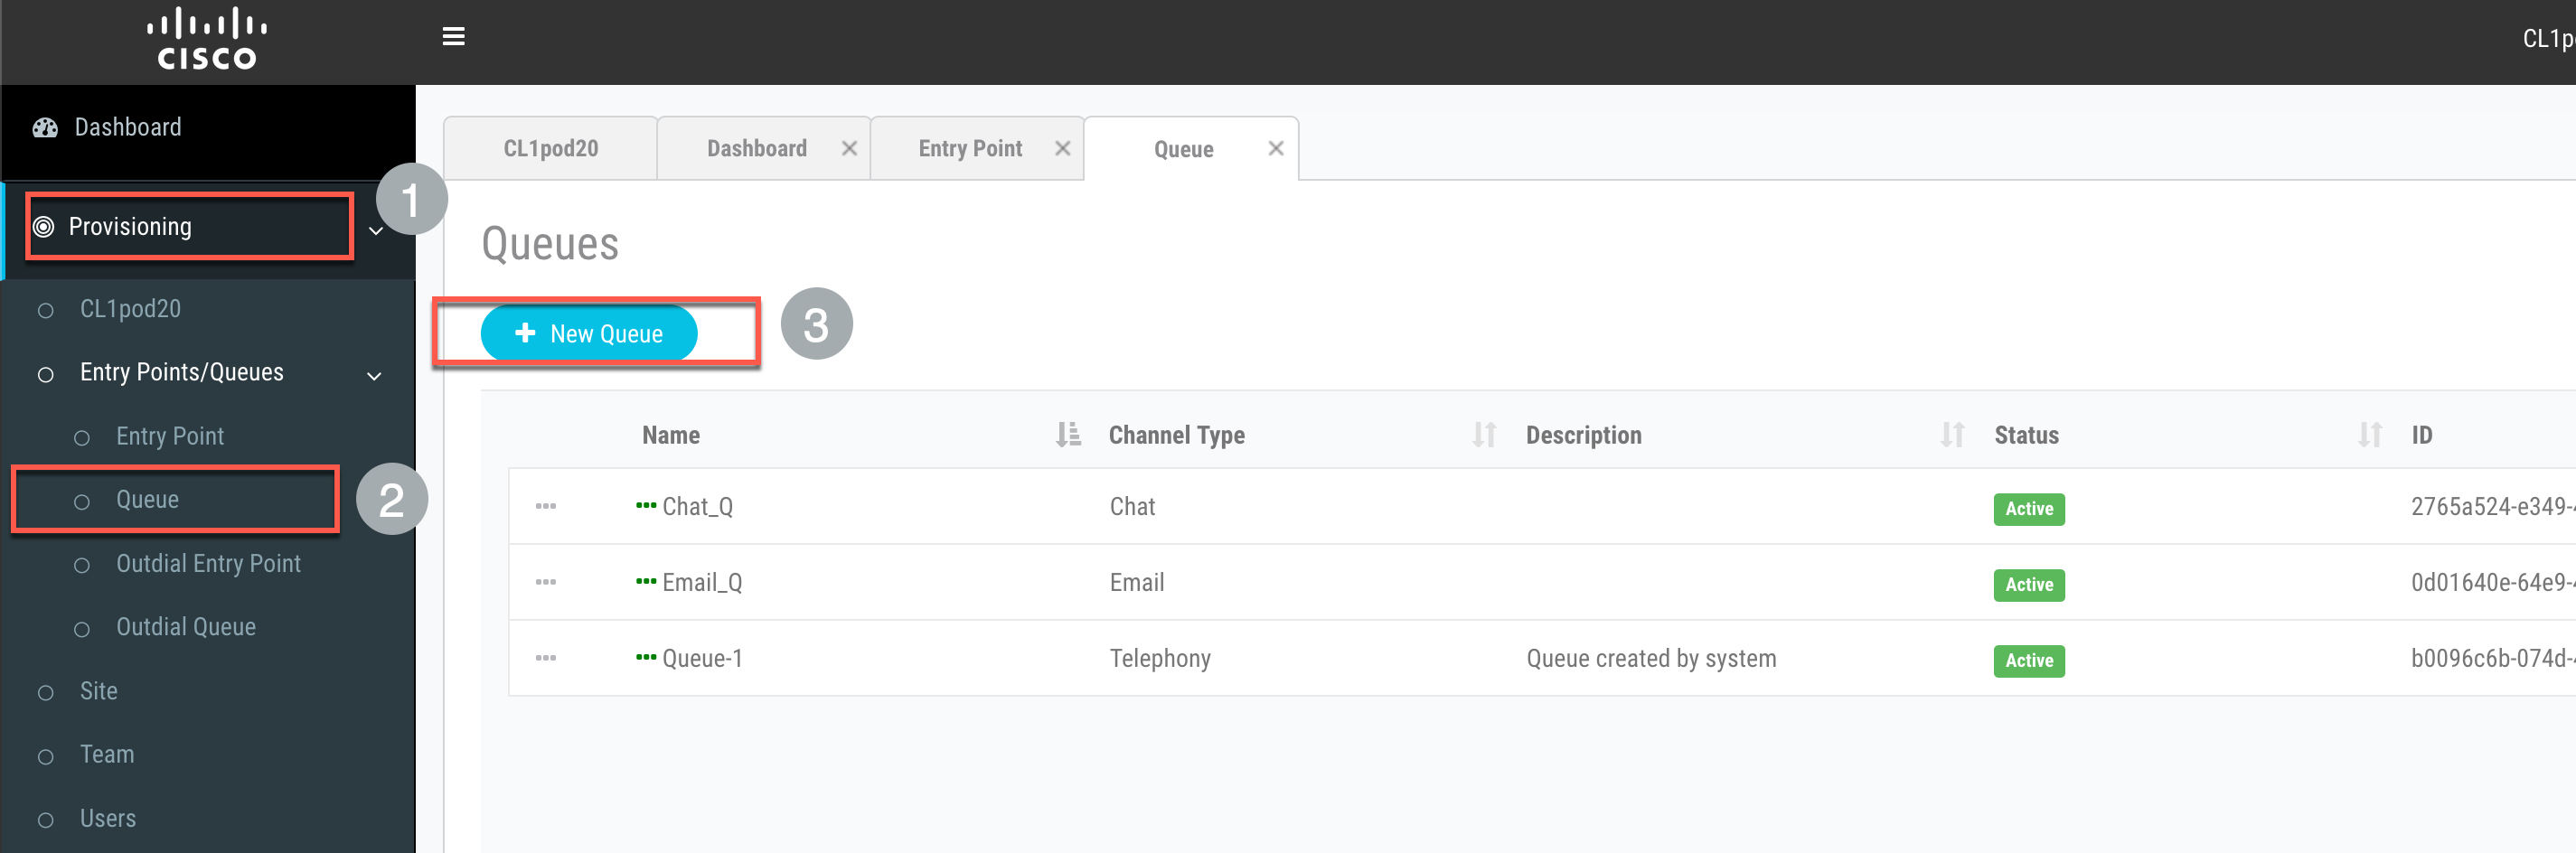
- Input Name as
WhatsApp_Queue. - Select
Social Channelin the Channel Type section. - Click
Add Groupin the Conversation distribution section.
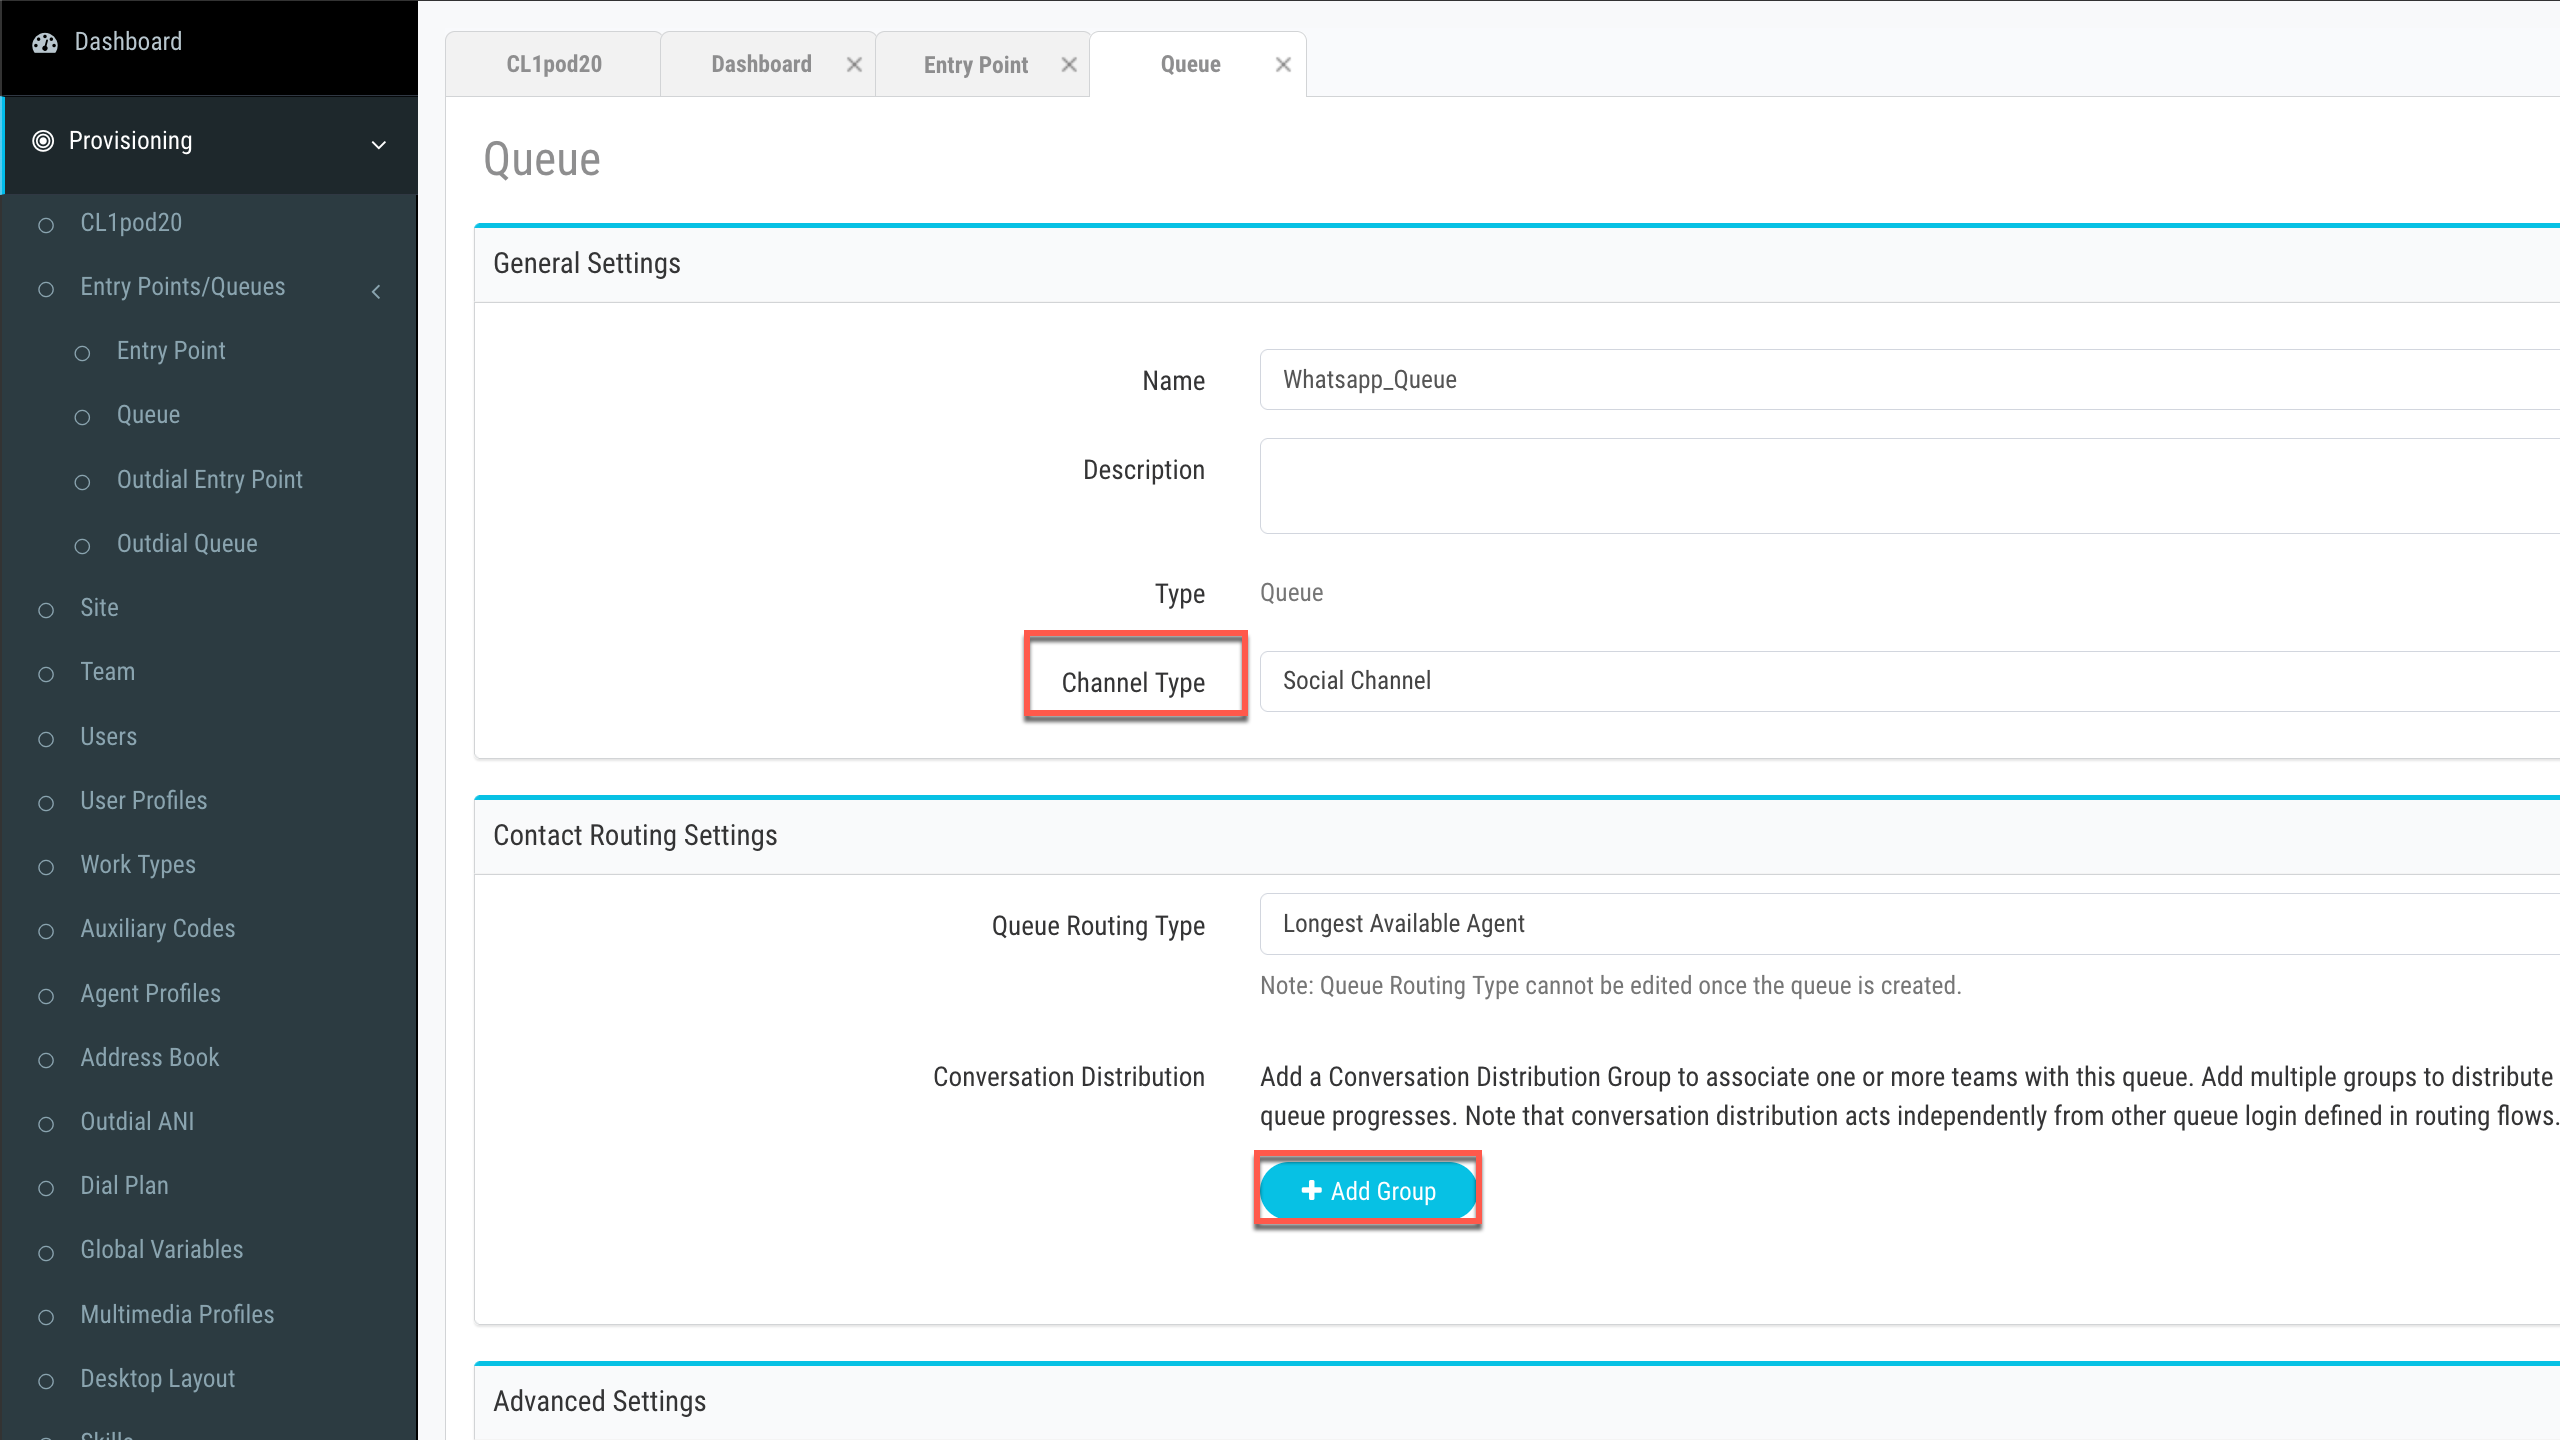
- Select the Agent based teams created in the previous lab and click
Save. Once saved, clickCloseto exit this window.

- Input Maximum Time in Queue as
300. - The Time Zone can stay as default value.
- Click on Save after comparing your values with the screenshot below.

4. Create/Upload WhatsApp flow
- Download the WhatsApp flow from the GitHub page.
- Navigate to Webex Connect Flows -> v3.0 ->Template -> Media Specific Workflows -> Whatsapp Inbound Flow.workflow.zip, select the zip file and click download.
- Unzip the downloaded file.
- Go to Webex Connect, click on Services and select the service in which the Asset is created in step 2. It should be My First Service
- In the service click on FLOWS -> CREATE FLOW
- Enter the FLOW NAME as WhatsApp Inbound Flow, select the TYPE as Work Flow and under METHOD select Upload a flow.
- Drag and drop the Whatsapp Inbound Flow.workflow flow that is downloaded in zip file, click CREATE
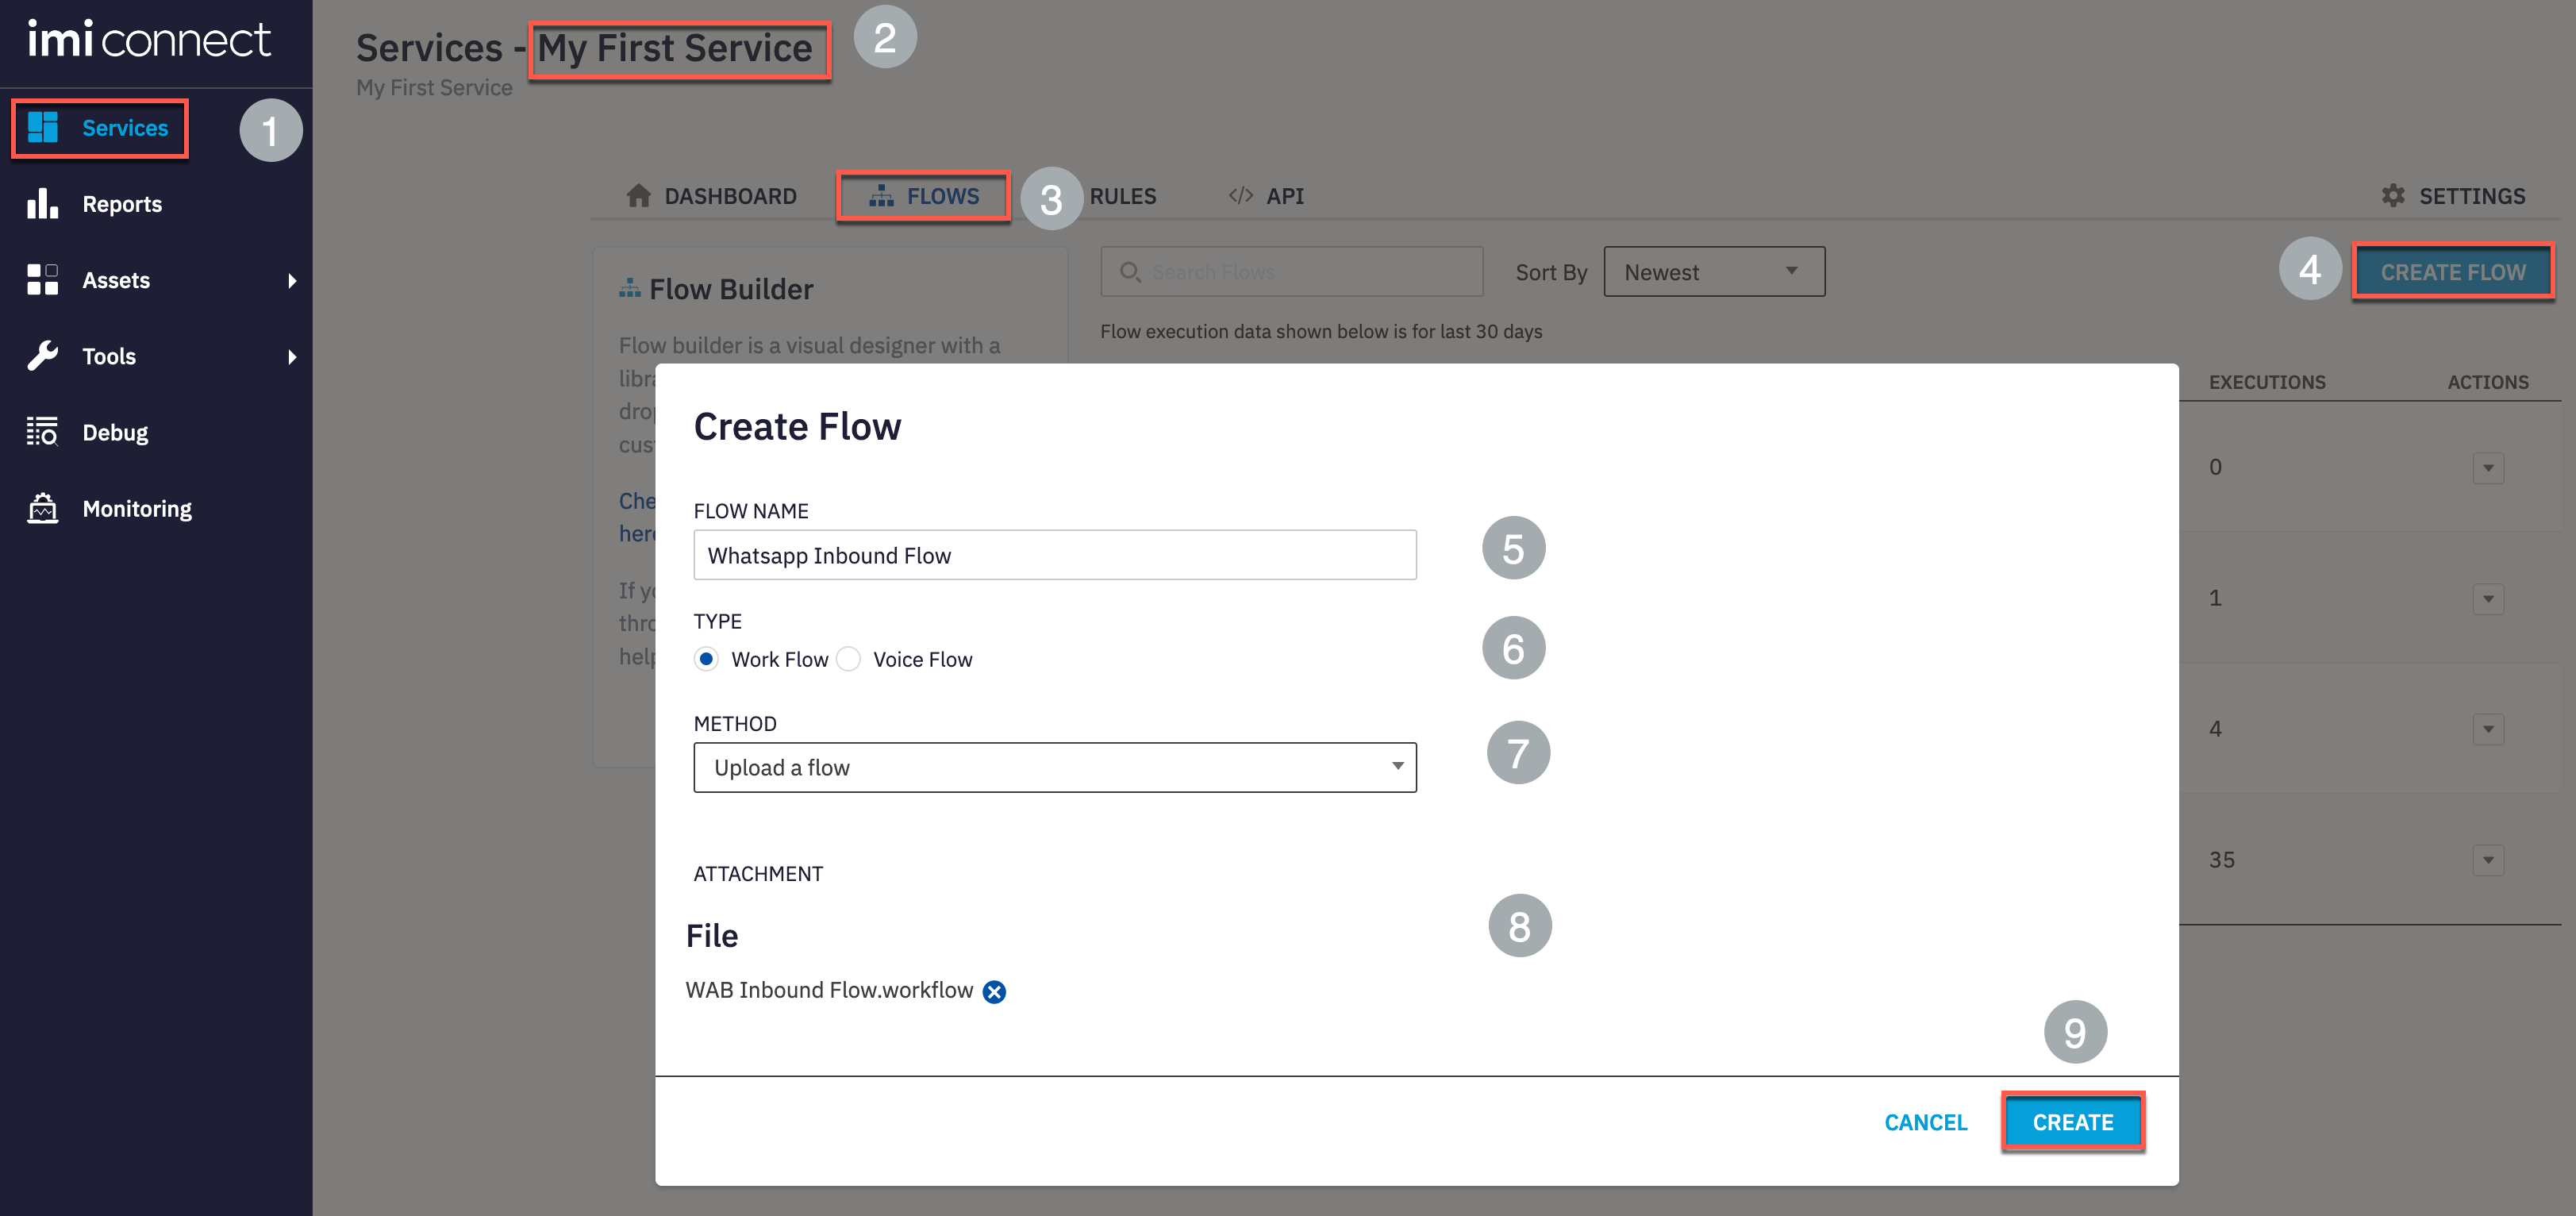
- Once the flow is saved, the ‘Configure WhatsApp Event’ node will open. Select incoming message as trigger and click Save
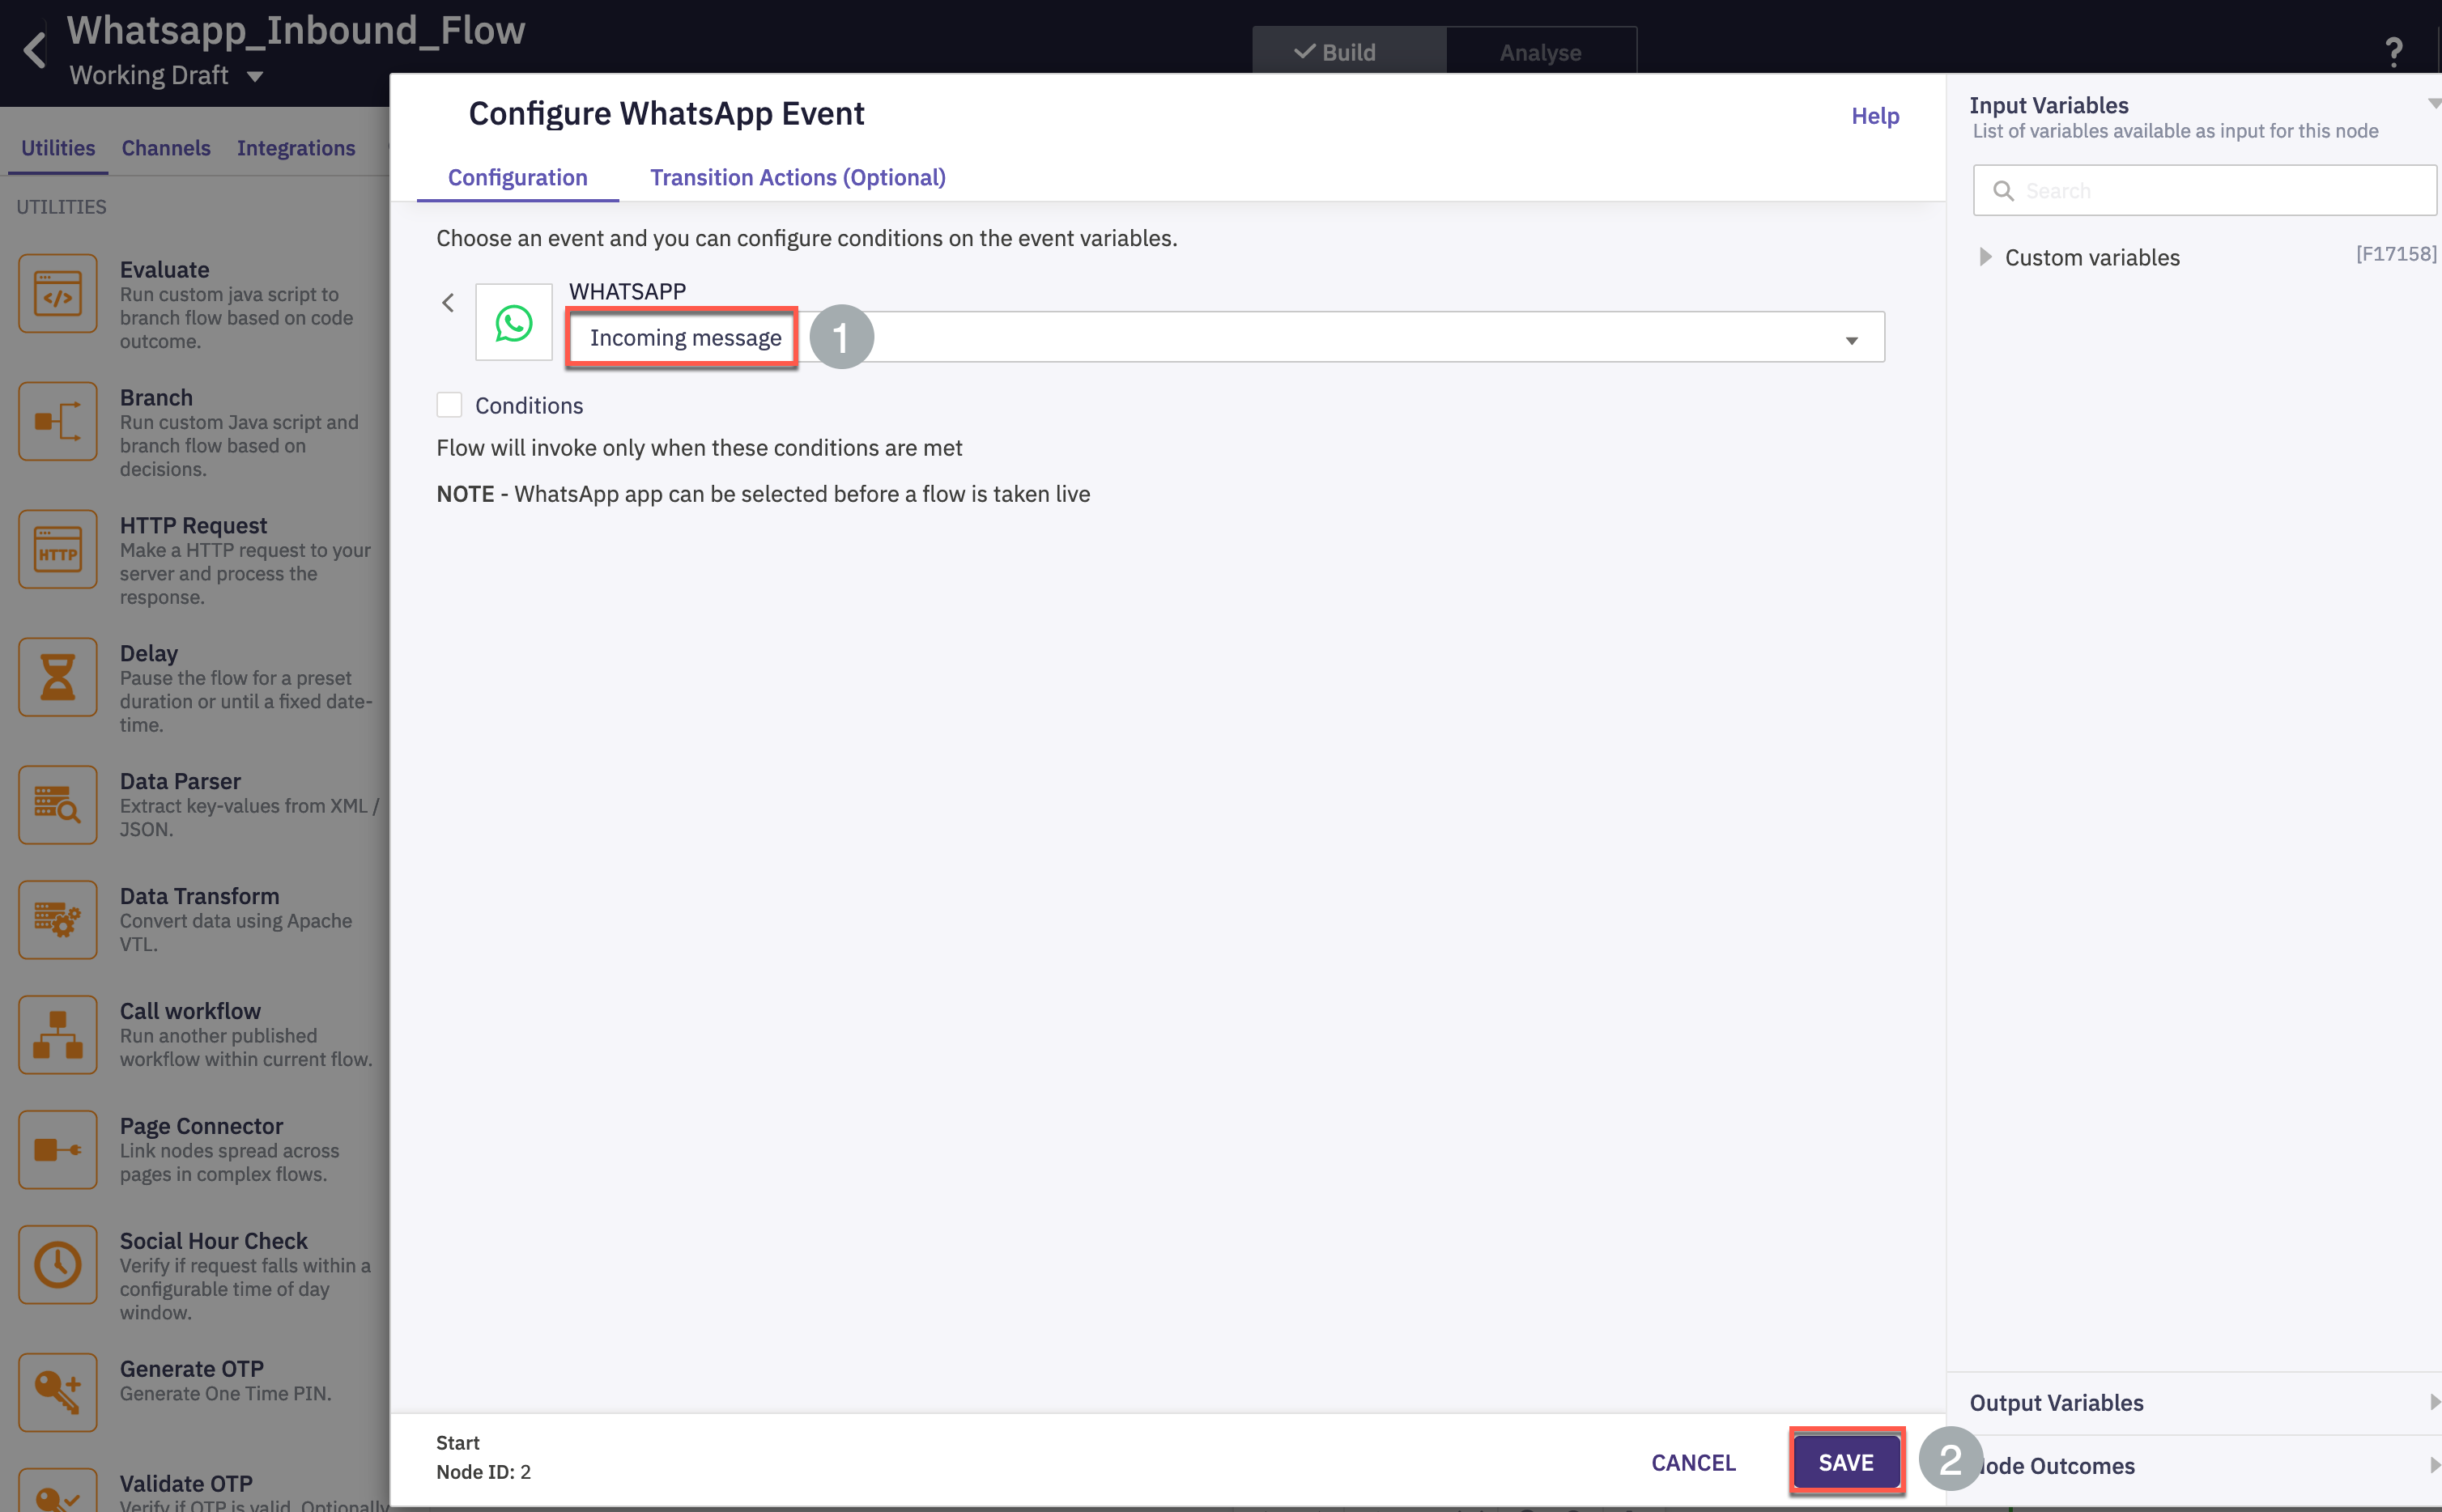
- Open Custom variables and update the value for WANumber and appid (These are the values that were identified in Step-1) and click on SAVE.
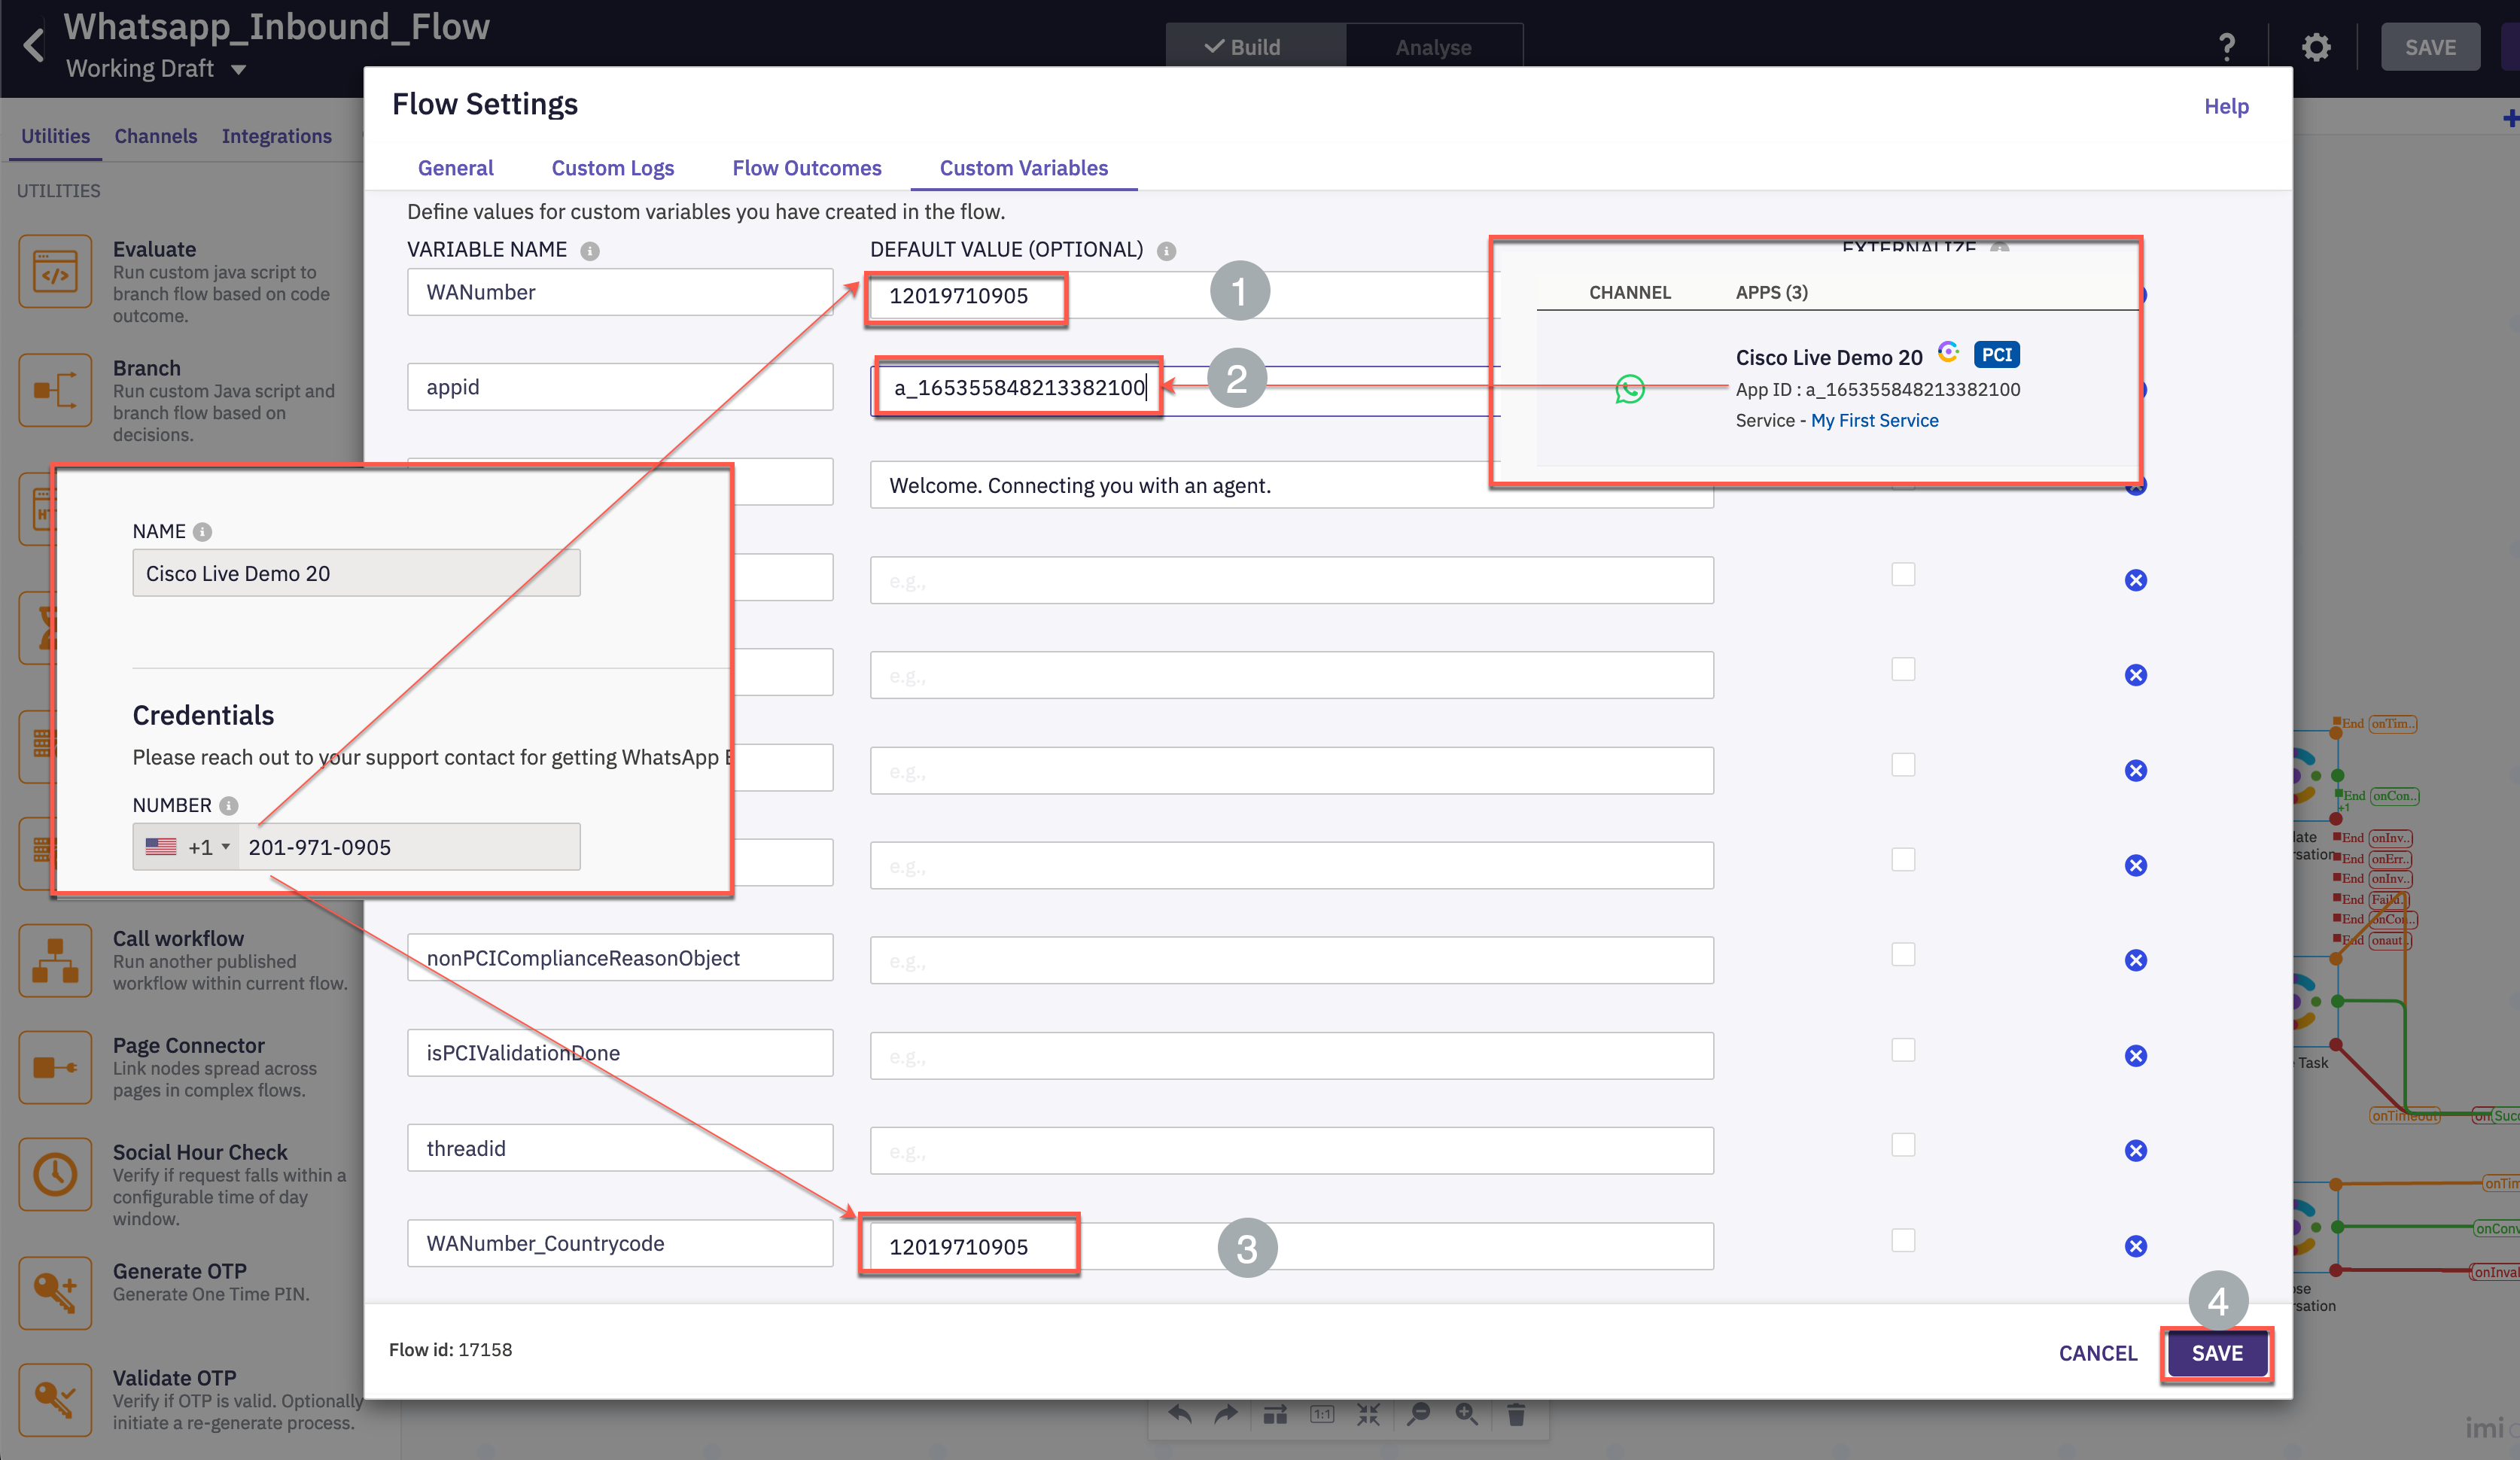
- In the created workflow find the Queue Task, click twice, select the QUEUE NAME as WhatsApp_Queue and click on SAVE.
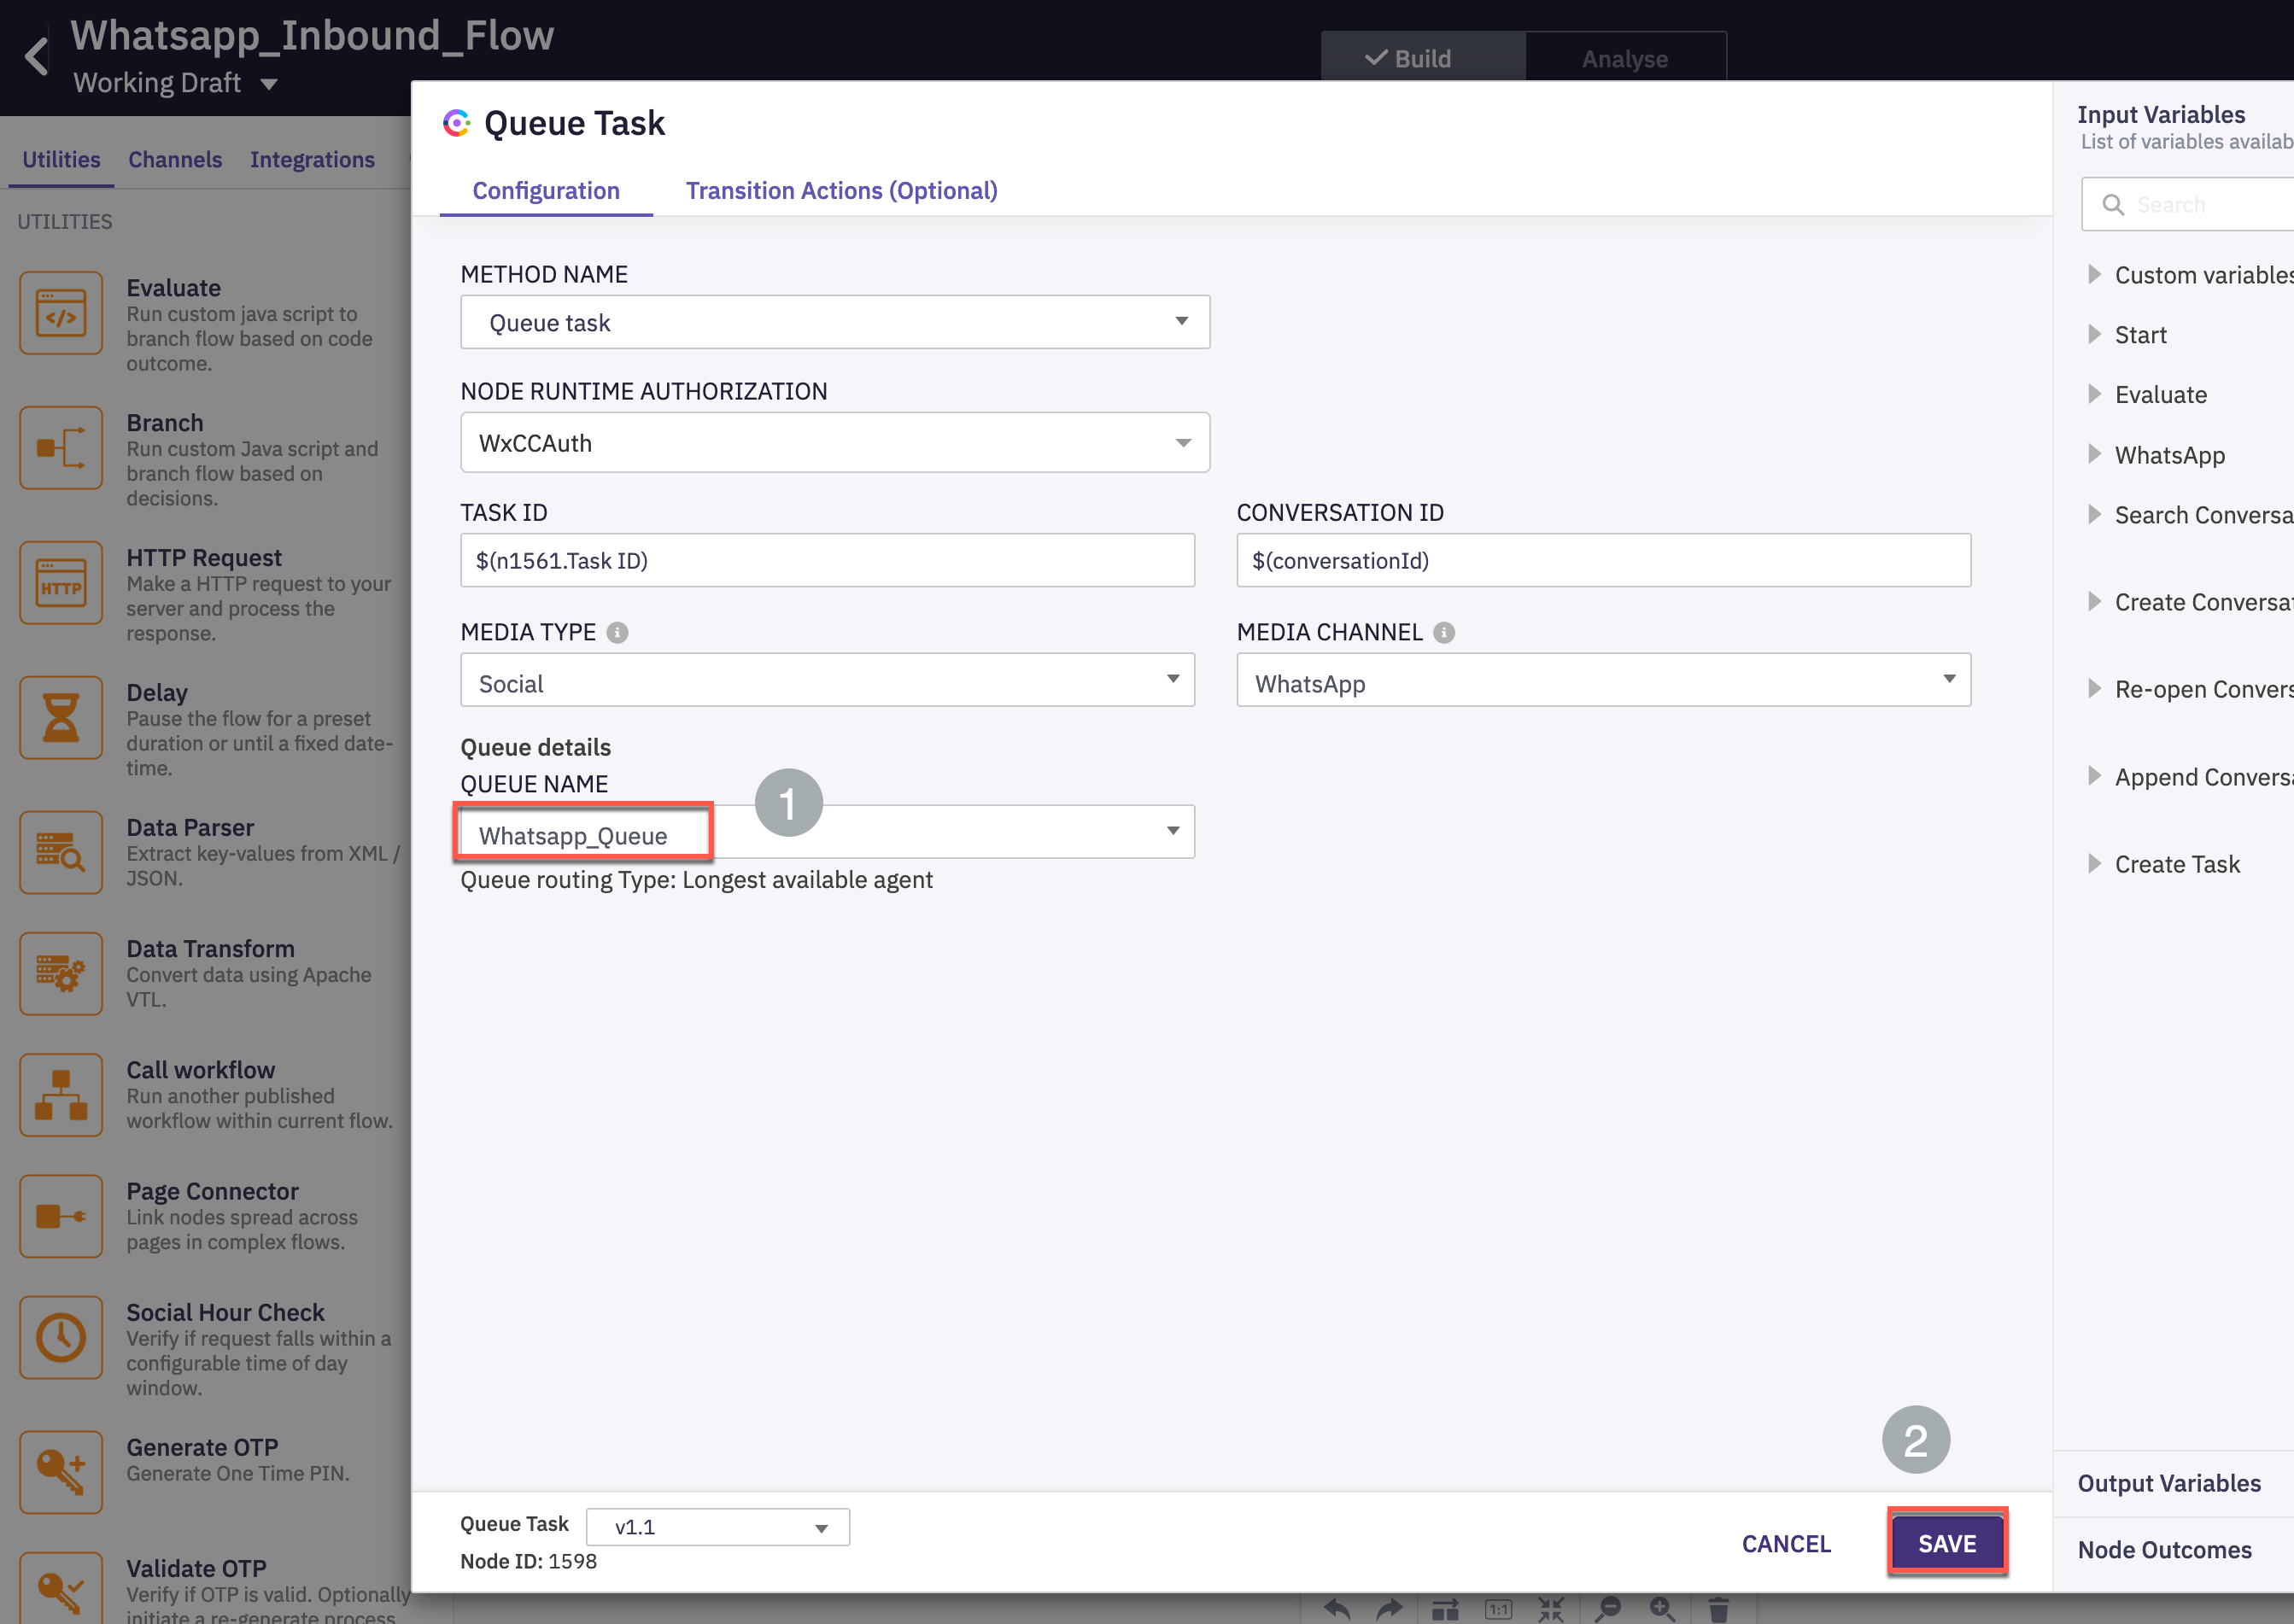
- Go to Resolve Conversation node and fill in Flow Id field with flowId value copied from the address bar of web browser tab. Then save changes.
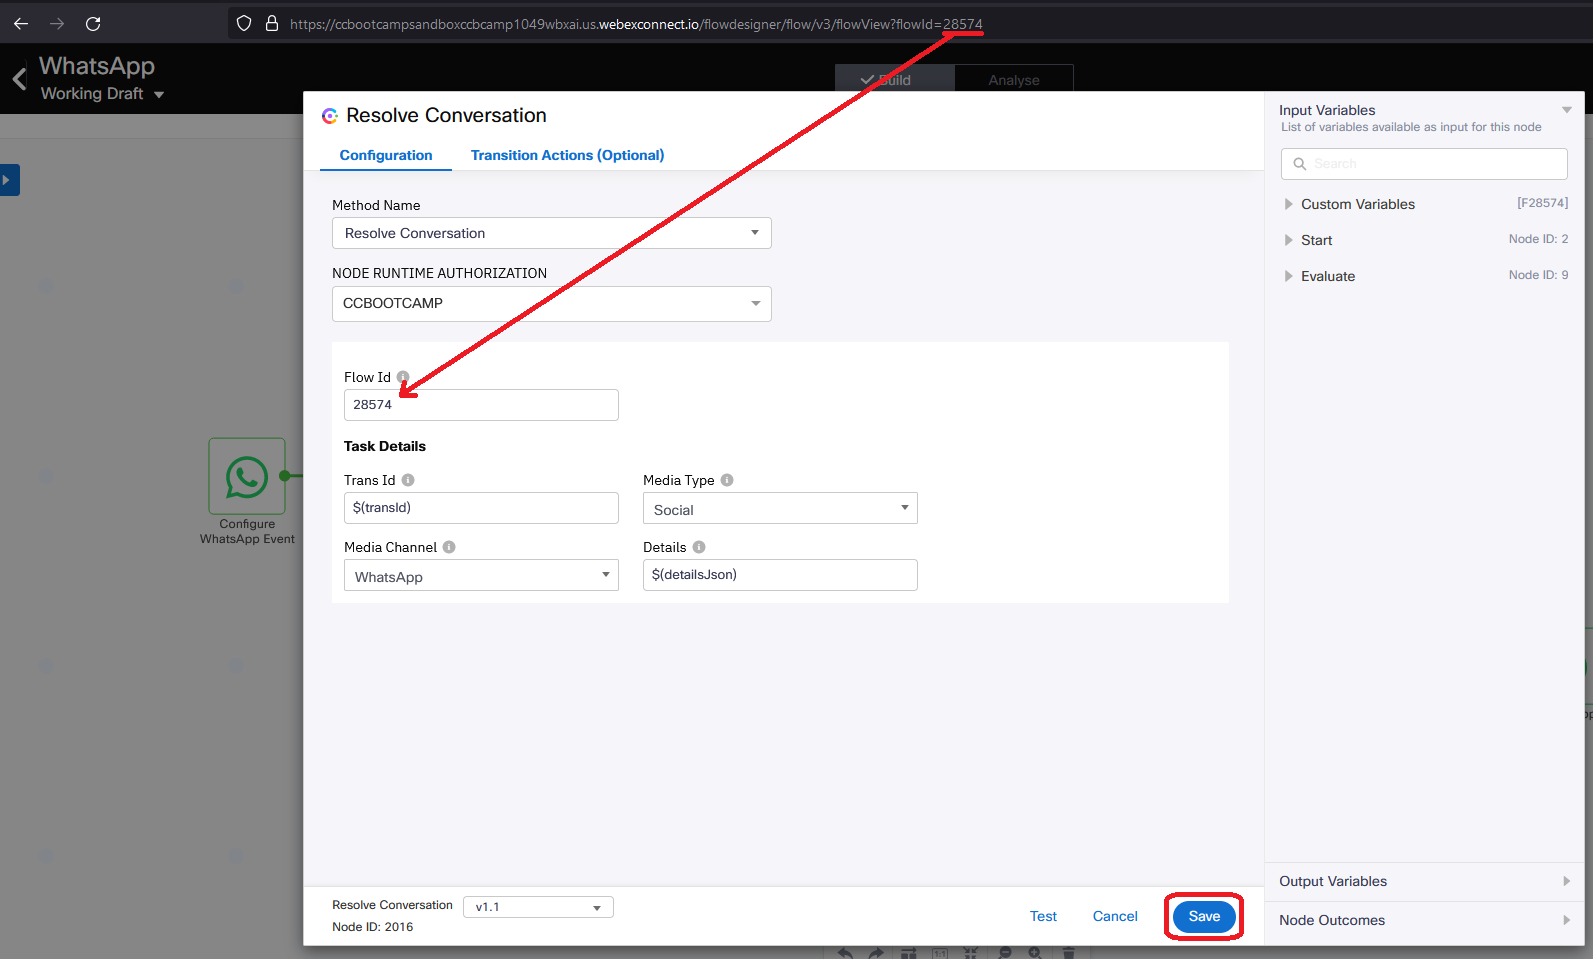
- Finally click on Make Live on top right corner and click Make Live.
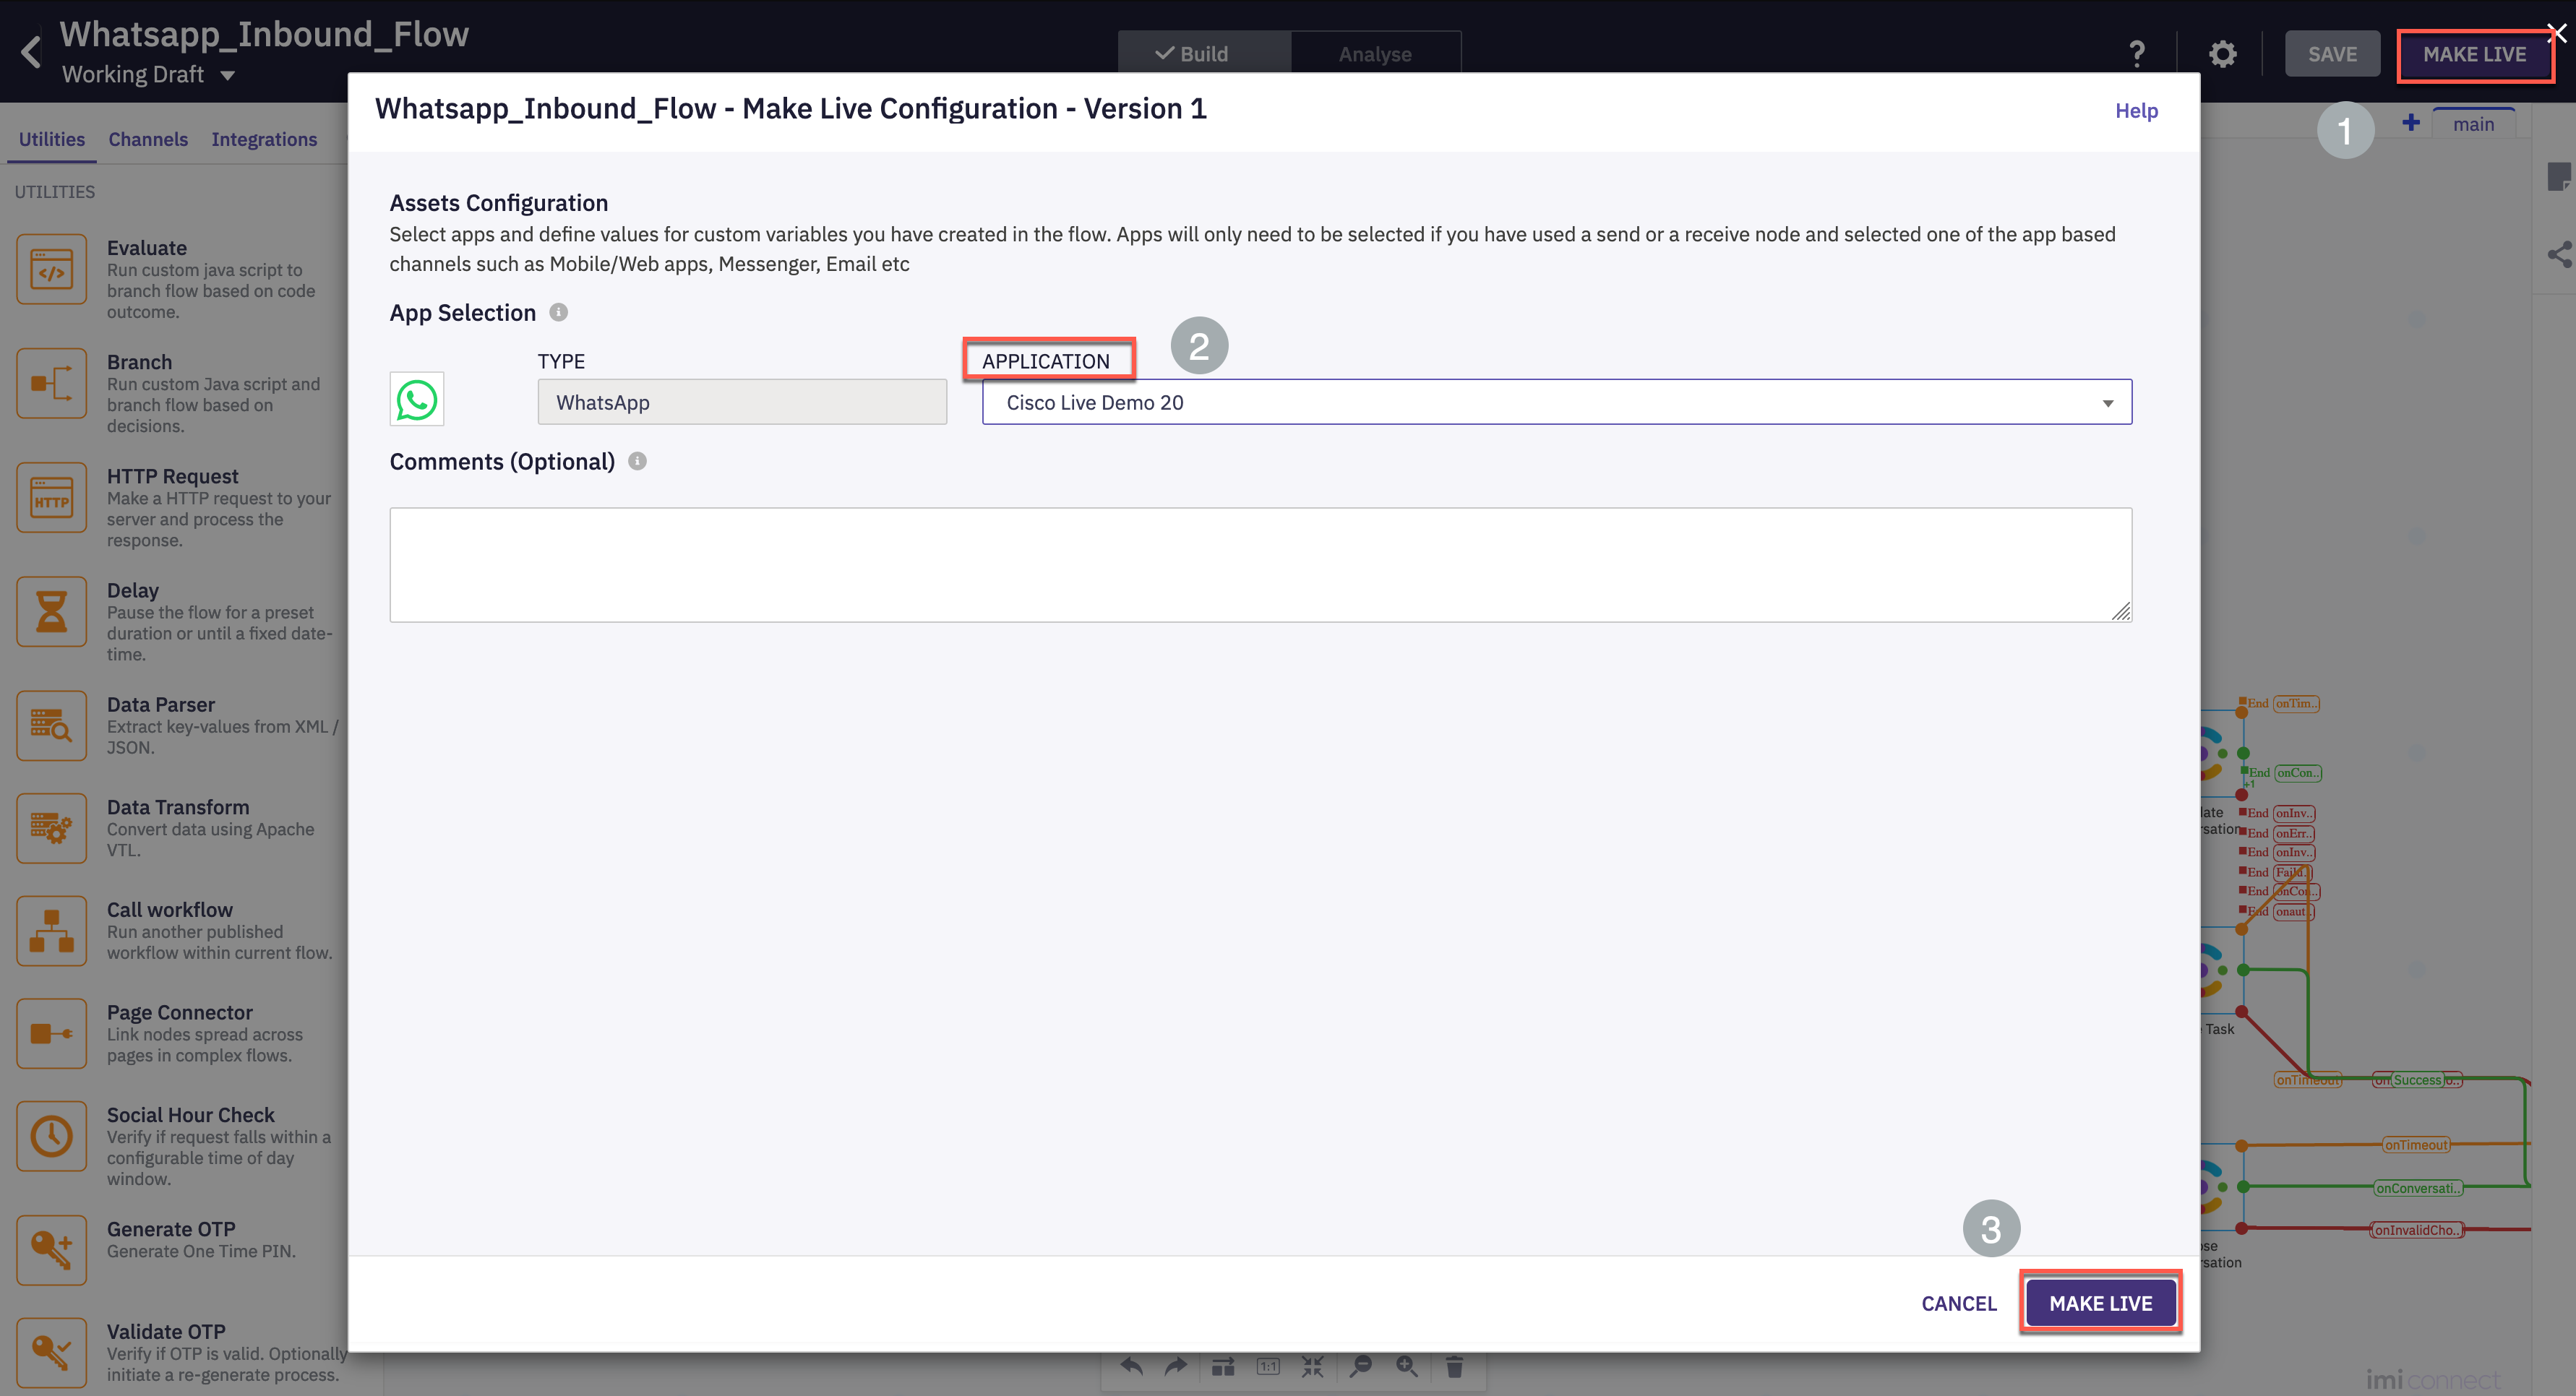
- Wait for 2 minutes and verify that the flow is published successfully & shows Live in state.
5. Verification - send WhatsApp message and accept the request
- Login to the Agent Desktop and make the agent Available.
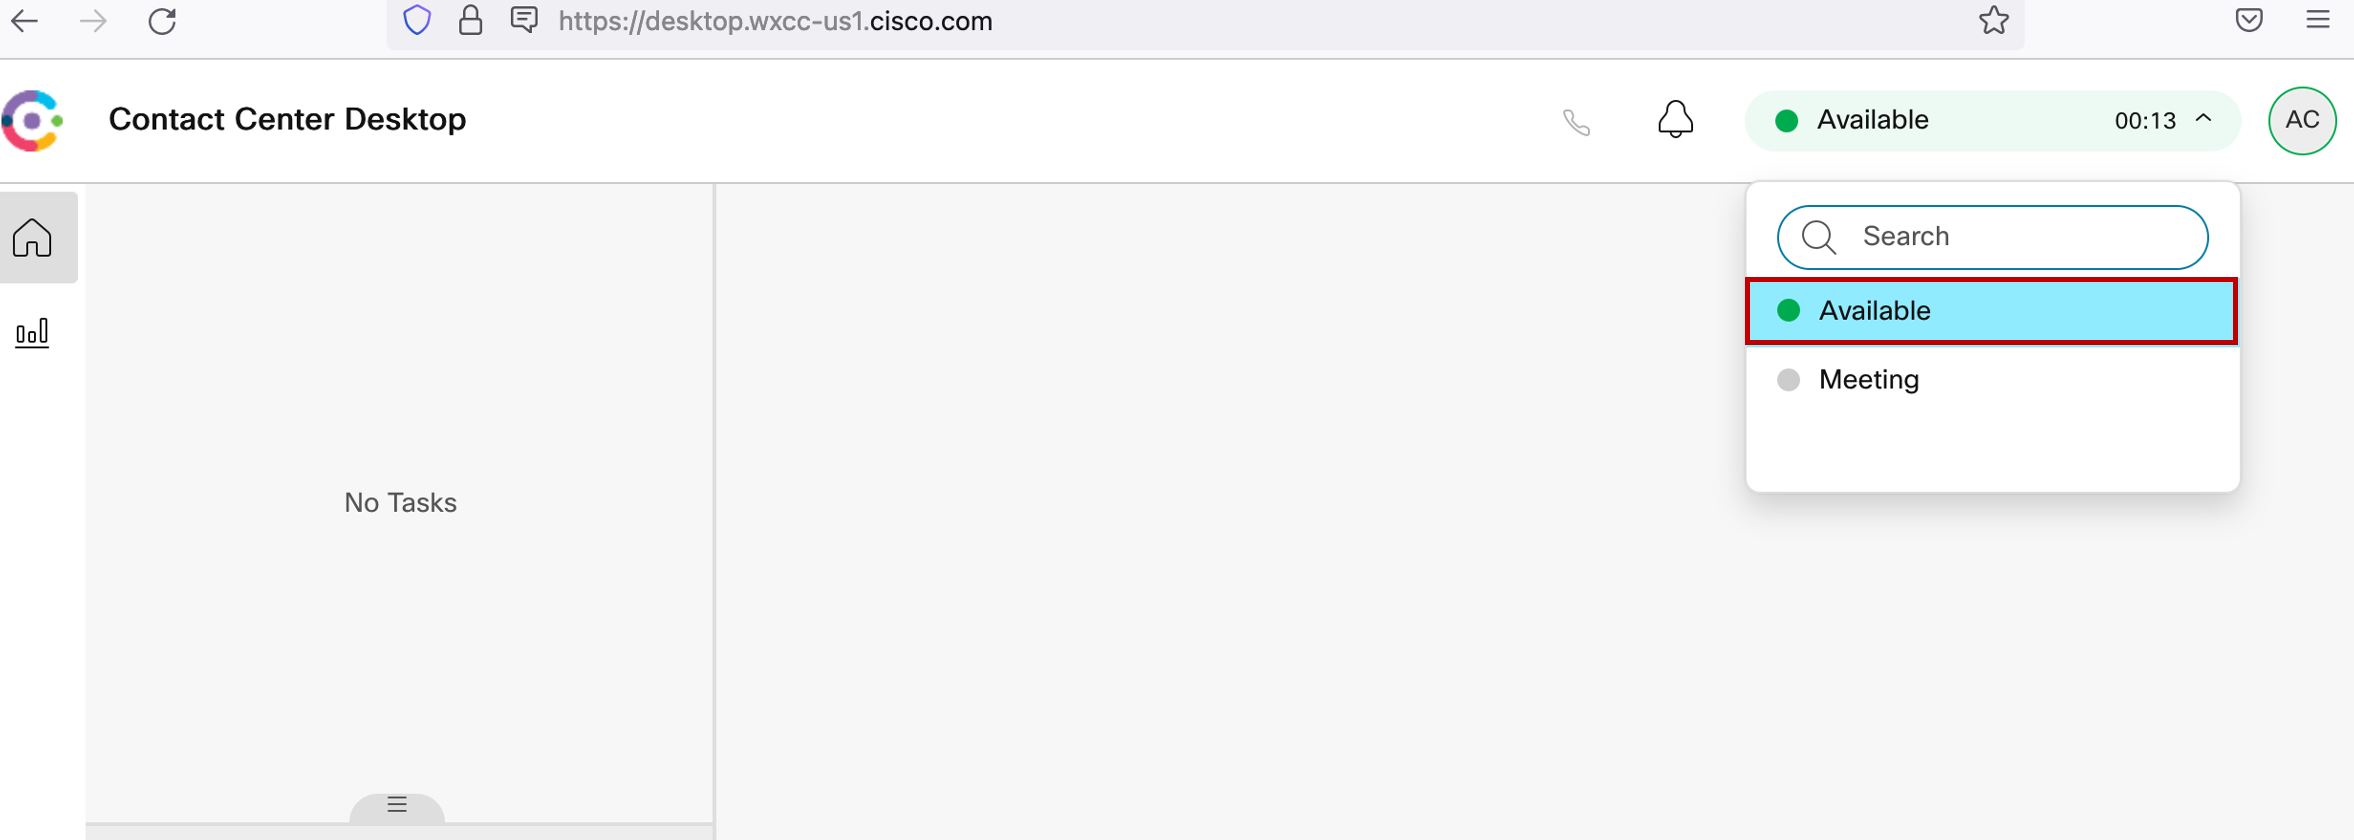
- In your personal mobile phone, add the WhatsApp number configured in the previous step as a new contact. (The screenshot is for reference. Please use the number assigned to your pod)
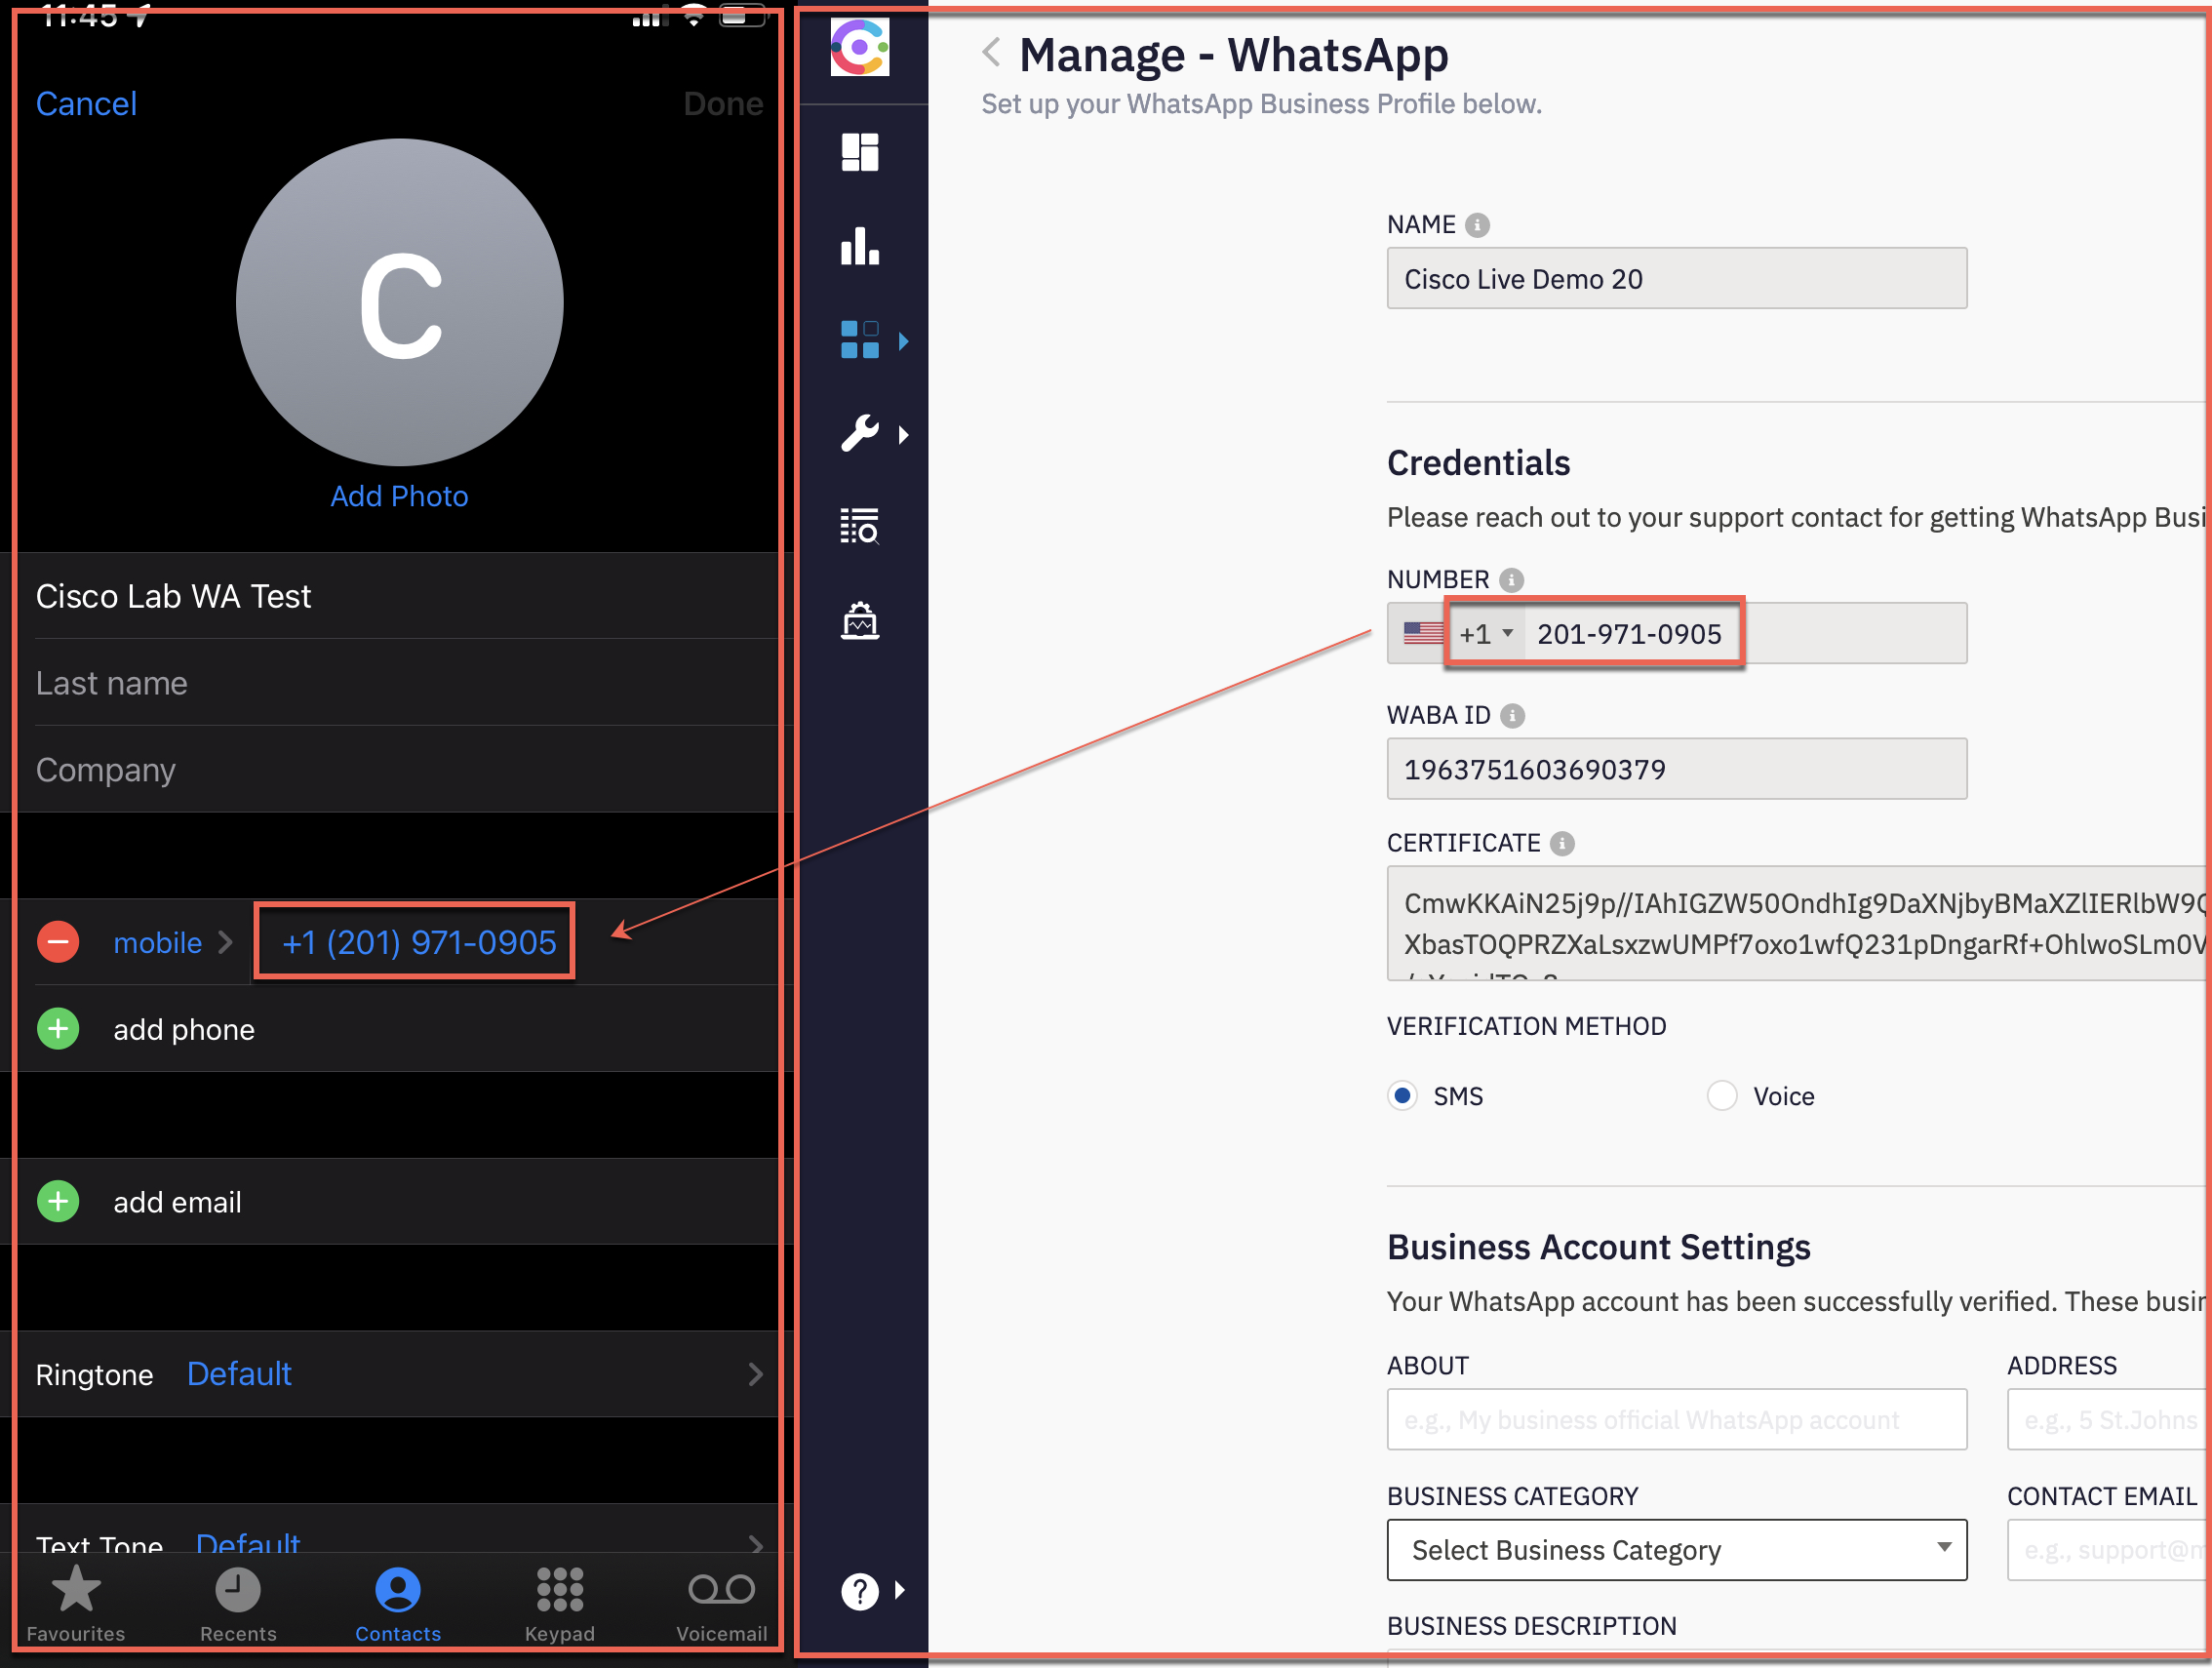
- Open WhatsApp and look up the contact created in the previous step
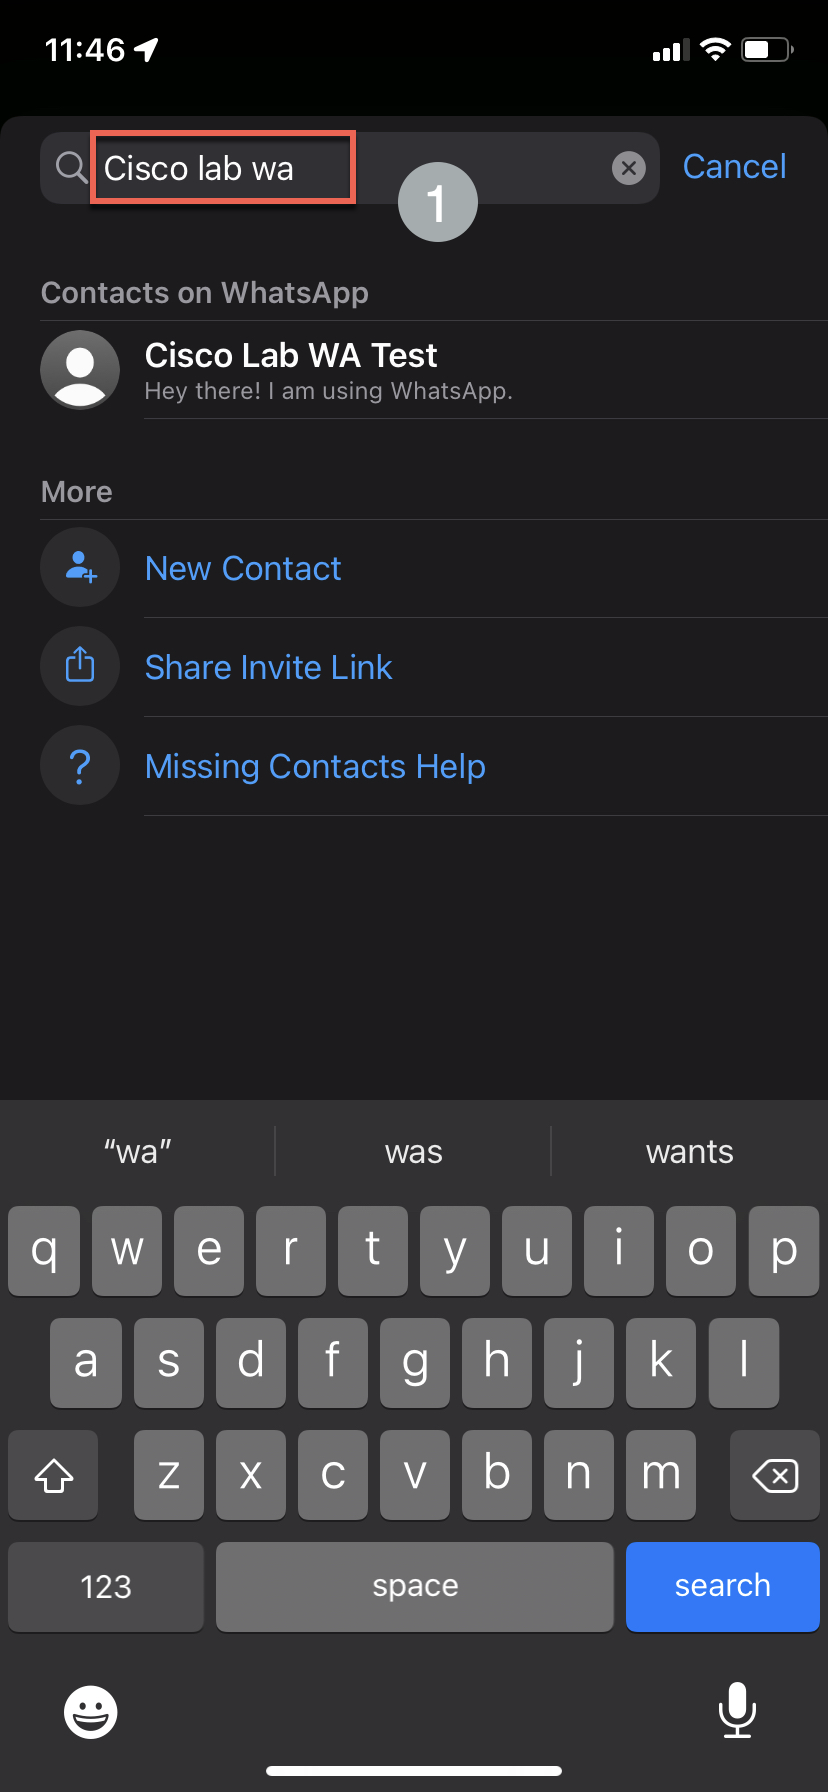
- Send a message to the contact identified in the previous step to initiate the conversation.
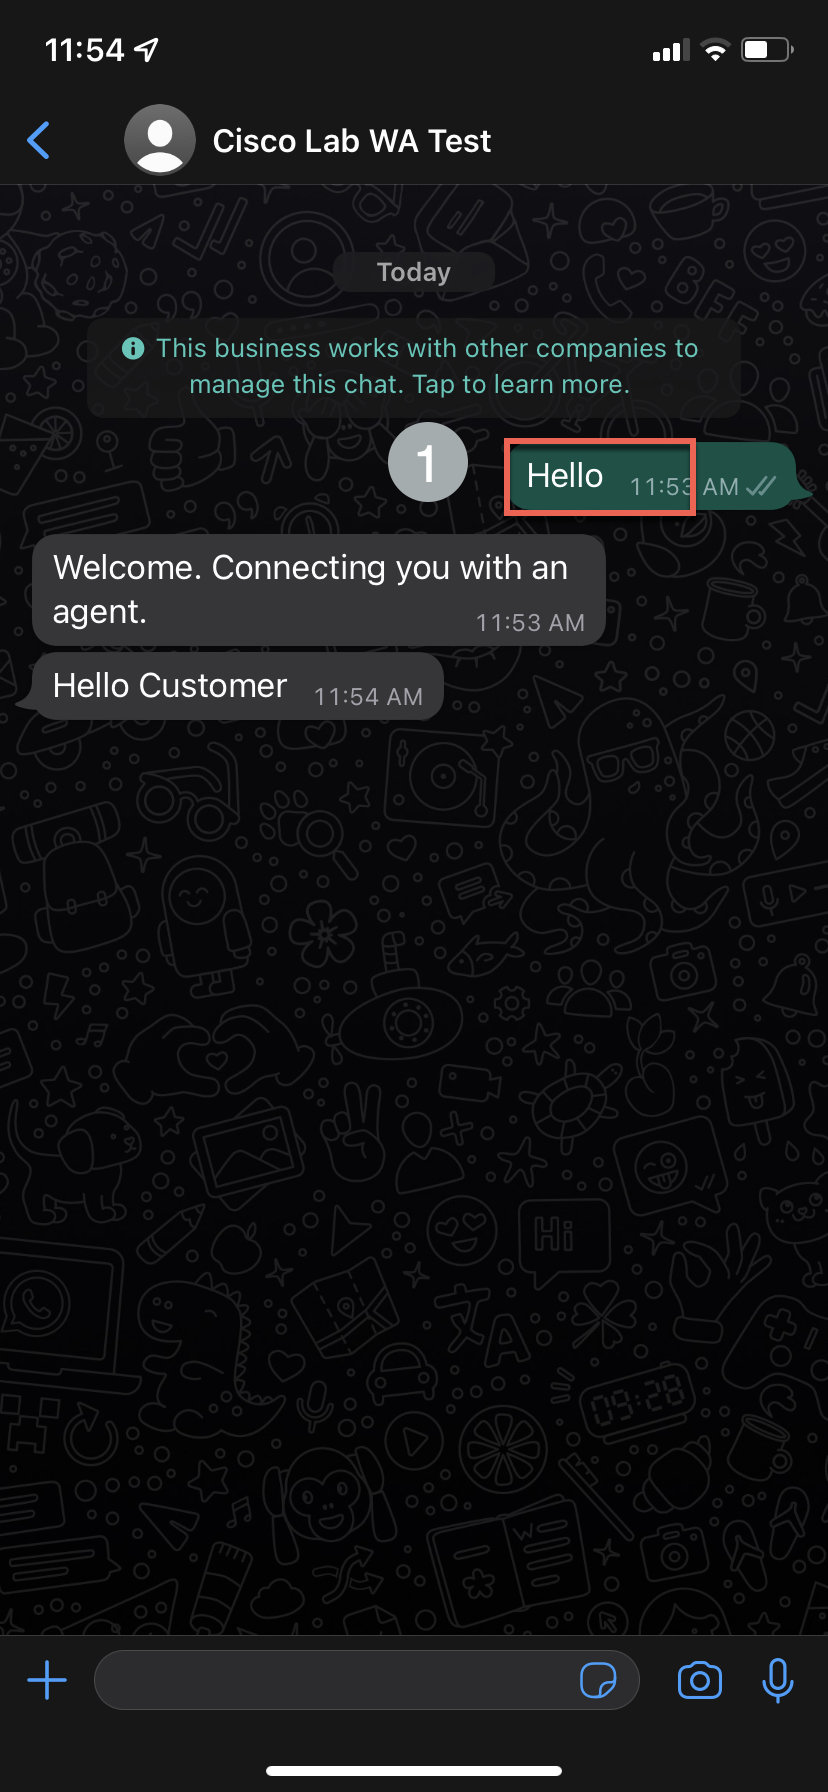
- The WhatsApp contact will be offered to the agent. Click “Accept” to handle the contact.
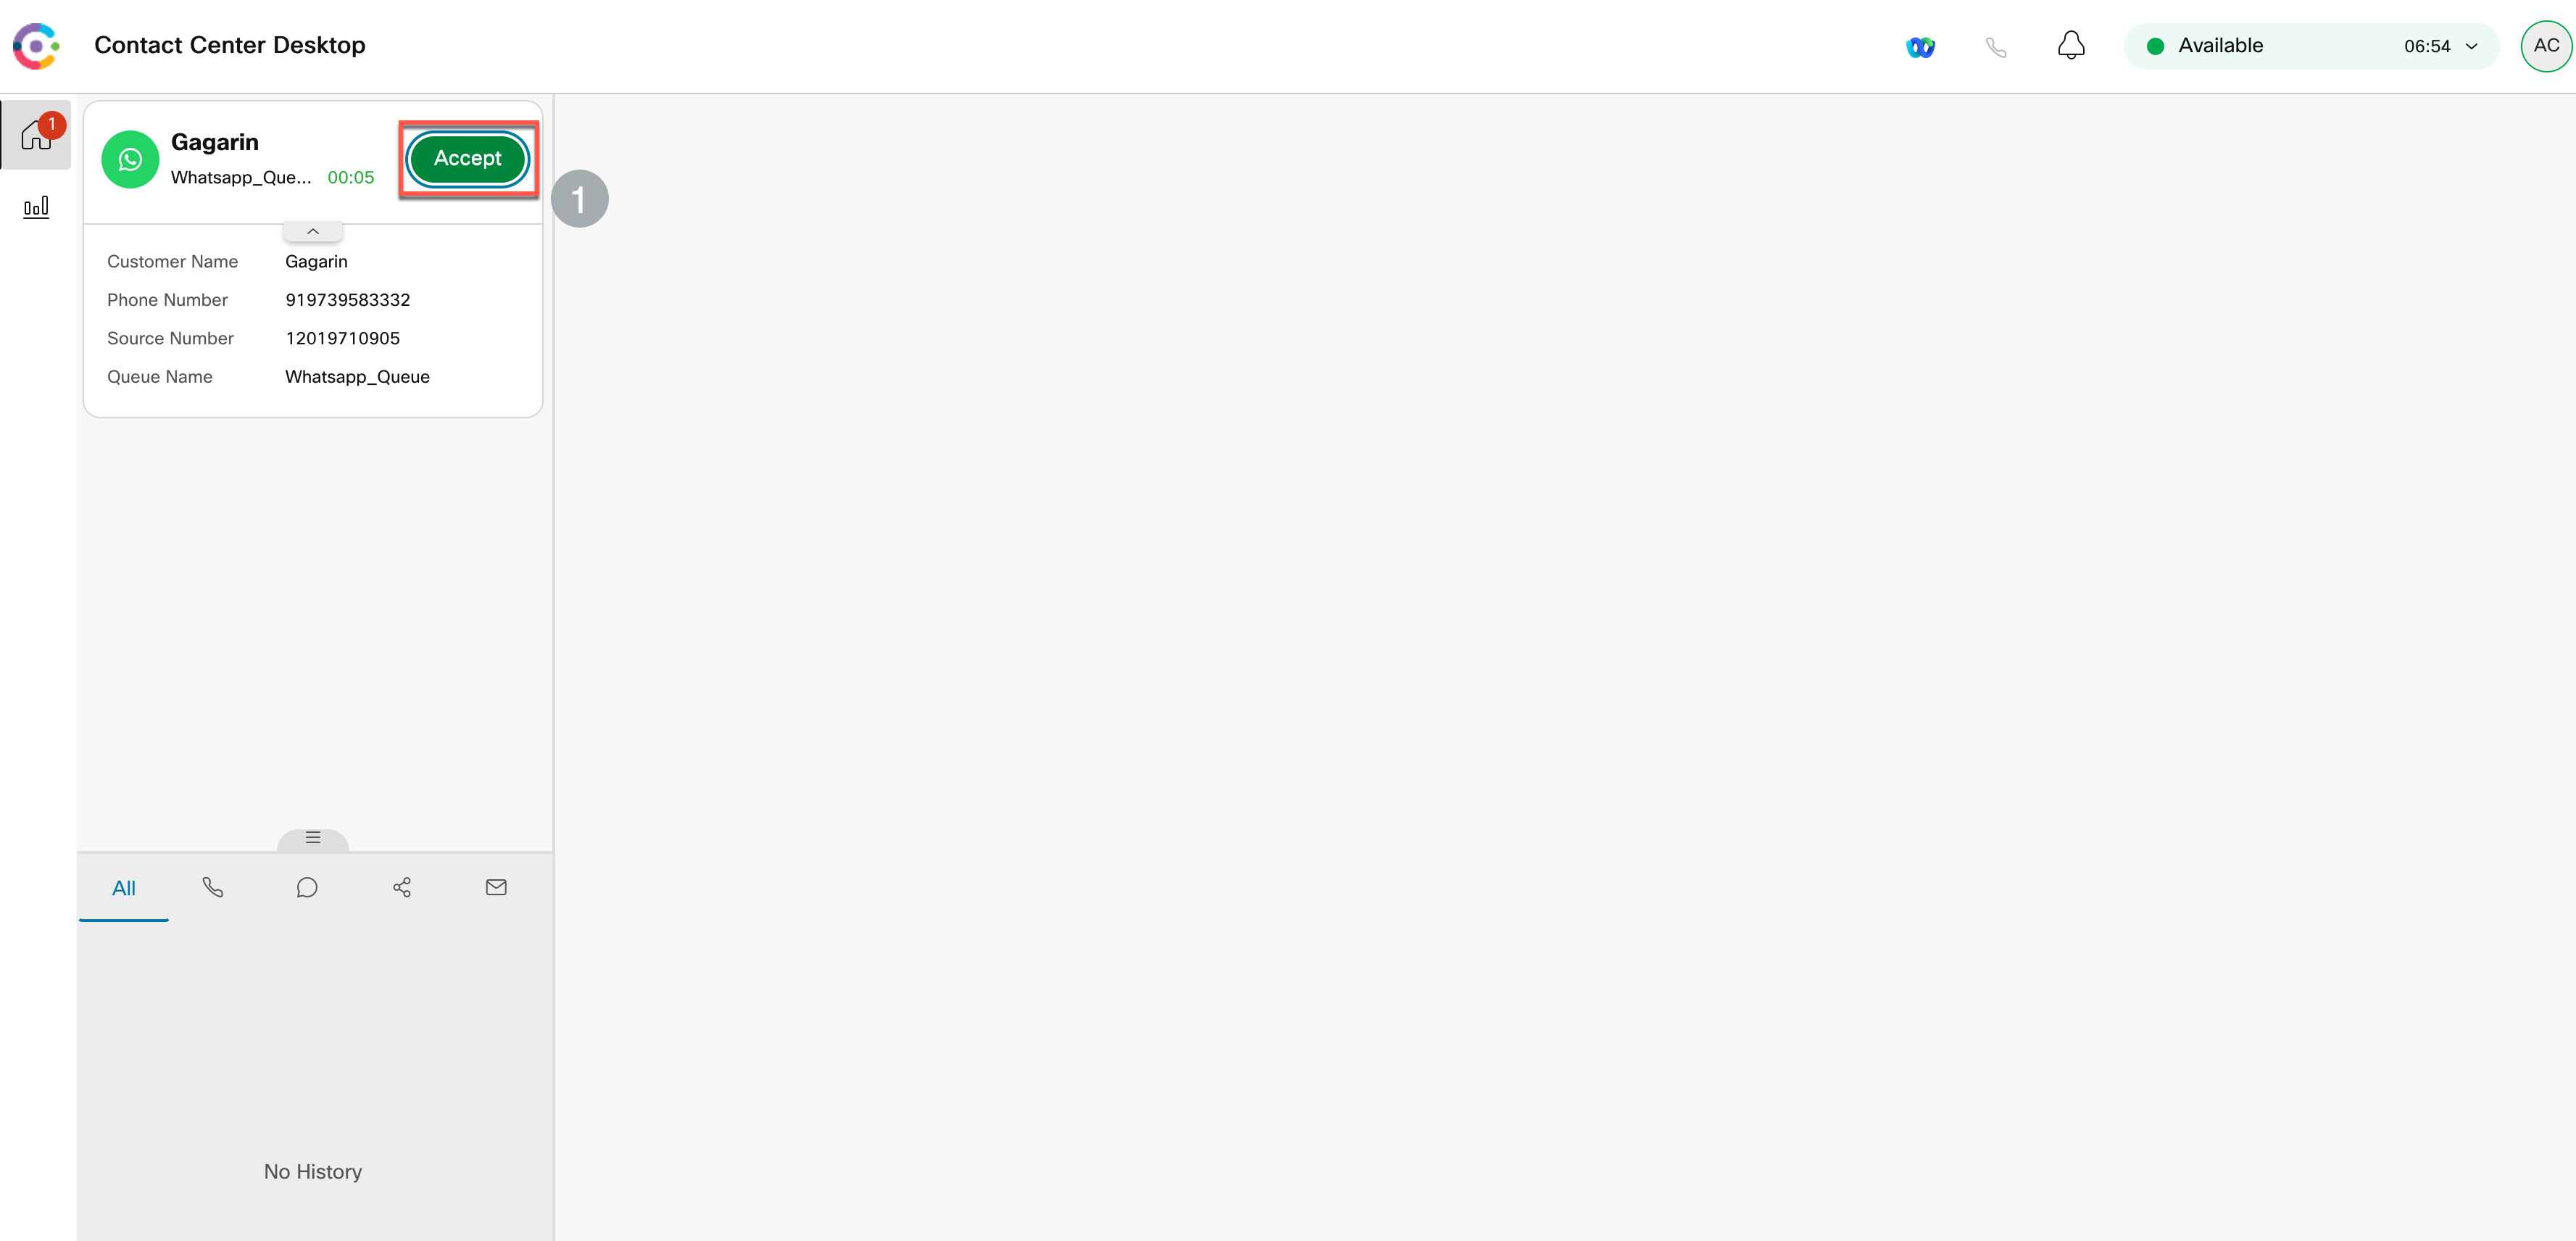
- Type a response and hit send button.
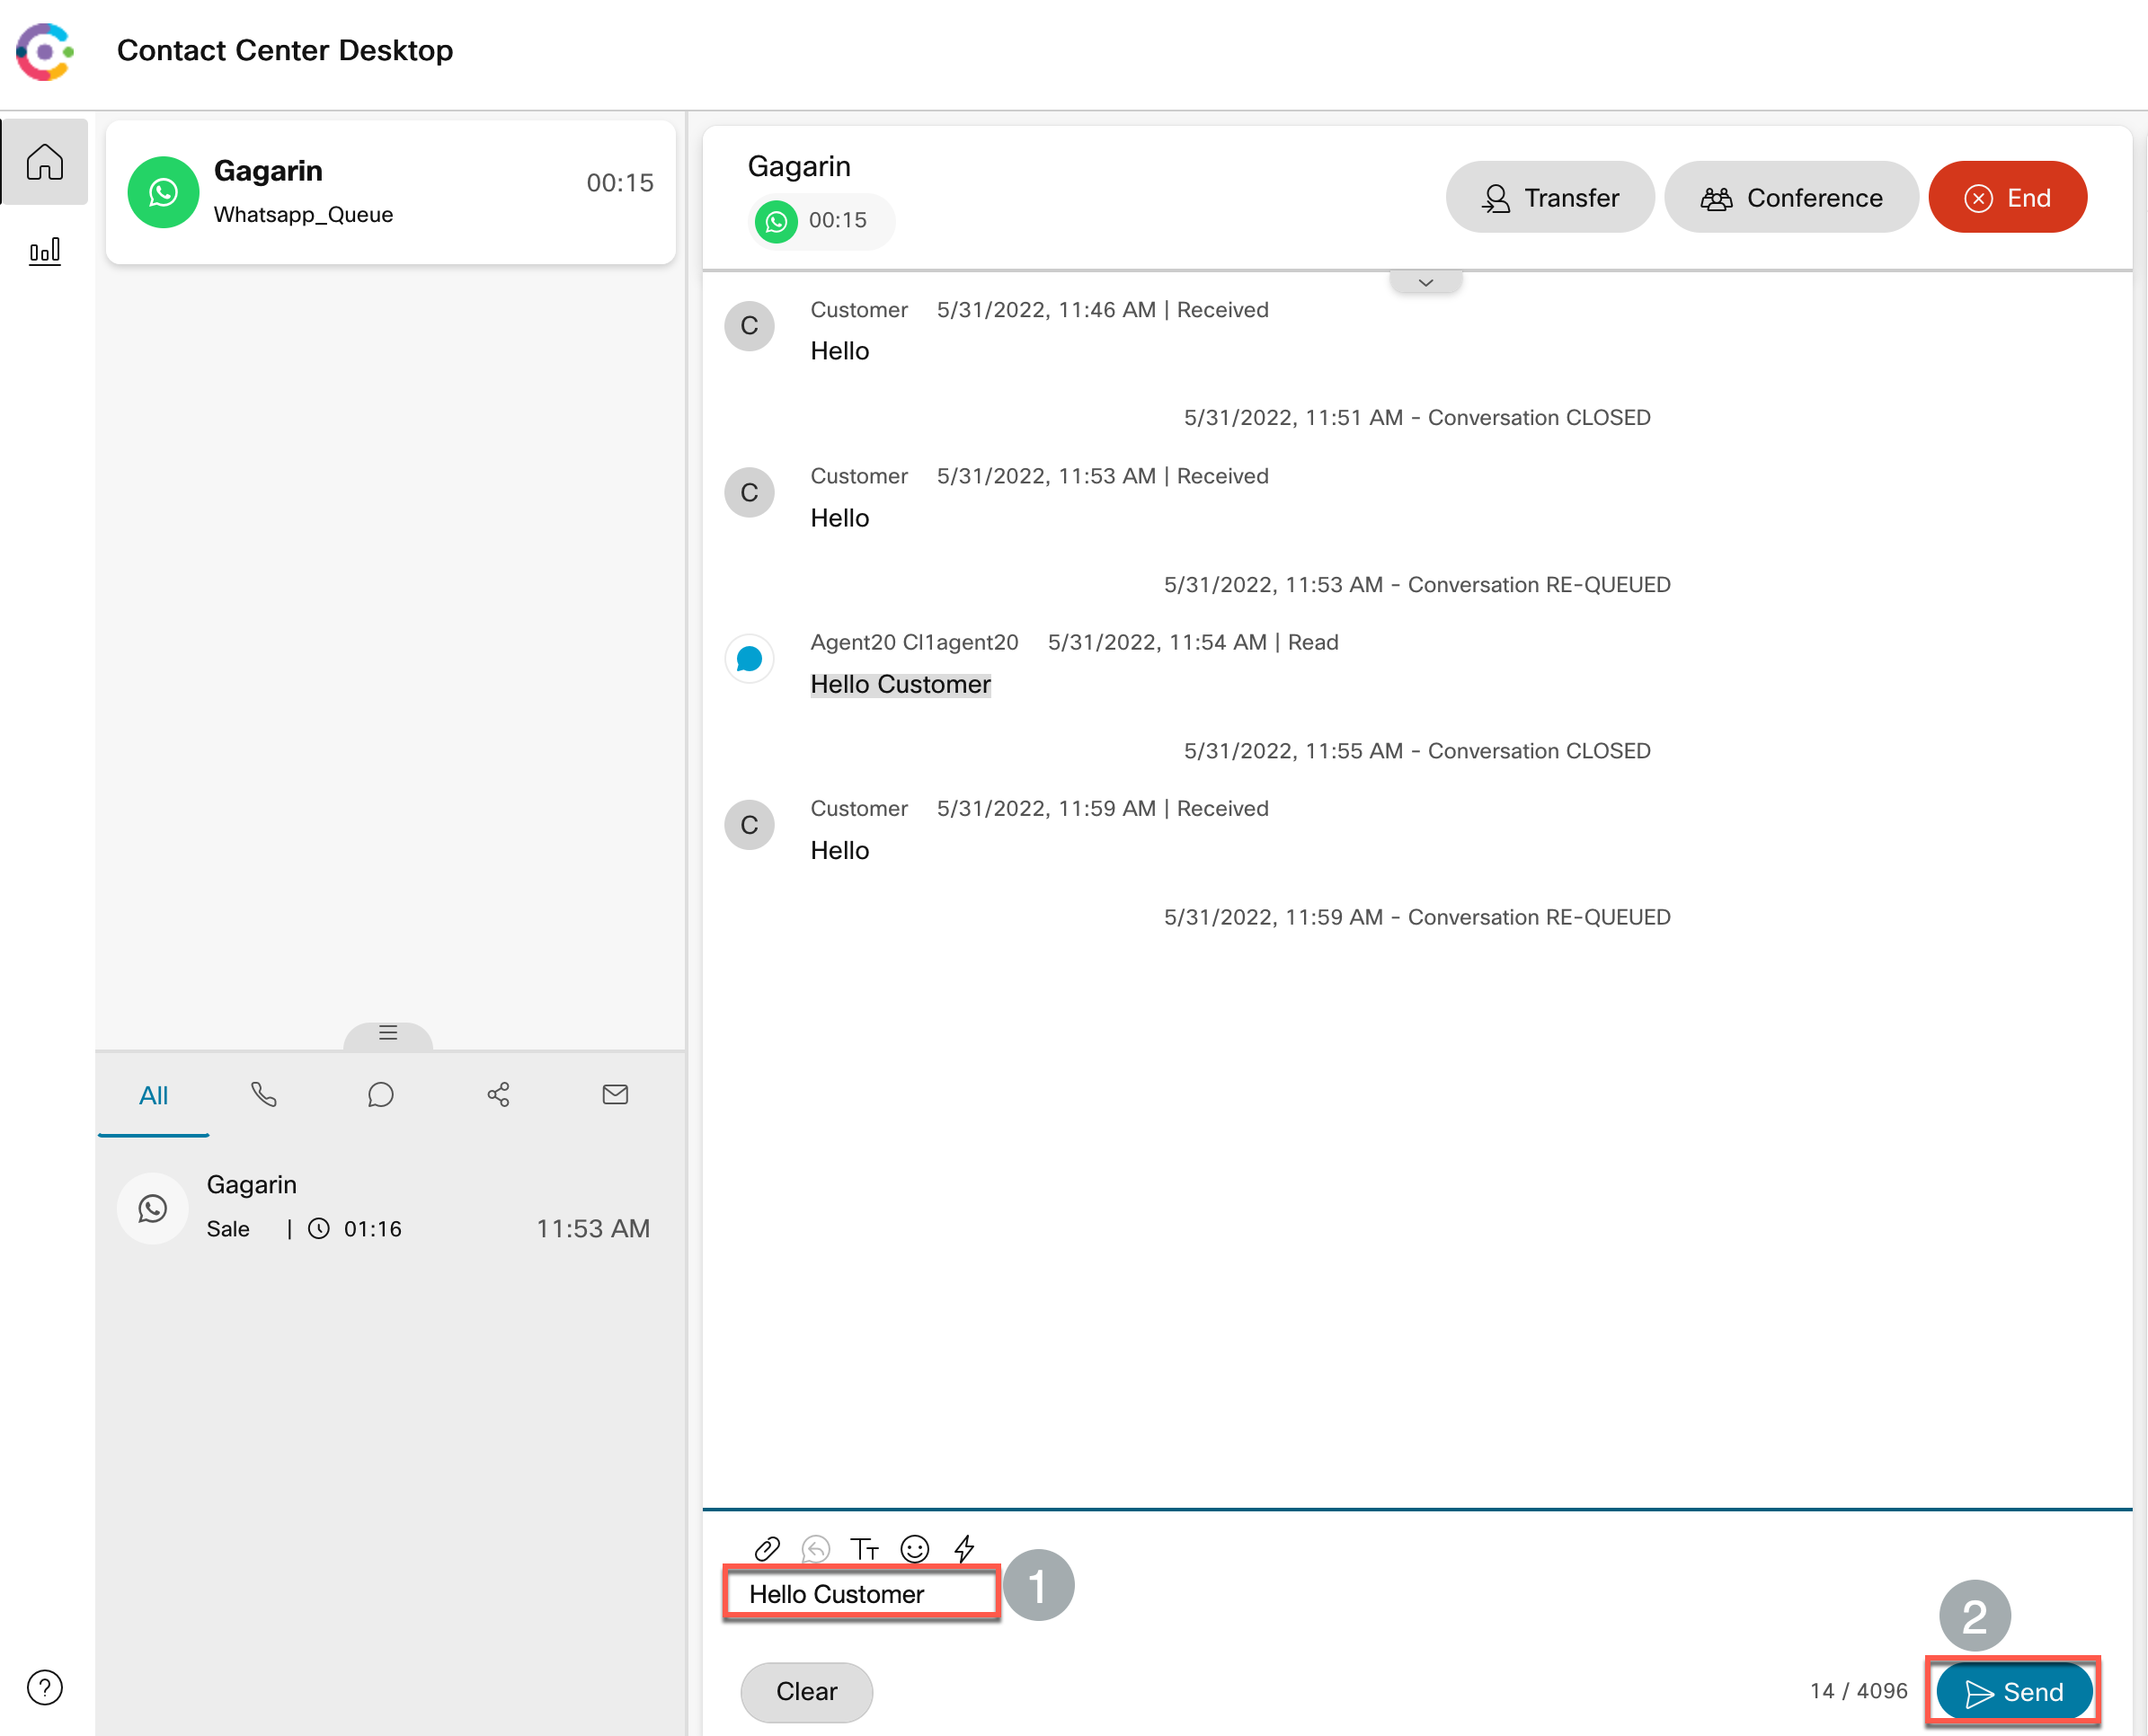
- End the contact
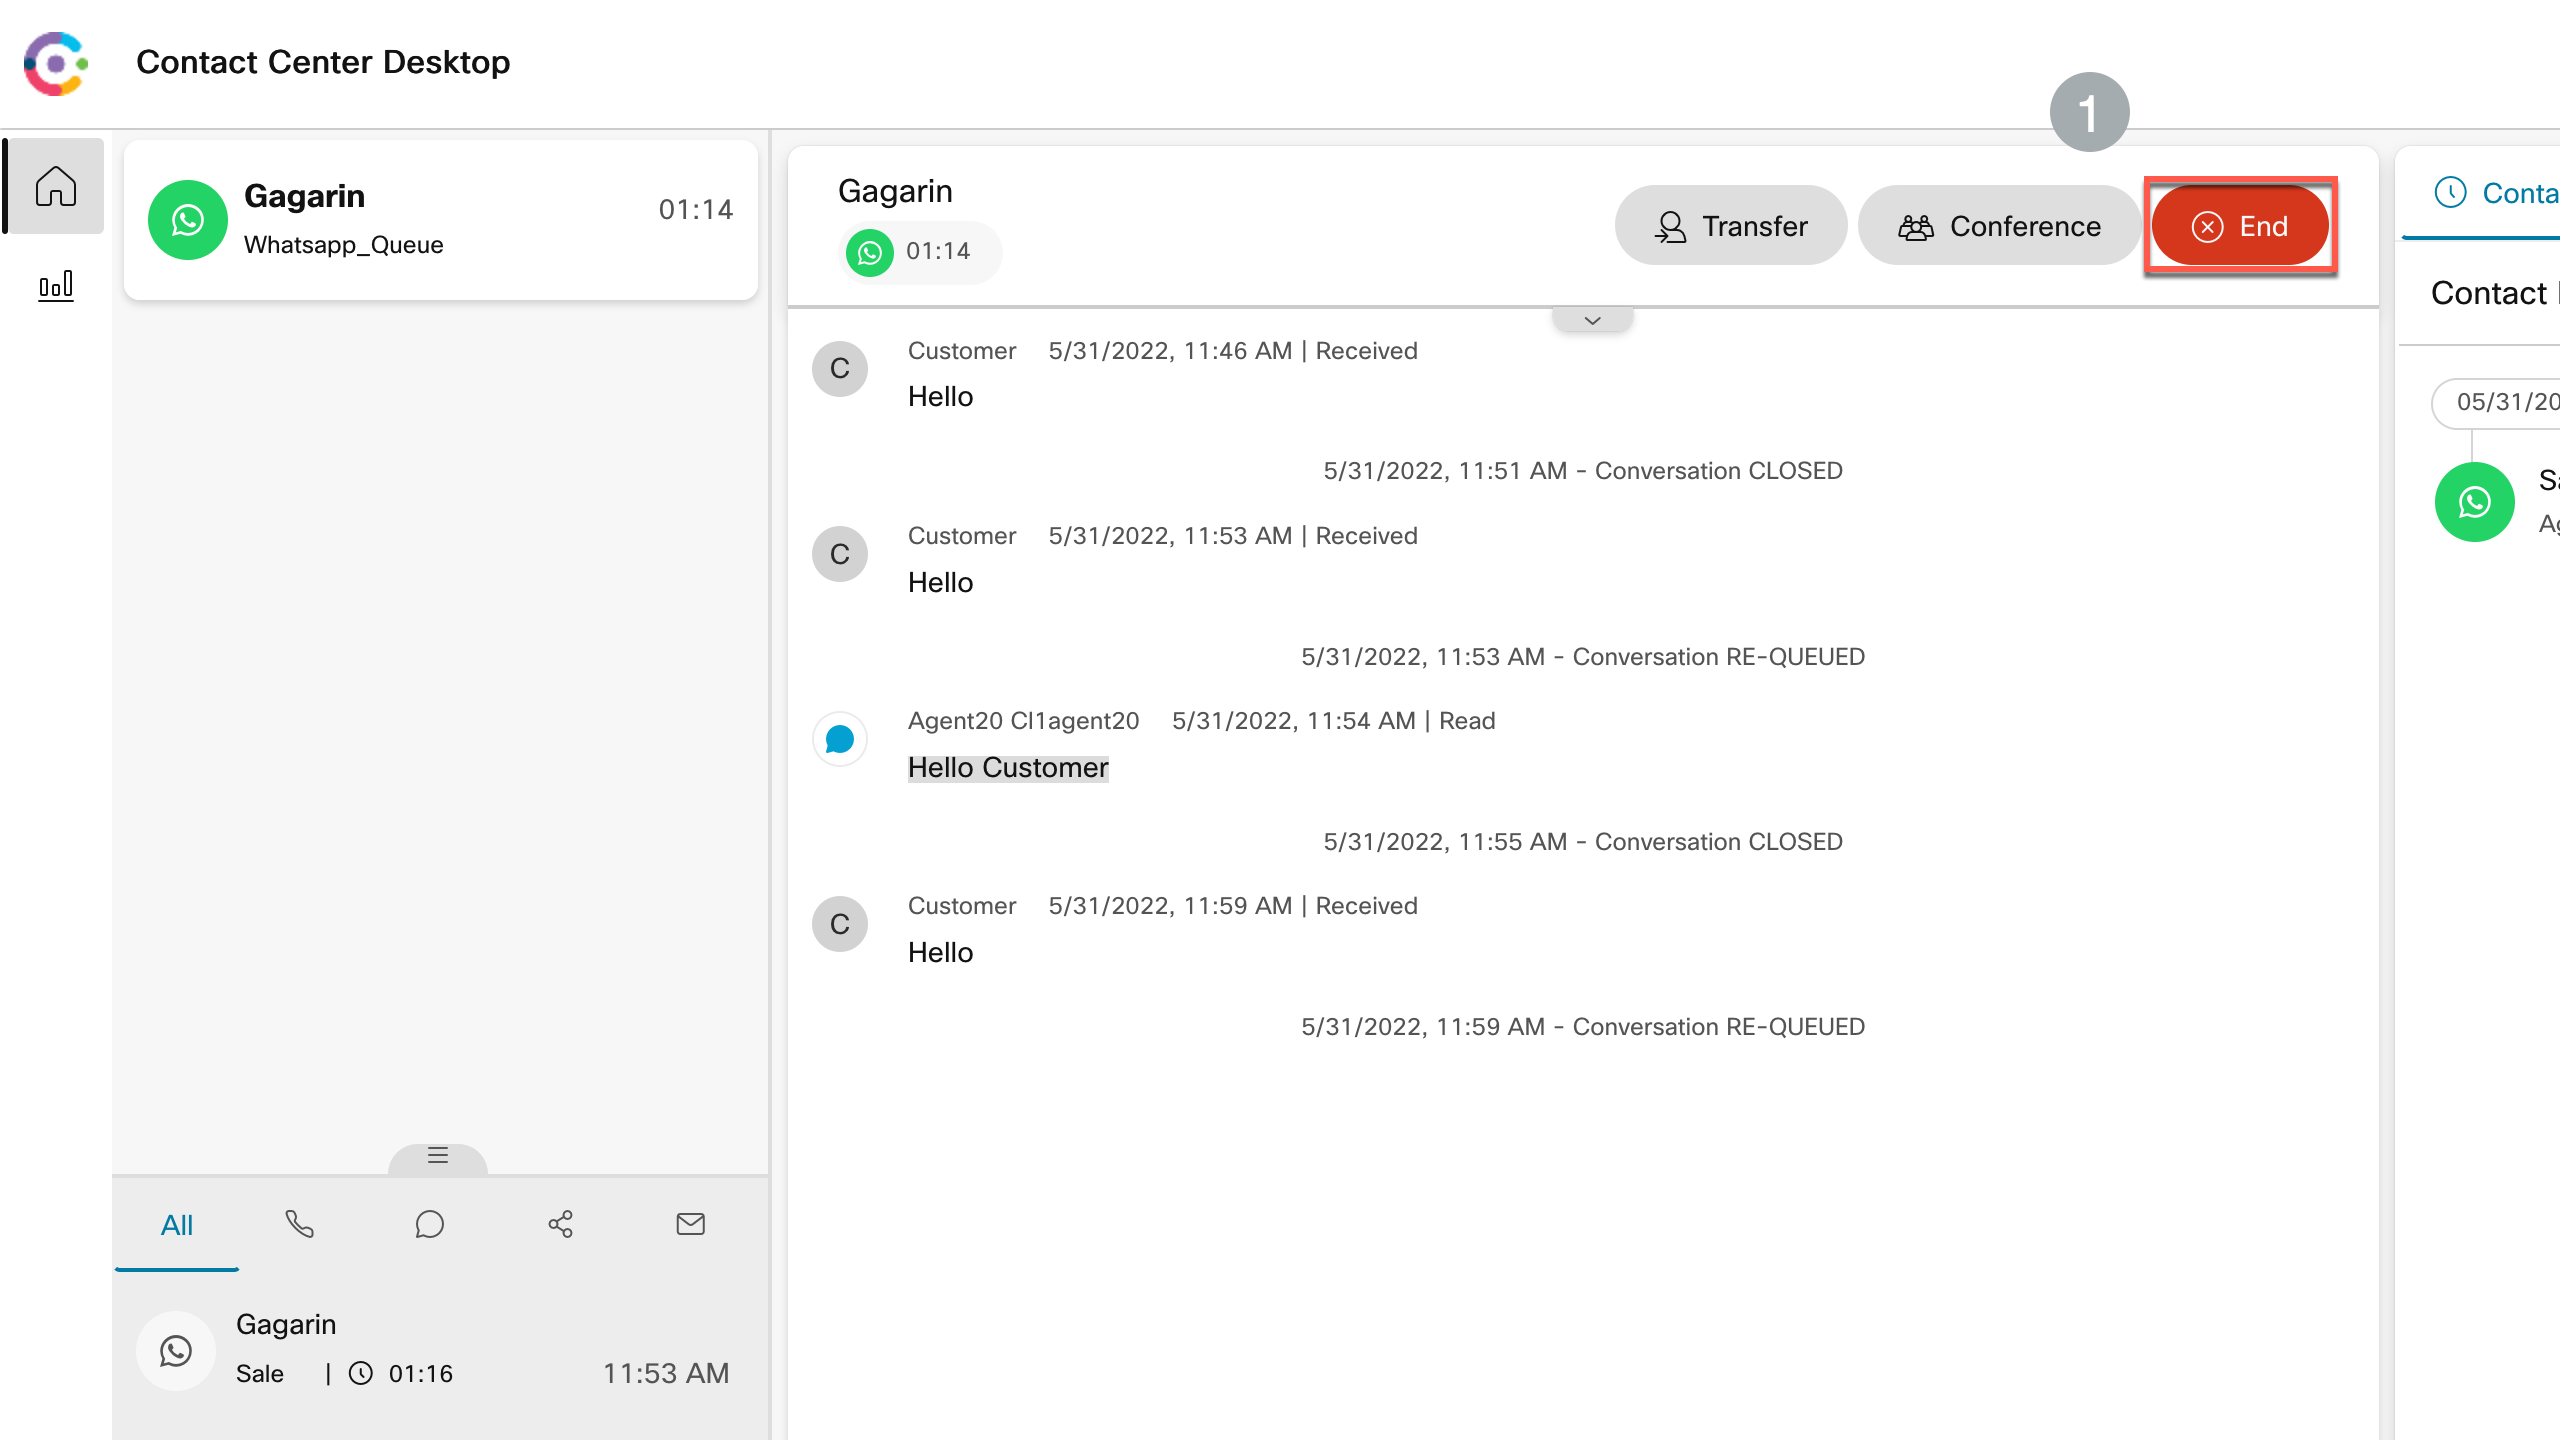
- Add wrap up and close the task.
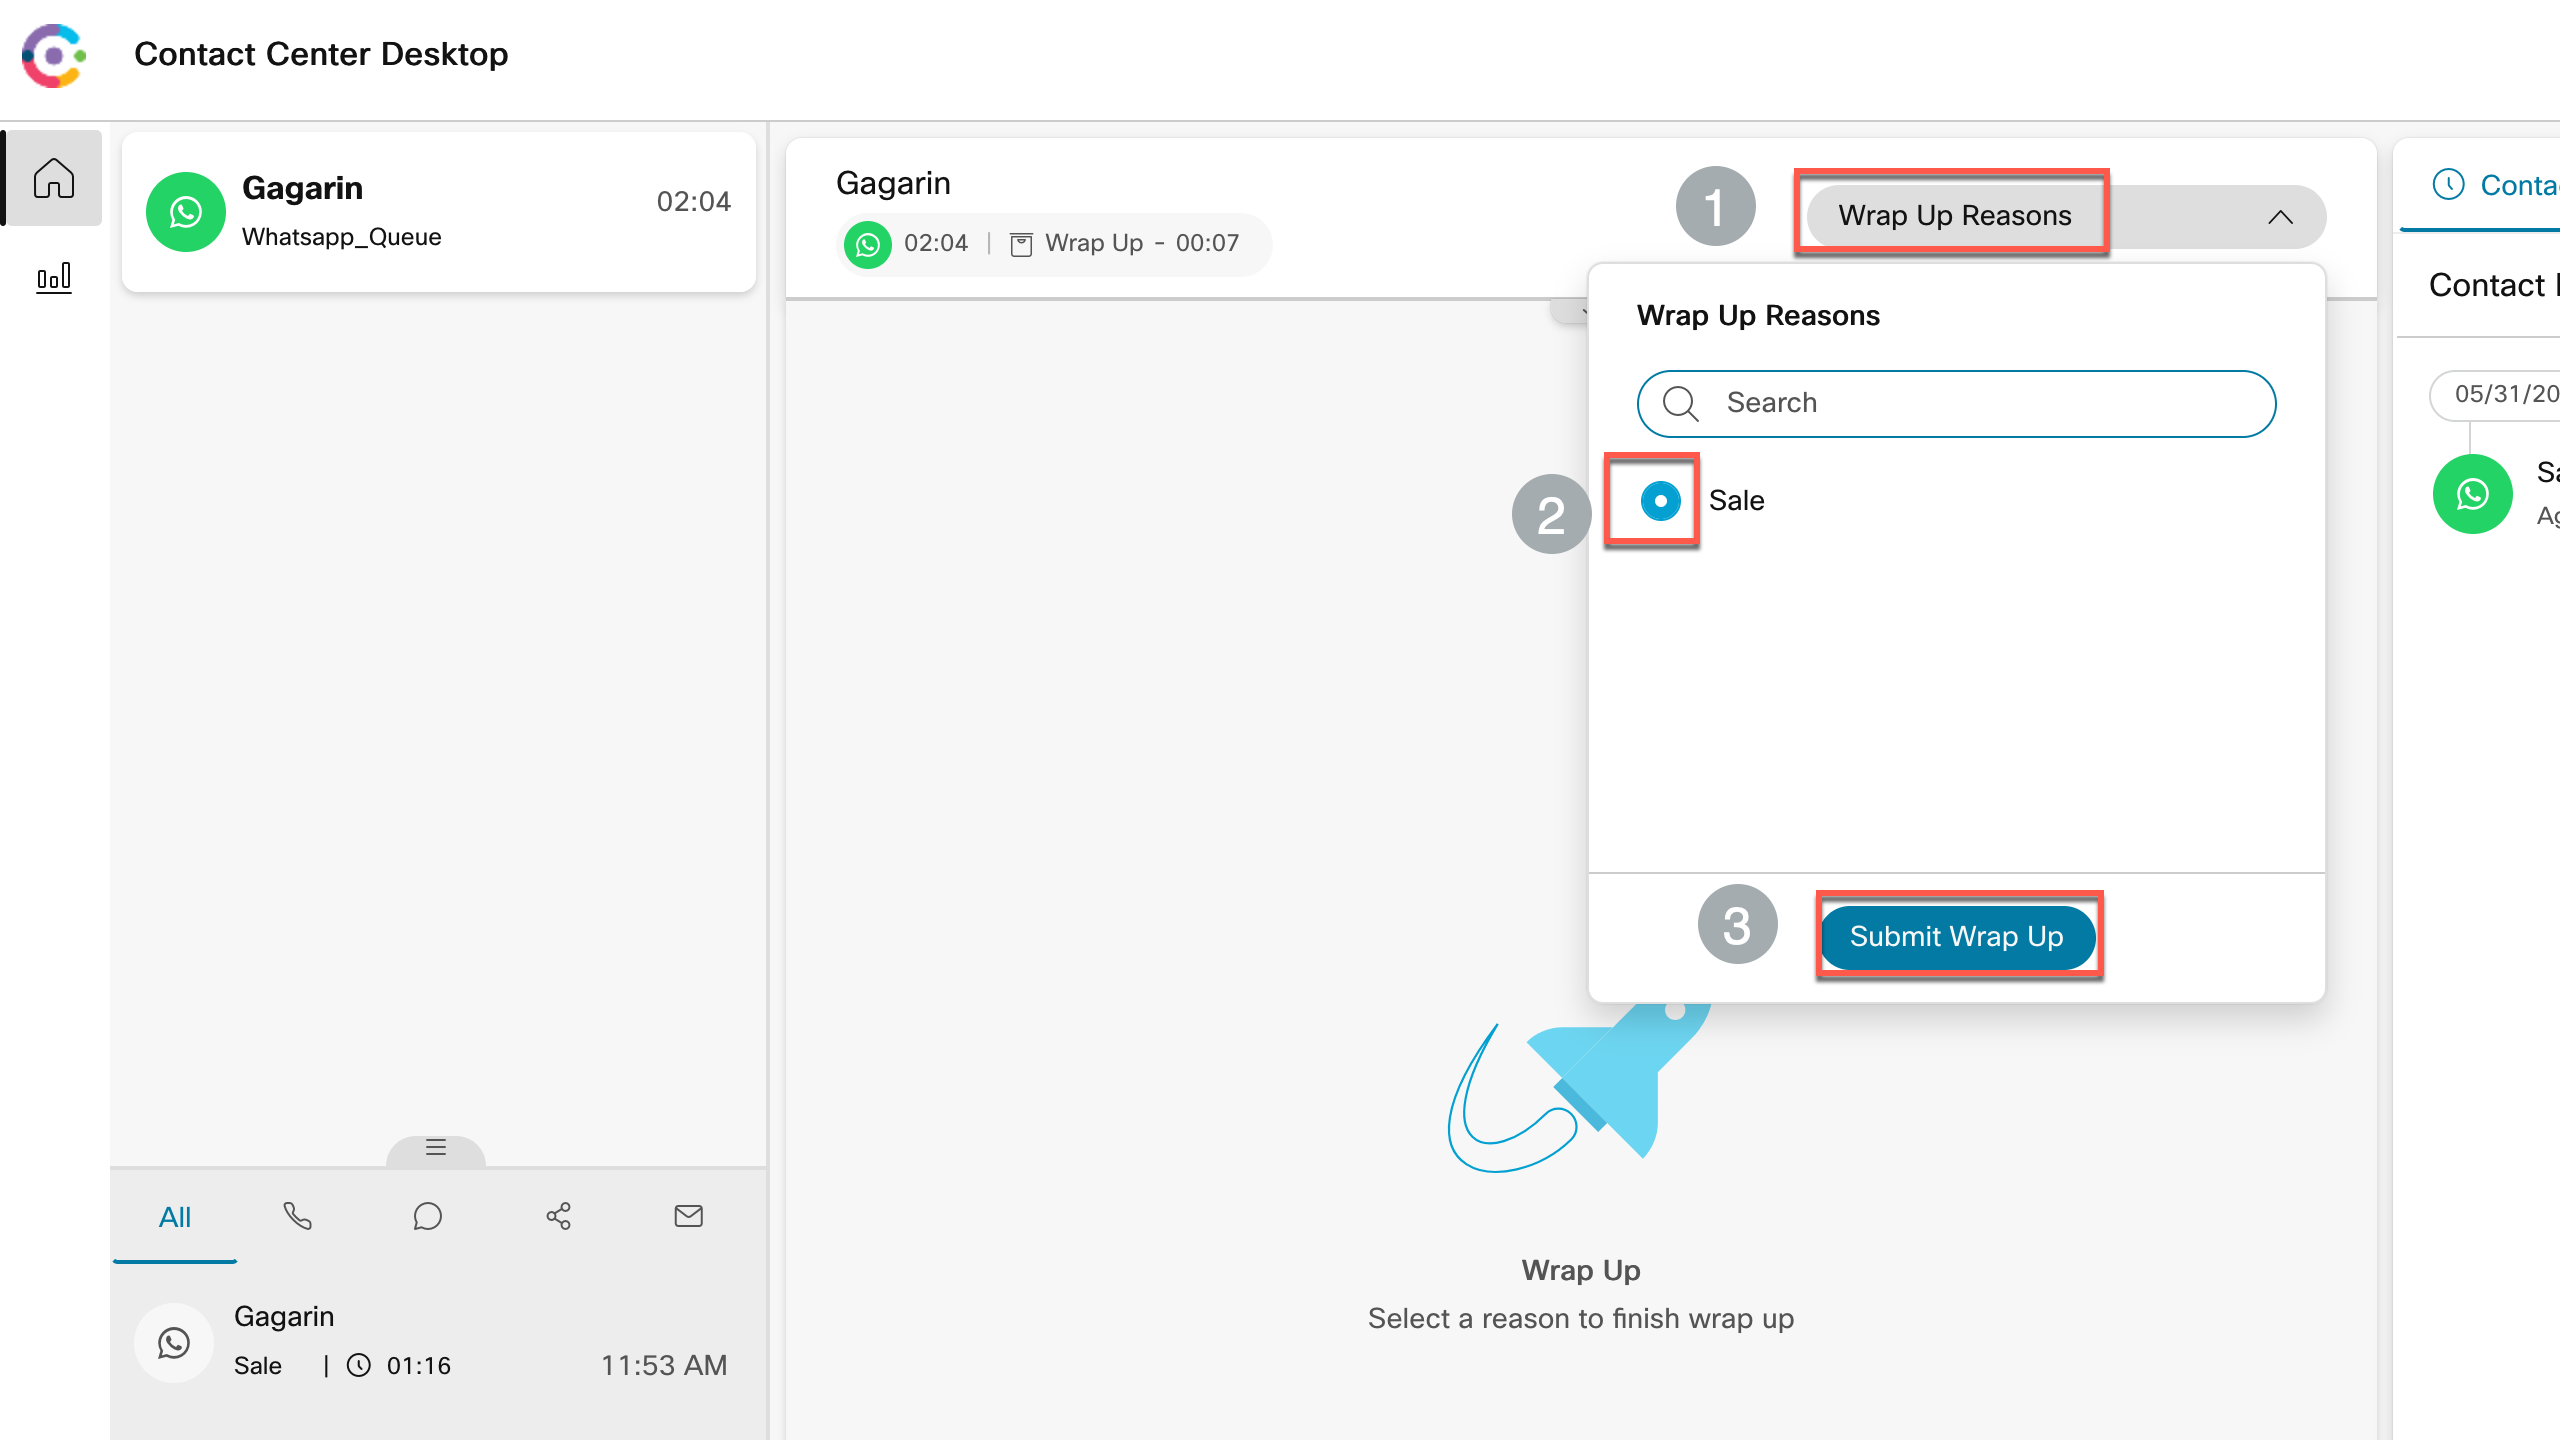
Congratulations, you have completed this section!
Lab.12.12 - Connect Templates
Table of Contents
| Topic | Lab Type | Difficulty Level | Estimated length |
|---|---|---|---|
| Understanding Connect Templates | Read & Understand | EASY | 5 min |
| Create Chat Templates in Connect | Read & Understand | EASY | 5 min |
| Create Email Templates in Connect | Read & Understand | EASY | 5 min |
| Create SMS Templates in Connect | Read & Understand | EASY | 5 min |
Introduction
Lab Objective
This section is designed to introduce Connect templates, which can be used for sending notifications from flows to the end user through various digital channels. In this section you will find configuration steps and examples of use. The goal is to understand the purpose of the most popular templates.
1. Understanding Connect Templates
Connect templates can be configured on the platform and used within flows. Here are few key points to note about Connect templates which provide better understanding of the feature:
- Templates can be referenced in various flows.
- Templates can be used to send messages from flow to the end users through various digital channels.
- Template text can include simple text, URLs or forms.
Each kind of template has different set of parameters depending on the type of digital channel which it is intended for.
- To create a template for any kind of digital channel, login to Connect Portal, then go to Tools -> Templates and press Add new Template button.
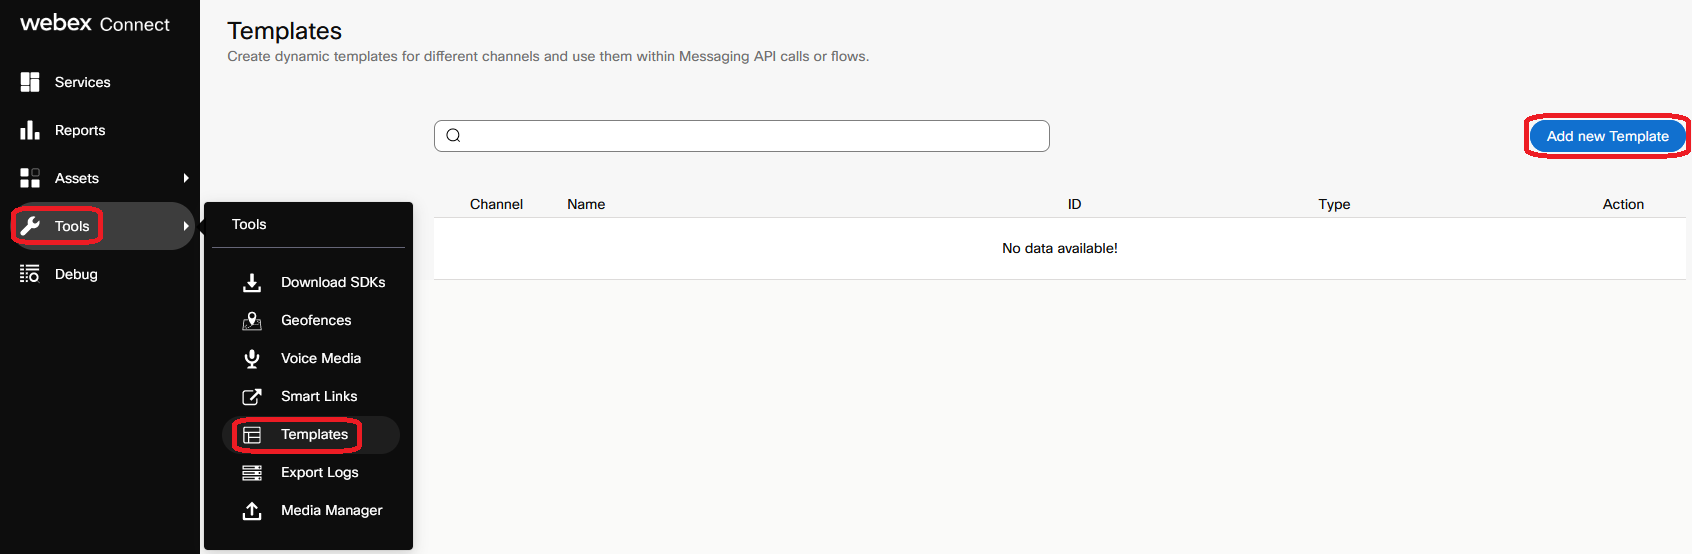
- You will be redirected to Manage Template window where you can select Channel and then provide other parameters of the template.
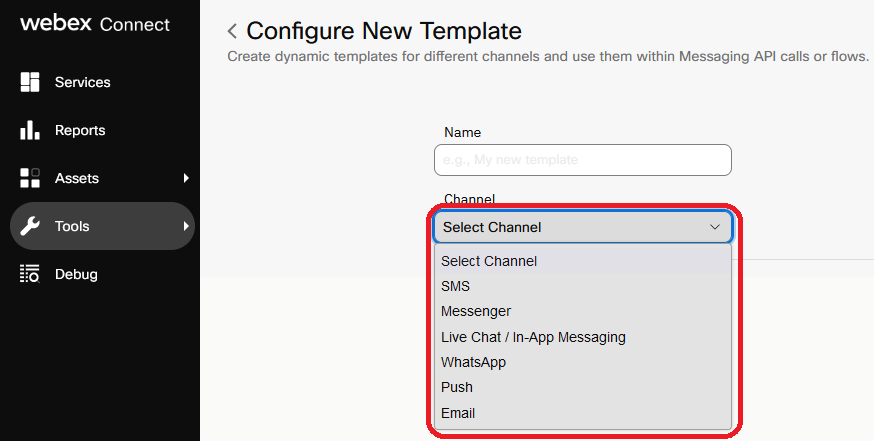
2. Create Chat Templates in Connect
Let’s create Chat Form template which can be used to request initial information about the end user just after chat is initiated. This process is decribed in details in Create Chat Flow lab.
- Select Channel as Live Chat / In-App Messaging in Manage Template window to create chat template. Then provide Name, Message Type as Form, Title, and press Add Field button to add fields to the form. Once all necessary fields have been added, you can see the entire form in Preview section on the right. Save the template after the form is constructed.
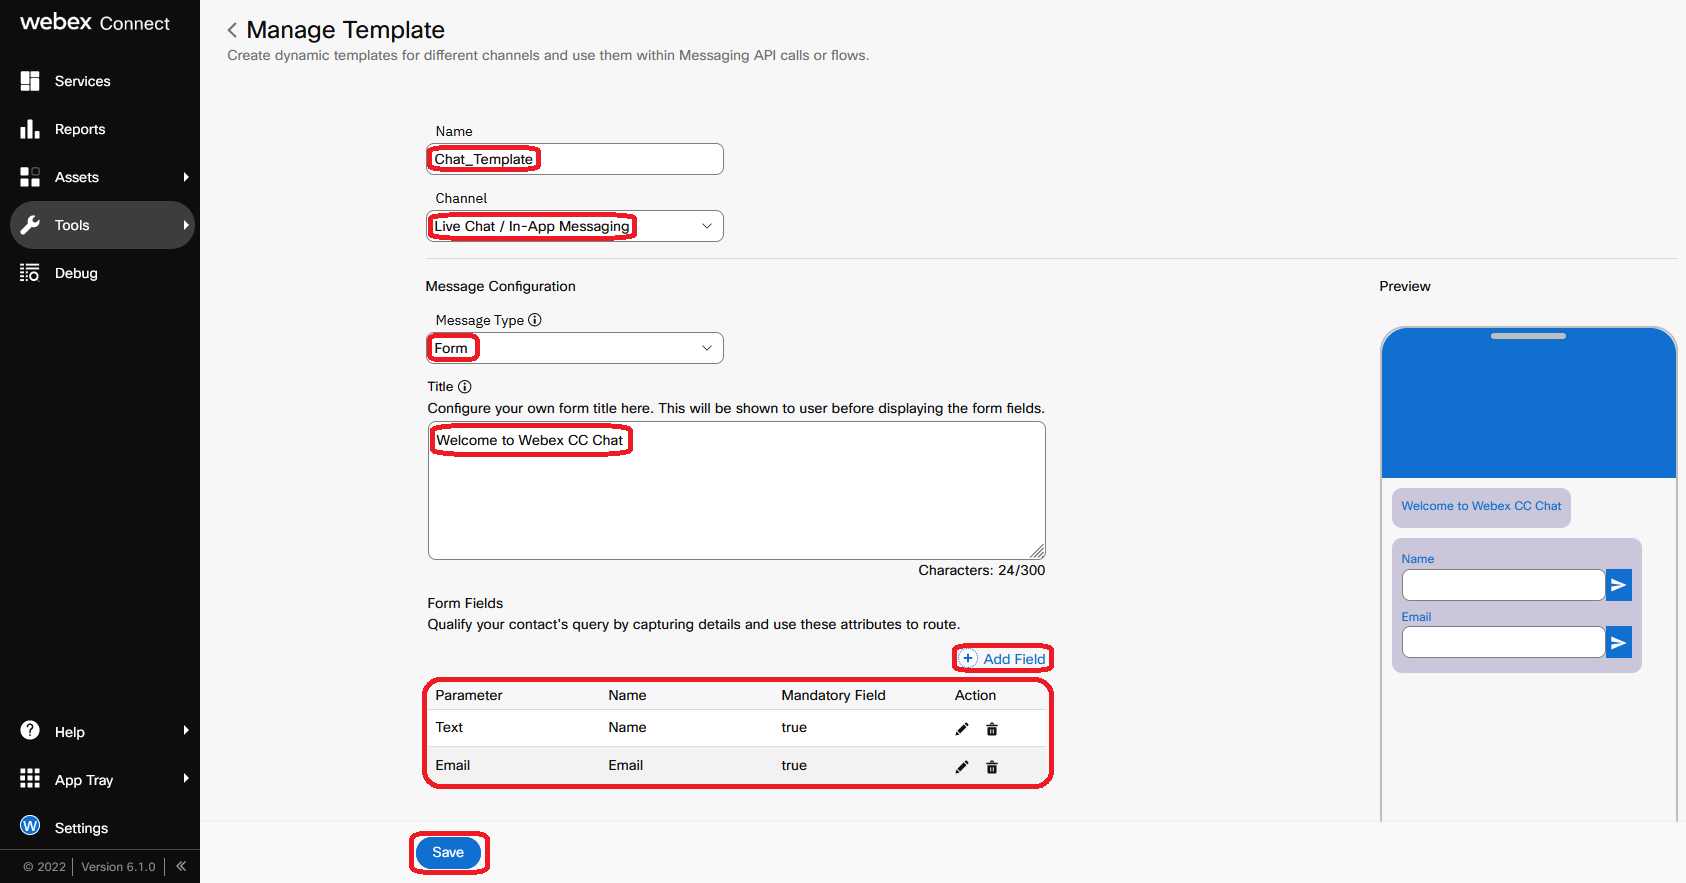
- After chat template has been created, you can use it in Pre-chat form and Receive nodes of the chat flow to get necessary details from the end user which initiated the chat. After selecting the template save changes and make the flow live.
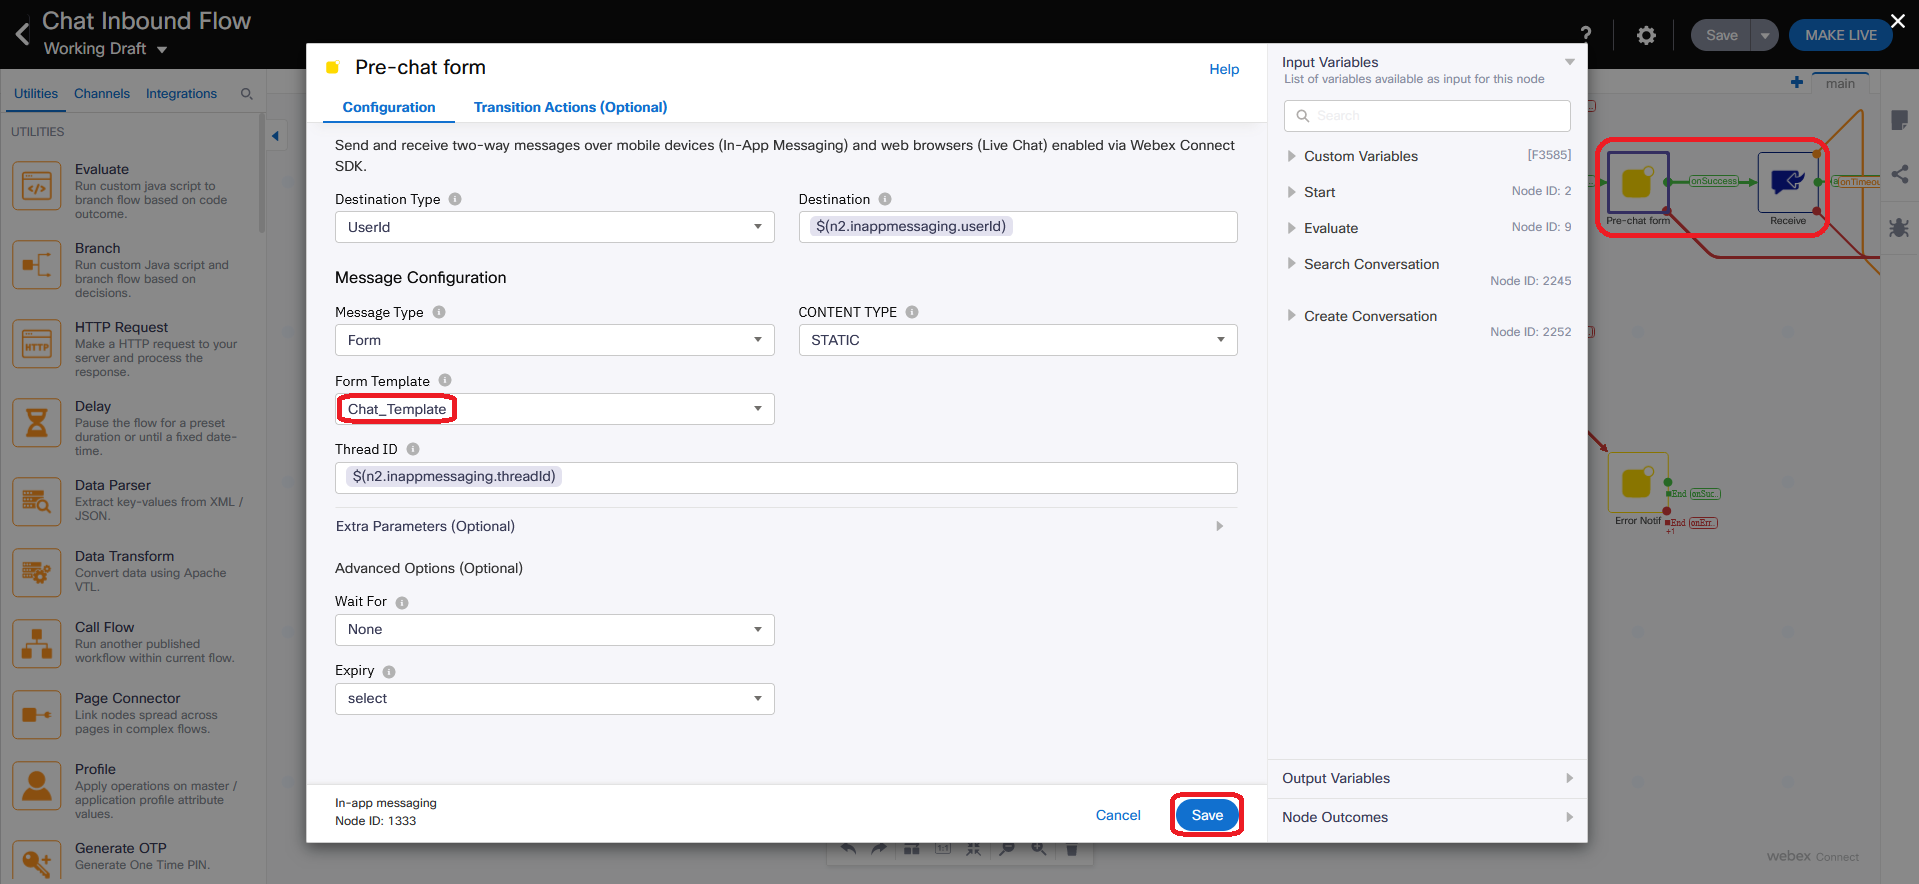
- The end user will get the form created in the template within chat widget.
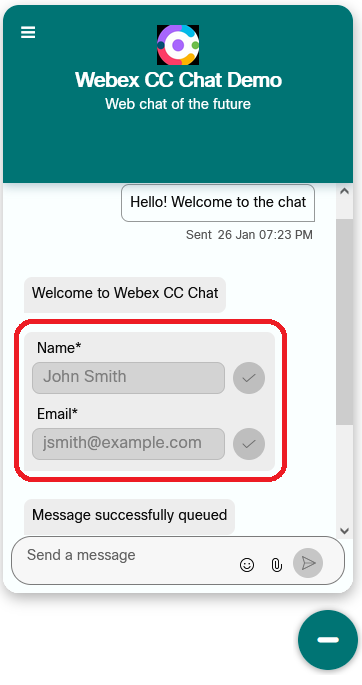
- The details eneterd by the user in the form will be forwarded to the agent which accepted chat request.
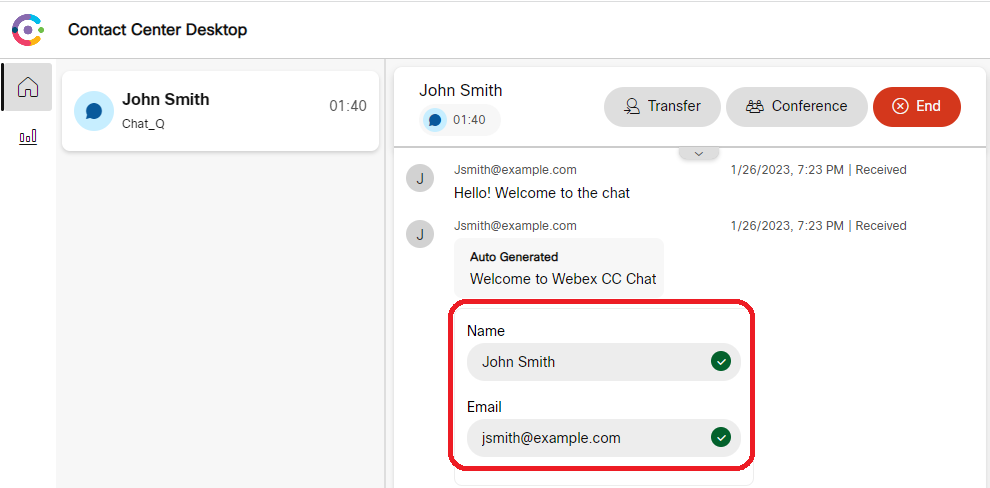
3. Create Email Templates in Connect
Let’s create Email template which notifies end user after incoming request over email has been accepted and ququed in Webex CC.
- Select Channel as Email in Manage Template window to create email template. Then provide Name, Reference ID, Template Type, Subject and save changes.
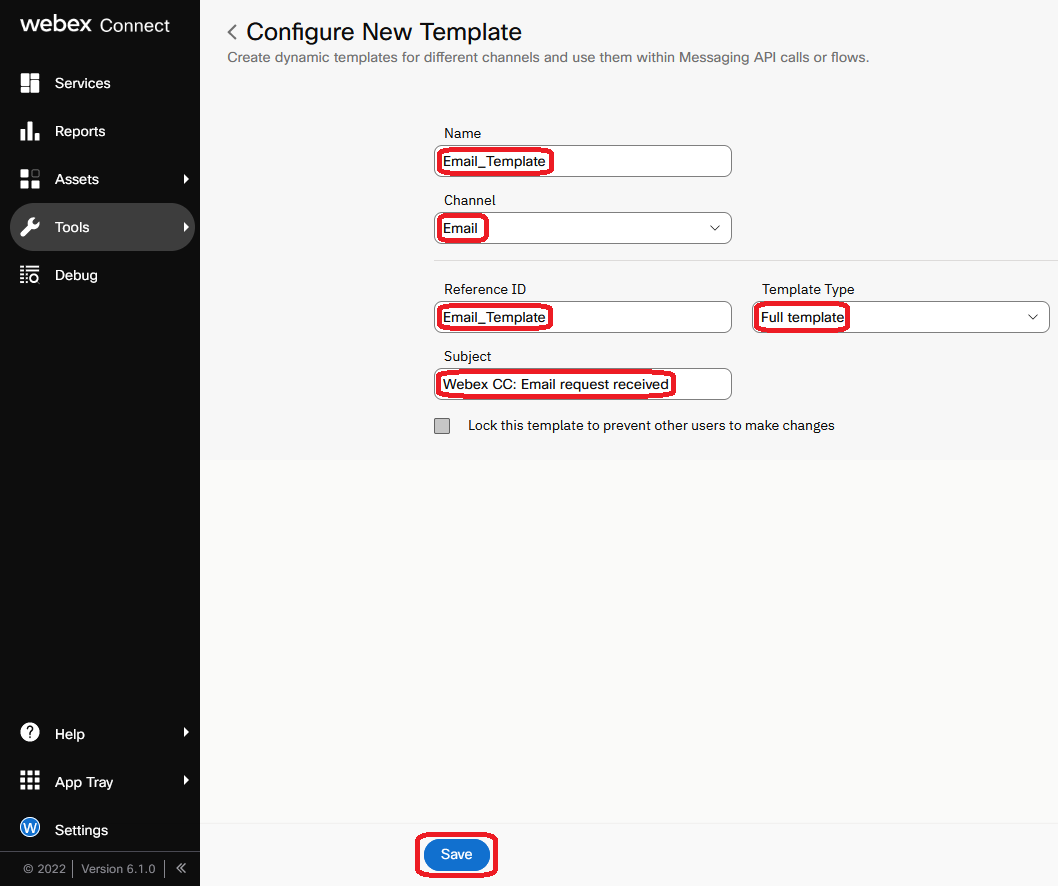
- You will be redirected to Email Composer. Please build the email using the canvas in the center and building blocks on the left-hand side. After email template is ready, press Save & Exit at the top right corner.
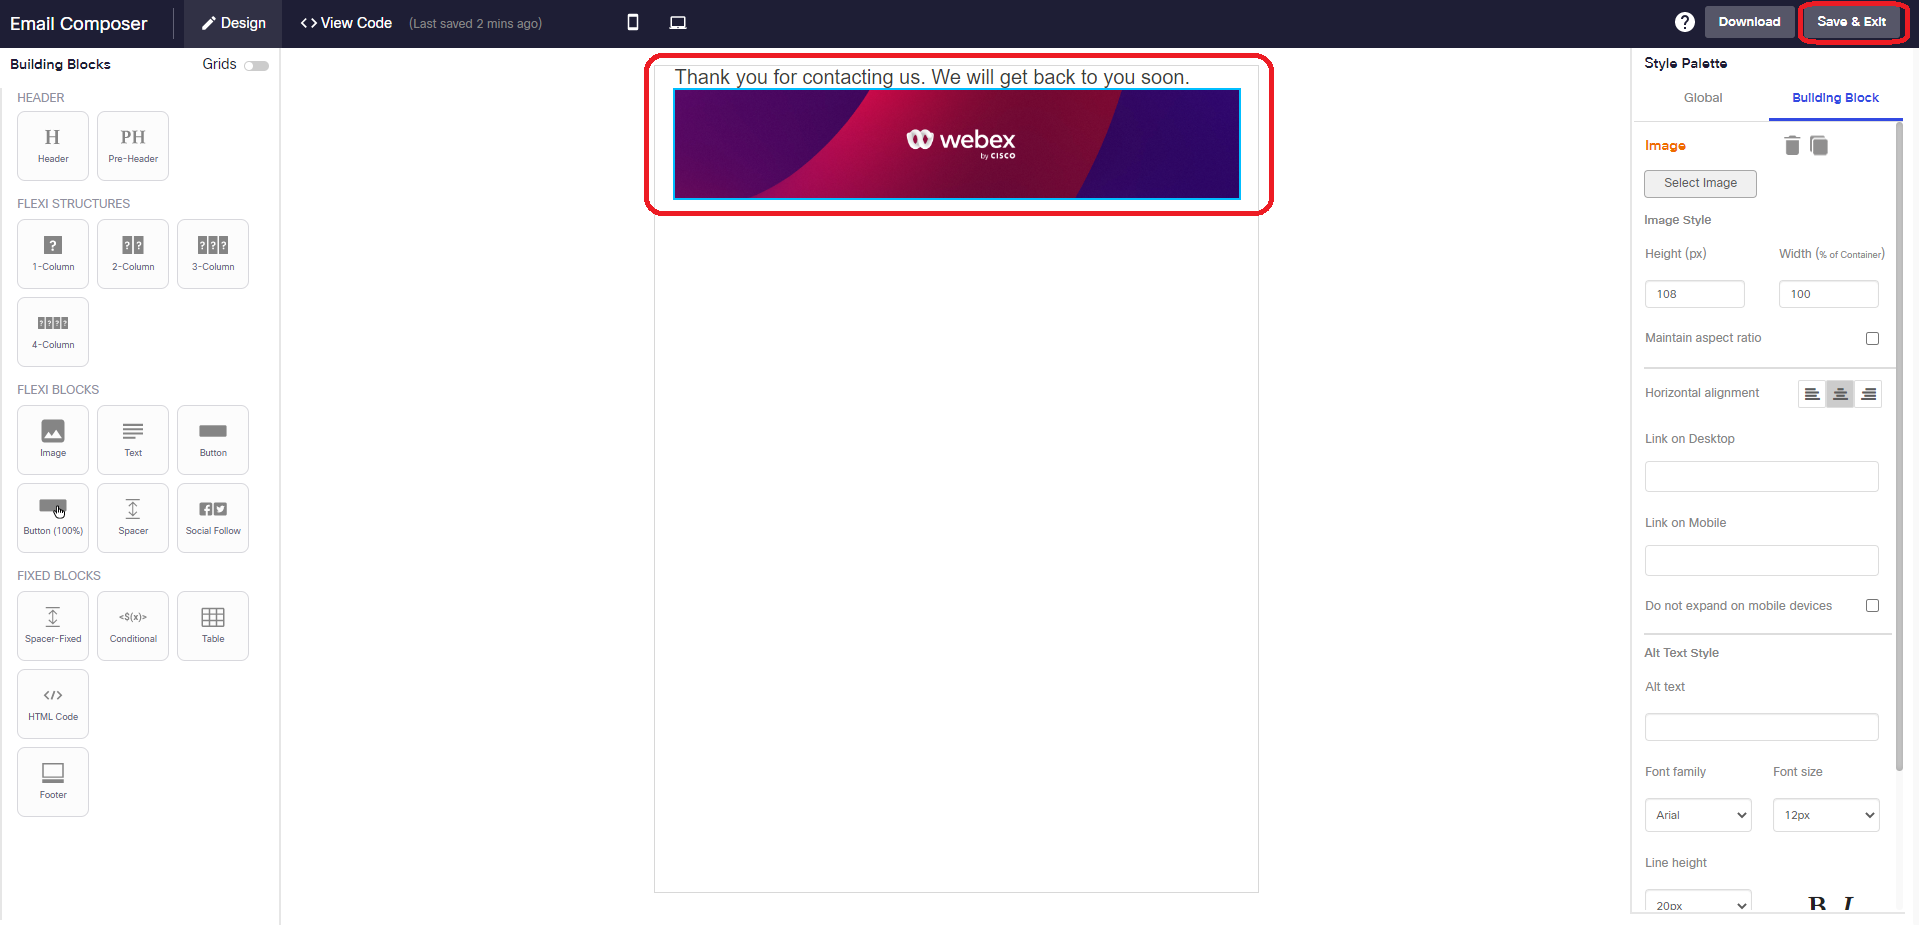
- Insert Email node into the corresponding flow just after Queue Task node. Provide necessary details including Email Type, Template Type, Template, save changes and make the flow live.
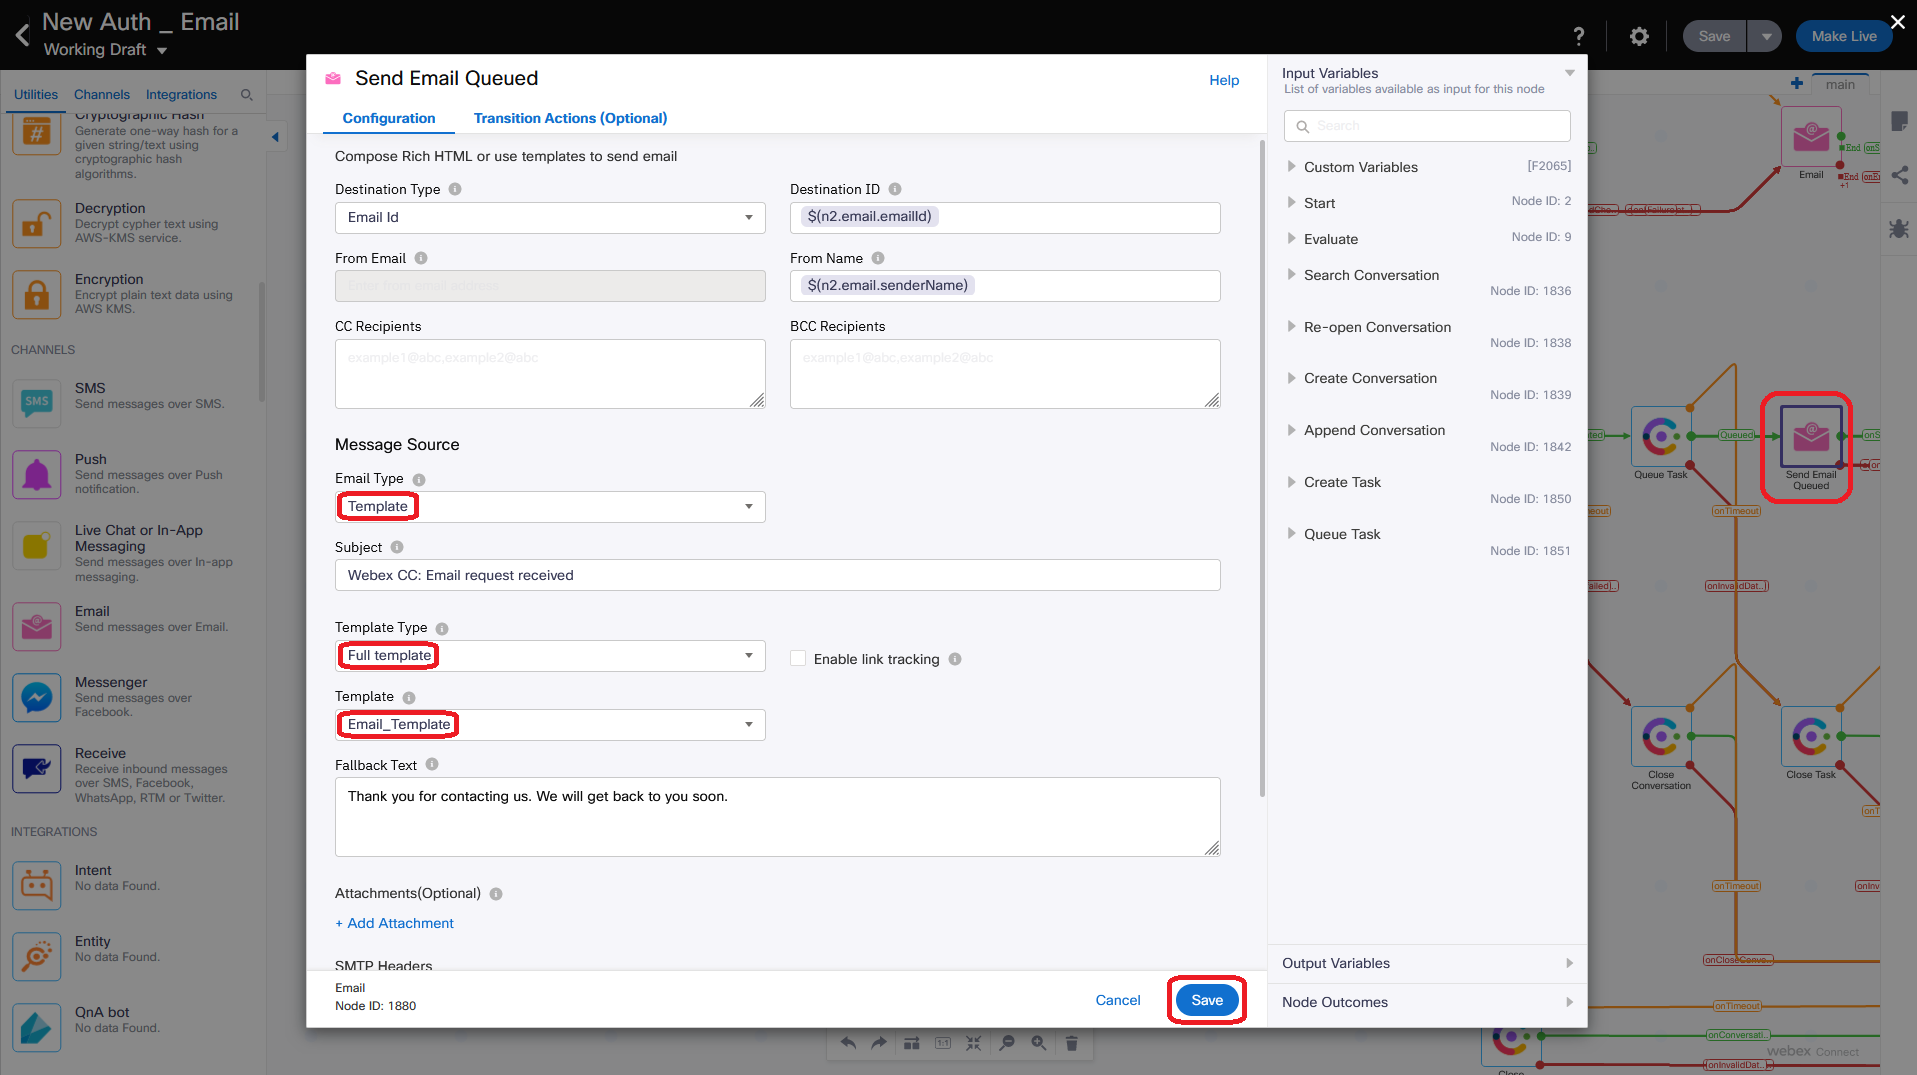
- After the flow is triggered and email request is queued, the end user will be notified over email.
4. Create SMS Templates in Connect
Let’s create SMS template which notifies end user after incoming request over SMS has been accepted and ququed in Webex CC.
- Select Channel as SMS in Manage Template window to create SMS template. Then provide Name, Message Type, Message, Template Type and save changes.
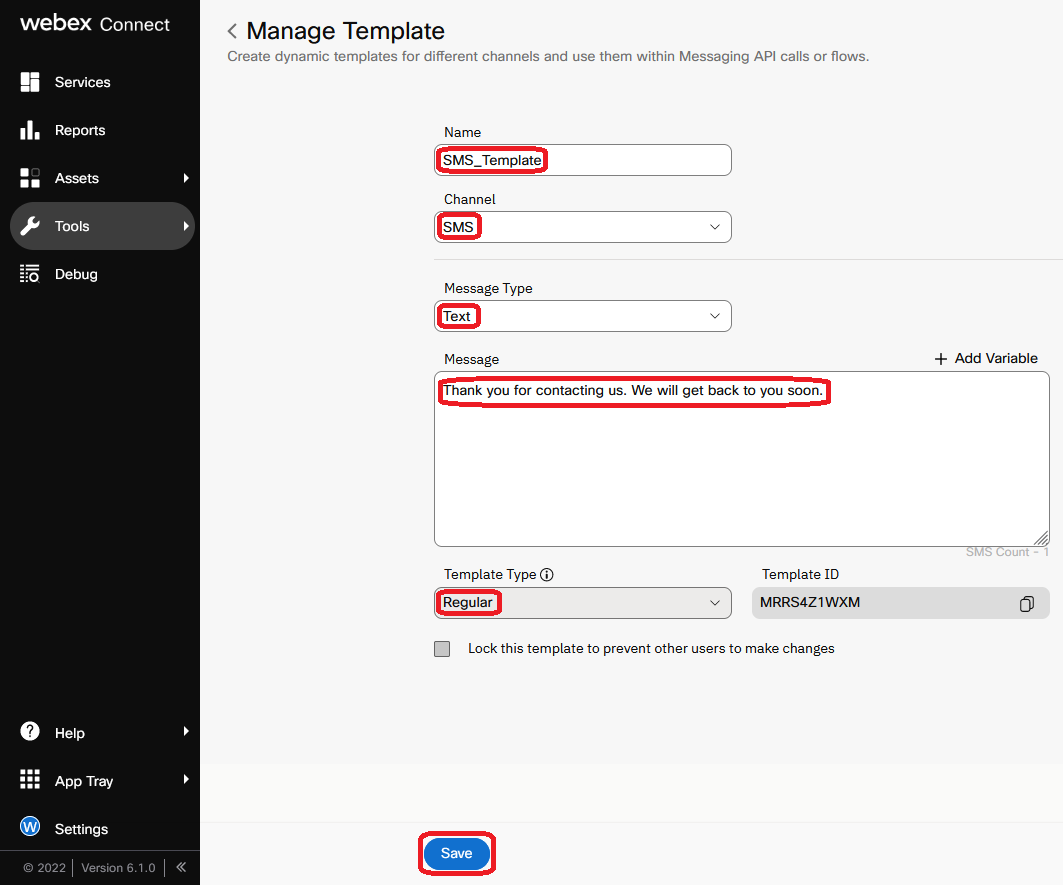
- Insert SMS node into the corresponding flow just after Queue Task node. Provide necessary details including Template, save changes and make the flow live.
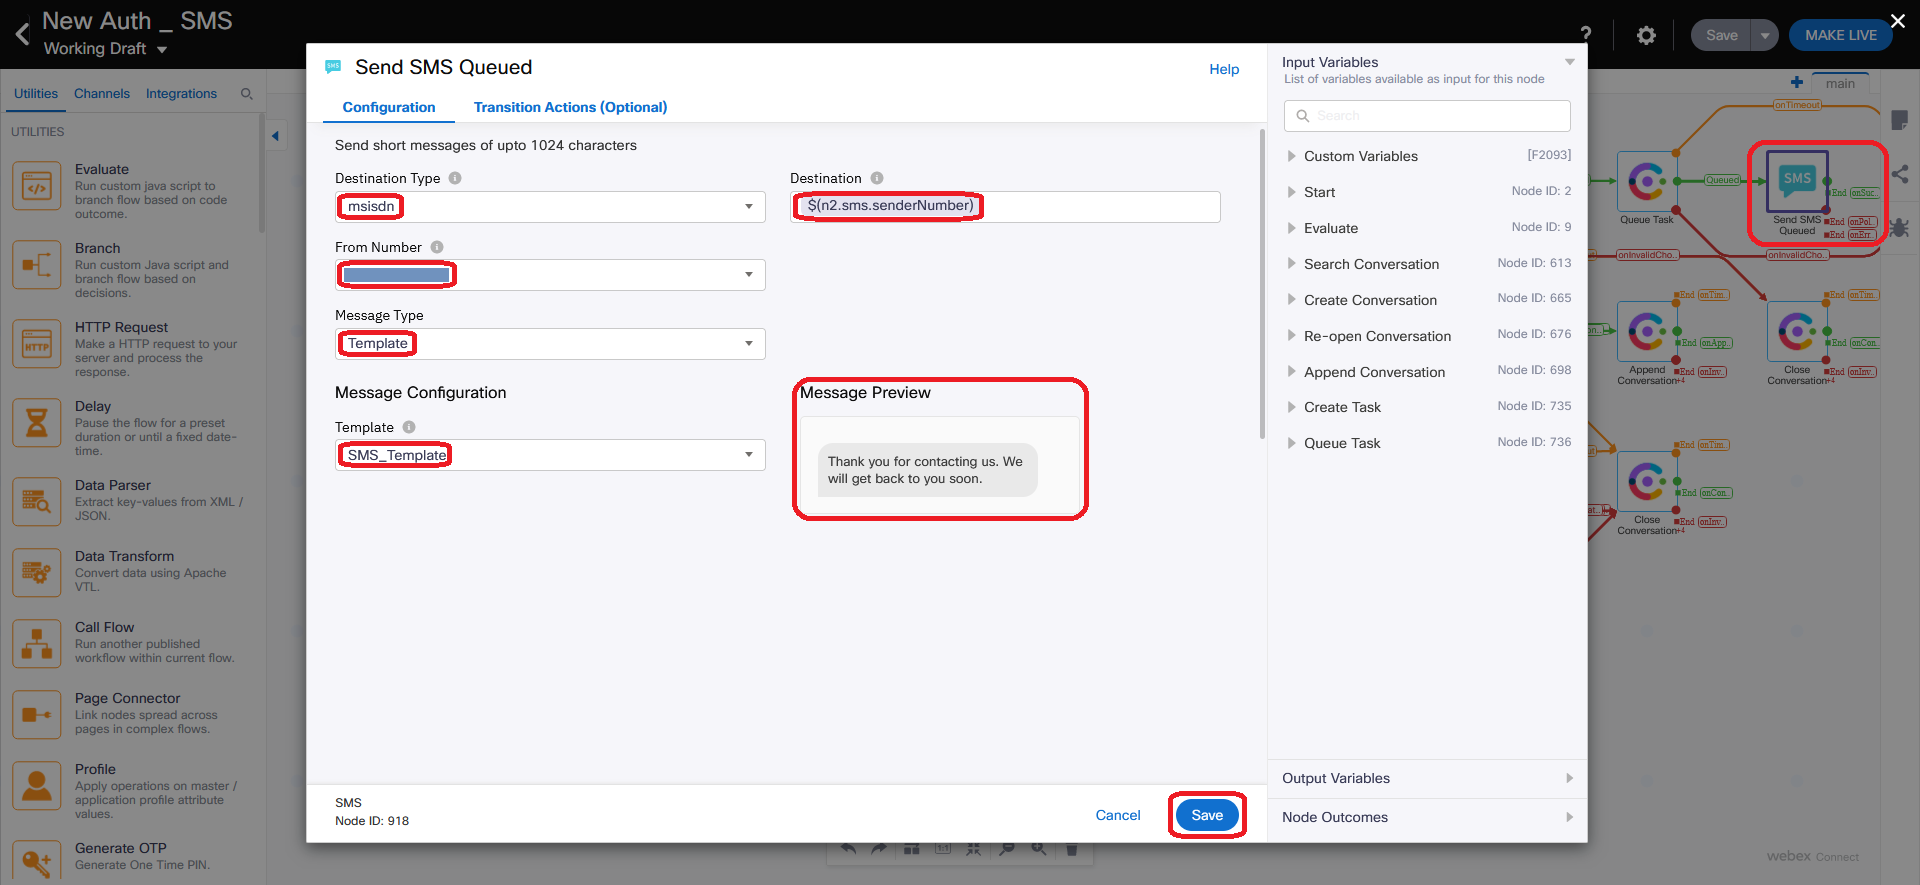
- After the flow is triggered and SMS request is queued, the end user will be notified over SMS.
Congratulations, you have completed this section!
Lab.12.13 - Engage Templates
Table of Contents
| Topic | Lab Type | Difficulty Level | Estimated length |
|---|---|---|---|
| Understanding Engage Templates | Read & Understand | EASY | 5 min |
| [Optional] Create Engage Template Group | Read & Understand | EASY | 5 min |
| Create Engage Templates | Read & Understand | EASY | 5 min |
| Bulk Upload of Engage Templates | Read & Understand | EASY | 5 min |
| Verify Engage Template in Agent Desktop | Read & Understand | EASY | 5 min |
Introduction
Lab Objective
This section is designed to introduce Engage templates, which can be used for quick reply from the agent desktop to the end user through various digital channels. In this section you will find configuration steps and examples of use. The goal is to understand the purpose of each template.
1. Understanding Engage Templates
Engage templates makes agent’s job easier by providing the possiblity to use some standard quick replies to the end-user in the agent desktop during the conversation ove any digital channel. Here are few key points to note about Engage templates which provide better understanding of the feature:
- Agent can use a template in the agent desktop only after accepting the conversation initiated via digital channel.
- Agent can edit the text of the template before sending the message unless it is prohibited by template settings.
- Engage administrator can create various template groups to organanize templates.
- Each template should be added into the group.
- Each teamplate can be created for for one or many digital channels.
- Many templates can be uploaded to Engage Portal in a bulk.
- One or more of the following categories can be assigned to each template brings more flexibility when using it:
- Start Template
- End Template
- Followup Template
- Engage administrator can use variables to customize the same template for each end user. For example:
- system.customer_name
- system.customer_id
- system.customer.mobile_no
- system.asset
- system.customer_email_address
2. [Optional] Create Engage Template Group
Note: This step should be completed if you want to create template group. There is no need to create new group if you want to add a template into an existing one.
- Login to WxCC Management Portal access the menu and cross launch Engage Portal by choosing New Digital Channels.
- Go to Assets -> Templates and press ’’+” button near TEMPLATE GROUPS section.

- Provide Template Group name and press Add button to save it.

- You can delet existing template group by clicking on bin icon near the template name in TEMPLATE GROUPS section.

3. Create Engage Templates
- Go to Assets -> Templates, click on template group name in TEMPLATE GROUPS section. Then press Add template button.

- Let’s create start template for web chat channel. Please click on Livechat in template header and provide necessary template details:
| Parameter Name | Parameter Value |
|---|---|
| Template DI | HelloTemplate |
| Template Text | Hello @@system.customer_name@@, How can I help you today? |
| Lock Template | Disabled |
Note: Please pay your attention that we used system.customer_name variable in Template Text field. You can see the list of all supported variables and select the required one when typing @@ in the field.
Note: You can lock the template by enabling Lock Template toggle. In this case agent will not be allowed to modify the text of the template before sending the message to the end user.
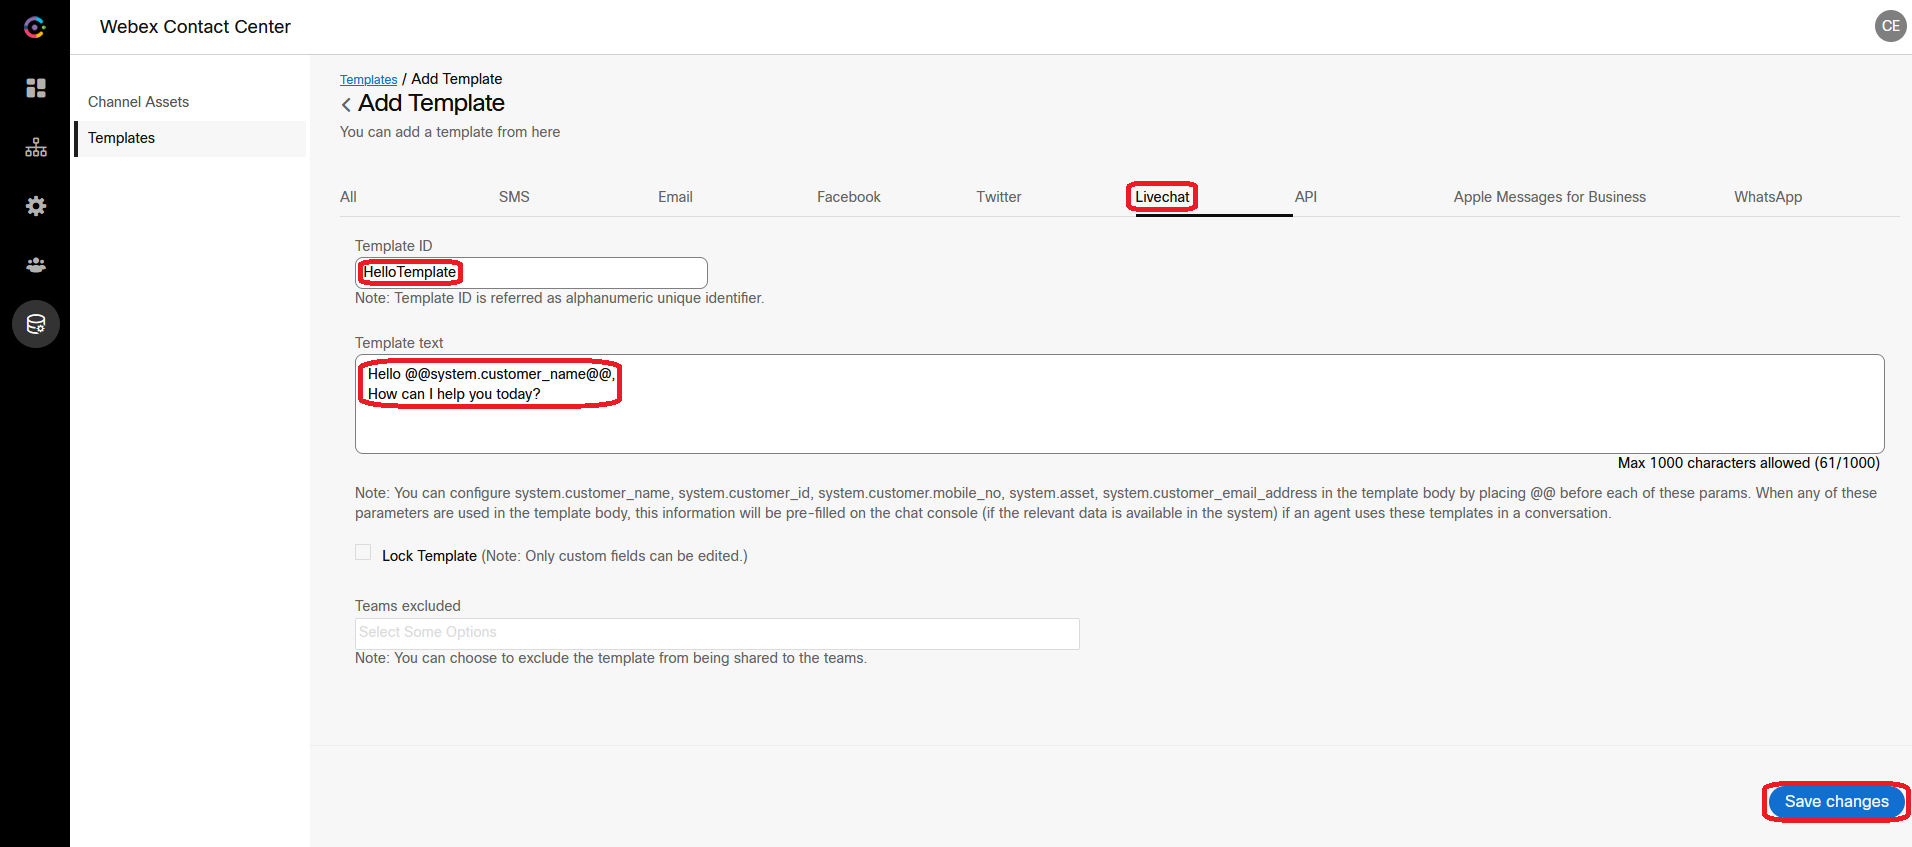
- You can edit or delete the template by clicking on corresponding icon in the Actions column in the table with template details.

4. Bulk Upload of Engage Templates
- Go to Assets -> Templates, click on Upload template button.

- Click on Download sample file here link to download CSV sample file.

- Open sample file, provide necessary values according to Help Notes section. Then delete Help Notes section and save changes.
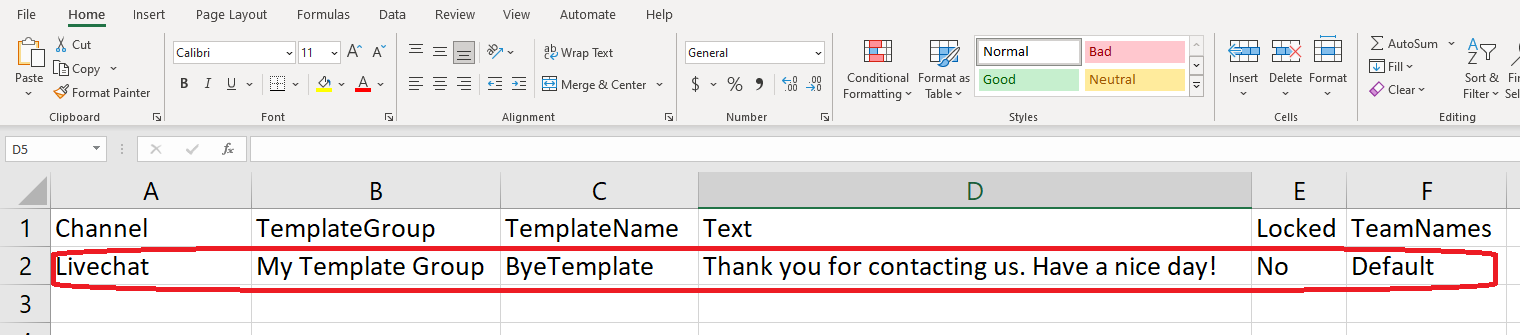
- Return to Upload Template window, press upload file button and select the file you created above.

- Check and make sure there were no conflicts found. Then click on Proceed button.
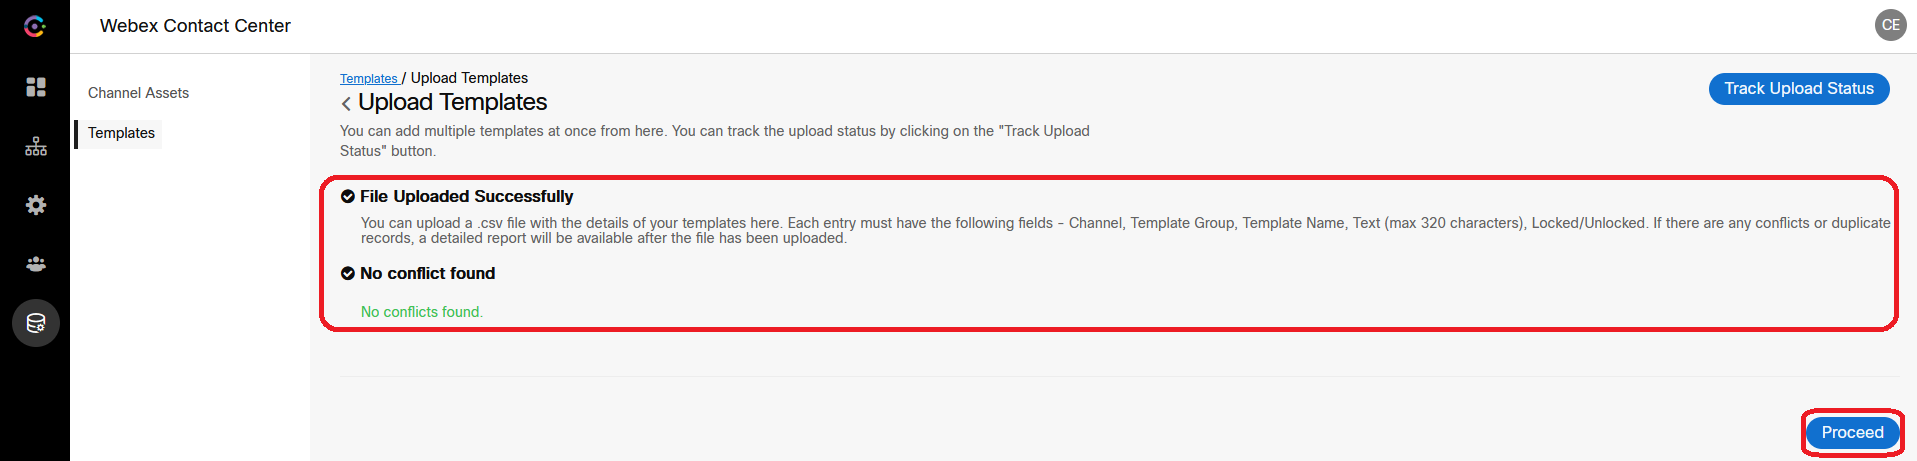
- Make sure your file is being processed and press OK button in pop-up window.
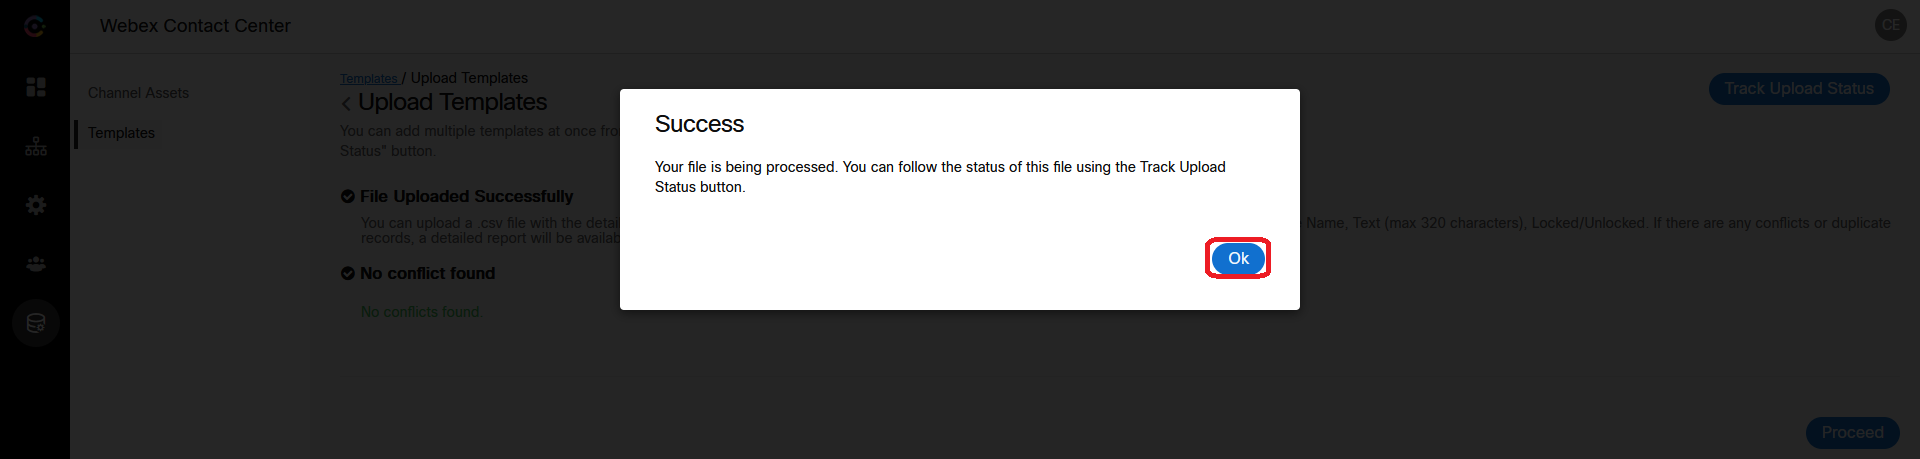
- Uploaded template will be added to the list.

5. Verify Engage Template in Agent Desktop
- Start web chat with the end user and make sure you are able to select the template in agent desktop and send the message.
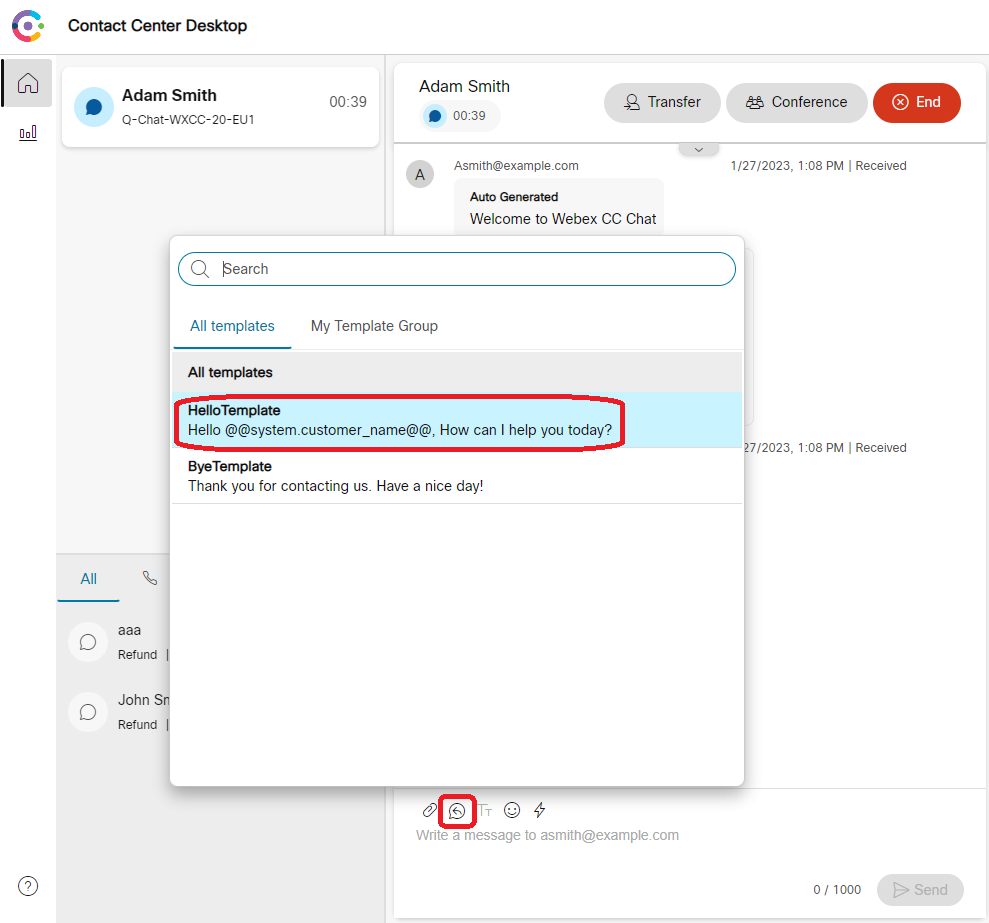

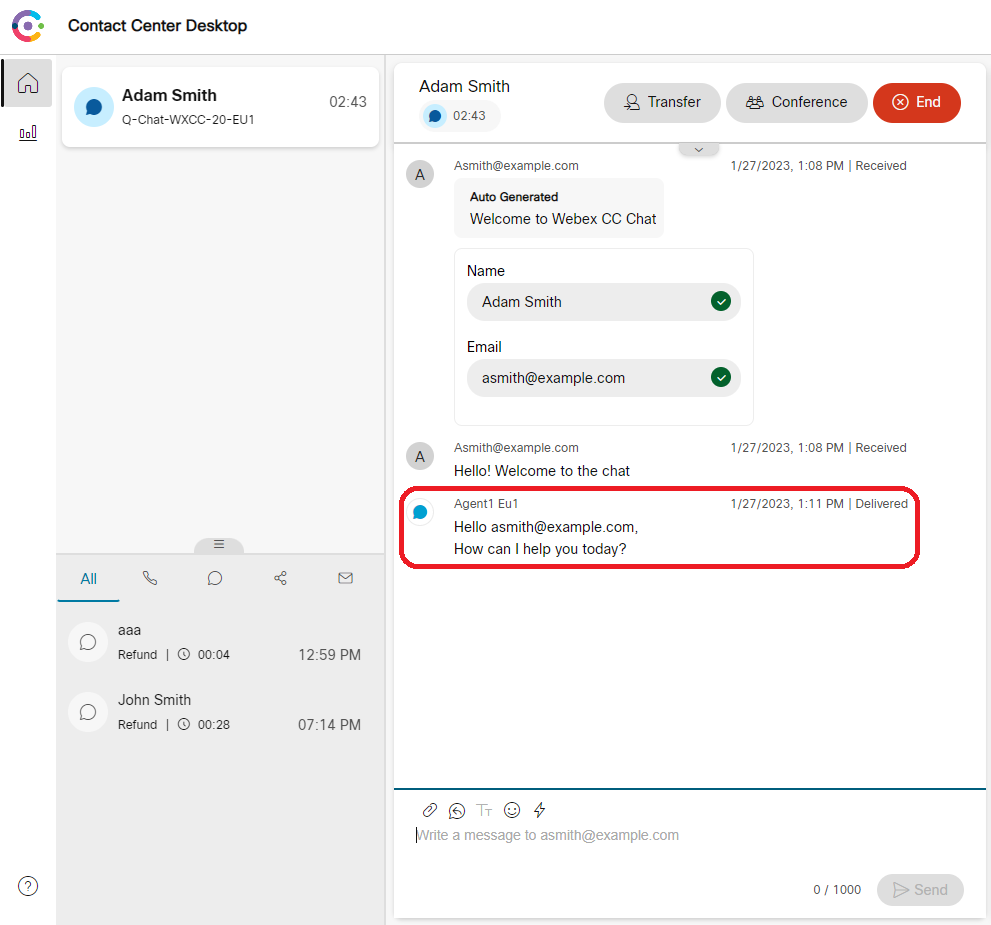
Congratulations, you have completed this section!
Lab.12.14 - Introduction to BOTs
Table of Contents
| Topic | Lab Type | Difficulty Level | Estimated length |
|---|---|---|---|
| Understanding Connect Bots | Read & Understand | MED | 5 min |
| Access and navigation | Read & Understand | EASY | 5 min |
| Understand and navigate Q&A Bots | Read & Understand | MED | 5 min |
| Understand and navigate Task Bots | Read & Understand | MED | 5 min |
Introduction
Lab Objective
This lab is designed to introduce the Bot Builder interface, which is used for the configuration and orchestration Bots within Connect. In this lab you will not find configuration steps, the goal is to understand the purpose and use of each menu item.
Pre-requisites
- Connect URL for browser access.
- Admin credentials to login to Connect administration portal.
1. Understanding Connect Bots
Bot Builder is a cloud-based bot platform that allows enterprises to create bots. It includes Bot creation, testing, hosting, analyzing, and editing capabilities. The key features of Bot Builder include:
- Rules for handling flows
- Ability to retain context
- Omni-channel deployment
- Live agent handover
- Bot orchestration framework
- One-click bot testing
- Integration with business systems
- Enterprise-grade data security and privacy
- Analytics
- Custom reports
There are three types of Bots that can be integrated within a Connect flow:
- Q&A Bots – are knowledge-driven bots whose knowledge base consists of a series of possible questions (with their alternative syntax) and related answers.
- Task Bots – enable multi-turn conversations where a bot can obtain relevant data from users to perform the task at hand.
- NLP Pipelines – is a solution to build customized bots by defining the desired behaviors, without using the features already provided by Q&A and Task bots.
2. Access and navigation
Bot Builder is a dedicated portal which can be accessed via Connect:
- Access your Connect tenant
- Navigate to App Tray > Bot Builder
The interface, similarly to Connect, is divided in two main parts: the main menu on the left side and the configuration of the selected object in the center-right side.
Move your mouse pointer on each icon of the menu to see its name and the available options:
- Dashboard – On the dashboard, the admin can review or create bots, which are then represented by cards that have basic information visible on them. There are 3 sections for each type of bot, by selecting each of them the admin can create new ones as the “+ New” button will update accordingly.
- Analytics – this section allows the administrator to collect and review statistics over bots utilization and performances. It’s a powerful tool to obtain an holistic view about volume and efficiency of configured bots.
- Help – the help icon will automatically open a new browser tab and redirect the admin to https://help.imiconnect.io/. On the home page scroll down until the ‘APP TRAY’ section and select ‘Bot Builder’ to read an in-depth explanation for all features and functionalities that bots can offer.
3. Understand and navigate Q&A Bots
First let’s start reviewing the interface as a new Q&A Bot gets created:
- Access your Connect tenant
- Navigate to App Tray > Bot Builder
- From the Dashboard > Select ‘Q&A bots’ > Click on ‘+ New Q&A Bot’
- Enter the Name and the Unique Name following your desired naming convention
- Select the text orientation as how the chat interface (within the Bot Builder) will position the text.
- [OPTIONAL] Toggle the option ‘Allow feedback’ to allow users to give a ‘thumb up’ or ‘thumb down’ to the answers the bot will prompt when consulted
- [OPTIONAL] Toggle the option ‘Allow agent handover’ to allow this bot to stop processing the incoming messages and handover the conversation to a different branch in your Connect flow.
- Click on ‘Done’ button to save and create the Q&A Bot.
Once opening a Q&A Bot a dedicated option menu appears on the left side and additional options on top
3.1 Settings
- Profile – in this section the admin can change the bot name, its description and the text alignment.
- Management – in this section the admin can change the Bot status and disable it (without deleting it) and change the ‘Allow Feedback’ option set when it was created.
- Handover – in this section the admin can change the ‘Allow agent handover’ option set when the bot was created, and change specific handover options.
3.2 Articles
Articles are containers of questions (in their possible variations), for which the answer to be provided will be the same. The questions are called ‘Utterances’. Here the key information about Articles:
- When creating a new Article the admin must provide a Default Utterance, which will be then displayed as ‘Title’ in the list. Then add possible alternative containing different key words and phrases the system will then use to recognize and match what will be provided by the user.
- Articles contain both the question (and its alternatives) and the related answer.
- Admin can create Categories and assign articles to them, so to have better control of existing configuration.
- When editing an Article, the admin can also edit the response (text, format and conditions).
- After any changes, the Q&A bot needs to be ‘Trained’ first, and then moved to ‘Live’.
Any new Q&A bot will be created with a default Articles list.
3.3 Testing
Bot Builder platform provides a built-in one-click bot testing framework that is extremely helpful in testing a large set of test cases easily and quickly. It helps to validate the use cases listed will trigger the expected behaviour.
3.4 Curation
Curation console helps users in optimizing their bot’s performance over time through human-in-the-loop learning. It facilitates users in reviewing cases where their bot performance was underwhelming. These can be curated to improve current articles/intents or to create new articles/intents
3.5 Session
Displays the history of all sessions established with the customers. Each session is displayed as a record that contains all sent/received messages. Messages from a specific session or from multiples sessions can be downloaded as CSV file. Reviewing sessions in detail is extremely useful to audit, analyse, and improve the bot performances and customer satisfaction.
3.6 History
Provide version control over all changes the administrator applies on that specific bot. Any admin can review which changes were applied on specific version and revert to previous ones where needed.
4. Understand and navigate Task Bots
First let’s start reviewing the interface as a new Q&A Bot gets created:
- Access your Connect tenant.
- Navigate to App Tray > Bot Builder.
- From the Dashboard > Select ‘Task bots’ > Click on ‘+ New Task Bot’.
- Enter the Name and the Unique Name following your desired naming convention
- Select the text orientation as how the chat interface (within the Bot Builder) will position the text.
- [OPTIONAL] Toggle the option ‘Allow feedback’ to allow users to give a ‘thumb up’ or ‘thumb down’ to the answers the bot will prompt when consulted.
- Click on ‘Done’ button to save and create the Q&A Bot.
Once opening a Task Bot a dedicated option menu appears on the left side and additional options on top
4.1 Settings
- Profile – in this section the admin can change the bot name, its description and the text alignment.
- Management – in this section the admin can change the Bot status and disable it (without deleting it) and change the ‘Allow Feedback’ option set when it was created.
- Handover – in this section the admin can change the ‘Allow agent handover’ option set when the bot was created, and change specific handover options.
4.2 Training
Similar to articles, the Training section allows the admin to define containers for customer queries, called Intents, and to identify specific words in those messages with objects called Entities. Here the key information about Articles:
- Entities only contain the questions and they are mapped to the desired response. The response is defined separately.
- The admin will first need to define the desired Entities with the desired type (List, Time, Date, etc.).
- The Intent Name is just descriptive. The list of messages coming from the customer, and alternatives, will be listed under Utterances.
- When creating the Intent (adding the desired Utterances), the system will automatically recognize the specific words and map them to the respective Entity.
- In case any word is not automatically mapped, the admin can select the desired text in an Utterance and manually map it to an Entity
- Any Entity that is mapped in the defined Utterances will be listed inside the Slots section. This allows to trigger specific actions for each Entities before the bot provides the desired Response for that Intent.
- Entities can be used across multiple Intents, and their value can be stored and used in the Responses.
- After any changes in the Training section, the Training bot needs to be ‘Trained’ first, and then moved to ‘Live’.
4.3 Responses
Answers for the Intents specified inside the Training section are defined within the respective Templates. Here the key information about Responses:
- The layouts of each response within the Templates can be edited (text, format and conditions).
- Different responses, depending on the used channel, can be defined within the same template.
- Conditions can be configured so to trigger a different response following predefined criteria
- After any changes in the Response section, the Training bot needs to be ‘Updated’ first, and then moved to ‘Live’.
- The Agent Handover Response template it’s the default response that allows the Task Bot Node inside the Connect Flow Designer to escalate the chat through a different route.
4.4 Testing
Bot Builder platform provides a built-in one-click bot testing framework that is extremely helpful in testing a large set of test cases easily and quickly. It helps to validate the use cases listed will trigger the expected behaviour.
4.5 Curation
Curation console helps users in optimizing their bot’s performance over time through human-in-the-loop learning. It facilitates users in reviewing cases where their bot performance was underwhelming. These can be curated to improve current articles/intents or to create new articles/intents
4.6 Session
Displays the history of all sessions established with the customers. Each session is displayed as a record that contains all sent/received messages. Messages from a specific session or from multiples sessions can be downloaded as CSV file. Reviewing sessions in detail is extremely useful to audit, analyse, and improve the bot performances and customer satisfaction.
4.7 History
Provide version control over all changes the administrator applies on that specific bot. Any admin can review which changes were applied on specific version and revert to previous ones where needed.
Congratulations, you have completed this section!
Lab.12.15 - QnA BOTs
Table of Contents
| Topic | Lab Type | Difficulty Level | Estimated length |
|---|---|---|---|
| Navigate to BOT Builder and Create bot | Practical Lab | MED | 5 min |
| Preview | Practical Lab | MED | 5 min |
| Bot testing | Practical Lab | MED | 5 min |
| Curation | Practical Lab | MED | 10 min |
Introduction
Lab Objective
This lab is designed to complete a new QnA bot creation, new article creation and previewing the same. We will also test the bot, add new test cases and learn about curation.
Pre-requisite
- WxCC Portal, Agent Desktop and IMI connect URL.
- Admin credentials to complete configurations in WxCC portal and IMI connect.
- Agent Credentials to Handle FBM digital contact.
- Sample Facebook Flow configured.
Quick Links
Control Hub: https://admin.webex.com
US Portal: https://portal.wxcc-us1.cisco.com/portal
US Agent Desktop: https://desktop.wxcc-us1.cisco.com
UK Portal: https://portal.wxcc-eu1.cisco.com/portal
UK Agent Desktop: https://desktop.wxcc-eu1.cisco.com
EMEA Portal: https://portal.wxcc-eu2.cisco.com/portal
EMEA Agent Desktop: https://desktop.wxcc-eu2.cisco.com
ANZ Portal: https://portal.wxcc-anz1.cisco.com/portal
ANZ Agent Desktop: https://desktop.wxcc-anz1.cisco.com
Webex Connect Documentation: https://help.imiconnect.io/
1. Navigate to BOT Builder and Create bot
- Log on to Connect portal and navigate to BOT Builder.
- On the top right you have 2 options QnA BOT and Task BOT.
- Create new QnA Bot.
- Give name and enable Agent handover and Allow feedback options. For easy tracking of configurations, please use the Attendee ID as part of your Bot name. For example: Bot Name: AttendeeID_QnA_Bot
2. Preview
- Navigate to Article -> click on 3 dot -> import from catalogue
- Once the Article is added, click on preview on top right and test the BOT
- Click on Session to check to user input matching with Article
3. Bot testing
- Open BOT Builder
- Log on to Connect portal and navigate to BOT Builder
- Click on the BOT created on Lab 1
- Click on Testing and add test case
- Execute the test case
- Click on session to validate the test case
4. Curation
- Make sure feedback to BOT is enabled under sessions
- Open preview option and run few input to test the article
- If BOT is not giving expected response, click on red down thumb to downvote the article
- Open curation menu
- BOT Admin has an option to change response, add new article or attach response with an existing Article
Congratulations, you have completed this section!
Lab.12.16 - Task BOTs
Table of Contents
| Topic | Lab Type | Difficulty Level | Estimated length |
|---|---|---|---|
| Create a new Task Bot | Practical Lab | HARD | 10 min |
| Add the Task Bot to your flow | Practical Lab | HARD | 15 min |
| Testing | Practical Lab | EASY | 5 min |
Introduction
Lab Objective
In this lab we will be creating a Task Bot using the Bot Builder in Webex Connect. We will collect information from the customer and pass the information to our chat agent so that they can assist the customer. Once the Task Bot configuration is completed we will incorporate the bot inside a Connect flow.
Pre-requisites
- Connect URL for browser access.
- Admin credentials to login to Connect administration portal.
- A Connect flow (previously built and successfully tested).
- Test agent credentials.
Quick Links
Control Hub: https://admin.webex.com
US Portal: https://portal.wxcc-us1.cisco.com/portal
US Agent Desktop: https://desktop.wxcc-us1.cisco.com
UK Portal: https://portal.wxcc-eu1.cisco.com/portal
UK Agent Desktop: https://desktop.wxcc-eu1.cisco.com
EMEA Portal: https://portal.wxcc-eu2.cisco.com/portal
EMEA Agent Desktop: https://desktop.wxcc-eu2.cisco.com
ANZ Portal: https://portal.wxcc-anz1.cisco.com/portal
ANZ Agent Desktop: https://desktop.wxcc-anz1.cisco.com
Webex Connect Documentation: https://help.imiconnect.io/
1. Create a new Task Bot
- Access your Connect tenant
- Navigate to App Tray > Bot Builder
- From the Dashboard > Select ‘Q&A bots’ > Click on ‘+ New Q&A Bot’
- Enter the Name and the Unique Name following your desired naming convention
- Leave the other settings as they are.
- Click on ‘Done’ button to save and create the Q&A Bot.
- Select Training > click on Entities > click on ‘+ Create entity’
- Provide a Name and select the respective Entity Type in the list > Click on Save
- Repeat the step above for as many intent you wish to add
- Select Training > click on Intents > click on ‘+ Create Intent’
- Insert a descriptive Intent Name
- Insert the utterances in the way you expect the customer to message your bot, including words you defined inside the Entities
- When adding utterances with Entities, those will be automatically highlighted and will appear in the Slot section
- You can decide to make Entities mandatory by selecting the respective checkbox. By doing so you will need to set the number of times the bot will keep asking for that value (Retries). The bot will ask for it using the corresponding Template Key (in the Responses).
- When using Entities it is recommended to add at least 3 alternative Utterances containing them.
- Select the Response which will be prompted as final message when all the required Entities will be collected. You can select ‘+ Create New’ at the bottom of the list to create a new dedicated response.
- When typing the response text, the syntax ${} will allow the admin to use system variables as part of the text to be presented as response to the customer. Use ${entity.YOURENTITYNAME} to use the value stored in an existing entity. It is recommended to use this only for Entities which are set as Required in the Intents to avoid empty messages being provided to customers.
- Click on Save (top-right) > Click on the ‘backward arrow’ (top-left) to return to the Training menu > Click on Train (top-right) > Leave a comment (mandatory) > Click on Continue > Click on Make Live (top-right) > Leave a comment (optional) > Click on Make Live.
- [OPTIONAL] Click on Preview (top-right) > In the chat widget that will appear you can start testing your bot by chatting with it.
2. Add the Task Bot to your flow
The recommendation in the Connect flow designer is to create a loop on the Task Bot node where any input from the customer will be received and answered by the bot. The loop can be interrupted either by checking the bot response through a Branch node (so to create different paths based on the responses) or when the bot itself will determine the Agent Handover condition. A Task Bot node can also be used without creating a loop, meaning that after the first execution the admin will need to define static subsequent actions. The Task Bot node should be added only after the Create/Re-open Conversation ID and Task nodes. For any nodes in the loop, the admin needs to ensure the Timeout and Failure Outcomes will be pointed to a Close Conversation and Close Task nodes.
- Access your Connect tenant.
- Navigate to Service > Select and open your existing working service.
- Click on Edit (top-right).
- Navigate to Settings > Custom Variables > Create a new Custom Variable and name it BotInputMessage.
- Edit the Incoming Message (first node) > select Transition Actions > in Action 1 section select ‘+ Add’ > select BotInputMessage > assign the value $(n2.messenger.message) > Save
- Create some space between the Create Conversation node and the next by moving the subsequent nodes > Remove the Successful Outcome link (green) coming out the Create Conversation node.
- From the node menu (left) select the Task Bot node and drag it in the flo
- Connect the Create Conversation node from the Successful Outcome to the Task Bot node
- Edit the Task Bot node
- From the BOT drop-down menu select the Bot name we previously created
- In the message field enter $(BotInputMessage)
- From the channel drop-down menu select the channel this flow is using
- In the PS ID field enter $(n2.messenger.psId)
- Save the node configuratiom
- Connect the Timeout and Failure Outcomes from the Task not node to the Close Conversation node
- From the node menu (left) select the Channel node (depending on the channel in use in the flow, i.e. SMS) and drag it in the flow
- Connect the Task Bot node from the Successful Outcome to the Channel node > a pop-up window will appear > select OnSuccess and click OK
- Edit the Channel node
- Copy the configuration from another pre-existing Channel node in the flow
- In the Message field enter $(nX.taskbot.text_response) (replace the X with the node ID from the Task Bot node)
- Save the node configuration
- Connect the Failure Outcomes from the Channel node to the Close Conversation node
- From the node menu (left) select the Branch node and drag it in the flow
- Connect the Channel node from the Successful Outcome to the Branch node
- Edit the Branch node
- In the Branch 1 VARIABLE field enter $(nX.taskbot.text_response) (replace the X with the node ID from the Task Bot node).
- From the Condition drop-down menu select ‘Equals’.
- In the VALUE field enter the same text defines in the Goodbye Response Template from the Bot Builder (customize it if needed).
- Save the node configuration.
- Connect the Failure Outcomes from Branch node to the Close Conversation node > Connect the Successful Outcomes to the Close Conversation node > a pop-up window will appear > select Branch 1 and click OK.
- From the node menu (left) select the Receive node and drag it in the flow
- Edit the Receive node
- In the SELECT INCOMING MESSAGE/EVENT list select the option corresponding to your channel.
- Edit the MAX TIMEOUT with the preferred duration (in seconds) for the time the flow will allow the customer to add a response (i.e. 120)
- Enter the corresponding ID for your channel.
- From the EVENT NAME drop-down menu select ‘Incoming Message’.
- Click on Transaction Actions
- Click on ‘+ Add Action’.
- in TIME select On-leave.
- Action – Set Variable.
- Variable – BotInputMessage.
- Value – $(nX.receive.message) (replace the X with the node ID from this Receive node).
- Save the node configuration
- Connect the Failure Outcomes from the Receive node to the Close Conversation node > Connect the Successful Outcomes back to the Task Bot node
- From the node menu (left) select the Channel node and drag it in the flow
- Edit the Channel node
- Copy the configuration from another pre-existing Channel node in the flow
- From the MESSAGE TYPE drop-down menu select ‘Text’.
- In the Message field enter the following message “Sorry we didn’t hear back from you, please contact us again later”.
- Save the node configuration.
- Connect all Failure and Successful Outcomes from the Messenger node to the Close Conversation node.
- From the node menu (left) select the Channel node and drag it in the flow
- Edit the Channel node
- Copy the configuration from another pre-existing Channel node in the flow.
- From the MESSAGE TYPE drop-down menu select ‘Text’.
- In the Message field enter $(nX.taskbot.text_response) (replace the X with the node ID from the Task Bot node).
- Save the node configuration.
- Connect the Failure Outcomes from the Messenger node to the Close Conversation node > Connect the Successful Outcome from the Task Bot node to the Messenger node (the ‘onAgentHandover’ outcome event will be automatically selected)
- From the node menu (left) select the Append Conversation node and drag it in the flow.
- Edit the Append Conversation node
- METHOD NAME = Append.
- NODE RUNTIME AUTH = Select your predefined authorization.
- CHANNEL = Select the channel in use.
- CONVERSATION ID = $(conversationId)
- DIRECTION –Inbound
- TEXT = enter $(nX.taskbot.text_response) (replace the X with the node ID from the Task Bot node).
- TIMESTAMP = $(n2.messenger.ts)
- ATTACHMENTS = $(parseDataAttachment)
- Save the node configuration
- Connect the Timeout and Failure Outcomes from the Append Conversation node to the Close Conversation node > Connect the Successful Outcome to the Create Task node.
- Connect the Successful Outcome of the Channel node to the Append Conversation node.
- Save and publish the flow (Make Live).
In this lab, when the conversation is escalated to the agent, the agent will only receive the last response from the Bot to the customer, and for this reason earlier we recommended to add the Entities’ values in the Agent Handover Response (so the agent can understand which values where entered and will not have to ask for them again). If you prefer to provide the entire transcript of all messages exchanged between customer and Bot, you will need to add an Append Conversation node after each Channel and Receive node.
3. Testing
Time to test your new configuration:
- Access the agent desktop using your test agent credentials.
- Using the preferred channel, send a message in.
- Continue your conversation with the bot and provide the Entities you defined.
- Get your conversation escalated to the agent.
- Have your agent conversating with the customer.
Congratulations, you have completed this section!
Lab.12.17 - Event Scheduler
Table of Contents
| Topic | Lab Type | Difficulty Level | Estimated length |
|---|---|---|---|
| Introduction to Event Scheduler | Read & Understand | HARD | 5 min |
| Schedule SMS Event | Practical Lab | HARD | 5 min |
| Schedule Custom Event | Practical Lab | EASY | 10 min |
Introduction
Lab Objective
In this Lab, we will learn about what is Event Scheduler, how it works & the various configuration options it provides. Please note, Event Scheduler mainly provides two configuration options i.e. SMS Event & Custom Event. You may choose to try either one or both of them.
Option 1: SMS Event– Allows you to send SMS messages simply by processing the file. One of the columns in the uploaded file must contain the recipients’ phone number(s).
Option 2: Custom Event – Allows you to trigger rules or flows associated with the selected custom event. The variables required to trigger the custom event and for the successful execution of concerned flows/rules should be available in the file.
Pre-requisite
- You’ve received Administrator credentials to configure in Management Portal and Webex Connect.
- At least one SMS number is already provisioned in Webex Connect.
- Access to MS Excel or any other CSV file editor
- You have successfully completed the previous Labs Pre-configuration, Email Configuration
Quick Links
Control Hub: https://admin.webex.com
US Portal: https://portal.wxcc-us1.cisco.com/portal
US Agent Desktop: https://desktop.wxcc-us1.cisco.com
UK Portal: https://portal.wxcc-eu1.cisco.com/portal
UK Agent Desktop: https://desktop.wxcc-eu1.cisco.com
EMEA Portal: https://portal.wxcc-eu2.cisco.com/portal
EMEA Agent Desktop: https://desktop.wxcc-eu2.cisco.com
ANZ Portal: https://portal.wxcc-anz1.cisco.com/portal
ANZ Agent Desktop: https://desktop.wxcc-anz1.cisco.com
Webex Connect Documentation: https://help.imiconnect.io/
1. Introduction to Event Scheduler
Event Scheduler allows Webex Connect users to send SMS messages or schedule execution of Webex Connect rules/live flows, by uploading a file (on the UI or via an SFTP location) with required information in the relevant format. From Webex Connect select the App Tray & then click on Event Scheduler (Event Scheduler will open in a new browser tab).
The Event Scheduler page gives access to:
- Scheduler – to create new or manage existing scheduled tasks
- Logs – to review all trigger executions in the last 6 months
- SFTP – to manage external data sources to feed the scheduled tasks
- Settings – to manage Social Hours (business hours) and holidays
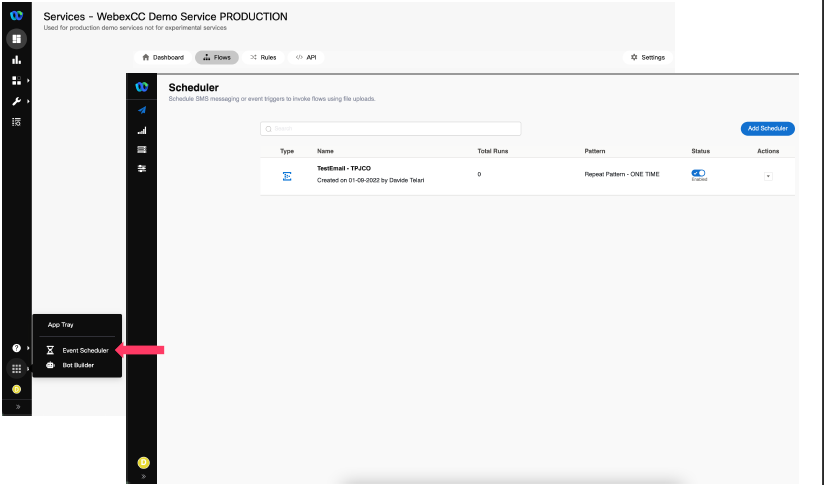
2. Schedule SMS Event
Configuring scheduled outbound SMS campaign only require the setup inside the Event Scheduler. SMS uses source files containing data that will be used by the scheduler to determine the destination numbers as well as building custom messages (i.e. names, dates, addresses, etc.)
- Inside Webex Connect portal, click on App Tray & then click on Event Scheduler.
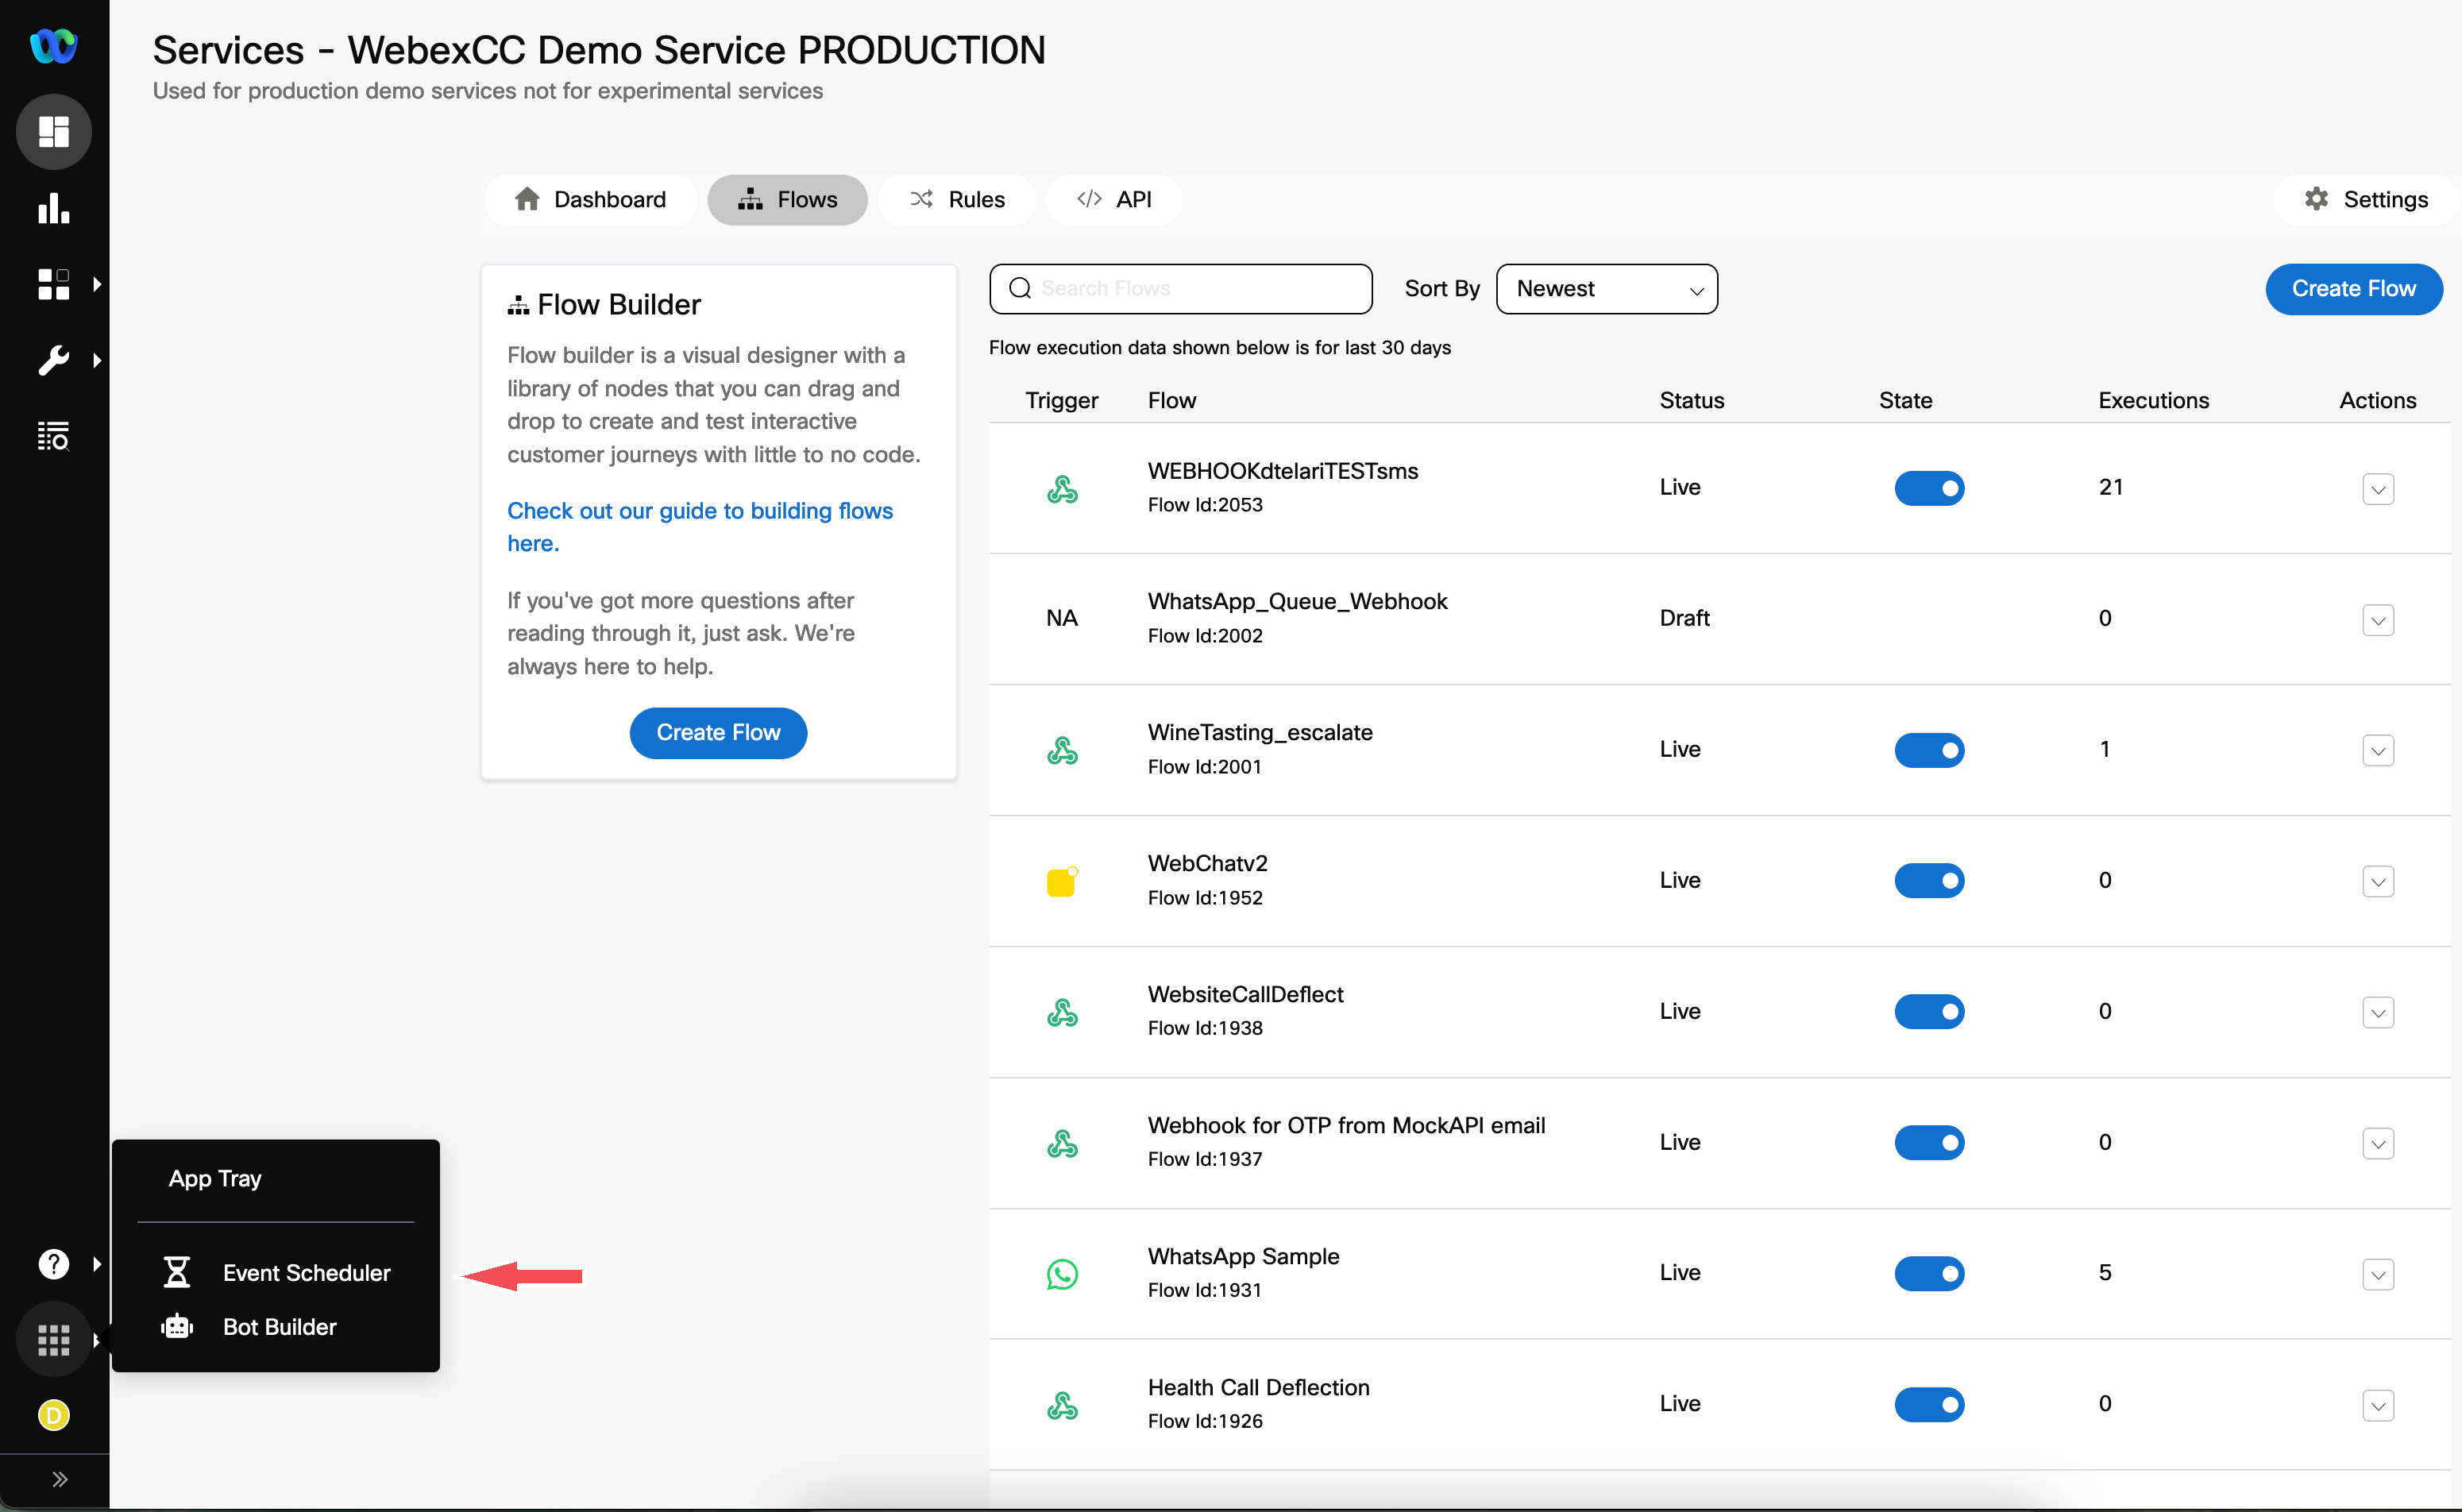
- From the Scheduler menu click on Add Schedule
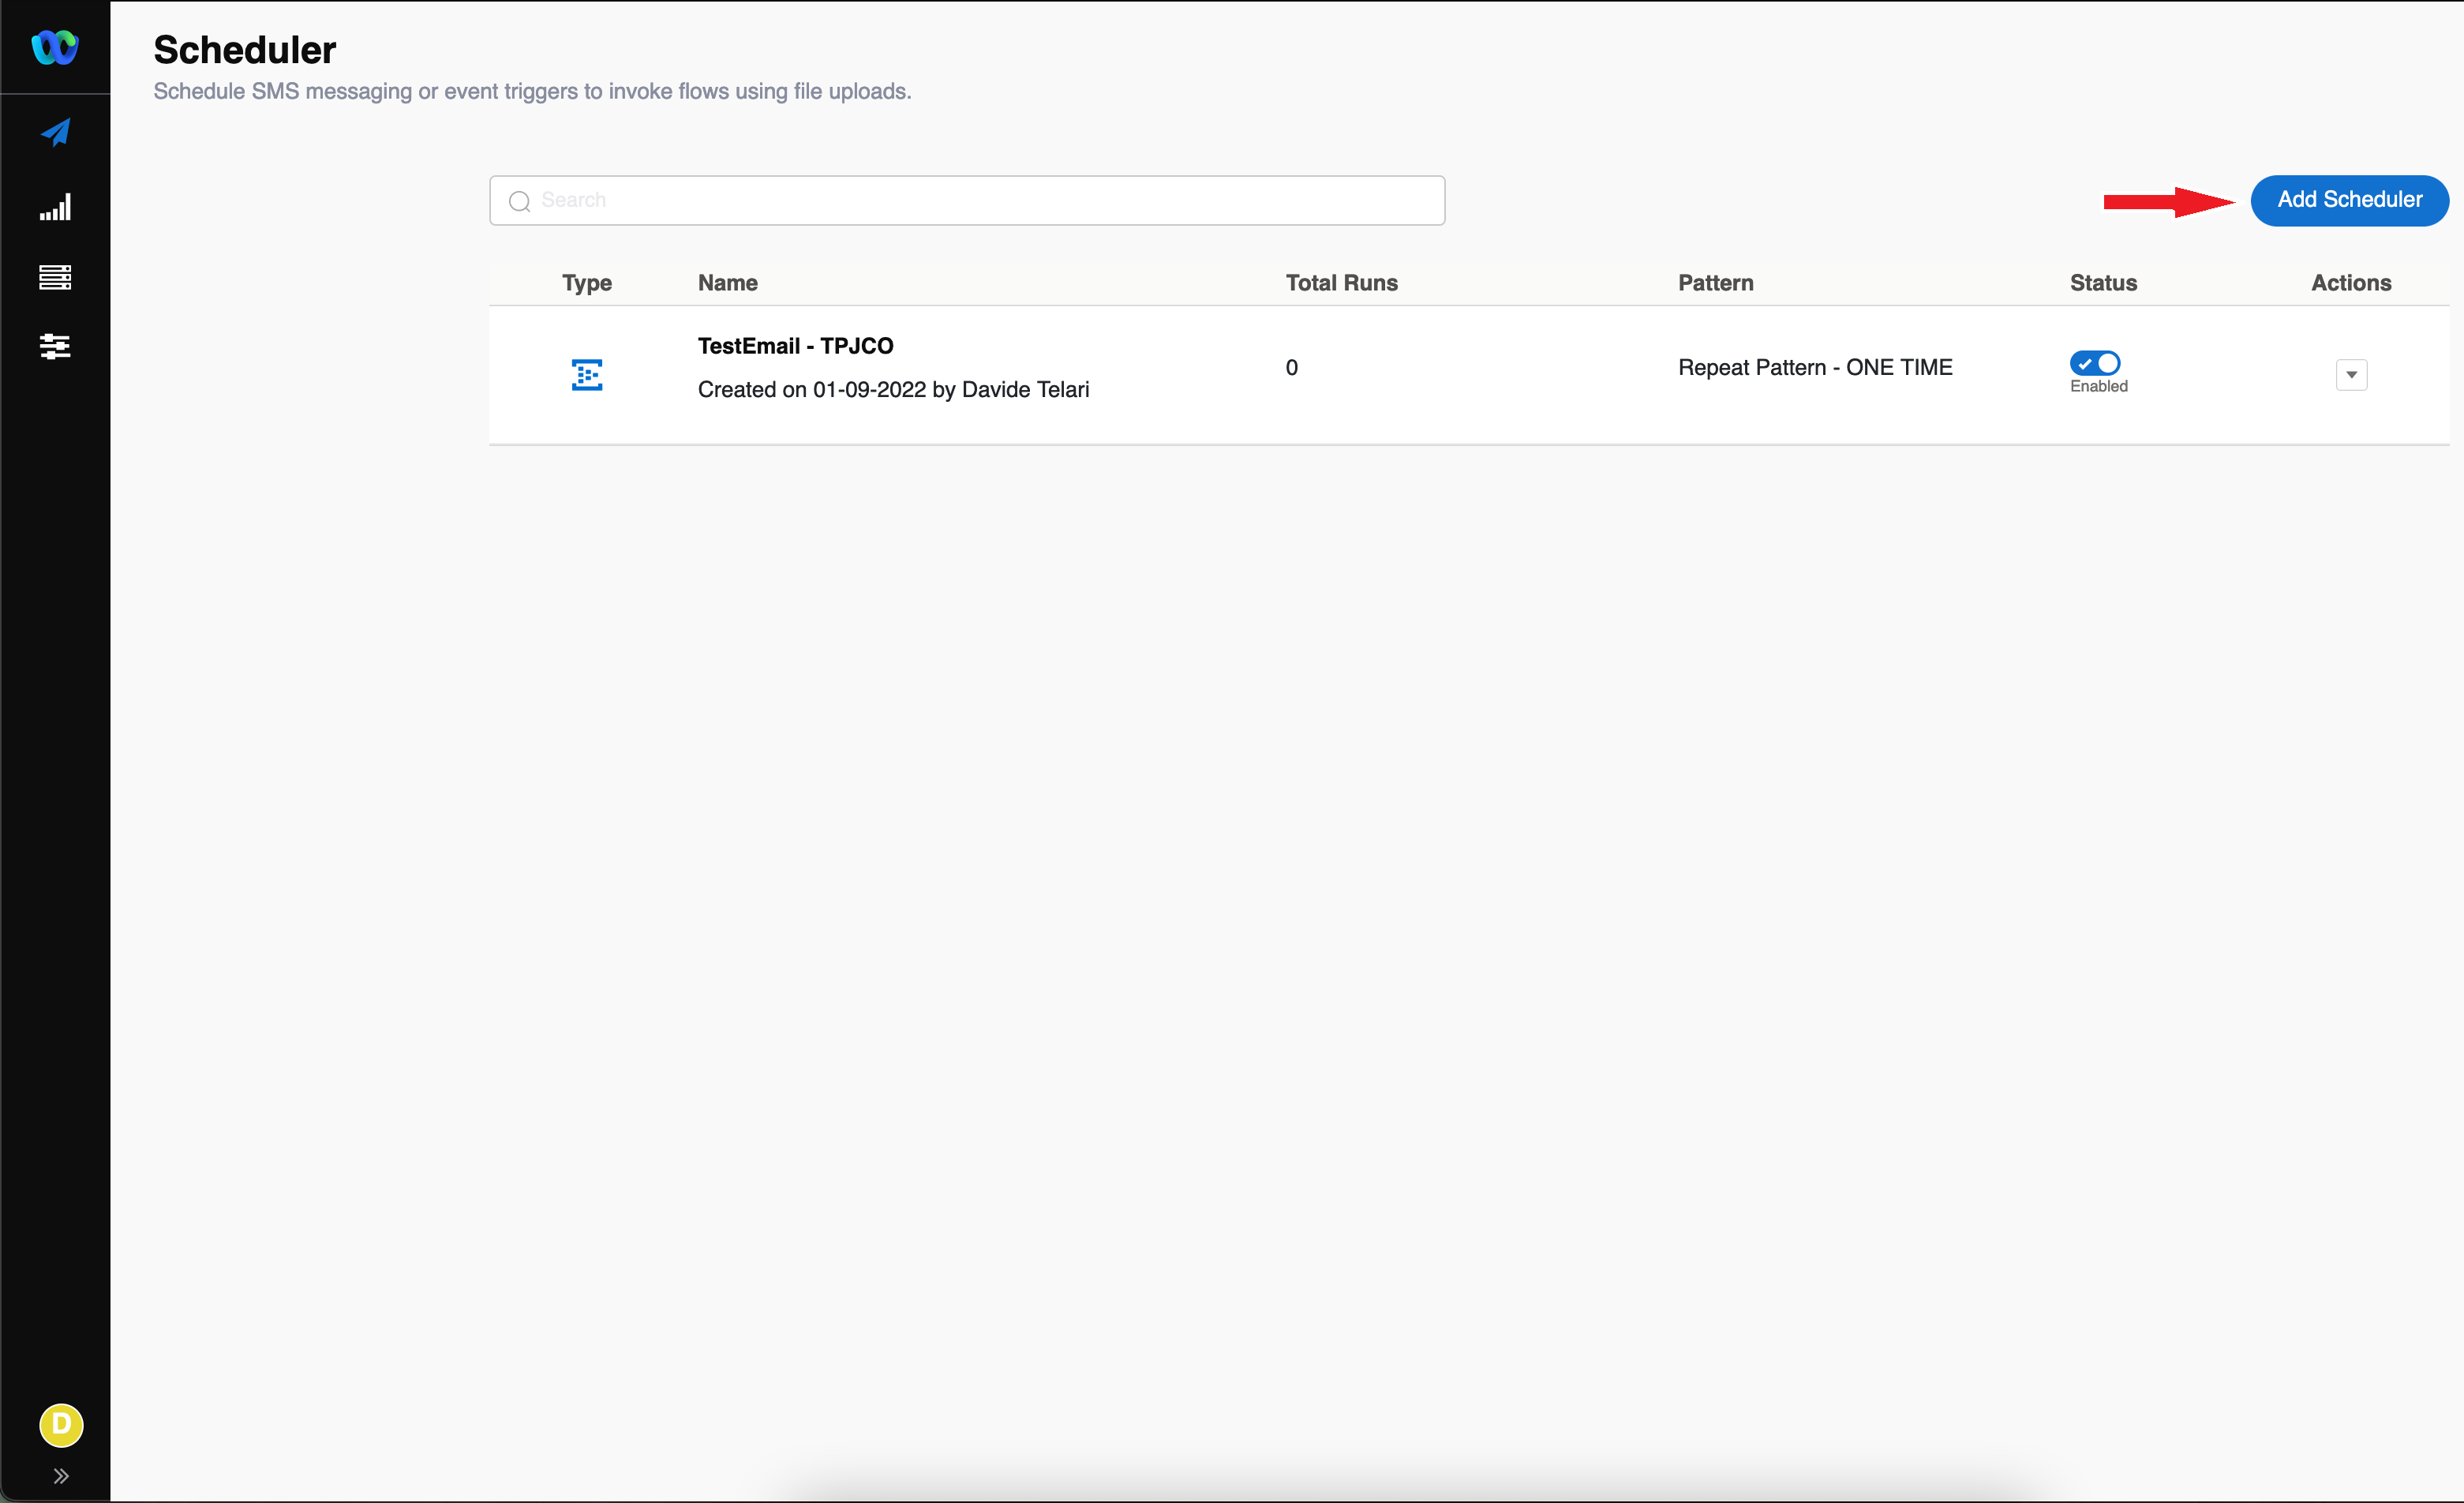
- Click on SMS
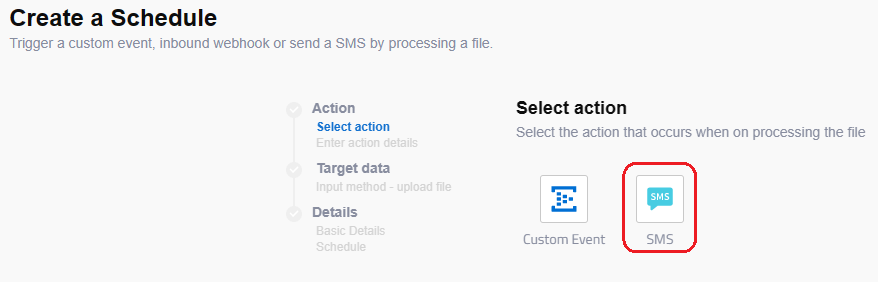
- Select options as described below & click Next
- Select Service : The Service you’ve setup.
- SMS Type : TEXT
- Sender ID : Select the number from where the SMS will be sent out
- Extra Parameters : are only required in case of specific in-country regulation
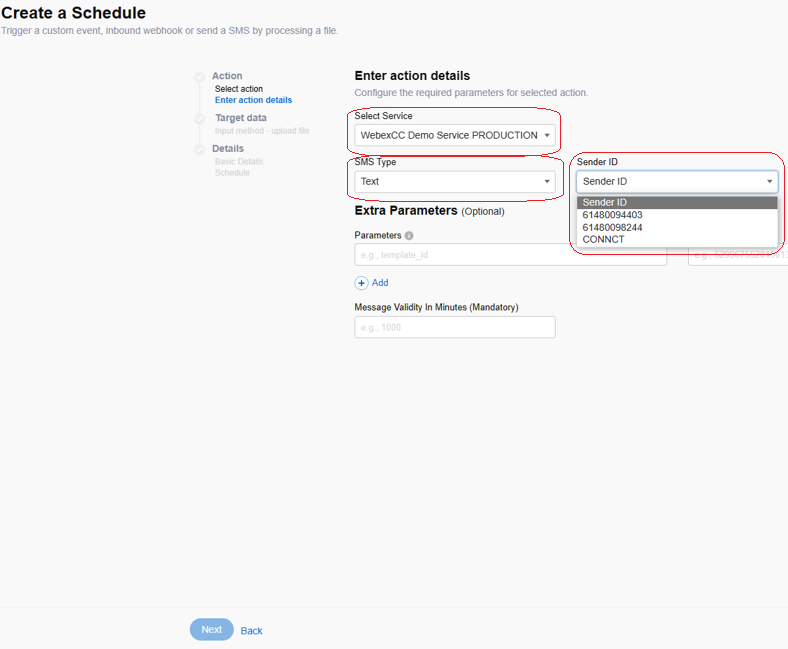
-
Open MS Excel or any other CSV file editor & Add the following column names:
- MessageType – In this column add at least one entry as ‘SMS’ and at least one entry as ‘email’
- Destination - In this column add the respective SMS numbers and Email addresses to perform the test with
- CustomerName – in this column add the Name (and/or Surname) for everyone added to the list
- Save the file.
- Choose if to upload a file created in previous step or use an existing SFTP connection. For this lab, we’ll choose Upload File.
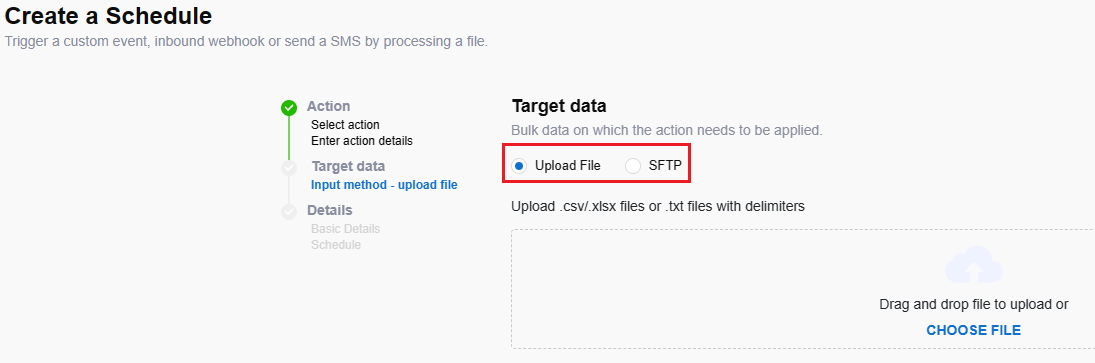
- Once the file is imported, the scheduler will validate the file and its content. As Recipient Variable select the column containing the Destination numbers for your message.
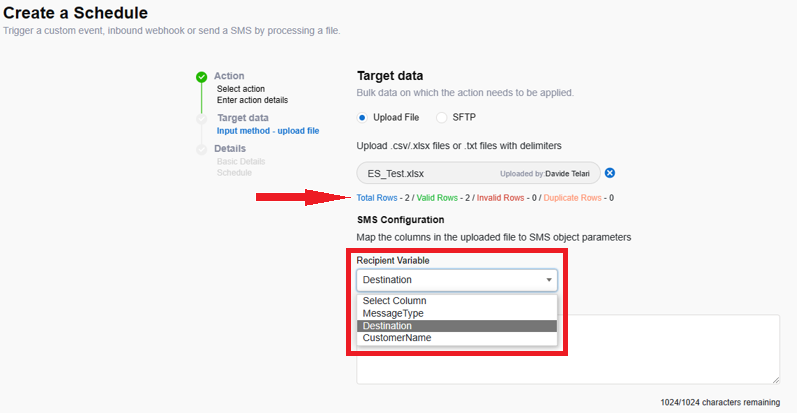
- Build the custom message in the Message Body and use $(ColumnName) to add the values from the desired column as part of the text & Click Next.
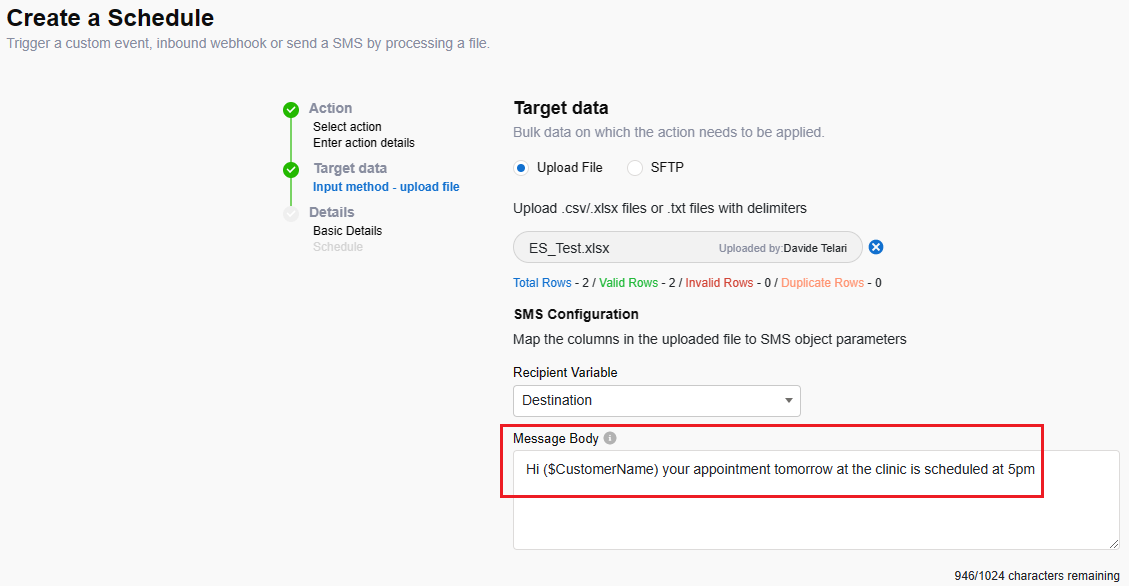
- Add a name for this Event & Click Next.
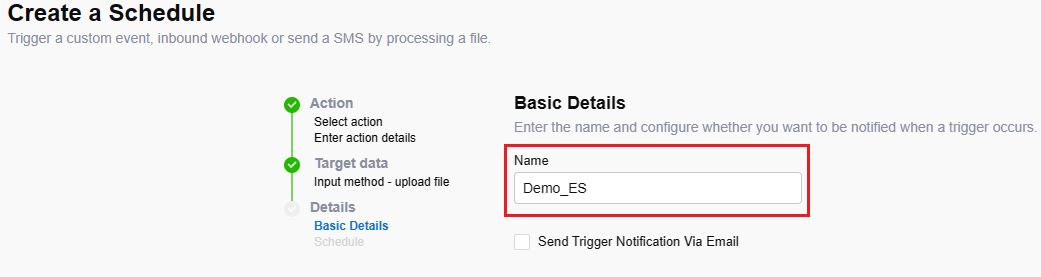
- Choose a schedule for this event to be executed & Click Save.
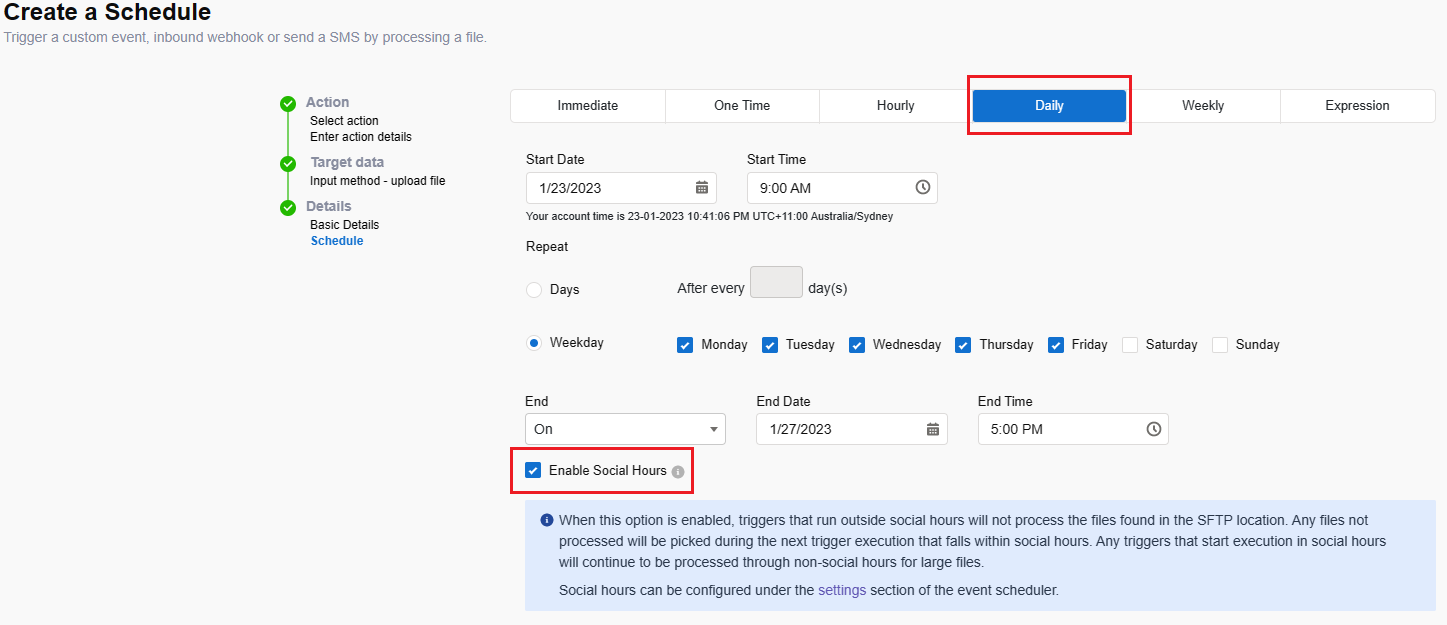
3. Schedule Custom Event
Configuration sequence for Custom Event is as below.
Create new Integration –> Create a new Flow –> Create a new Schedule
Custom Events use source files containing data that will be used by flows when sending out the desired messages (i.e. destination addresses, names, dates). This section will take a ‘Appointment Reminder’ use case Scenario as reference, to describe the process administrator will have to follow when sending reminders via SMS or Email to a list of customers
3.1 Create new Integration
- Inside Webex Connect portal, click on Assets & then click on Integrations.
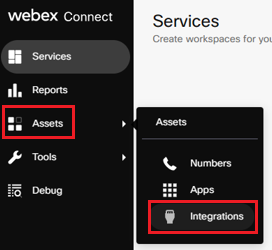
- Click on Add Integrations & then click on Custom Event

- Name the event (i.e. “EVENT Appointment Reminder”)
- Add the following parameters:
- type (String)
- name (String)
- destination (String)
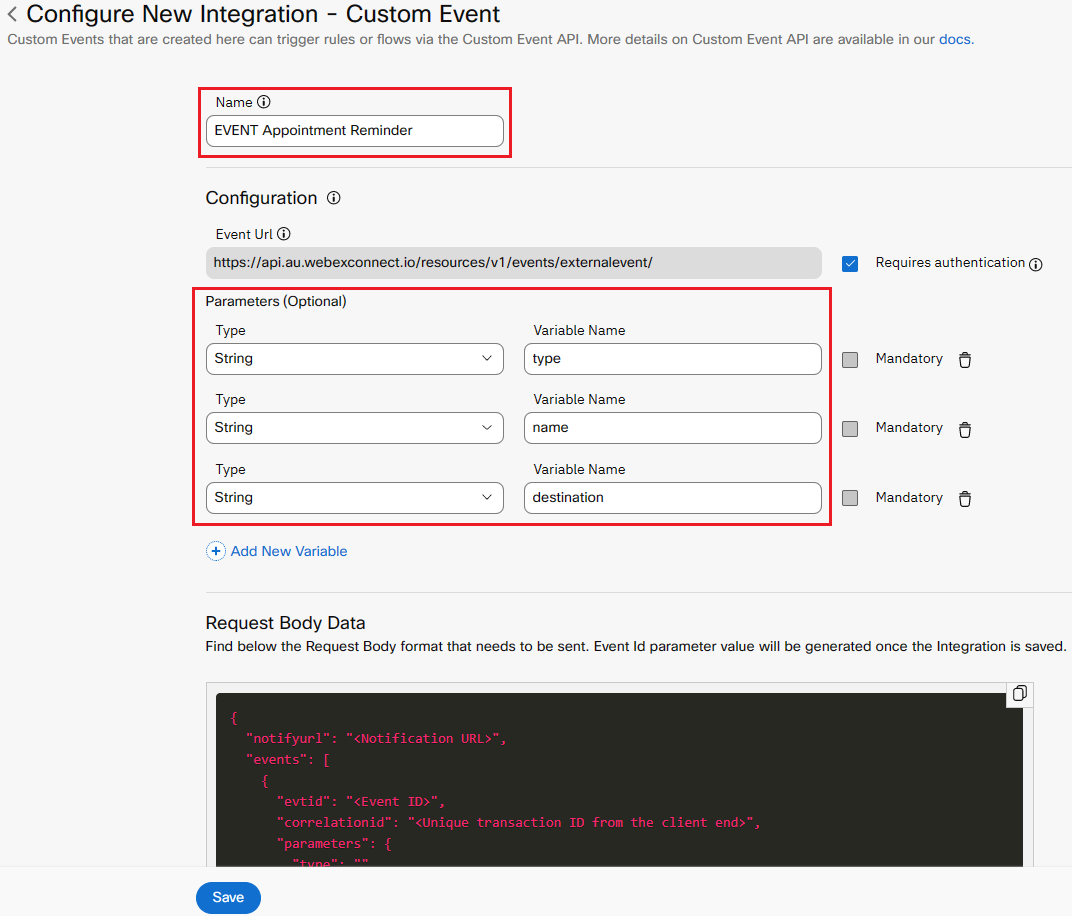
- Leave rest of the config unchanged & Click on the Save button.
3.2 Create a new Flow
- Inside Webex Connect portal, navigate to Services > Select the desired service > Click on Flows > Click on Create Flow.
- Enter Flow name (e.g., “AppointmentReminder”). In the ‘Method’ select New Flow, Select Start from Scratch & Click Create.
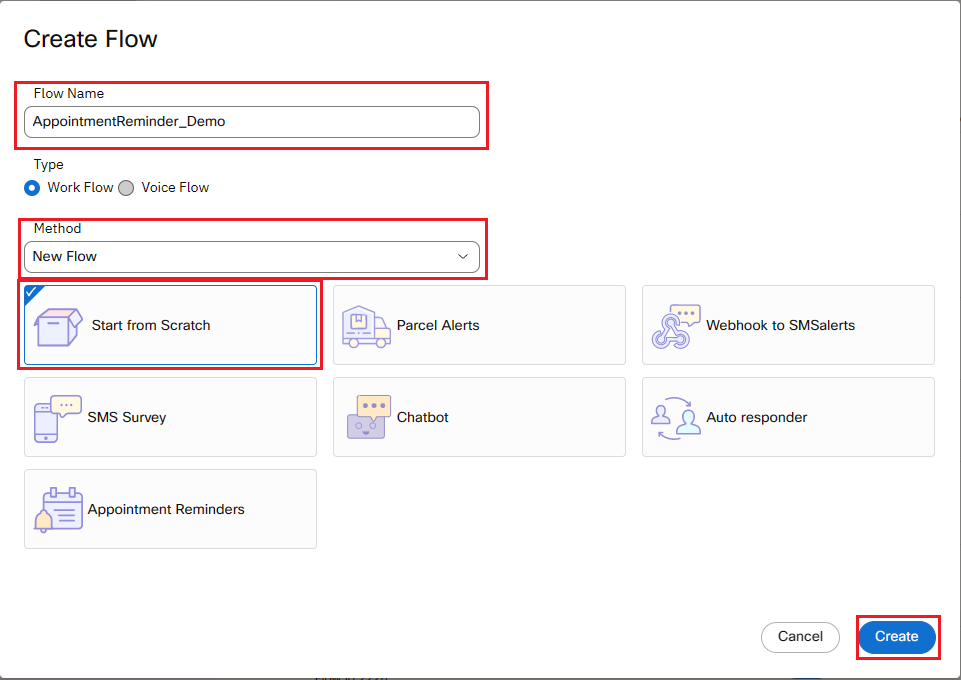
- On the Select Trigger Category page, click Custom Event
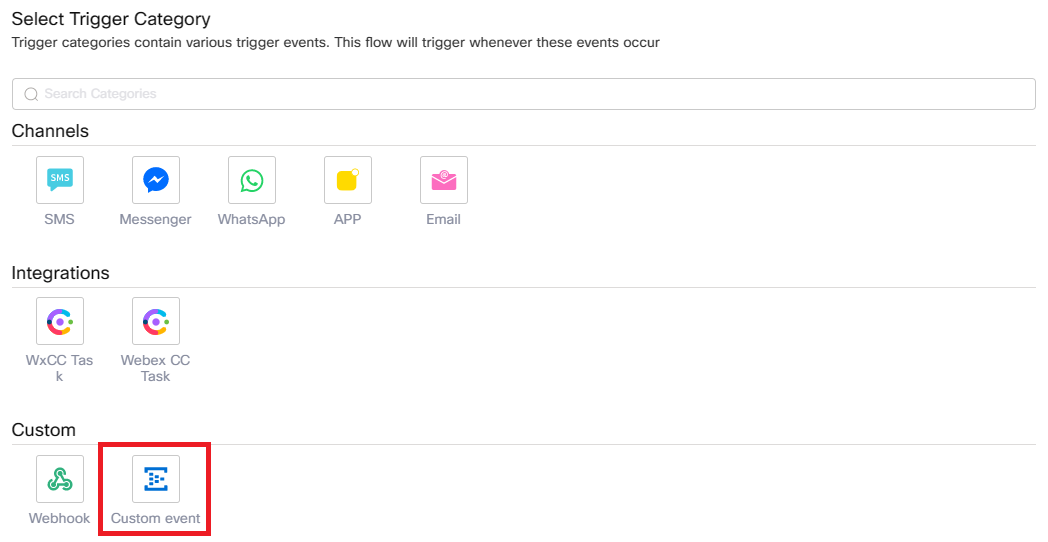
- Once the flow editor loads the Configure Custom Event node will automatically open. From Select Event dropdown, select ‘EVENT Appointment Reminder’ & the list of Parameters will automatically populate. Click Save.
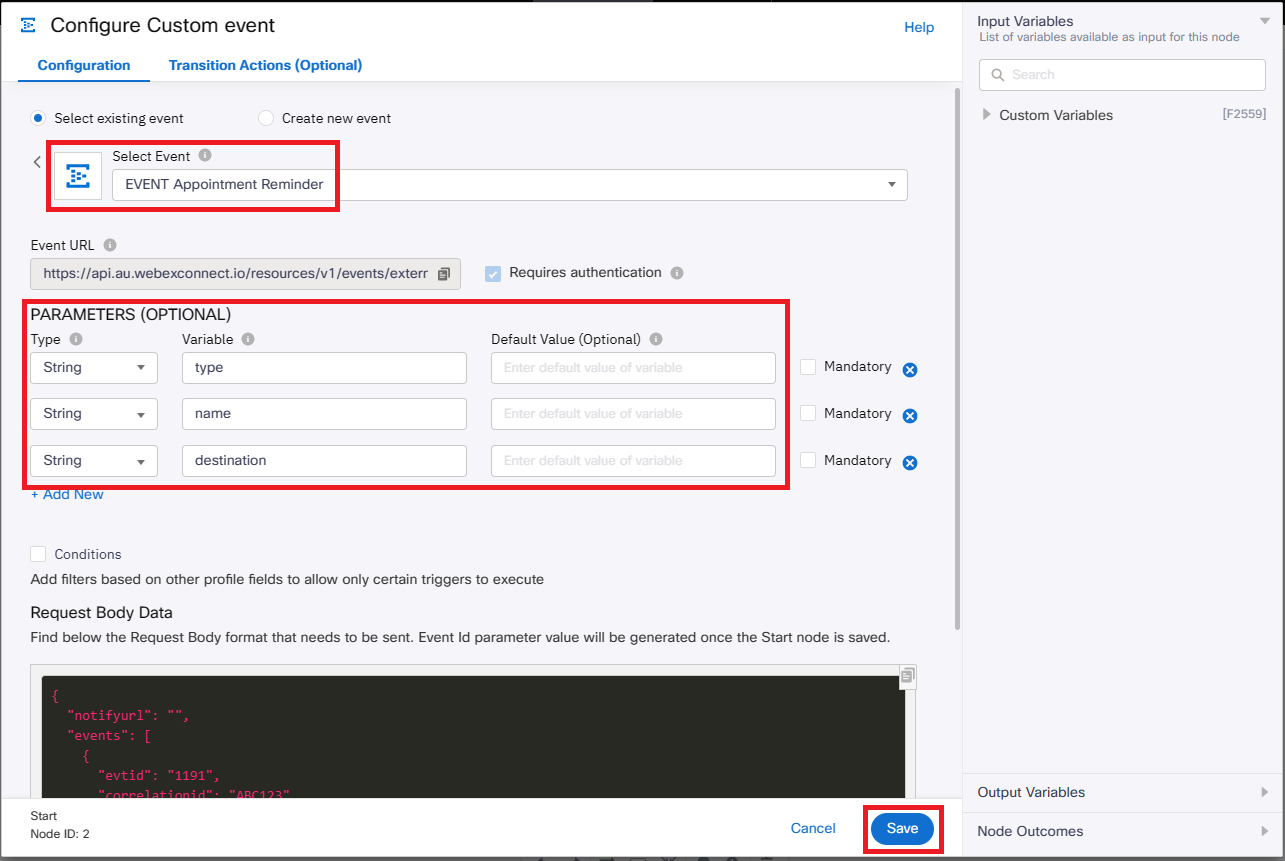
- From node menu (left) select Branch node and drag it in to flow canvas (right).
- Connect Configure Custom Event node to Branch node
- Edit Branch node (double click on the node)
- Click in the Branch 1 VARIABLE field (on left), select from the Input Variables list (on right ) ‘Start’ > customEvent.type
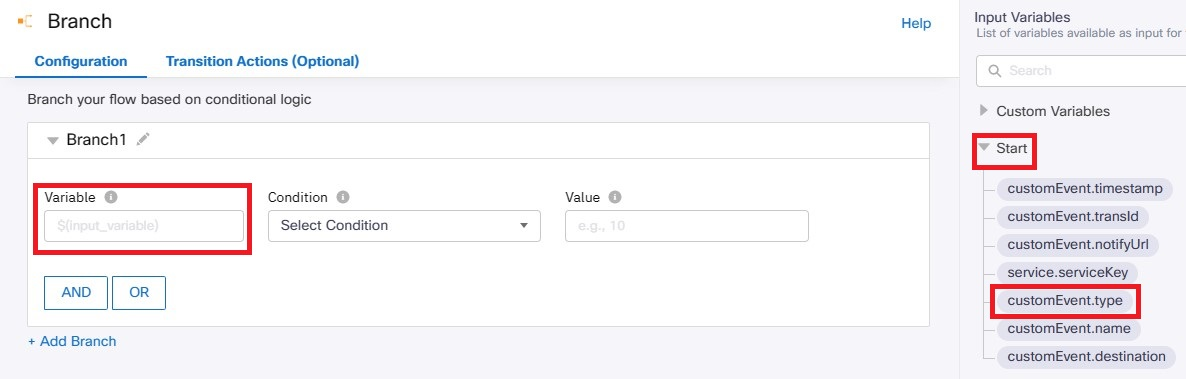
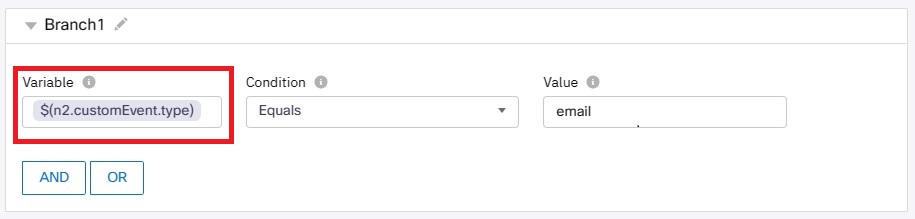
- From the Condition drop-down menu select ‘Equals’
- In the VALUE field enter “email” (without quotes)
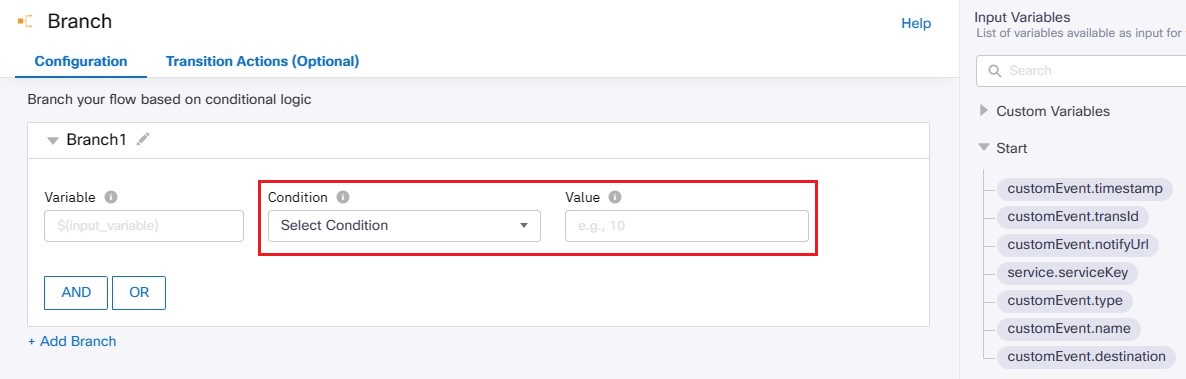
- Rename Branch 1 into ‘EMAIL’

- Click on Add Branch
- Click in the Branch 2 VARIABLE field (on left), select from the Input Variables list (on right ) ‘Start’ > customEvent.type
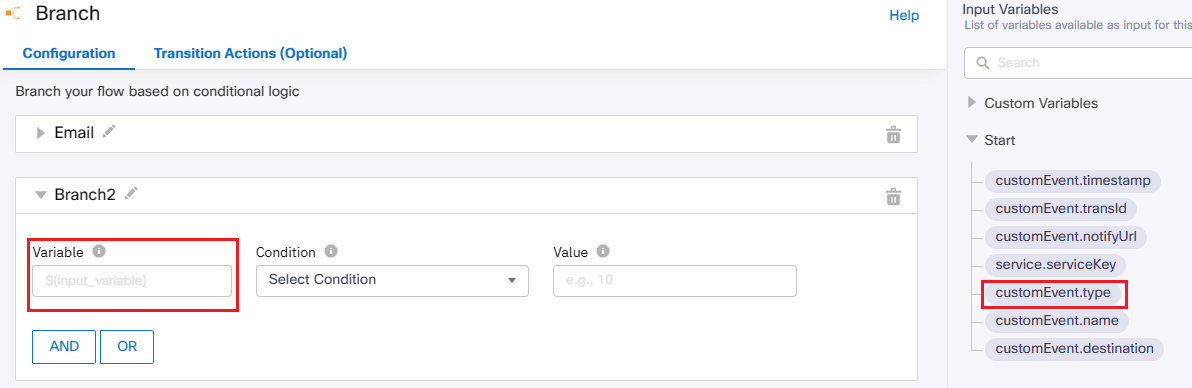
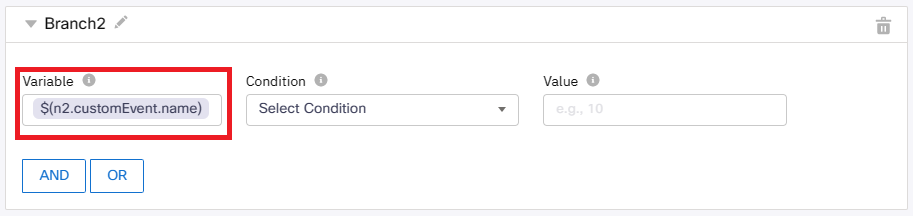
- From the Condition drop-down menu select ‘Equals’
- In the VALUE field enter “SMS” (without quotes)
- Rename Branch 2 into ‘SMS’
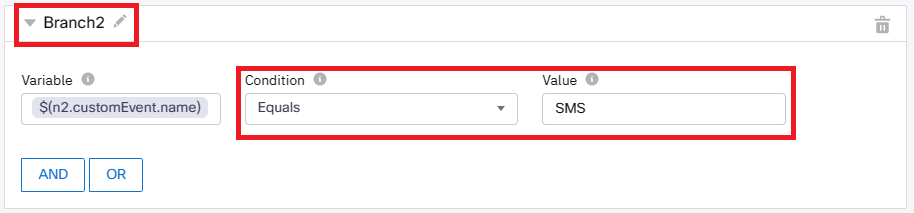
- Click Save.
- From the node menu (left) select the Email node and drag it in the flow. Repeat this step so to have 2x Email nodes in the flow. Also do the same for getting one SMS node.
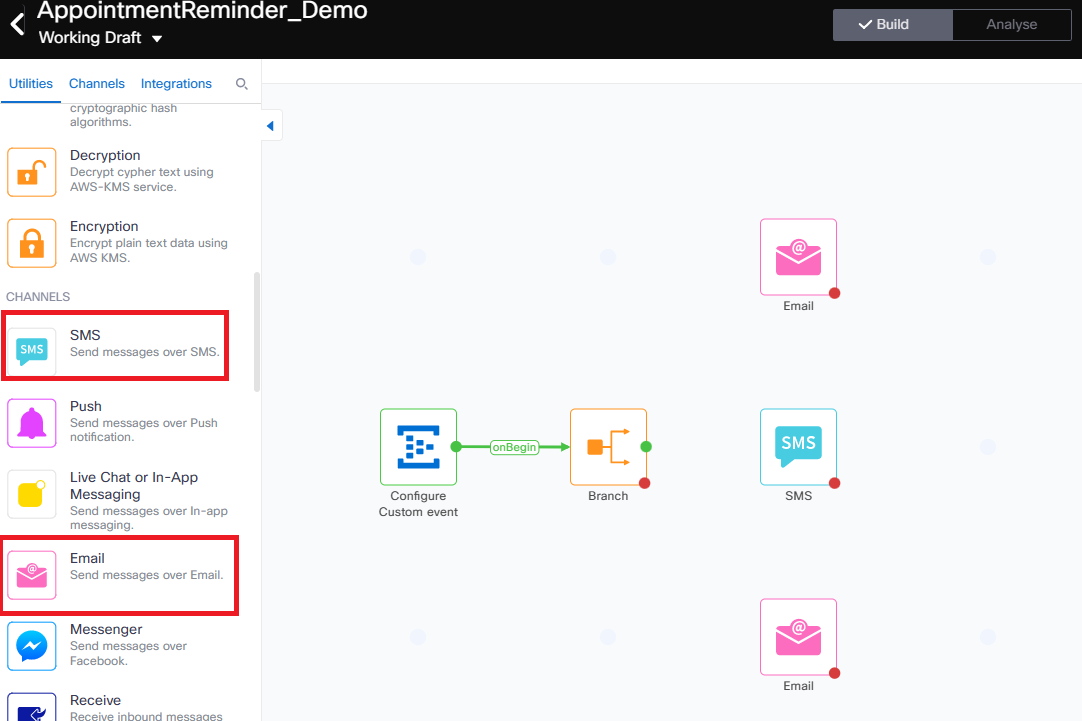
- Edit the first Email node as described below & click Save.
- In Destination Type select Email Id
- In Destination enter $(n2.customEvent.destination)
- In From Name enter “Booking Reminder”
- In Email Type select Text
- In Subject enter “Gentle reminder about your booking”
- In Message enter “Hi $(n2.customEvent.name), we would like to remind you that your appointment is tomorrow!”
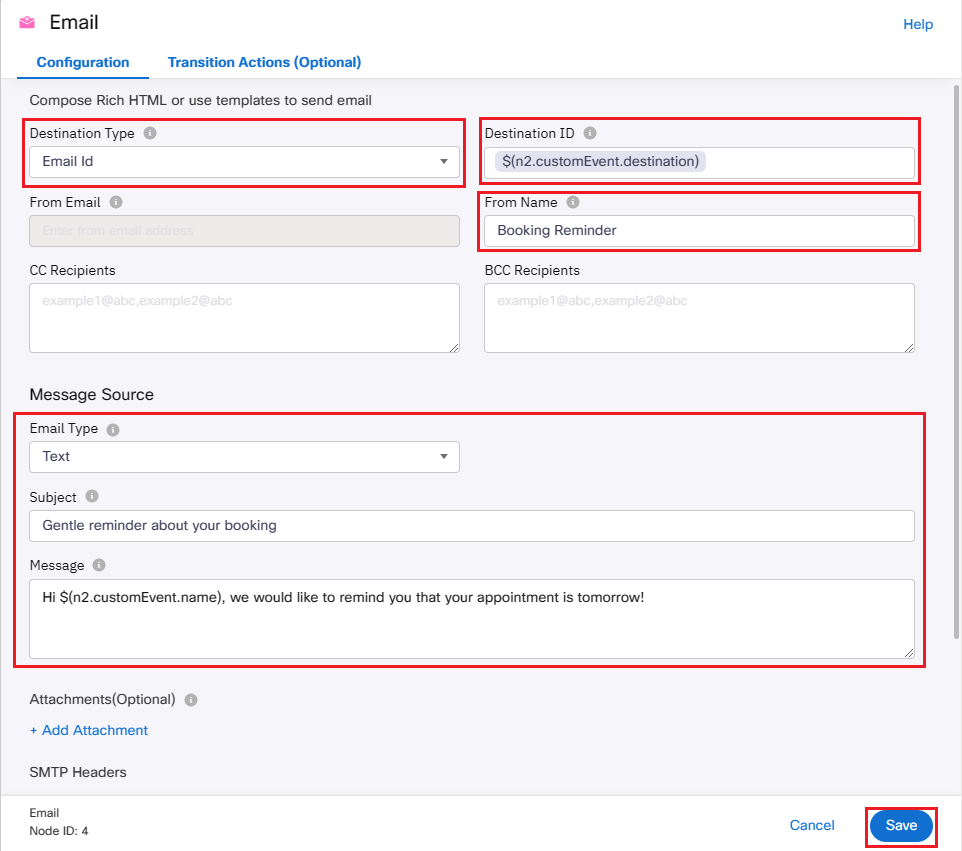
-
Edit the first SMS node as described below & click Save.
- In Destination Type select msisdn
- In Destination enter $(n2.customEvent.destination)
- In From Number drop-down menu select the SMS number from where you wish to send the SMS.
- In Message Type select Text.
- In Message enter “Hi $(n2.customEvent.name), we would like to remind you that your appointment is tomorrow!”
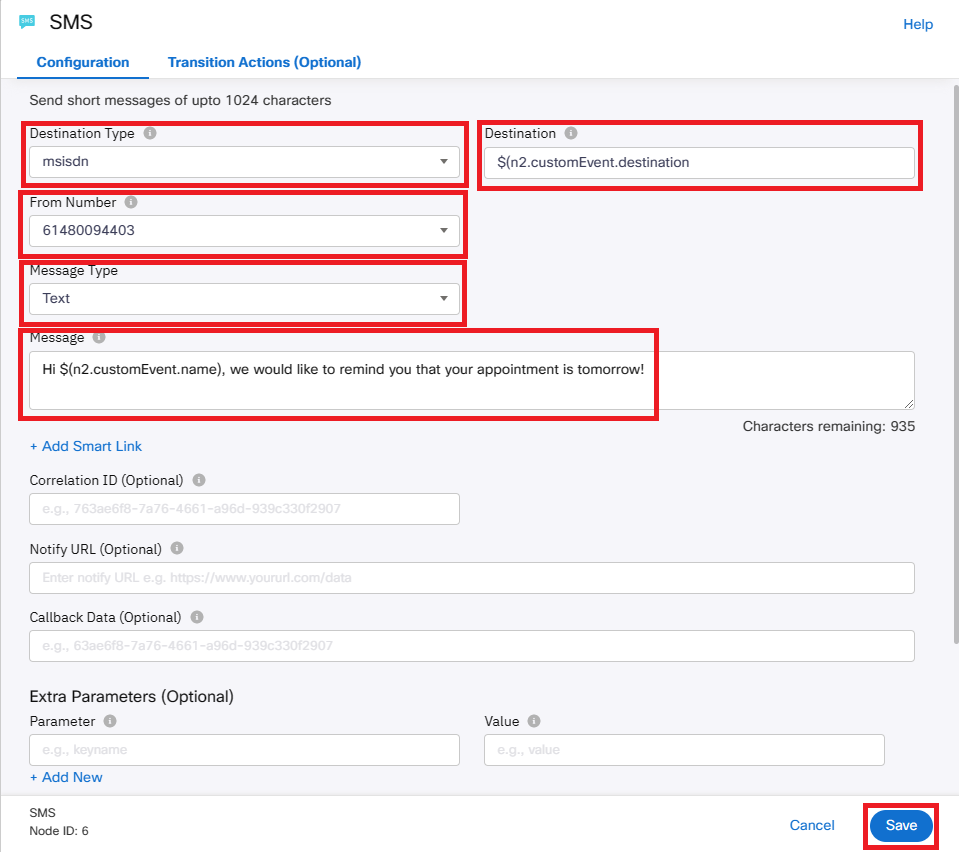
-
Edit the second Email node as described below & click Save.
- In Destination Type select Email Id.
- In Destination enter the email address from an administrator (who will be notified in case of issues).
- In From Name enter “Booking Error”
- In Email Type select Text
- In Subject enter “Error message from AppointmentReminder flow”
- In Message enter.
“Something went wrong with the scheduled message that contained following data:
Type = $(n2.customEvent.type) Name = $(n2.customEvent.name) Destination = $(n2.customEvent.destination) The message has not been delivered.”
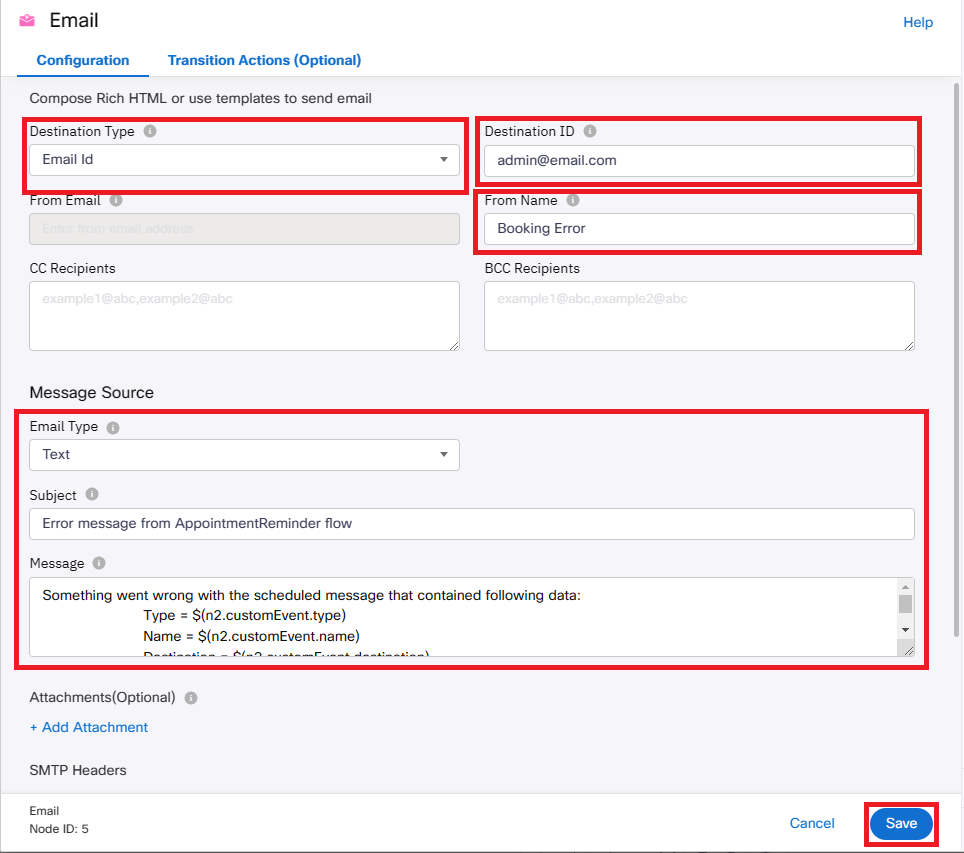
- Click on the Settings icon (near the Save button on the top-right) & enable the Descriptive logs toggle, put 60 in “Enabled for” field to enable Descriptive logs for an hour. Click on Save
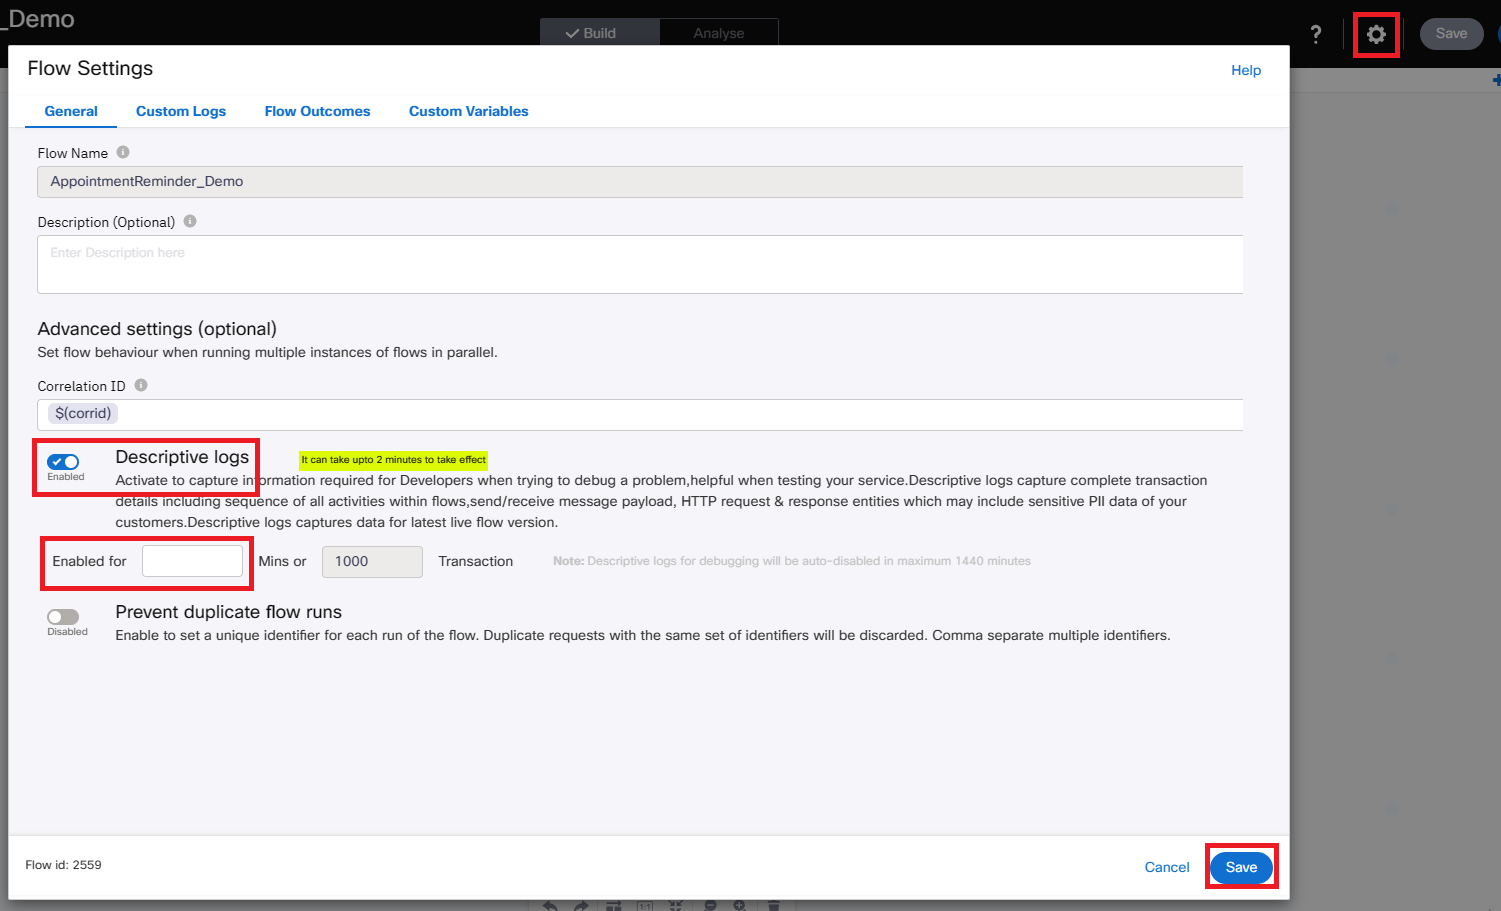
- Click on Save (on the top-right of the flow canvas).
- Drag the Successful Outcome from the SMS and Email nodes to any empty point of the flow canvas. On the screen that opens, as Node Event, select OnSuccess & as Flow Result, select 101 –…[ Success ]. Click Save
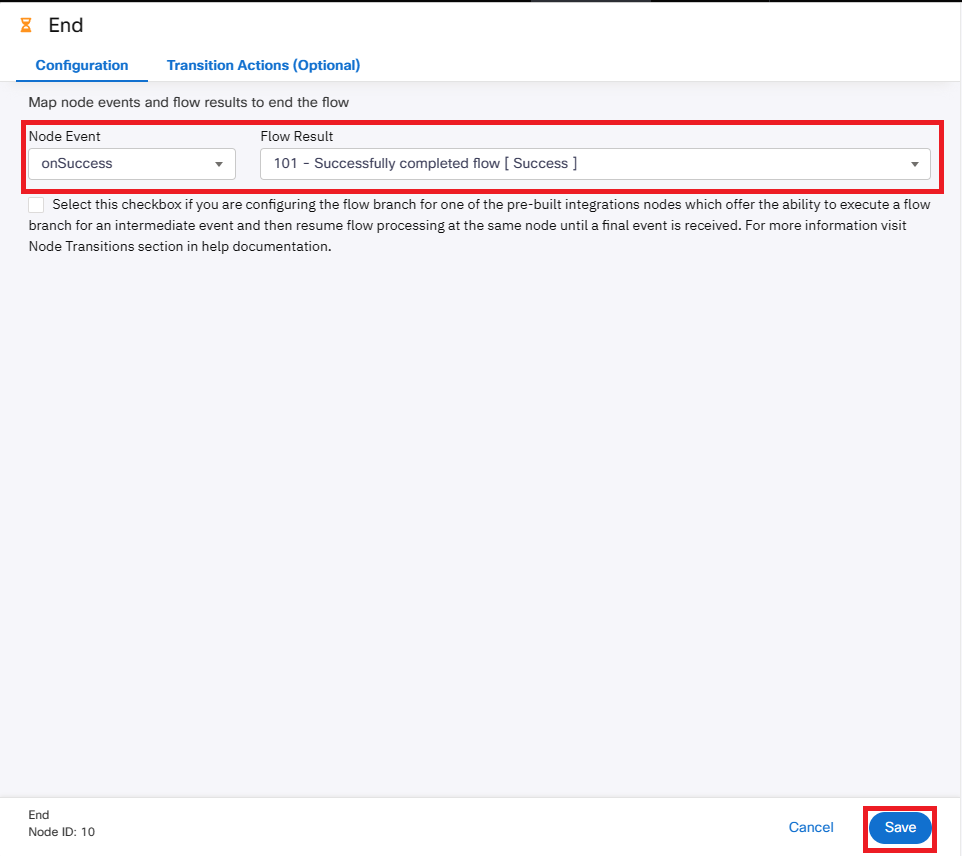
- Drag the Error Outcome from the SMS and Email nodes to any empty point of the flow canvas. On the screen that opens, as Node Event, select OnError & as Flow Result, select 102 –…[ Error ]. Click Save
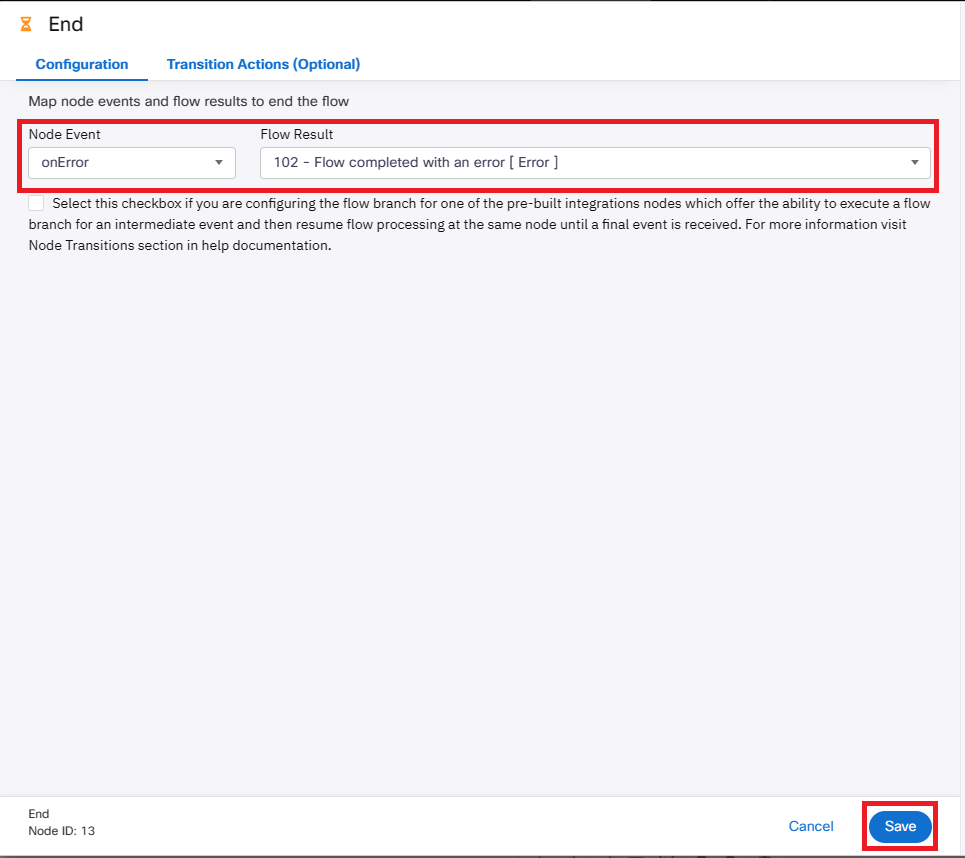
- Drag the Error Outcome from the SMS and Email nodes to any empty point of the flow canvas. On the screen that opens, as Node Event, select OnPolicyFail & as Flow Result, select 102 –…[ Error ]. Click Save

- Connect the Branch node from the Successful Outcome to the first Email node & Select EMAIL from the drop-down menu that will pop-up.
- Connect the Branch node from the Successful Outcome to the SMS node & Select SMS from the drop-down menu that will pop-up.
- Connect the Branch node from the Successful Outcome to the second Email node (the ‘None of the above’ option will be automatically selected).
- Connect the Branch node from the Error Outcome to the second Email node.
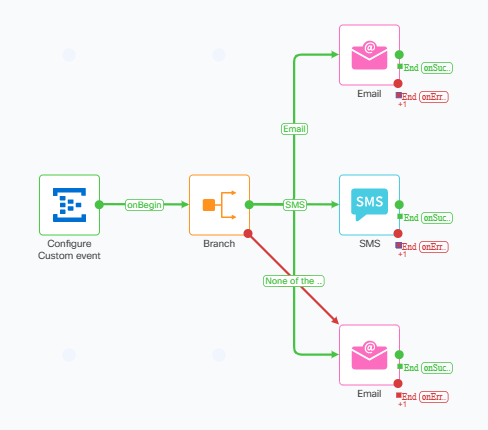
- Click on MAKE LIVE (near the Save button on the top-right), Select the preconfigured Email Application (from where outbound emails will be sent) & Click on Make Live.
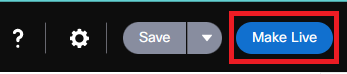
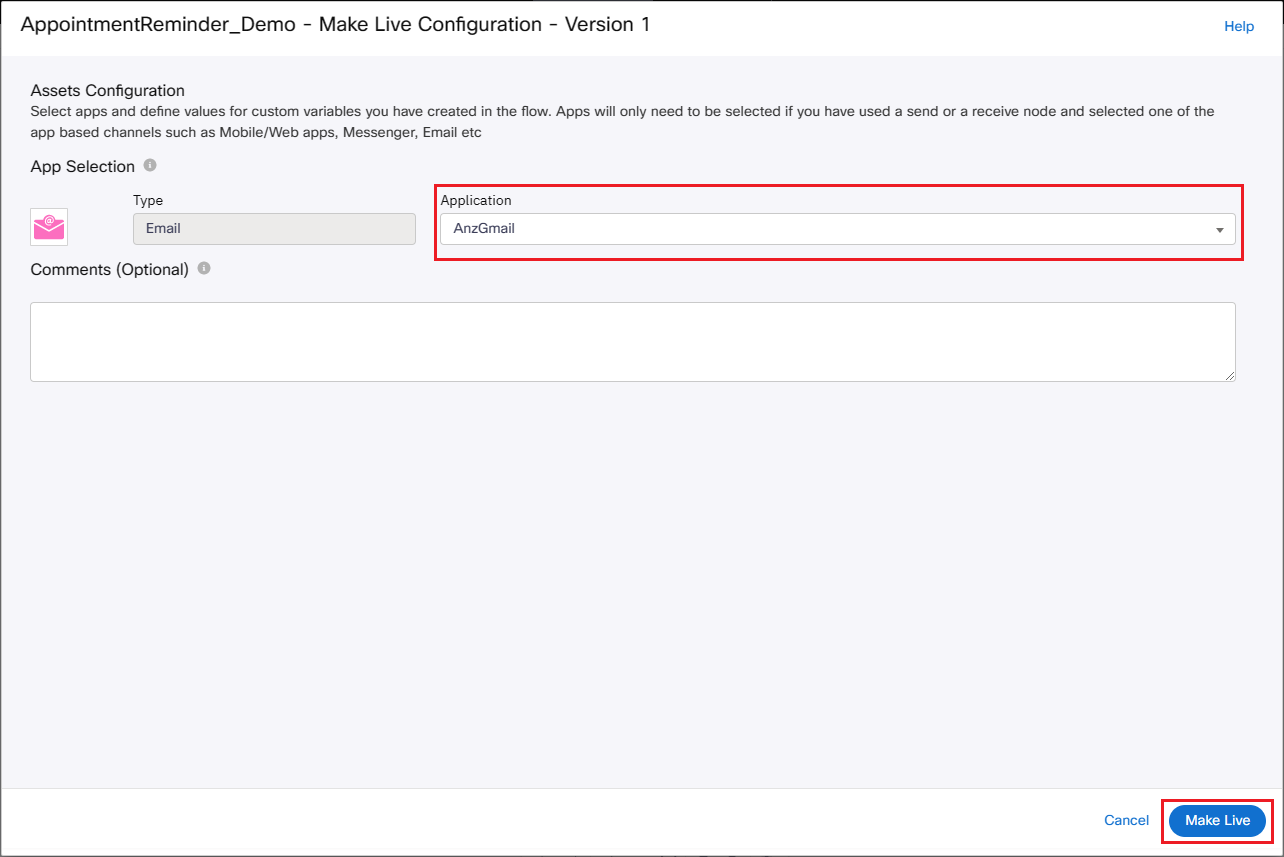
-
Open MS Excel or any other CSV file editor & Add the following column names:
- MessageType – In this column add at least one entry as ‘SMS’ and at least one entry as ‘email’.
- Destination - In this column add the respective SMS numbers and Email addresses to perform the test with.
- CustomerName – in this column add the Name (and/or Surname) for everyone added to the list
-
Save the file.
3.3 Create a new Schedule
- Inside Webex Connect portal navigate to App Tray & click on Event Scheduler
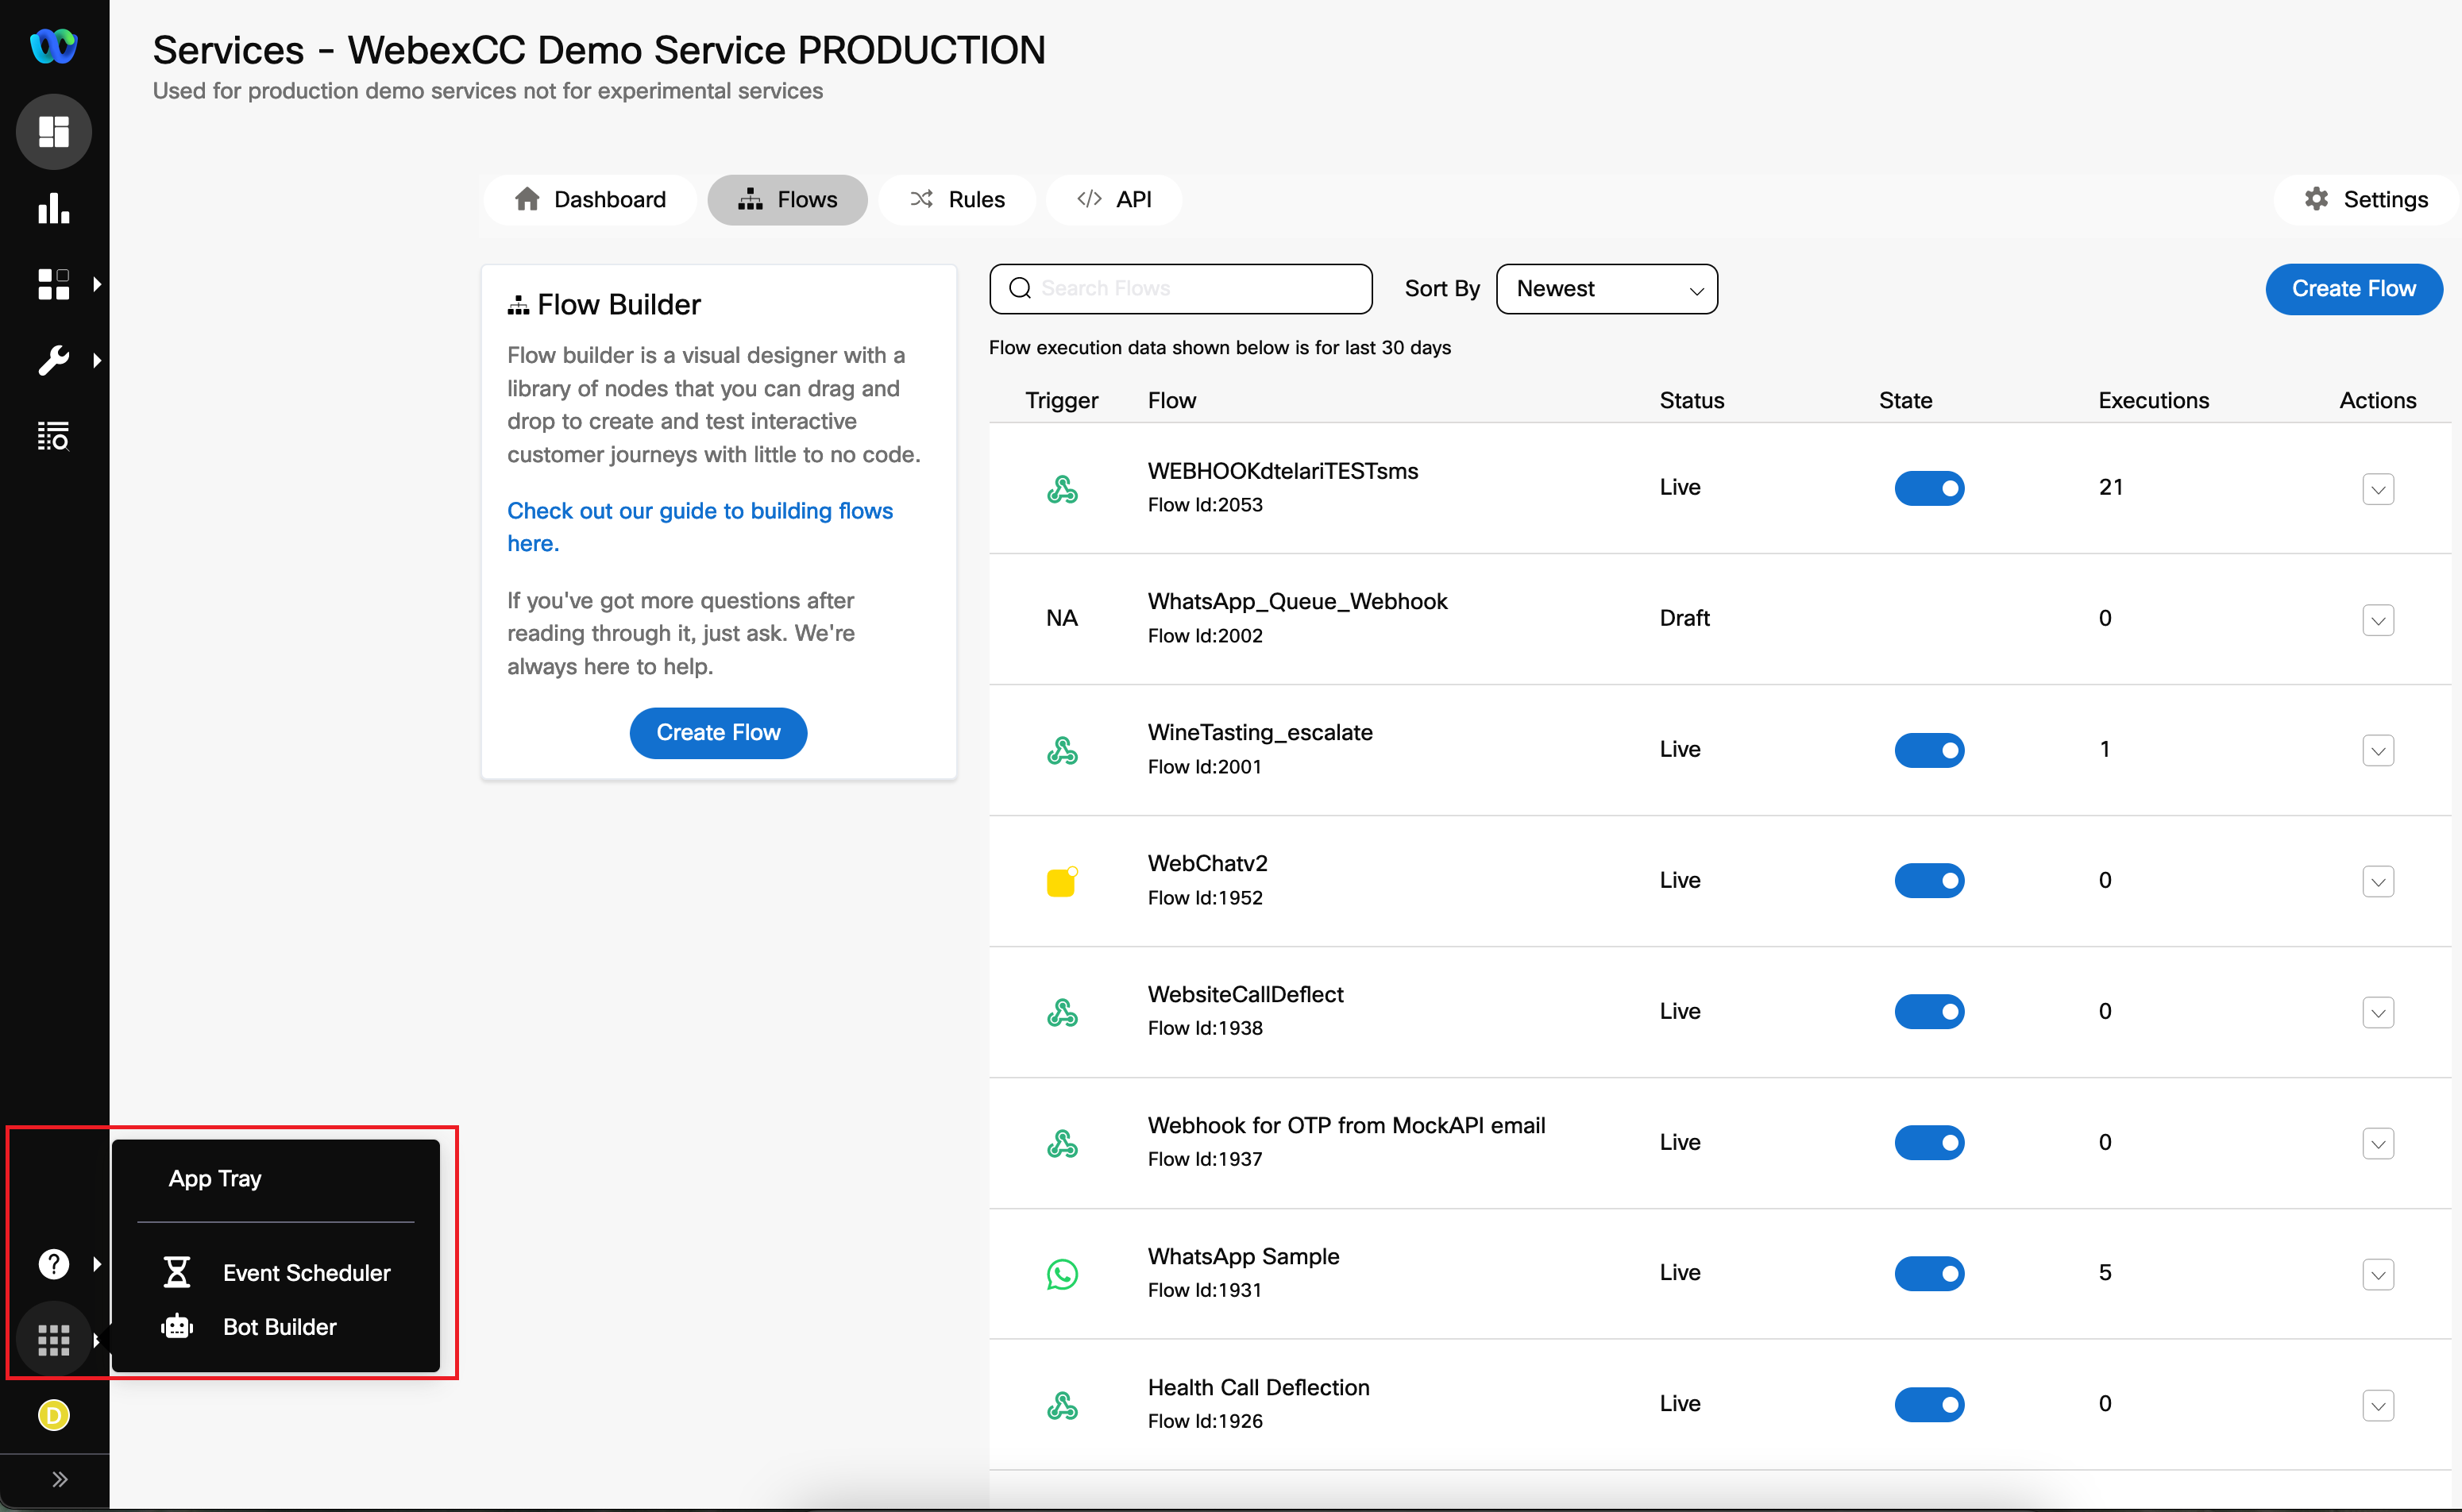
- On Scheduler page, click on Add Schedule button.

- Click Custom Event
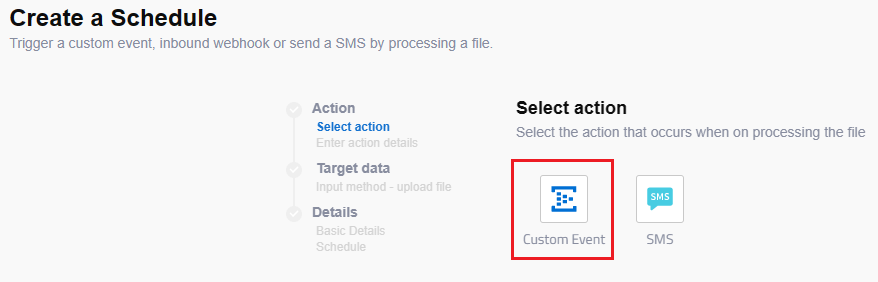
- Select the Service containing the AppointmentReminder flow & Select EVENT Appointment Reminder from the ‘Select Event / Inbound Webhook’ drop-down menu. Click Next.
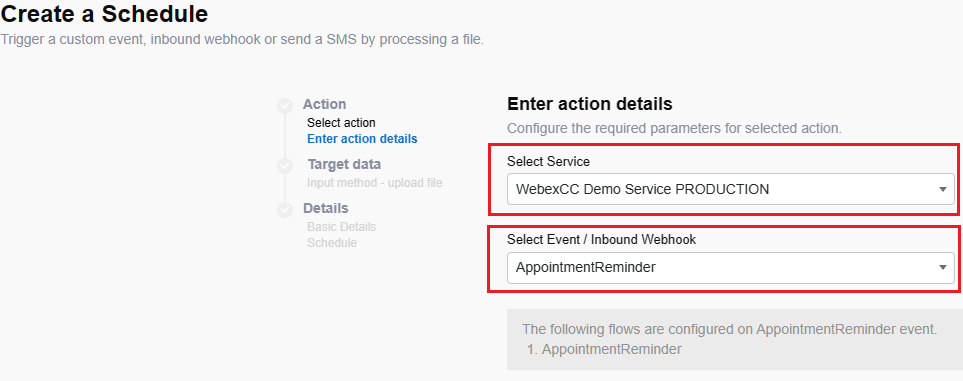
- Select ‘Upload File’, Drag and drop the previously created spreadsheet in the marked area for file drop. The page will automatically refresh and will request the admin to map the Custom Event Integration parameters with the Column Names in the loaded file. Map the FILE HEADERS as the name indicates. The page will automatically refresh and will notify about Total, Valid, Invalid and Duplicate Rows from the file (for additional validation). Click on Next button
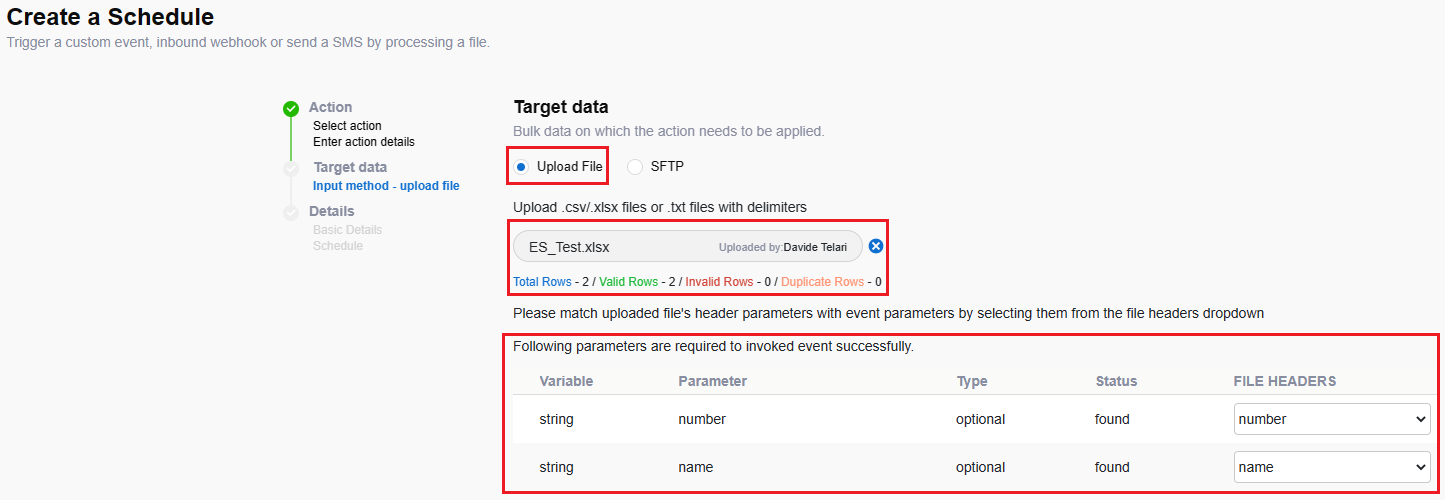
- Add “Appointment Reminder Schedule” as name for this Event & Click on Next button
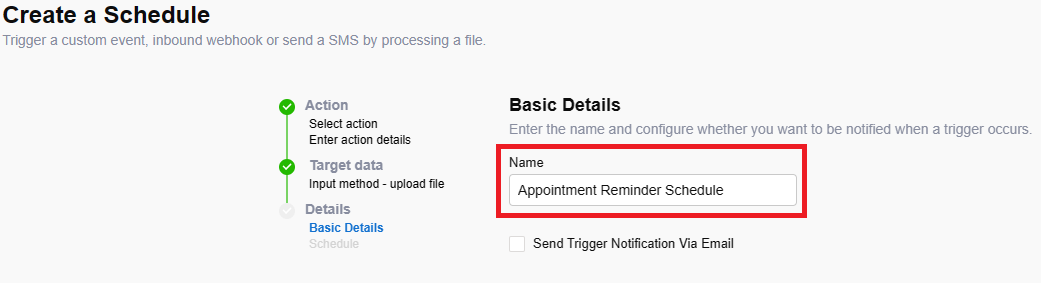
- Choose ‘Immediate’ as the execution schedule for this event (the event will be actually executed 2 minutes later). Click Save.
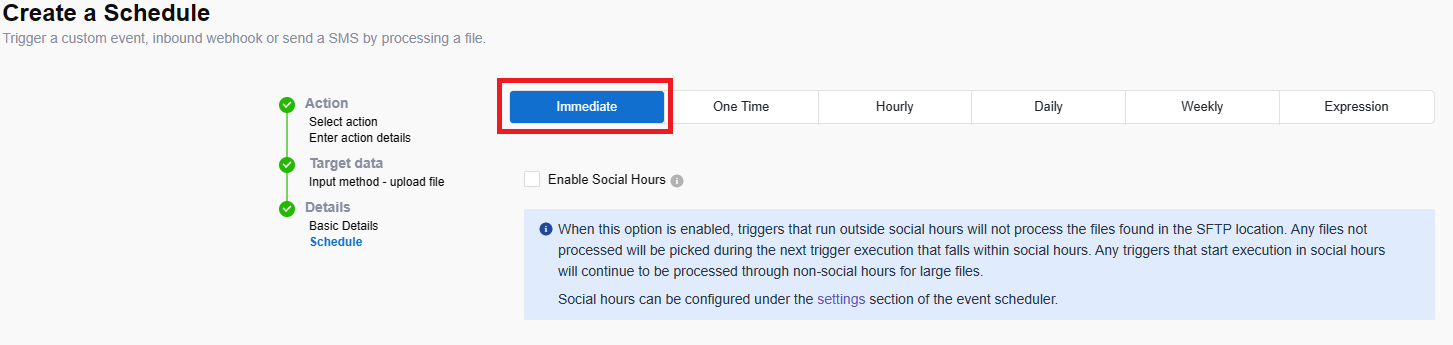
Congratulations, you have completed this section!
Lab.12.18 - Inbound Webhooks
Table of Contents
| Topic | Lab Type | Difficulty Level | Estimated length |
|---|---|---|---|
| Creating an Inbound webhook flow | Practical Lab | MED | 15 min |
| Creating a voice flow in flow control | Practical Lab | HARD | 15 min |
| Test the Inbound Webhook | Practical Lab | EASY | 5 min |
Introduction
Lab Objective
Inbound Webhooks generate a unique endpoint that can be embedded into your applications to notify Webex Connect of events occurring on business systems.This lab is designed to showcase the capabilities of an inbound Webhook in Webex Connect.
In this lab, we will explore how an Inbound Webhook can be used to generate an email to a customer that initiated the contact through a voice call.
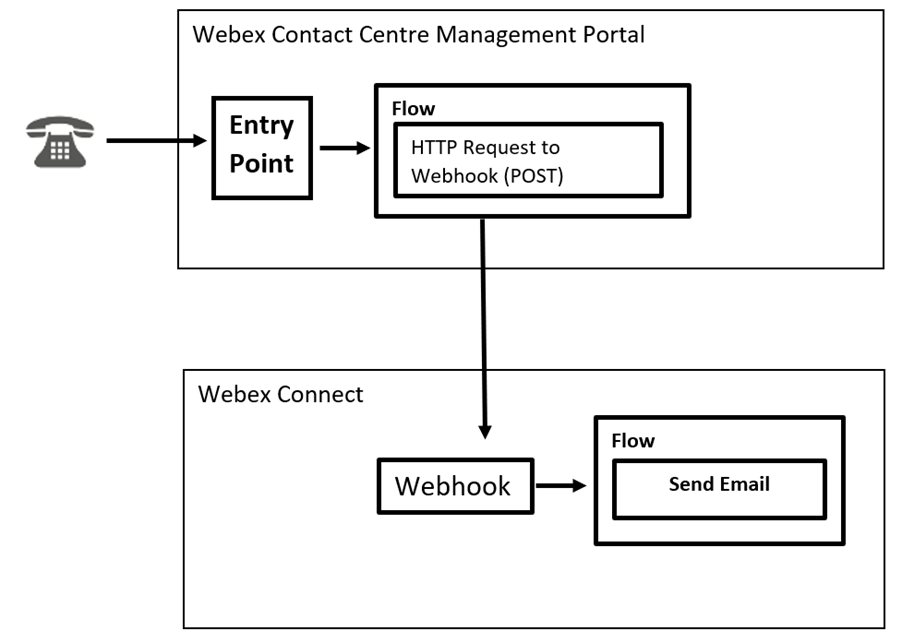
Pre-requisite
- Admin credentials to login to WxCC and Webex Connect portal
- Knowledge of WxCC Connect flows and basic troubleshooting
Quick Links
Control Hub: https://admin.webex.com
US Portal: https://portal.wxcc-us1.cisco.com/portal
US Agent Desktop: https://desktop.wxcc-us1.cisco.com
UK Portal: https://portal.wxcc-eu1.cisco.com/portal
UK Agent Desktop: https://desktop.wxcc-eu1.cisco.com
EMEA Portal: https://portal.wxcc-eu2.cisco.com/portal
EMEA Agent Desktop: https://desktop.wxcc-eu2.cisco.com
ANZ Portal: https://portal.wxcc-anz1.cisco.com/portal
ANZ Agent Desktop: https://desktop.wxcc-anz1.cisco.com
Webex Connect Documentation: https://help.imiconnect.io/
1. Create an Inbound Webhook
- Click on Assets —> Integrations from the left navigation pane
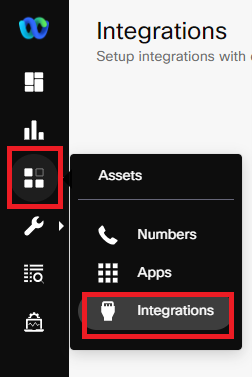
- Click on the Add Integration button and select Inbound Webhook
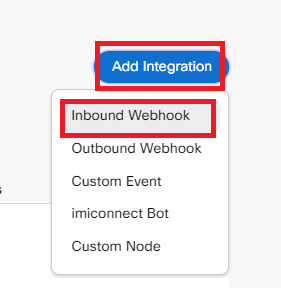
- Enter a unique name for the Inbound Webhook and enter the JSON data as follows. Click on Parse and Save.
Note: Save the Webhook URL for future reference
{ “outage”:”outage notification”, “maintenance”:”maintenance notification” }
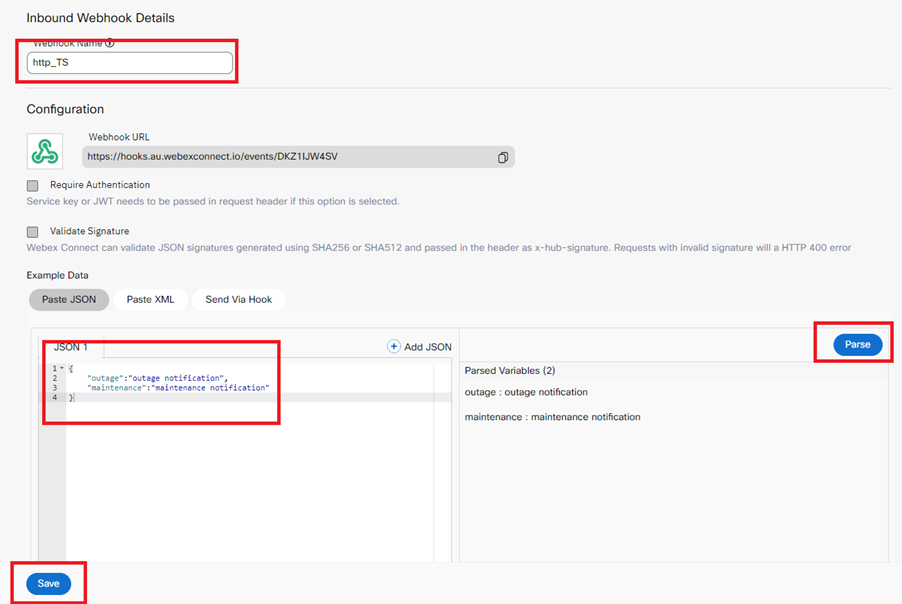
- Navigate to the Service you created earlier on in the labs and click on Create blank Flow.
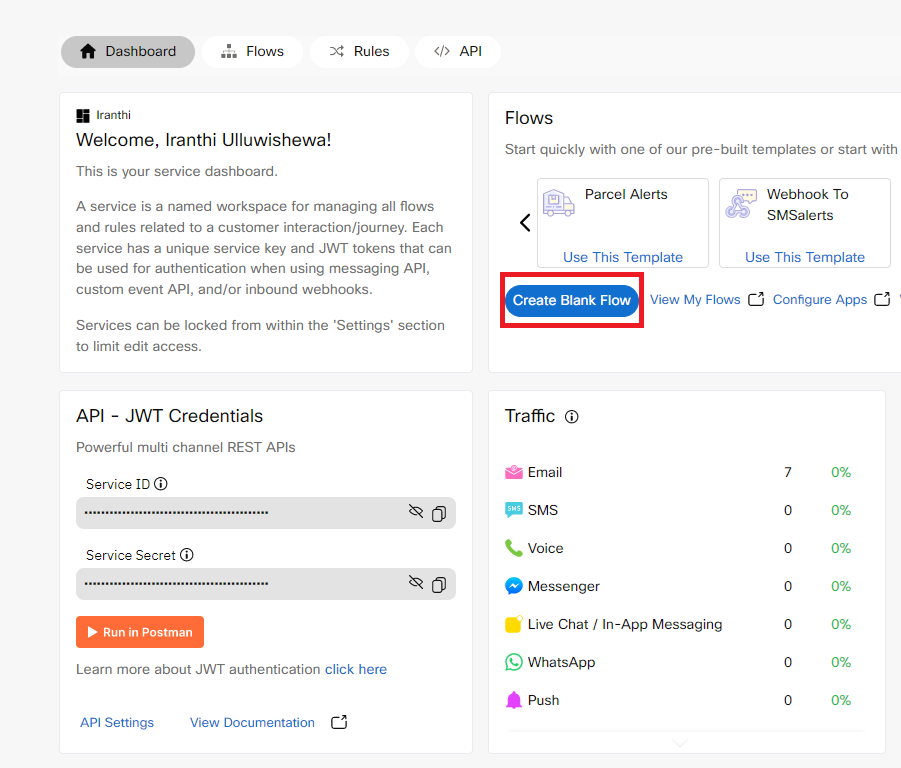
- Give the flow a unique name and click on create flow button.
- Select the Trigger Category as Webhook
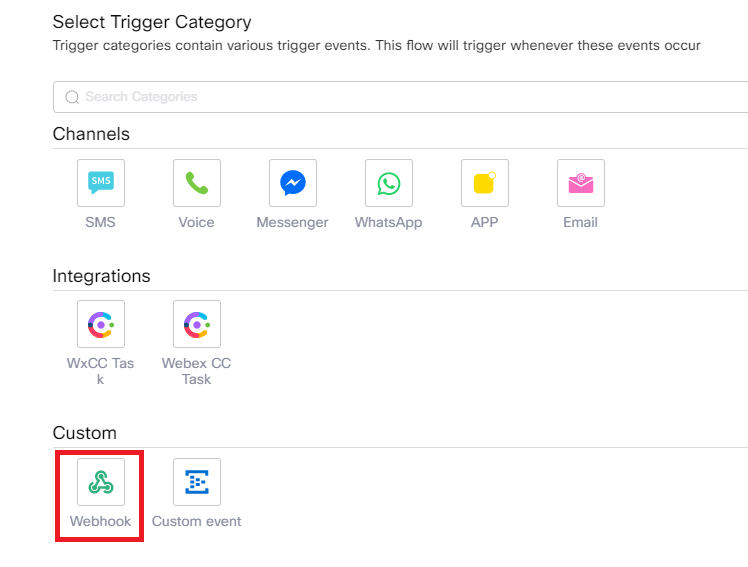
- Select the Webhook you created in a previous step and click Save.
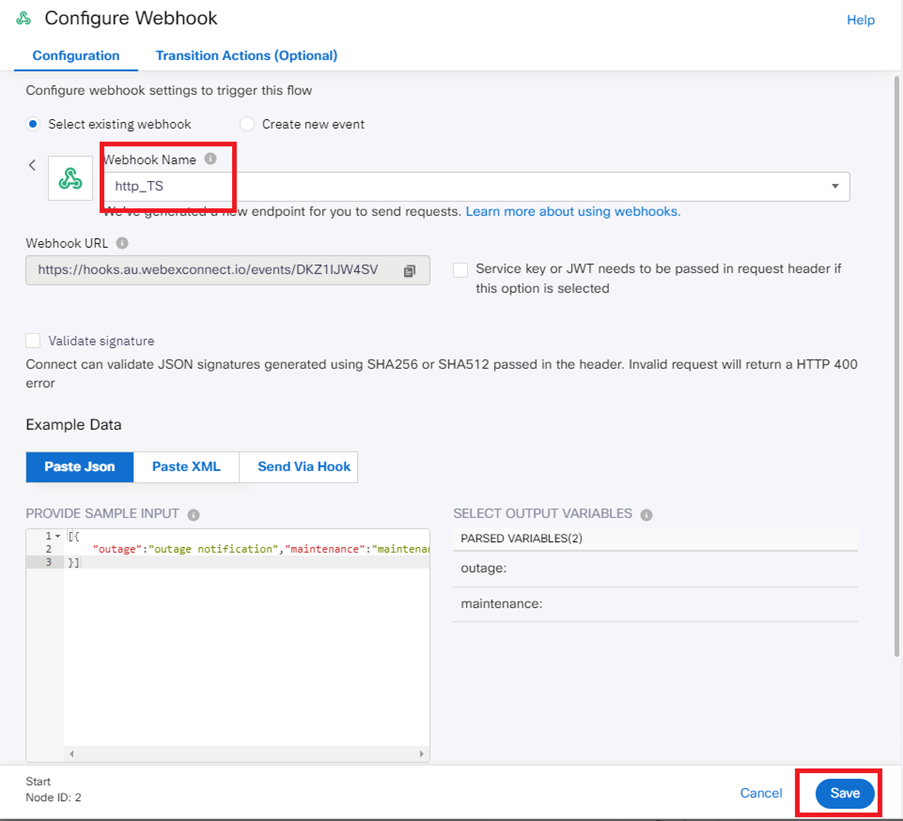
- Drag and drop the Email node from the left pane and connect the two nodes.
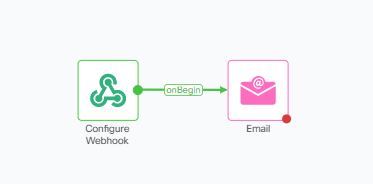
- Double click on the Email node to access the settings and details as shown below. Click Save.
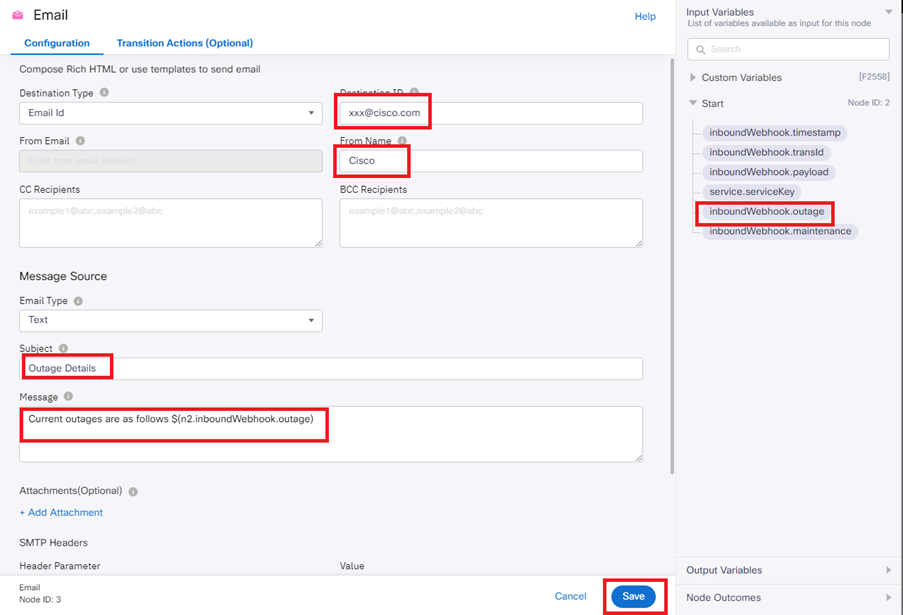
- Save the flow and make the flow Live.
2. Creating a voice flow in flow control
- Login to the Webex Contact Centre management portal and navigate to flow control.
- Create a simple flow that sends out Outage details as an email. The main menu prompt takes the caller to a http request node when they press 1.
- The http request node then triggers the Webhook along with the message that needs to be sent out in the request body .
Request Body: { “outage”: “Current power outages are applicable for the suburbs 2118, 2456, 2761, 2229” }
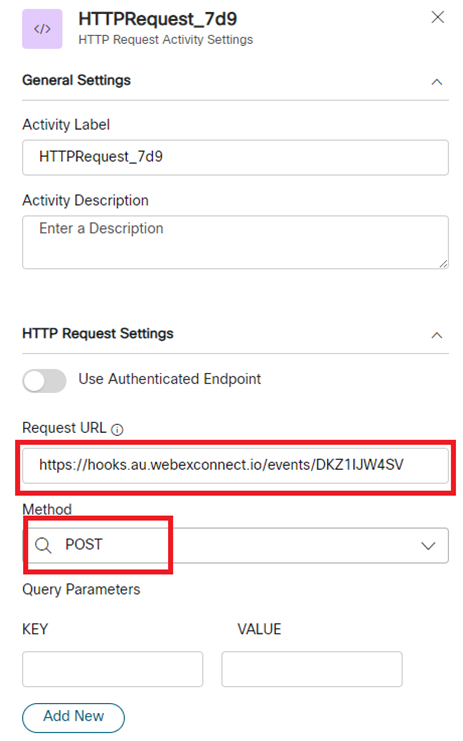
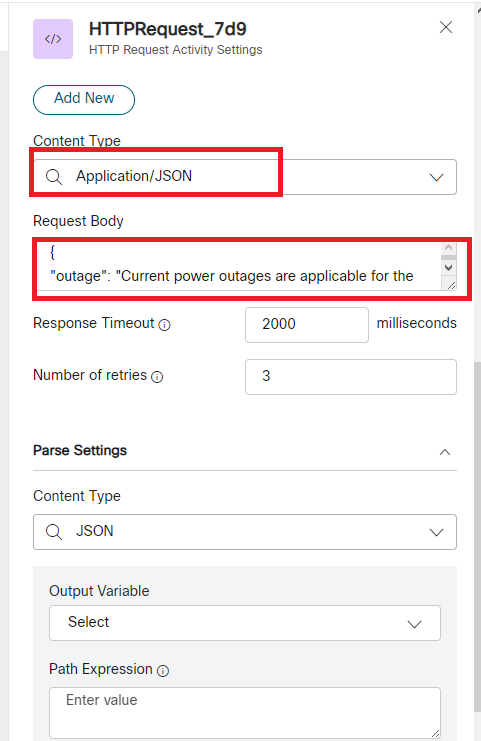
- Save and publish the flow.
3. Testing the Inbound Webhook
- Make a call to the Entry point associated with the voice call flow that you created in the previous step.
- After making the selection and the call should get disconnected.
- Check the email box of the Destination Email address that was entered in the Webex Connect flow to ensure the email has been received.
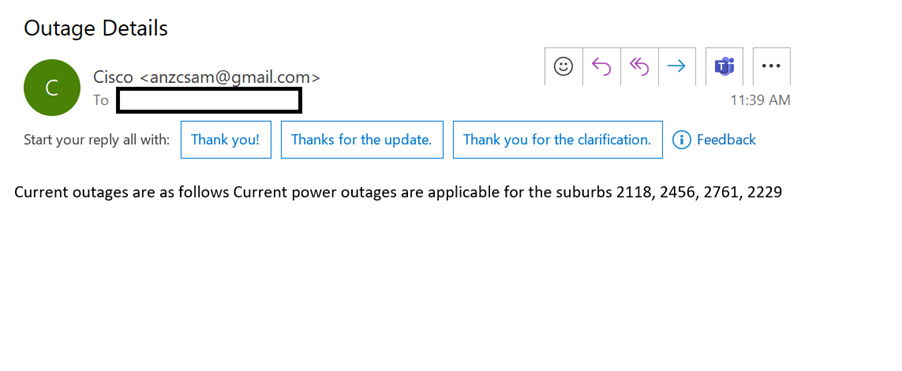
Congratulations, you have completed this section!
Lab.12.19 - Troubleshooting
Table of Contents
| Topic | Lab Type | Difficulty Level | Estimated length |
|---|---|---|---|
| Understanding of Webex Connect troubleshooting capabilities | Read & Understand | MED | 15 min |
| Debugging a flow | Read & Understand | MED | 15 min |
| The most common issues in Webex Connect flows | Read & Understand | MED | 30 min |
Introduction
Lab Objective
This section is designed to introduce troubleshooting capabilities available for digital channels in Webex Connect platform. In addition there examples of the most common issues and the ways of how to fix them.
Pre-requisite
- You received Webex CC Management Portal, Agent Desktop and Webex Connect URL .
- You have admin credentials for Webex CC Management Portal and Engage Portal.
- You have admin credentials for Connect Portal.
- You have at least one flow created and published in Webex Connect.
1. Understanding of Webex Connect troubleshooting capabilities
Note: Please check and make sure all configuration steps for digital channel have been completed successfully before start troubleshooting it.
There are the following troubleshooting capabilities available for the administrator to troubleshoot issues in digital channels provided by Webex Connect:
- Export Logs tool
- The debugger built into the flow builder Let’s consider how we can use both of them.
1.1. Export Logs tool
This tool allows Webex Connect admin to download inbound and outbound log events as XLSX file for any Service / Asset / Digital Channel for desired timeframe. The we can inspect this file to check, for example, whether the message was received or sent by corresponding component of Webex Connect platform.
Please login to Connect Portal, then go to Tools -> Export Logs to access the tool.
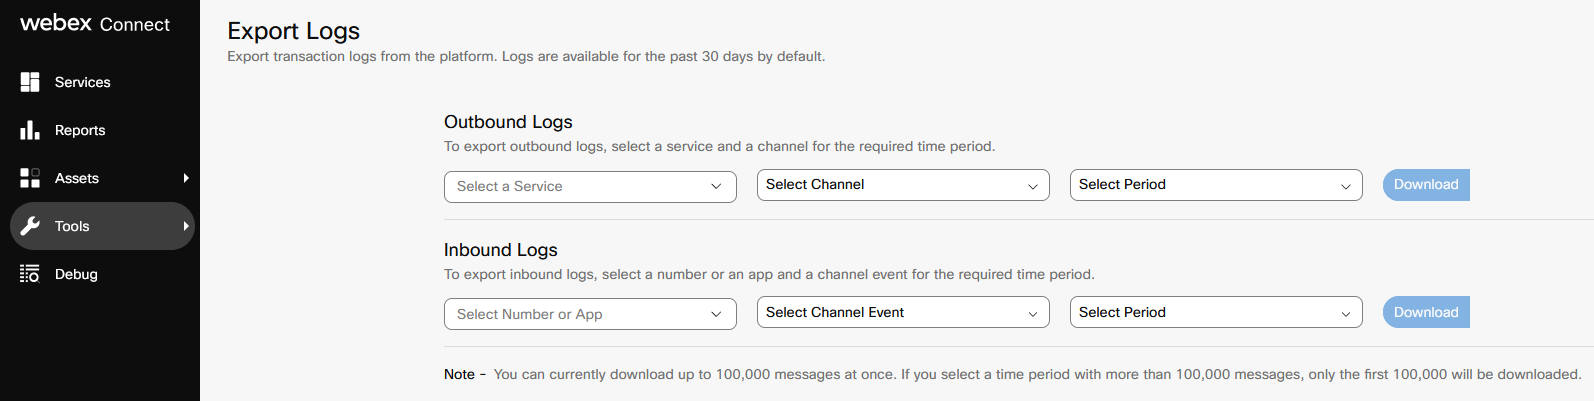
Let’s download all incoming messages received via Chat_Asset for the last 7 days. We need to provide the following details and press Download button:
| Parameter Name | Parameter Value |
|---|---|
| Number or App | Chat_asset |
| Channel Event | Incoming Message |
| Period | Last 7 days |
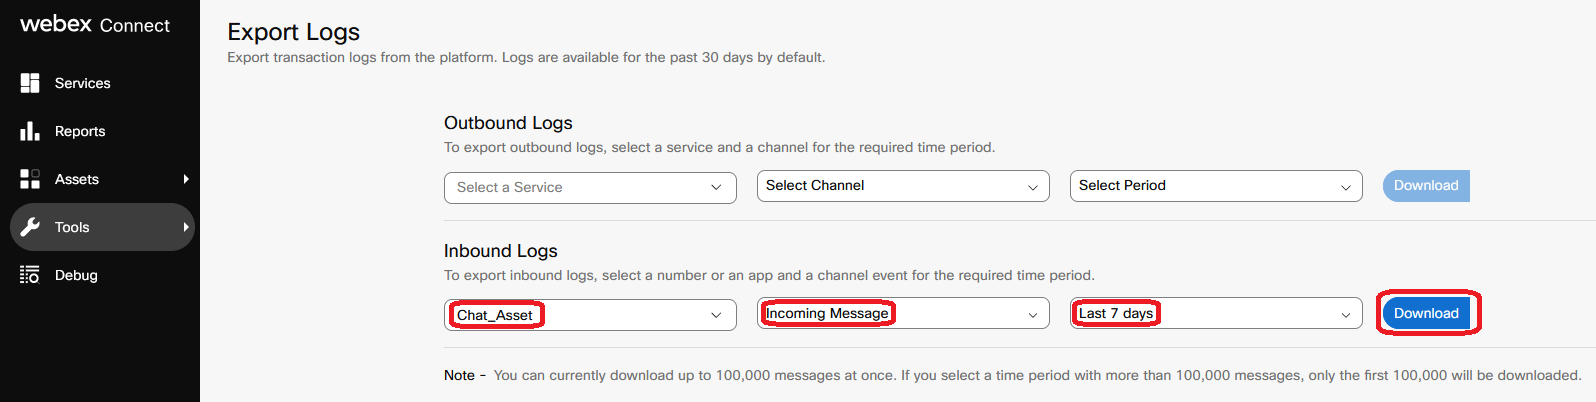
After the log file has been downloaded, we can open the file and see all inbound events, including timestamps, IDs and message text. We can use the file to check whether specific message rom the end user has been received by Webex Connect via selected Number or App (asset).

Now, let’s download all outbound messages for My First Service for the last 7 days. We need to provide the following details and press Download button:
| Parameter Name | Parameter Value |
|---|---|
| Service | My First Sertvice |
| Channel | Live Chat / In-App Messaging |
| Period | Last 7 days |

After the log file has been downloaded, we can open the file and see all outbound events, incliding timestamps, IDs and message text. We can use this log to check whether exact message has been sent to the end user by Webex Connect via selected Service / Channel.

1.2. Flow Debugger
This tool allows Webex Connect admin to track flow execution from the beginning till the end. Flow debugger has the following capabilities:
- search for exact flow execution event based on the timestamp or Transaction ID
- briefly shows the result of exectuting each node of the flow in the form of a list
- adds unique ID to each node on flow canvas to simplify the mapping between the nodes and items in the list
- shows all the parameters used when calling each flow node
- shows the responce returned by each flow node after it had been called
- shows the values of the variables created by admin for troubleshooting purpose
Note: By default, debugging details are encrypted in Flow Debugger. Webex Connect admin account should have Decryption Access permission to be able to decrypt the details.
- Admin account with Owner permission has Decryption Access by default.
- Admin accoun without Owner permission has no Decryption Access by default - it can be granted by the owner.
Login to Connect Portal and go to Settings -> Teammates and loot at Decryption Access column to check which accounts on Connect Portal have log decryption permission. For example:
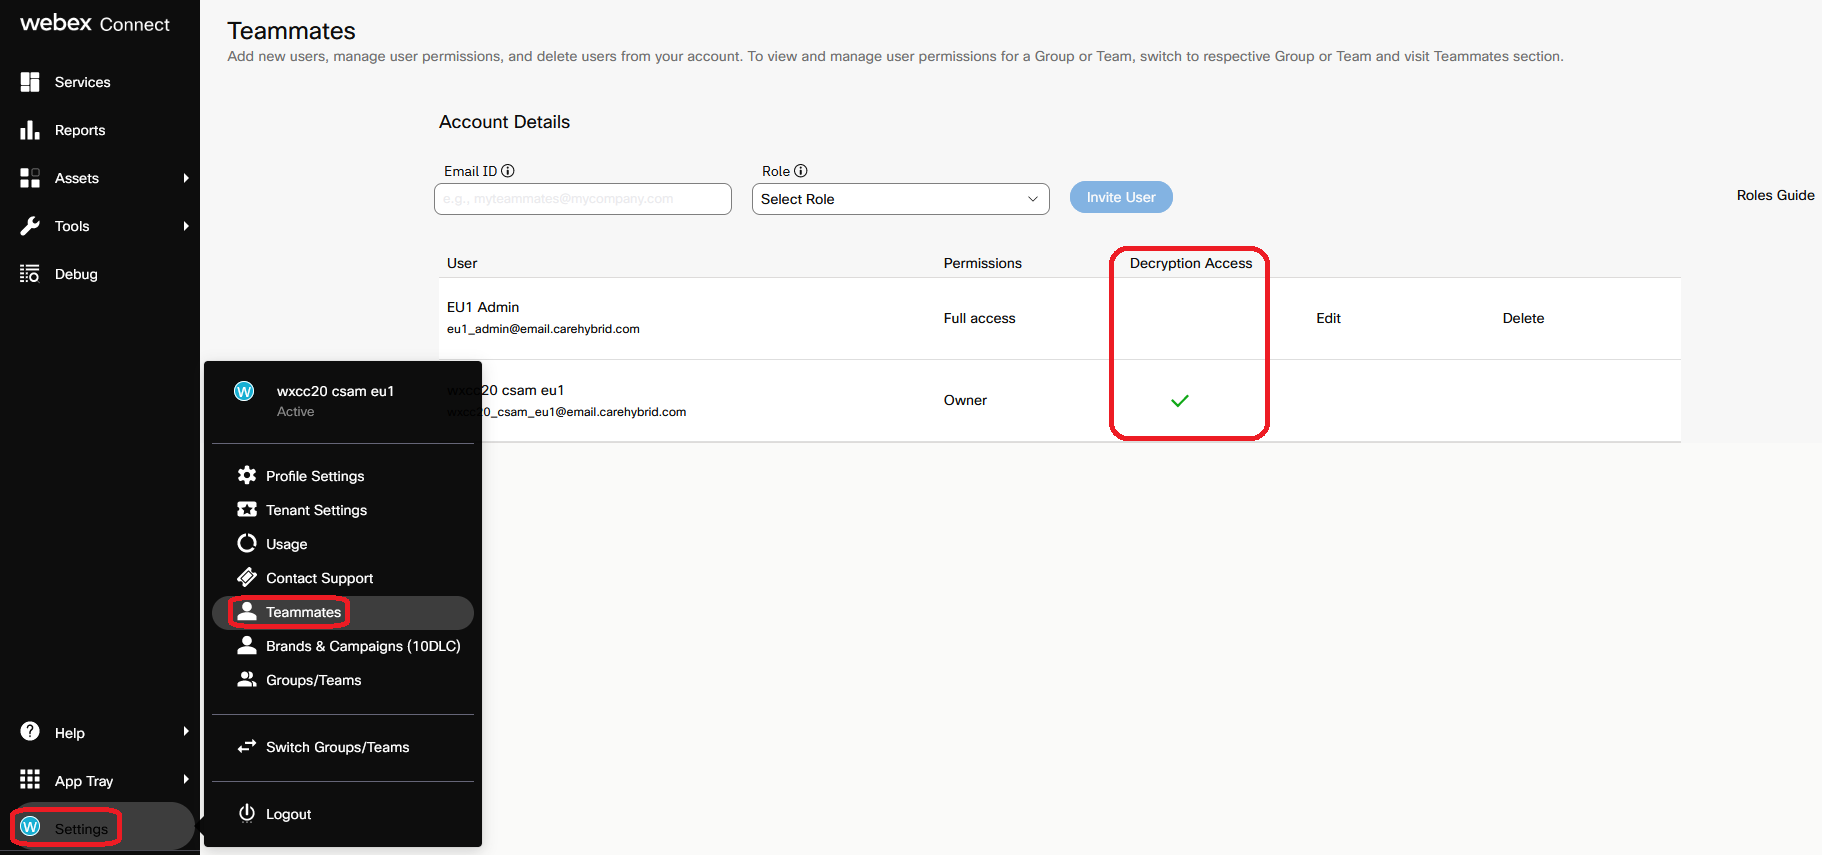
To grant Decryption Access permission to some admin account, check and make sure you are logged in under admin account with Owner permission. Then click Edit button next to the desired admin account, tick Decrypt Logs check box in the pop-up window with account details and save changes.
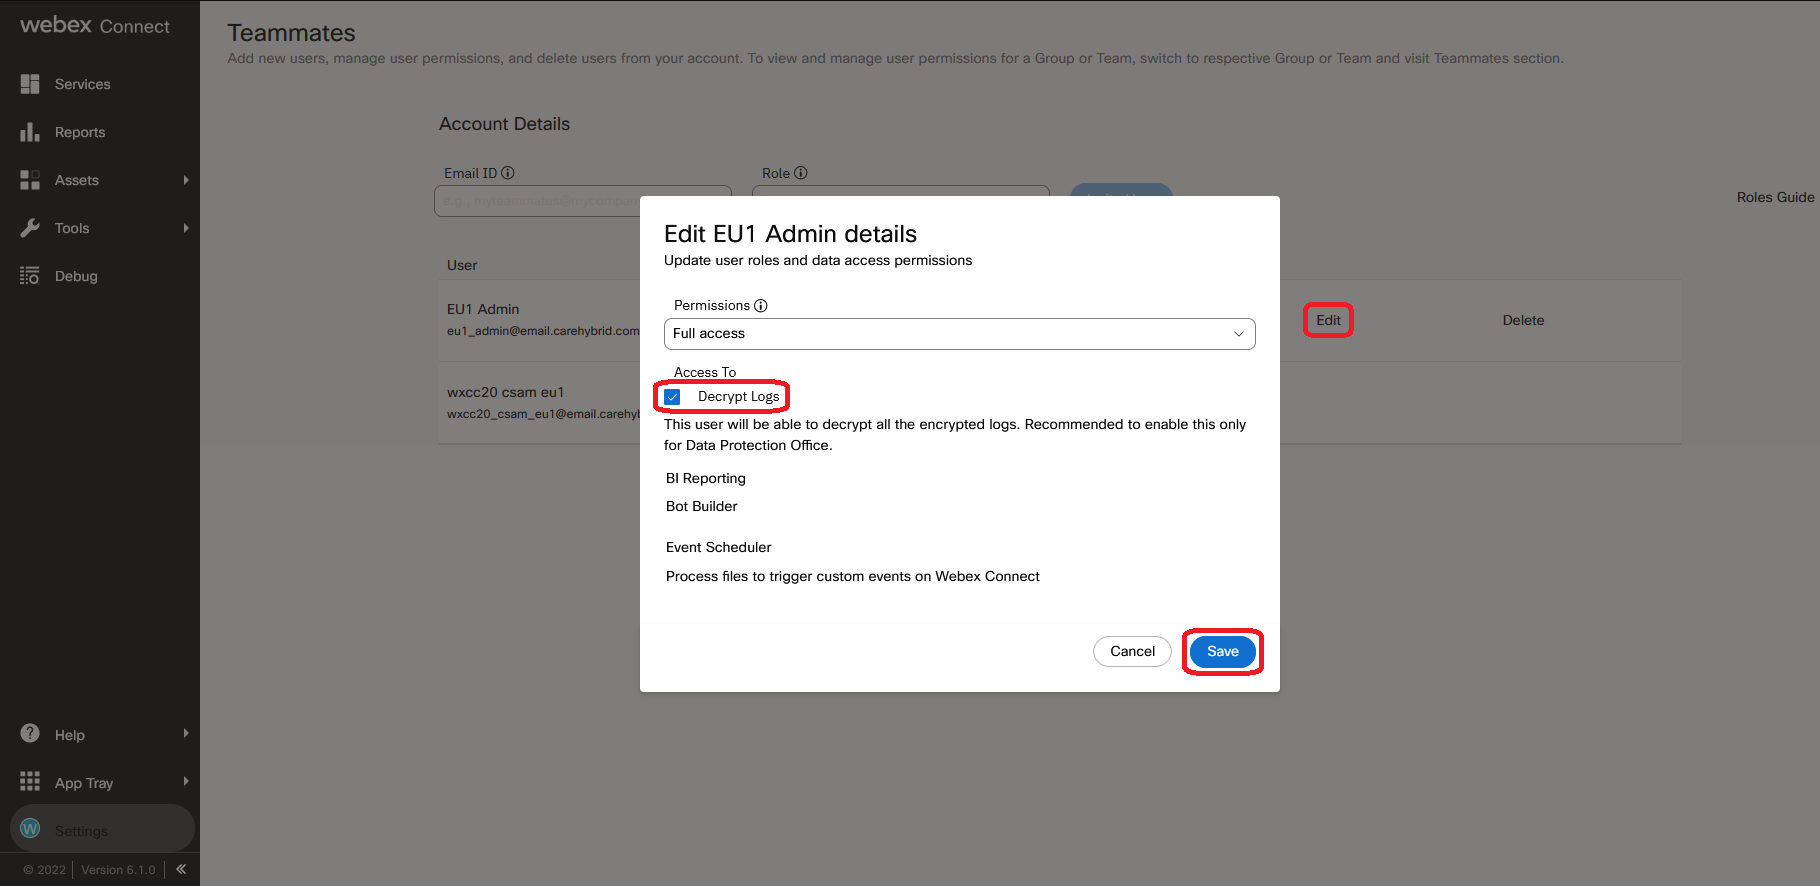
Check and make sure Decryption Access permission is visible next to the desired admin account in the list of users.
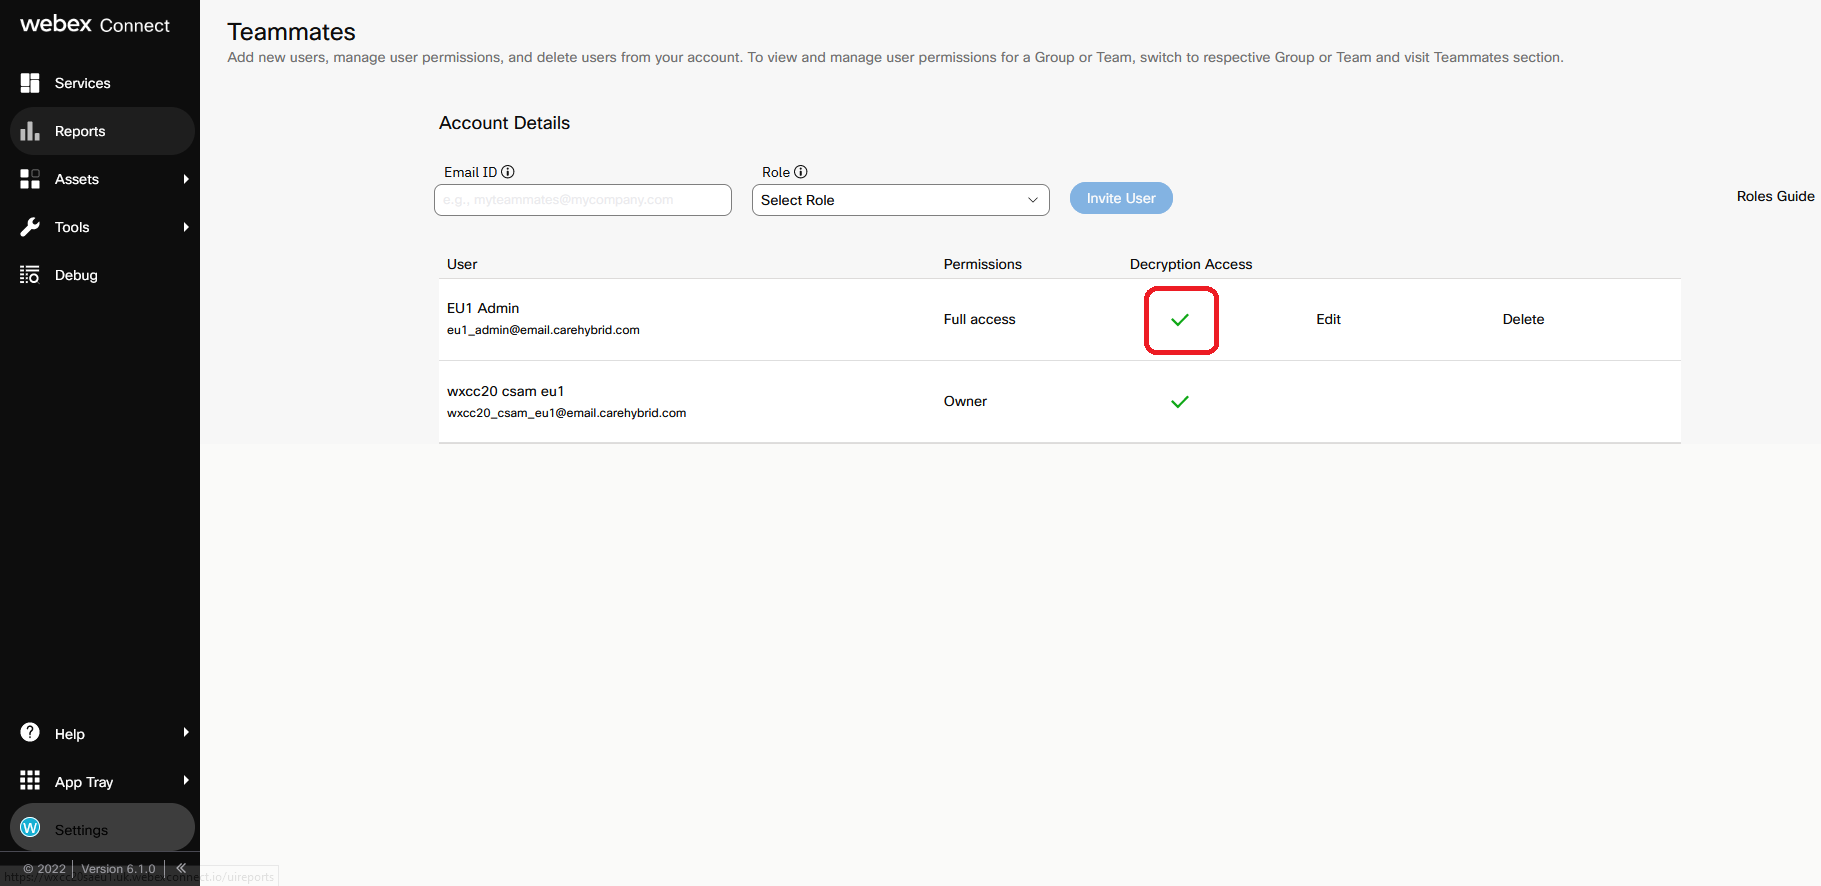
2. Debugging a flow
Flow debugger is embedded into Webex Connect flow builedr. Let’s have a look how to use it.
- Login to Connect Portal and go to Services. Then go to the service, switch to Flows tab and double-click on the flow which you are going to debug.
- Once the flow is loaded, click on Debug button on the right pane. Flow debugger window will appear at the bottom. This window is scalable, so we can adjust its size to make troublehooting process more convenient.
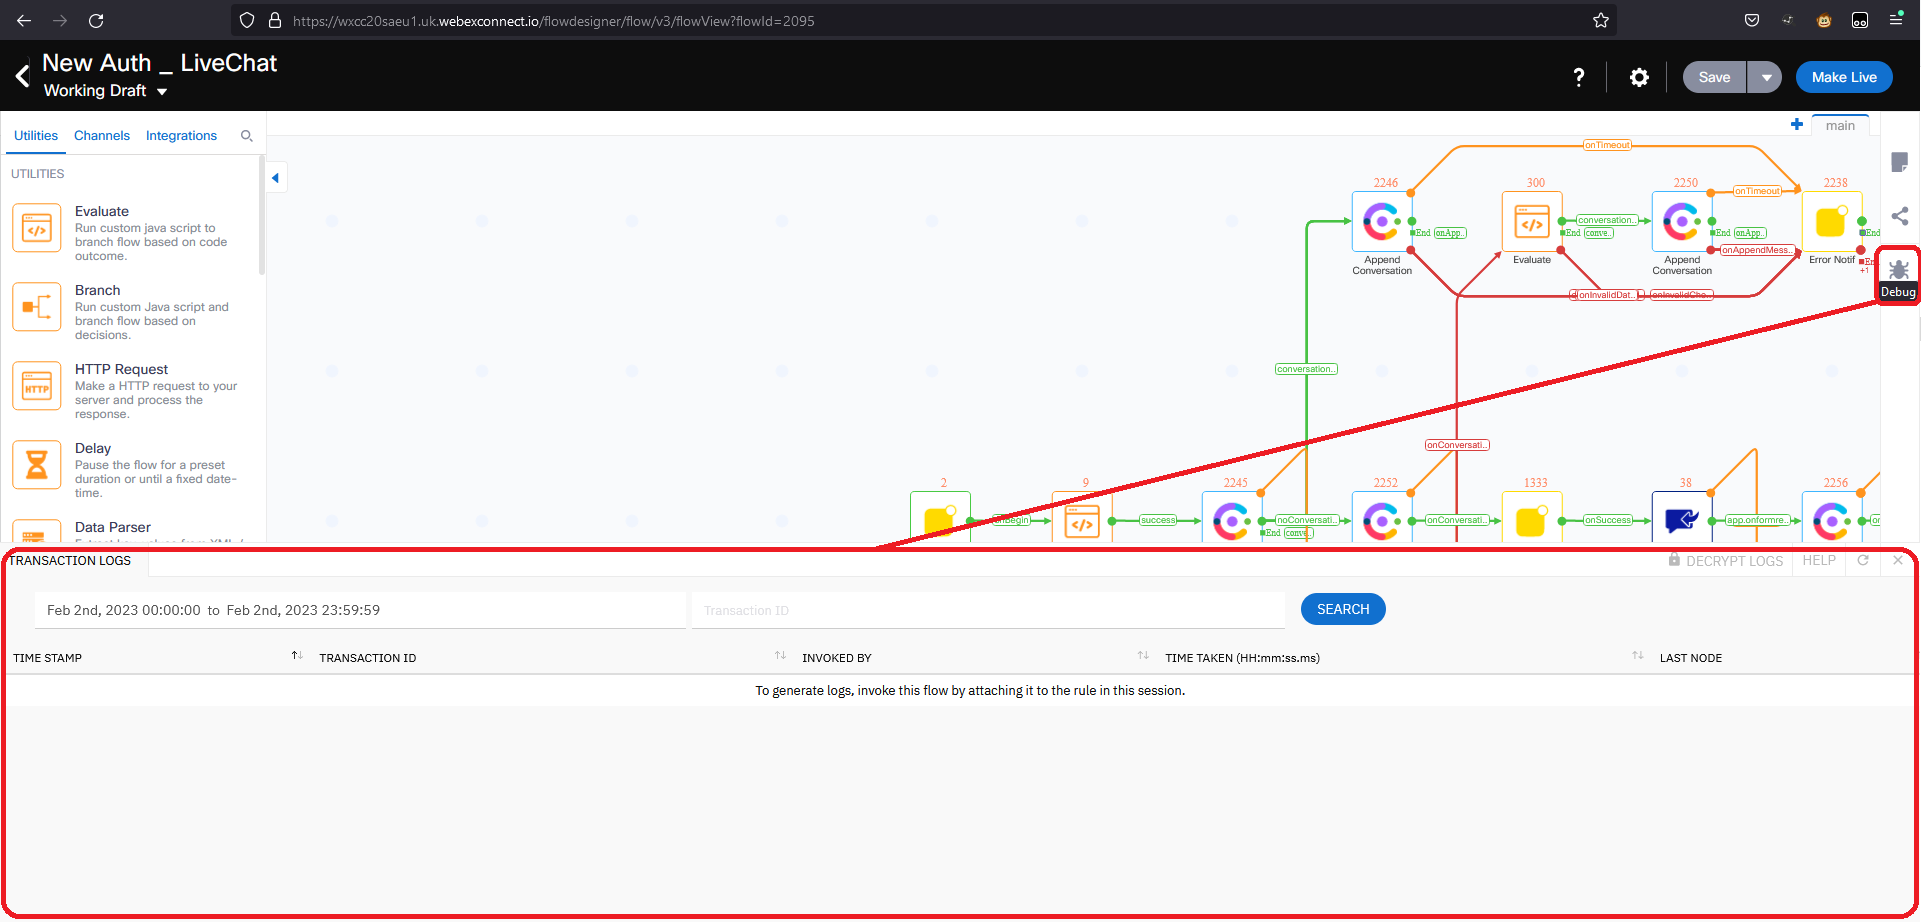
- Provide proper time frame or Transaction ID (if you know it) and press Search button to find corresponding flow events. You will see all found flow events as a list in debugger window. Each line of the list represents single flow execution.
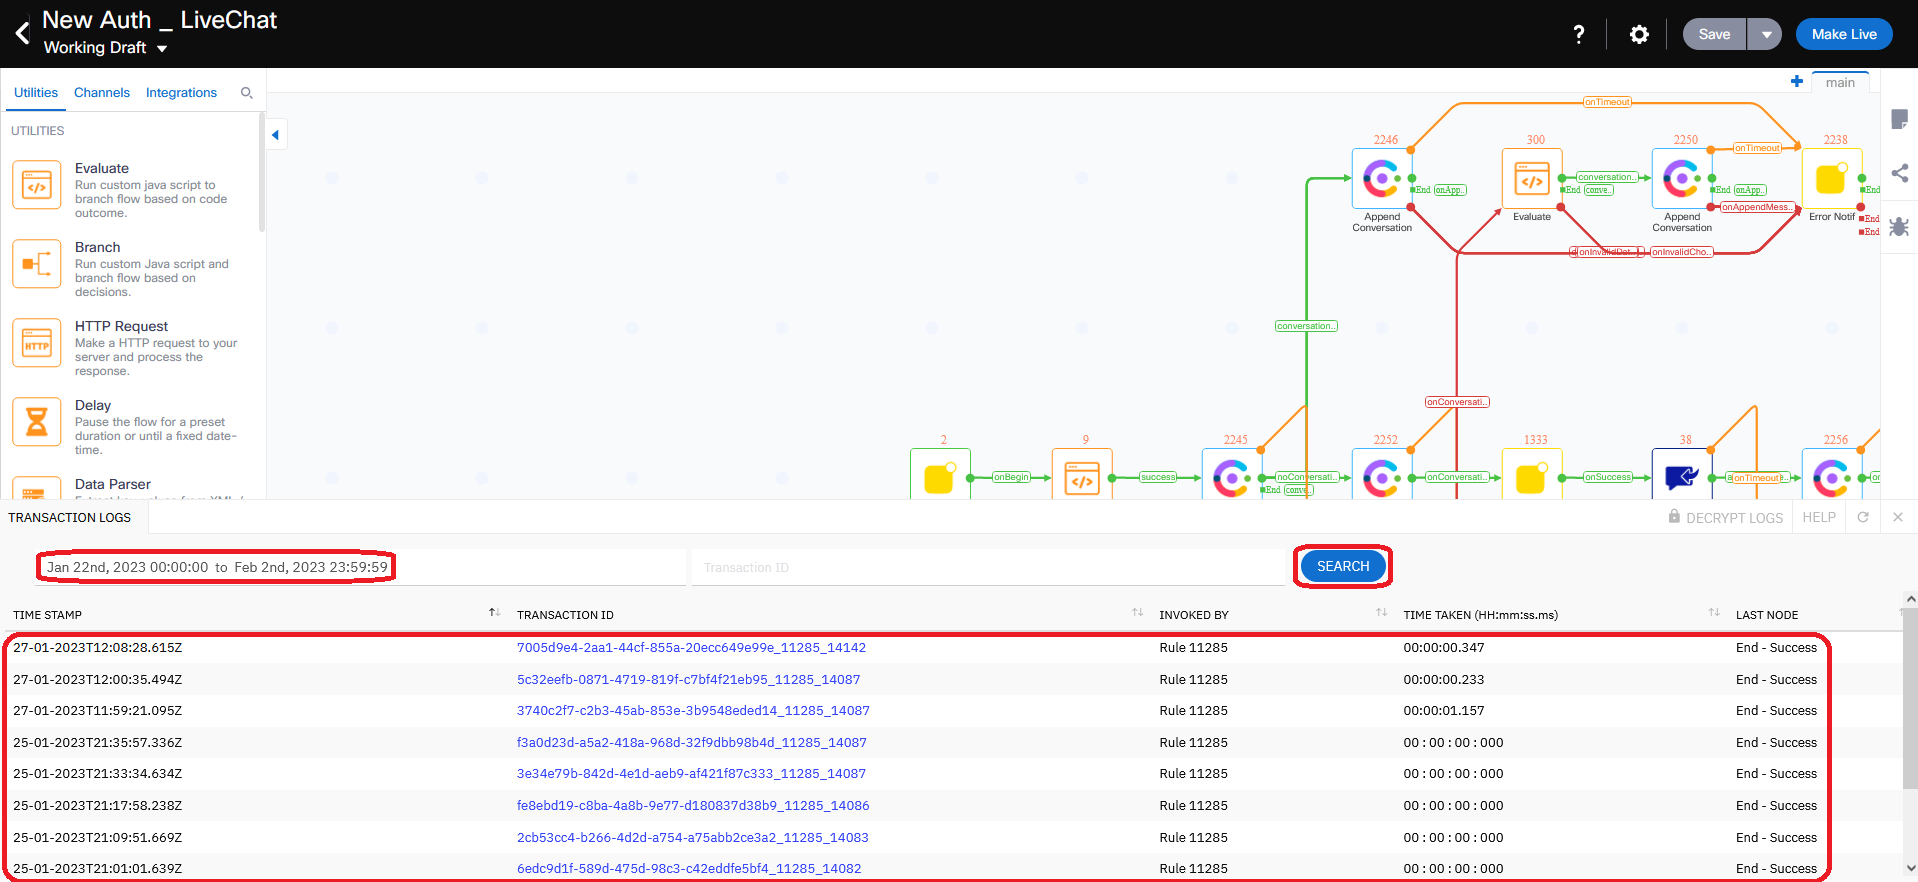
- Click on the corresponding hyperlink in Transaction ID column to see the details of exact flow execution. Those details will be displayed as a list at a separate tab in the same debugger window. The title of the tab will be the value of the Transaction ID.
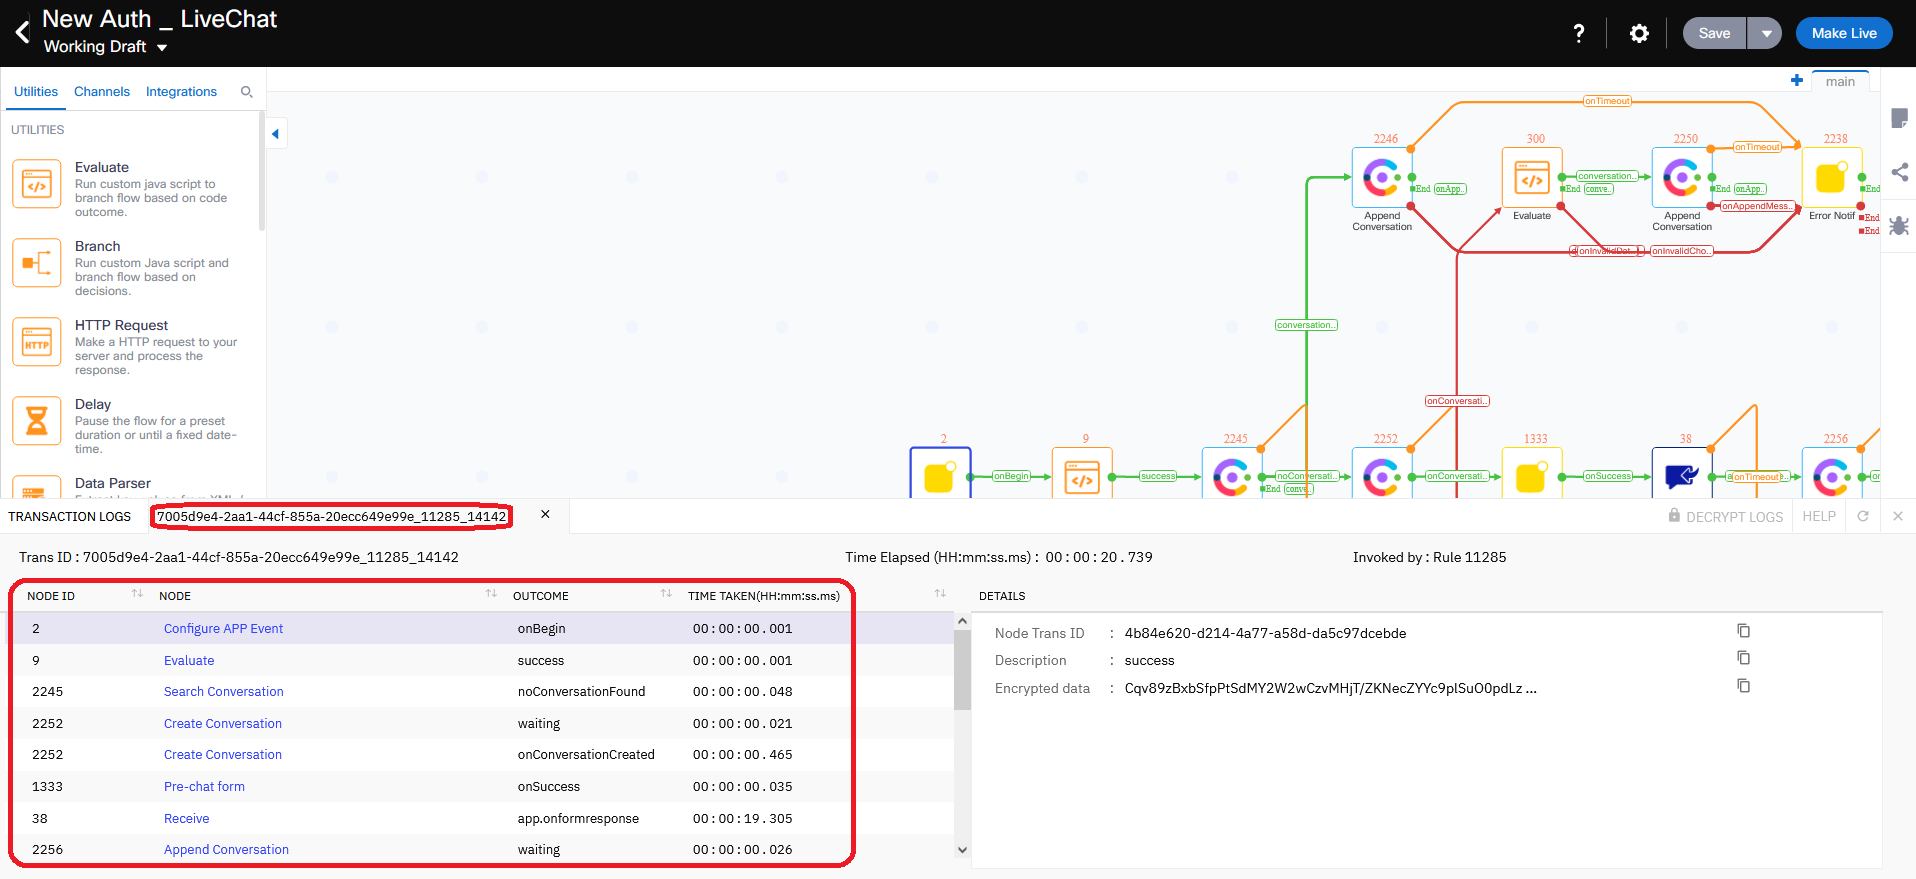
- Select one item from the list to see its details on the right-hand side of debugging window. All details of the event are encrypted by default. Click on DECRYPT LOGS button in the title of debuggin screen to see decrypted log messages.
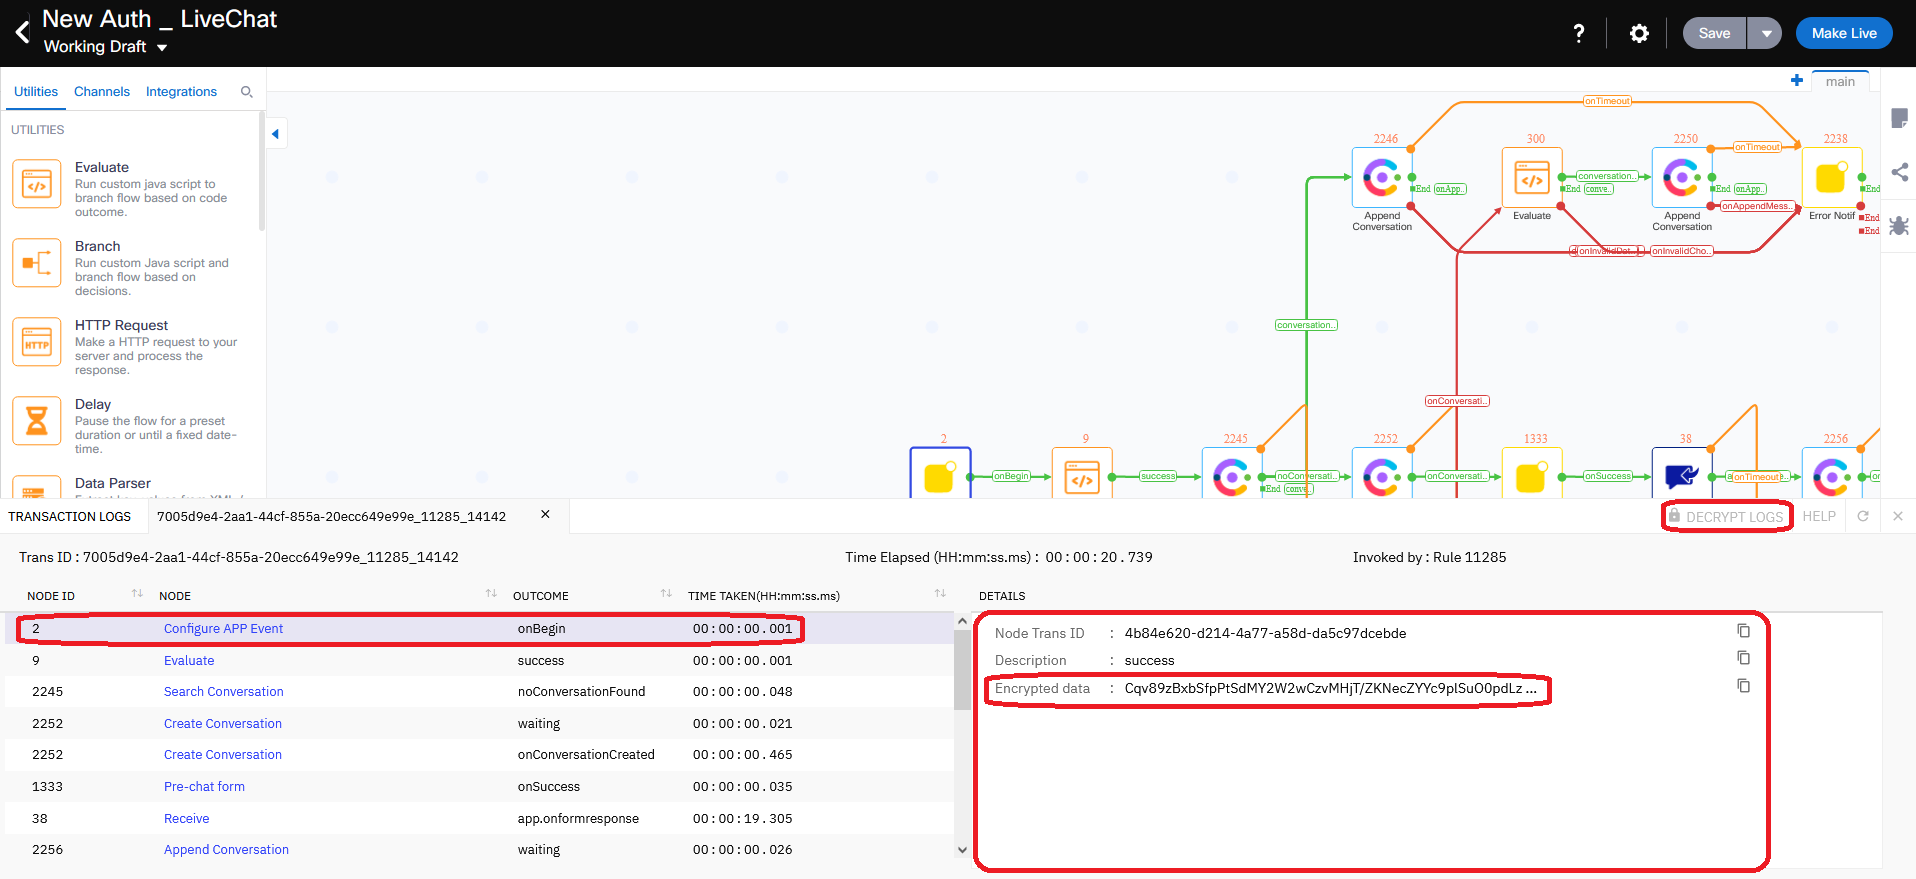
- Decrypted log messages will be displayed on the right-hand side of debuggin window. Those log messages include the parameters used when calling the node as well as the results returned by the node after the request was processed. You can copy the value of any debug message by pressing copy icon next to the message on the right-hand side of debugging window.
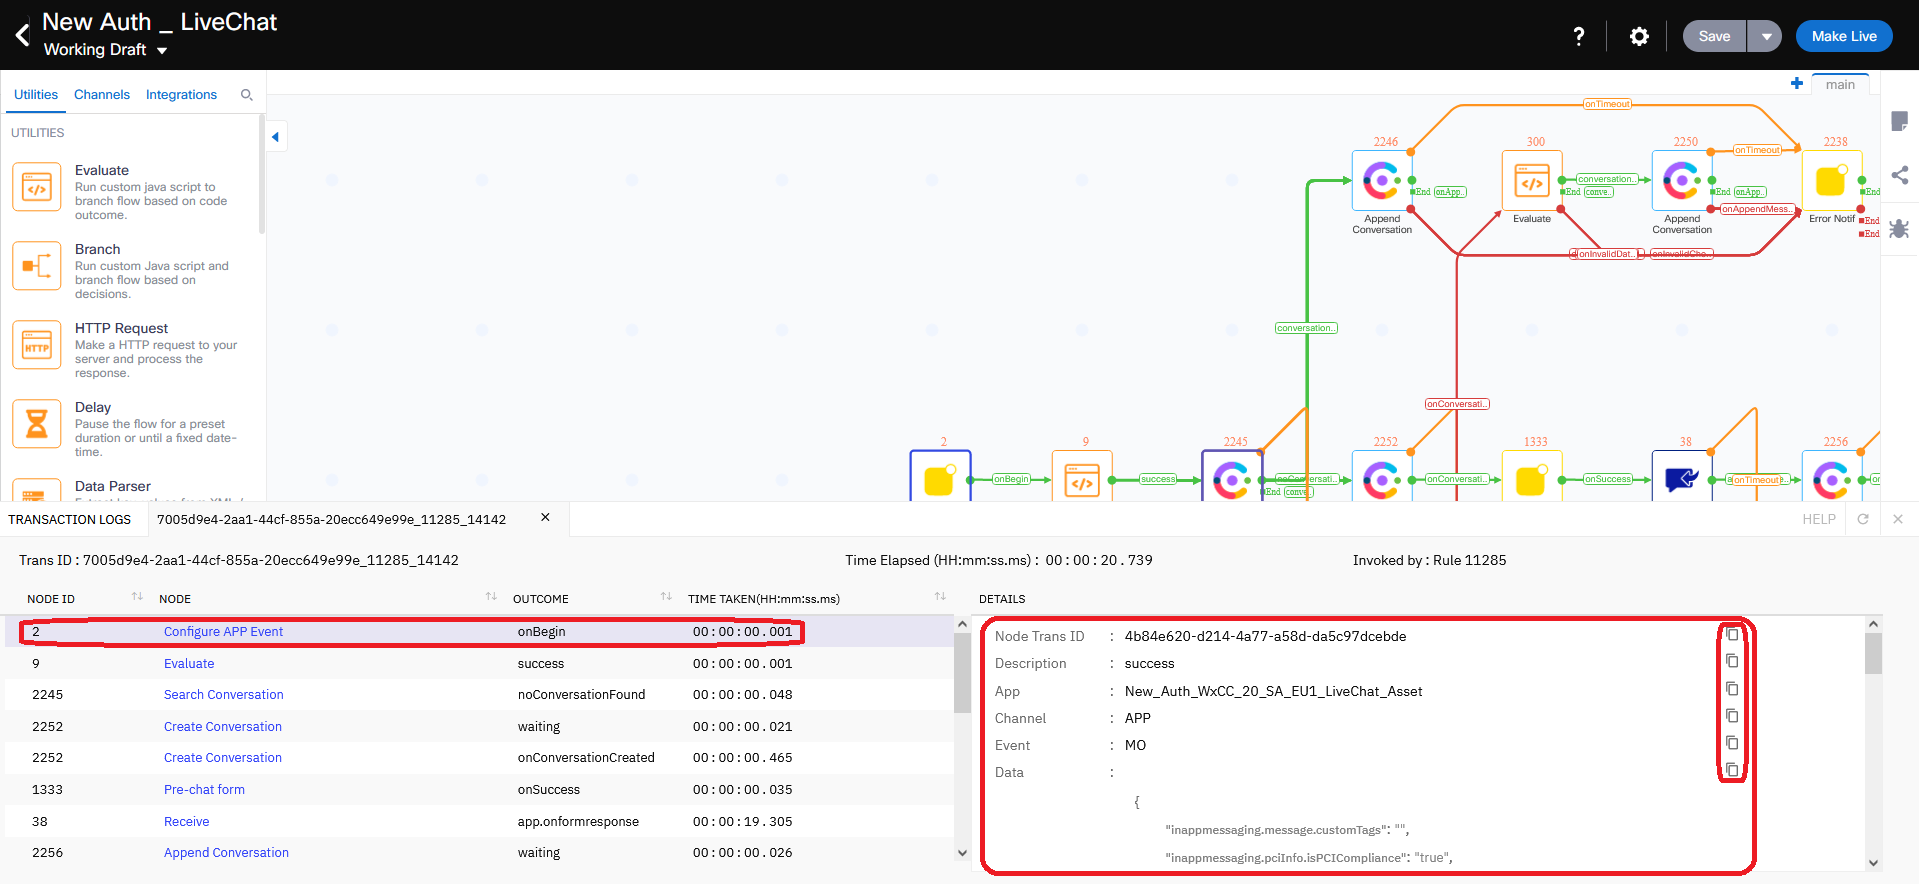
- All items in the list have Node ID and Node which matches the same values for each node on flow canvas.
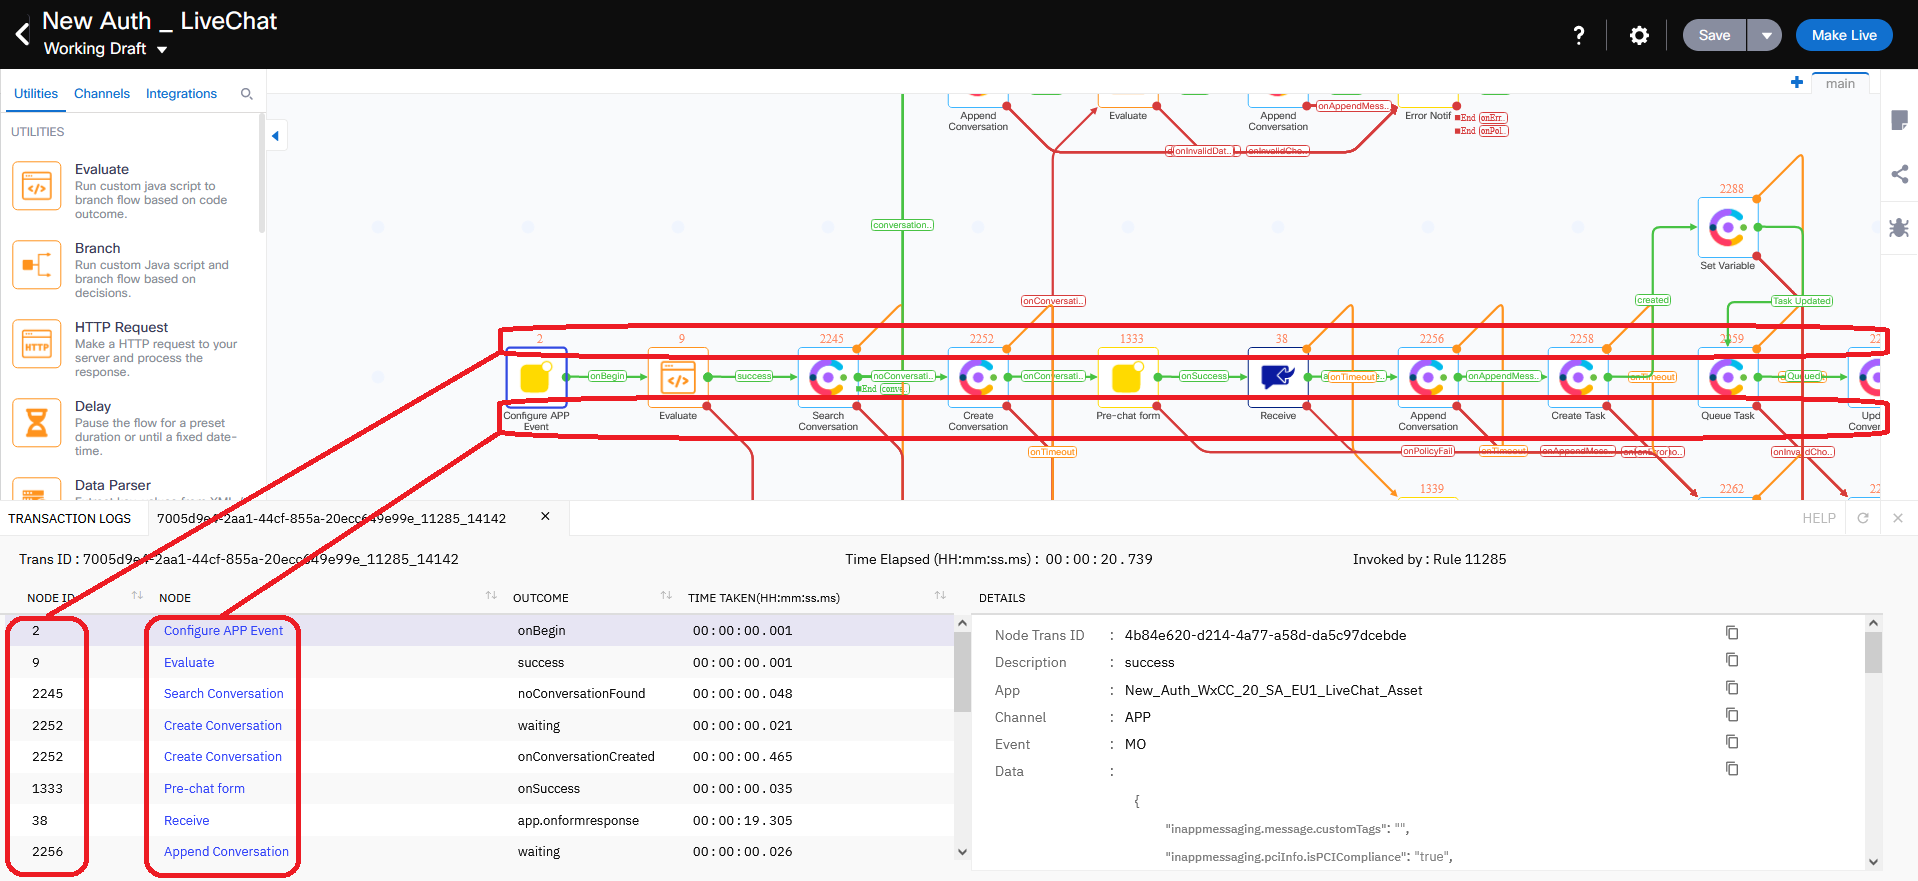
- So, every time you click on any item in the list in debugging window the log messages of this node are displayed on the righ-hand side. In addition, corresponding node is highlighted with a blue border on flow canvas, which simplifies troubleshhoting.
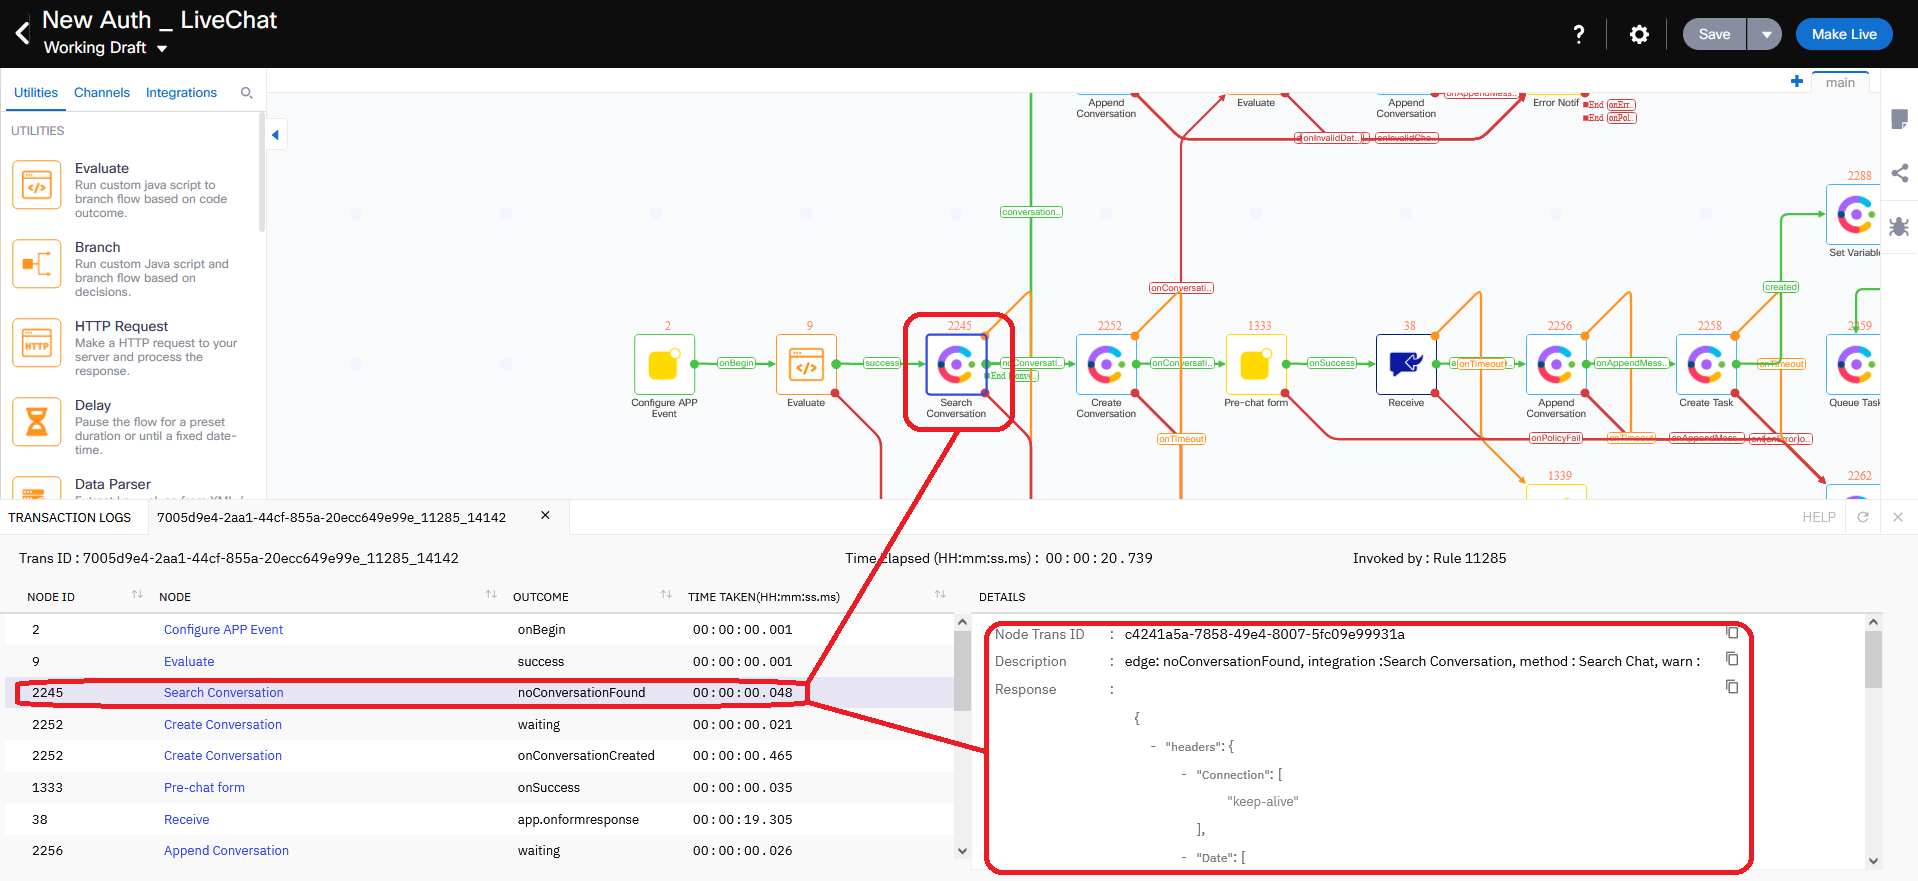
- The OUTCOME column of the list shows the result of execuiting each flow node. In case if any node has been completed with an error or timeout, it will be displayed as an outcome in the line of the list which corresponds to the affected flow node. Error details will be available on rigth-hand side of debugging window.
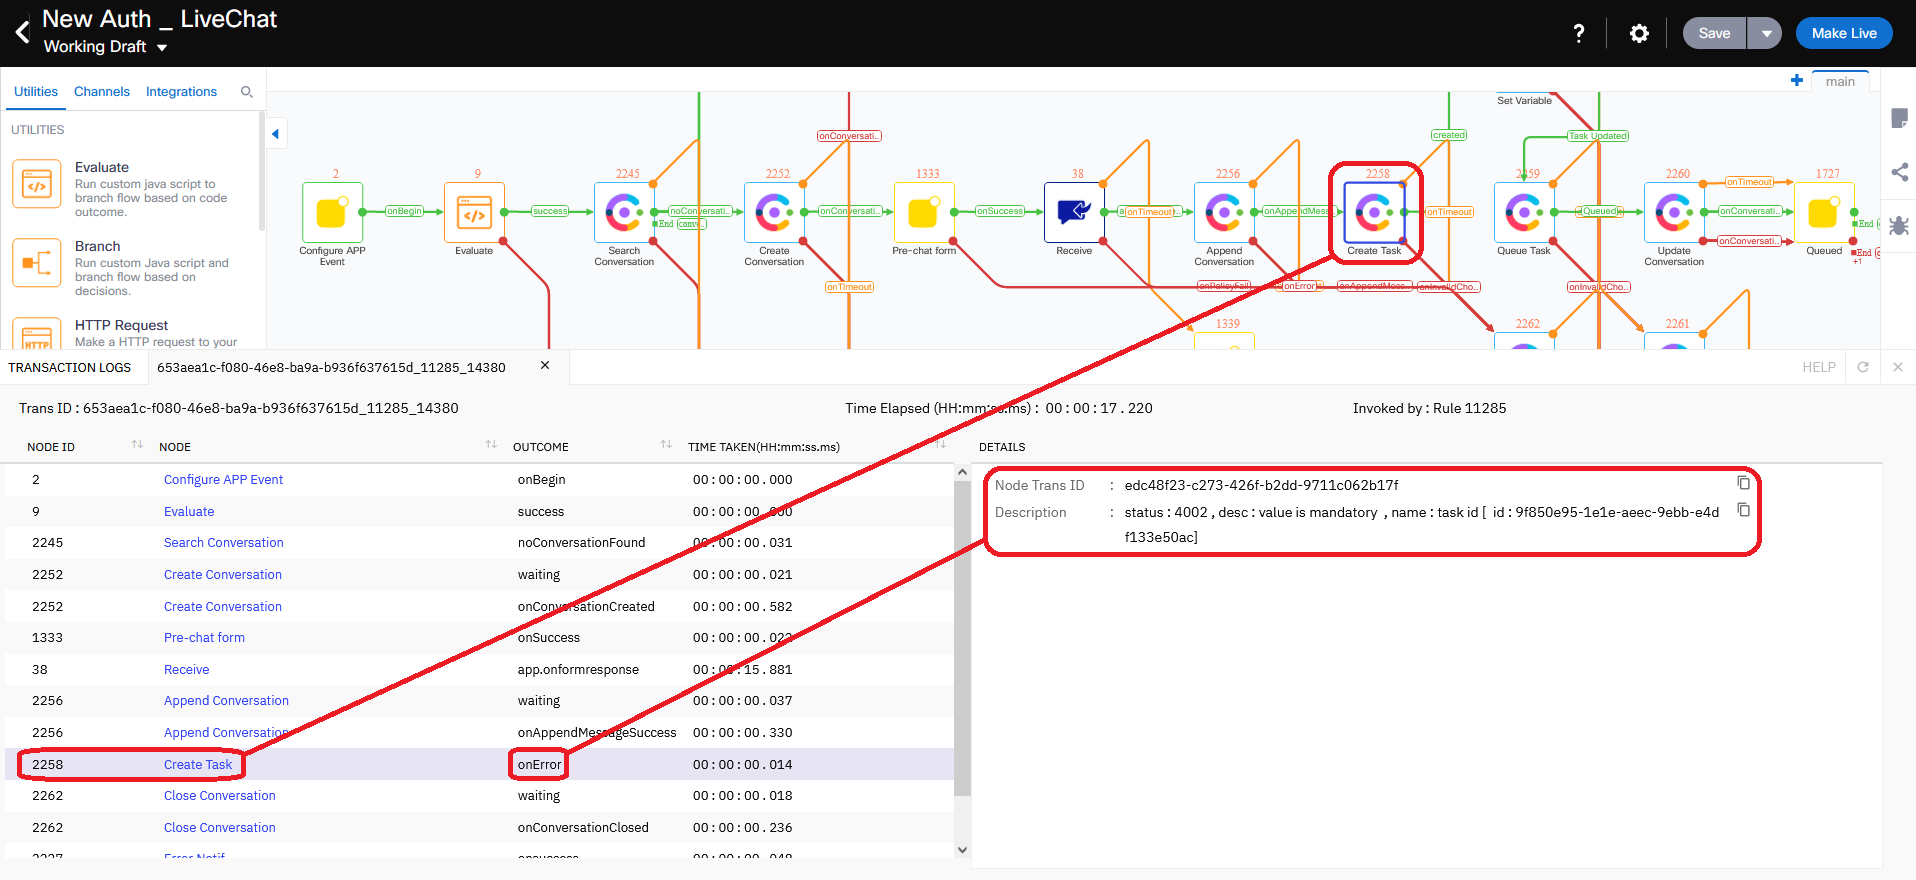
In the next section we will look at the most common issues in Webex Connect flows and how to solve them.
3. The most common issues in Webex Connect flows
Let’s look at few examples of the most commn issues in Webex Connect flows. We will consider how to identify the cause of each issue and potential solutions.
3.1. Engage Asset not linked to Entry Point in Webex CC
Here is an example of what will happen if live chat app (asset) is not assigned to the Entry Point on Webex CC management portal. Flow debugger disaplays onInvalidChoice error next to the affected Create Task node. The error on the right-hand side of debugging window contains desc : no valid edge found for the async event message.
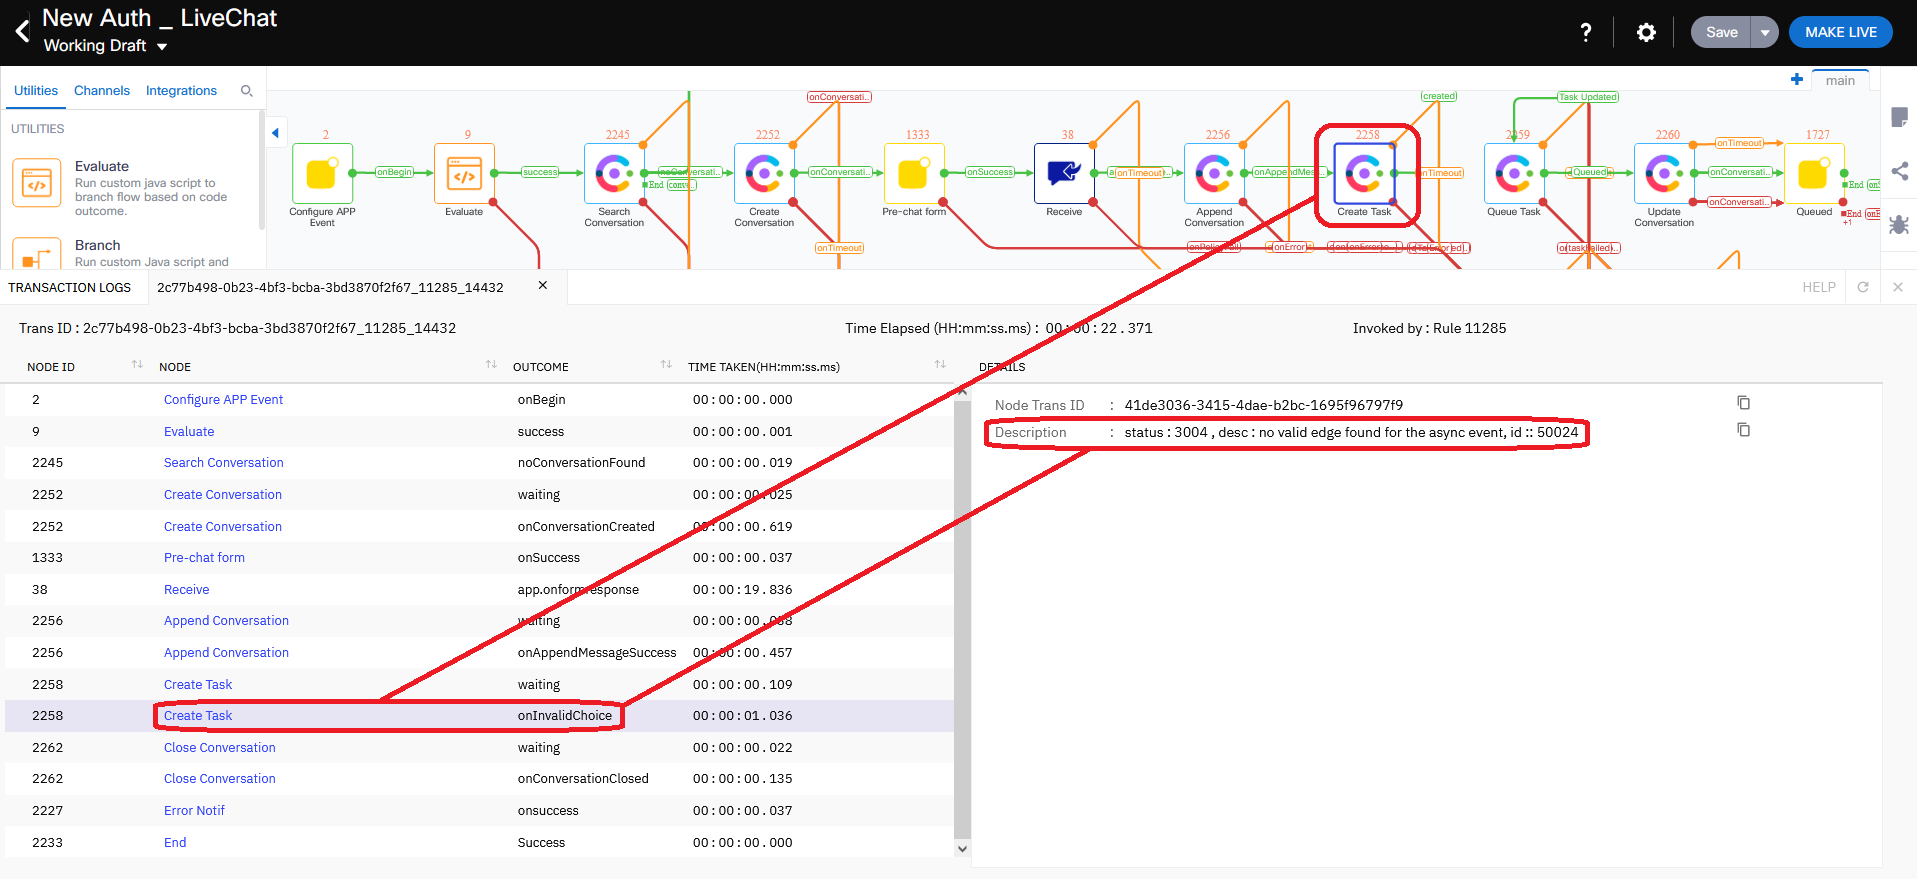
Please follow the action plan below to fox the issue:
- Please check which app/asset is assigned to the affected flow on Connect Portal.
- Login to Webex CC Management Portal, go to Provisioning -> Etry Points/Queues -> Entry Point and select Edit next to the proper Entry Point.
- Then select affected app/asset created on Connect Portal in the Asset Name drop-down list and save changes. If the affected asset is not in the drop-down list, please create new one on Connect portal, register it with proper service and check one more time.
3.2. Engage authorization not working
Here is an example where Webex CC authorization does not work properly. Flow debugger disaplays onInvalidData error next to the affected Engage node.
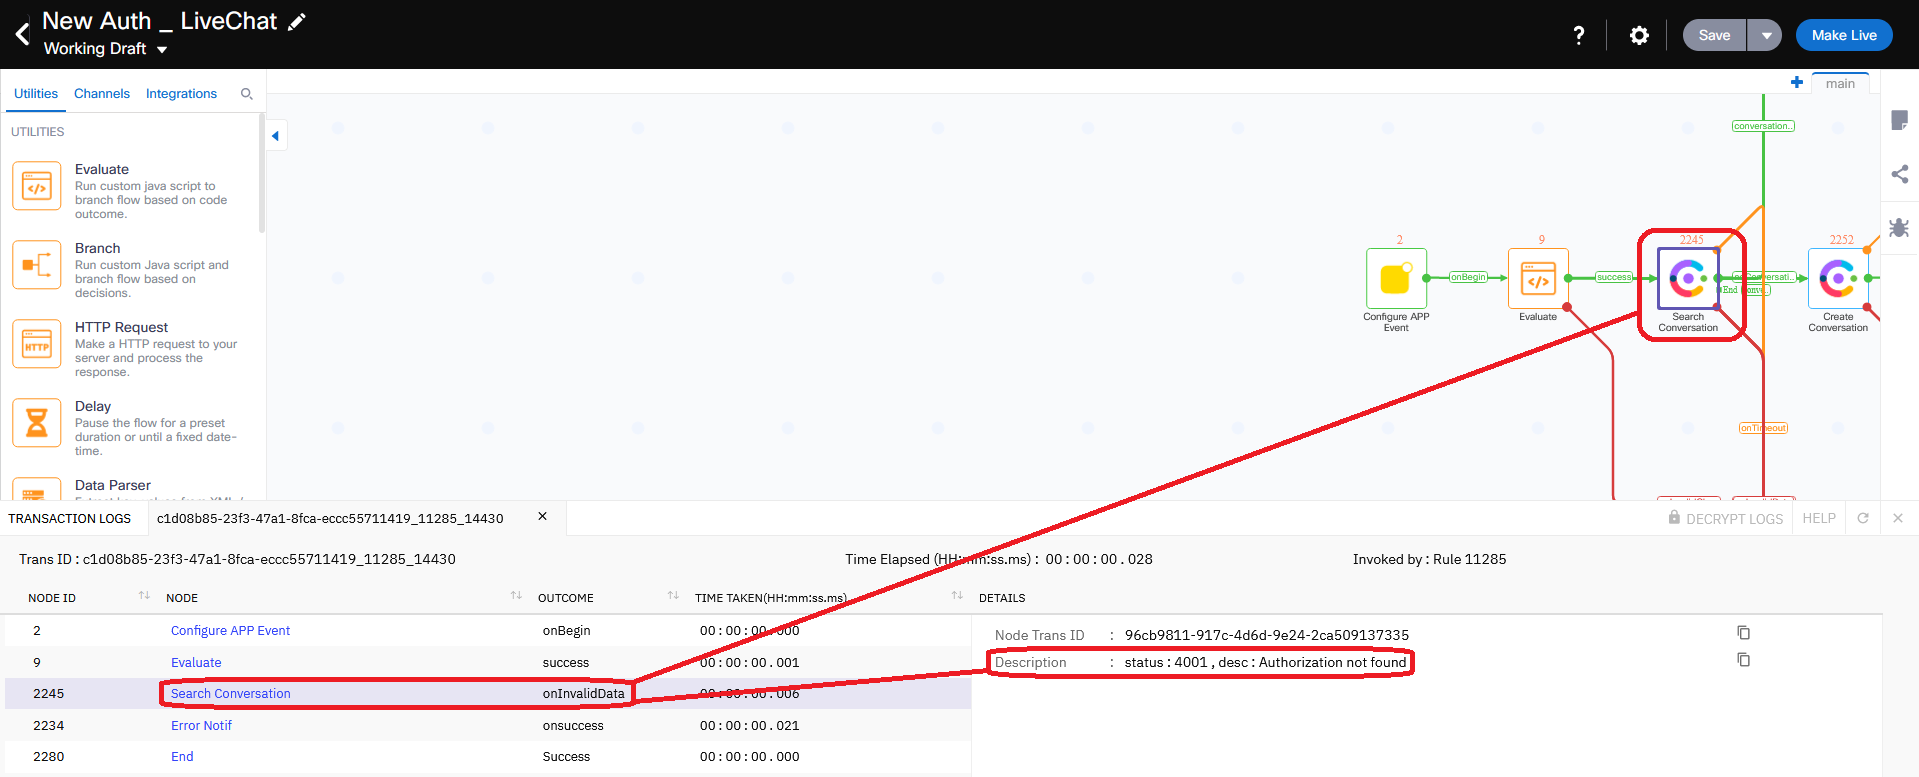
The error desc : Authorization not found means the autorization configured in NODE RUNTIME AUTHORIZATION field of Search Conversation node does not work.
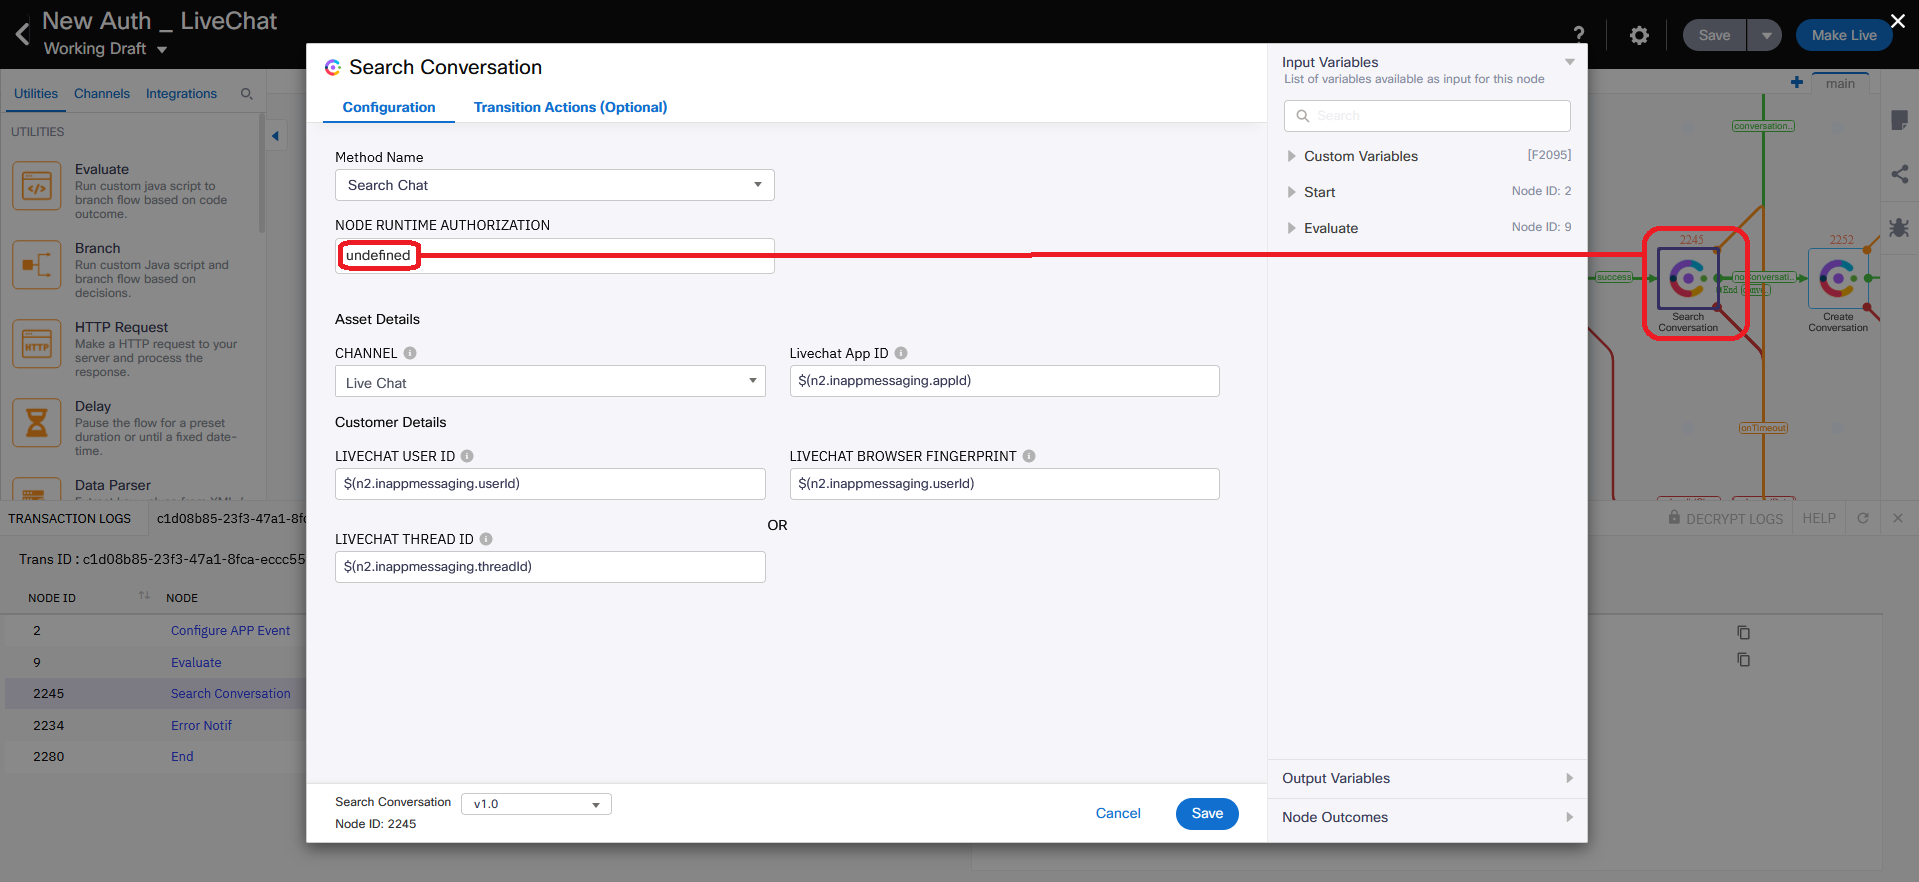
Potential ways to fix the issue:
-
If there is undefined value of autorization selected in NODE RUNTIME AUTHORIZATION field of the affected node, this means that Engage autorization used for this node has been deleted. Please select another autorization from the drop-down list or create new authorization, then save changes and make the flow live.
-
If there is incorrect autorization selected in NODE RUNTIME AUTHORIZATION field of the affected node, please select proper value from the drop-down list, save changes and make the flow live.
-
If correct autorization is selected in NODE RUNTIME AUTHORIZATION field of the affected node, but it fails, please update selected authorization. Go to Assets -> Integrations -> Webex CC Engage and select Manage from the drop-down list next to the integartion name. For example:
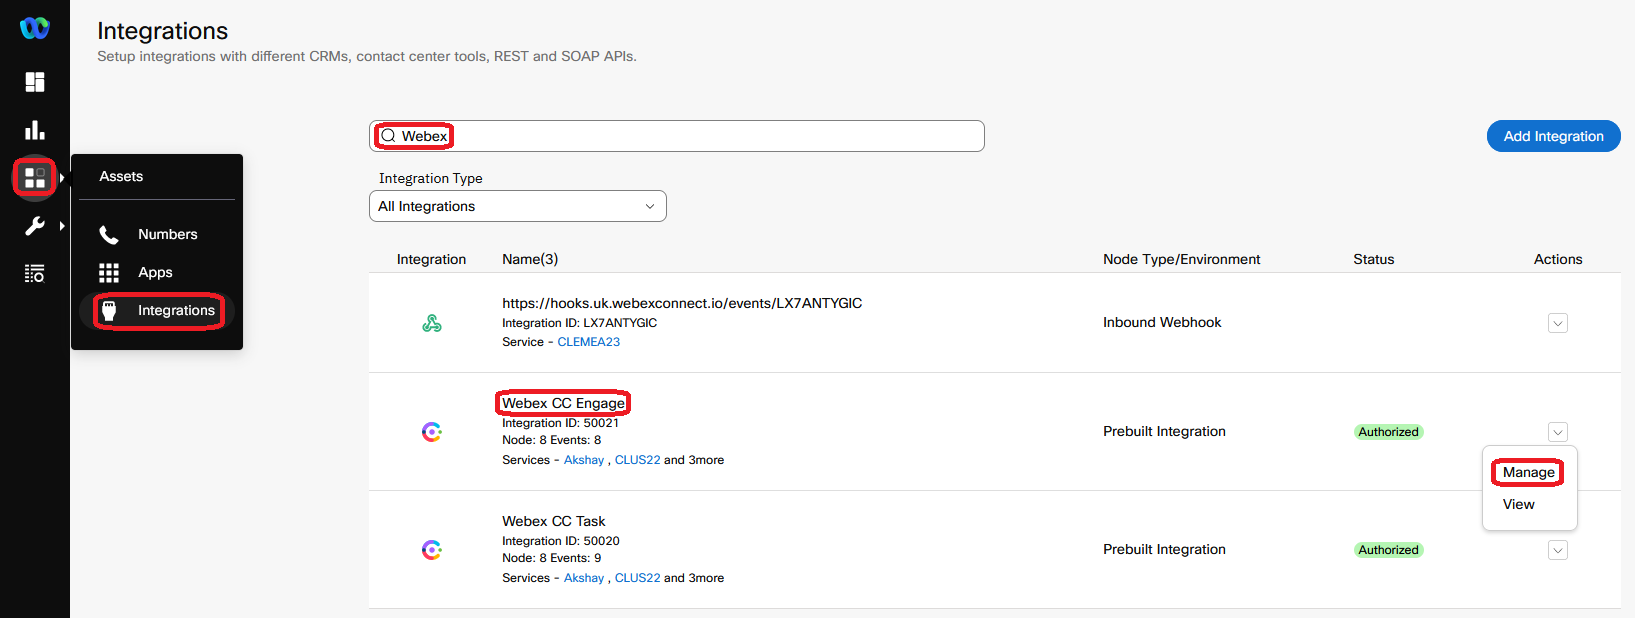
Then scroll down to Node Authorizations, click on arrow button to expand the list and select Update from Actions list next to the affected authorization.
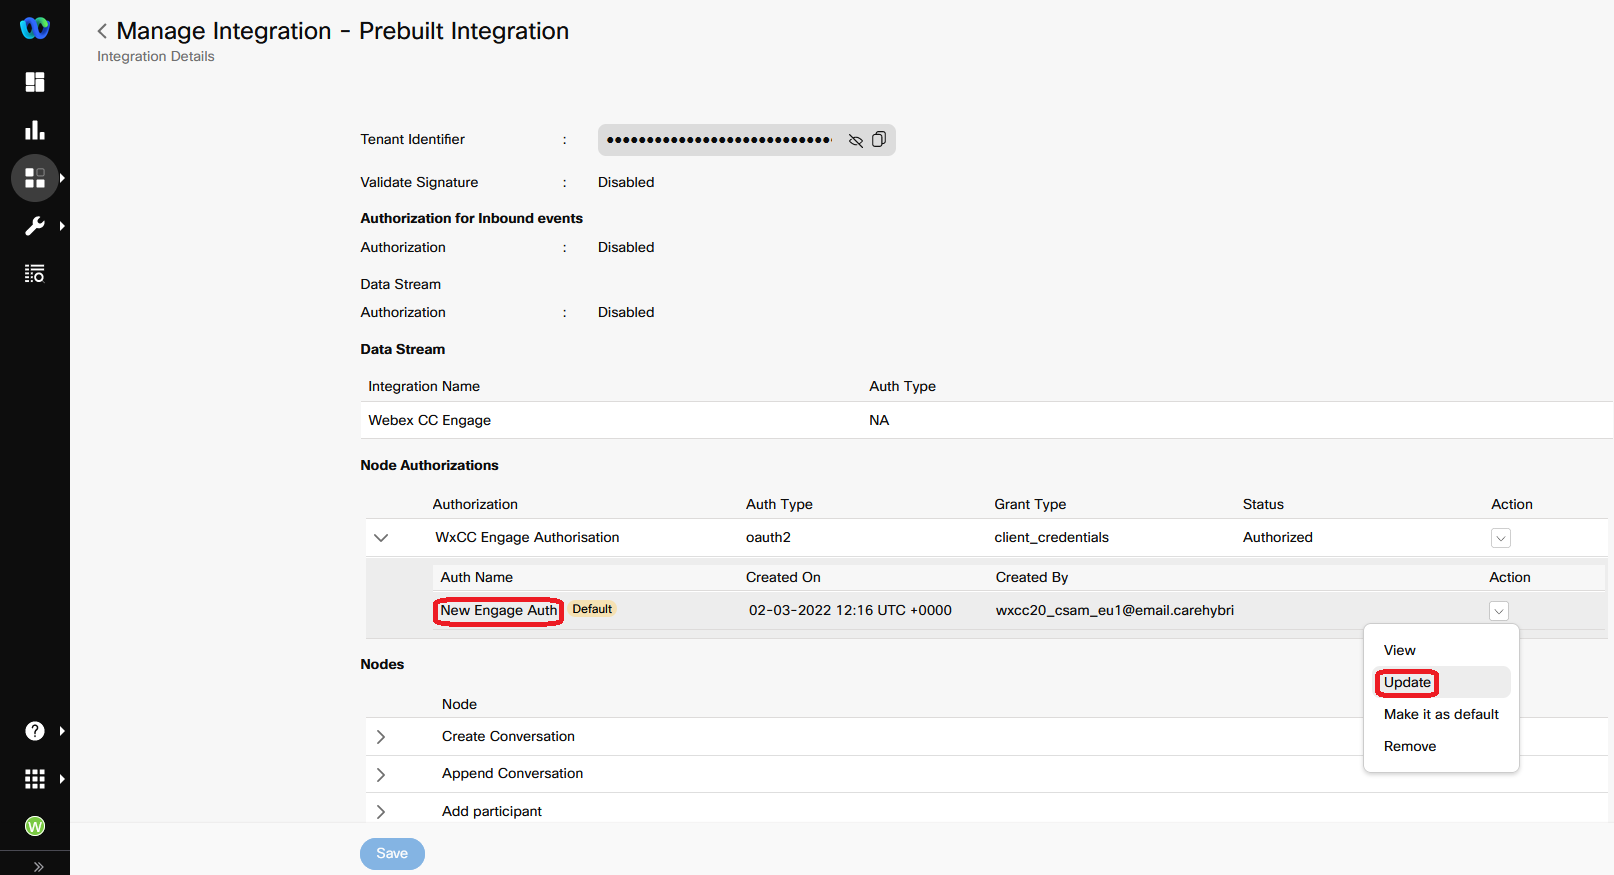
Then click on Authorize button in the pop-up window and provide credentials if needed to update Webex CC authorization.
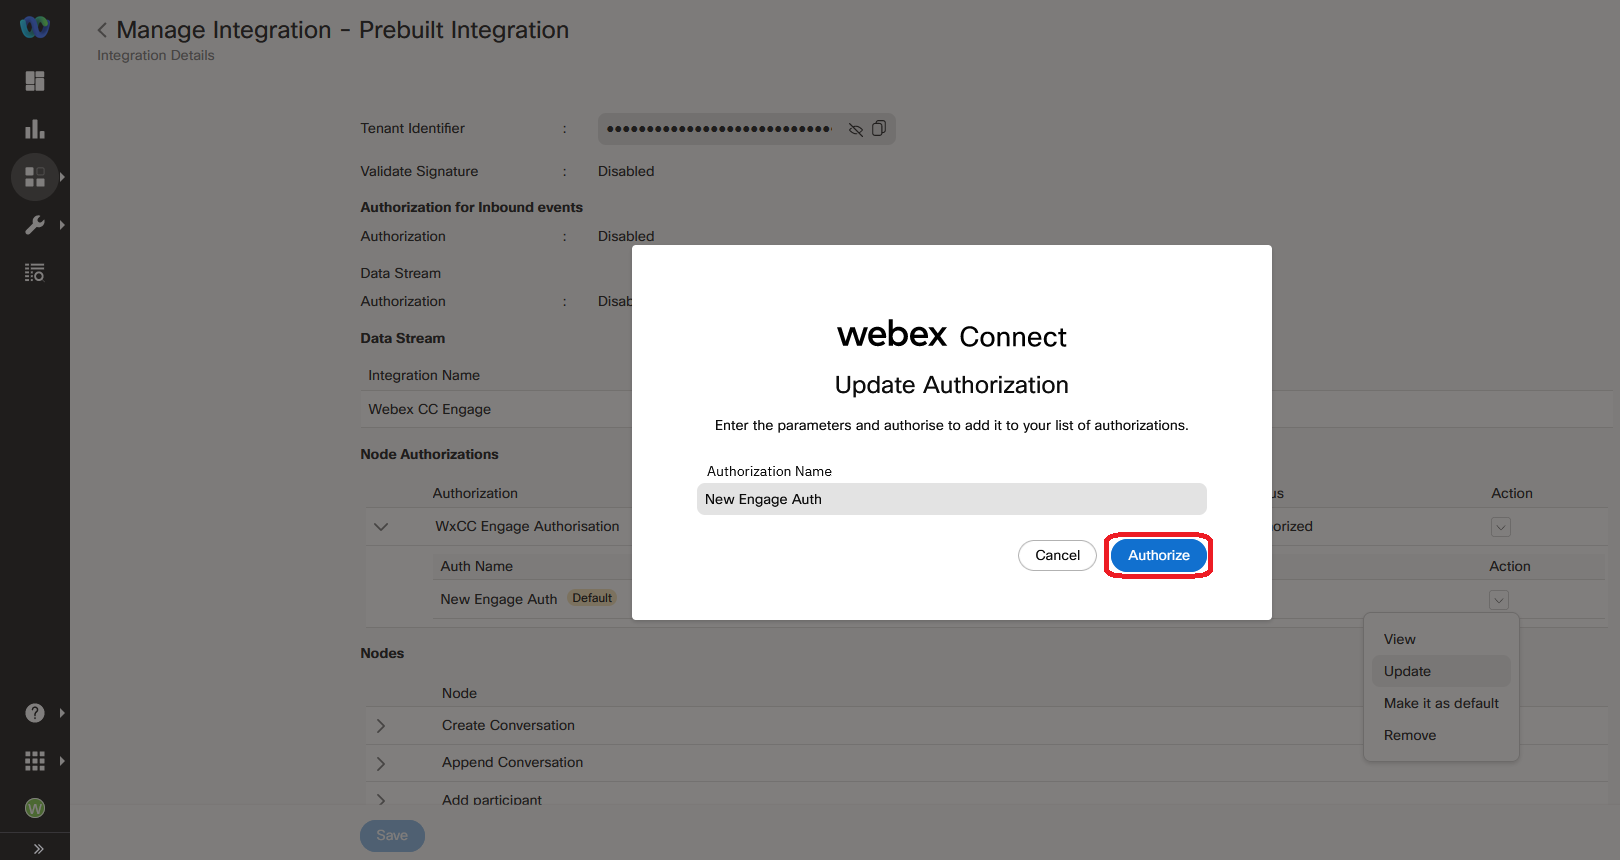
3.3. Webex CC authorization not working
Here is an example where Webex CC authorization does not work properly. Flow debugger disaplays onauthorizationfail error next to the affected Webex CC node.

The error desc : unauthorized, integration :Create Task, method : Create Task means the autorization configured in NODE RUNTIME AUTHORIZATION field of Create Task node does not work.
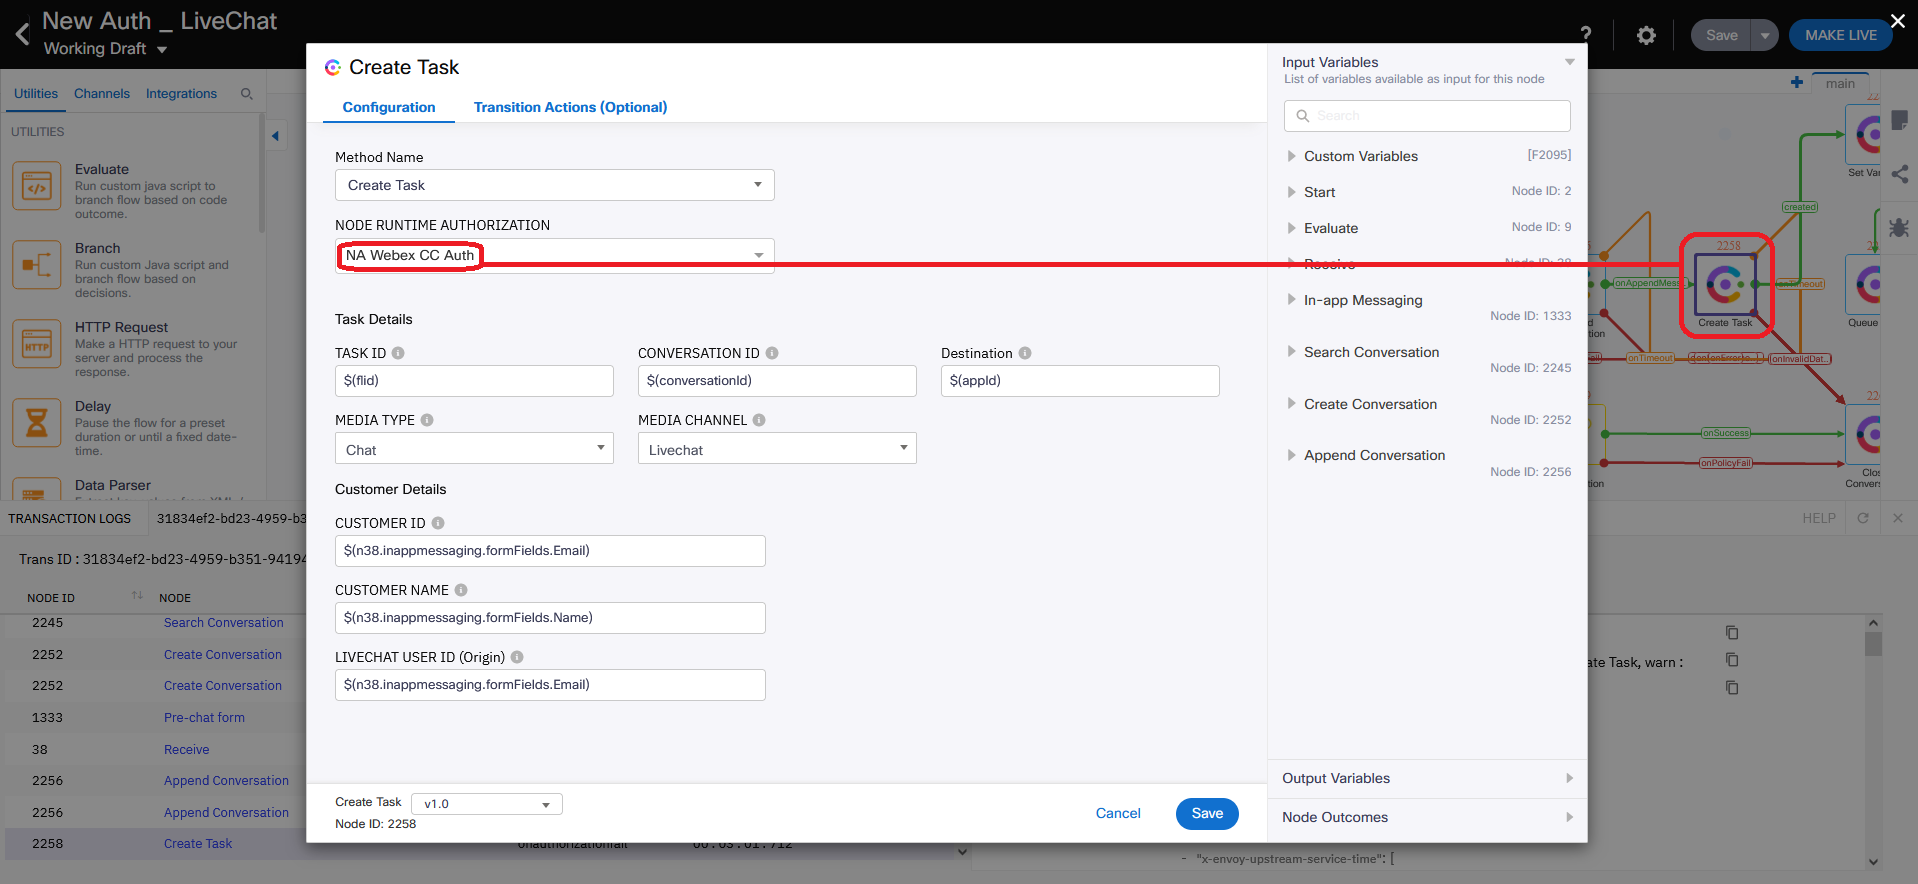
Potential ways to fix the issue:
-
If there is incorrect autorization selected in NODE RUNTIME AUTHORIZATION field of the affected node, please select proper value from the drop-down list, save changes and make the flow live.
-
If correct autorization is selected in NODE RUNTIME AUTHORIZATION field of the affected node, but it fails, please make sure proper account is still active on Control Hub. Then go to Assets -> Integrations -> Webex CC Task and select Manage from the drop-down list next to the integartion name. For example:
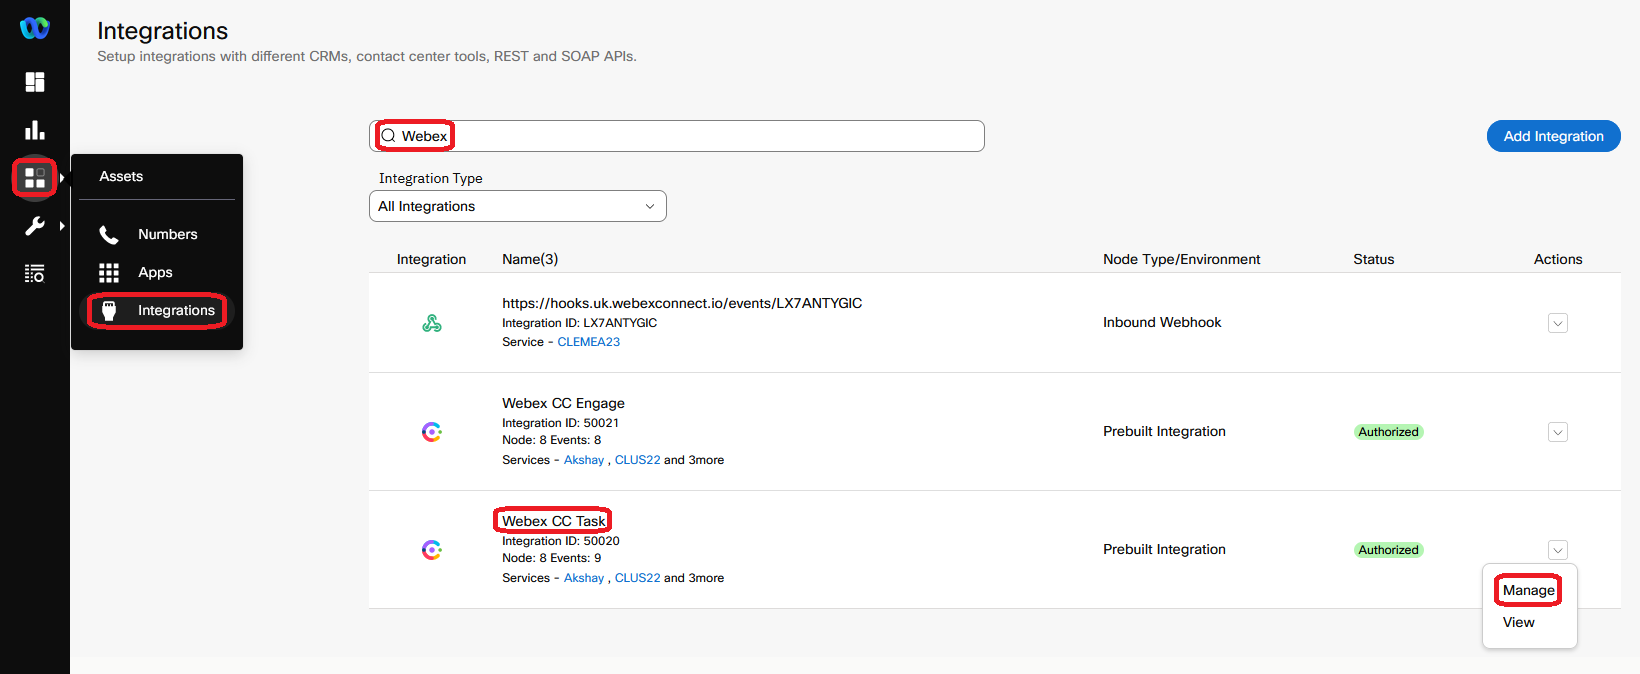
Then scroll down to Node Authorizations, click on arrow button to expand the list and select Update from Actions list next to the affected authorization.
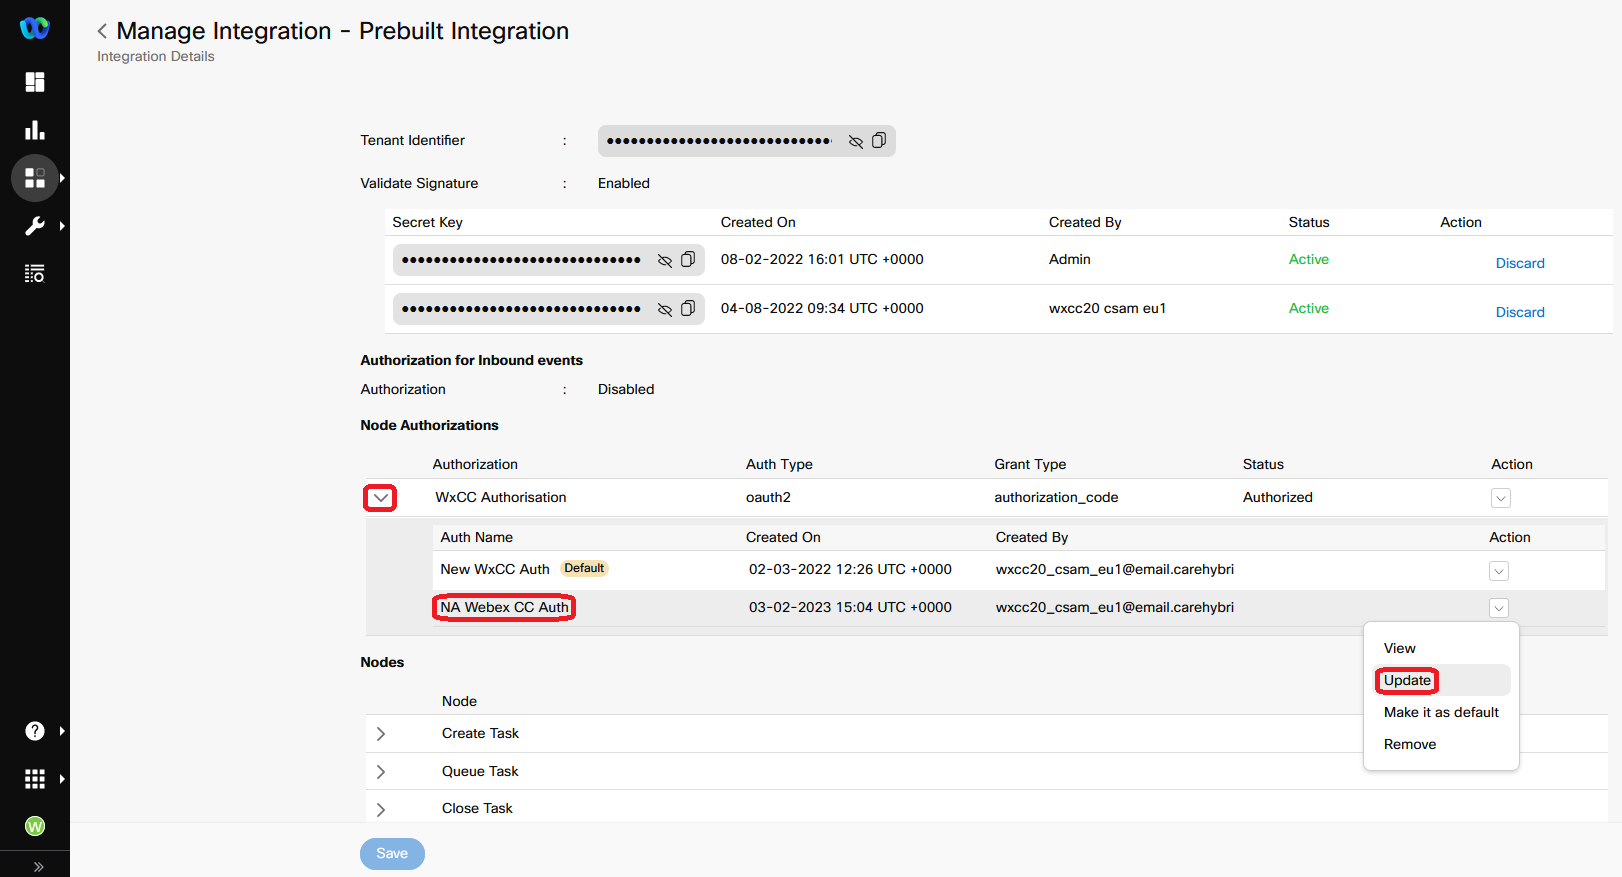
Then click on Authorize button in the pop-up window and provide credentials if needed to update Webex CC authorization.
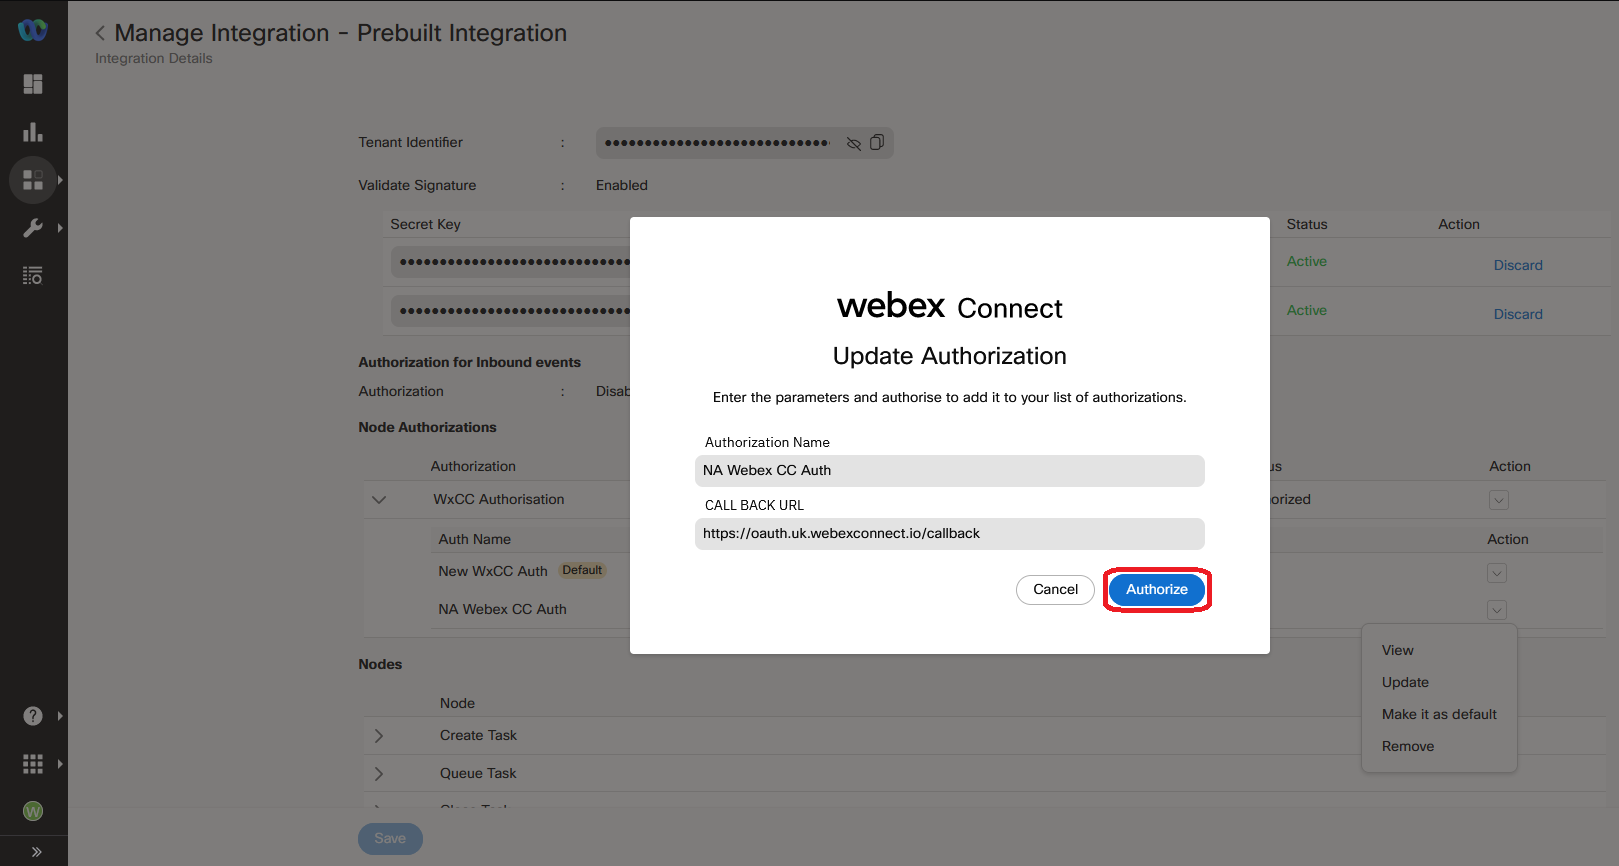
3.4. Variable does not exist or has an empty value
Here is an example where the variable assigned to one of the parameters of flow node does not exist or has empty value. Flow debugger disaplays onError error next to the affected Create Task node.
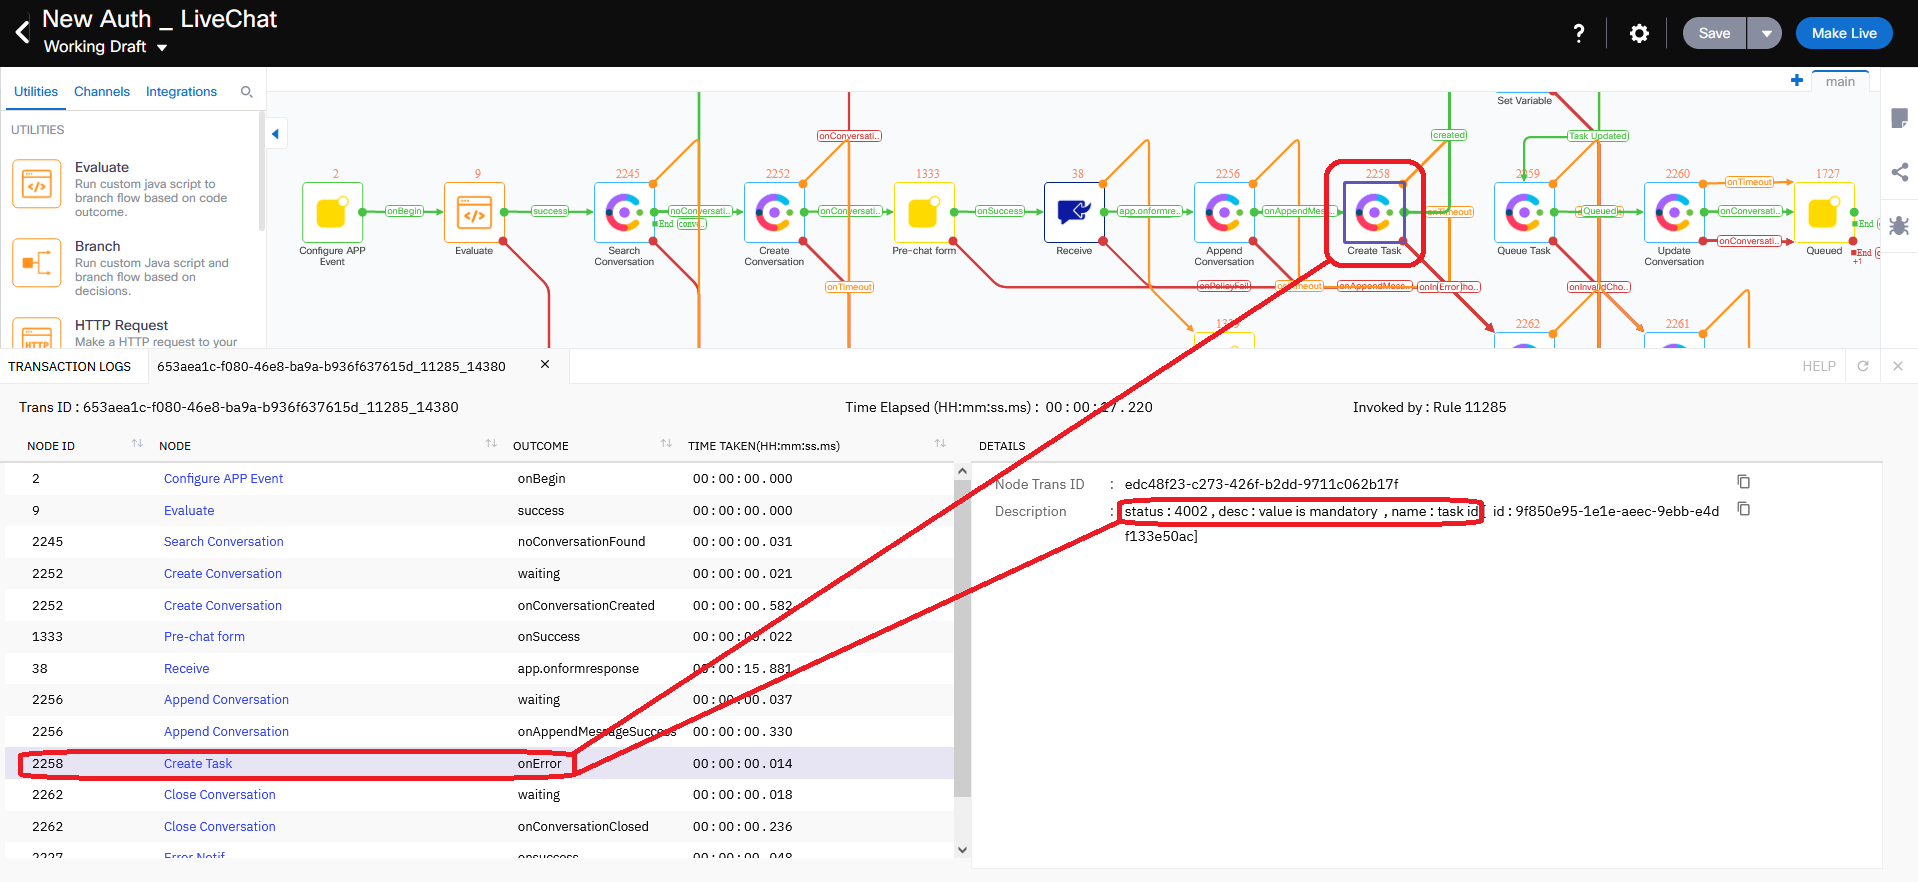
The error desc : value is mandatory , name : task id means TASK ID parameter of Create Task node had no value when the node was executed. It could happen if the variable assigned to TASK ID did not exist or had an empty value. To fix this issue, we need to open the configuration of Cretae Task node and check the value of TASK ID parameter. In our case there is a variable $(flid_na), which does not exist and that’s why there was an empty value used when calling Create Task node.
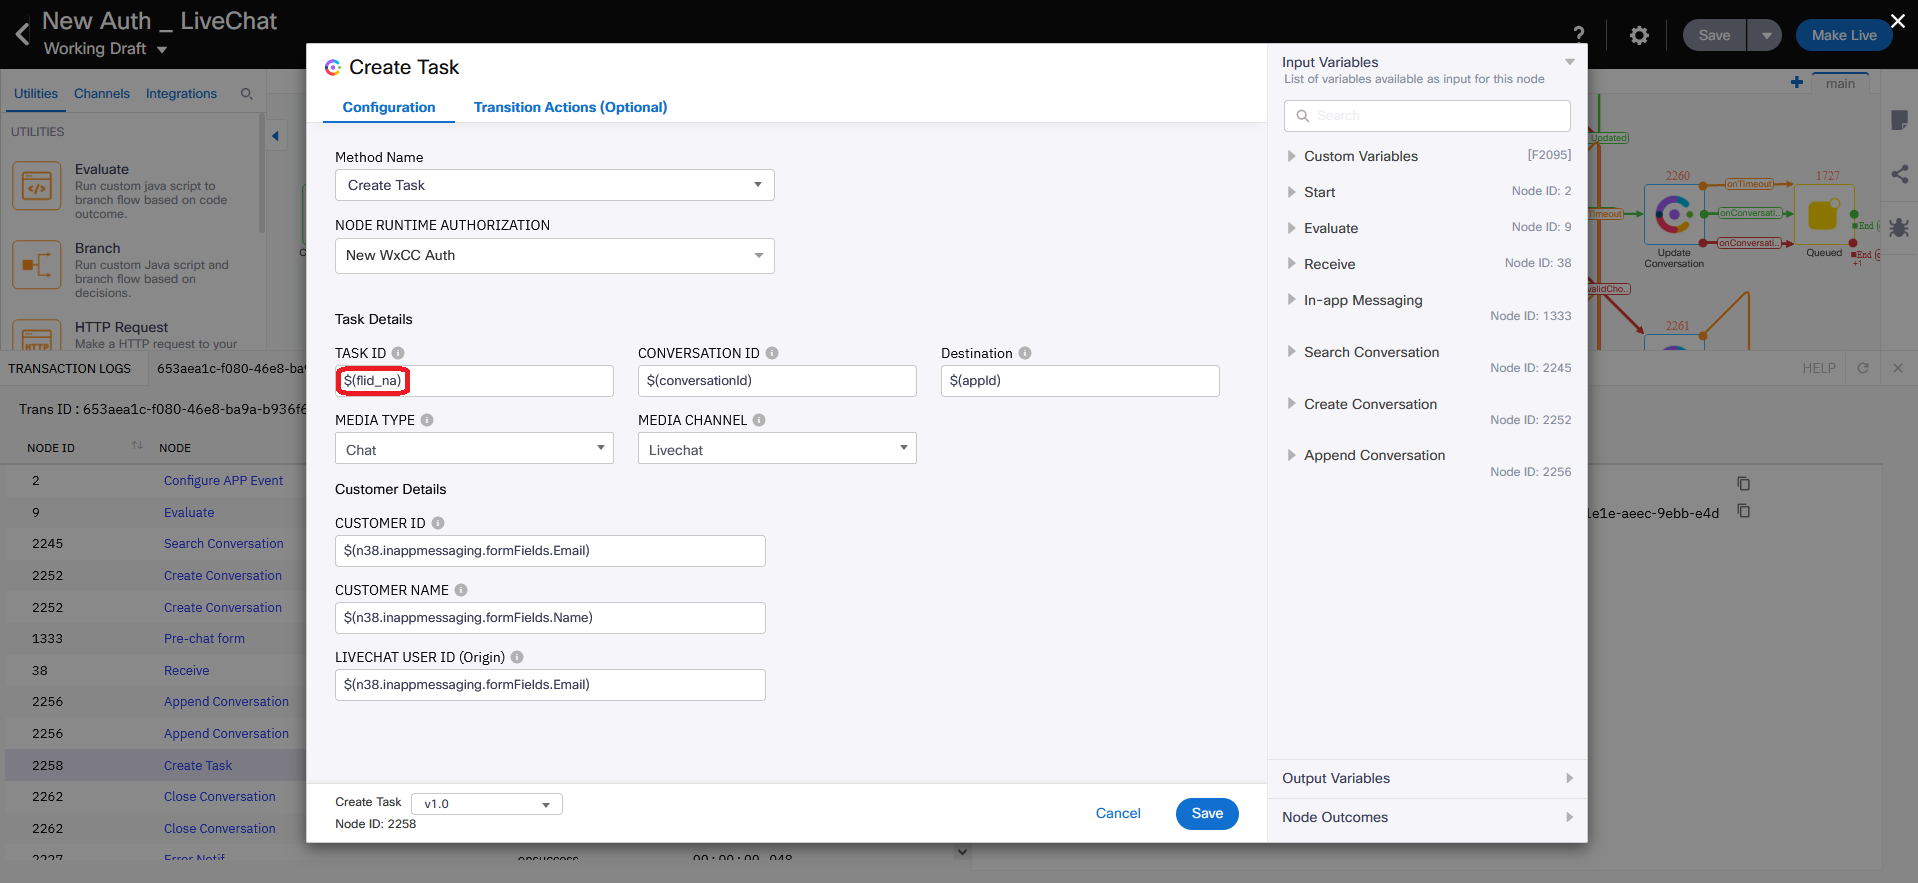
Potential ways to fix the issue:
- Correct variable name if it is wrong and check the value of this variable
- Create a variable if it does not exist and assign proper value to it
- [Not a flexible approach] Replace the variable name by exact value
3.5. Variable or parameter has wrong value
Here is an example where the variable or parameter of a flow node has wrong value. Flow debugger disaplays onAppendMessageFailure error next to the affected Append Conversation node.

The error "”description”:”Chat ID provided does not exist”,”event”:”conversation-message:error”,”value”:{“conversationId”:”this-is-wrong-ID-just-for-example”,”aliasId”:””}” means that CONVERSATION ID parameter of Append Conversation node has wrong value - “this-is-wrong-ID-just-for-example”. Please double-click on the affected node and correct the value of CONVERSATION ID parameter to fix the issue. Then save changes and make the flow live.
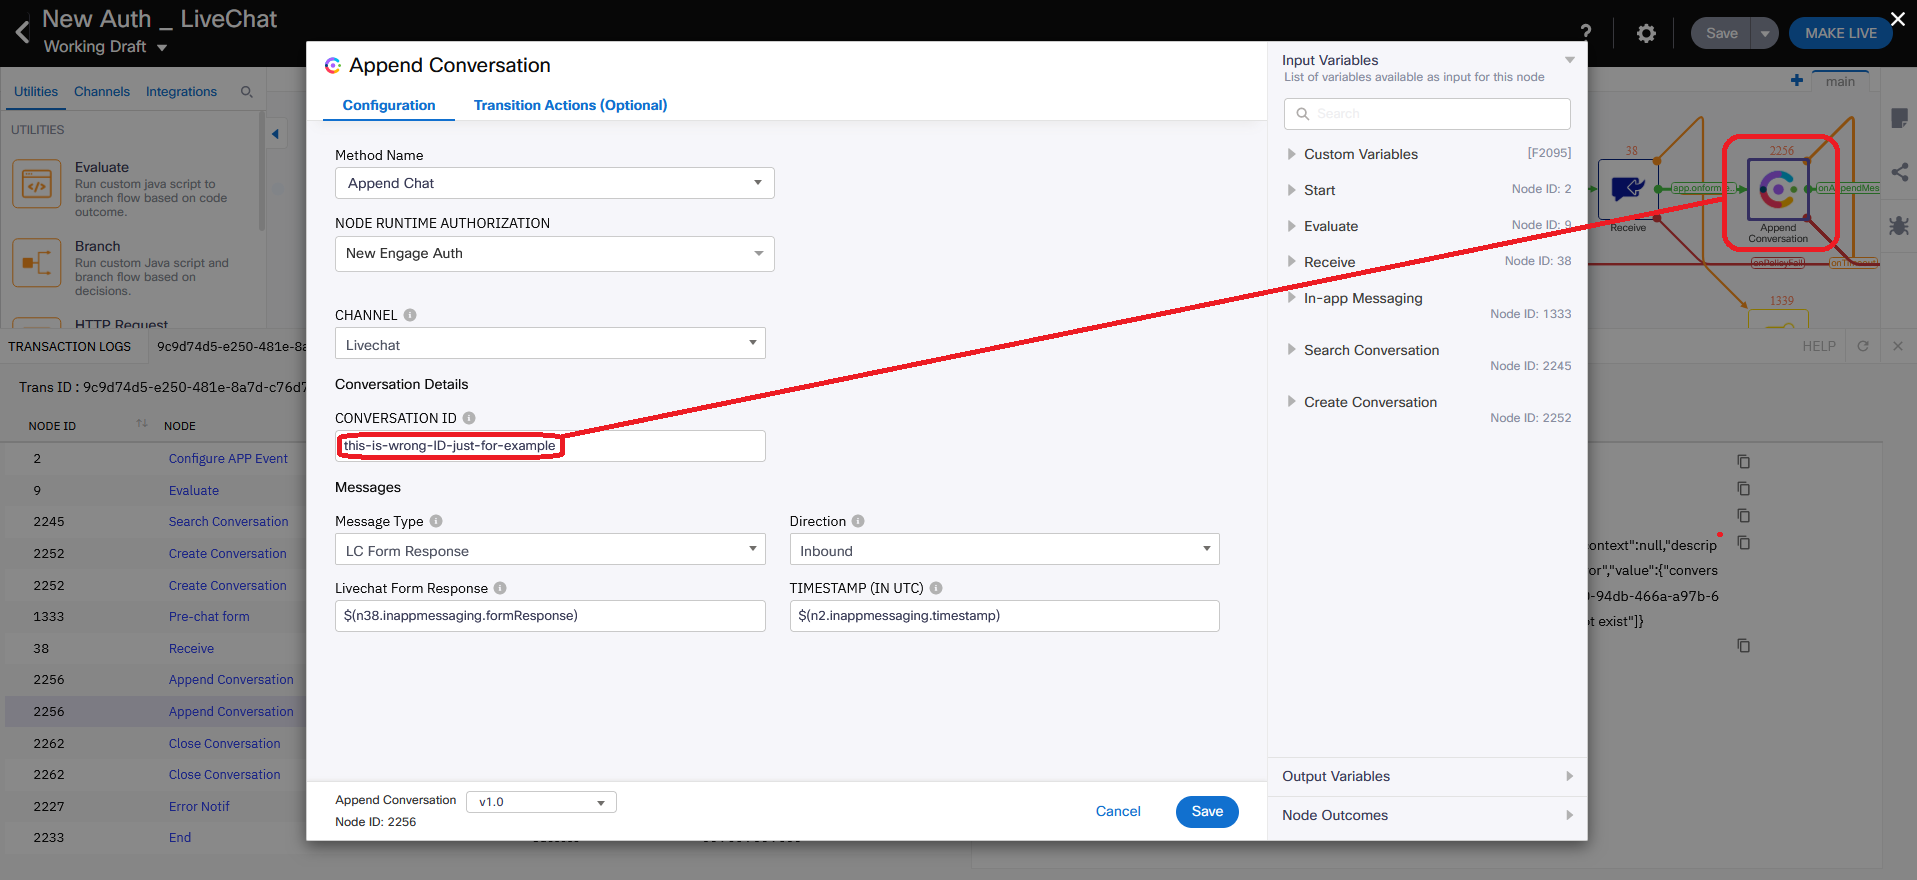
Congratulations, you have completed this section!
Lab.12.20 - Creating Custom Nodes
Table of Contents
| Topic | Lab Type | Difficulty Level | Estimated length |
|---|---|---|---|
| Adding a Custom Node | Practical Lab | MED | 15 min |
| Demo | Read & Understand | EASY | 15 min |
Introduction
Lab Objective
This lab walks you through the creation of custom node and a demo of its usage. Custom nodes allow you to configure reusable integrations with your existing business system or with third-party applications using REST/SOAP APIs. In this sample example, we are going to show how you can integrate with WxCC and update Site name via calling into Entry Point.
Pre-requisite
- Admin credentials to login to Webex Connect portal
Quick Links
Control Hub: https://admin.webex.com
Portal: https://portal.wxcc-us1.cisco.com/portal
Agent Desktop: https://desktop.wxcc-us1.cisco.com
Webex Connect Portal: https://wxcctrainingpod29.us.webexconnect.io Webex Connect Documentation: https://help.imiconnect.io/
1. Adding a Custom Node
1.1. Navigate to Integrations in Webex Connect
- Login in to Webex Connect portal
- From left column, navigate to “Integrations”
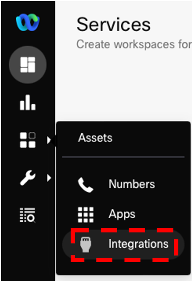
1.2. Add Custom Node
- In Integrations, click ‘Add Integration’
- Select ‘Custom Node’
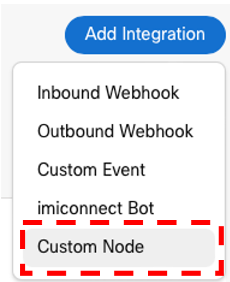
- Name your Custom Node, select ‘Custom Nodes’ under Node Category and click OK. For easy tracking of configurations, please use the Attendee ID as part of your node name. For example: Node Name: AttendeeID_CustomNode
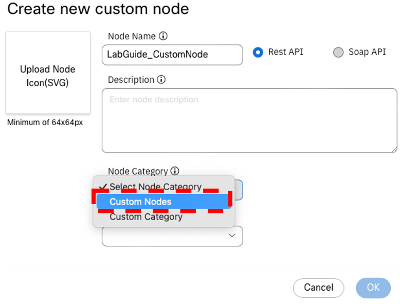
1.3. Configure REST API under Settings tab
These settings are specific to the requirement of your existing business system or with third-party applications you are trying to integrate.
- Step 1: Configure Authorization
- Step 2: Configure Headers
- Step 3: Configure Body
- Step 4: Configure Response
1.4. Configure Node UI tab (optional)
- This setting are specific to the requirement of your existing business system or with third-party applications you are trying to integrate.
2. Demo
Here a quick Demo via calling EP into Webhook to invoke custom node to update WxCC Site name:
Note: The ppt presented in the video has an error. The HTTP Request to Webhook is a POST request. Please refer to the diagram below.
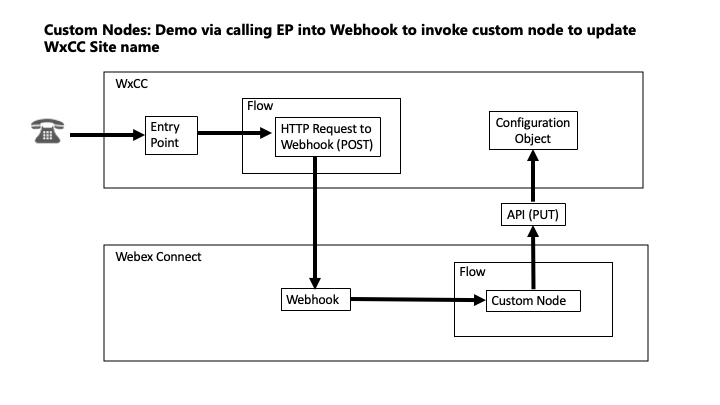
Congratulations, you have completed this section!
Lab.12.21 - Event and Triggers
Table of Contents
| Topic | Lab Type | Difficulty Level | Estimated length |
|---|---|---|---|
| Creating an Inbound webhook flow | Practical Lab | MED | 15 min |
| Creating an Event in Webex Engage Portal | Practical Lab | MED | 10 min |
| Test the Event Trigger | Practical Lab | EASY | 5 min |
Introduction
Lab Objective
This lab walks through the configuration of Events and Triggers in the Webex Contact Centre Engage Portal. Once configured, these can be invoked by an agent handling digital interactions to achieve the required use case.
Pre-requisite
- Admin credentials to login to WxCC and Webex Connect portal
- Working inbound chat and routed flow
- Knowledge of WxCC Connect flows and basic troubleshooting
Quick Links
Control Hub: https://admin.webex.com
US Portal: https://portal.wxcc-us1.cisco.com/portal
US Agent Desktop: https://desktop.wxcc-us1.cisco.com
UK Portal: https://portal.wxcc-eu1.cisco.com/portal
UK Agent Desktop: https://desktop.wxcc-eu1.cisco.com
EMEA Portal: https://portal.wxcc-eu2.cisco.com/portal
EMEA Agent Desktop: https://desktop.wxcc-eu2.cisco.com
ANZ Portal: https://portal.wxcc-anz1.cisco.com/portal
ANZ Agent Desktop: https://desktop.wxcc-anz1.cisco.com
Webex Connect Documentation: https://help.imiconnect.io/
1. Creating an Inbound Webhook flow
- Login to Webex Connect portal. From Left column, navigate to Assets–> Integrations
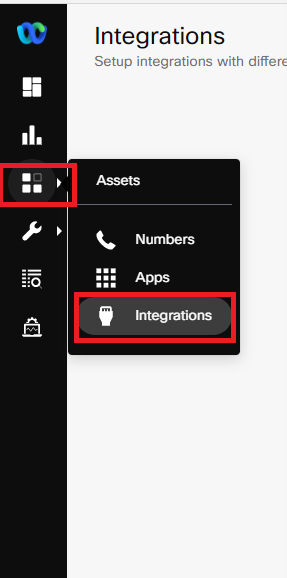
- Click on Add Integration–>Inbound Webhook

- Give the Webhook a Unique name , and copy the Webhook URL and keep it aside for future reference. Click Save.
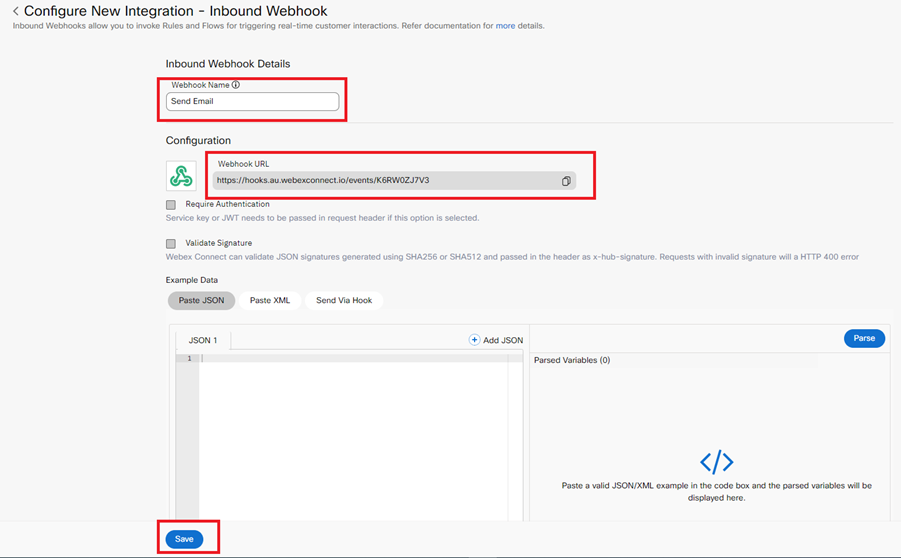
- Navigate to the relevant Service from the Left Pane and click on Create Blank Flow.
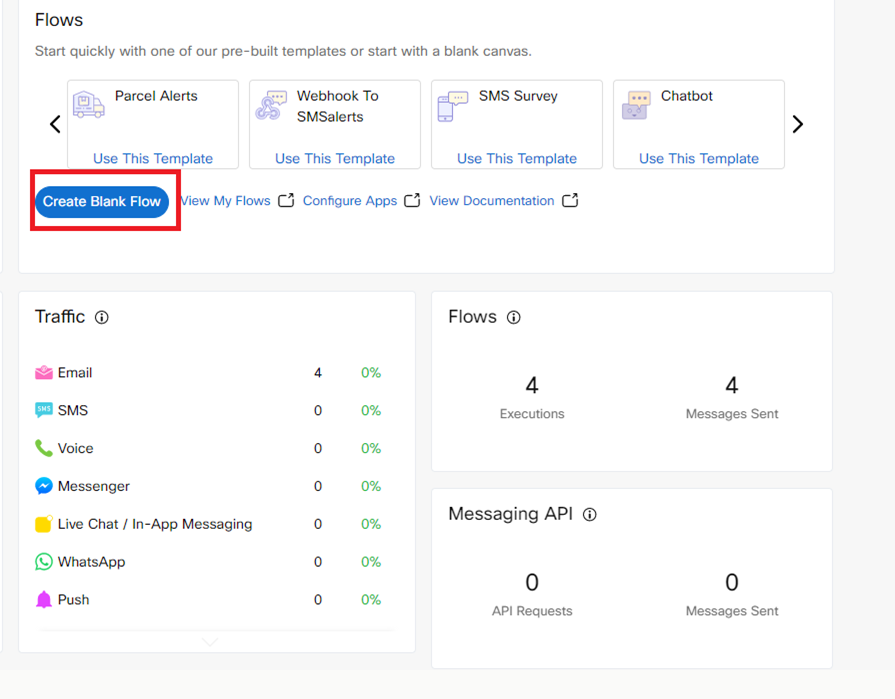
- Give the flow a name and click Create. Select the Webhook as the Trigger category.
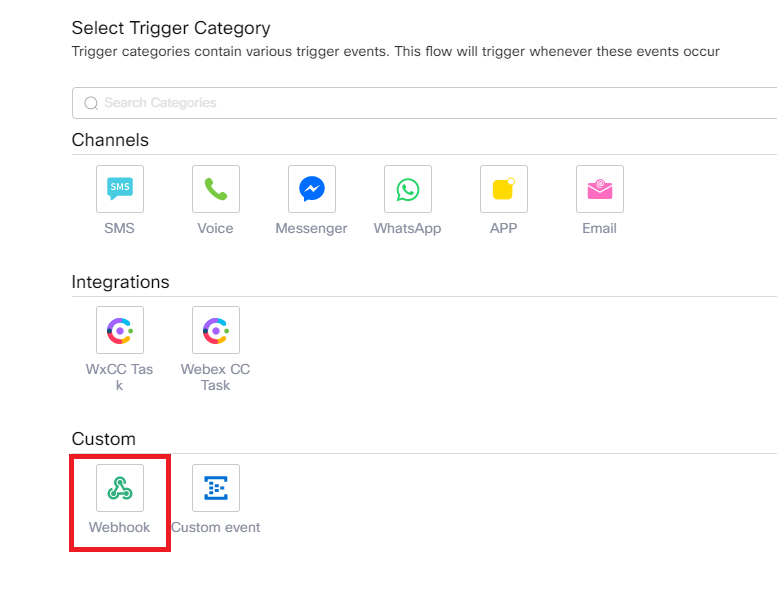
- Select the Webhook name from the dropdown and paste the below Json data and click Parse. Save the changes
{ “email”: “xxx@cisco.com”, “url”: “https://www.cisco.com/” }
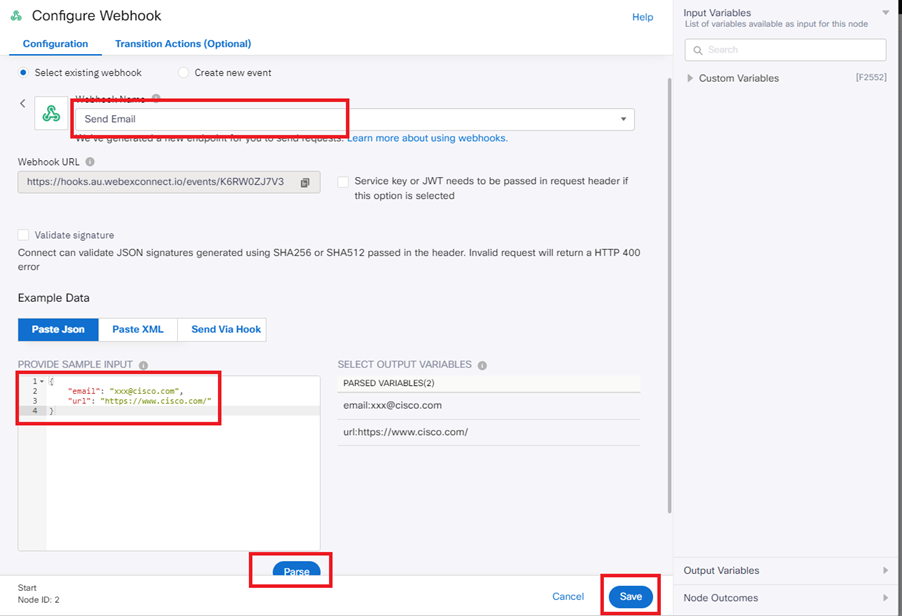
- Drag the Email node from the left pane on to the canvas and connect the two nodes.
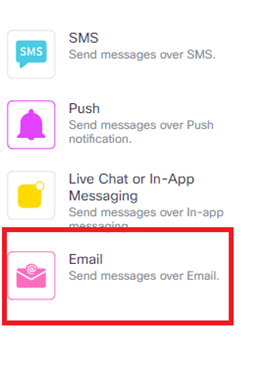
- Open the Email node and enter the Destination ID, From Name, Message and Subject. Click Save.

- Save the flow and make live.
2. Creating an Event in Webex Engage Portal
- Login to Webex Contact Centre Management Portal and cross launch Webex Engage from the left side pane.
- Click on Groups- –> Default
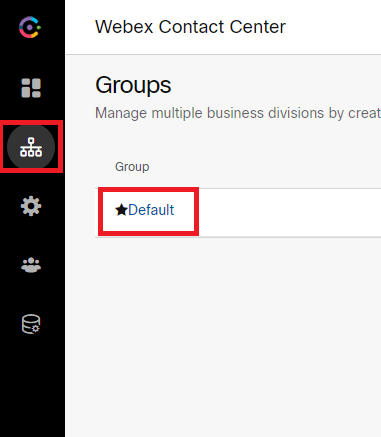
- Click on the Default Team
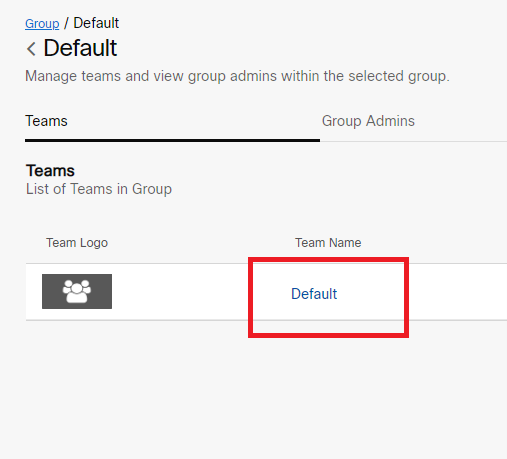
- Click on Events and Rules and click Add new event.
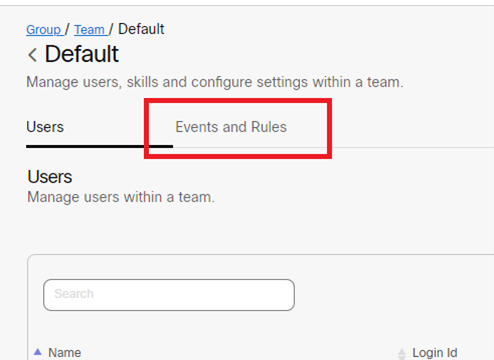
- Enter a unique name, Method, Webhook URL, payload as Key Value pair .

- To enter the key Value pair, click on Add Param and enter parameters as shown below.
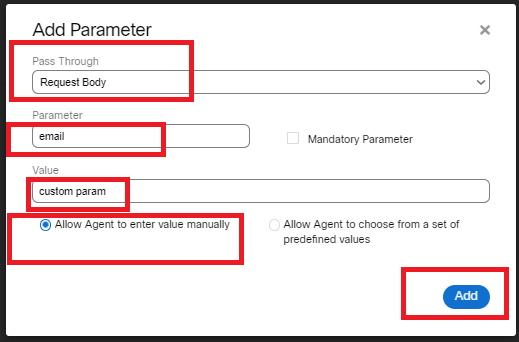
- Repeat the above step to create the url parameter

3. Test the Event Trigger
- Login to the agent desktop and initiate a chat session. After accepting the chat session click on the lightning bolt icon to select the trigger and click Next.
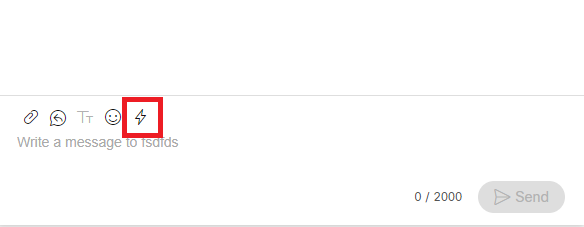
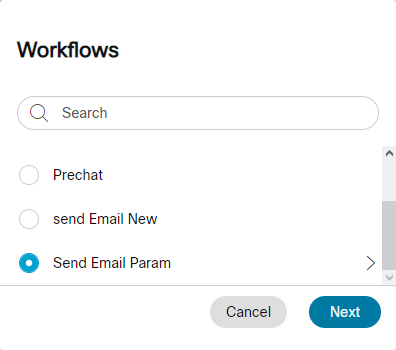
- Enter the email address you want to send the Email to and the url and press Trigger.
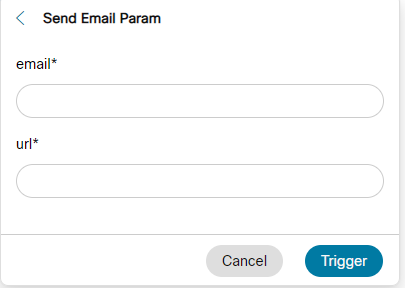
- Check the recipient’s mailbox to validate the Email has been received successfully.
Congratulations, you have completed this section!
Lab.12.22 - Global and Flow variable support in Digital channels
Table of Contents
| Topic | Lab Type | Difficulty Level | Estimated length |
|---|---|---|---|
| Fetching and Reporting Global variable | Practical Lab | MED | 15 min |
| Configuring Flow variables | Practical Lab | MED | 15 min |
| Transfer Global and Flow variable values between Webex Connect flows | Practical Lab | MED | 15 min |
Introduction
Lab Objective
This lab walks through the configuration of Global and Flow variables for digital channels. The behavior of these variables are the same as how they would work for telephony flows. Global variables are centrally configured and reported in WxCC and they are fetch via flows in Webex Connect. Flow variables are configured locally within Webex Connect flows and are not reportable.
Both variables are transferable between flows. In the second part of this lab in 12.24.3, we will configure the transfer of chat form entries received in the inbound chat flow to routed flow when agent accepts the inbound chat.
Pre-requisite
- Admin credentials to login to WxCC and Webex Connect portal
- Working inbound chat and routed flow
- Knowledge of WxCC Global variables and Analyzer
Quick Links
Control Hub: https://admin.webex.com
US Portal: https://portal.wxcc-us1.cisco.com/portal
US Agent Desktop: https://desktop.wxcc-us1.cisco.com
UK Portal: https://portal.wxcc-eu1.cisco.com/portal
UK Agent Desktop: https://desktop.wxcc-eu1.cisco.com
EMEA Portal: https://portal.wxcc-eu2.cisco.com/portal
EMEA Agent Desktop: https://desktop.wxcc-eu2.cisco.com
ANZ Portal: https://portal.wxcc-anz1.cisco.com/portal
ANZ Agent Desktop: https://desktop.wxcc-anz1.cisco.com
Webex Connect Documentation: https://help.imiconnect.io/
1. Fetching and Reporting Global Variable
1.1. Login in to Webex CC administration portal
- From left column, navigate to “Global Variables”
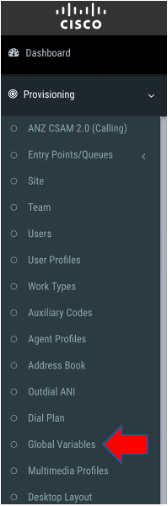
-
Create a new OR select an existing Global Variable with the following configurations. For easy tracking of configurations, please use the Attendee ID as part of your global variable name. For example: Name: AttendeeID_GV
- Name: AttendeeID_GV
- Variable Type: String
- Default Value: your prefered value
- Make Reportable: Yes
- Make Agent Viewable: Yes
- Desktop Label: your prefered value
- Agent Editable: Yes
1.2. Next, login to Webex Connect portal and open your inbound chat flow
- Click “Edit” on the top right of the flow
- Delete connection between “Queue Task” and “Update Conversation”
- Drag the “Set Variable” from the left panel and drop between “Queue Task” and “Update Conversation” nodes and connect them as shown in the video
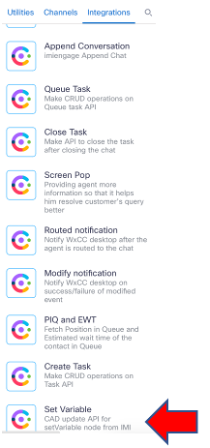
-
Configure “Set Variable” with the following:
- Method Name: Select Global Variable
- Node Runtime Authorization: Configured for your tenant
- Task ID: $(flid)
- Select the Global Variable configured earlier in WxCC Portal
- Set Variable: Leave as default value configured
- Save and make the flow live
- Start a new chat session and observe the Global variable value appearing in the interaction panel of Agent Desktop
- Capture the Session ID appearing at the address bar of the Agent Desktop upon accepting the chat session
1.3. Configure Analyzer to report the Global Variables configured in Webex Connect flow
- Navigate to “Reporting and Analytics” at the left column of WxCC portal
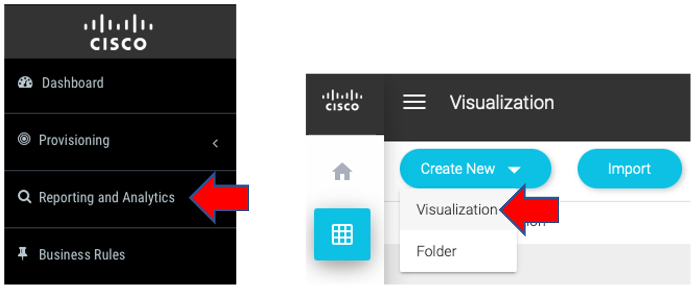
- Create a new visualization with the following fields:
- Session ID
- Global Variable defined in WxCC portal (In the video example, the Globle variable is DavidGV1)
- Create a report filter with the captured Session ID
- Run the report and observe the Global variable value
1.4. Repeat a new chat sessions with the following scenario:
- Chat session 2 use case: Prior to starting the chat session, open the specific flow again in Webex Connect. Edit the “Set Variable” value of the Global variable in the “Set Variable” node to something other than the default. Capture the Session ID for Analyzer report filter.
- Re-run the Anayzer report after adding the Session ID and observe the reported value of the Global variable.
2. Configuring Flow Variables
2.1. Login in to Webex Connect portal and open your inbound chat flow
- Click “Edit” on the top right of the flow
- Delete connection between “Set Variable” and “Update Conversation”
- Drag a second “Set Variable” from the left panel and drop between the earlier “Set Variable” and “Update Conversation” nodes and connect them as shown in the video
- Configure “Set Variable” with the following:
- Method Name: Select Flow Variable
- Node Runtime Authorization: Configured for your tenant
- Task ID: $(flid)
- Set Variable:
- Name: AttendeeID_FV (For easy tracking, please prepend your Attendee ID)
- Type: String
- Value:
- Enable “Make agent viewable”
- Description: your prefered value
- Desktop Label: your prefered value
- Check “Agent Editable”
- Click Save
- Save and make the flow live.
- Start a new chat session and observe the Flow variable value appearing in the interaction panel of Agent Desktop.
- Note that Flow variables are not reportable in Analyzer.
3. Transfer Global and Flow variable values between Webex Connect flows
3.1. Lab Objective
To transfer chat form input and Global variable values from inbound chat flow to channel-agnostic routed flow for Agent Desktop screen pop
3.2. Login in to Webex Connect portal and open your routed flow
- Click “Edit” on the top right of the flow
- Click on the gear icon at the top right of the screen and navigate to Custom Variables
-
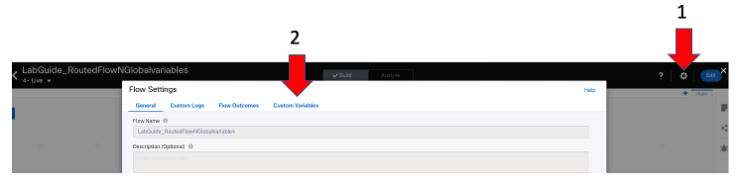
- Add the Global variable and Flow variable specific to your configuration (Note that the variables are case-sensitive)

- Next, double-click on the “Extract Task Variables” node and insert the following Javascript under Configuration tab just before the last line (Note: the italized words are specific to your variable name):
`// function to extract fields into flow usable variables
function extractVariable(varname) {
for (var i = 0; i < responseArray.length; i++) {
var object = responseArray[i];
if (object.name == varname) {
return object.value;
} } }
//Extracting NatureOfRequest and DavidGV1 variables set in the live chat inbound flow var natureOfRequest = extractVariable(“NatureOfRequest”); var davidGV1 = extractVariable(“DavidGV1”);`
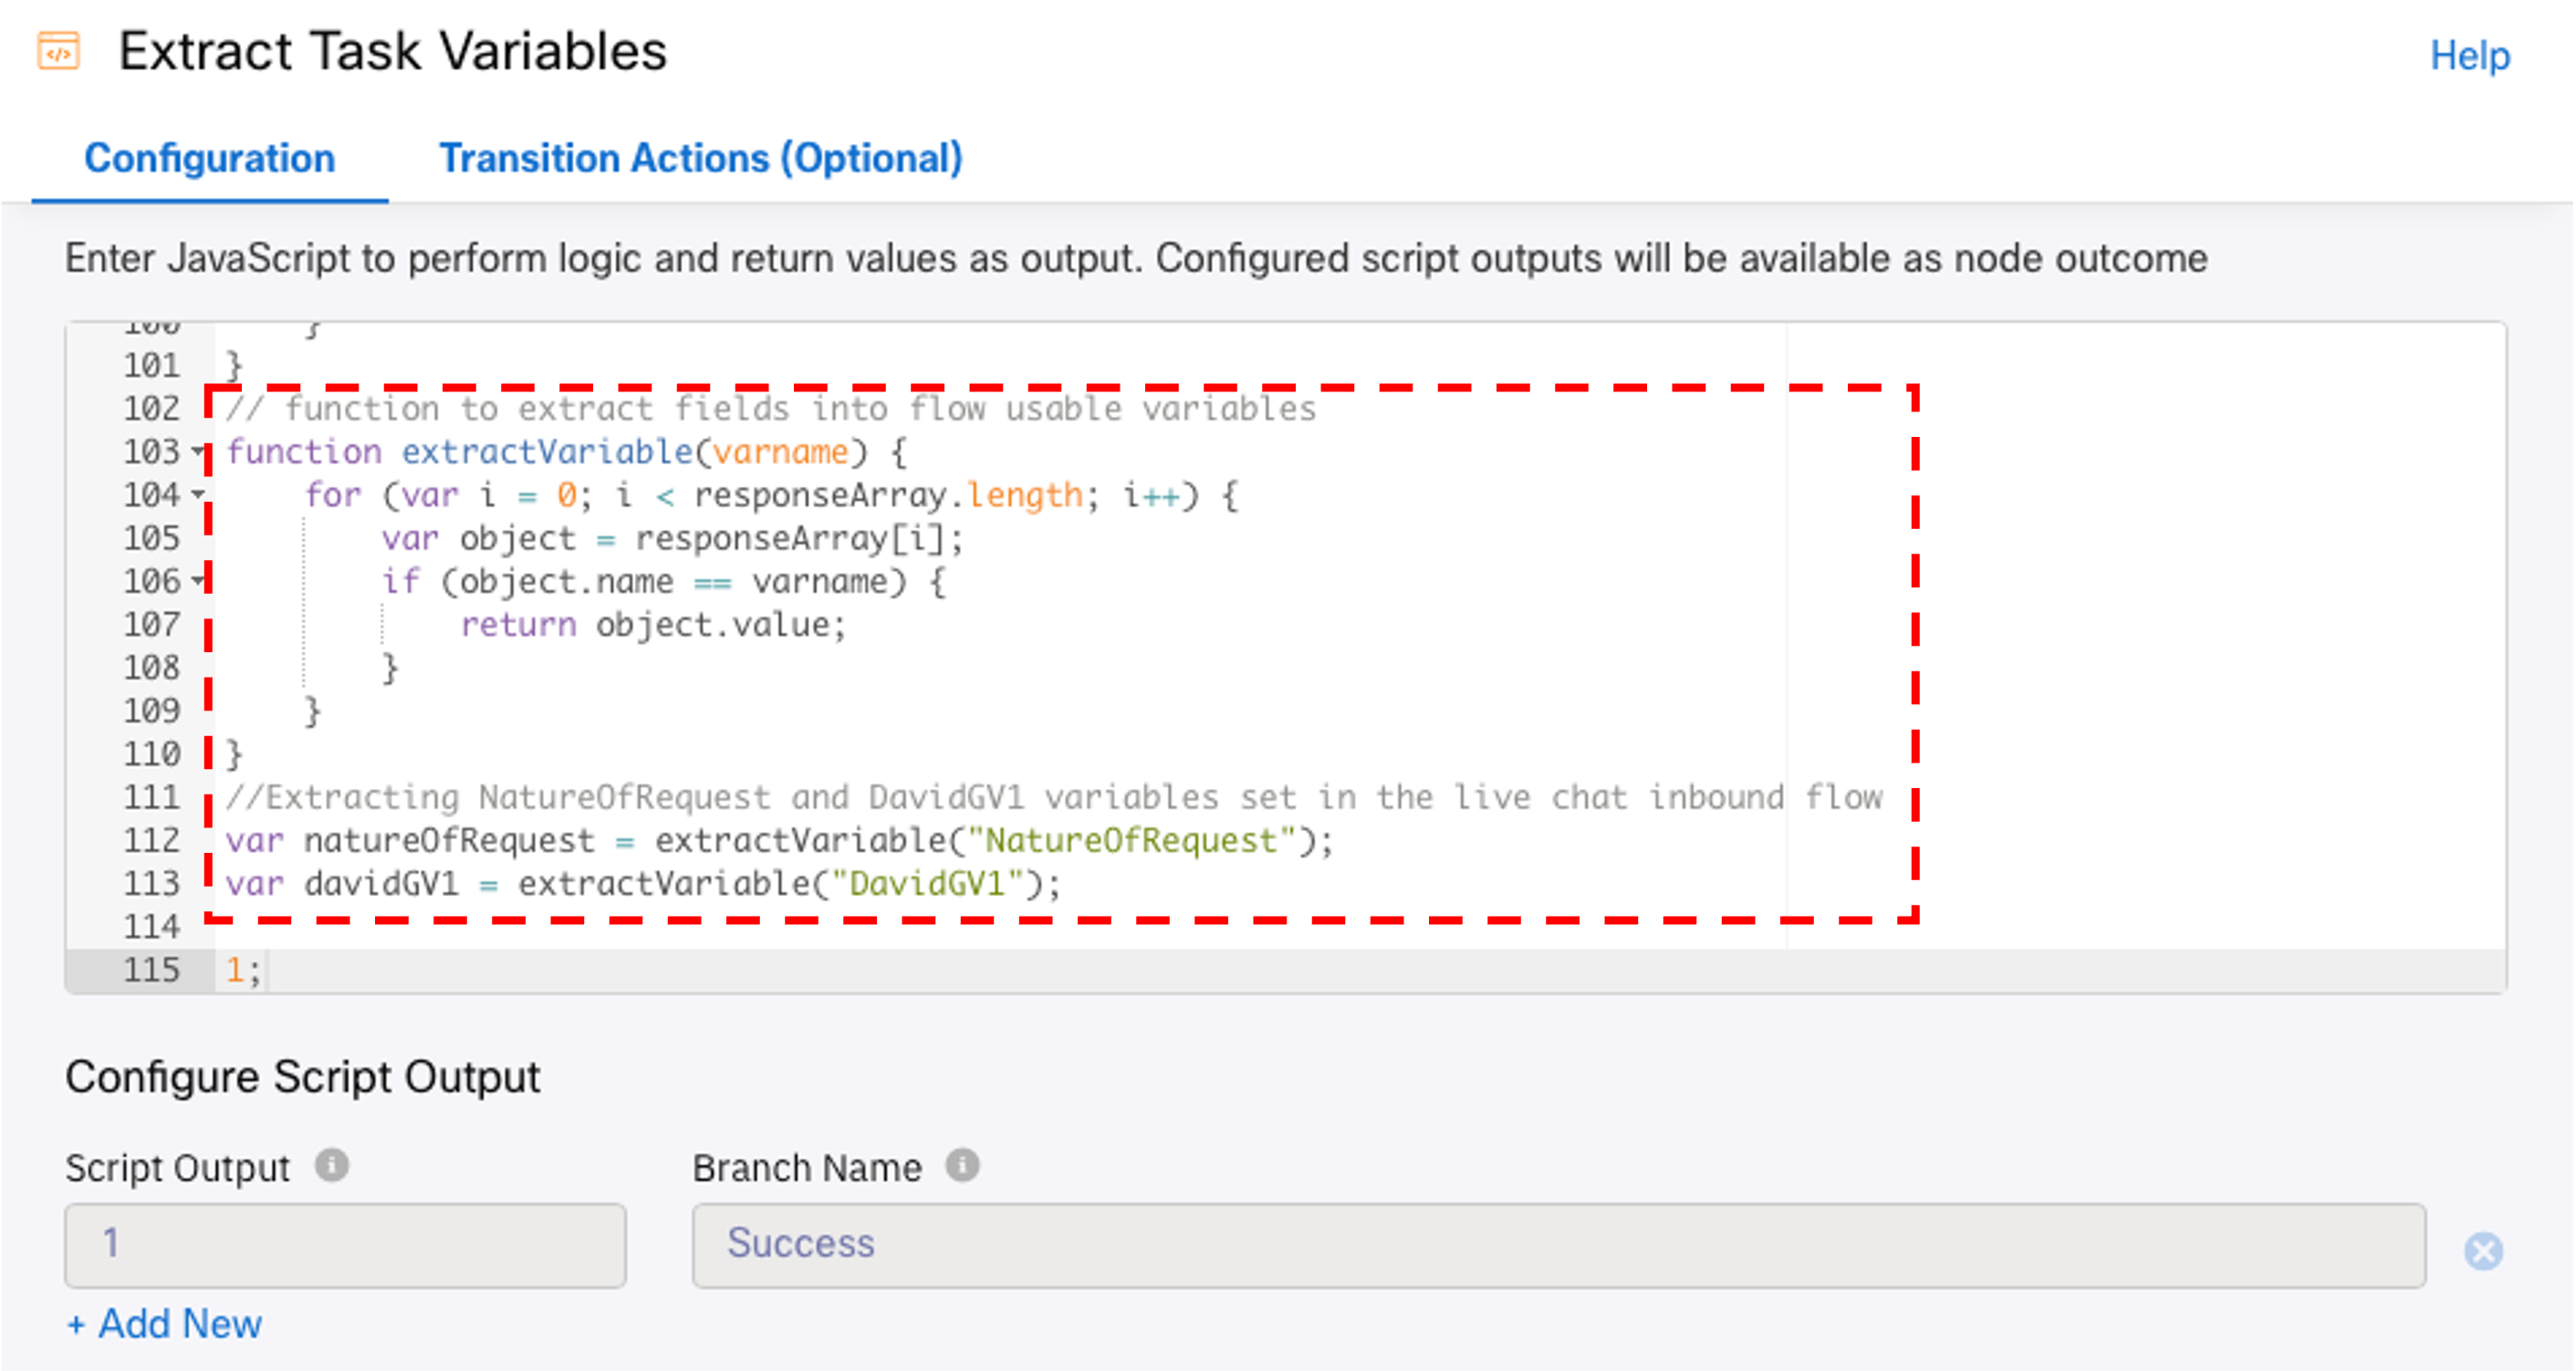
- Within the same “Extract Task Variables” node, navigate to the second option “Transition Actions (Optional)” and add the Custom variables under “Time: On-leave” and “Action: Set variable” created above to the extracted Global and Flow variables:
-
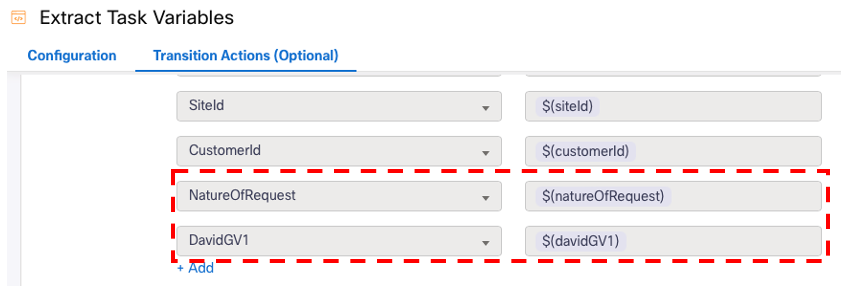
- Scroll down the same page and add both variables to the Debug Log for troubleshooting purposes if required.
- Save the settings and double-click on the Screen Pop node
- Add the following under “Query Parameters”:
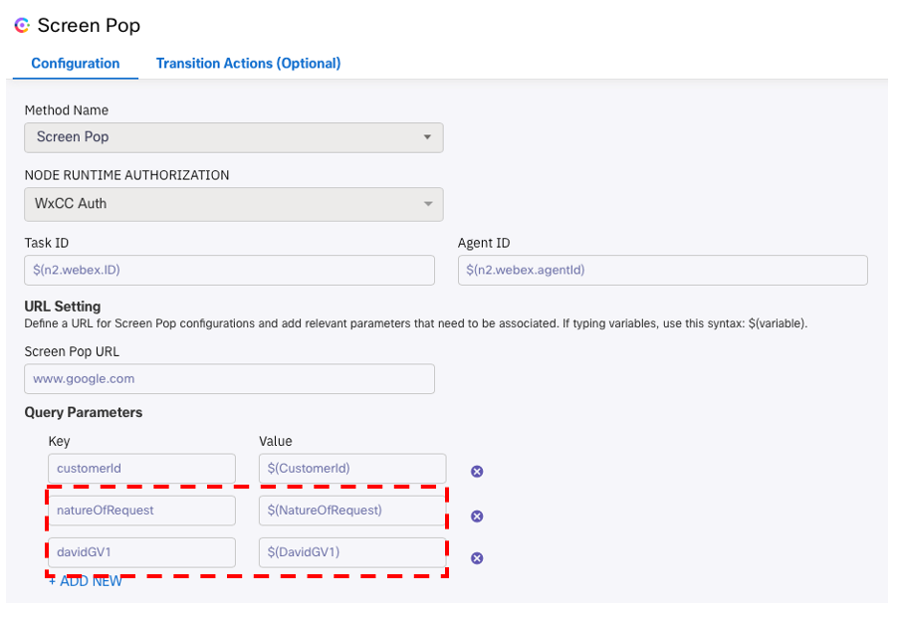
- Save and make the flow live.
- Start a new chat session and observe the Screen Pop address bar upon Agent Desktop accepting the chat session. Both Global and Flow variables from the channel specific inbound chat flow are transfered to the routed flow.
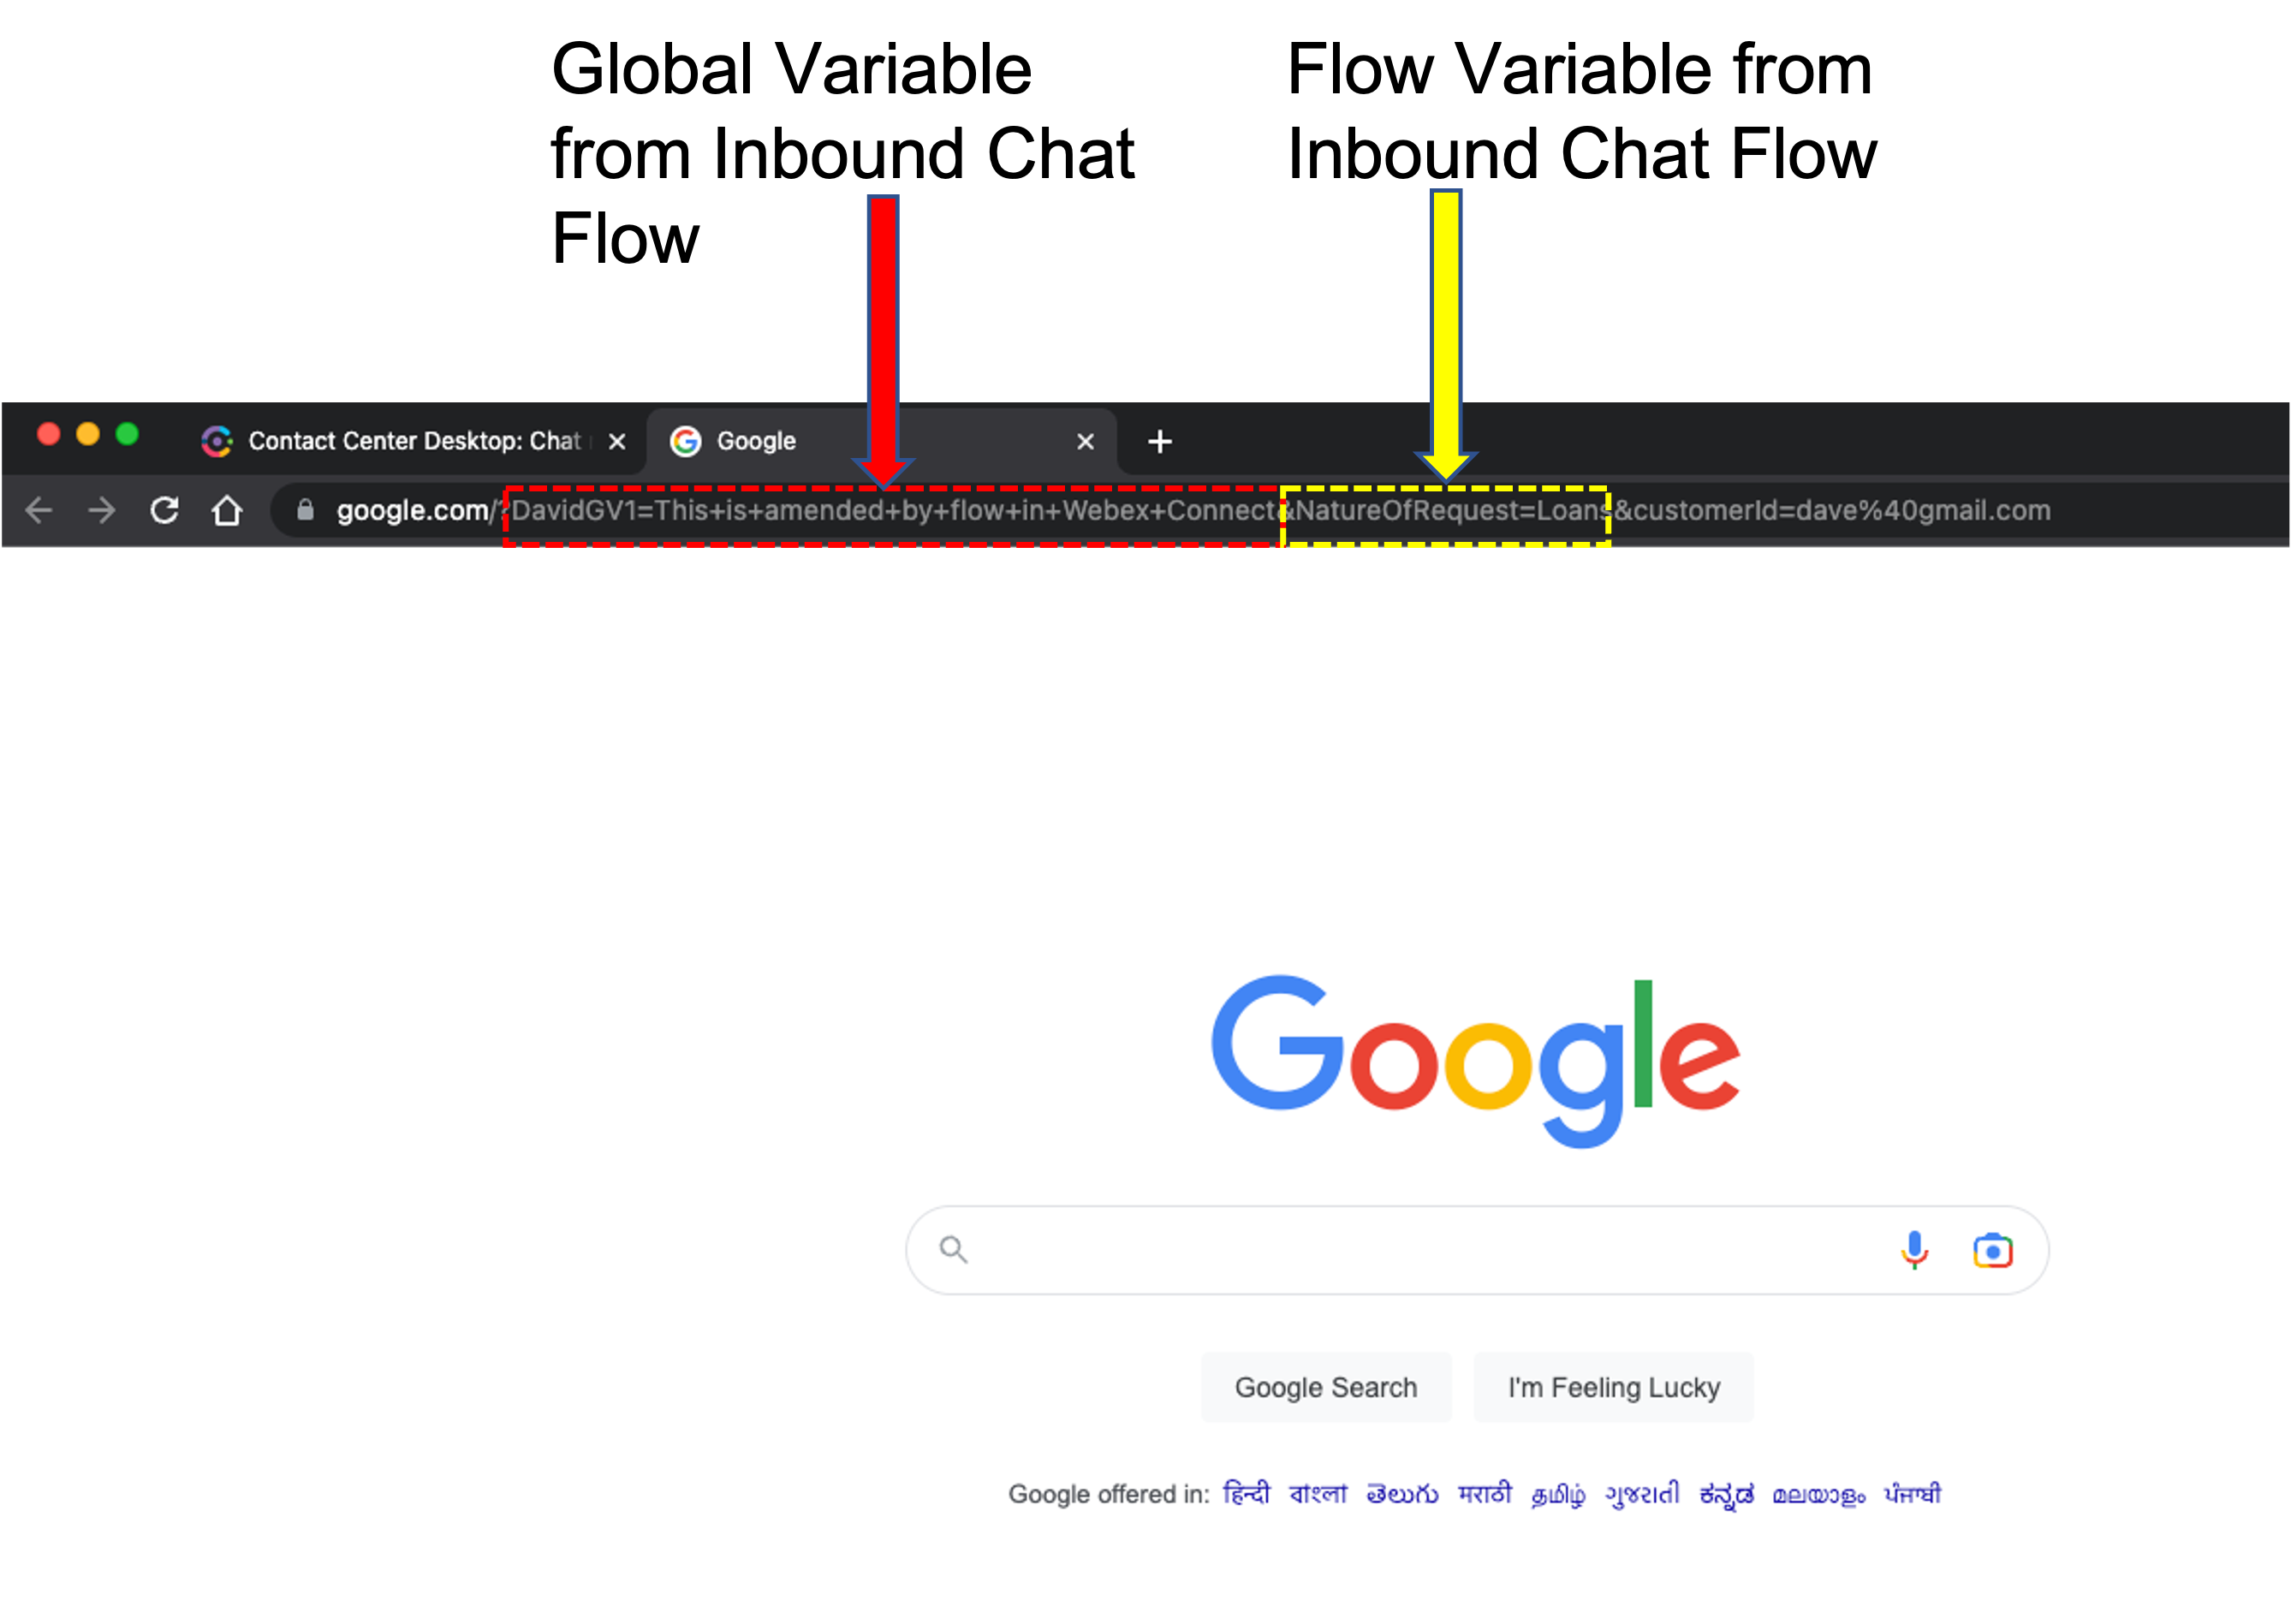
Providing Digital Channels feedback
We are seeking your feedback on the Digital Channel capabilities. By participating in this survey, you will help us to improve the quality of our products: https://forms.gle/qDRF2hYdkZHr5owa8
Congratulations, you have completed this section!