Lab 1 - Admin Experience
Last modified: Wed, 20 Sep 2023
Table of Contents
| Topic | Lab Type | Difficulty Level | Estimated length |
|---|---|---|---|
| Introduction to the new Admin Experience | Watch & Understand | EASY | 10 min |
| Control Hub User Management Tasks | Practical Lab | EASY | 10 min |
| Contact Center User Configuration | Practical Lab | EASY | 10 min |
| Bulk Operations | Practical Lab | EASY | 5 min |
| Access to the Agent Desktop | Practical Lab | EASY | 10 min |
| Bonus: Single Sign-on with OKTA IdP | Practical Lab (optional) | MID | 15 min |
Overview of the lab:
In this Lab, we will go through Admin UI by completing the tasks that are required for the general pre-configuration of a tenant. These tasks are to be undertaken by a customer administrator. By following each of the steps, you would have prepared your tenant to begin configuring different services offered by the platform. At the end of the lab, you should be able to log in to an agent interface with the configured user extension. You can do the tasks from the lab guide either on the Lab Tenant (you need to request access from the lab support team) or you can do it directly on your Gold Tenant / personal tenant.
Introduction
Lab Objective
- This lab is designed to help you do the initial setup and configuration of the tenant.
- The lab contains multiple exercises on Control Hub (Admin Portal) to make you comfortable with the Webex Contact Center application.
Pre-requisites
- You have Admin access to Control Hub
- You have the PSTN number (dialed number) registered on the Control Hub
Quick Links
Control Hub: https://admin.webex.com
Agent Desktop: https://desktop.wxcc-us1.cisco.com\
Lab Section
Introduction to the new Admin Experience
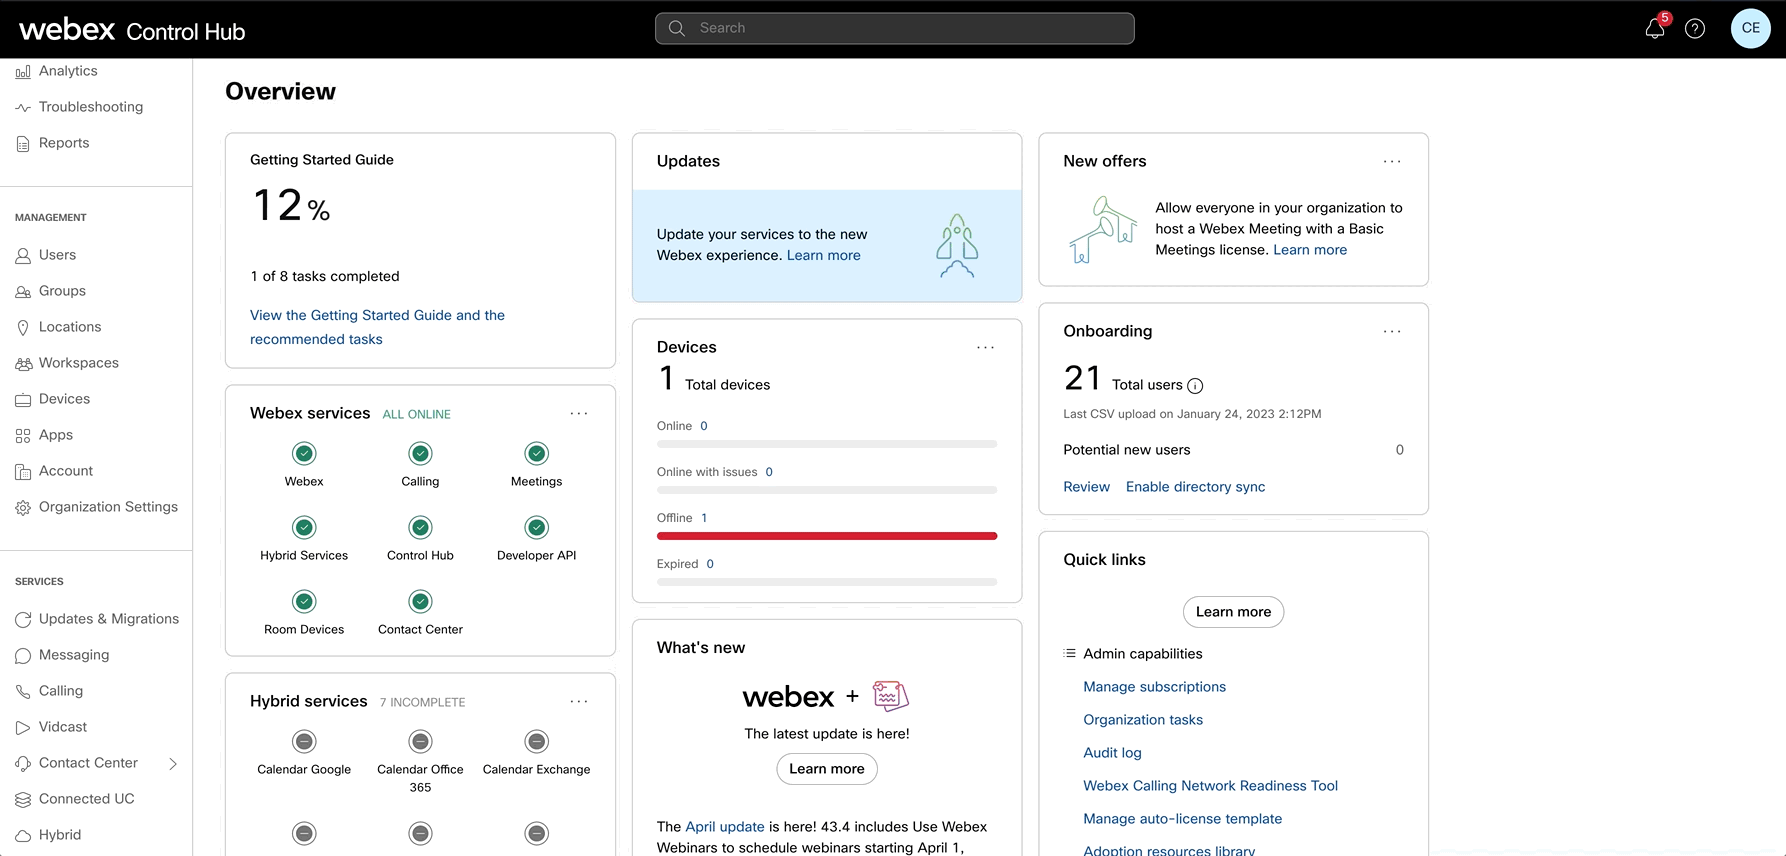
The overall aim of admin consolidation is to provide a single pane of glass (SPOG) experience for administrators so that admins need not have frequent context switch by having to traverse different applications. The following video outlines the new features of a new admin experience. This introduces, the new left navigation panel for Webex Contact Center in Control Hub as well as other configuration settings which were migrated from the Management Portal.
Control Hub User Management Tasks
The following video outlines the process to manage different types of users to the Customer tenant. Following the steps, you will add new users and set the Calling extension. While adding the user, we will see how to select user roles.
1. Define your Attendee ID and Other parameters
Please SKIP task #1 if you are doing the labs on the Gold Tenant. The task below is only for the Lab Tenant option where you have received an email with the Lab tenant credentials. In a such case, please copy and paste the Attendee ID number from the email into the corresponding field (Example: IDXXX).
2. Add agent and supervisor users and set the calling extensions
We don’t recommend using the @maildrop.cc or @mailinator.com accounts on your Gold Tenant due to security reasons. An attacker can easily gain access to your tenant and execute the outbound calls.
- As a result of the task below you should add two new users (agent and supervisor) to the Control Hub and assign Webex CC Agent and Supervisor licenses.
- Please SKIP task #2 if you are working with the Lab Tenant. This tenant is integrated with SSO where the agents and supervisors have been pre-created according to the table below.
| User Role | User email | Endpoint |
|---|---|---|
| Agent | wxcclabs+agent_ |
WebRTC |
| Supervisor | wxcclabs+supvr_ |
Webex App |
-
Login to the Control Hub with the admin account.
-
In the left navigation pane go to Users under Management.
-
Click on Manage Users button.
-
Select Manually add users.
-
Set the agent’s First name, Last name and input the Email addresses of the agent.
-
Click on
+sign and add the supervisor in the same way. -
For consistency, verify that the Email addresses are same as in the table above and click Next.
-
In Step 2: Assign license for users select Webex Calling (Professional) & Contact Center (Premium Agent).
-
On the next page, make sure that the Location is selected under Assign Numbers. The correct value should be already selected by default.
-
The Phone Number left as None.
-
On the same page, Enter the correct
Extensionunder Assign Numbers. The correct Extensions should be provided to you with the admin credentials. -
In step Step 4: Review verify the data and Click Add users.
-
On the next page, you should get confirmation “2 users added”. Confirm the same by pressing Close.
-
Now select the supervisor user and modify his role to Premium Agent - Supervisor Role by clicking the Edit Licenses button in the Licenses section.
-
Click Save and Close to confirm the changes.
-
Validate the users by going to the email account. Open the Control Hub validation email and follow the Cisco Webex instructions to activate the both accounts.
-
Refresh the Users page in the Control Hub, make sure that both users are in Active status.
Contact Center User Configuration
The following video outlines how to create a Site, Team, and Multimedia Profile that will be assigned to the Contact Center users. We will also learn how to navigate to the Webex Contact Center admin section and how to associate customer-created Site, Team, and Multi-Media Profile with new users.
| Entity | Name |
|---|---|
| Multimedia Profiles | |
| Site | |
| Team1 |
NOTE: If you are using the Lab Tenant the Attendee ID should be used as a name prefix for all your configurations.
1. Create new Multimedia Profile
-
Login with admin credentials to Control Hub by accessing https://admin.webex.com.
-
In the left pane navigate to Contact Center card.
-
Click Settings in the upper menu.
-
Scroll down in the left navigation panel to the DESKTOP EXPERIENCE section and click on Multimedia Profiles.
-
Click on
Create Multimedia Profilebutton. -
Input Name as
Your_Attendee_ID _MMP. -
In the Media Details section, leave the Blended mode and input
1for Voice,3for Chat,3for Email,3for Social, and click Create button in the lower right corner.
2. Create new Site
-
Navigate to USER MANAGEMENT in the left navigation panel and select Sites.
-
Click on
Create Sitebutton and provide the Name asYour_Attendee_ID _Site. -
Select your MMP in the Multimedia profile drop down list and hit Create.
3. Create new Team
-
Navigate to Teams under the USER MANAGEMENT.
-
Click on
Create Team. -
Input Name as
Your_Attendee_ID _Team1. -
Select your site from the Parent Site drop-down.
-
Select the team type
Agent Based. -
Select your Multimedia profile.
-
Left as a default value Global Layout in the Desktop layout drop-down and click on Create button.
4. Activate the Contact Center Settings for the users
-
Navigate to Contact Center Users under the USER MANAGEMENT.
-
Using Search, find your attendee ID and select the agent, to launch the Edit view for a particular User configuration.
-
Click on Contact Center Enabled toggle to move it to On.
-
In the Agent Settings section, select your site in the Site drop-down.
-
Click the Teams area and select your team
-
Select the default Agent-Profile in the Desktop Profile drop-down list.
-
Choose the Multimedia Profile and hit Save.
-
In the User’s table make sure that the agent is now shown with the Contact Center Enabled flag as
Yesand Status asActive. -
Repeat the steps above for the supervisor.
5. Use that form for providing the Admin UI feedback.
Bulk Operations
In this section you will learn how to use the Bulk Configuration in Control Hub by creating a second team. As an administrator, you can use Bulk Operations to create, modify, import, or export configuration objects in Webex Contact Center. This feature provides greater speed and efficiency to deploy and configure Webex Contact Center systems.
Bulk Operations are available for the following configuration object types:
| Entry Point | Auxiliary Code |
| Queue | Agent Profile |
| Outdial Entry Point | Address Book |
| Outdial Queue | Outdial ANI |
| Site | Skill Definition |
| Team | Skill Profile |
| Users | Entry Point Mappings |
| User Profiles | Audio Files |
| Work Types | Global Variable |
Create the second Team
-
Go to the Control Hub by accessing https://admin.webex.com.
-
In the left pane navigate to Contact Center card.
-
Select Bulk Operations in the Webex CC navigation pane from the left.
-
Click Create Bulk Operations button in the right upper corner.
-
In Step 1 select the configuration object Team in the drop-down list.
-
In the Export section enter the MyTeam as the file name and click Next button.
-
Once the task is Completed click on Download export file button under the Action and open the csv file in the notepad.
-
The first line is the headers, it is mandatory to have it during the import process. Remove all lines from the CSV file except the first line with headers and the line with
Your_Attendee_ID _Team1.
NAME,SITE,TYPE,MULTIMEDIA PROFILE,SKILL PROFILE,DN,CAPACITY,DESKTOP LAYOUT
xxxx_team1,pod110_Site,AGENT,pod110_MMP,,,,Global Layout
- Rename the Team1 to
Your_Attendee_ID _Team2 and save the file. You should have only 2 rows in the file. Example:
NAME,SITE,TYPE,MULTIMEDIA PROFILE,SKILL PROFILE,DN,CAPACITY,DESKTOP LAYOUT
xxxx_team2,pod110_Site,AGENT,pod110_MMP,,,,Global Layout
-
Go back to the Bulk Operations menu and click Create Bulk Operations button again.
-
In step 1, select the Team configuration object from the drop-down list and import the CSV file by dragging it into the Import section.
-
Click Next button and wait the results. The status should be shown as Completed.
-
Go to the Management Portal, click on Provisioning -> Team and verify that the
Your_Attendee_ID _Team2 is created. -
In the Management Portal directly associate the
Your_Attendee_ID _Team2 with your agent and supervisor by adding your users to that team (Advanced Settings -> Agents).
Access to the Agent Desktop
By following the steps below, you will log in to the Agent Desktop with your credentials and indicate the number (DN) where you want to receive the calls.
The Lab Tenant is located in the US datacenter. It does not allow outbound international calls. If you have the U.S. numbers you can use that for sign in as an agent or supervisor. Otherwise, please WebRTC for agent and download the Webex App for supervisor according to the steps below.
1. Download and Login in the Webex app for PC or Mac
Please SKIP task #1 if you are doing the labs on the Gold Tenant.
For the Lab Tenant you would need Webex app for placing calls to Entry Point and sign in as supervisor. Alternatively, if you have the US number, you can use it as an supervisor’s extension. This tenant does not allow numbers outside of the United States. In this lab, we will use the Webex app for your PC or Mac for the supervisor account.
- Download the Webex app from https://www.webex.com/downloads.html.
-
Install the application on your PC/Mac.
-
Open Webex app and сlick Sign In. Specify the supervisor credentials.
2. Agent Desktop Login
Note: To log in to the agent desktop, use either a different web browser or a new incognito web page. This will prevent the browser caching issues with admin and agent credentials. Depending on your tenant’s location the agent ULR link can be different. The example below is for the tenant in the US datacenter.
-
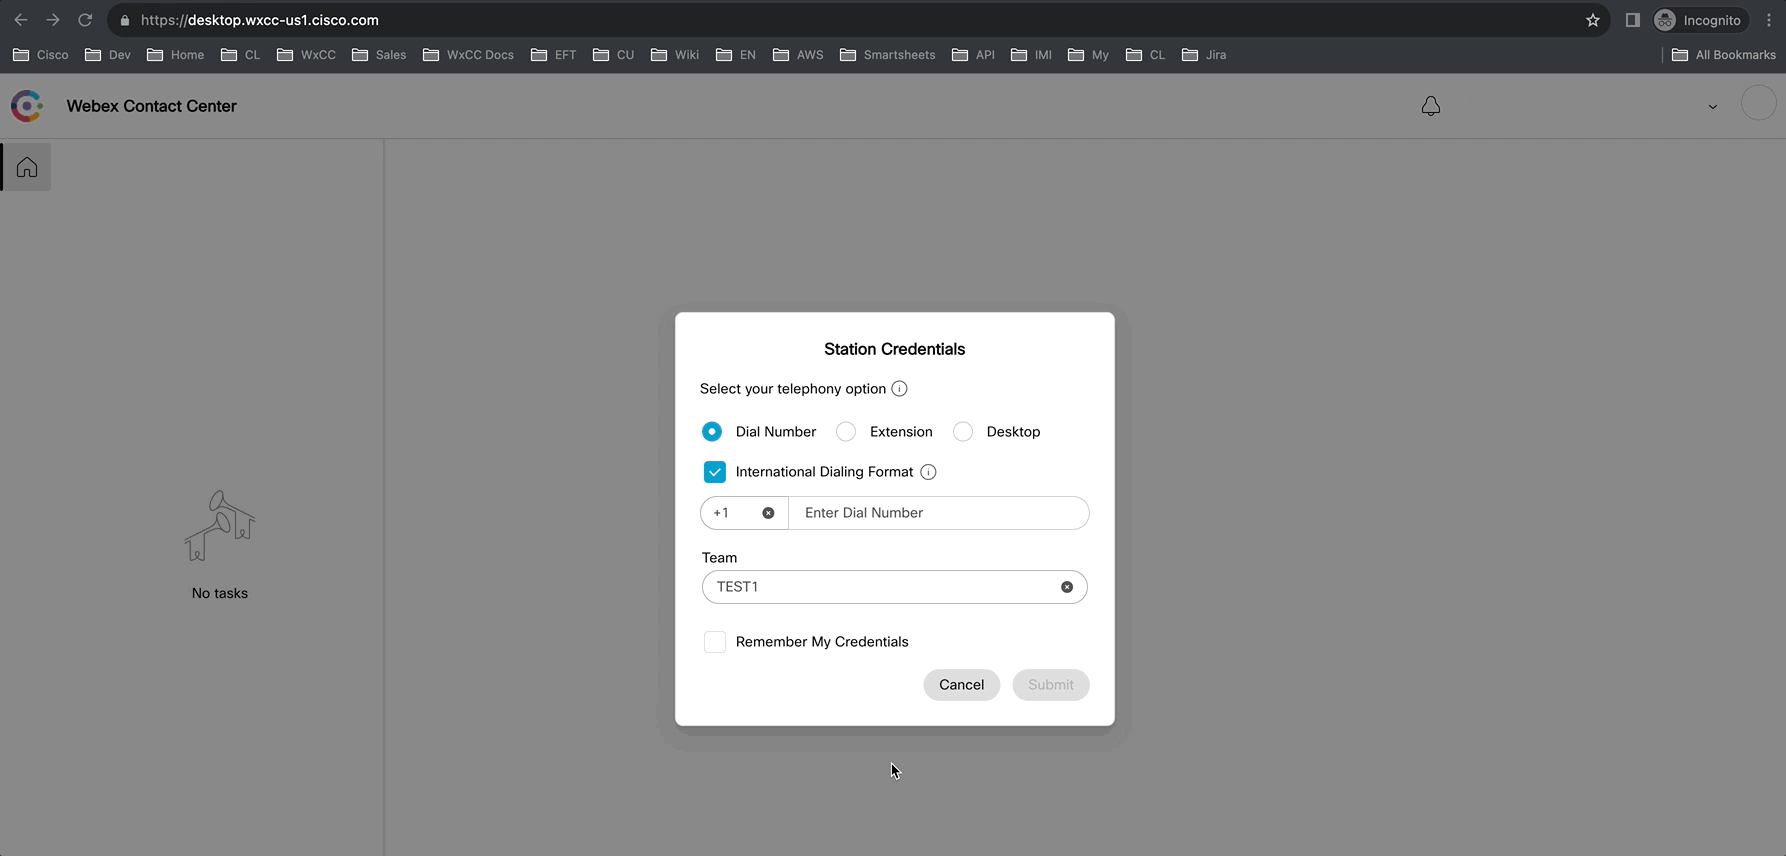
Navigate to https://desktop.wxcc-us1.cisco.com/ in the chrome browser with the incognito mode.
-
Enter the agent’s email ID which you created in the previous task.
-
Enter the Password for the appropriate username.
-
In the Station Credentials pane, select “Desktop”.
-
Select the team
Your_Attendee_ID _Team1. -
Click Submit button. The browser may ask you to confirm use the microphone from the browser.
-
Make sure that you are successfully logged in to the Agent Desktop.
Now you can continue with Lab 2 or try the bonus SSO task below.
Bonus: Single Sign-on with OKTA IdP
NOTE: Please skip this task If you are using the Lab Tenant, this task can be configured only on your Gold Tenant. Inform other users on your tenant since the non SSO accounts will be deactivated.
In this section you will learn how to enable Single sign-on (SSO) in Control Hub. It enables users to sign in to Webex securely by authenticating to your organizations common identity provider (IdP). The Webex App uses the Webex service to communicate with the Webex Platform Identity Service. The identity service authenticates with your identity provider (IdP)
-
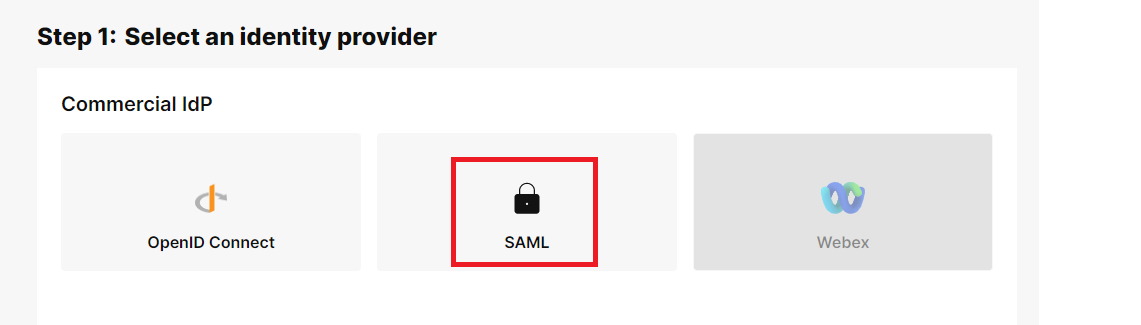
From the customer view in https://admin.webex.com, go to Management > Security , and under the Authentication tab click Activate SSO option to start the setup wizard.
-
Select SAML as the identity provider and click Next.
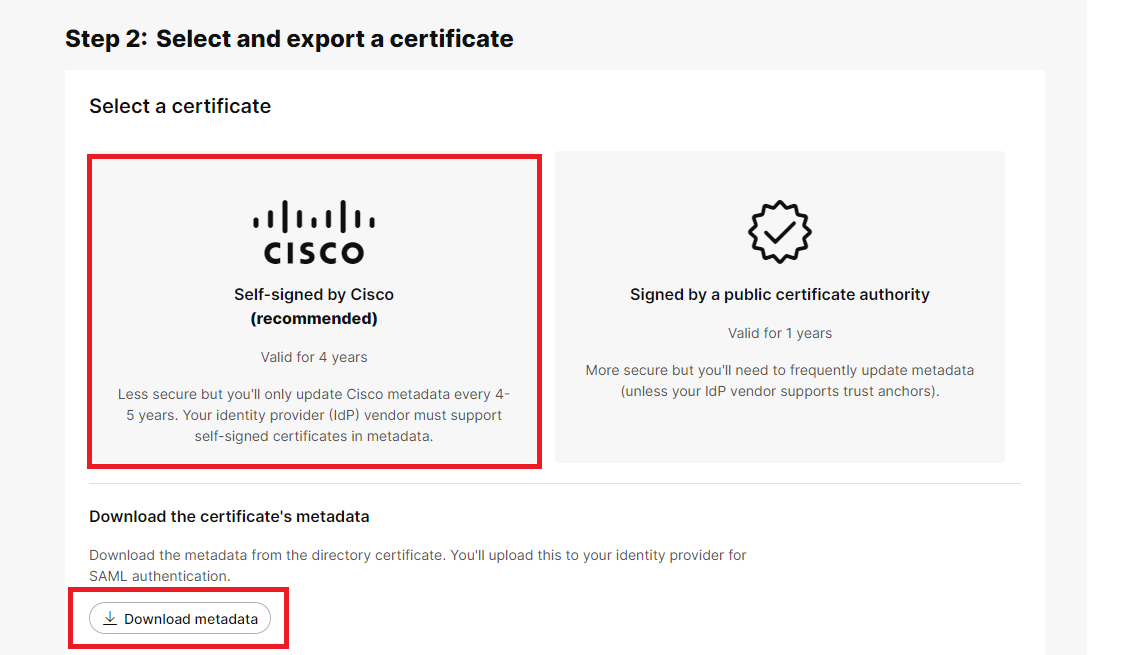
- Choose the self signed by Cisco certificate and download the metadata and click Next.
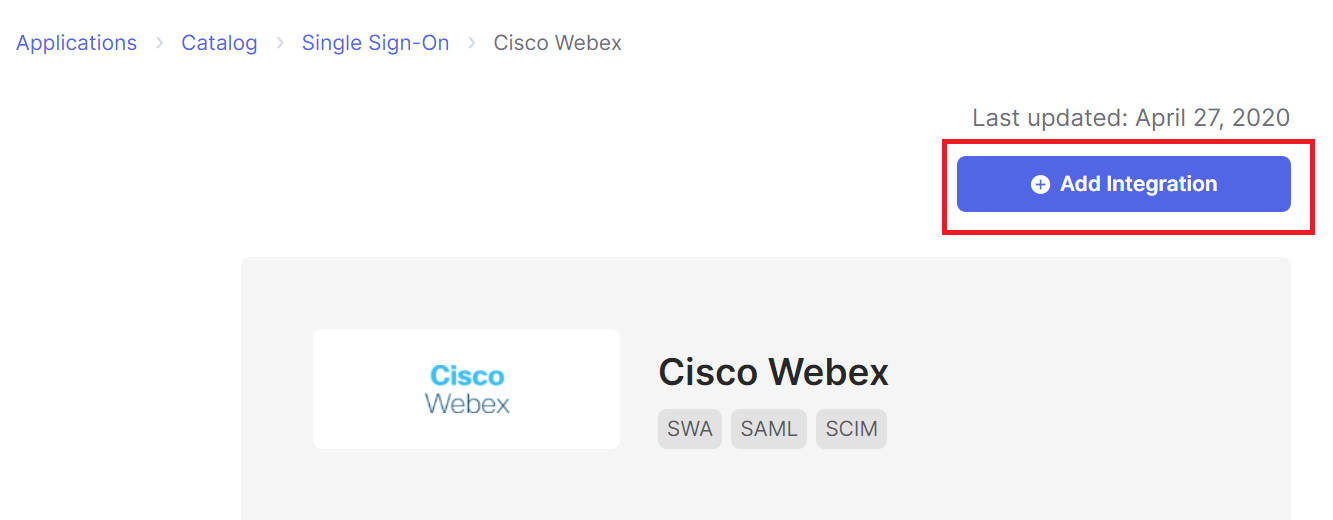
- Sign in to the Okta Tenant (example.okta.com, where example is your company or organization name) as an administrator, go to Applications, and then click Browse App Catalog. Search for “Cisco Webex” and add the application to your tenant.
-
Click Next and then click SAML 2.0.
-
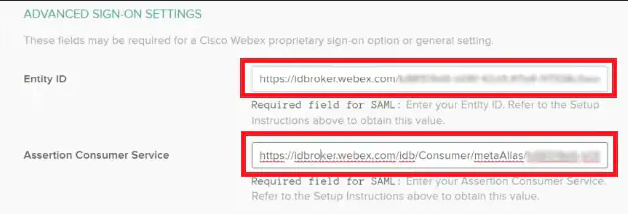
In your browser, open the metadata file that you downloaded from Control Hub. Copy the URLs for the entityID (at the top of the file) and the assertionConsumerService location (at the bottom of the file)


-On the Cisco Webex tab in Okta, click on Sign On and then click on edit.Scroll to Advanced Sign-on Settings, and then paste the Entity ID and Assertion Consumer Service values that you copied from the Control Hub metadata file and then save changes.
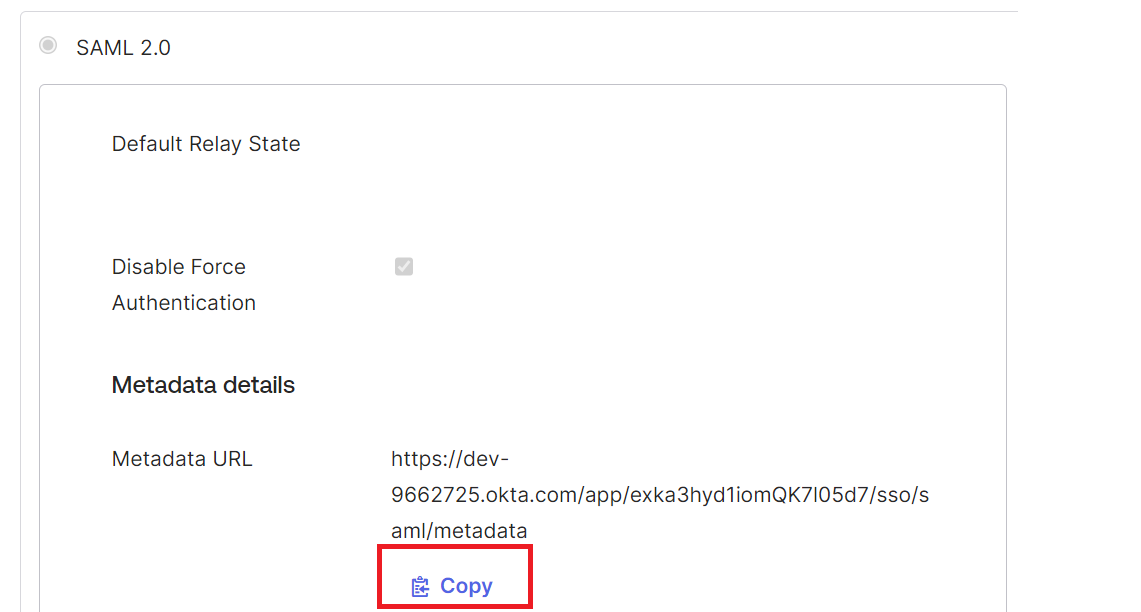
- Click Sign On and then download the Okta metadata file. You’ll import this file back into your Control Hub instance
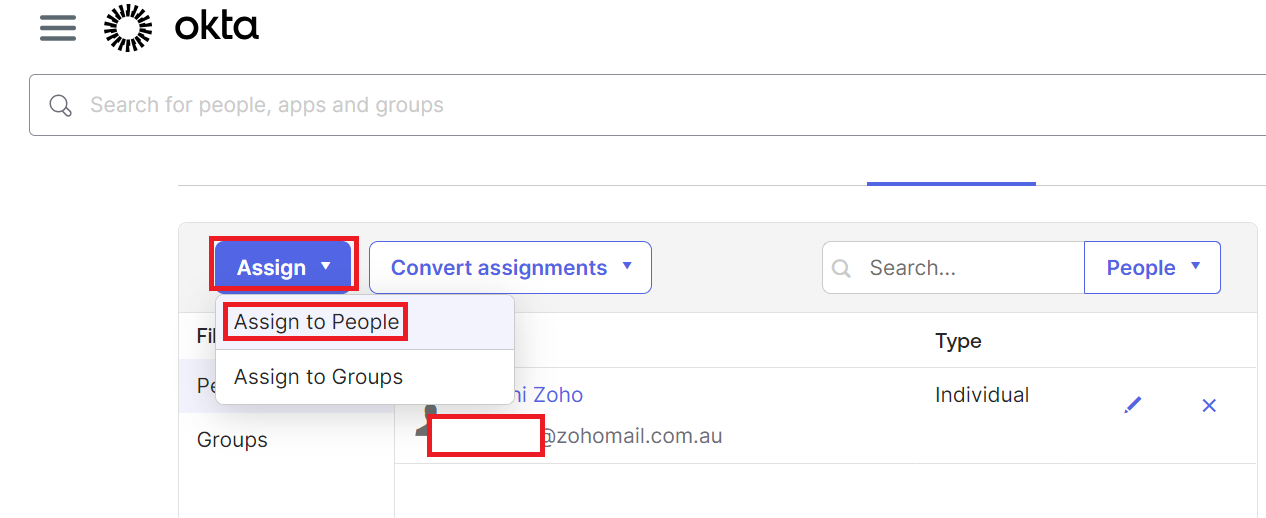
- Click Assignments, choose all the users and any relevant groups that you want to associate with apps and services managed in Control Hub, click Assign and then click Done.
-
Return back to Contro Hub.If Control Hub is no longer open in the browser tab, from the customer view in https://admin.webex.com, go to Management > Organization Settings, scroll to Authentication, and then choose Actions > Import Metadata
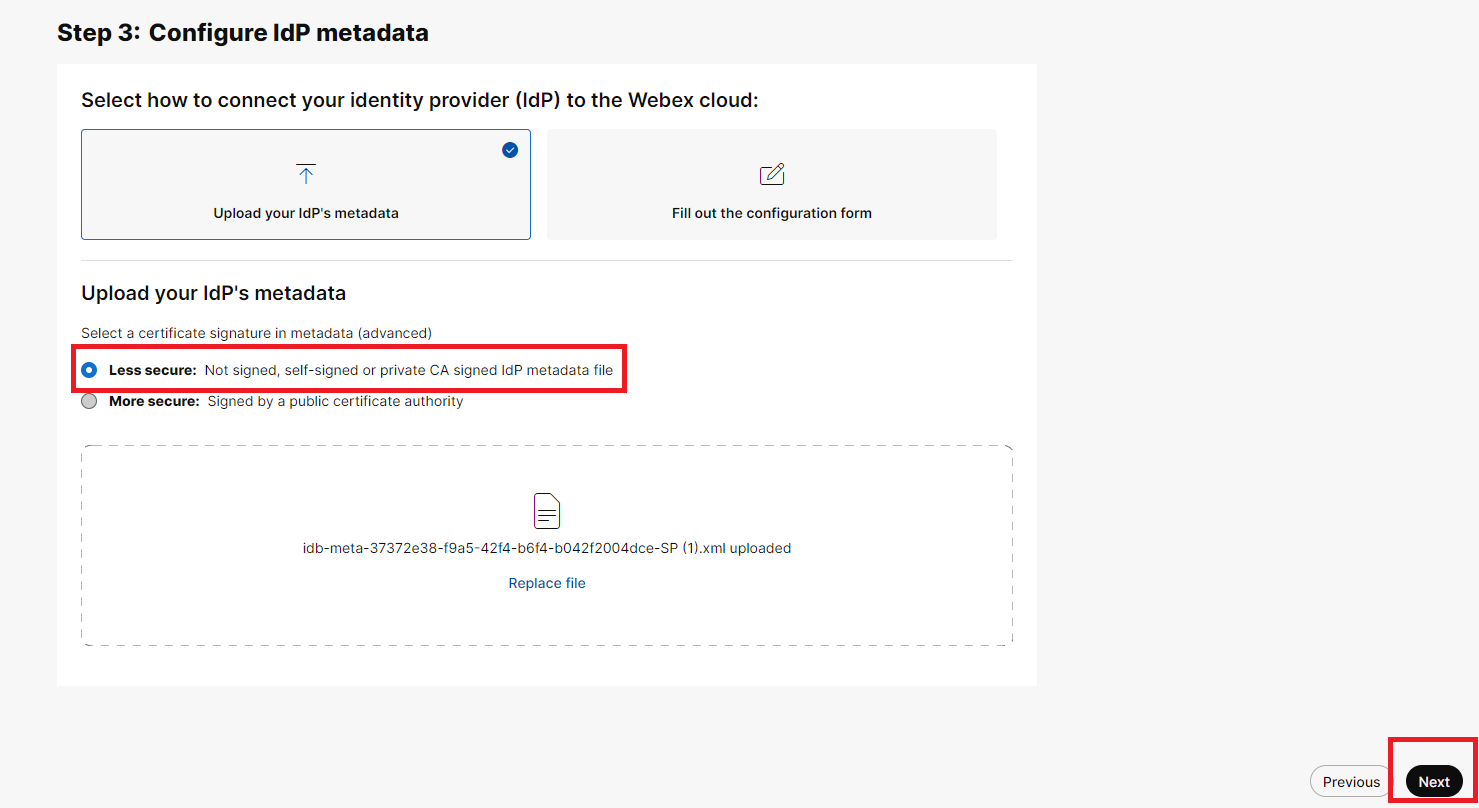
-
On the Import IdP Metadata page, either drag and drop the IdP metadata file onto the page or use the file browser option to locate and upload the metadata file. Click Next.
-
At the next page just click Next
-
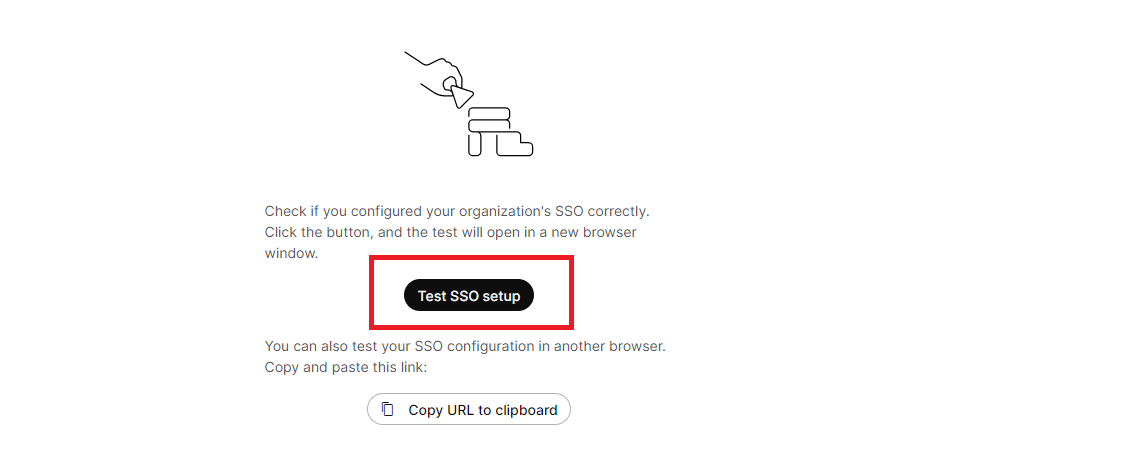
Select Test SSO setup, and when a new browser tab opens, authenticate with the IdP by signing in.
- Return to the Control Hub browser tab. If the test was successful, select Successful test. Turn on SSO and click Next.
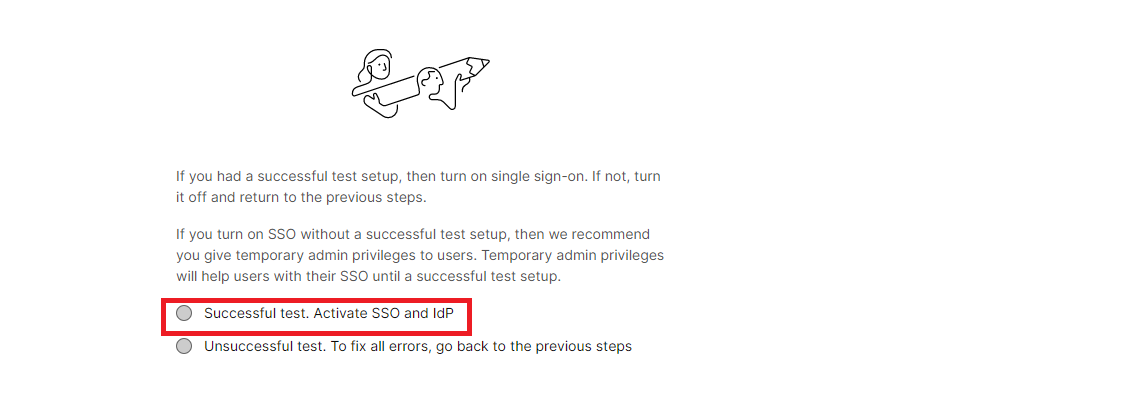
Congratulations! You have successfully turned on SSO for your tenant
Congratulations, you have completed this lab! You can continue with the next one.