Lab 7 - Google Dialogflow & TTS
Last modified: Thu, 20 Feb 2024
Overview of the lab:
In this Lab, we will go through the tasks that are required to setup Contact Center AI with the Voice Bot and Text-to-Speech (TTS) capabilities.
Table of Contents
| Topic | Lab Type | Difficulty Level | Estimated length |
|---|---|---|---|
| Setup the Google Account | Practical Lab | EASY | 20 min |
| Setup Dialogflow ES Agent \& Google Connector | Practical Lab | MID | 20 min |
| Configure TTS, EWT \& PIQ | Practical Lab | MID | 20 min |
| Configure Dialogflow ES Virutal Agent | Practical Lab | MID | 15 min |
| Configure Dialogflow CX Virutal Agent | Practical Lab | MID | 90 min |
Introduction
Lab Objective
-
This lab is designed to help you configure a Google Dialogflow Agent using CCAI (Contact Center AI) on Webex Contact Center and utilize TTS (Text-to-Speech) capabilities.
-
At the end of this lab, you should have a fully functioning bot front-ending the Webex Contact Center and text to speech prompts.
Prerequisites
-
You must have a Google Account created.
- A credit/debit card (American Express, Mastercard or Visa) is needed to create the Google Billing account.
Note: No card will be automatically billed any cost, but a billing account needs to be setup to be able to utilize TTS.
- Lab 2 (IVR Contact Routing Lab) should be completed, as same call flows will be used and expanded upon.
Quick Links
Control hub: https://admin.webex.com
Agent Desktop: https://desktop.wxcc-us1.cisco.com
Google Cloud Console: https://console.cloud.google.com
Dialogflow: https://dialogflow.cloud.google.com
Lab Section
Setup the Google Account
-
Login to Google Cloud Console with your Google Account credentials.
-
Click on Select a project on top and then on NEW PROJECT on the pop-up window.
-
Enter a name for your project, e.g.
TS2021-CCAIand click on CREATE. -
Make sure you have this project selected.
-
On the navigation bar on the left, click on Billing.
-
Click on LINK A BILLING ACCOUNT and then on CREATE BILLING ACCOUNT.
-
Enter your Account Information (
Country,Mobile Phone), accept the Terms of Service and click on CONTINUE. -
Enter your credit/debit card details and click on START MY FREE TRIAL.
-
Click on CLOSE on the next pop-up window.
-
On the search bar, type
text to speechand click on the Cloud Text-to-Speech API. -
Click on ENABLE.
-
Click on CREATE CREDENTIALS on the top-right.
-
If prompted,choose Cloud Text-to-Speech API from the dropdown menu and check the Application Data option and No, I’m not using them and then click on NEXT.
-
On the Service account details, enter a name for the service account, e.g.
TS2021_TTS_SAand then click on CREATE AND CONTINUE. -
On Grant this service account access to project, search and choose the DialogFlow API Admin role and then click on CONTINUE and then on DONE.
-
Similarly, now on the search bar type
dialogflow APIand click on the Dialogflow API. -
Click on ENABLE.
-
Click on CREATE CREDENTIALS on the top-right.
-
If prompted,choose Dialogflow API from the dropdown menu and check the Application Data option and No, I’n not using them and then click on NEXT.
-
On the Service account details, enter a name for the service account, e.g.
TS2021_CCAI_SAand then click on CREATE AND CONTINUE. -
On Grant this service account access to project, search and choose the DialogFlow API Admin role and then click on CONTINUE and then on DONE.
-
To generate the required .json keys, click on the service account you created (e.g. ts2021-ccai-sa@ts2021-ccai.iam.gserviceaccount.com).
-
Click on the KEYS tab and then on ADD KEY > Create new key.
-
Choose the JSON key type and click on CREATE. Make sure you have the key saved locally.
-
Click on Service Accounts on the left and follow the same procedure to download the TTS JSON key as well.
Setup Dialogflow ES Agent & Google Connector
-
Open Control Hub Admin page.
-
Go to Contact Center > Connectors and click Set Up on Google connector.
-
Give a name to the connector, e.g.
techsummit_google_ttsand click on Upload Authentication Key to upload the .json file key downloaded before. Click on Done. -
Go to Features tab and click on New template.
-
Click on Virtual Agent.
-
Check only Use For Voice and click on Next.
-
Choose Yes, I have a preconfigured Dialogflow agent.
-
Click on Download Intents and save the .zip file with the two intents locally.
-
Open a new tab and go to Dialogflow page and login with your Google credentials.
-
Click on Create an Agent.
-
On the GOOGLE PROJECT, give a name to the agent, e.g.
TS_DF_Agent, choose the project created in the previous step and click on CREATE. -
On the next page, click on the dots on the top right (next to CREATE INTENT) and choose Upload Intent.
-
Unzip the two intents you downloaded from Control Hub (escalation.json & handled.json) and upload them here.
-
Go back to the Control Hub tab and click on Next.
-
Give a name to your virtual agent, e.g.
TS_CCAI_Agentand click on Next. -
Upload the CCAI/Dialogflow .json key downloaded in the previous part and click on Validate. If all is good, click on Next.
-
Skip the avatar step and click Next.
-
Click on Finish to complete the Virtual Agent creation.
Configure TTS, EWT & PIQ
-
Open Flow 3 in the Flow Designer from Lab 2 (IVR Contact Routing Lab).
-
In the Success Play Message block, chose Enable Text-to-Speech under Prompt, choose your created connector (e.g.
techsummit_google_tts) and set language as en-GB-Standard-A. -
Type “Thanks {{Customer_Name}}, we got your information” as your TTS message.
-
Make a new test call and verify that you get a personalized message with the customer’s name based on the PIN provided.
-
For EWT, after the QueueContact1 node, add a Get Queue info block.
-
Under Queue Information, select Static Queue and enter your queue.
-
On success path, add a new Play Message block. Name it EWT_PIQ.
-
Add the TTS connector to it similar to the step above and type “You Estimated Wait Time is {{GetQueueInfo.EWT}} and your position in Queue is {{GetQueueInfo.PIQ}}” as message.
-
Similarly, for the Insufficient Information block, add a new Play Message block and name it PIQ.
-
Again, add the TTS connector and type “Your position in Queue is {{GetQueueInfo.PIQ}}” as message.
-
Save and publish the flow. Test the call flow and make sure you hear the PIQ prompt.
Note: Make sure no agent is available to handle the call to be able to listen to the PIQ prompt.
Configure Dialogflow ES Virutal Agent
-
Create a new call flow in the Flow Designer.
-
Create a flow logic similar to the video guide, i.e. first add a Virtual Agent block after the New Phone Contact.
-
Under Conversational Experience, add the virtual agent you have created (e.g.
TS_CCAI_Agent) and enable Make Prompts Interruptible. -
For
Handledoutput from Virtual Agent, which means that self-service was successful, connect the output to a Play Message block and add a “Call successfully handled by virtual agent!” TTS message to it. -
Connect that Play Message to a Disconnect Contact block.
-
Respectively, for
Escalatedoutput, which means that self-service was not sufficient and we need to escalate this to an agent, connect the output to a Queue Contact block and assign your Queue to that block. -
Add a Play Music block with some music on hold and loop it to itself to use as MOH while customer is waiting for an available agent.
-
Map that flow to your entry point to be able to make test calls.
-
Make a test call and when virtual agent greets you and asks you what you would want, answer with
I don't need any more help. This will trigger the Handled output and terminate the call after a message from the bot. -
Make another test call. This time, answer with
I need help with billing. This will trigger the Escalated output and search for an available agent. -
Optionally, you can send the transcript of the conversation between the customer and the virtual agent to the agent when connected. To do so, you would need to Enable Conversation Transcipt under Advanced Settings in the Virtual Agent block.
-
Also, you would need to create a CAD Variable to save the TranscriptURL output variable from the Virtual Agent block and pass it to the desktop.
-
Feel free to play around with various phrases as responses to the virtual agent and see if it is able to handle them properly.
Configure Dialogflow CX Virutal Agent
Table of Contents
- Introduction to Webex Contact Center with Dialogflow CX
- Addresses and Credentials
- Provisioning
- Create Dialogflow CX Virtual Agent
- Configure Dialogflow CX Virtual Agent
- Objectives
- Task 1. Navigate to Dialogflow CX Agent flow builder and customize the initial greeting.
- Task 2. Create new page to collect the caller name
- Task 3. Create new page Agent_or_Estimate and connect it with the Caller_Name page.
- Task 4. Configure Route in Agent_or_Estimate page to move the call to new page What_Kind_Of_Agent.
- Task 5. Configure Route for Estimate branch and Connect Agent_or_Estimate to new page Estimate_Details.
- Task 6. Configure Estimate_Details page with Parameters and Route
- Task 7. Configure Estimate_Details page with Routes.
- Configure Flow with Virtual Agent in Webex Contact Center Management Portal
Introduction to Webex Contact Center with Dialogflow CX
The Webex Contact Center with Google CCAI is the integration that allows the use of Google Text-To-Speech, Natural Language Understanding and Virtual Agent technologies with Webex Contact Center.
Dialogflow CX is designed for building complex, multi-turn conversations that involve multiple steps and decision points. It provides tools for creating conversational flows, managing context, handling user intents and entities, and integrating with other applications. Think of conversations that have many turns and where you want to track the interaction content very deeply. These types of conversations typically happen on the phone line to a Contact Center where people ask all types of questions, and the Virtual Agent needs to listen in and provide the answers. It does not mean that you cannot build complex flow using Dialogflow Essentials, which is another version of Dialogflow, but you would need to use a lot of code around it to build a whole framework to achieve complicated logic. But with Dialogflow CX flow builder interface it is no longer the case as the graphical interface lets developers design and build conversational AI applications without requiring extensive coding skills.
Webex Contact Center now supports Dialogflow CX integration and using this article, you can configure and test the solution.
The integration requires you to do configuration in multiple portals: Google Cloud Platform and Google Dialogflow CX, Webex Control Hub, and Webex Contract Center.
Addresses and Credentials
Provisioning
Objectives
The objective of this section is to introduce you to Provisioning process which would require to obtain Google CCAI licence for Webex Contact Center.
Introduction to Provisioning
For billing purposes, you need to provision Webex Contact Center with Google CCAI.
Google provides these APIs for integration of Dialogflow Virtual Agent and Text-to-Speech technologies:
- Dialogflow API
- Cloud Speech-to-Text API
- Cloud Natural Language API
- Cloud Text-to-Speech API
These APIs are not necessarily free and can require a billing account on Google Cloud Portal. The main reason of the Provisioning process is to create the billing account between Cisco and Google for the user, so all user billing goes directly through the Cisco Accounting team. It means the user pays to Cisco and Cisco pays to Google.

The process takes a couple of days, so you are not going to complete the Provisioning process in this section. For your information in the next screenshot, you can see the high-level diagram with the required steps to complete the Provisioning.
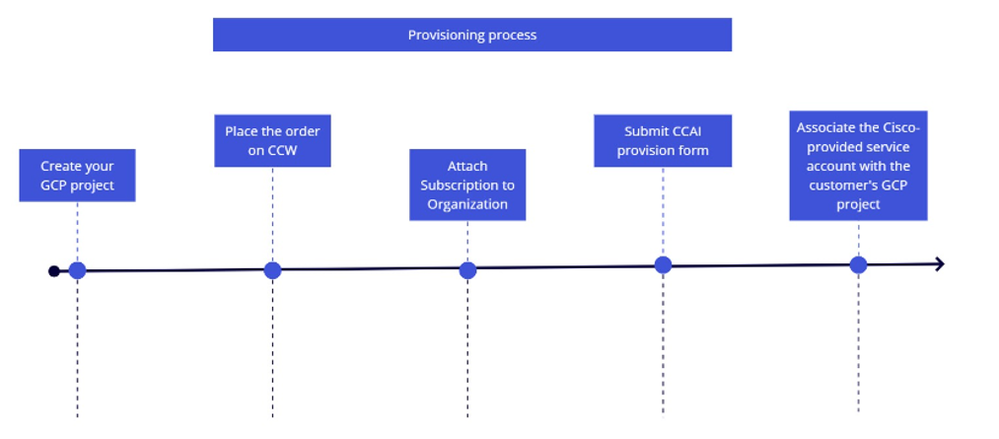
If you would like to read more about the Provisioning process, refer to Provision Google CCAI for WxCC article.
Create Dialogflow CX Virtual Agent
Objectives
This section describes how to navigate Dialogflow CX and Webex Control Hub portals to create a new agent and bind the agent to the Webex environment by creating a new Contact Center AI Config.
Task 1. Create new Virtual Agent
Step 1. Log into Dialogflow CX portal using your user account and password. Select project CL2024AMS. (If you experience any difficulties with logging in please clear the catch and cookies on the browser you use.)
Step 2. Click Create Agent. Then select Build your own.
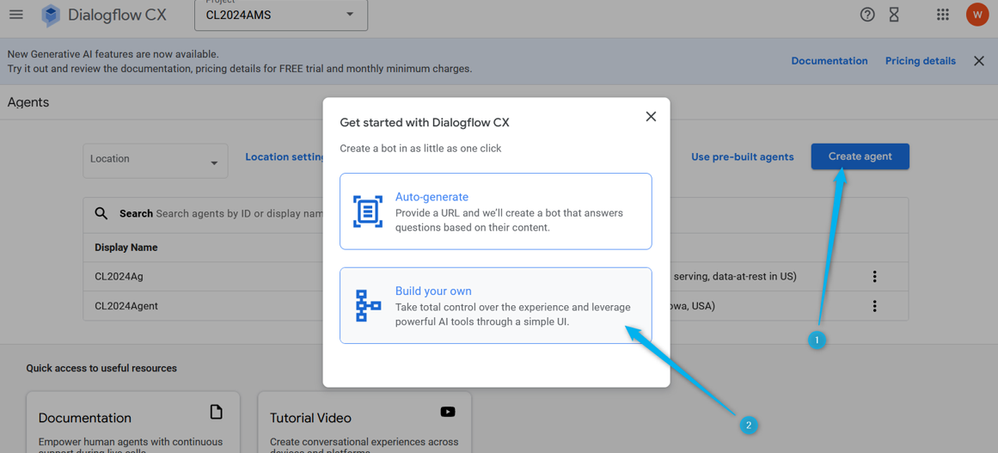
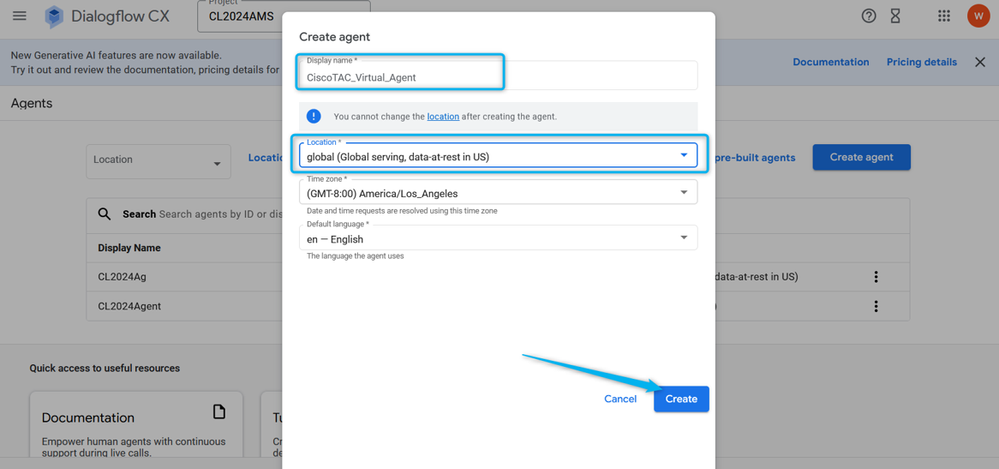
Step 3. Provide the name for the new agent using this format: {Your Name}_Virtual_Agent . Select location global (Global serving, data-at-rest in US).
Task 2. Assign the agent that you created for the Conversational profile.
Note: A Dialogflow Conversation profile is a set of configuration settings that define the behavior of the virtual agent in a conversation with a user.
Step 1. On the left top corner click Menu icon.
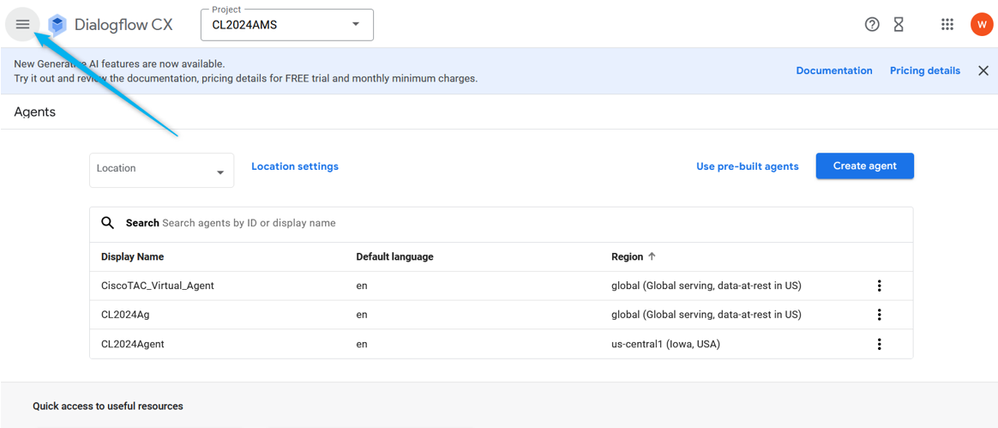
Step 2. From the Menu options, select Agent Assist.
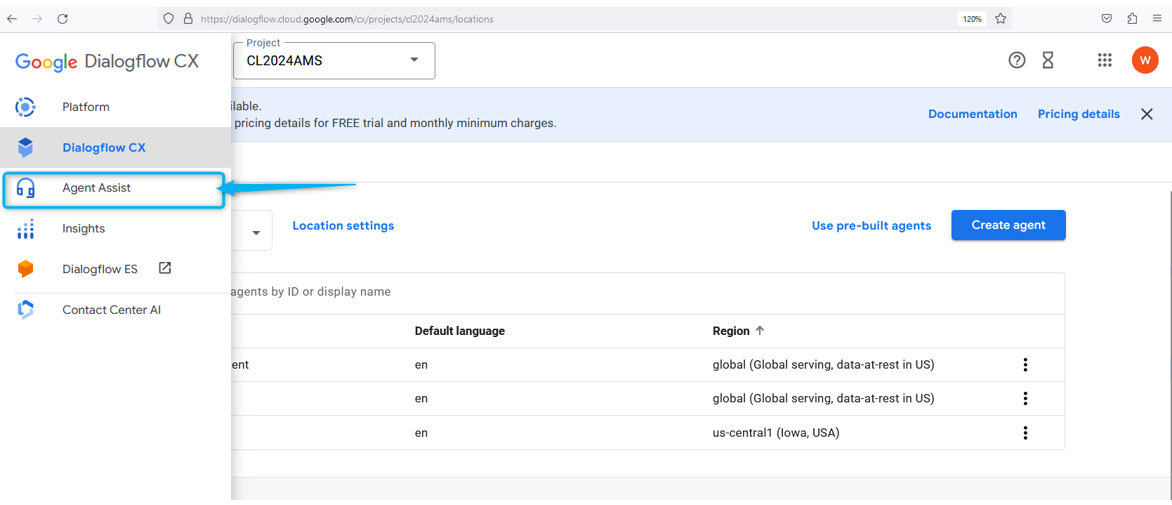
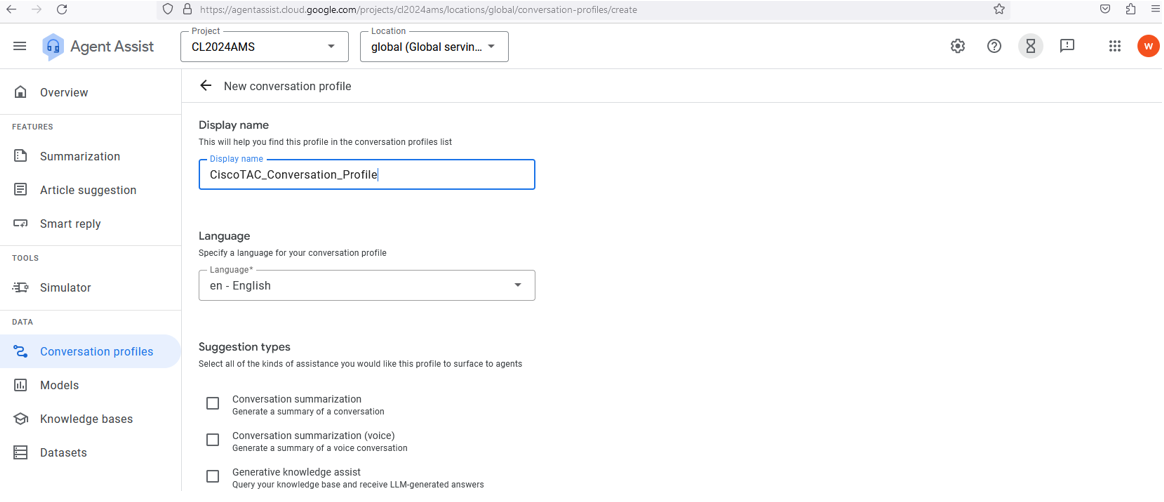
Step 3. In the next window click on the Conversation profile under the DATA section. Now create a new Conversation profile for your section.
.png)
Step 4. Create the name for your Conversation profile using this format: {Your Name}_Conversational_Profile.
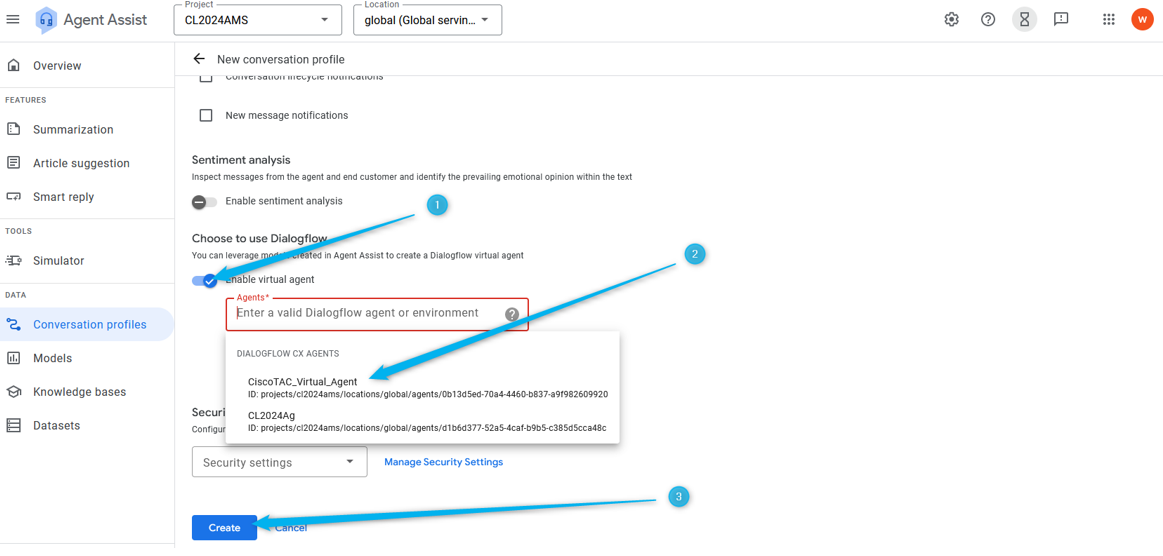
Step 5. Scroll down and enable the virtual agent for this Conversation profile. Click on the Agents field and select the agent that you created in the previous task and then click Create.
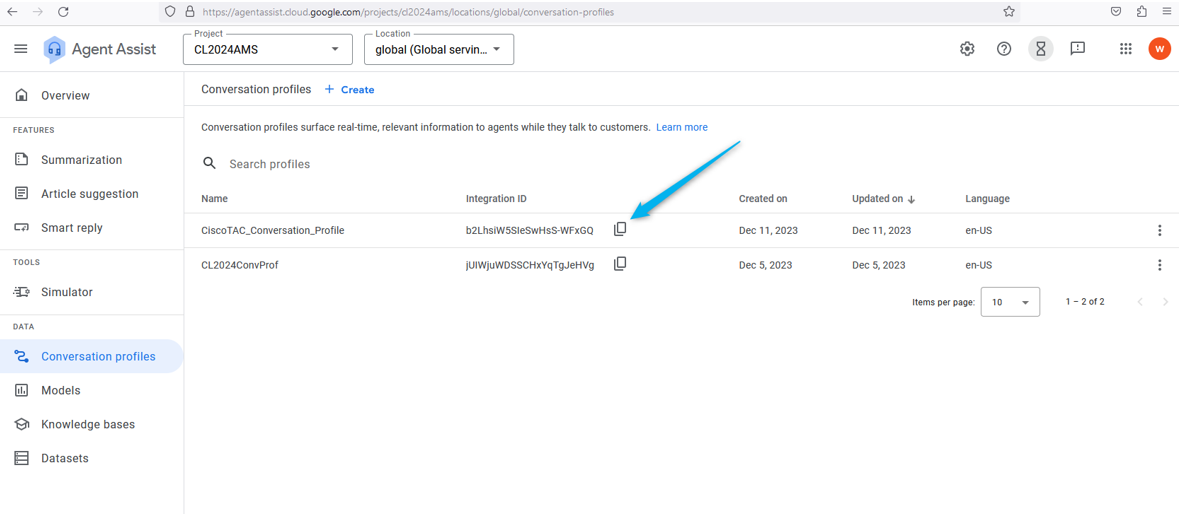
Step 6. Once the Conversation profile is created, copy the profile ID past it to a notepad, or just know that this is the place where you can get the Conversation Profile ID as you need it the Task 4 of this section when configuring the AI config in Webex Control Hub.
Task 3. Configure Google Contact Center AI connector
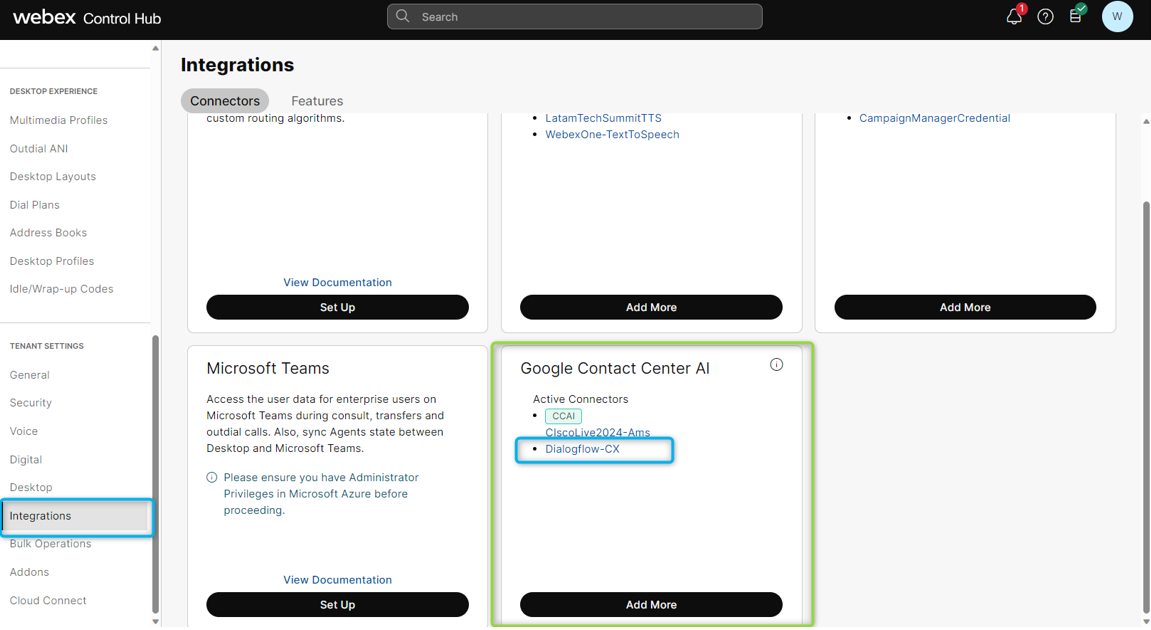
(This Task is information only) Log into Webex Control Hub using your user account, select Contact Center service and open Connectors. You can see the Google Contact Center AI card. This connector is used specifically for Dialogflow CX agents. Only users with permissions to Cisco Project can create this connector. For security reasons, the users for this section do not have such permission so this connector is preconfigured for you. For the demo purposes Dialogflow-CX connector can be used.
Task 4. Create Contact Center AI config
Step 1. In Webex Control Hub, go to the Contact Center service, select Feature, and click New.
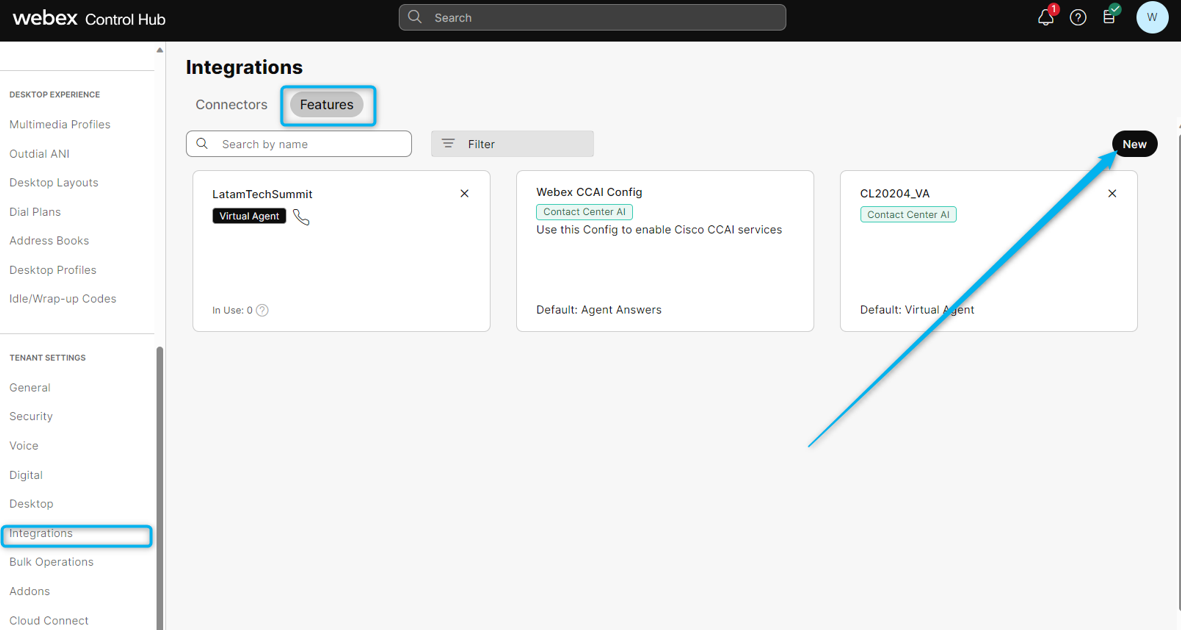
Step 2. On the next window, select Contact Center AI Config.

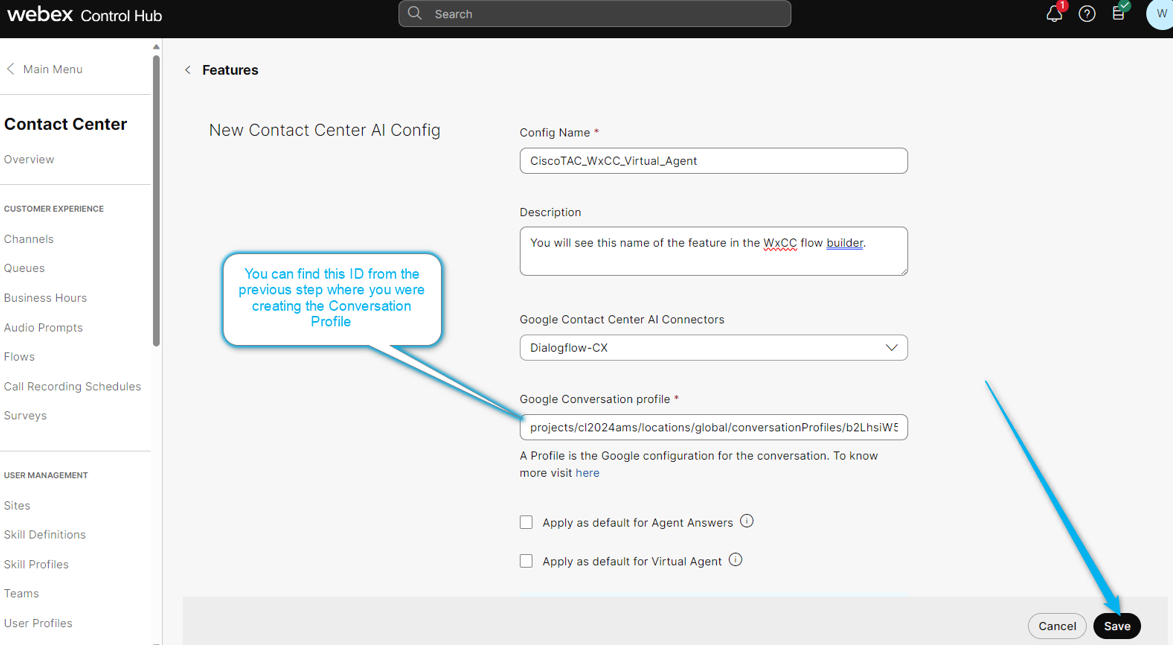
Step 3. Give the name for the feature using this format: {Your Name}_WxCC__Virtual_Agent. Select Dialogflow CX as the Google Contact Center AI Connector and post the Conversation profile ID that you had previously in Task 2.
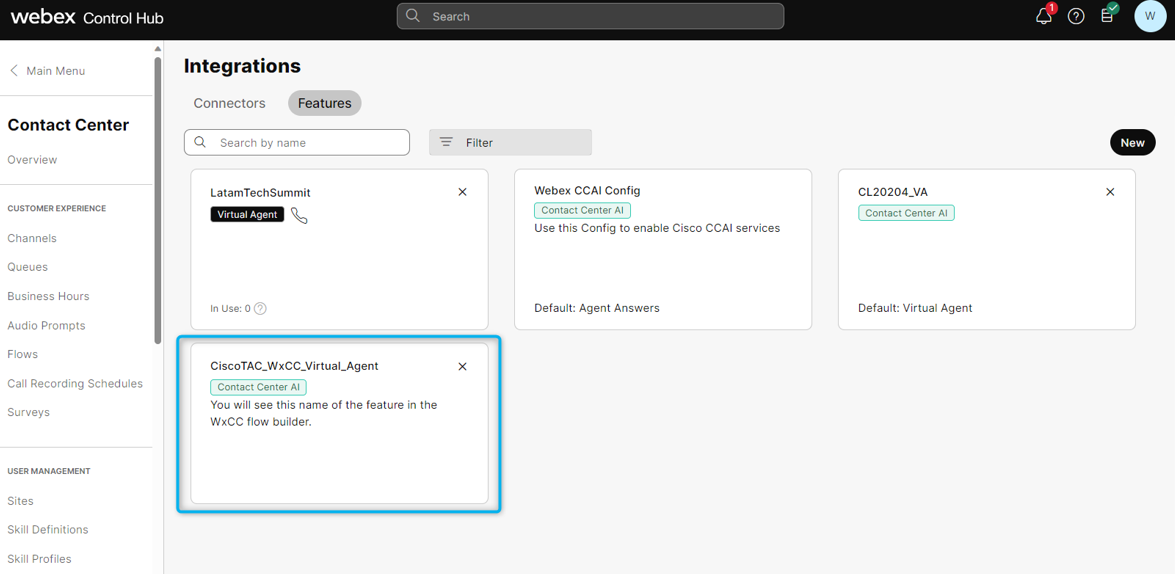
Step 4. You can now see the Feature was created.
Configure Dialogflow CX Virtual Agent
Objectives
This section describes how to configure the Virtual Agent to have a conversation with a caller and decide whether to send the call directly to the queue with human agents or collect estimate information and send the data to the Analyzer report.
In the next screenshot, you can see a functional diagram of the flow for this section.
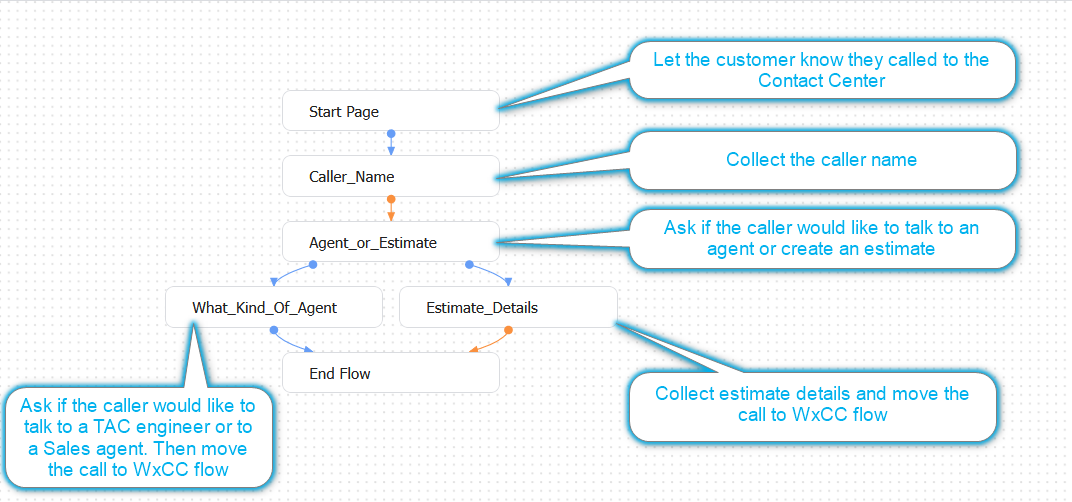
Task 1. Navigate to Dialogflow CX Agent flow builder and customize the initial greeting.
Step 1. Log in to Google Dialogflow CX portal using your user account and password. Select project CL2024AMS.
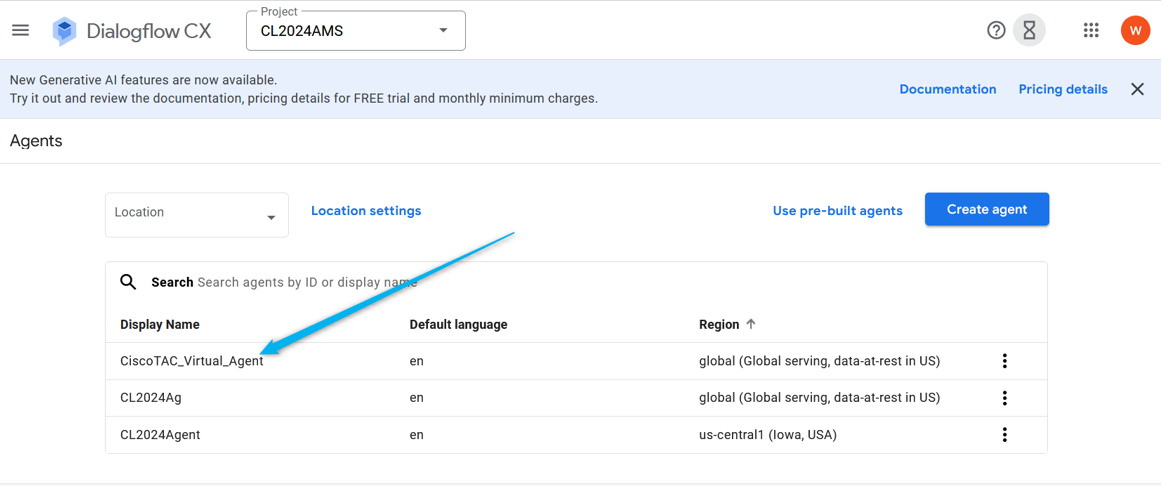
Step 2. Select the Virtual Agent that you created earlier.
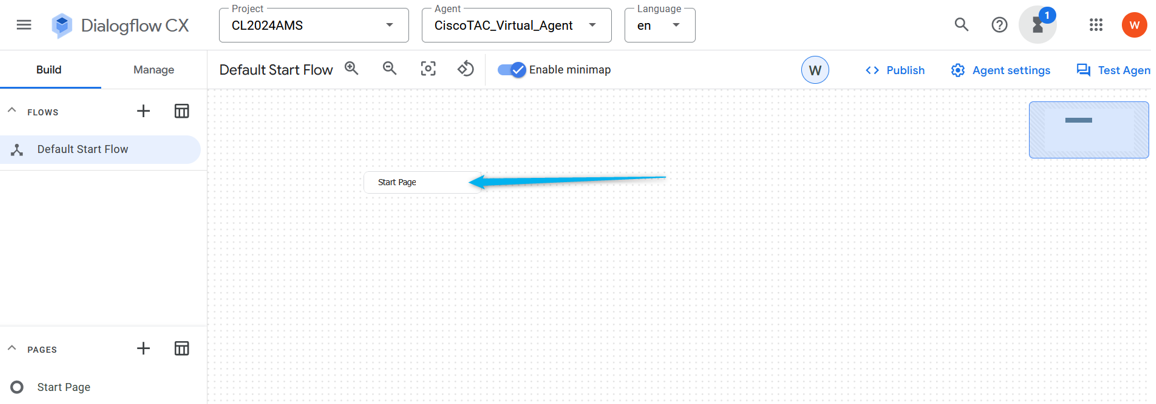
Step 3. In the Dialogflow CX builder click on the Start page.
Note: In Dialogflow CX, a page is a set of instructions that holds one or more related conversational turns. It represents a single step in a conversation flow, and it can contain various types of content, including text responses, prompts for user input, fulfillment actions, and more. Pages are connected together to create a conversation flow that guides the user through a conversation with the Dialogflow CX agent.
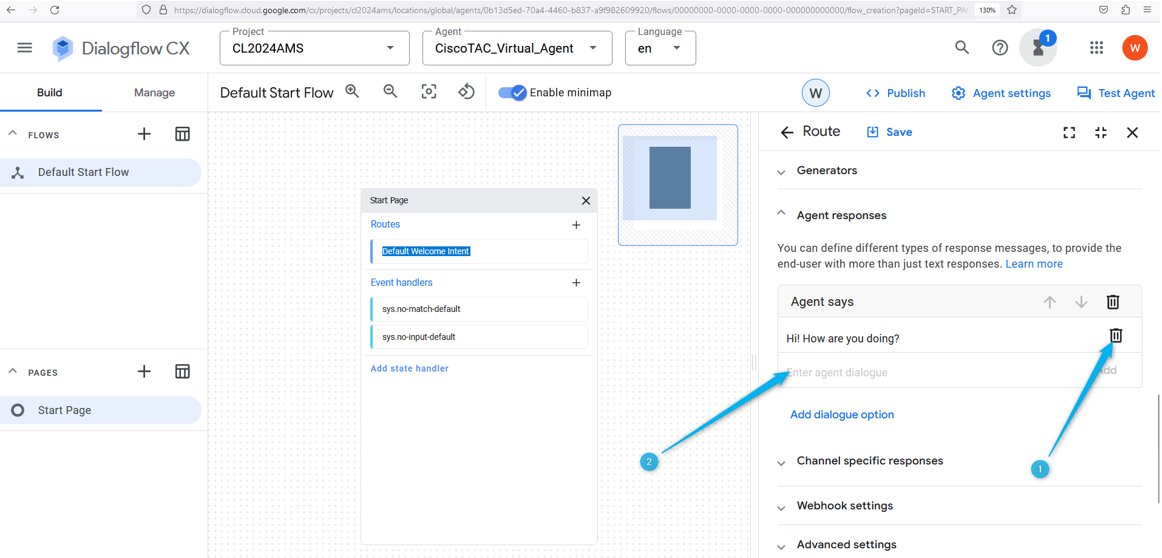
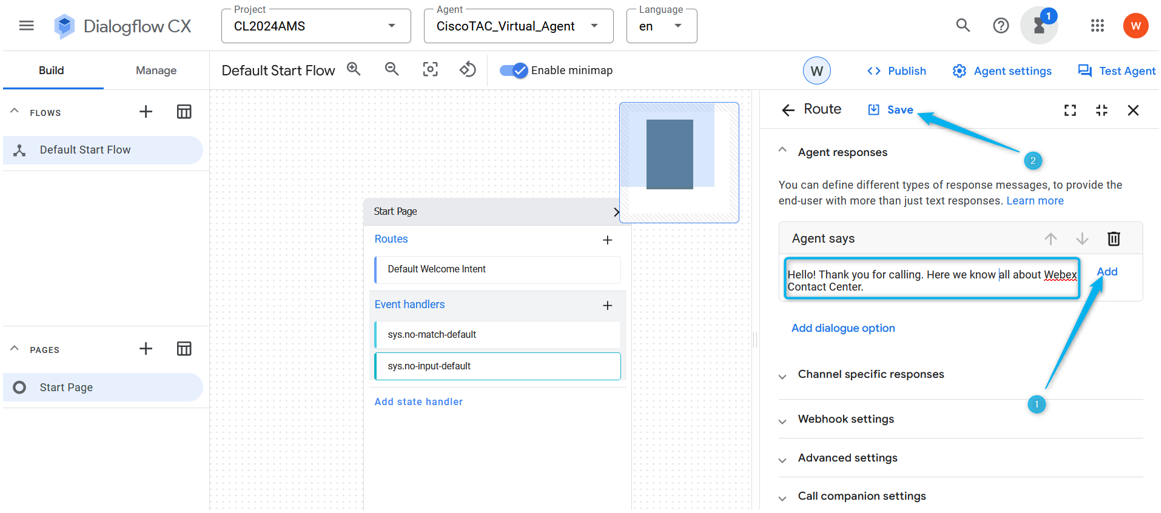
Step 4. In the Start page click on Default Welcome Intent Route<//b>. On the right window, scroll down, delete all the default Agent responses, and click on the field to Enter agent dialog.
Note: A route is a mapping between an intent and a specific page or flow within a conversation. Routes define how a conversation can flow based on the user input and the intent that is matched.
Step 5. Provide your customized message to let the caller know that they reached an organization that provides sales services of Webex Contact Center. You can type something like: Hello! Thank you for calling. Here you know all about Webex Contact Center. In Dialogflow CX, the changes are not saved automatically, so you need to save the page every time you make a change.
Note: Agent responses are the messages or actions that an agent sends back to the user or caller during a conversation. When a user or caller sends a message or makes a request to a Dialogflow CX agent, the agent analyses the input and determines the appropriate response to send back.
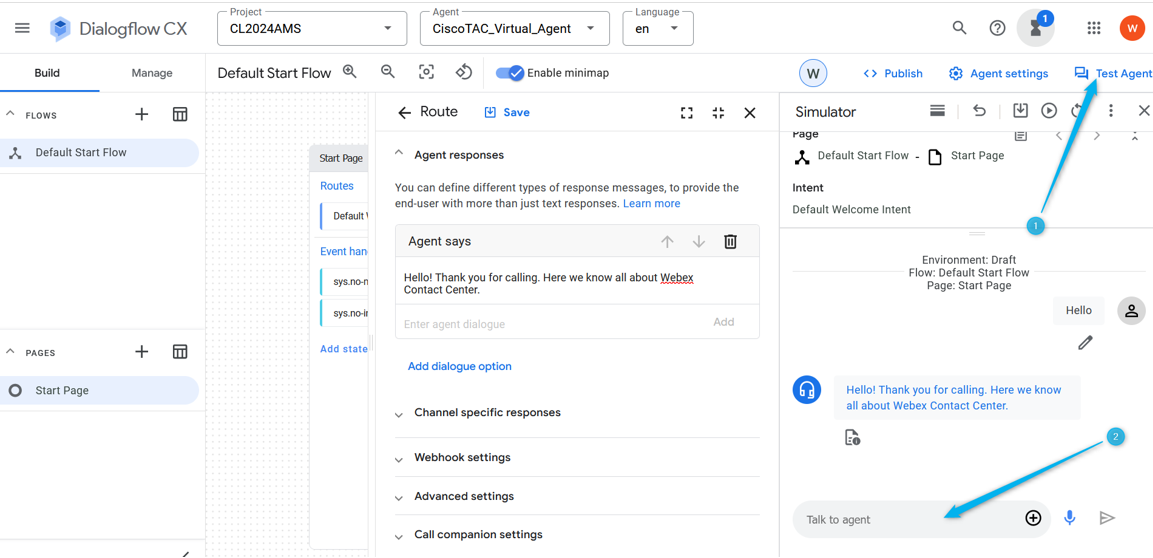
Step 6. Test the agent response that you just created. Click Test Agent and type a greeting message such as Hello.
Task 2. Create new page to collect the caller name
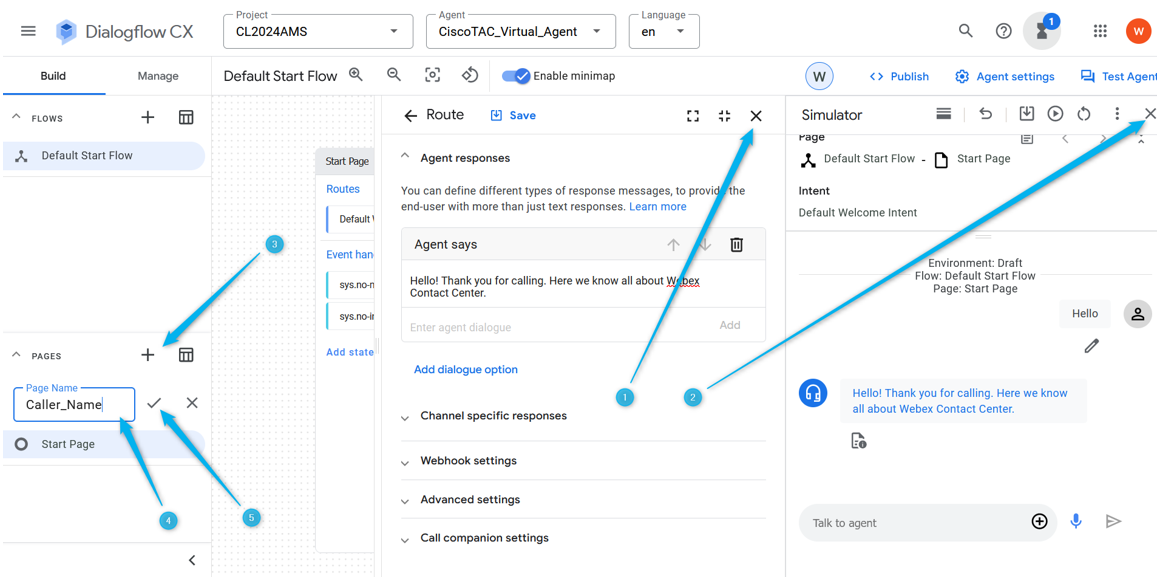
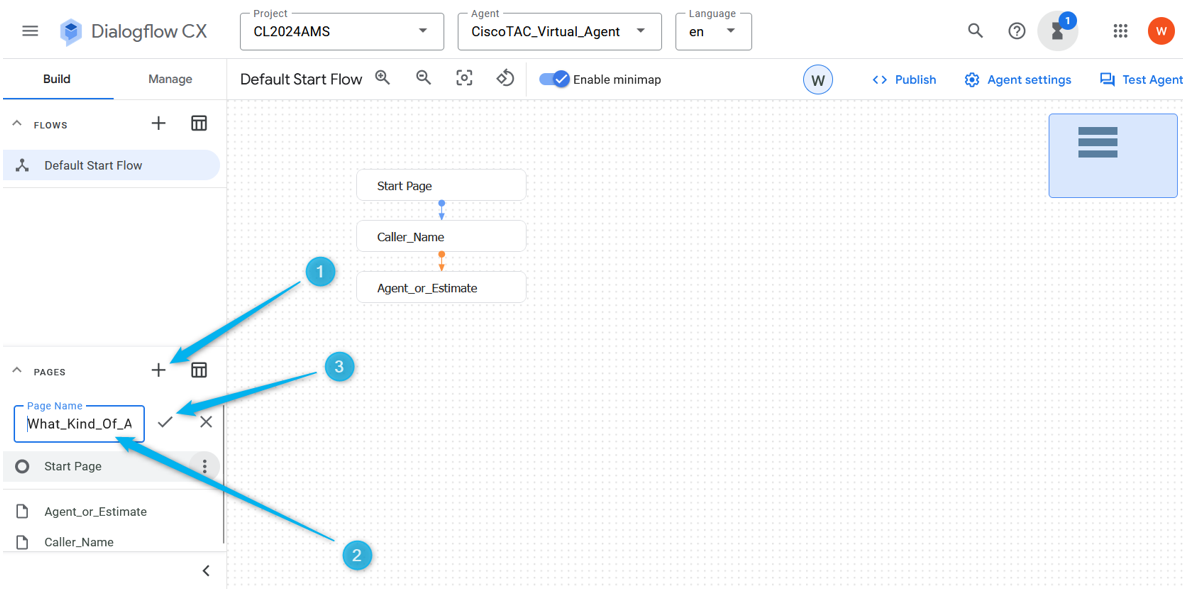
Step 1. Close the Start page and Test Agent windows and click the plus icon (+) to create a new page. Name the page Caller_Name and confirm the creation.
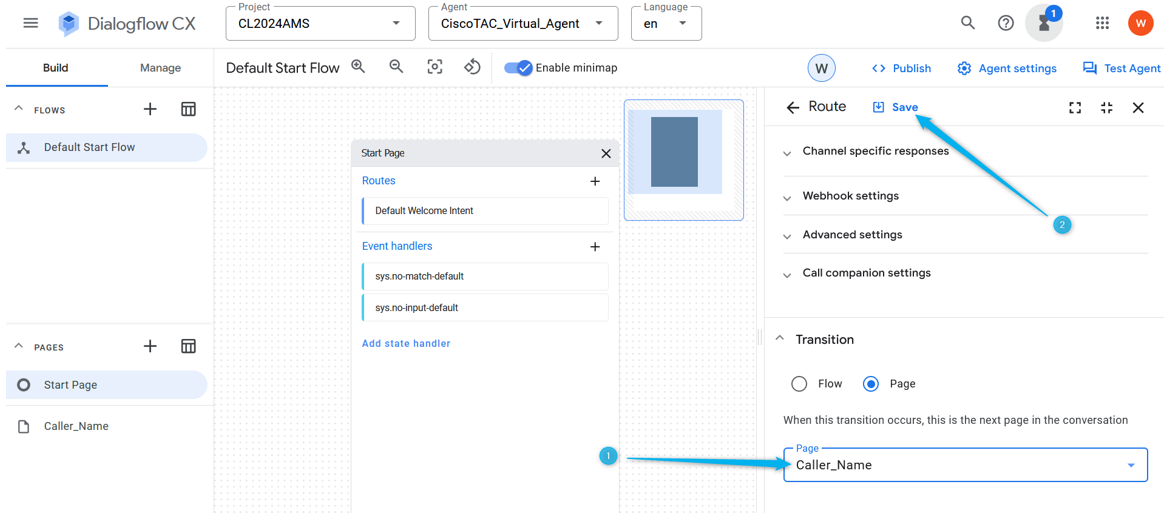
Step 2. Connect the Start page and Caller_Name page. For this, click the Default Welcome Intent route on the Start page. Scroll down on the right side and select that you would like the conversation to go to the next page.
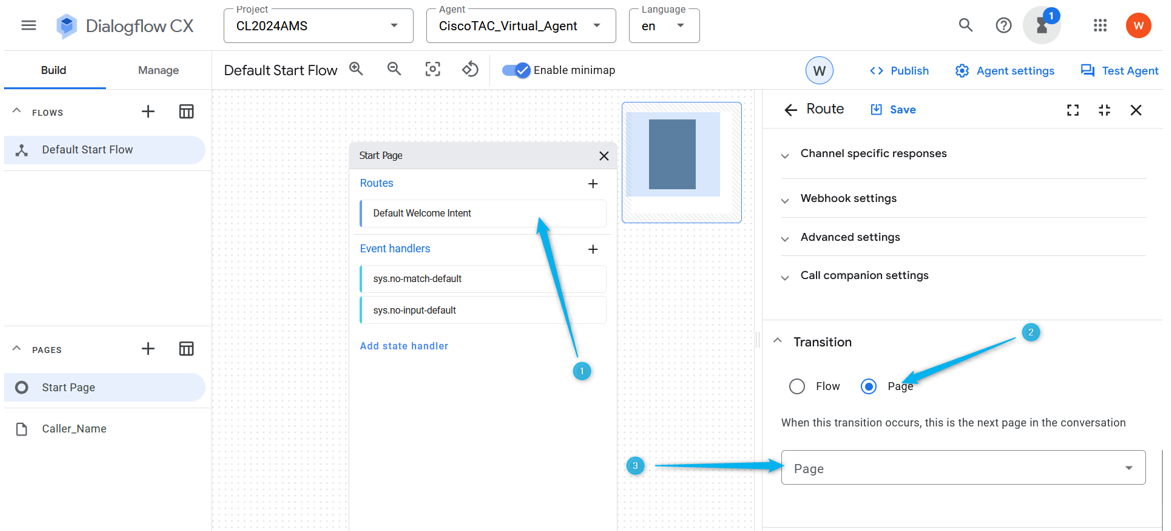
Step 3. From the drop-down list, select Caller_Name page. Do not forget to Save the change.
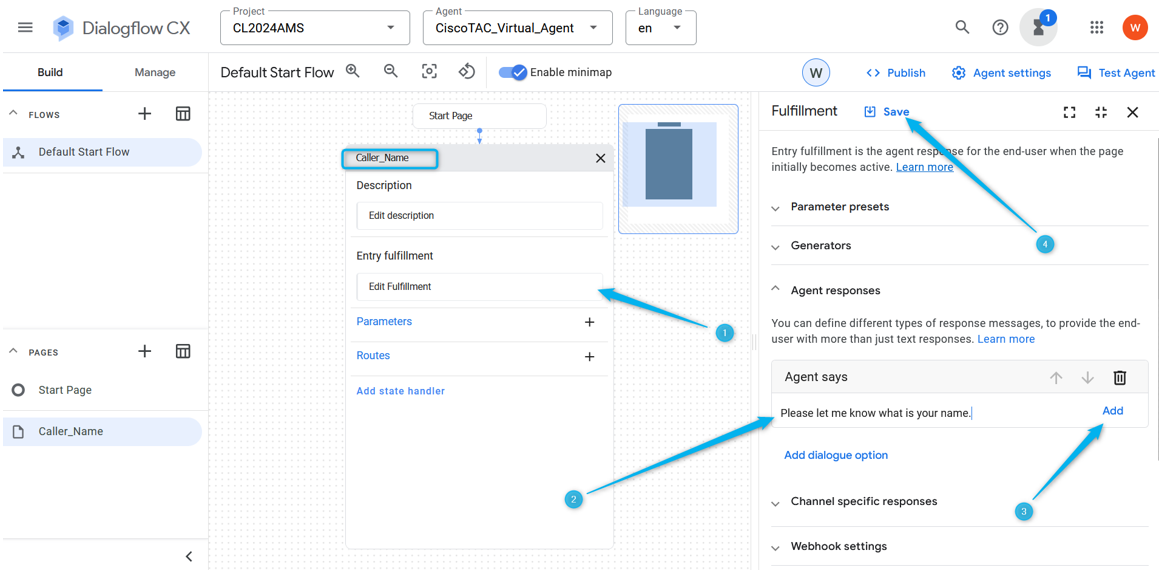
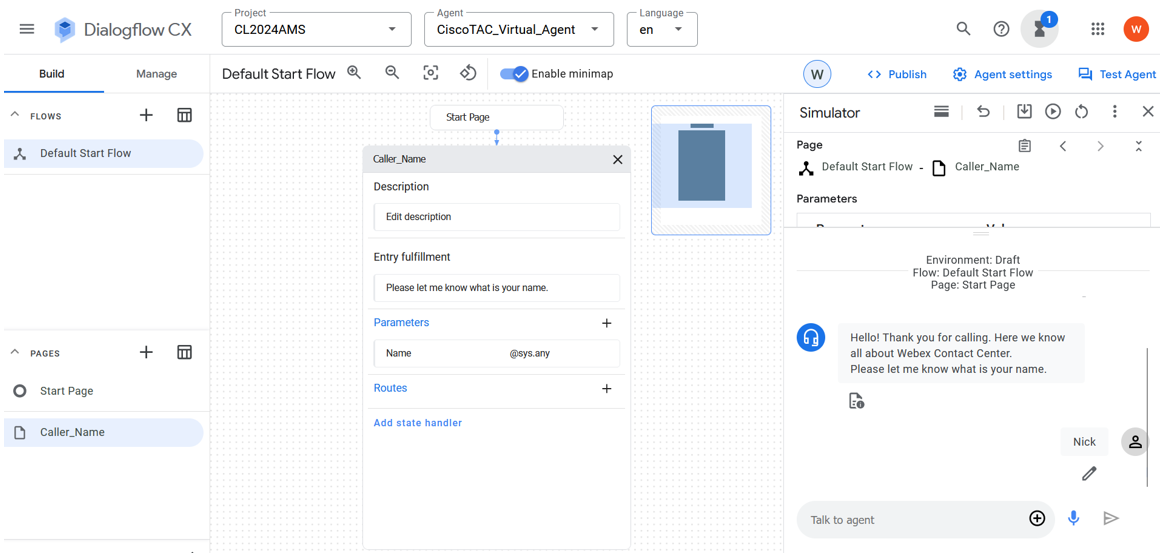
Step 4. Configure the Caller_Name page to collect the name from the caller and store it in the parameter. In the Caller_Name page click Entry Fulfillment and type message in which you ask the caller name. Click Add and Save the change.
Note: Entry Fulfillment is needed to provide a message to the caller once the call is moved to a new page to let the caller know where they are in the conversation and set the right expectations.
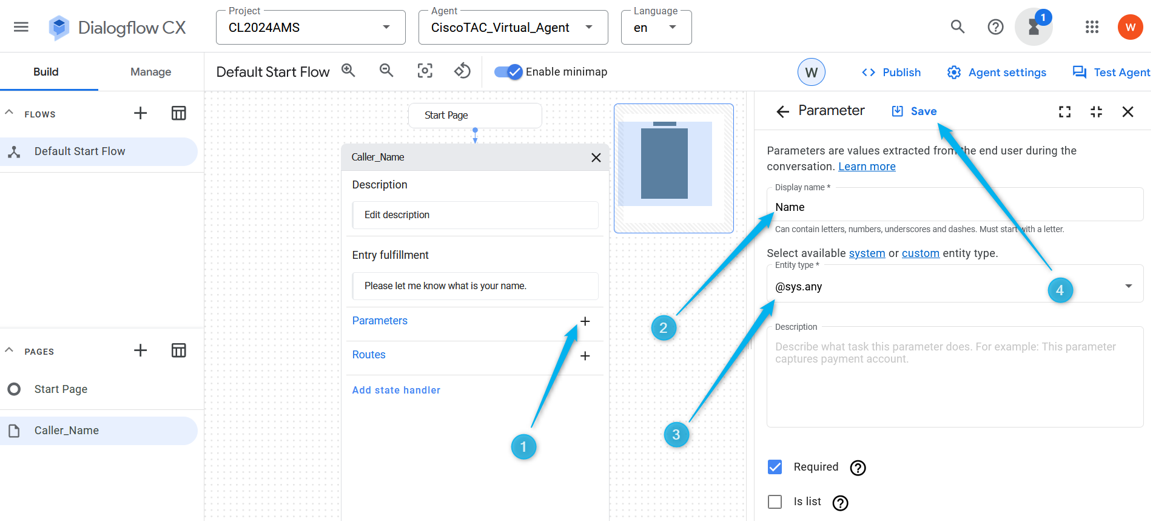
Step 5. While on the Caller_Name page, click on Parameters, type Name as the parameter’s name, select sys.any from the list of preconfigured Entities, and click on Save.
Note: A Parameter is a named entity or value that is extracted from user input during a conversation. Parameters can be used to store information that is relevant to the user request, such as their name, date of birth, or preferred language. Parameters can also be used to pass data to other parts of your application such as Contact Center.
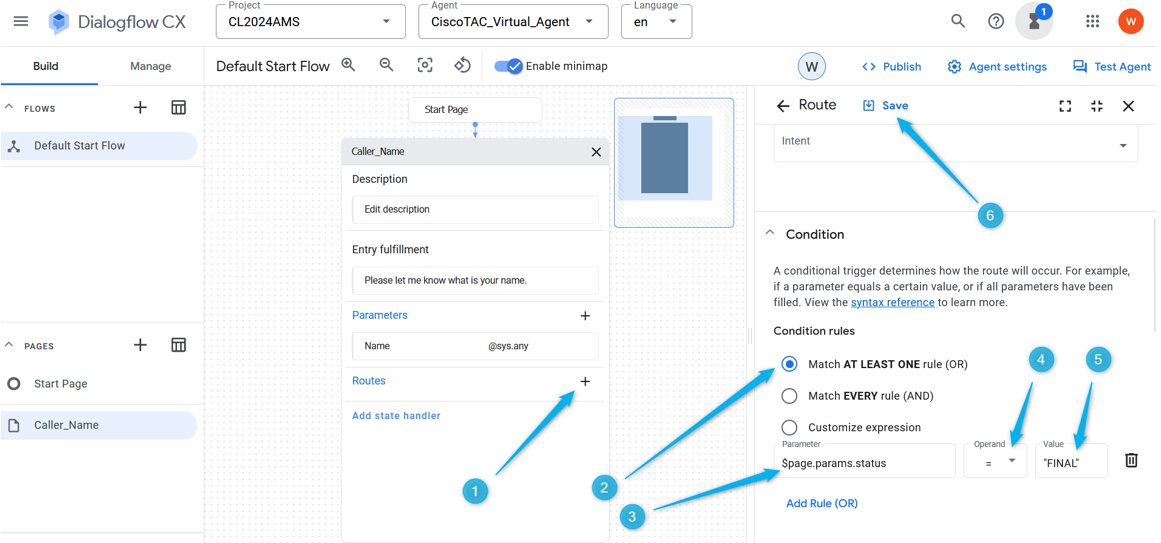
Step 6. Configure Routes in the Caller_Name page. Click Route, on the right window scroll down to Condition and set the condition $page.params.status =”FINAL”. Click Save. By setting this condition, you can expect the call to move to the next page once the Name parameter which you created in the previous step is filled with a value. For example, if the caller says Nick then the call can move forward.
Note: A Condition in the Dialogflow Routes configuration is a rule or set of rules that define when the route must be triggered. The Condition can be based on various factors such as user input, context, parameters, and session data.
Step 7. Using the Test Agent option on the right top side, test if the flow is working as designed at this point.
Task 3. Create new page Agent_or_Estimate and connect it with the Caller_Name page.
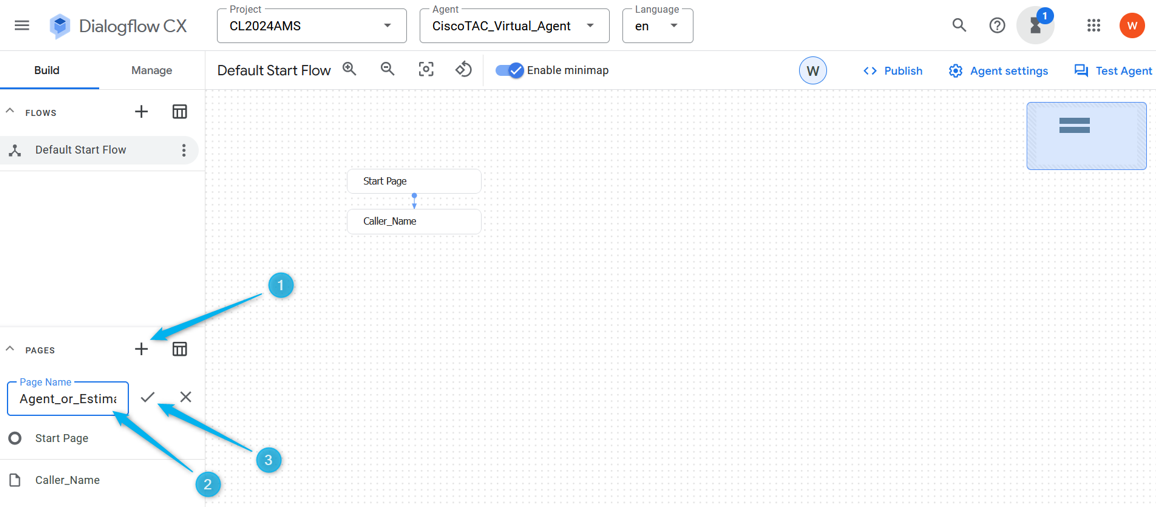
Step 1. On the left bottom side, click to add a new page, name it Agent_or_Estimate, and confirm the creation.
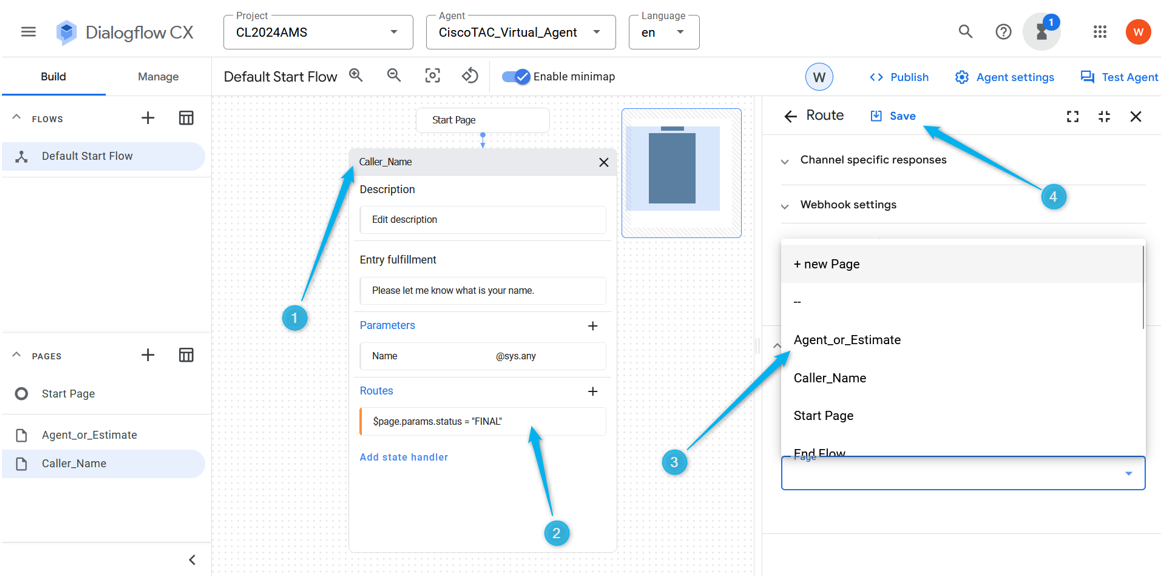
Step 2. Connect Caller_Name and Agent_or_Estimate pages. Open the Caller_Name page, and select the route that you created in the previous step, on the right side scroll down and select the page Agent_or_Estimate. Do not forget to Save the change.
Remember in Task 2 of this section you configured the condition that once the parameter is filled it triggers an action. By selecting the next page you specify what action it is, in this example the call moves to the page Agent_or_Estimate.
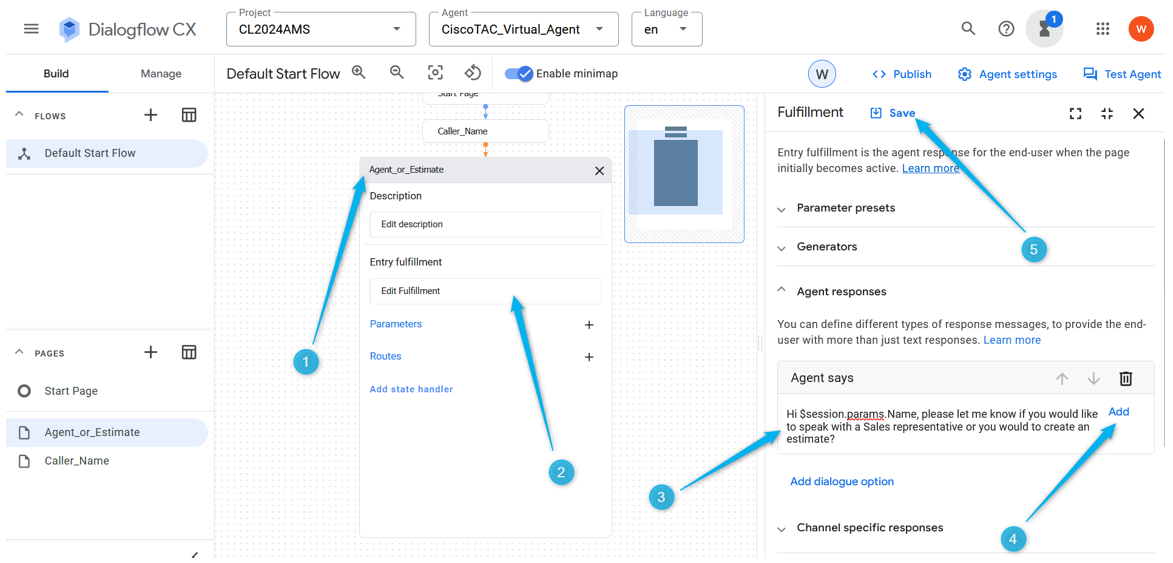
Step 3. Configure Entry Fulfillment for Agent_or_Estimate page. Open up Agent_or_Estimate page, and click Entry Fulfillment. In the Agent response type: Hi $session.params.Name, please let me know if you would like to speak with an agent or if you would to create an estimate?
Do not forget to Save the change.
Note: If you cannot copy and paste the suggested fulfillment just start typing in the Agent Response field, then you can paste the text, then delete unnecessary text.
Step 4. Test if the conversation flow is configured properly at this point. Click Test Agent and in the Talk to Agent field type Hello and then type your name.
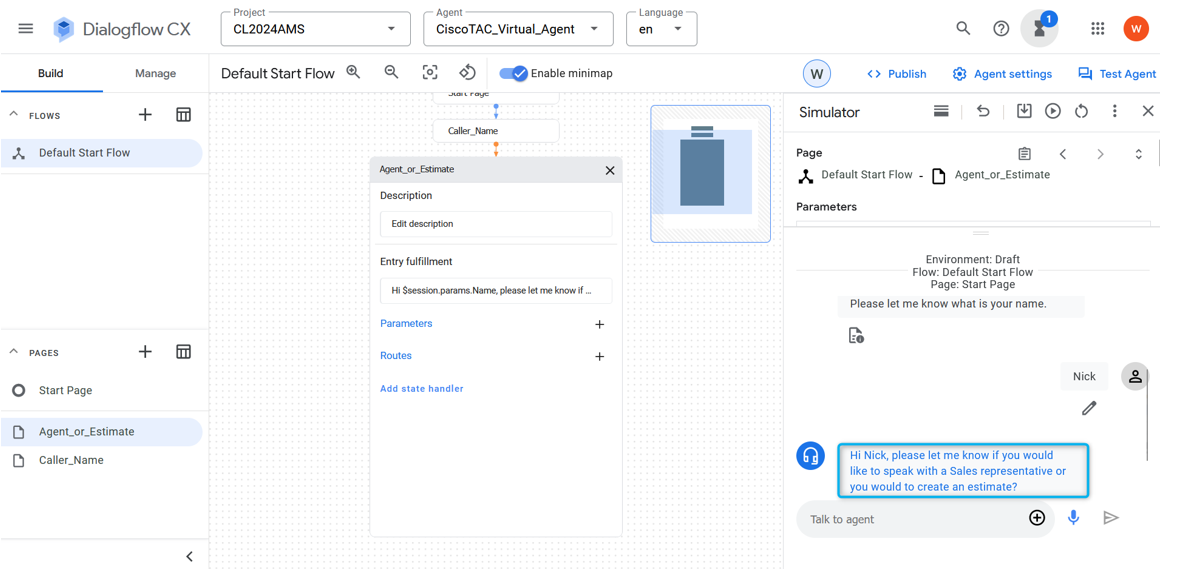
Task 4. Configure Route in Agent_or_Estimate page to move the call to new page What_Kind_Of_Agent.
Step 1. Open up the Agent_or_Estimate page, click on Create New Route, and then click on Create New Intent.
Note: An intent is a mapping between what a user says or types and a specific action or response that the conversational agent can take. Intents help the agent understand the user request and determine the appropriate response or action to take.
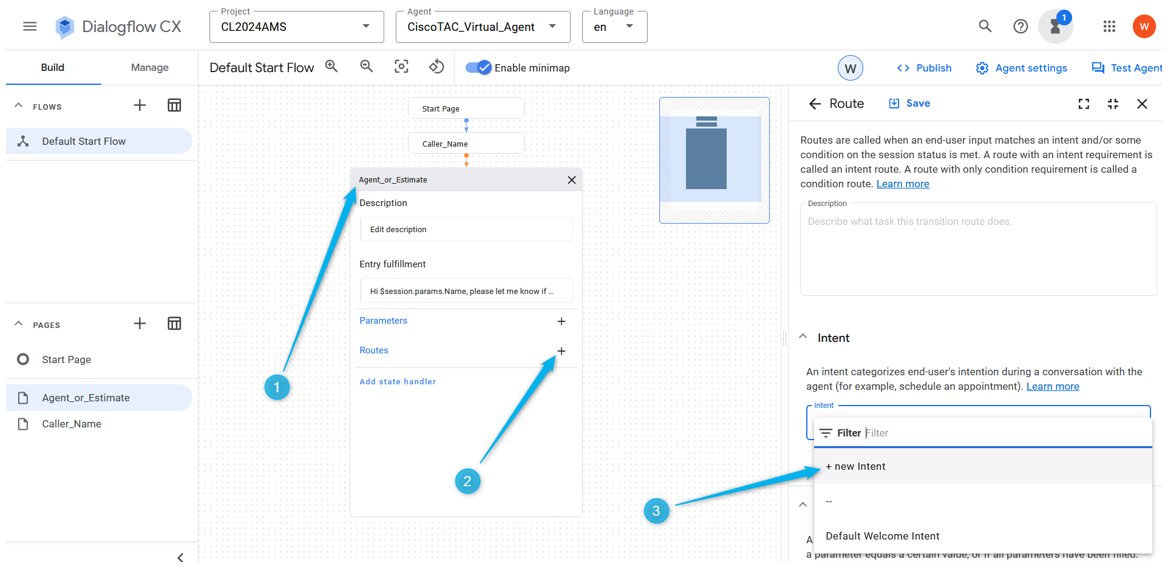
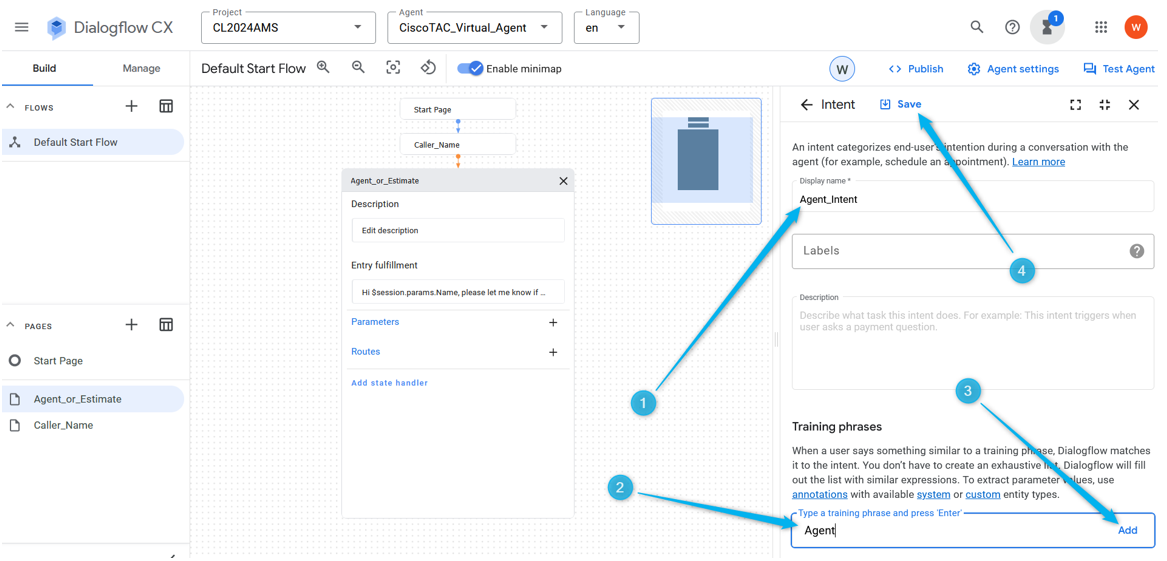
Step 2. Name the Intent Agent_intent. Provide 3-5 training phrases, something like agent, representative, escalate, real person. Do not forget to save the change of the page.
Step 3. Create new page and name it What_Kind_Of_Agent.
Step 4. Click on Agent_or_Estimate page. Add a new Route, select the Intent.
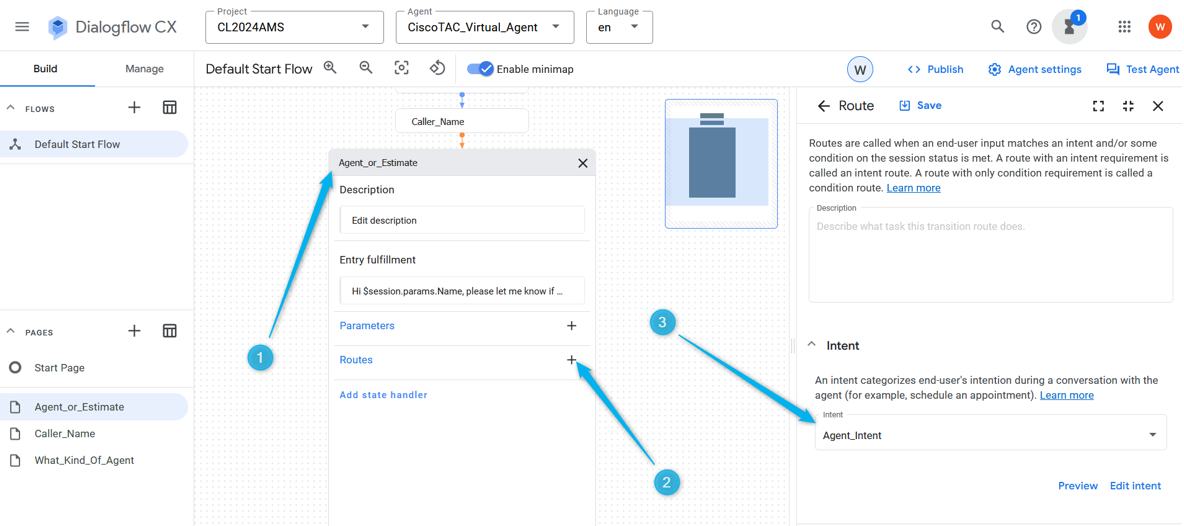
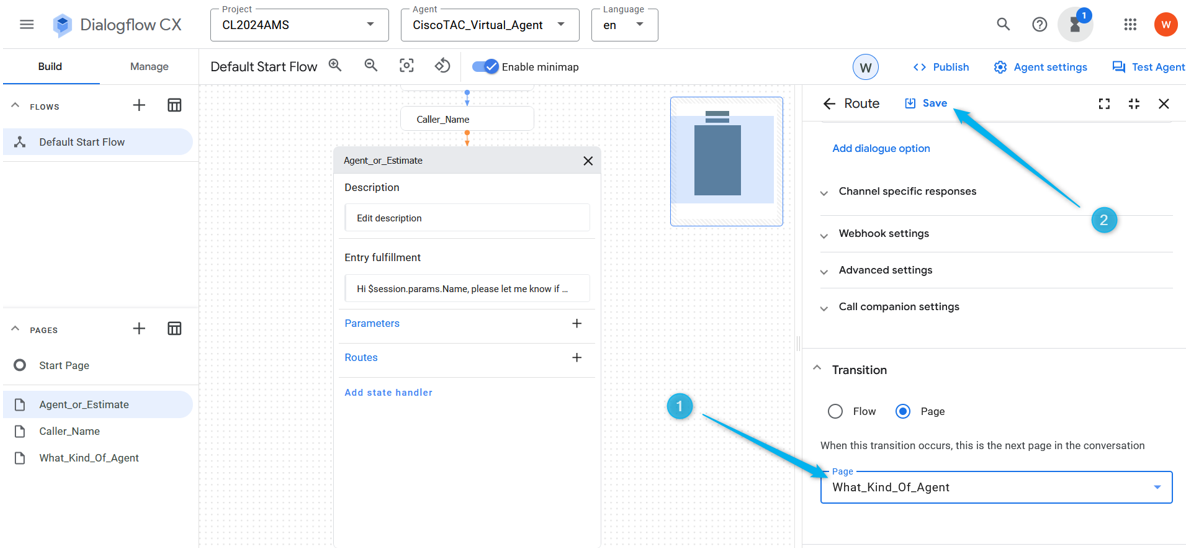
Step 5. On the Routes settings scroll down and select action to move the call to the page What_Kind_Of_Agent.
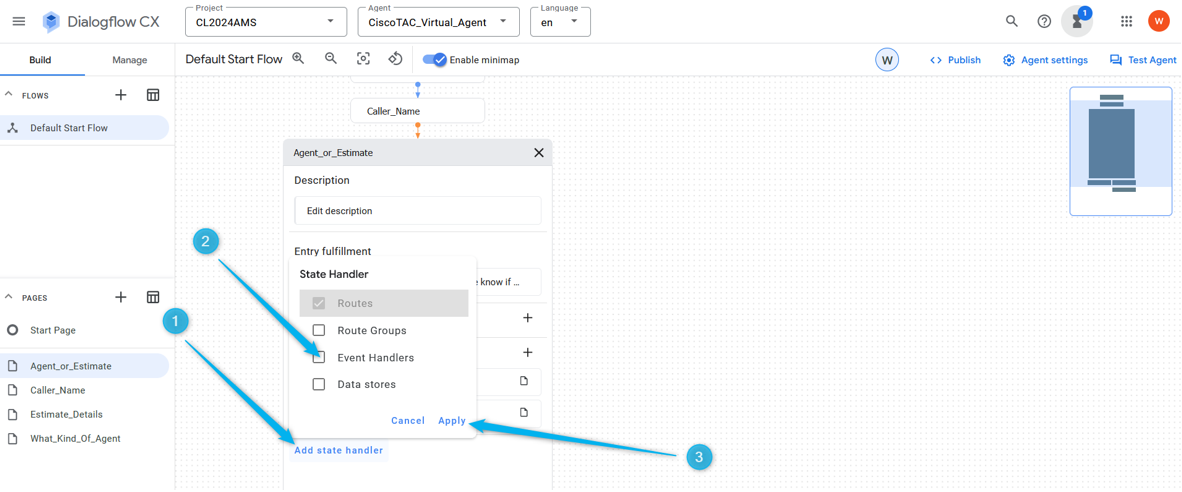
Step 6. For a better communication experience you need to add no-input-default Event handlers otherwise the system detects no input even before you have a chance to provide input. While on the Agent_or_Estimate page, click on Add state handler, select Event handlers, and click on Apply.
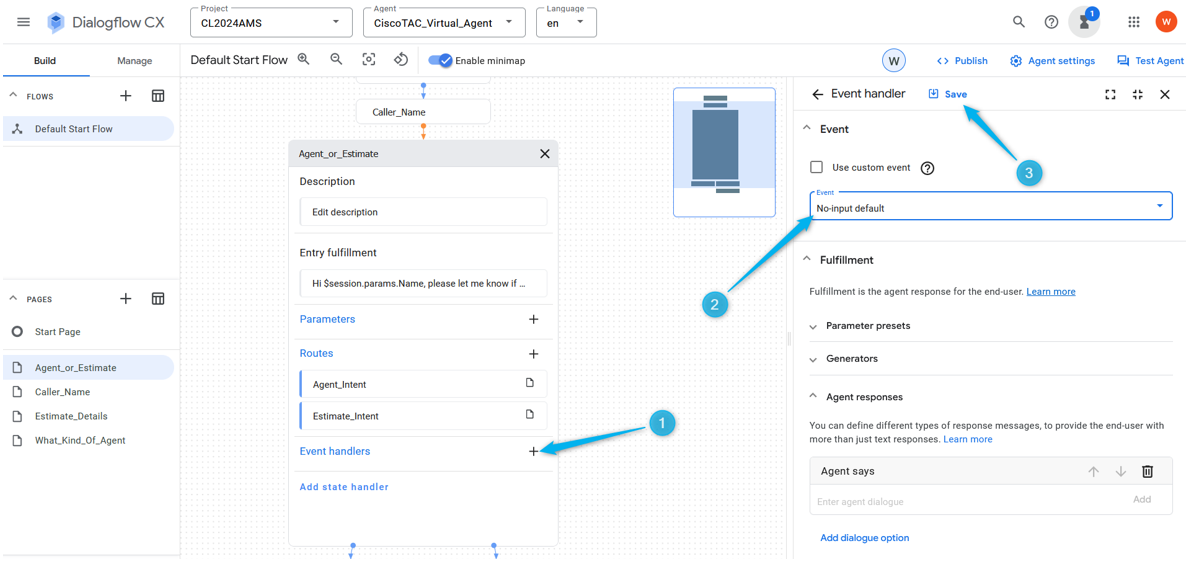
Note: An Event handlers is a type of intent that is triggered when a specific event occurs. For example, if the Virtual Agent does not receive any input or it does not recognize the input, the event handler is used to trigger no-input intent which helps to continue the conversation.
Step 7. Click on Add New Event handlers, select from the No-input default list and save the change.
Task 5. Configure Route for Estimate branch and Connect Agent_or_Estimate to new page Estimate_Details.
Step 1. Create Estimate_Intent. While on Agent_or_Estimate page click the plus icon (+) to add new Route and create new Intent.
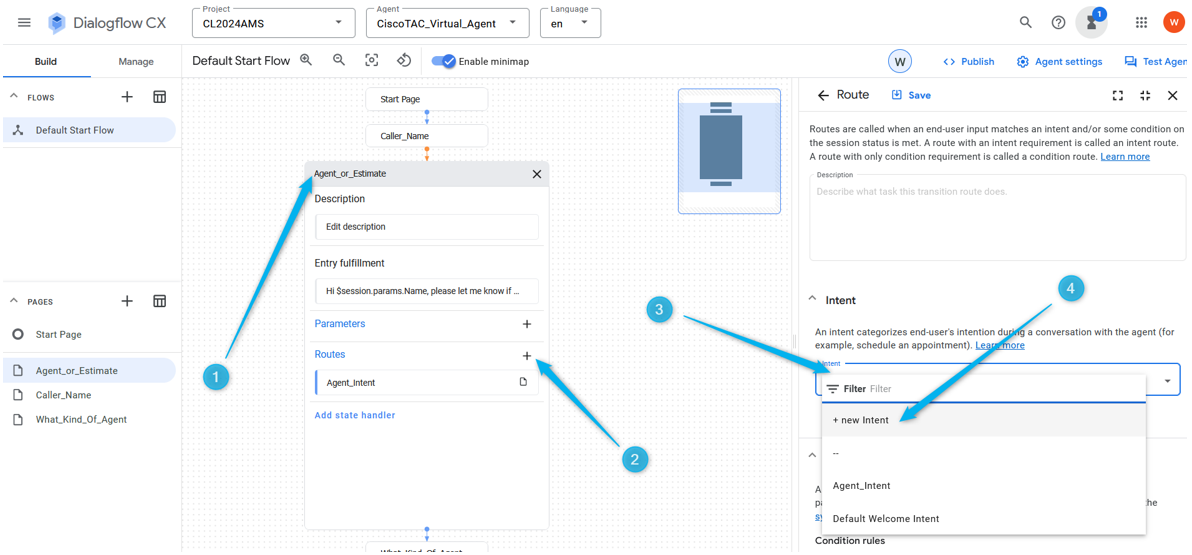
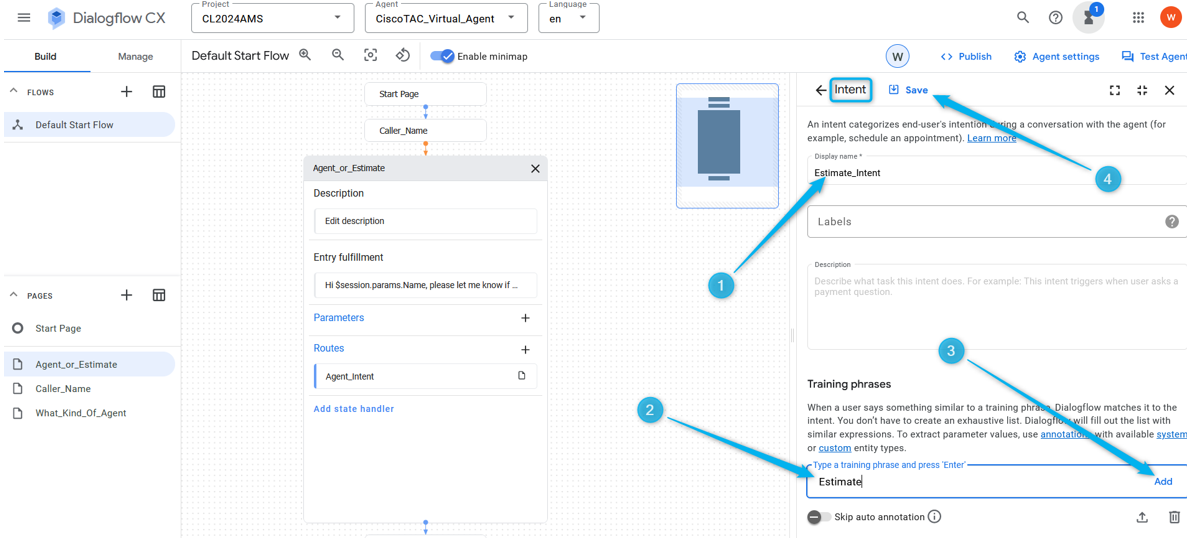
Step 2. Name the intent as Estimate_Intent and provide some training phrases. As for the training phrases you can add statements like estimate, price calculation, I need to know how much it cost. Save the intent.
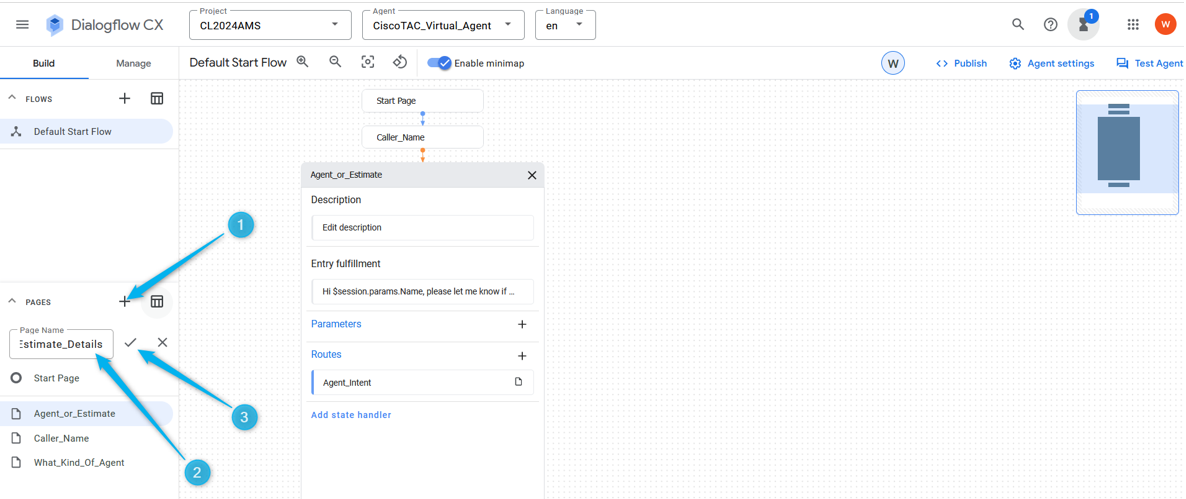
Step 3. Create new page with the name Estimate_Details. Connect Agent_or_Estimate and Estimate_Details pages when Estimate_Intent is triggered.
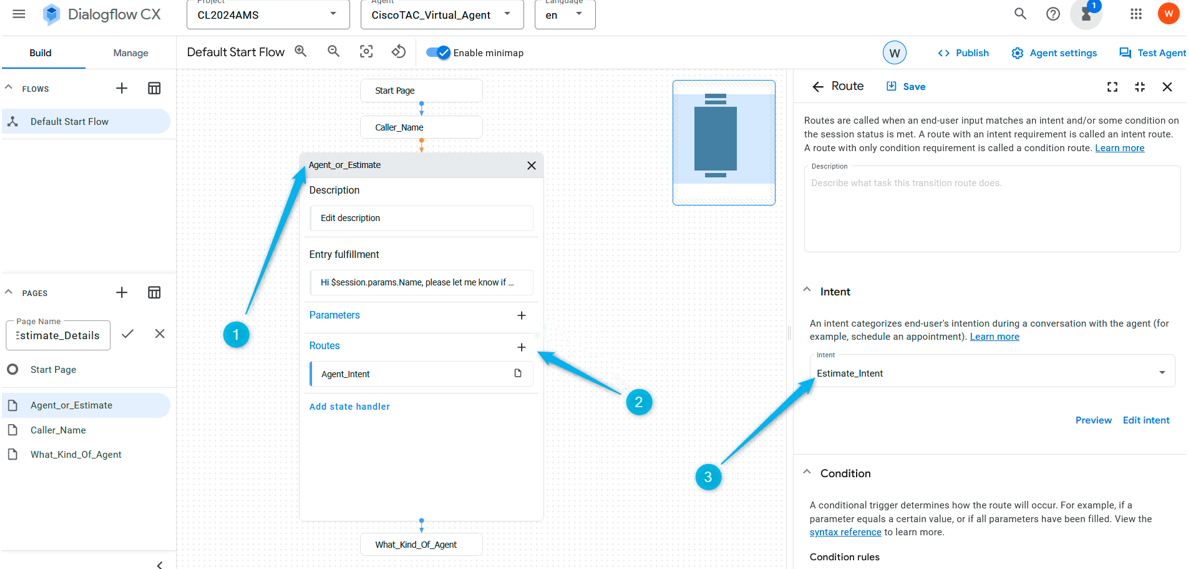
Step 4. Click the Agent_or_Estimate page. Add new Route, and select the Intent Estimate_Intent.
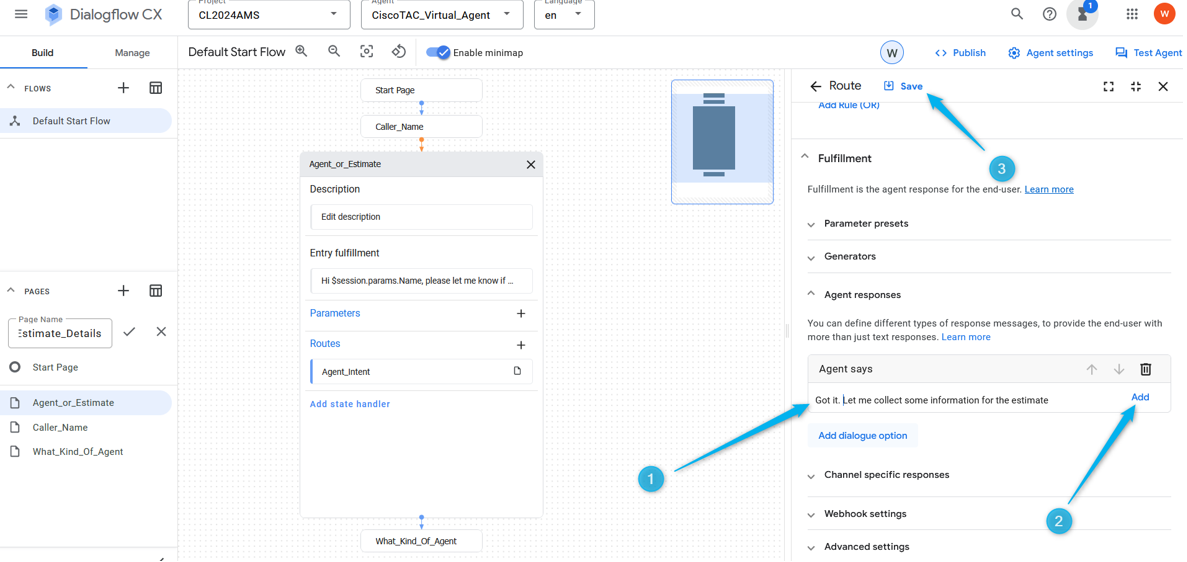
Step 5. Scroll a bit down and add the agent response that the caller hears once the Estimate_Intent is triggered. You can type something like, let me collect some information for the estimate.
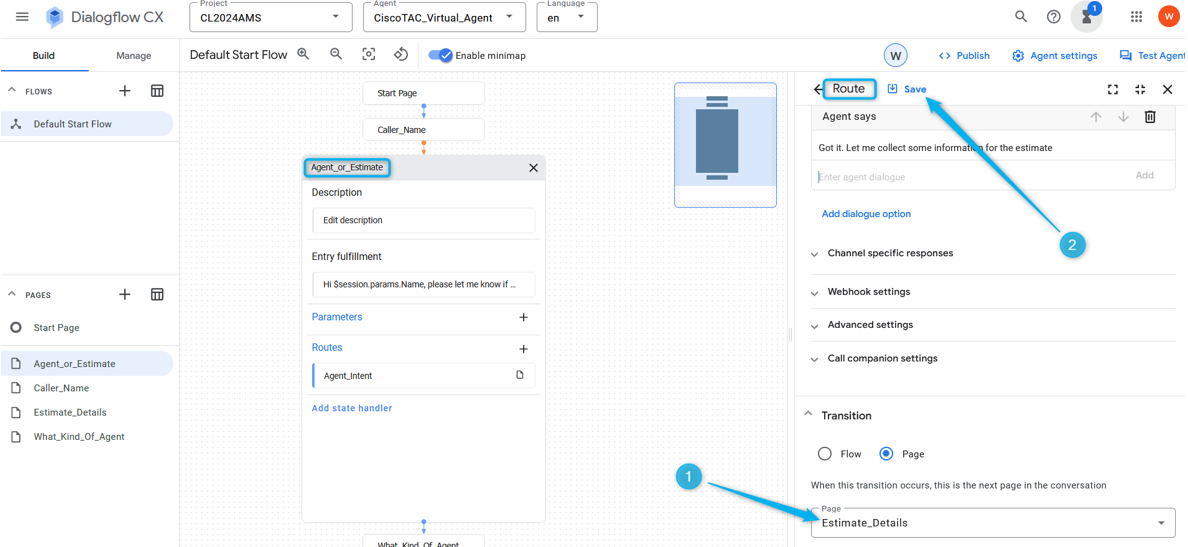
Step 6. Scroll all the way down and select the transaction to the page Estimate_Details once the intent is triggered. Save the page configuration.
Task 6. Configure Estimate_Details page with Parameters and Route
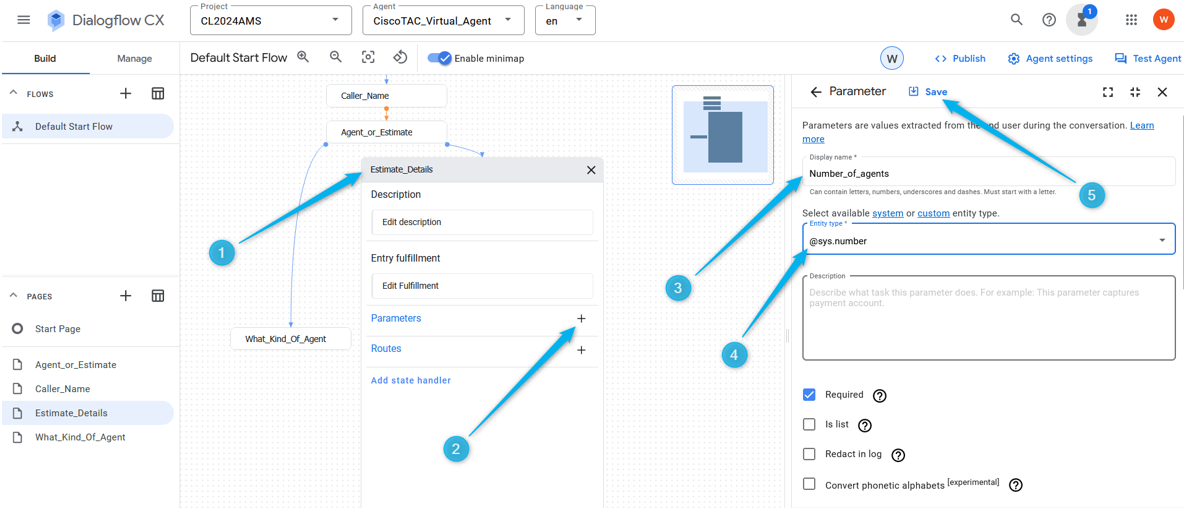
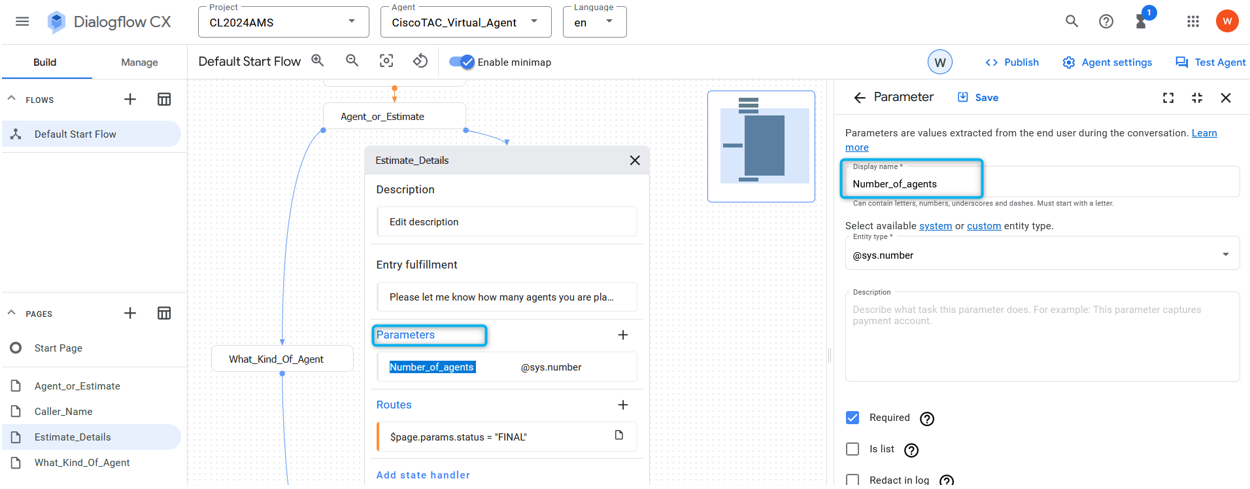
Step 1. Similar to how you created the Parameter for the caller name, create the Parameter for the number of agents which the caller needs the estimate for. Click on the Estimate_Details page, add the Parameter, name it Number_of_agents, and select from the list the standard Entity type sys.number. Do not forget to save the change.
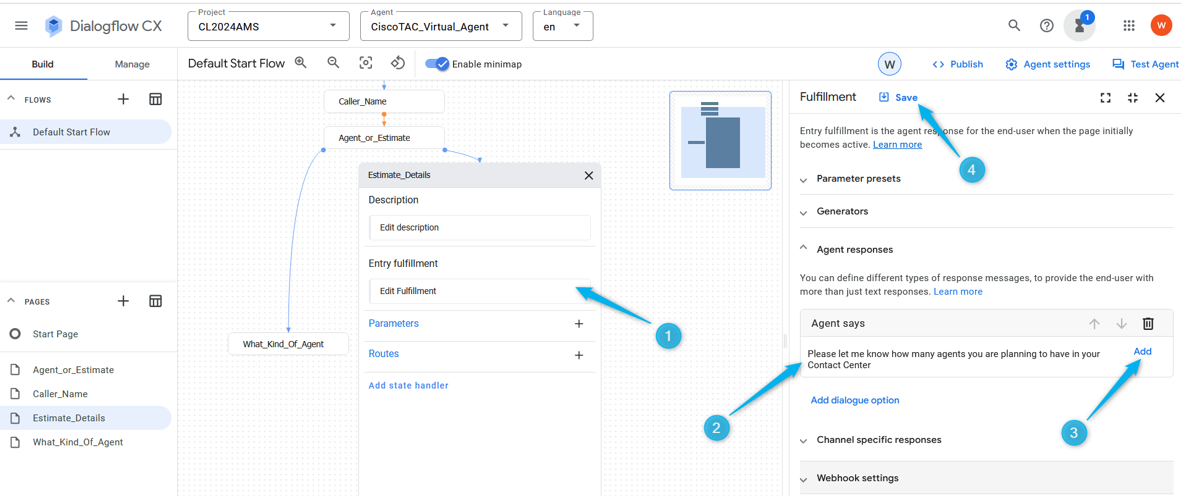
Step 2. Configure the Entry Fulfillment for the caller to understand what information the Virtual Agent is looking for. You can type something like, please let me know how many agents you are planning to have in your Contact Center.
Note: If you cannot copy and paste the suggested fulfillment just start typing in the Agent Responses field, then you can paste the text, then delete unnecessary text.
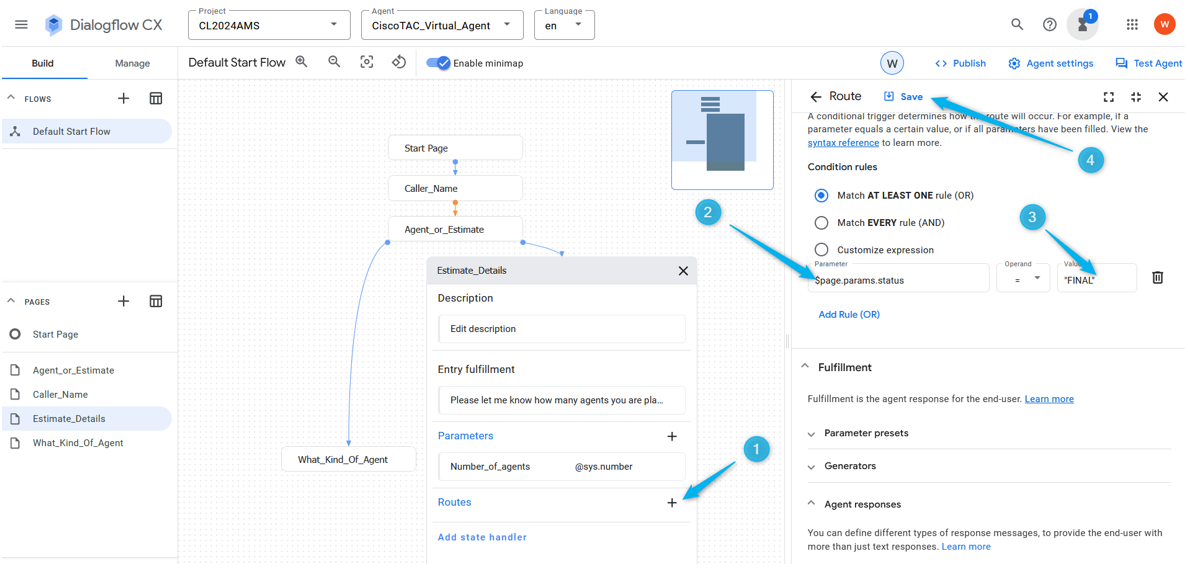
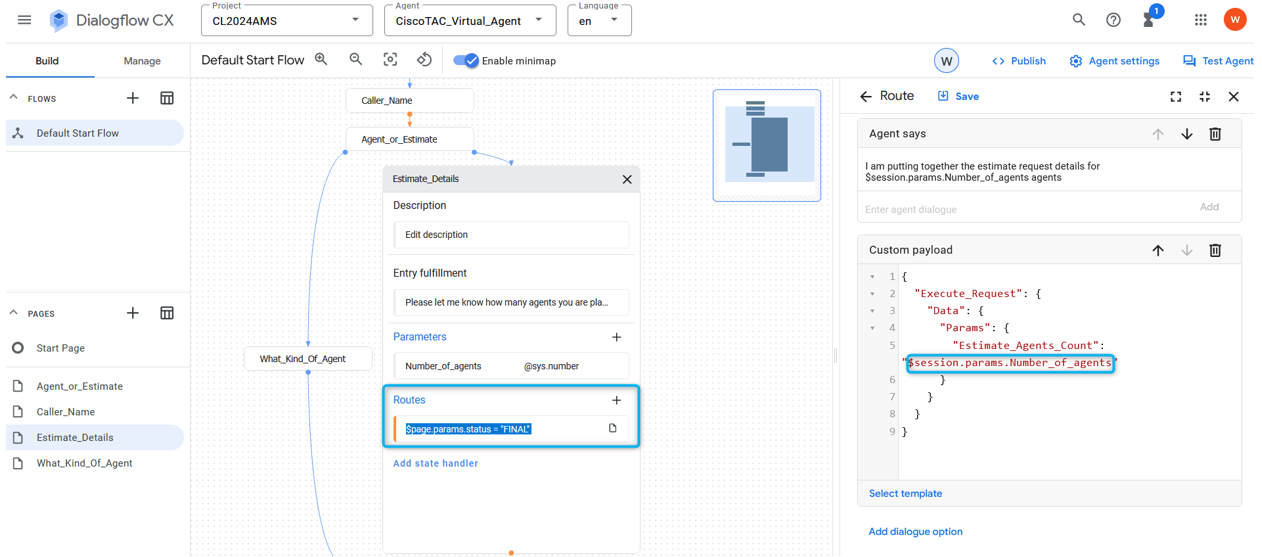
Step 3. Select the condition which triggers the action on the Estimate_Details page. While on the Estimate_details page, click on add new Route, on the right window scroll down a bit and configure the condition $page.params.status =“FINAL”.
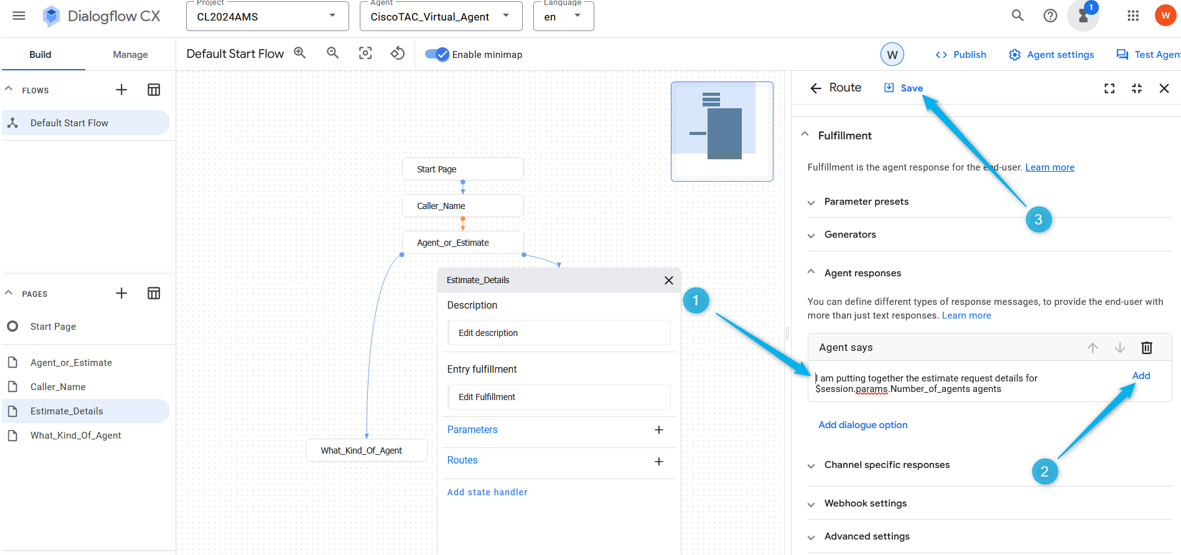
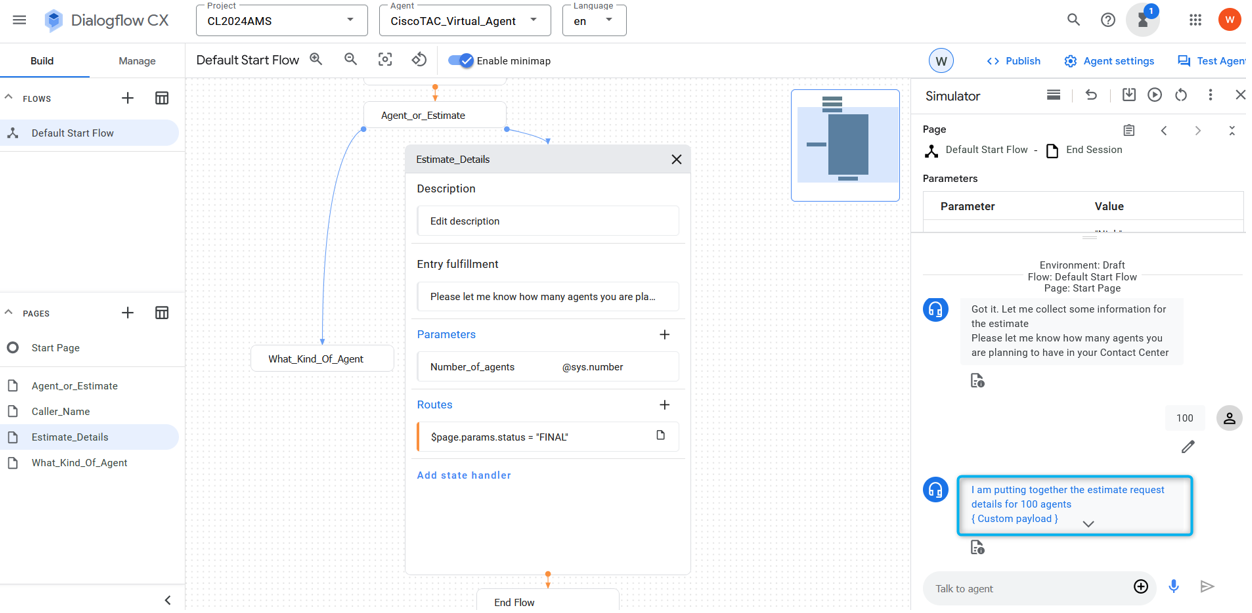
Step 4. Scroll more down and add the Virtual Agent response. Type: I am putting together the estimate request details for $session.params.Number_of_agents agents.
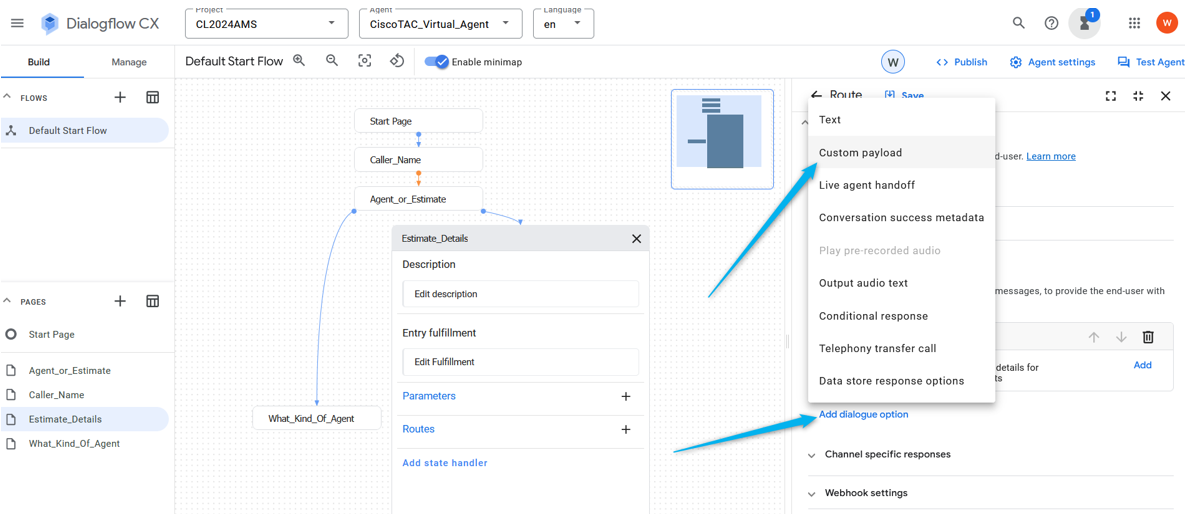
Step 5. Add dialogue option and select Custom payload from the list.
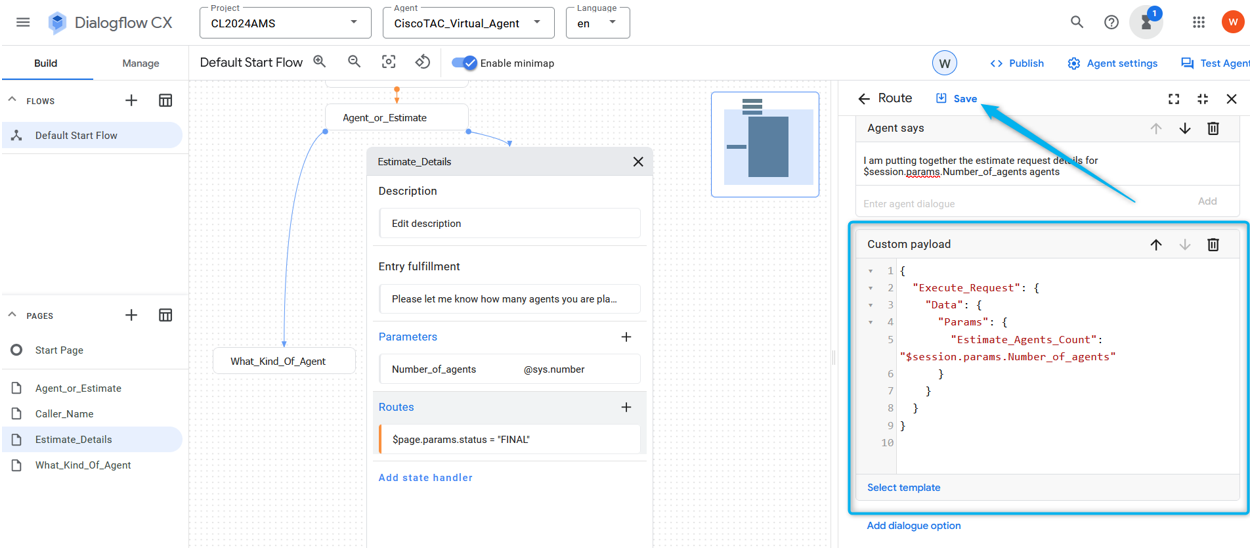
Post this next syntax to the Custom payload section and save the configurations.
{
“Execute_Request”: {
"Data": {

  "Params": {

    "Estimate_Agents_Count": "$session.params.Number_of_agents"

  }

}
}
}
Note: In JSON data format, a variable is a key-value pair that represents a property of an object. The key is a string that identifies the property, and the value is the data associated with the property.
The Custom payload contains the key Estimate_Agents_Count and the value is the Parameter $session.params.Number_of_agents. This Parameter is changed depending on the caller response.
Step 6. Scroll more down on the Route section and set up Transition to End Flow.
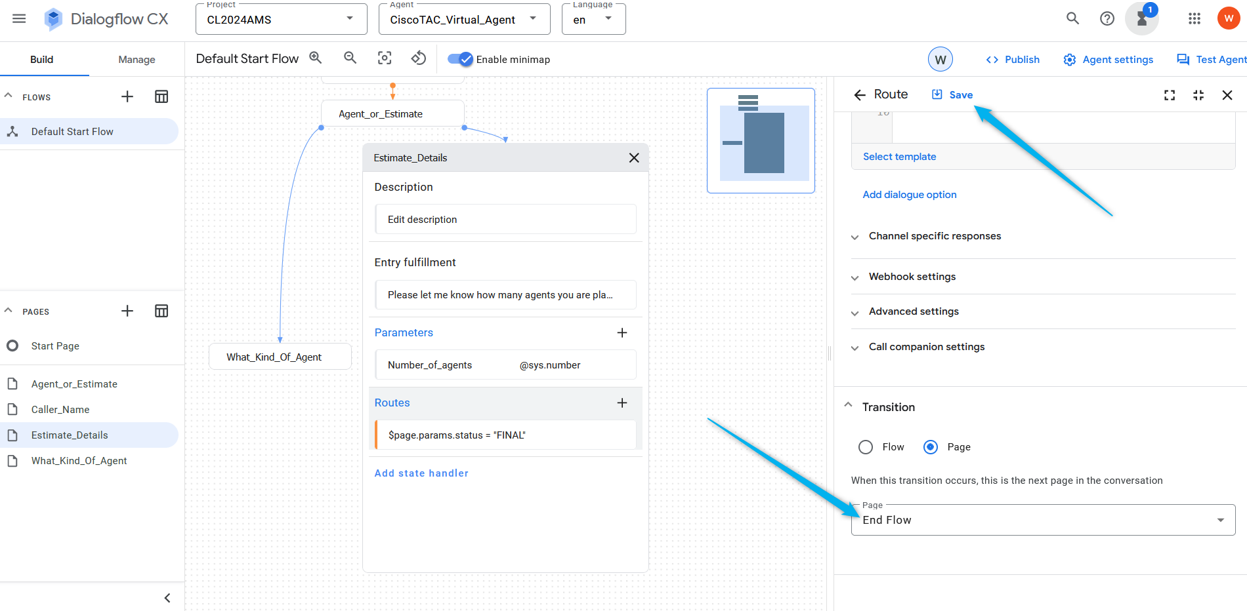
It terminates the session on the Dialogflow side and transfers the call to WxCC where it continues from the Virtual Agent Handled path.
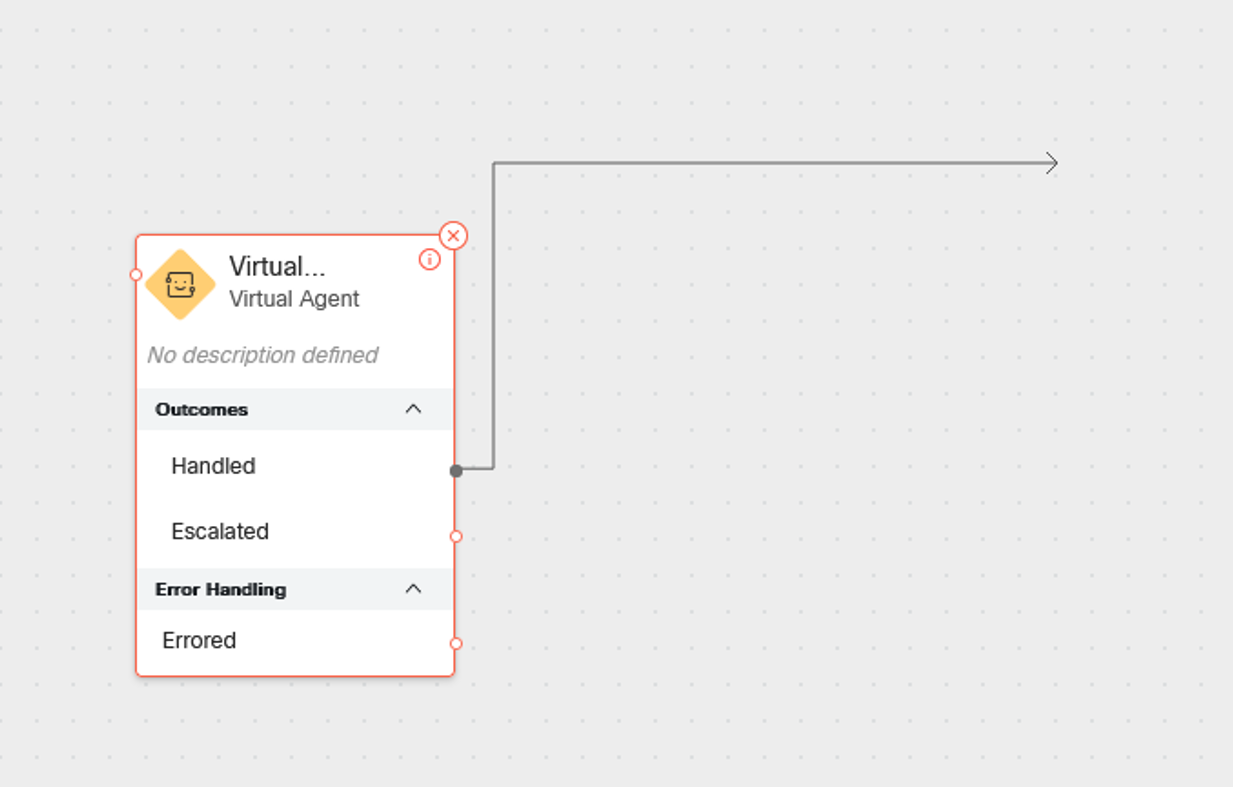
Step 7. Test your Virtual Agent flow at this point.
Task 7. Configure Estimate_Details page with Routes.
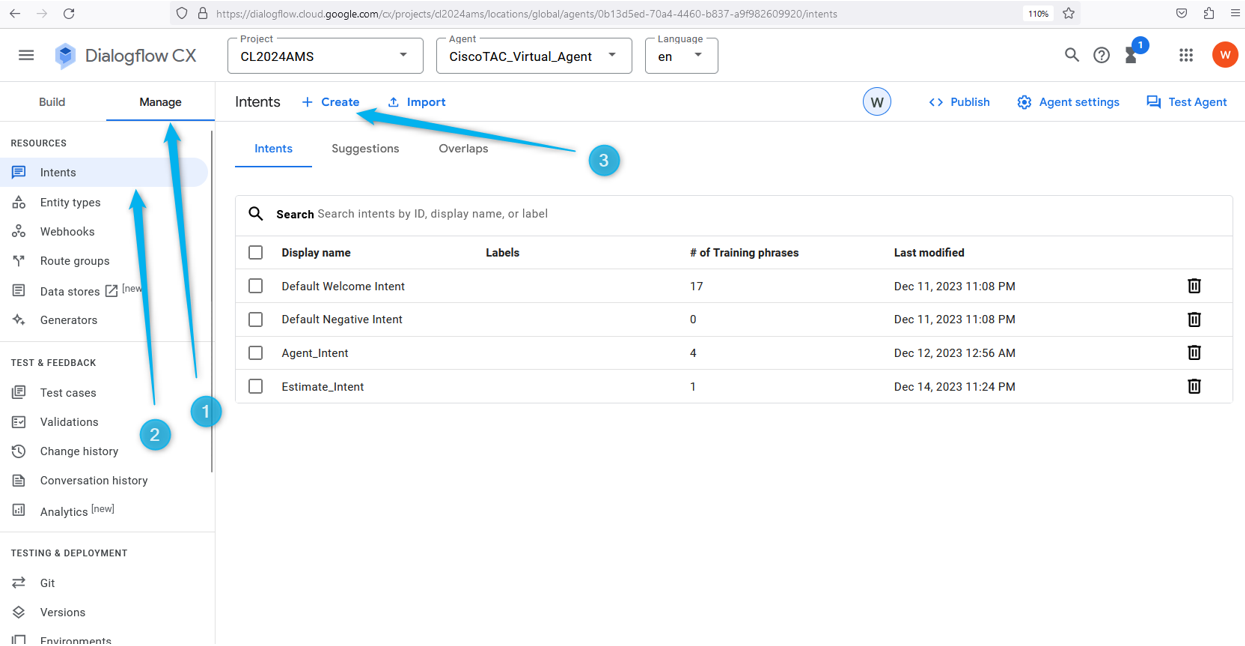
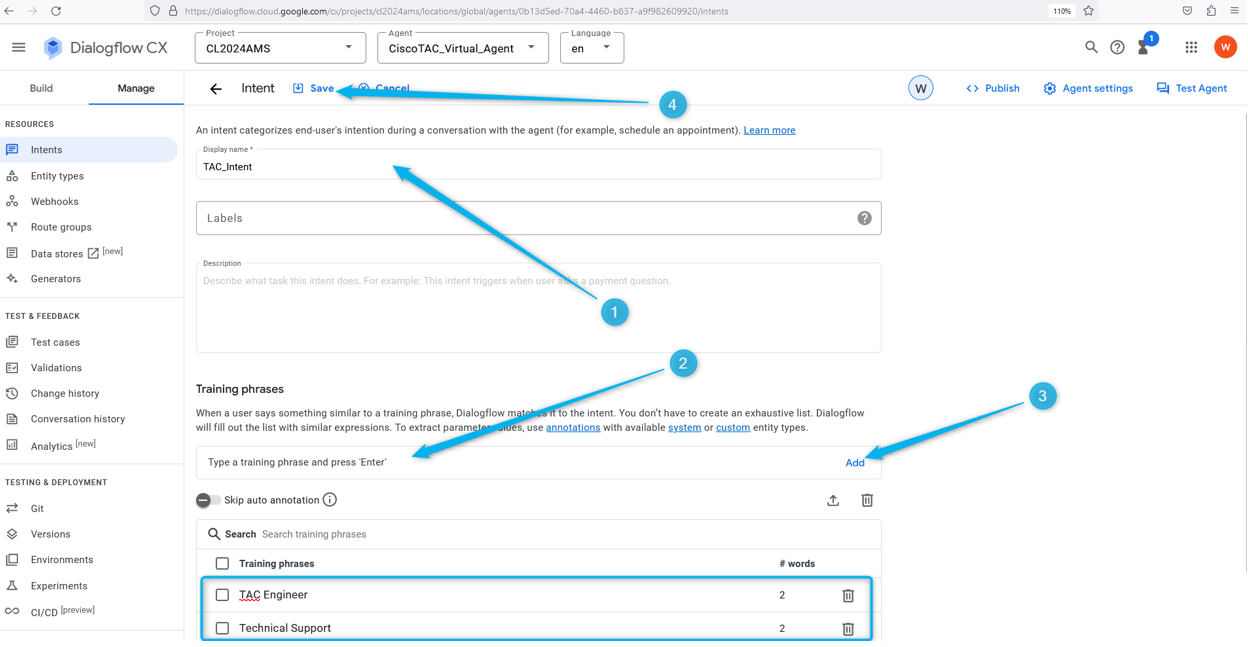
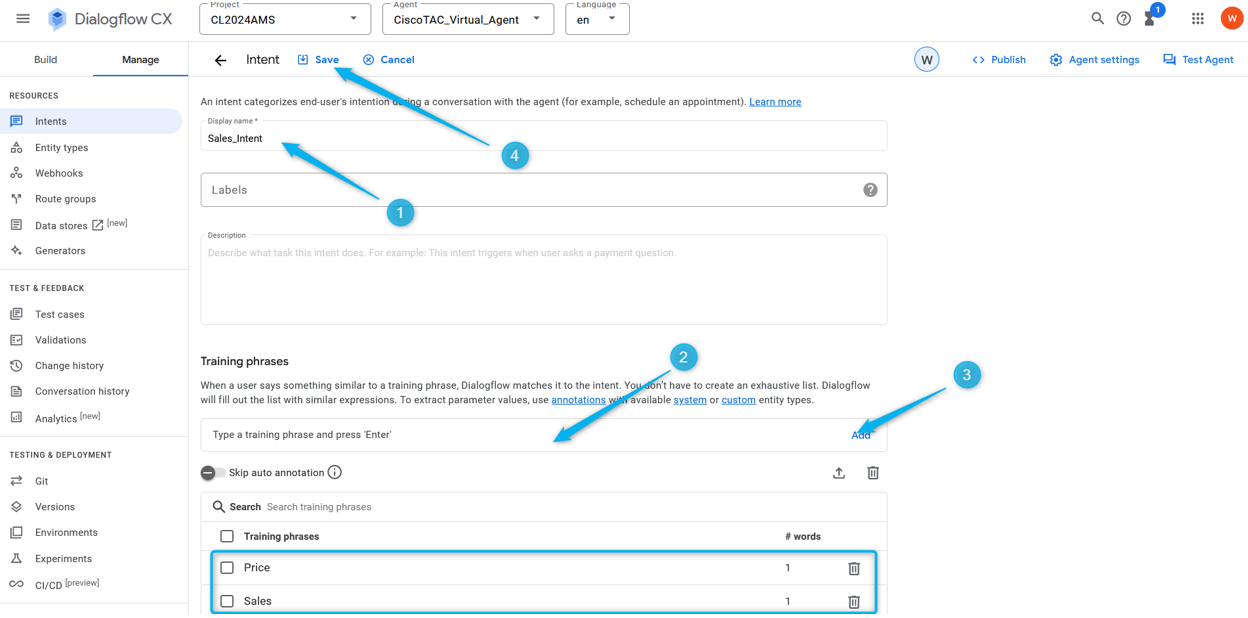
Step 1. Create two additional intents, TAC_Intent and Sales_Intent. Click on Manage, select Intents from the Resources list, and then click on Create.
Name the intent and provide some training phrases. For example, for TAC_Intent you can add the phrases like: TAC Engineer, Technical Support.
For Sales_Intent you can specify something like Price, Sales, and so on.
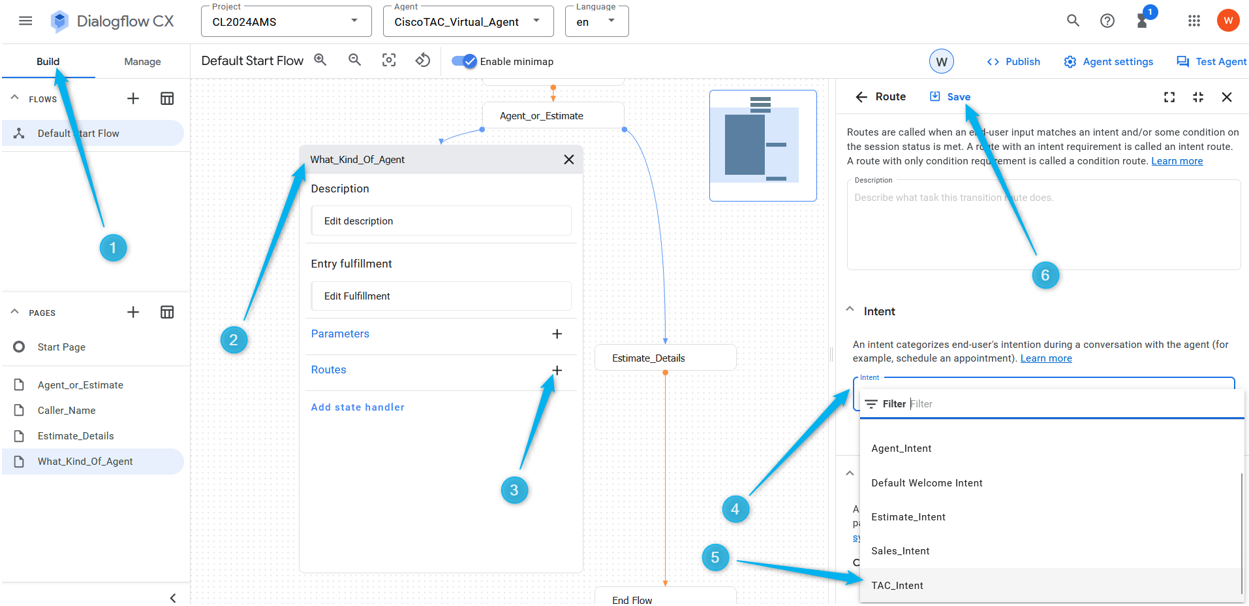
Step 2. Add Route for the TAC queue. Go back to the queue and click on the What_Kind_Of_Agent page. Then click on Add New Route and select the intent you created in the previous step for the TAC queue. Save the route settings.
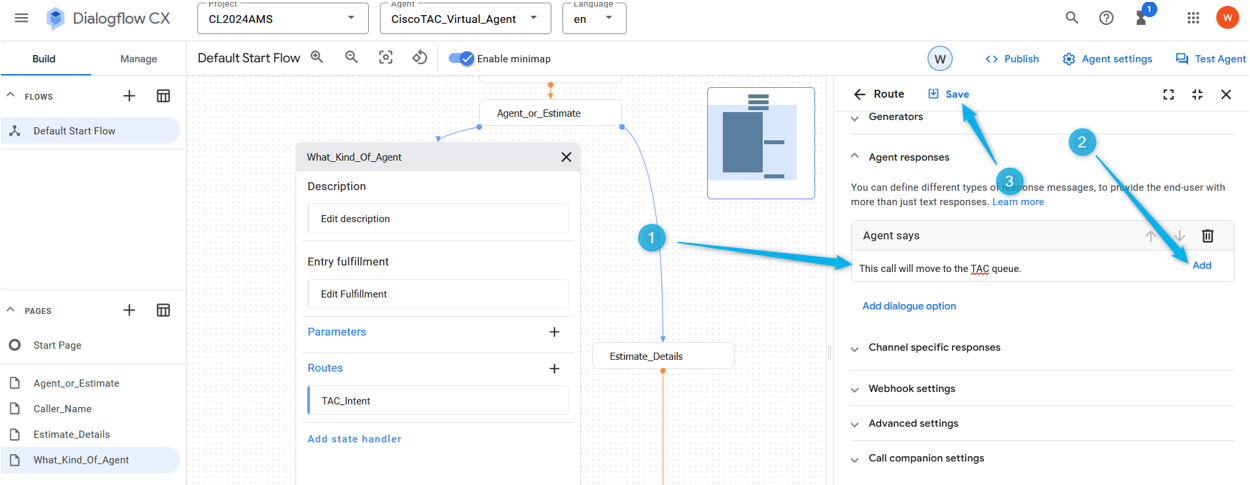
Step 3. Scroll down and add the agent response that the caller hears once the intent is triggered.
Step 4. Add the dialog option to move the call to the live agent by selecting Live agent handoff.
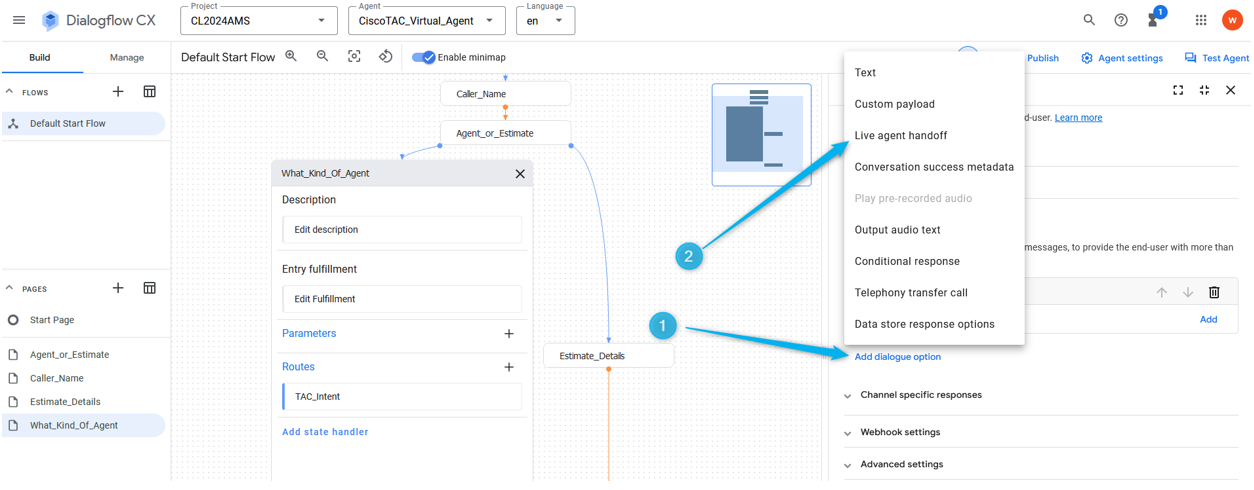
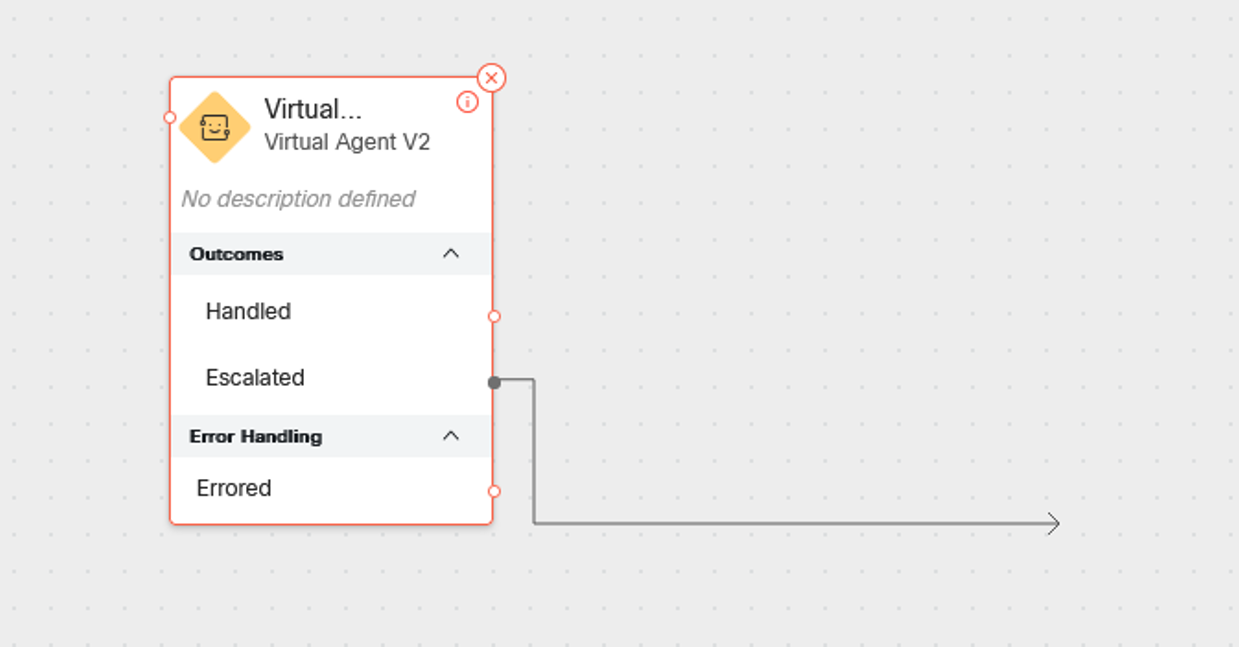
By selecting this option, the call moves out of the Escalate output of the Virtual Agent V2 block in the flow builder.
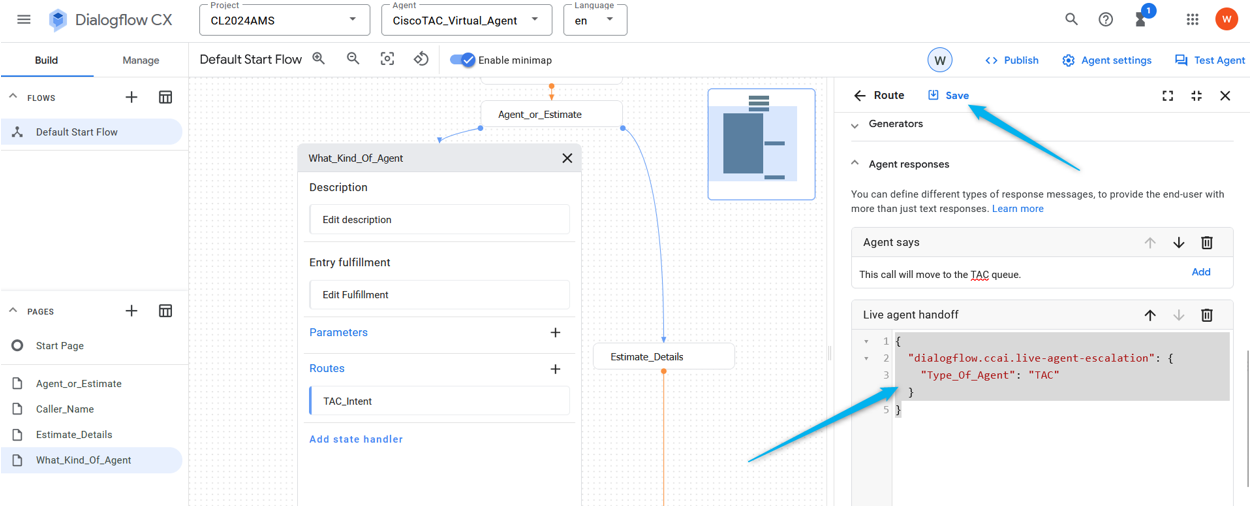
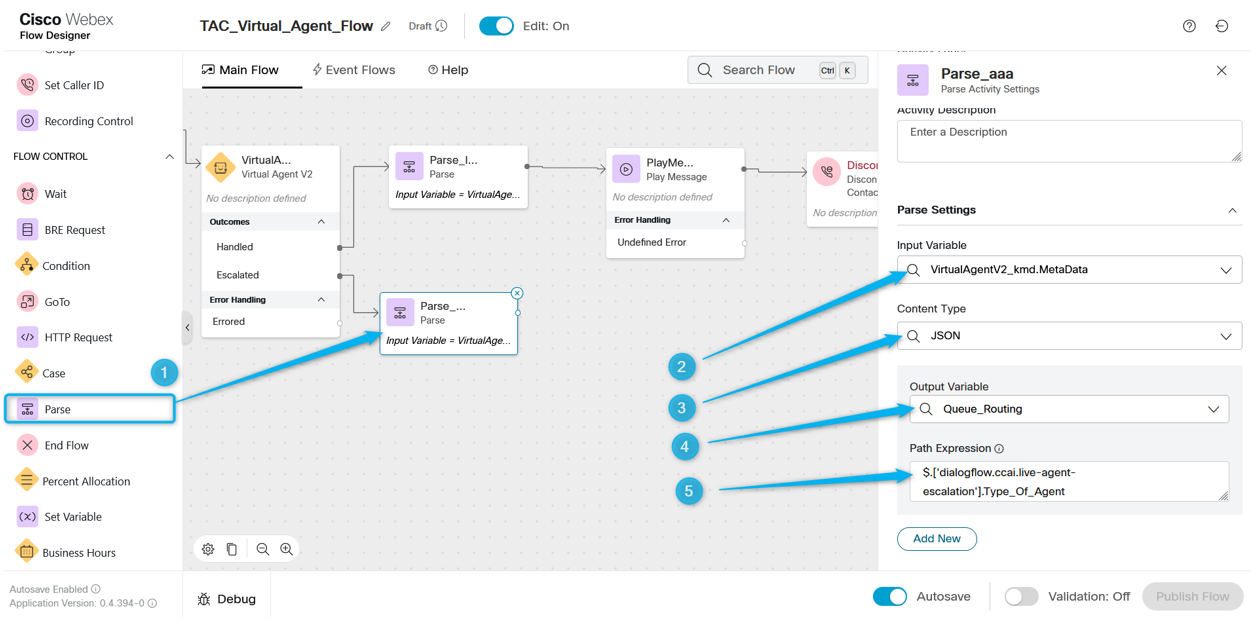
Step 5. In the Live agent handoff payload field, you can add the data in the JSON format which you can later parse in the WxCC flow. In this case, you need to add Type_Of_Agent (TAC). TAC which helps you to make the routing decision to the correct queue in the flow.
{
“dialogflow.ccai.live-agent-escalation”: {
"Type_Of_Agent": "TAC"
}
}
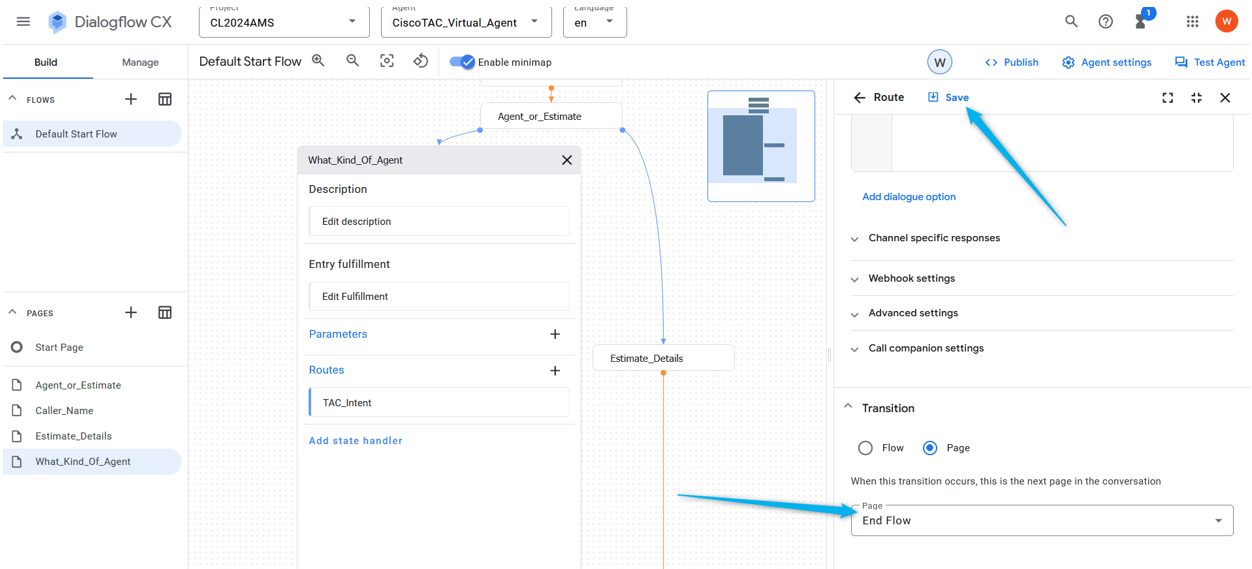
Step 6. End the flow on the Dialogflow side once the call is moved to the WxCC flow.
Step 7. Do the same steps to configure the Route for the Sales queue. Click on Add New Route. Select Sales_Intent and save the Route settings.
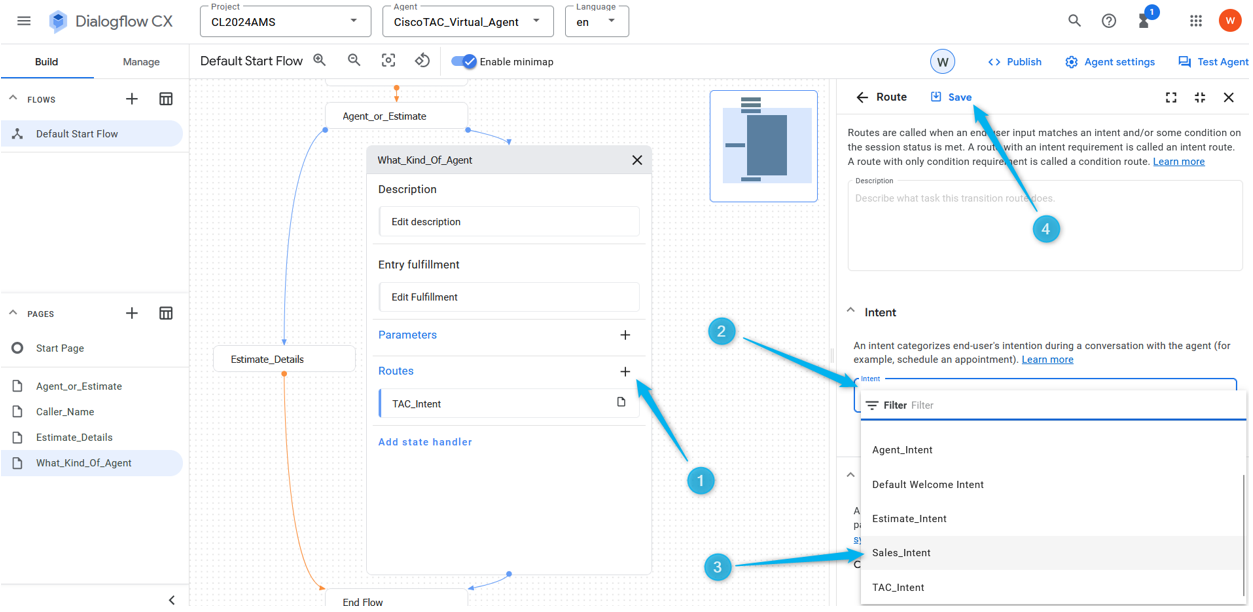
Step 8. Add the Agent response and Live agent handoff dialog option.
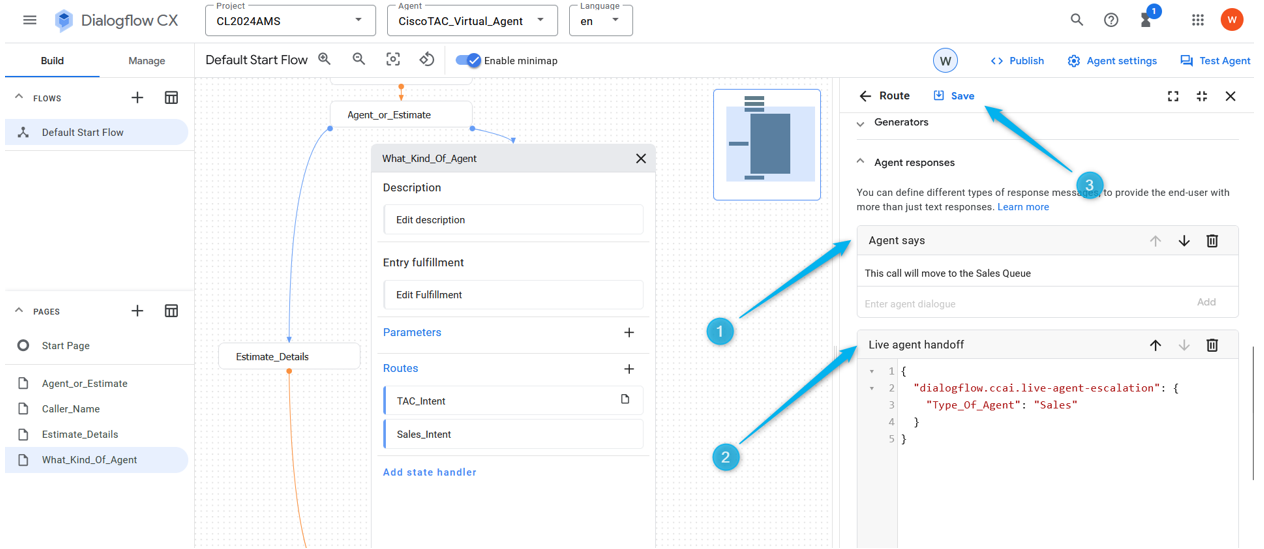
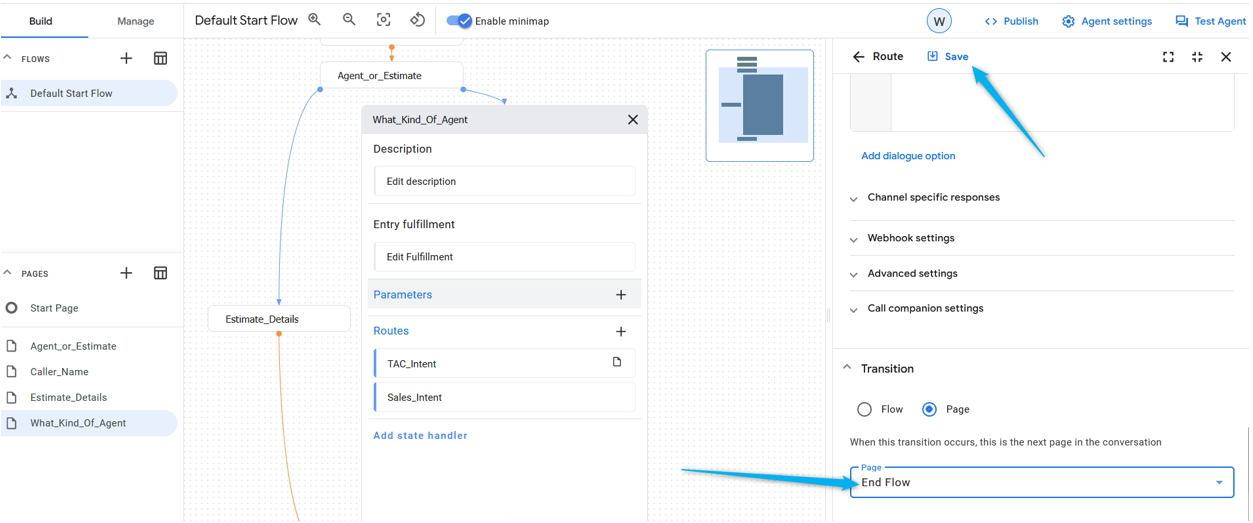
Step 9. End the flow for this page once the intent is triggered and the call is moved to the WxCC flow.
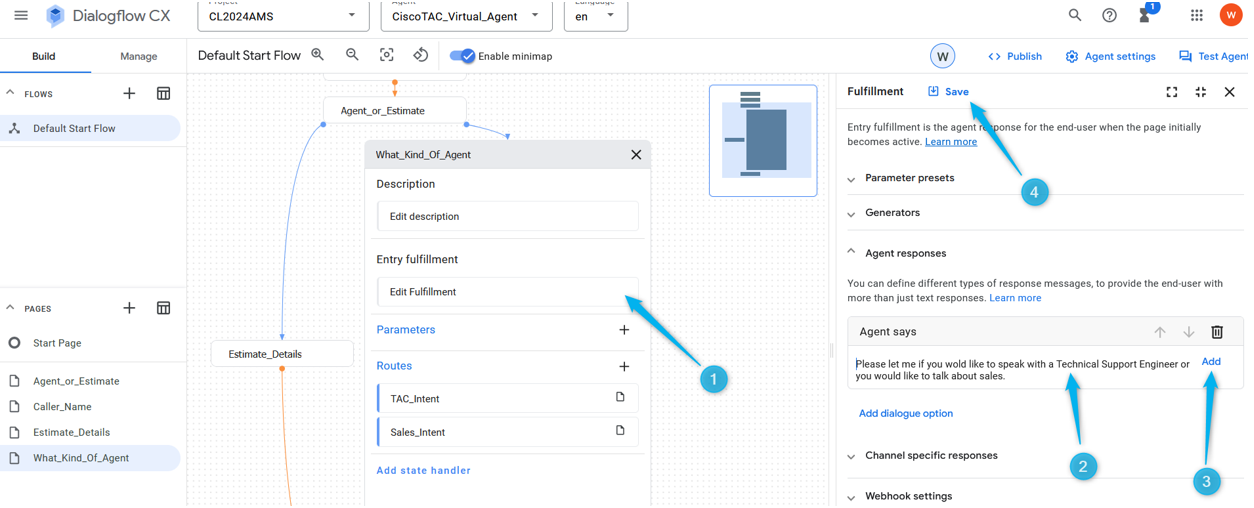
Step 10. Add the Entry Fulfillment to the What_Kind_Of_Agent page so the caller knows what kind of answer the Virtual Agent expects. Click on the Entry Fulfillment field and type, please let me if you would like to speak with a Technical Support Engineer or you would like to talk about sales.
Step 11. Test your Virtual Agent.
Configure Flow with Virtual Agent in Webex Contact Center Management Portal
Objectives
In this section, you can see how to build flow in Webex Contact Center Flow Builder with the Virtual Agent block which moves the call to queue with live agents or to estimate branch where data about the number of agents for the estimate can be extracted and used for Analyzer report.
Task 1. Create new flow.
Step 1. In the Webex Contact Center Admin portal open up the Routing Strategy Module and Create New Flow entry window.
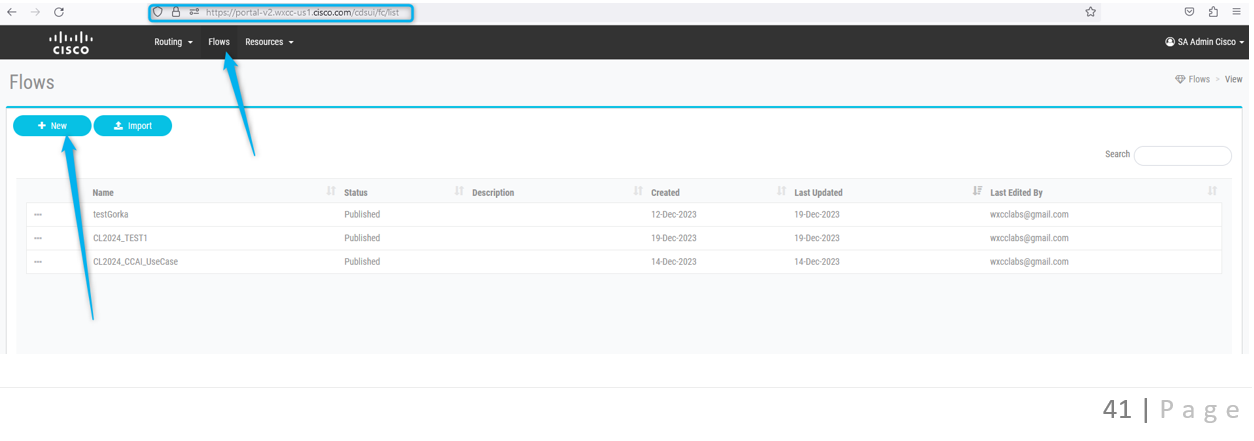
Step 2. Call the flow {Your Name}_Virtual_Agent_Flow.
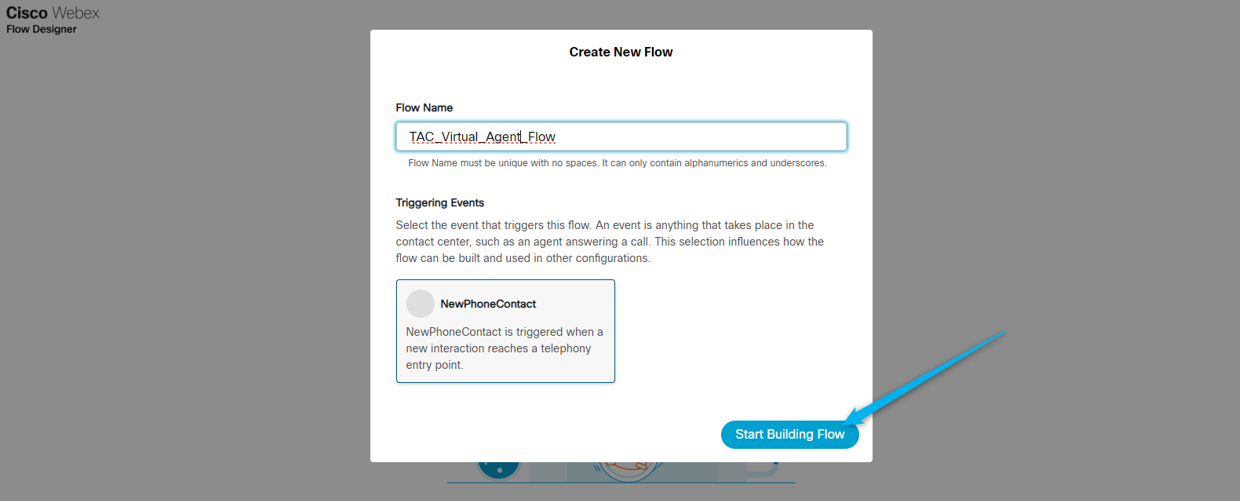
Task 2. Configured Handled path to extract estimate data for the Analyzer report.
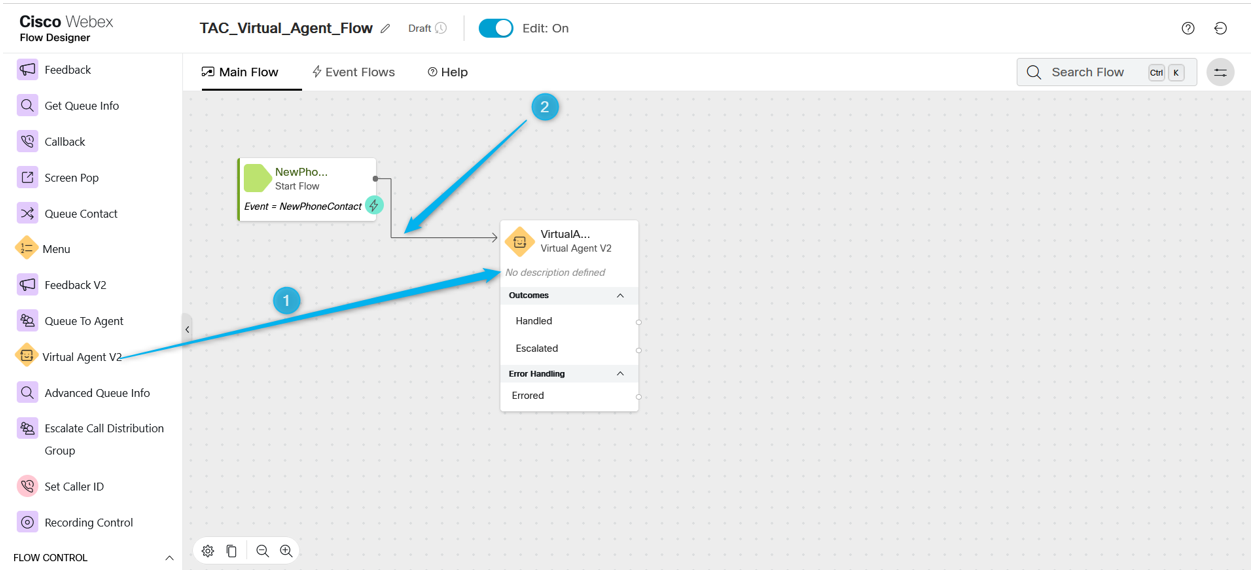
Step 1. Move the Virtual Agent V2 to the flow and connect it with the NewPhoneContact block.
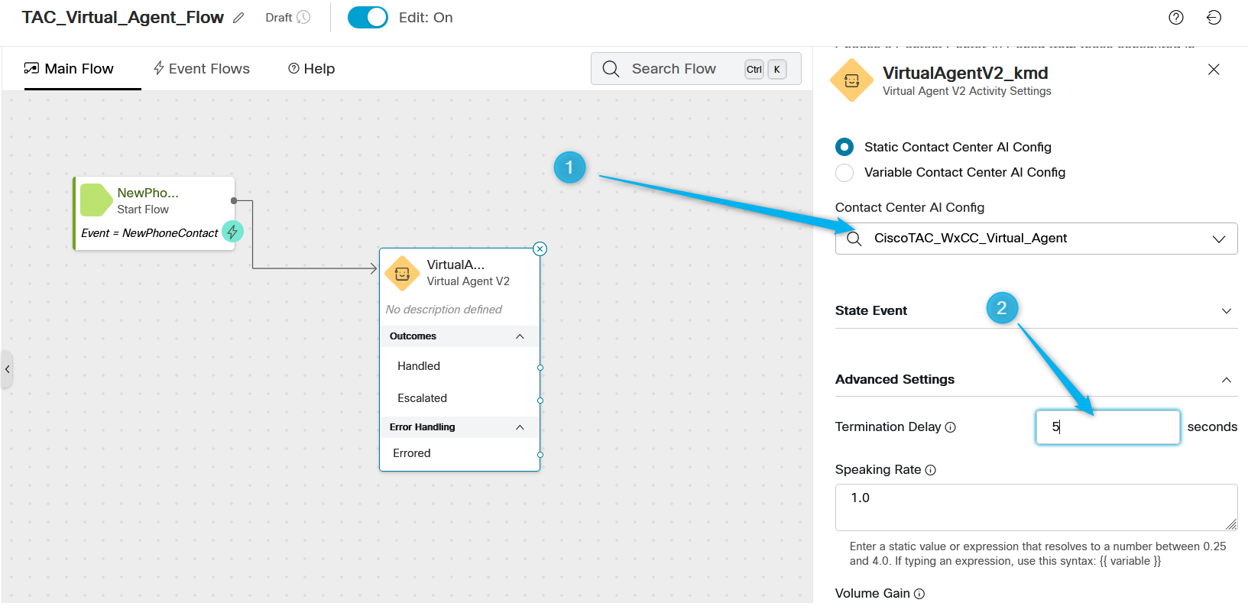
Step 2. Click on Virtual Agent V2 block and under the block settings select Contact Center AI Config which you created earlier or use the preconfigured Virtual Agent Dan_User1_Virtual_Agent. Also, click Advanced Settings and increase the Termination Delay time from 3 to 5 seconds.
Note: Termination Delay is the time range that must be set to allow completion of the audio prompt from the Virtual Agent in Dialogflow before the contacts move to the Webex Contact Center. For example, if in Dialogflow VA config there is a long response before the call goes to Live agent handoff, it cuts the response not finished and the call moves to the queue.
Step 3. (Informational only) Understand how the call-related data is moving from Dialogflow to Webex Contact Center.
When the conversation is transferred from Dialogflow to WxCC, it creates some output variable with data in JSON format which has been generated in the Dialogflow portal while the caller was interacting with the Virtual Agent. One of the output variables is VirtualAgentV2.MetaData. You can see it by clicking anywhere on the grey area in the Flow Builder and scroll down on the right window. This output variable contains the data you specified in the Custom payload.
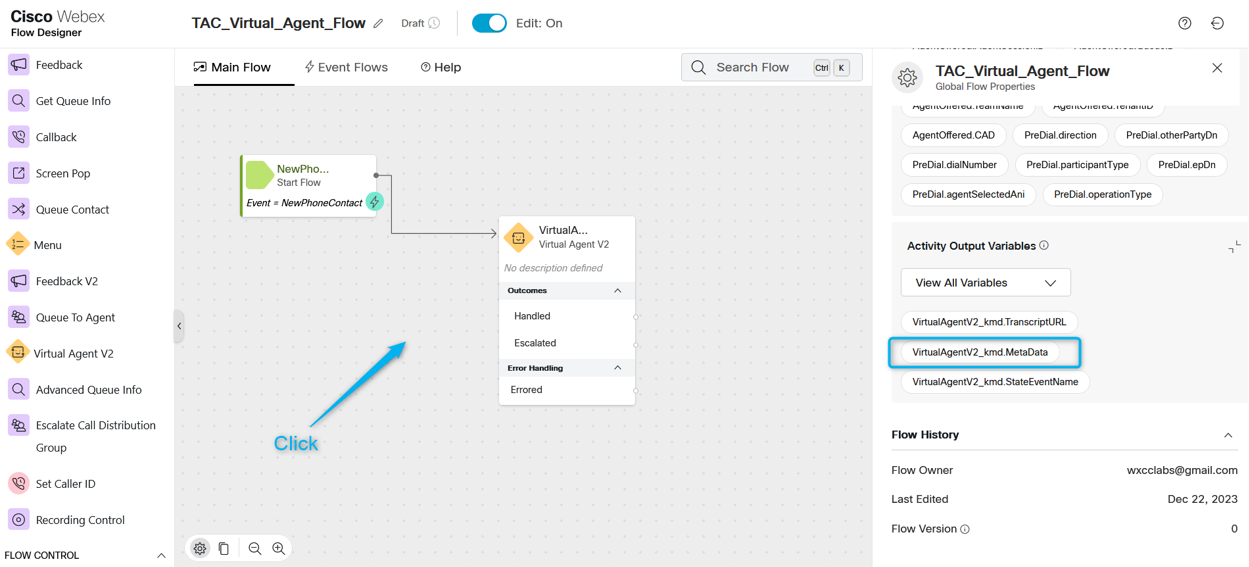
The goal here is to extract the information about how many agents the caller requested for the estimate. In the previous section, you have created the parameter with the name Number_of_Agents.
And you configure the Route with Custom payload where once the parameter is filled, the value of the parameter is assigned to the key Estimate_Agents_Count and then the call is moved to WxCC side.
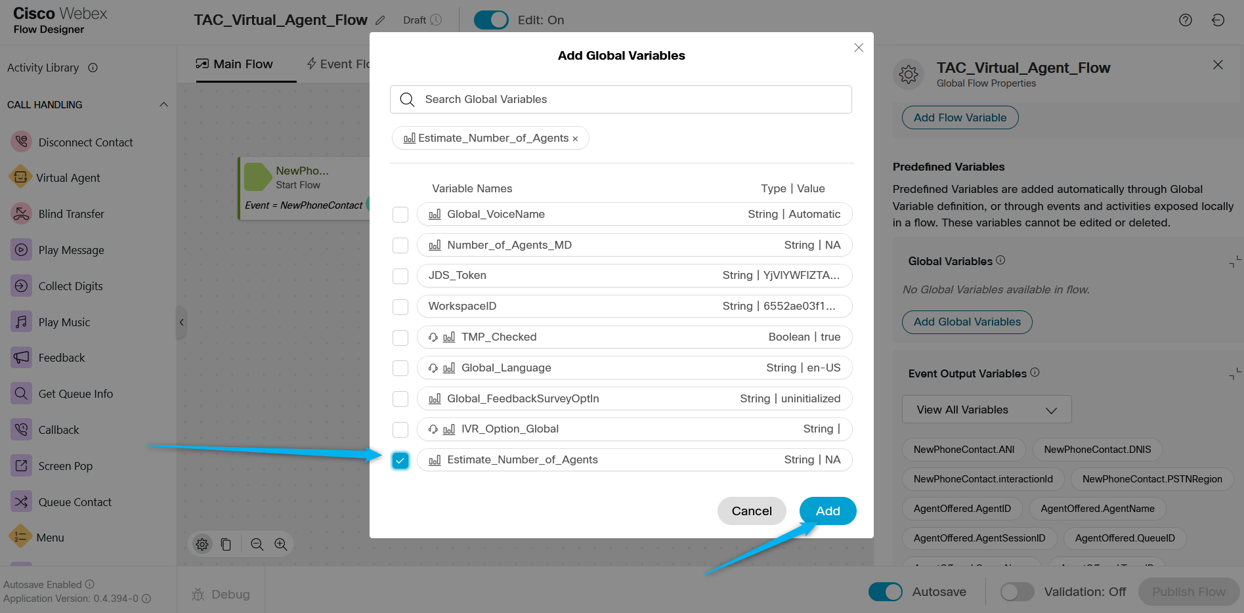
Step 4. Configure Virtual Agent Handled path to extract the estimate data and associate it with Global Variable. By parsing JSON data from the VirtualAgentV2_MetaData variable you can extract the value of the Number_of_Agents parameter value and assign it to the new variable on the WxCC environment. You also want the variable to be reportable, so you need to use a Global Variable. While in WxCC flow builder, cick anywhere on the grey area, and on the right window click on Add Global Variable.
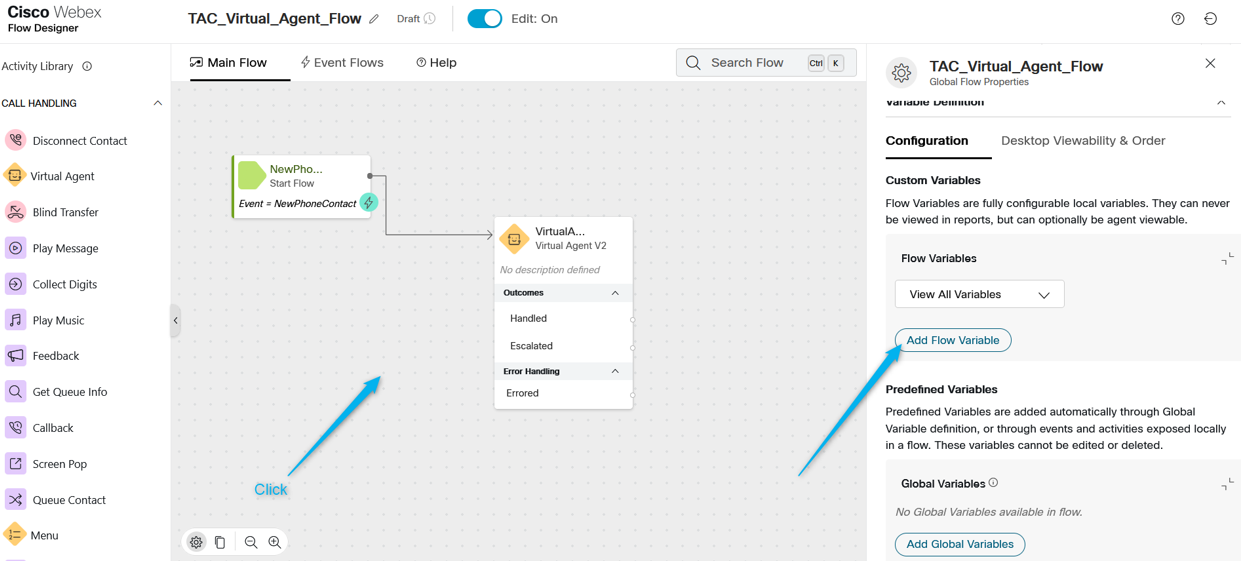
The Global Variable Estimate_Number_of_Agents needs to be created earlier in the WxCC Admin Portal. Then you just need to select it and click Add. This makes this Global Variable available for you to use in your flow.
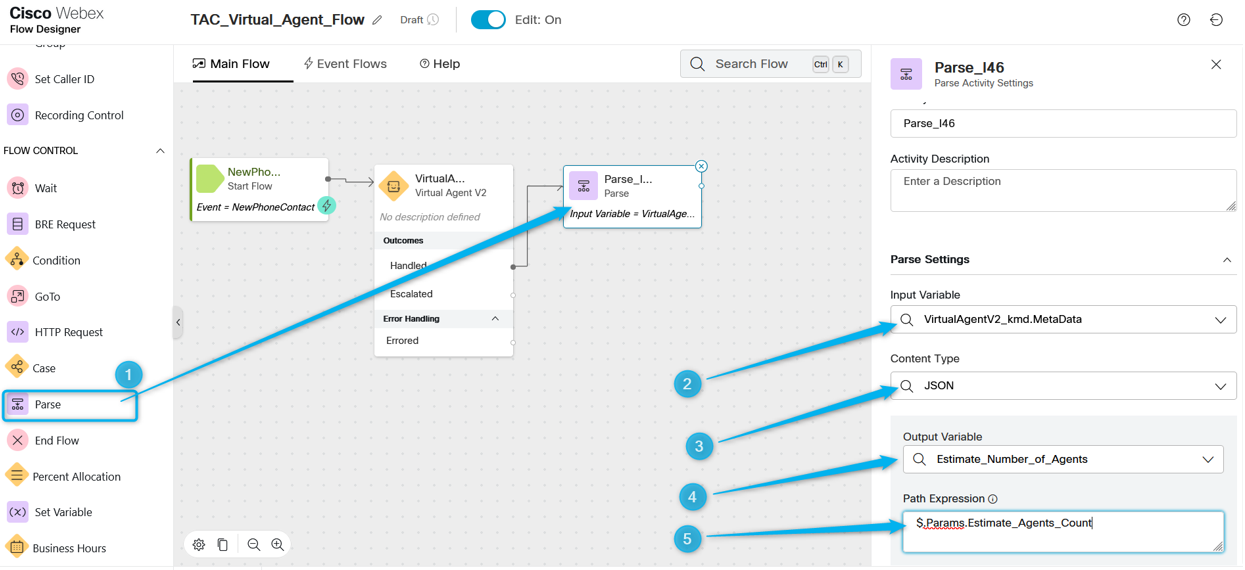
Step 5. Add the Parse node. In the Parse node select VirtualAgentV2.MetaData as the Input Variable, select from the list the Global Variable you added to the flow in the previous step as the Output Variable, and use this next string to parse the JSON data $.Params.Estimate_Agents_Count.
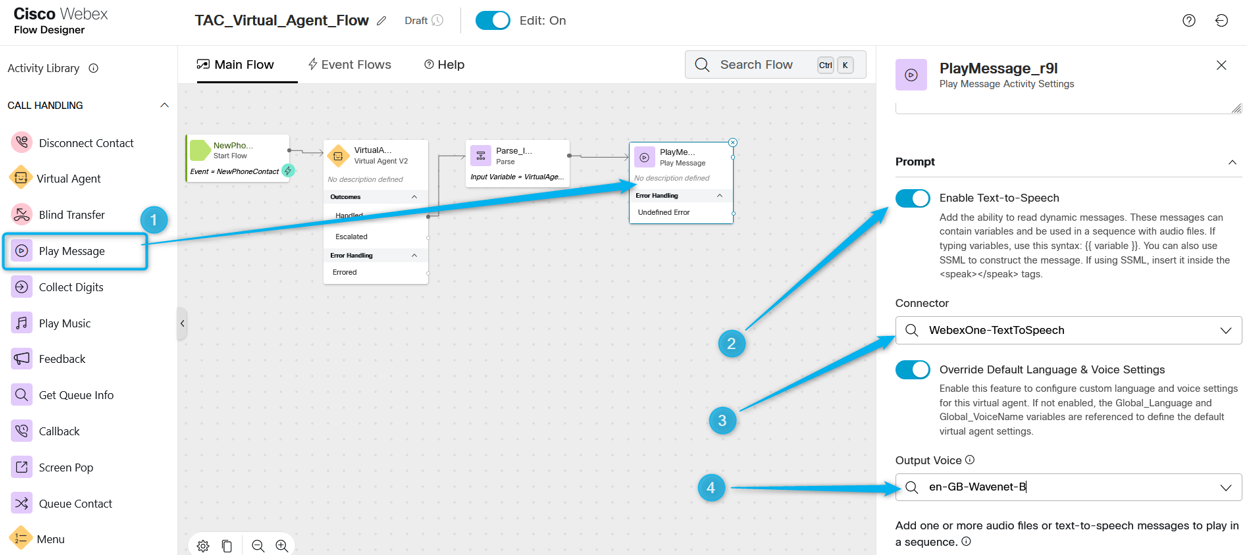
Step. 6. Use the Play Message node to validate the result and notify the caller. Add the Play Message node, Enable Text-to-Speech feature, select the TTS connector and choose Output Voice from the list.
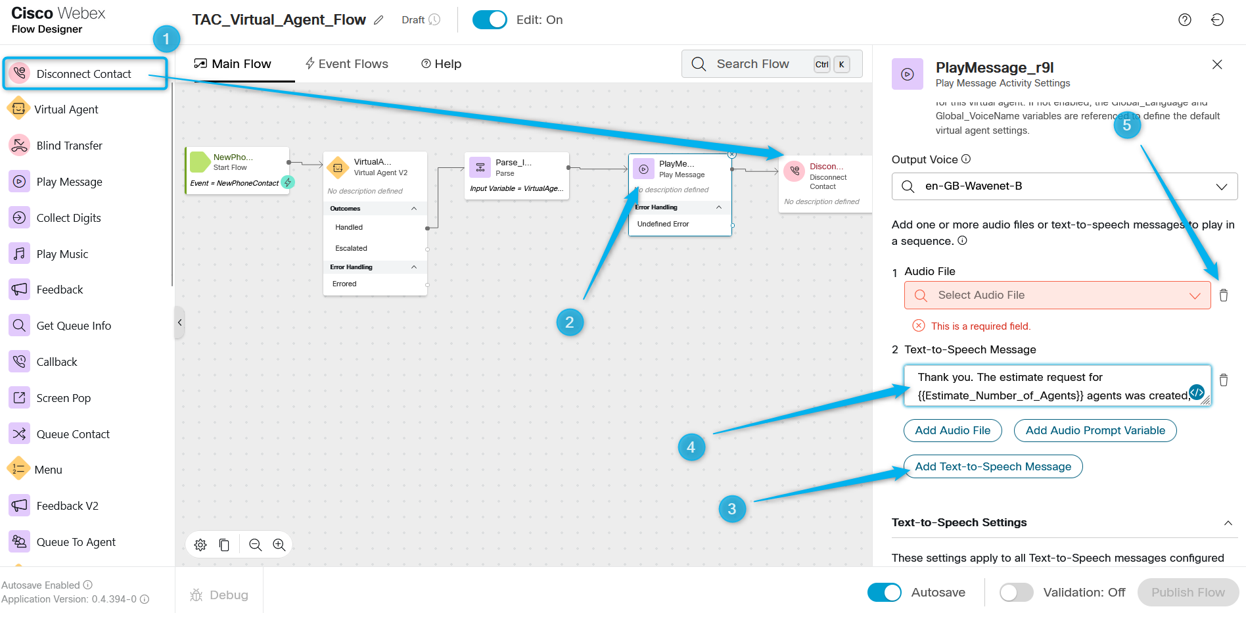
Step 7. Add Disconnect Contact node. Then click in the Play Message again, and add this Text-to-Speech Message, in the TTS field type, thank you. The estimate request for agents was created, and your team can reach out to you soon with the results.
Delete the Audio File option and publish the flow.
Task 3. Configured Escalated to move the call to the appropriate Queue with live agents.
Step 1. Create Flow variable and name it Queue_Routing.
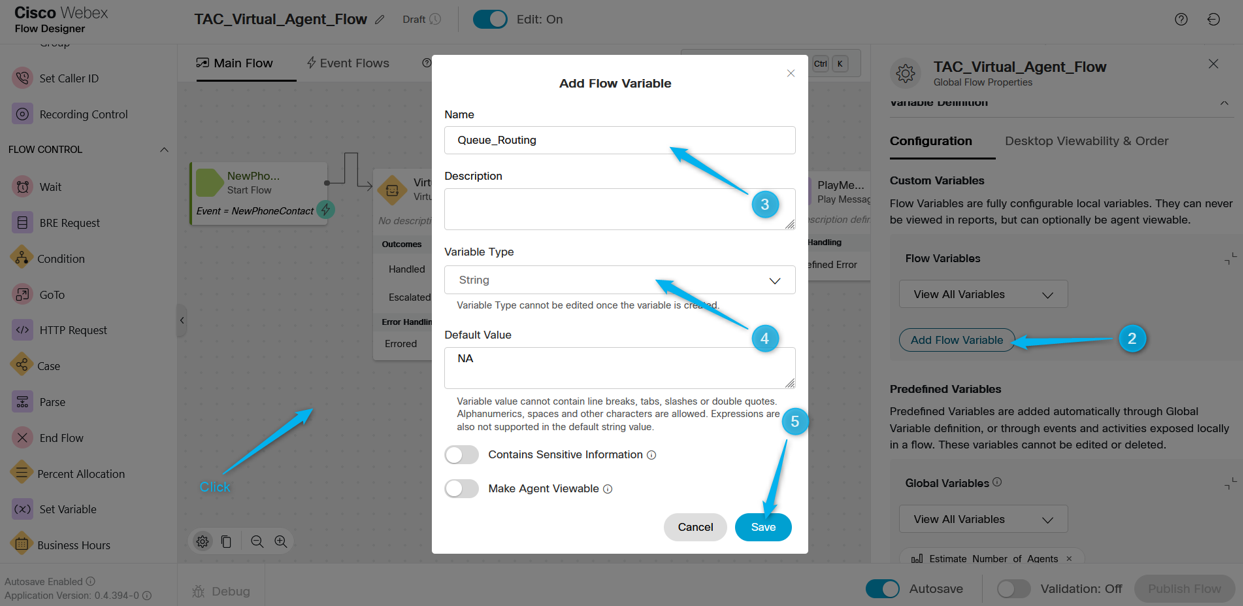
Step 2. Add the Parse node and configure it to assign the value of the Type_Of_Agent variable from Dialogflow to the Queue_Routing flow variable.
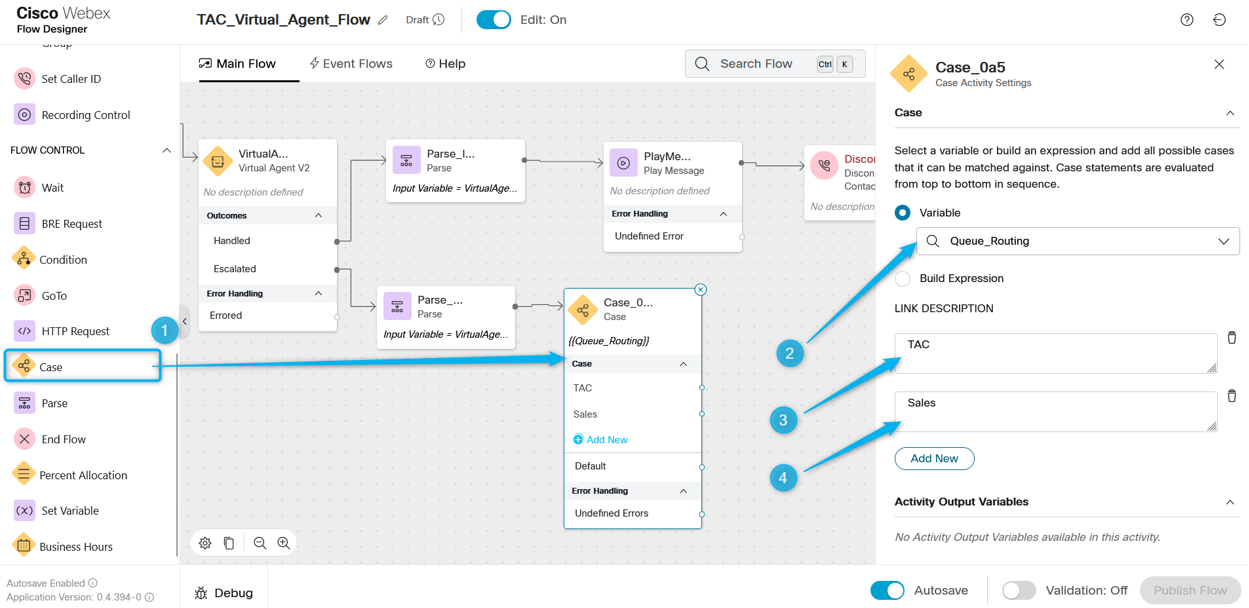
Step 3 Add the Case node and configure it with the variable Queue_Routing. In the link, Description configure values TAC and Sales as these are two values you move from the Dialogflow portal.
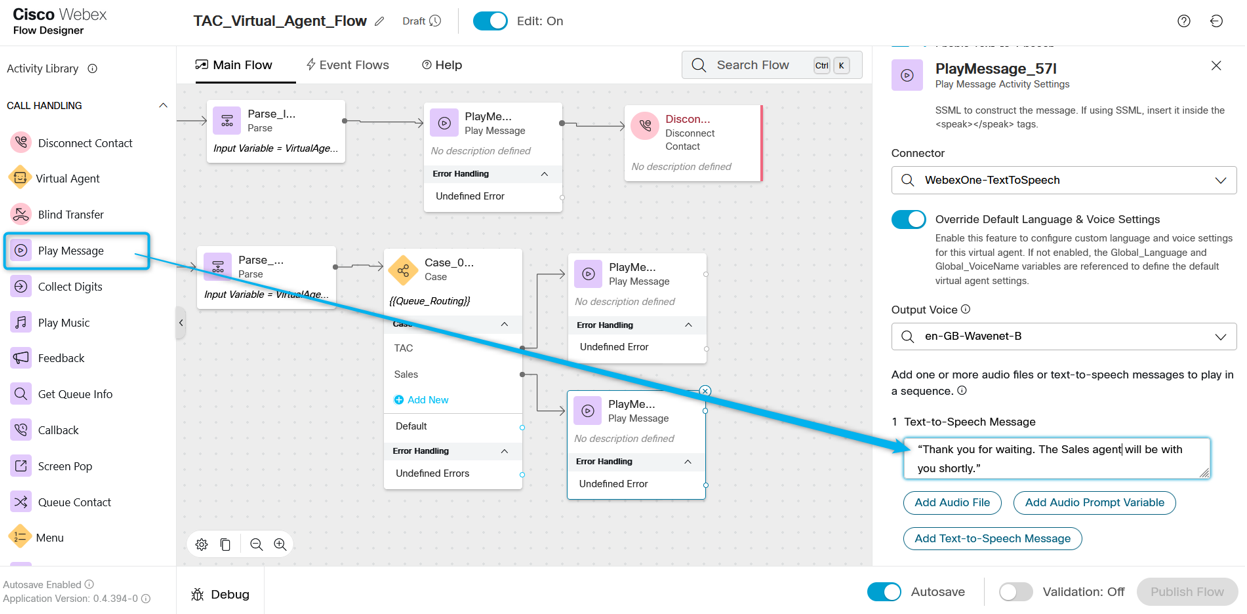
Step 4. Add Play Message nodes to verify the call goes to the TAC queue. Configure the Play Message node with TTS and type the text similar to this, Thank ou for waiting. The TAC engineer can be with you shortly.
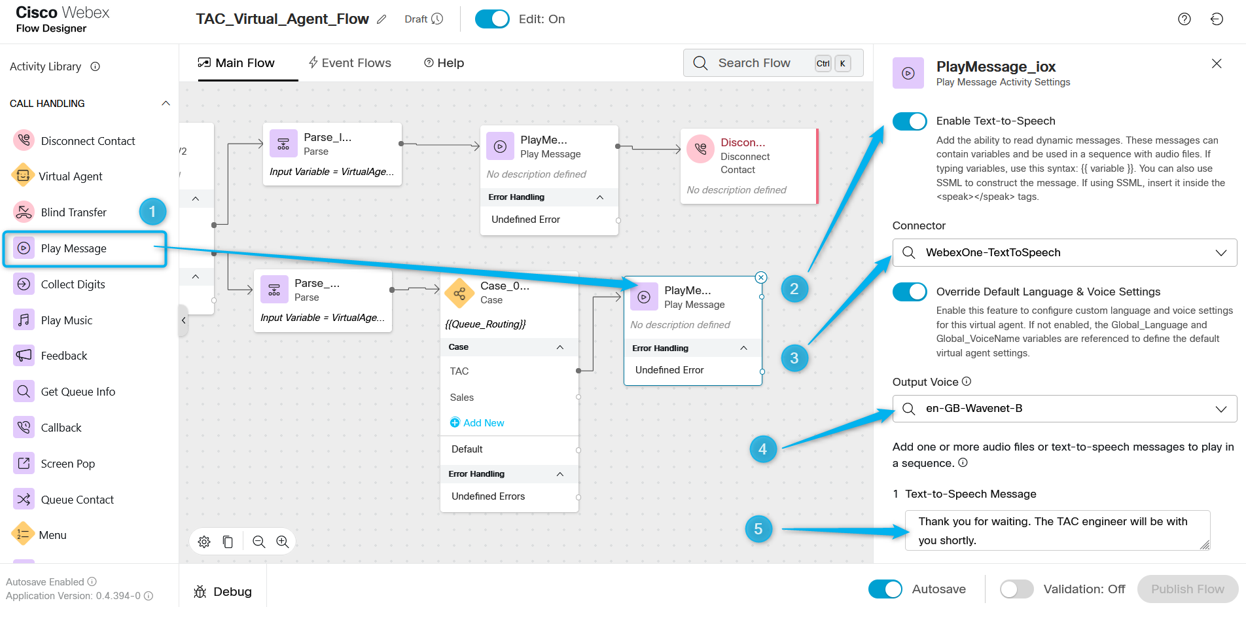
Step 5. Do the same for the Sales queue. Let the caller know that the call can be connected to the Sales agent shortly.
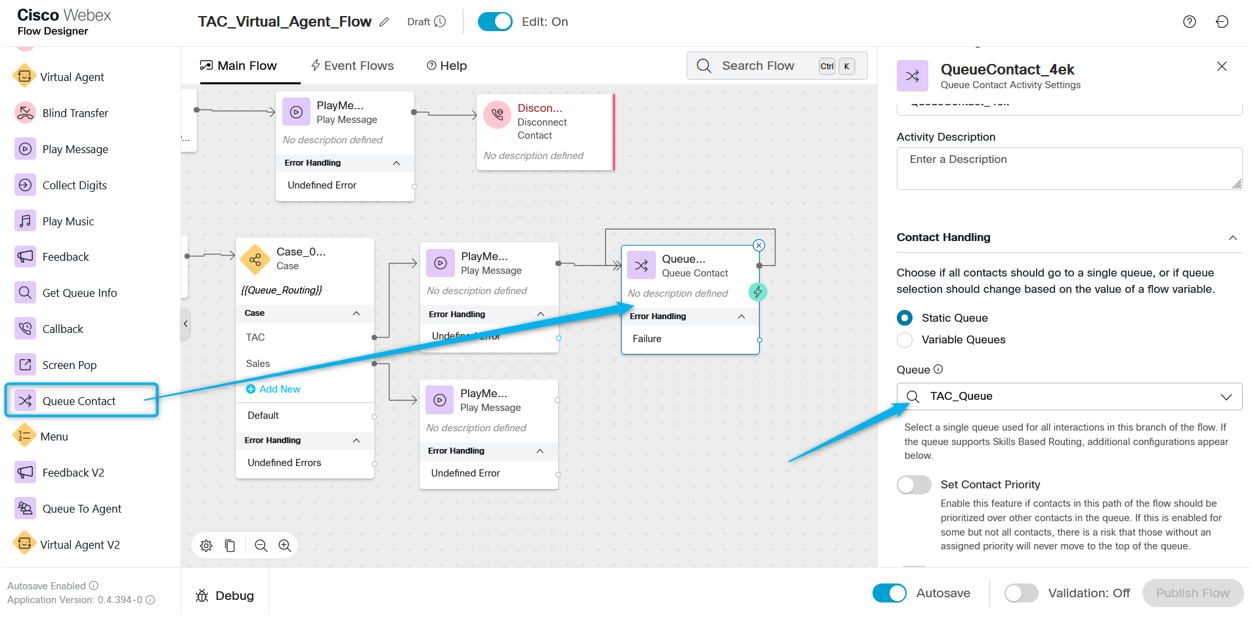
Step 6. Add Queue Contact block and configure it with the TAC_Queue.
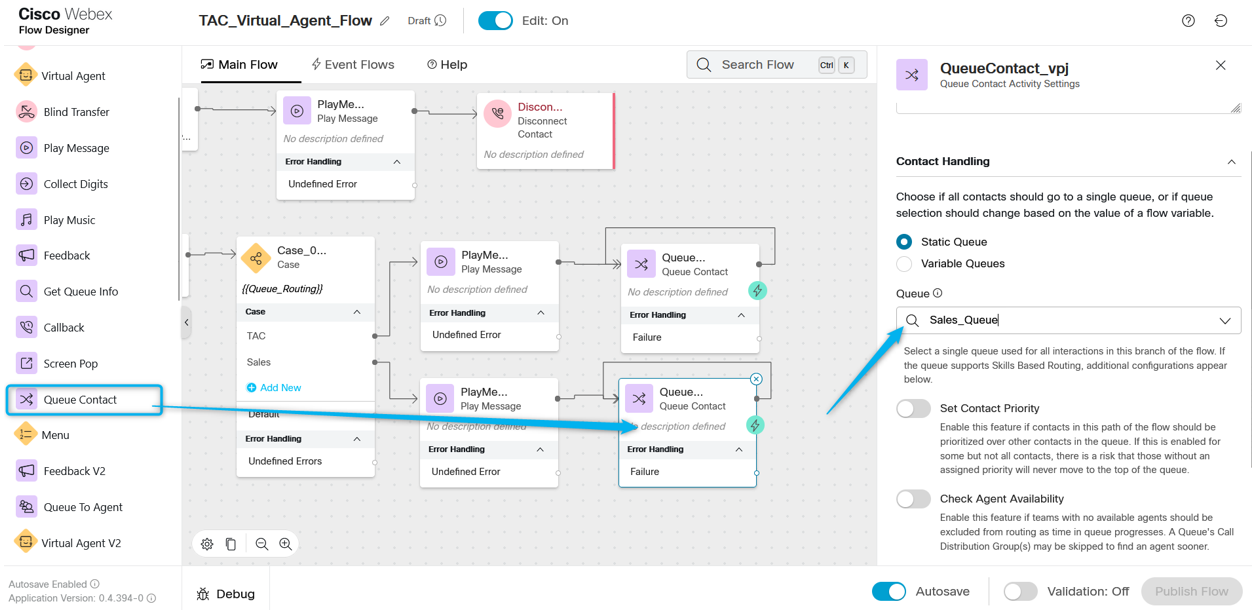
Step 7. Add additional Queue Contact and configure it with the Sales_Queue.
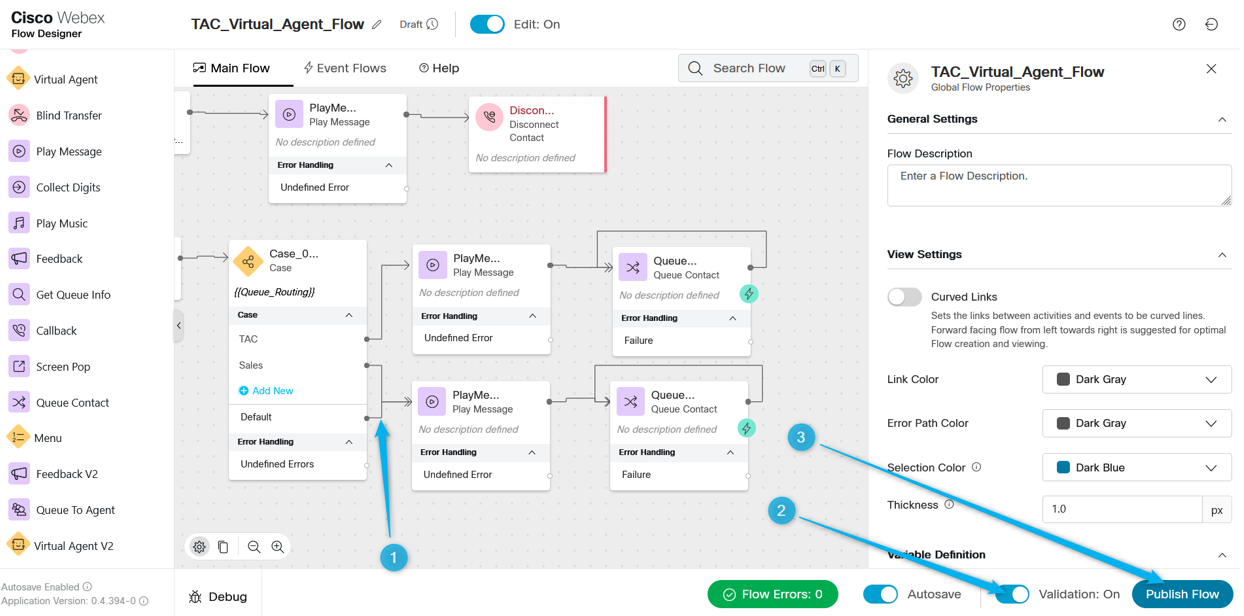
Step 8. Point Default output on the Case node to the Play Message related to the Sales Queue. Validate and click Publish the Flow.
Task 4. Add the flow to you Entry Point.
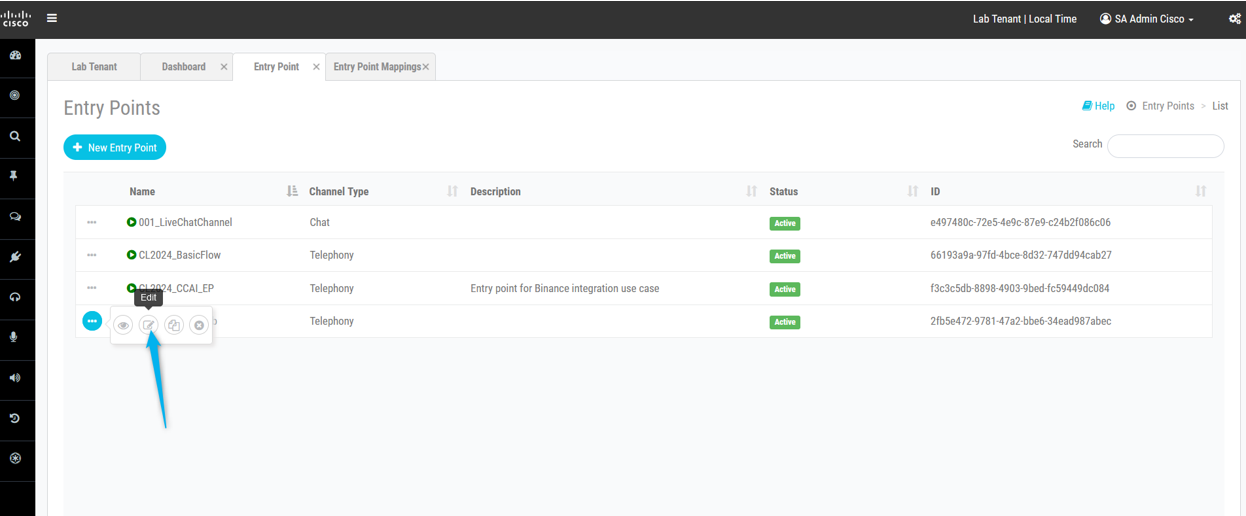
Step 1. Go to Entry Points and select your Entry Point. Click on three dots to edit the Entry Point.
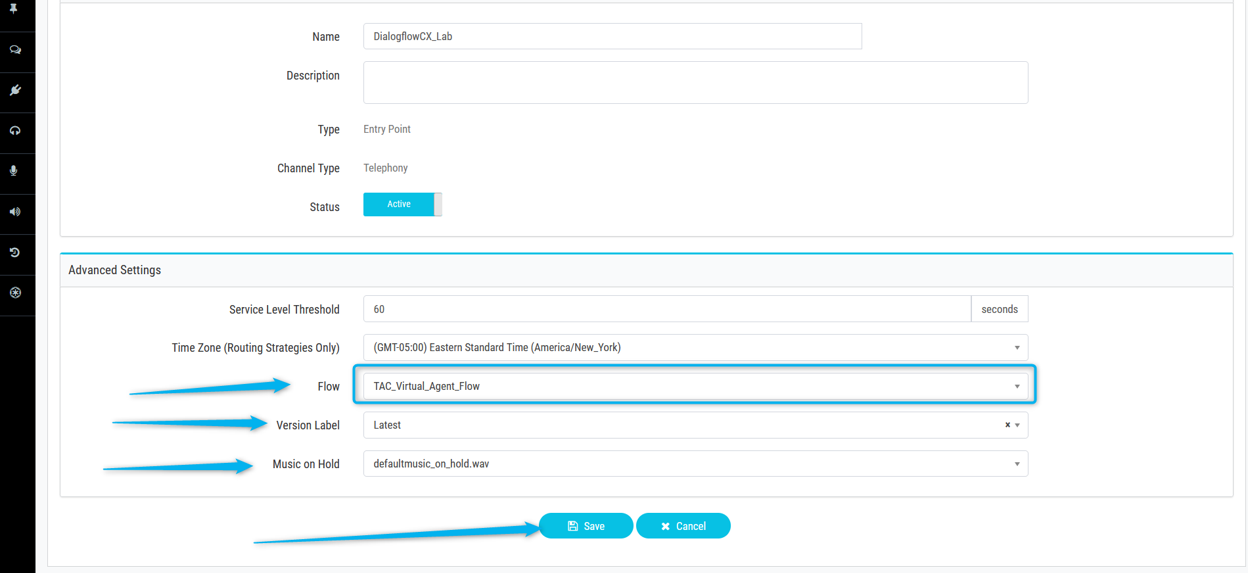
Step 2. Select the flow and other required fields and save the Entry Point.
Step 3. Configure Entry Point mapping for your Entry Point.

Task 5. Test your configurations.
After all these configurations are completed, call the DN related to your Entry Point and test the integration.
Congratulations, you have completed this lab! You can continue with the next one.

#