Lab 3 - Agent Desktop
Last modified: Wed, 27 Sept 2023
Overview of the lab:
In this lab, we will go through the Agents Desktop portal use in their daily basis. We will review how to complete some of the most common tasks and some more advance features will be introduced.
At the end of the lab, you should be able to handle calls as an agent, perform some useful agent tasks and create your cutomized Agent Desktop.
Table of Contents
| Topic | Lab Type | Dificulty Level | Estimated length |
|---|---|---|---|
| Agent Desktop Overview | Demo | EASY | 10 min |
| Basic Features | Practical Lab | EASY | 15 min |
| Custom Desktop Layouts | Practical Lab | MEDIUM | 30 min |
Introduction
Lab Objective
-
The objective of this lab is to get an idea about the Agents user journey, to familiarize with the platform they use and to explore some of the most useful new features they offer.
-
In the first part of the lab we will focus on explaining the different parts and and possible functions of Agent Desktop interface
-
In the second part of the lab, you will learn some of the basic functions that a user can perform as an agent: handle Incoming calls, making outdial calls and configure some User Profile setting
-
In the third part of the lab we will customize Horizontal header of the platform and also add some custom widget in the Navigarion bar section.
Pre-requisite
-
You need to have Webex App installed in your laptop or mobile phone to place calls. If you prefer, you could also do it from your phone number directly.
- You will need an extra device (your personal phone for example) to test Consult and Conference functionalities
-
For doing this lab, you must first complete the Lab 1: Control Hub and Admin Portal:
- You have the administrator’s access to the Tenant Management Portal.
- Agent and Supervisor users created and configured
- You have agent’s access to the Agent Desktop
- You have the supervisor’s access to the Tenant Management Portal.
- Agent is part of 2 Teams.
- Webex Calling extension is assigned to the supervisor user.
- You also must complete the Lab 2: IVR Contact Routing:
- Simple flow configured and making a call tested
- Global variables created as Agent Editable
- For Part 3 - Custom Desktop Layour, you should have a Webex Contact Center Analyzer Report. You can use the Stock Reports created by default or use your own custom Reports
How to create Analyzer Report on Webex Contact Center Analyzer
Quick Links
Control Hub: https://admin.webex.com
Portal: https://portal.wxcc-us1.cisco.com/portal
Agent Desktop: https://desktop.wxcc-us1.cisco.com
Developer Portal: https://developer.webex-cx.com
API Samples Git Repository: https://github.com/CiscoDevNet/webex-contact-center-api-samples
Widgets Samples Git Repository: https://github.com/CiscoDevNet/webex-contact-center-widget-starter/tree/master/Examples\
Lab Section
Please submit the form with your Attendee ID. All configuration items in the lab guide will be renamed with that prefix.
Agent Desktop Overview
Station Login
-
In order to access to the Agent Desktop you can do it either via the Management Portal (Desktop module) or navigating to the direct URL: https://desktop.wxcc-<DC>.cisco.com/
-
Once you’re in the login page, enter the agent credentials (username and password)
-
Based on the Voice Channel Options set at the Desktop Profile of the agent, the following telephony options can be:
- Dial Number: E.164 format phone number where agent will receive incoming and outdial calls.
- If your administrator configures the default Dial Number (DN), the default DN is prepopulated in the Dial Number and Extension fields.
- If your administrator restricts the DN to the default DN, you cannot edit the prepopulated DN when signing in to the Agent Desktop.
-
If you check the International Dialing Format box, you can choose the country code based on your geographical location from the drop-down list. You can also enter a country code or country name to filter the list. Dial numbers are validated based on the country code.
- Extension: Internal extension where agent will receive incoming and outdial calls. This option it’s just valid in case the agent is using Webex Calling or some other softphone as calling endpoint.
- Desktop: This is the new WebRTC option, it allows to receive inbound and make outbound calls through the internet, without the need of any phone or softphone. You can watch a Vidcast with the overview of this feature below.
- Dial Number: E.164 format phone number where agent will receive incoming and outdial calls.
</div>
-
Select one of the possible teams from the list. Agents can belong to multiple teams, but they can only receive calls of 1 specific teams
-
Check the Remember My Credentials box to save your station credential details for future sign-ins
-
Be aware that agents cannot access the Agent Desktop from multiple browsers or multiple tabs of the same browser window. In that case, a warning message will be displayed
The video below shows a demo about the agent login process and the available options:
Agent Desktop Interface
The Desktop UI language is based on the language preference settings on your browser. Currently, it supports 29 languages: Bulgarian, Catalan, Chinese (China), Chinese (Taiwan), Croatian, Czech, Danish, Dutch, English (UK), English (US), Finnish, French, German, Hungarian, Italian, Japanese, Korean, Norwegian, Polish, Portuguese (Brazil), Portuguese (Portugal), Romanian, Russian, Serbian, Slovak, Slovenian, Spanish, Swedish, and Turkish.
Watch the following video, where each of the sections and their main options are explained. You will get a better idea of how the Agent Desktop look like and how to use it:
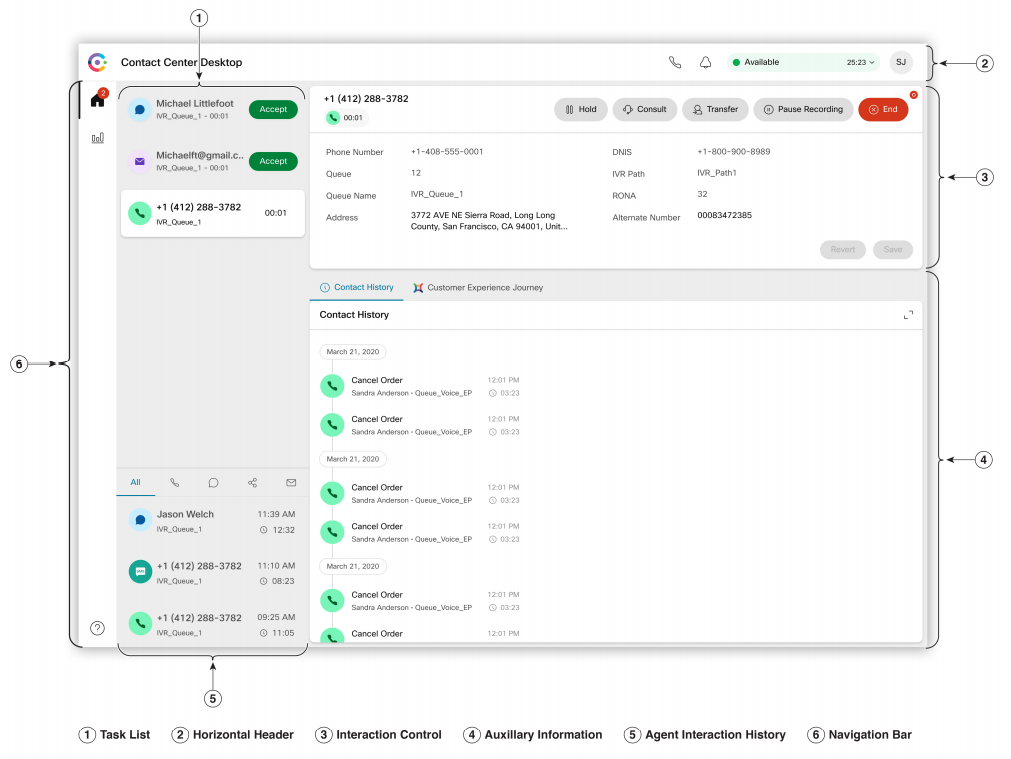
The Agent Desktop is divided in 6 sections. In the image above you can see a general view of the Agent Desktop and where each section is located. We explain them all shortly:
-
Task List: When a request is routed to your queue and you are Available, a new request appears in your Task List pane. You must accept the requests to start communication with the customer.
-
Horizontal Header: Basic functionalities such as: Title and logo, Agent availability state, Notification Center, Outdial and User Profile. We will explain more in detail some User Profile options in the next section of the lab.
-
Interaction Control: When you accept a voice call (inbound or outbound), by default, the Interaction Control pane is expanded. This pane includes: customer information (CAD variables), timers (for example: connected and call on hold time) and call control buttons (Record, Hold, Transfer…).
-
Auxiliary Information: The center pane displays details based on your selection of the contact card in the Task List panel. For Voice requests, it will display the customer contacts history. Whereas for any digital channels (email, chat or social messaging), you will see the whole conversation with the customer and you will be able to send new messages.
-
Agent Interaction History: You can view your previous contacts of the agent across all the channels (voice, email, chat, and social) in this pane. The pane displays details for the last 24 hours. Moreover, for Voice channel you can callback to the contact phone number.
-
Navigation bar: By default you can find the following icons here: Home, Agent Performance Statistics and Help. However, you can customize it and add some additional icons and widgets.
Calls Handling
In the following video you will see how to handle incoming calls and what are the different agent states:
Agent states:
-
Available: Indicates that you are ready to accept and respond to contact requests that are routed to you. After you sign in, you must select Available from the drop-down list to accept voice call, chat, email, and social messaging conversation requests.
-
Idle: Indicates that you are signed in but not ready to accept any routed requests. When you sign in to the desktop, your state is set to the default idle reason configured by your administrator.
-
RONA (Redirection on No Answer): Indicates that you have not accepted a voice call, chat, email, or social messaging conversation request within the specified time. Your administrator configures the time available to accept an incoming request from any channel. If you cannot accept the request within the specified time displayed in the timer, the action button on the popover flashes for a few seconds and your state automatically changes to RONA. The request is returned to the queue. When your state changes to RONA, a popover appears and you can select the state that you want to be moved: to Idle or to Available
-
Engaged: indicates that you are busy and connected with a customer. When you have accepted the contact request, the Available state changes to the Engaged - Available label. When you’re in this state, you can continue to receive active requests on other channels, depending on the channel capacity. If you don’t want to receive more requests, you can select any Idle state, so you will be moved to Engaged - Idle label.
Manage Voice Calls
-
Call Associated Data (CAD) variables: These variables allow the administrator to collect call data such as a case number or any action code of the customer. In Flow Designer, your administrator configures the variables, labels of the variables, and the order in which they must appear on the Interaction Control panel. While you are on a call, you can edit the CAD variables if your administrator configures the CAD variables as editable.
-
Hold/Resume: You can put the customer on hold so that you can consult with another agent or lookup additional information without having the customer listening to you. Click on Resume to take a call off hold.
-
Pause/Resume Recording: Your administrator can choose for each Queue either to record all the calls or not. In case the recording is enabled, the agent can Pause and Resume the recording.
-
End: After you have helped your customer with queries, it is a good practice to ask the customer to end the voice call. If necessary, you can also end the call. When the customer ends the call, agent will need to select some Wrap Up Reasons from the dialog box appears.
-
Consult: You can initiate a consult call with another agent while you are on an active call with a customer.
-
Transfer: If you cannot resolve a customer query and want to escalate the active voice call (inbound or outbound), you can transfer the call to another agent or supervisor.
-
Either for Consult and Transfer you have the following options:
-
Agent: You can either select an agent from the drop-down list, or use the search field to filter the list. The drop-down list displays the names of available agents.
-
Queue: You can select a Queue or Entry Point from the drop-down list, or use the search field to filter the list. The drop-down list displays the queues that are available to transfer the call.
-
DN: You can enter a name or number; select a name or number from the drop-down list; or use the search field to filter the list. The drop-down list shows the grouped list of contacts in your address book. Names are listed along with the numbers for the contacts in the address book.
-
-
Conference: To start a three-way conference call between you, the customer and another agent. For this option, you (primary agent) must have initiated a consult call. Click Transfer to transfer the call to the consulting agent. The consulted agent can exit the call by clicking Exit Conference, and the call continues between the primary agent and the customer. Only the primary agent can end the Conference.
-
Only when using WebRTC:
-
Mute/Unmute: Agents can silence themself in case they don’t want to be heard for a moment. Similar as the function in Webex Calling/Meetings.
-
Keypad: In case agent needs to insert some digit or number during a call. Similar as the function in Webex Calling/Meetings.
-
Basic Features
| Entity | Name |
|---|---|
| Agent 1 | wxcclabs+agent_ |
| Supervisor 1 | wxcclabs+supvr_ |
| Desktop Profile | |
| Entry Point | |
| Queue | |
| Team 1 | |
| Team 2 | |
| Outdial ANI | |
| Outdial ANI Entry 1 | |
| Address Book | |
| Address Book Entry 1 | |
| Multimedia Profile |
NOTE: Please create all the tenant entities following the naming convention mentioned specified in the table above. Your attendeeID is provided in the email in the “Attendee ID” line.
Be aware that all entities that don’t match with attendee IDs will be deleted
Testing Incoming call
In this section, you will will interact as an agent and test an Incoming call. Review the video of the lab section above to understand the different call handling options.
If you’re using the shared lab tenant, we propose to complete the lab using Desktop (WebRTC) telephony option.
If you’re using your Gold Tenant, be aware that WebRTC option only works with RTMS media stack. Firefox browser is still not supported.
-
In order to test properly an incoming call, first we need to make sure that we have all the call handling options enabled
-
Login with your administrator user in the Control Hub and navigate to Services > Contact Center > Settings > Desktop
- Make sure that
End CallandEnd Consultare enabled - You can also configure Auto Wrapup and RONA timeouts
- Make sure that
- Now open the Management Portal and navigate to Provisioning > Desktop Profiles and edit your Desktop Profile:
- In the Collaboration tab:
- Set the Buddy Teams to
All - Enable
Consult to Queue
- Set the Buddy Teams to
- In the Voice Channel Options tab:
- Set the options you want to enable: Dial Number, Extension or Desktop
- In the Collaboration tab:
- Navigate to Provisioning > Queue and edit your Queue
- Enable
Permit Recording, Record All Calls and Pause/Resume- Make sure that these settings are also enabled at tenant level
- You can also set the Recording Pause Duration. This is the maxiumum duration that an agent can pause the recording
- Enable
- Now place it’s time to test the incoming call
- Login the Agent Desktop with yourAgent1 user
- Select
Desktopas telephony option - Under User Profile > User Settings, click on Speaker and Microphone to set them
- Click on Test Your Network option, under Help, to check your internet connectivity speed, latency and jitter
- Move to
Availablestate - Make a call to the DN mapped to your EP (You should have mapped your EP in Lab 2)
- We suggest to use the Webex App installed and enabled for your Supervisor user to place the incoming call. If you prefer, you could also do it from your phone number directly.
- Accept the call from the Agent Desktop
- Check the CAD variables and try to edit any Global Variable
- Change to
Engage - Idle. This way you will not receive any other digital channel requests
- Let’s play with the call interaction buttons
- Click on
Holdto pause the conversation with the end-customer and click onResumeto talk with him again - Click on
Pause Recording, say some personal infor and click again onResumeto continue the recording - Click on
Transferand select theWelcome_EP- End-customer be redirected to a common EP already created
- End the call (this can be done from customer or agent perspective) and select any Wrap-up code
- Click on
For this part, you will need a third calling device for interacting as a Supervisor
- Now, using a different browser, login in the Agent Desktop with your Supervisor user and move to
Availablestatus- In a separate device (you mobile phone for example), login in Webex App with your Supervisor user
- Place the call from the third calling endpoint (your personal phone for example)
- Try
Consult, Conference and Transferfunctions between End Customer, Agent and Supervisor.
Exploring User Profile
In this section, we will explore what are the available options and settings under the User Profile.
- First, we will see how to change from one team to another one
- In order to notice some difference when we make the Team change, we need to modify some setting from your Team 2 (created in Lab 1) . For that, we will assign a different Multimedia Profile to that team.
- Navigate to the Management Portal > Provisioning > Teams
- Find your Team 2 and click on
Edit - Check your User settings and make sure that there is not Multimedia Profile assigned. User settings have preference over Team setting, so the Multimedia Profile at User level will be applied.
- Change the Multimedia Profile of the team from
<w class="attendee_out">AttendeeID</w>_MMPtoDefault_Telephony_Profile
- Find your Team 2 and click on
- Now, login in the Agent Desktop selecting
AttendeeID _team1- Open your User Profile and check that the Channel Capacity
- Now, click on your Team, you will see a dropdown list with other available Teams
- Click on
AttendeeID _team2 Save Team Selectionto confirm that you want to change a team
- You will see notification appeared in the Notification Center
- You can change the Notification settings to disable the incoming notifications or the sound
- Mark the notification as
Read - Go to the User Profile and check the Channel Capacity again, it’s different
- Test some additional options:
- Switch to Dark Mode
- Keyboard shortcuts
- Download error log
Outdial
In this section, we will test Outdial calls using different Outdial ANIs and Address Books.
- Navigate to Management Portal > Provisioning > Outdial ANI
- Click on
New Outdial ANI - Name:
AttendeeID _outdialANI - Add Outdial ANI entry
- Name:
AttendeeID _outdialANIEntry1 - Number: Select your mapped DN
- Name:
- Click on
- Navigate to Management Portal > Provisioning > Address Book
- Click on
New Address Book - Name:
AttendeeID _addressBook - Parent Type:
Site - Add Address Book entries
- Name:
AttendeeID _addressBookEntry1 - International calls are disabled, so only US numbers are supported. For example: +18662293239 (Cisco Helpdesk)
- Name:
- Click on
- Navigate to Management Portal > Provisioning > Desktop Profiles
- Search for your Desktop Profile and make sure that Outdial is enabled and
Outdial Entry Point-1(created by the system) selected - Select your Outdial ANI
- Search for your Desktop Profile and make sure that Outdial is enabled and
- Navigate to Management Portal > Tenant > Settings
- See the number of the Default Outdial ANI
This is a required setting at tenant level, so PLEASE DON’T EDIT IT
- Now, login in the Agent Desktop with your Agent1 with the Webex Extension of the Agent
- Open the Outdial on the Horizontal Header
- Input your personal phone number
- Don’t select any Outdial ANI
- Click on the telephone button to place the call
- The call will be delivered to your phone number from the Default Outdial ANI defined at Tenant level
- Now repeat the same but choosing your Outdial ANI configured before. You will see that the call is coming with a different ANI
- Finally, let’s see how Adress Book works
- Open the Outdial window and swith to the Address Book tab
- You will see the the list of entries of
AttendeeID _addressBook configured before - You can search by entry name or DN
- Try to call any of the numbers in the list
Custom Desktop Layout
Basic JSON elements
The following are the top-level and most important properties to know for JSON layout:
-
appTitle: To specify a title on the horizontal header of the Desktop. The default title isWebex Contact Center. -
logo: To specify a URL for the company logo. If you do not provide a URL, then the Webex Contact Center logo appears by default. -
taskPageIllustration: To specify a custom illustration for the task page based on organization preferences and brand alignment. When an agent signs in, the task page displays the configured illustration as a background. By default, the task page appears without illustration. -
stopNavigateOnAcceptTask: To determine whether to shift the focus to a newly accepted task, when the agent accepts the new task while working on a previous task. The default value isfalse. -
dragDropEnabled: To enable the drag-and-drop and resizing of the widgets on the custom pages, set the value totrue. The default value isfalse. -
notificationTimer: To set the duration (in seconds) after which the desktop notifications on the Desktop are automatically dismissed. The notification appears at the top-right corner of the Desktop. The default timeout value is 8 seconds. The valid range for timeout values is 1-10 seconds. For the timeout changes to take effect, the browser must be refreshed after the changes are made. -
maximumNotificationCount: To set the number of desktop notifications to be displayed at a time on the Desktop. The default value is 3. The range for desktop notifications is 1-10. The desktop notifications are stacked. If there are many notifications, they appear with a slight delay depending on thenotificationTimersettings. -
browserNotificationTimer: To set the duration (in seconds) after which the browser toaster notifications on the Desktop are automatically dismissed. Toaster is a native browser notification that appears only if the Desktop is not the active browser window or tab. The Desktop browser window or tab is inactive when -
wxmConfigured: (Optional) To configure Webex Experience Management, set the value totrue. The default value isfalse. -
desktopChatApp: To configure multiple Cisco-offered chat applications such as Webex App. -
webexConfigured: Webex App along with its messaging, calling, and meeting functionalities, can be configured within the Desktop. This configuration allows agents to collaborate with other agents, supervisors, and subject matter experts (SMEs) in their organization without navigating away from the Desktop. -
headerActions: To change the order of the icons on the horizontal header of the Desktop. The default order is as follows:["webex", "outdial", "notification"]. -
area: Theareaproperty is the core section of the Desktop Layout. You can define the layout as per the area.
Personalize the title and logo
In this video, you will learn the desktop layout customization process. After watching this, you will be able to customize the Agent Desktop with a custom logo, custom title. You will also learn how to enable/disbale standard widgets:
-
Login to https://portal.wxcc-us1.cisco.com with admin credentials.
-
Navigate to Provisioning –> Desktop Layout.
-
Click on New Layout button.
-
Click on Download button to download the Default Desktop Layout.json file.
-
Open the Default Desktop Layout.json file with any text editor (e.g. Notepad, Sublime text).
-
Modify the appTitle key value with your company name in order to change Agent Desktop title.
-
Modify the logo key value with your company logo URL or use this https://raw.githubusercontent.com/wxcctechsummit/holcct2100/main/labslive/CiscoLiveLogo.jpg.
-
Modify the wxmConfigured and webexConfigured key values to true to enable the standard (out of box) widgets.
-
Save As JSON file with a distinguishable name.
-
Login as admin to Desktop Layout module in the Webex Contact Center Management Portal.
-
Click on New Layout.
-
Provide the following name:
AttendeeID _desktopLayout -
Select
AttendeeID _team2 as Team. -
Click Upload button to upload the modified JSON file.
-
Click Save button to apply the layout.
-
Login to the Agent Desktop.
-
Open the User Profile and click on the arrow
>under Team. -
Change the team of the agent to
AttendeeID _team2 -
Click on Save Team Selection.
-
Confirm the changes by clicking on Change Team.
-
Wait for few seconds to see the results.
-
Now you should be able to see the new logo, new title and will be able to access the out of box widgets i.e Webex & Custom Experience Analytics.
Reorder components of Horizontal Header
In this section, you will learn how to reorder components of Horizontal Header.
-
Take the same desktop layout file that you used in the last section.
-
Open the desktop layout file with any text editor (e.g. Notepad, Sublime text).
-
Make sure the layout version is 0.0.7 or higher.
-
Under advancedHeader, change the order of components.
-
Save As JSON file and upload it on Webex Contact Center Management Portal against your team.
-
Now login to the Agent Desktop or refresh the browser if you are already logged in.
-
You should be able to see the order of components in the Horizontal header as per your configuration.
Create iFrame Widget & change default landing page
The iFrame widget is a special widget that can be used to embed a different application. The iFrame widget creates an HTML iFrame and renders your application.
In this section, you will learn how to create a iFrame widget and how to change the default landing page in the Agent Desktop. For this example, we are using Webex Contact Center Analyzer Report as a iFrame widget.
-
Take the default desktop layout file.
-
Open the desktop layout file with any text editor (e.g. Notepad, Sublime text).
- Create another section under navigation similar to that of existing Customer Experience Analytics.
Check out this sample Analyzer_iFrame_Widget.json
-
In the new section, add the label key value with your choice.
-
Add the icon key value with your choice.
-
Add a new key isDefaultLandingPage and its value should be set as true.
-
src key value should be same as URL of your analyzer report.
-
Save As JSON file and upload it on Webex Contact Center Management Portal against your team.
-
Now login to the Agent Desktop or refresh the browser if you are already logged in.
- You should be able to see the new widget you added when you login to the agent desktop as it is set as the default landing page.
Populate Custom Widget with desktop parameters
A Custom Widget is a component with some specific encapsulated functionality, exported as a custom HTML element that is placed within the desktop.
Watch the demo below to understand the ability to pass default Desktop parameters into your Custom widget. This will help developers understand how data is handled in the Desktop STORE and injected into widgets inside of Webex Contact Center desktop.
Below, you will find a breakdown of all possible data and type definitions that is available through the STORE key:
- STORE.agent: Desktop profile info and settings.
- STORE.agentContact: Agent tasks and interactions
- STORE.app: Company logo, title and dark mode
- STORE.auth: Authentication token used for Single Sign On
- STORE.generalNotifications: Application notifications
- STORE.dynamic: Connector (smaller) or Desktop (larger) view area
Check the Developer guide for more details about Custom Widgets.
If you want to explore and play around with the possible types of custom widgets you can create, check the below Git repository with some samples: https://github.com/CiscoDevNet/webex-contact-center-widget-starter/tree/master/Examples
JavaScript SDK and Modules
Desktop JavaScript SDK is an npm package that allows you to request up-to-date information from the Desktop. Using the SDK, you can request information such as agent details, assigned tasks, details of specific tasks, current browser locale, and the authentication token for Single Sign-On (SSO) integration.
-
To start using the JavaScript SDK, run the following command in your project folder:
npm install @wxcc-desktop/sdk --saveoryarn add @wxcc-desktop/sdk. -
Once you have installed the package in your project, include it in the appropriate component file following the ES6 import pattern:
import {Desktop} from "@wxcc-desktop/sdk";. Desktopis the root module of the JavaScript SDK. The root module provides a reference to the following sub-modules:- Configuration Module
- Localization Module
- Actions Module
- Logger Module
- Agent State Information Module
- Agent Contact Module
- Dialer Module
- Screen Pop Module
- Shortcut Key Module
- Call Monitoring Module
- Check the Developer Guide for more details about each module.
—
Congratulations, you have completed this lab! You can continue with the next one.