Lab 9 - Outbound Campaign (Preview & Progressive)
author: Gagarin Sathiyanarayanan (gasathiy@cisco.com)
Last modified: Wed, 16 Apr 2025
Table of Contents
| Topic | Lab Type | Difficulty Level | Estimated length |
|---|---|---|---|
| Lab 9.1 Verify Tenant Provisioning | Practical Lab | EASY | 5 min |
| Lab 9.2 Preview Campaign | Practical Lab | EASY | 20 min |
| Lab 9.3 Progressive Campaign | Practical Lab | EASY | 20 min |
| Lab 9.4 Predictive Campaign | Coming Soon | Coming Soon | Coming Soon |
| Lab 9.5 Call Guide | Coming Soon | Coming Soon | Coming Soon |
Introduction
In this lab you will learn about configuring Webex Contact centre to manage outbound voice campaigns using the LCM (List and Campaign Manager) application.
Lab Objective
- Configure Webex Contact Centre and LCM (List and Campaign Manager) application
- Verify that the Agents can accept outbound campaign calls from the Webex CC Agent Desktop
Lab Pre-requisites
- In this lab tenant, the tenant provisioning and integration is already completed. If you are using a different tenant, you can configure and use outbound campaigns only if your enterprise has purchased the Acqueon SKU and provisioning, integration is completed.
- You should also be able to login to agent desktop with your respective team created in previous labs
- This step should have been completed as part of previous lab sections. If not already done, please create a team and add your agent to this new team
- Acqueon tenant version should be
v4.2.1.2310 and above( instructions in this guide are based onv4.2.1.2401)
Lab Section
Lab 9.1 Verify Tenant Provisioning
- Login to Control Hub, navigate to Contact Center Settings > Addons and ensure
Campaign Managementoption is enabled

- Navigate to
Integrationsoption and ensure a custom connector with the nameCampaignManagerCredentialis created

Note: The steps mentioned above are integral to the Acqueon provisioning and integration process and should have been completed as part of your initial setup. This current step serves merely as a verification to ensure everything is in place before you begin with the lab. This has already been completed for the lab tenant. If you are using a different tenant and discover that any of the necessary steps have not been completed on your tenant, please consult the Webex Contact Center Ordering Guide available at https://www.cisco.com/c/en/us/partners/tools/collaboration-ordering-guides.html. Here, you can find the relevant SKUs and instructions on how to place your order.
Lab 9.2 Preview Campaign
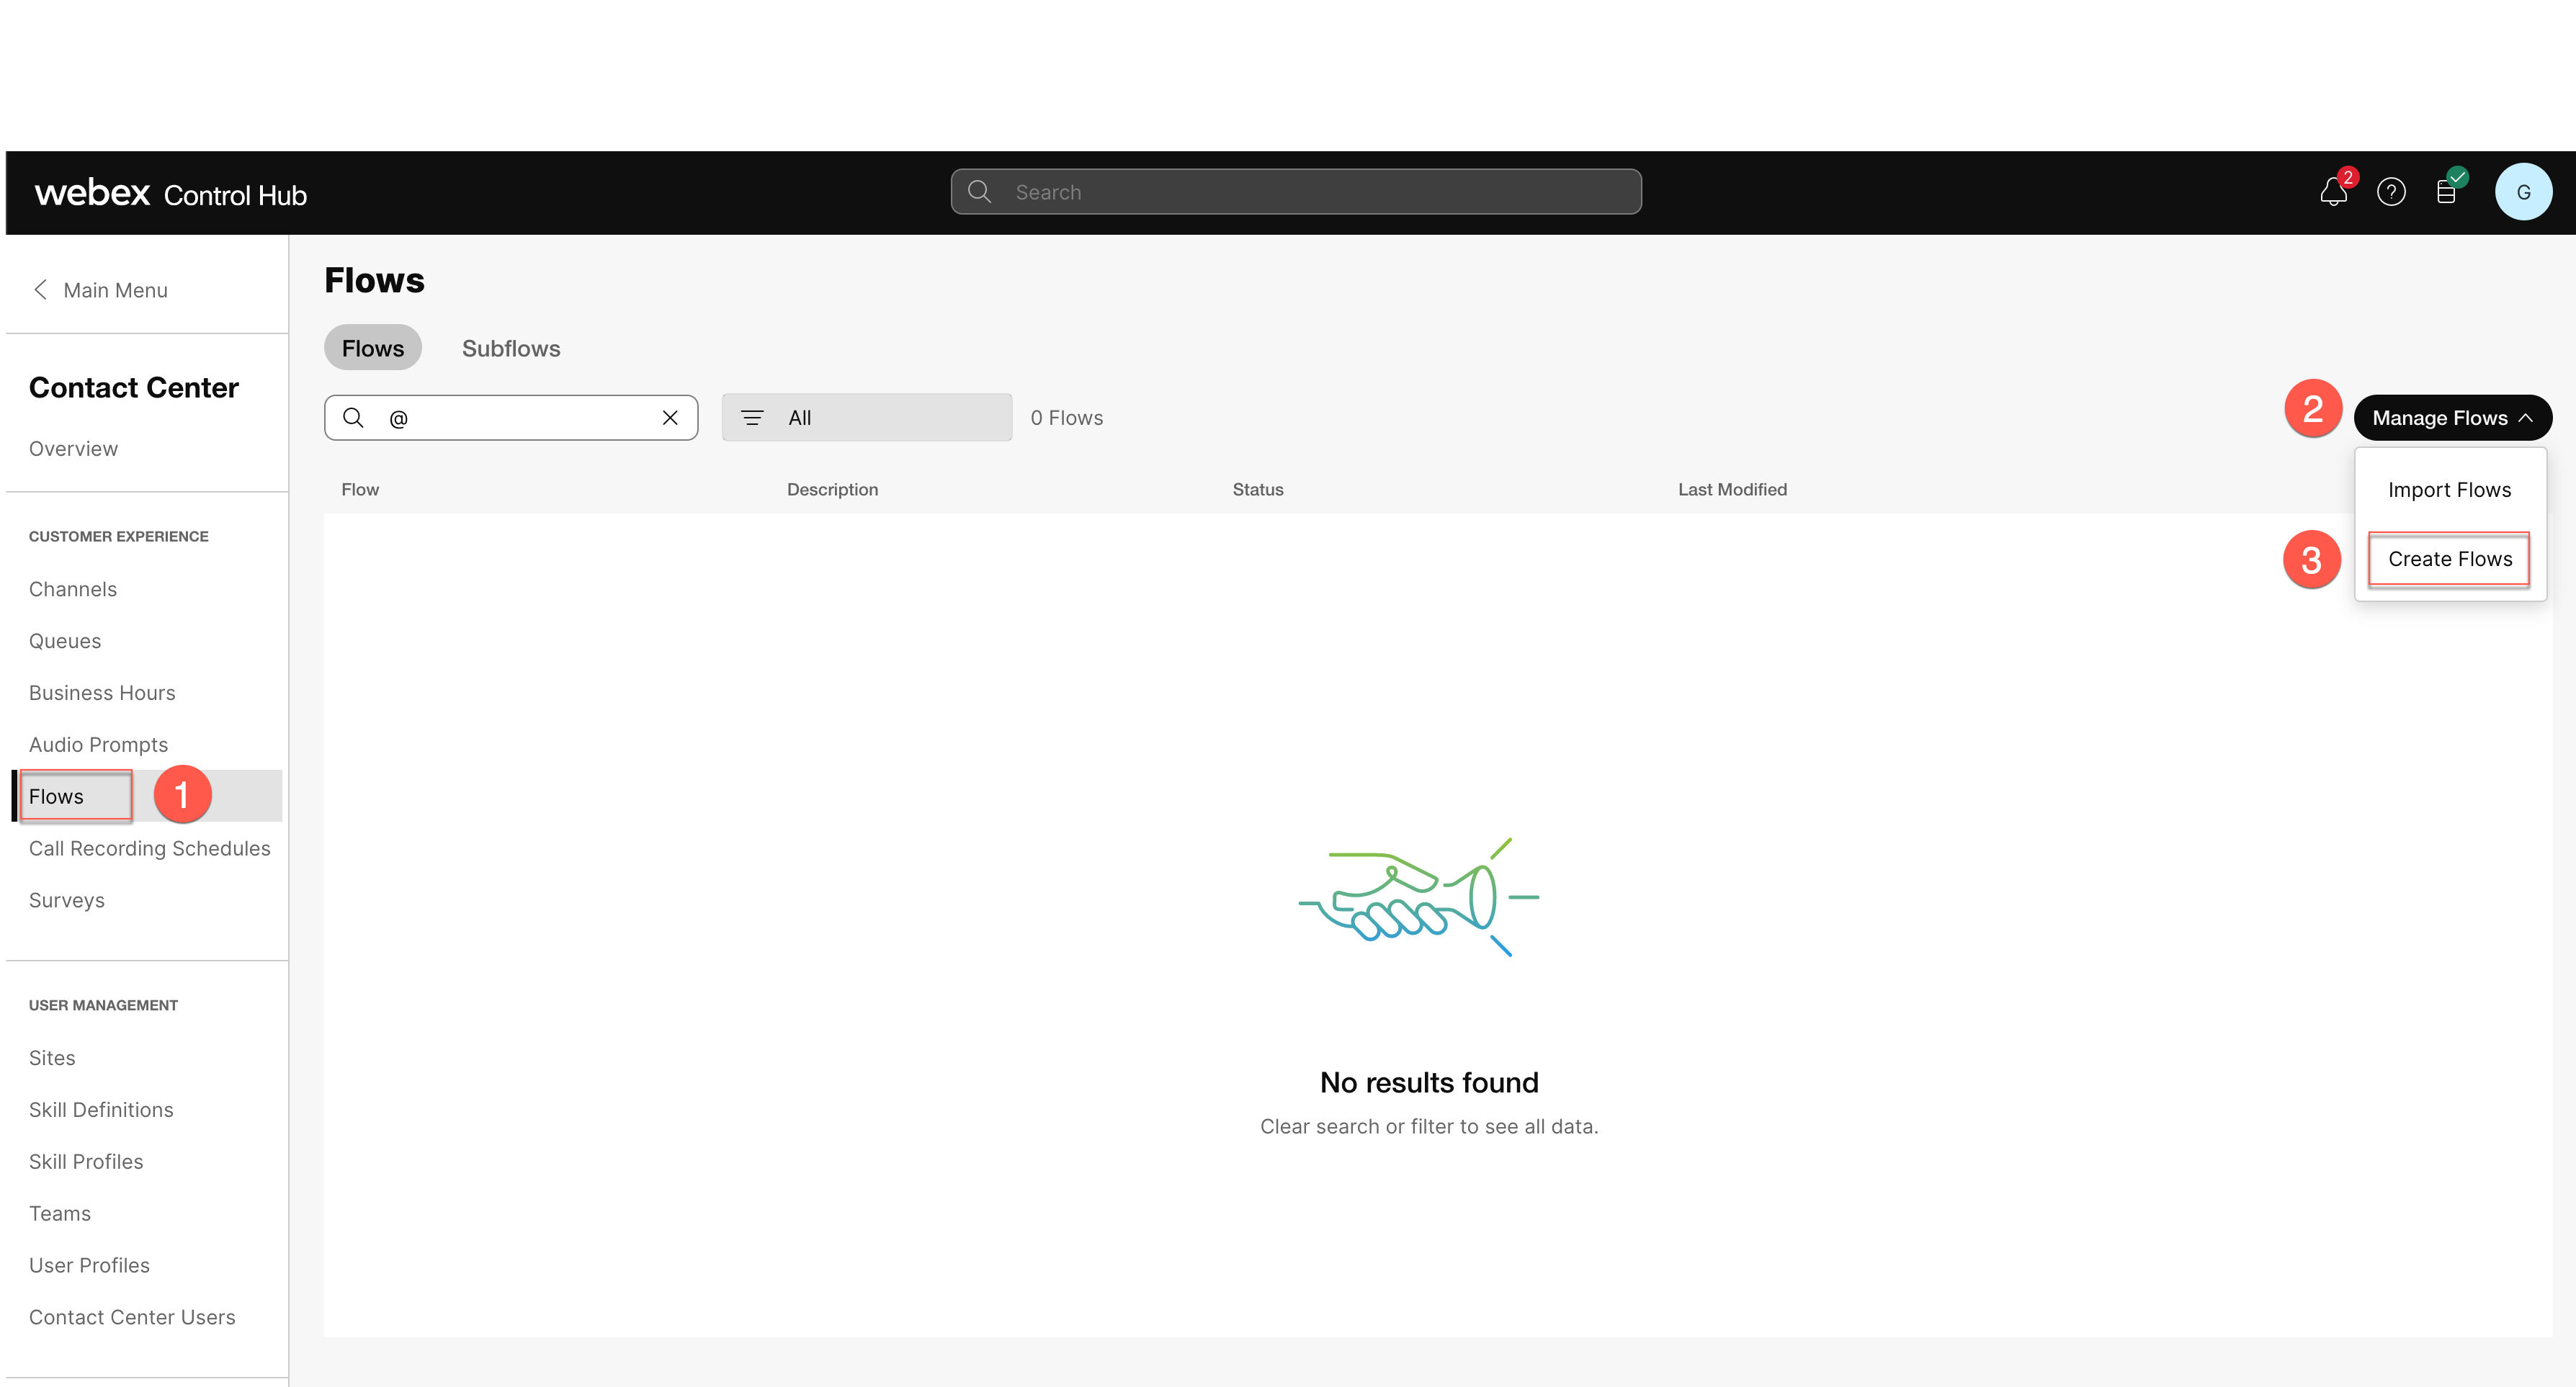
Step 1: Navigate to Flows > Manage Flows > Create Flows
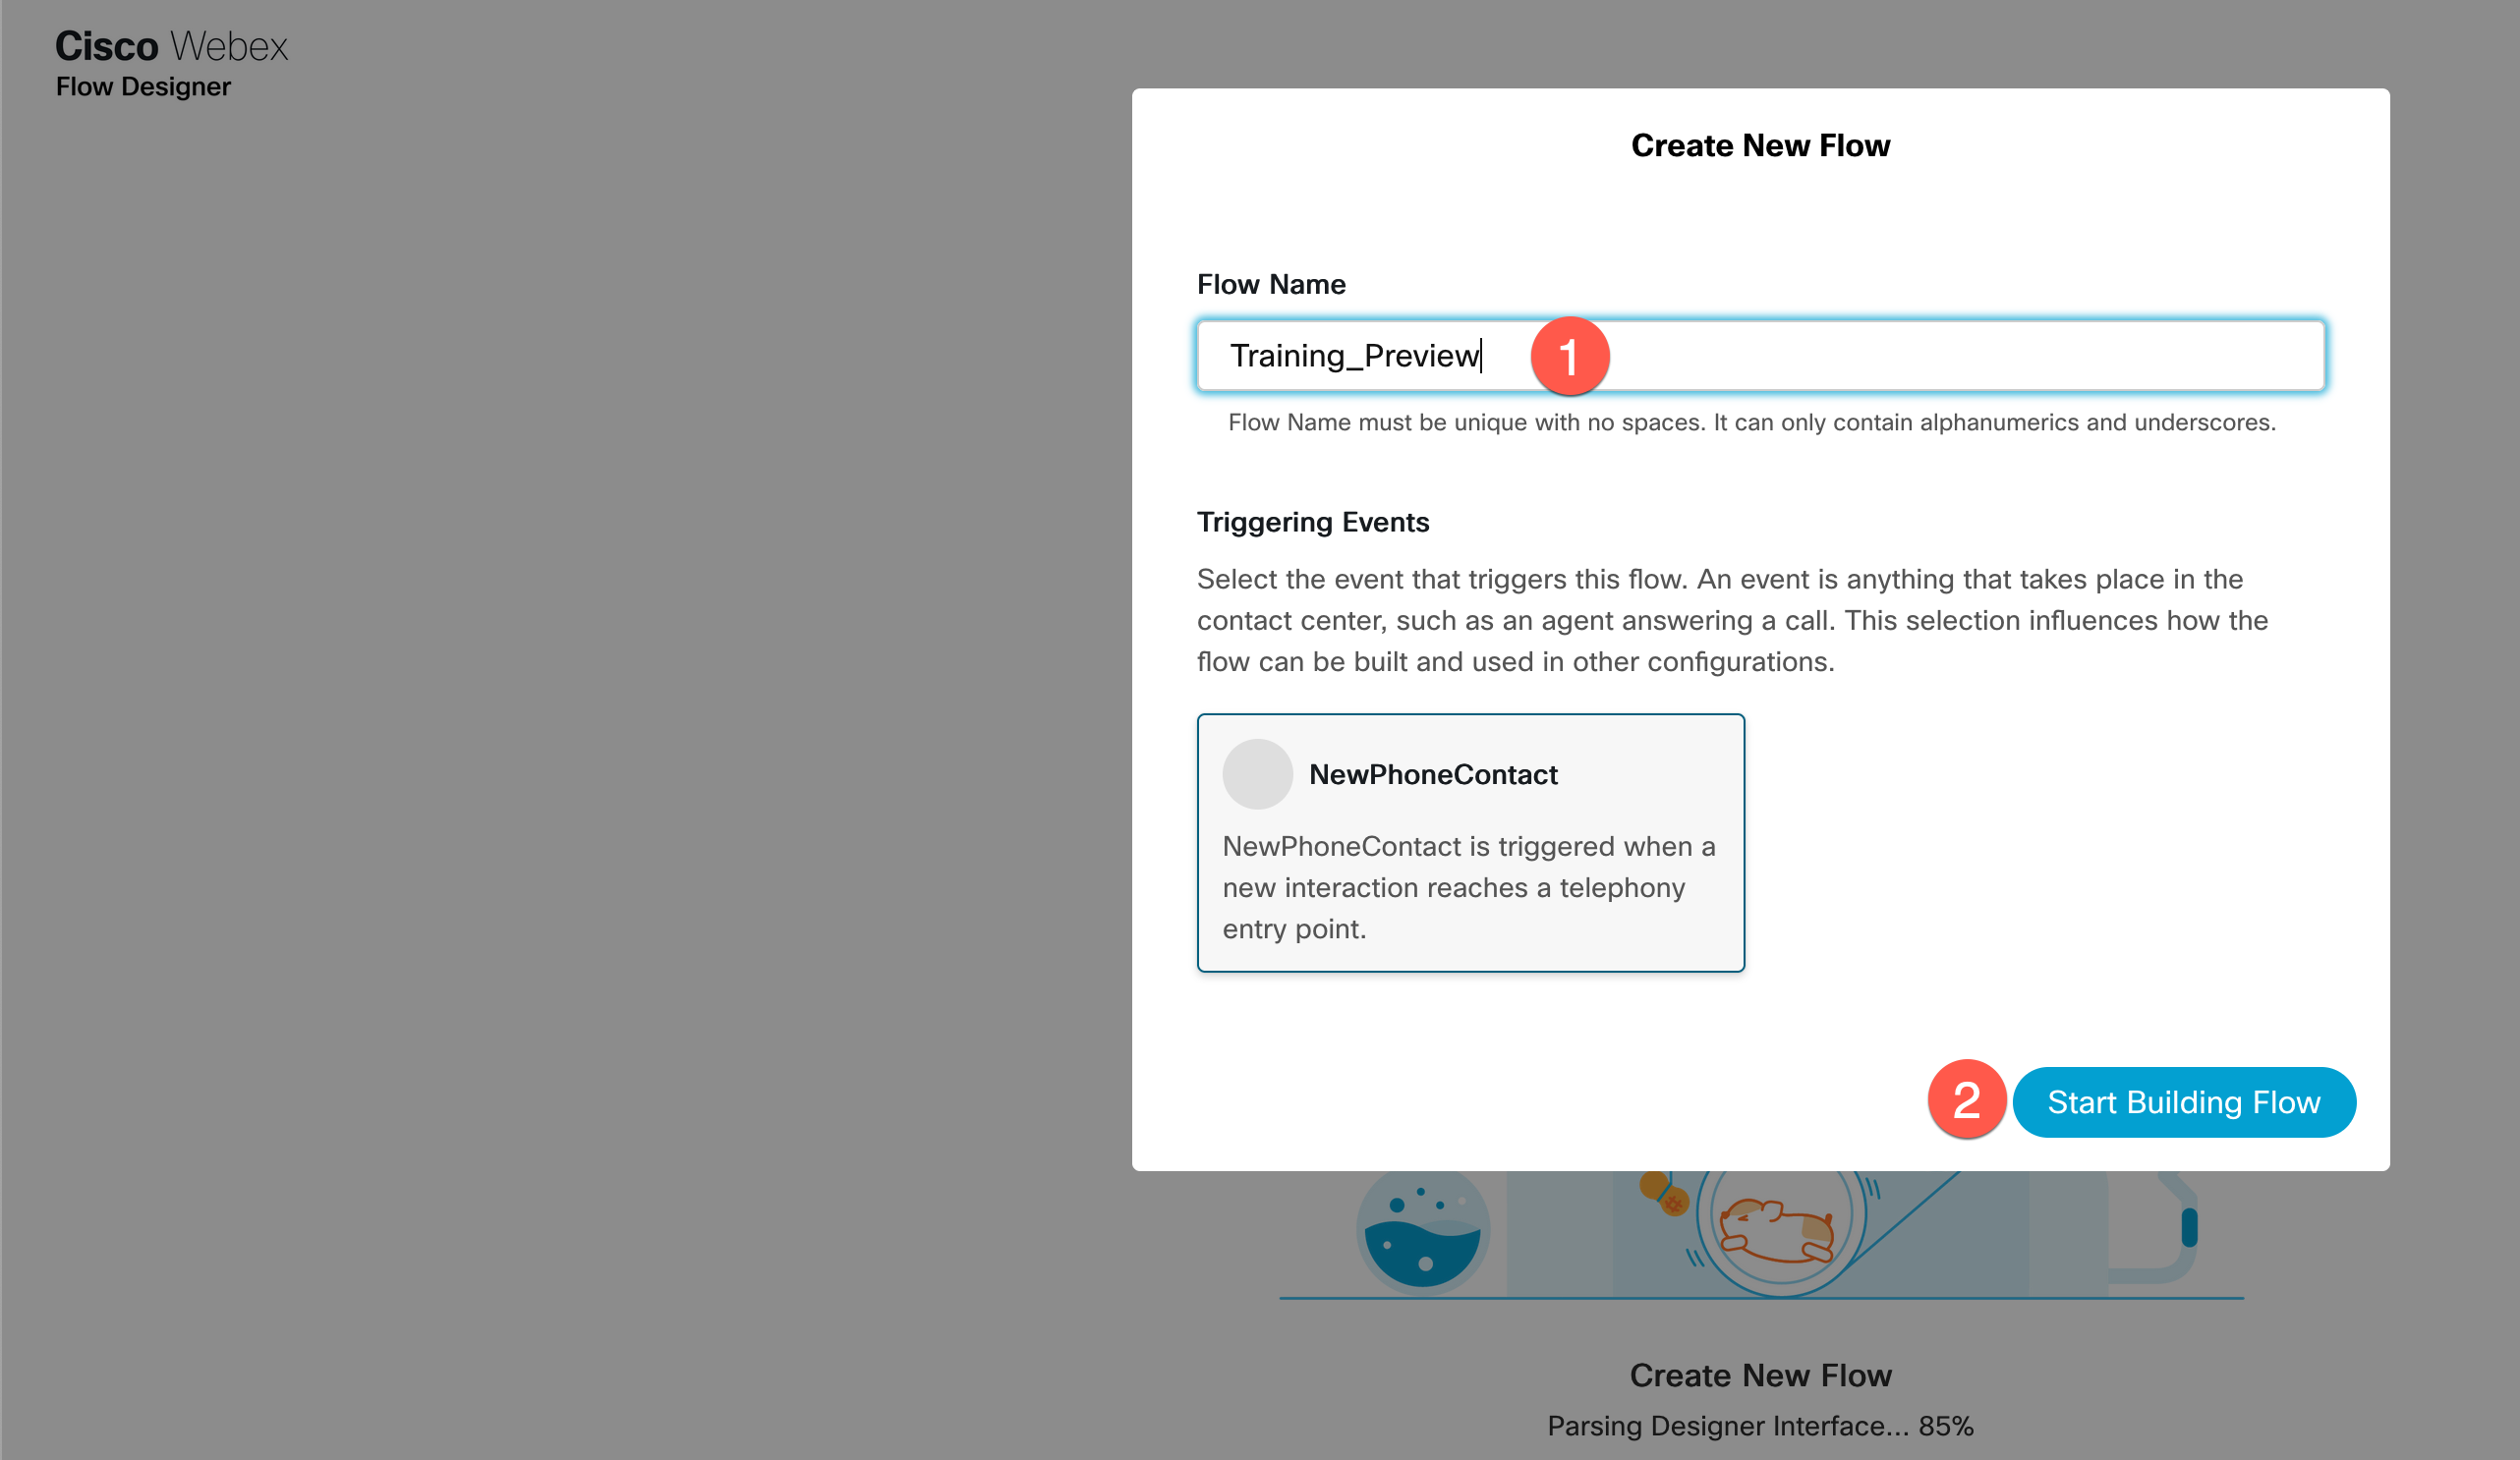
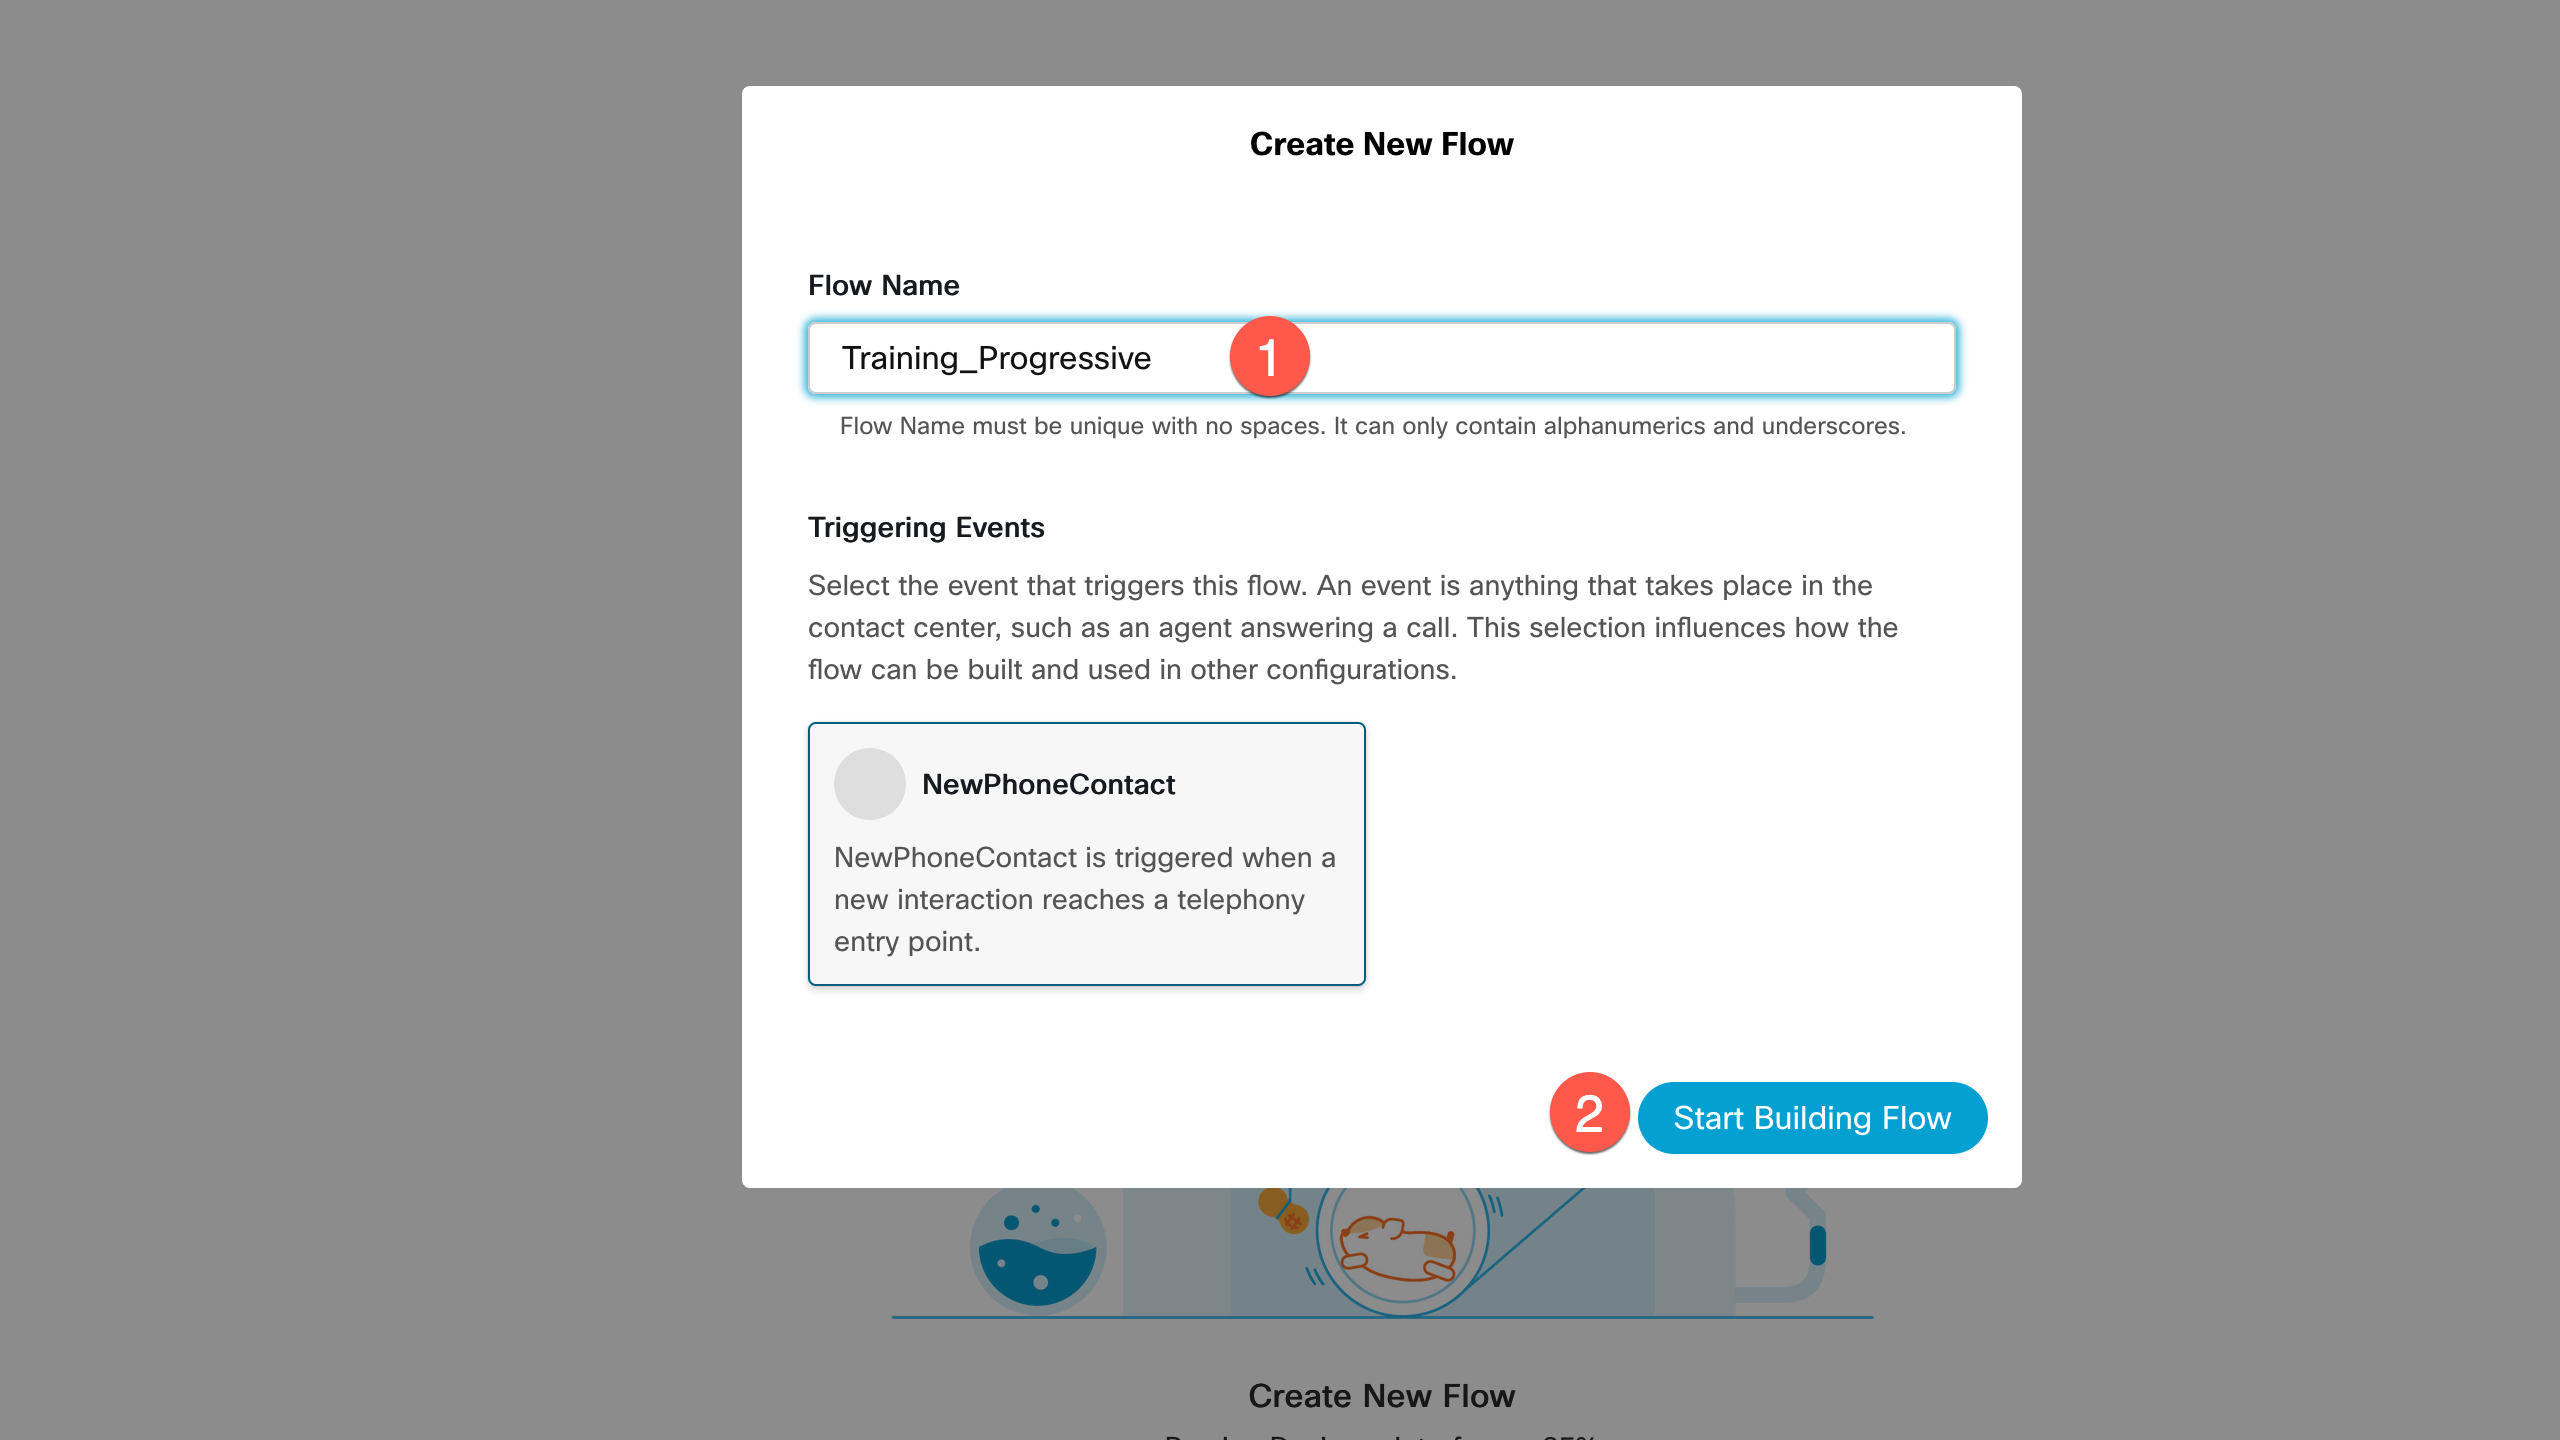
Step 2: Provide a desired Flow Name and click Start building Flow
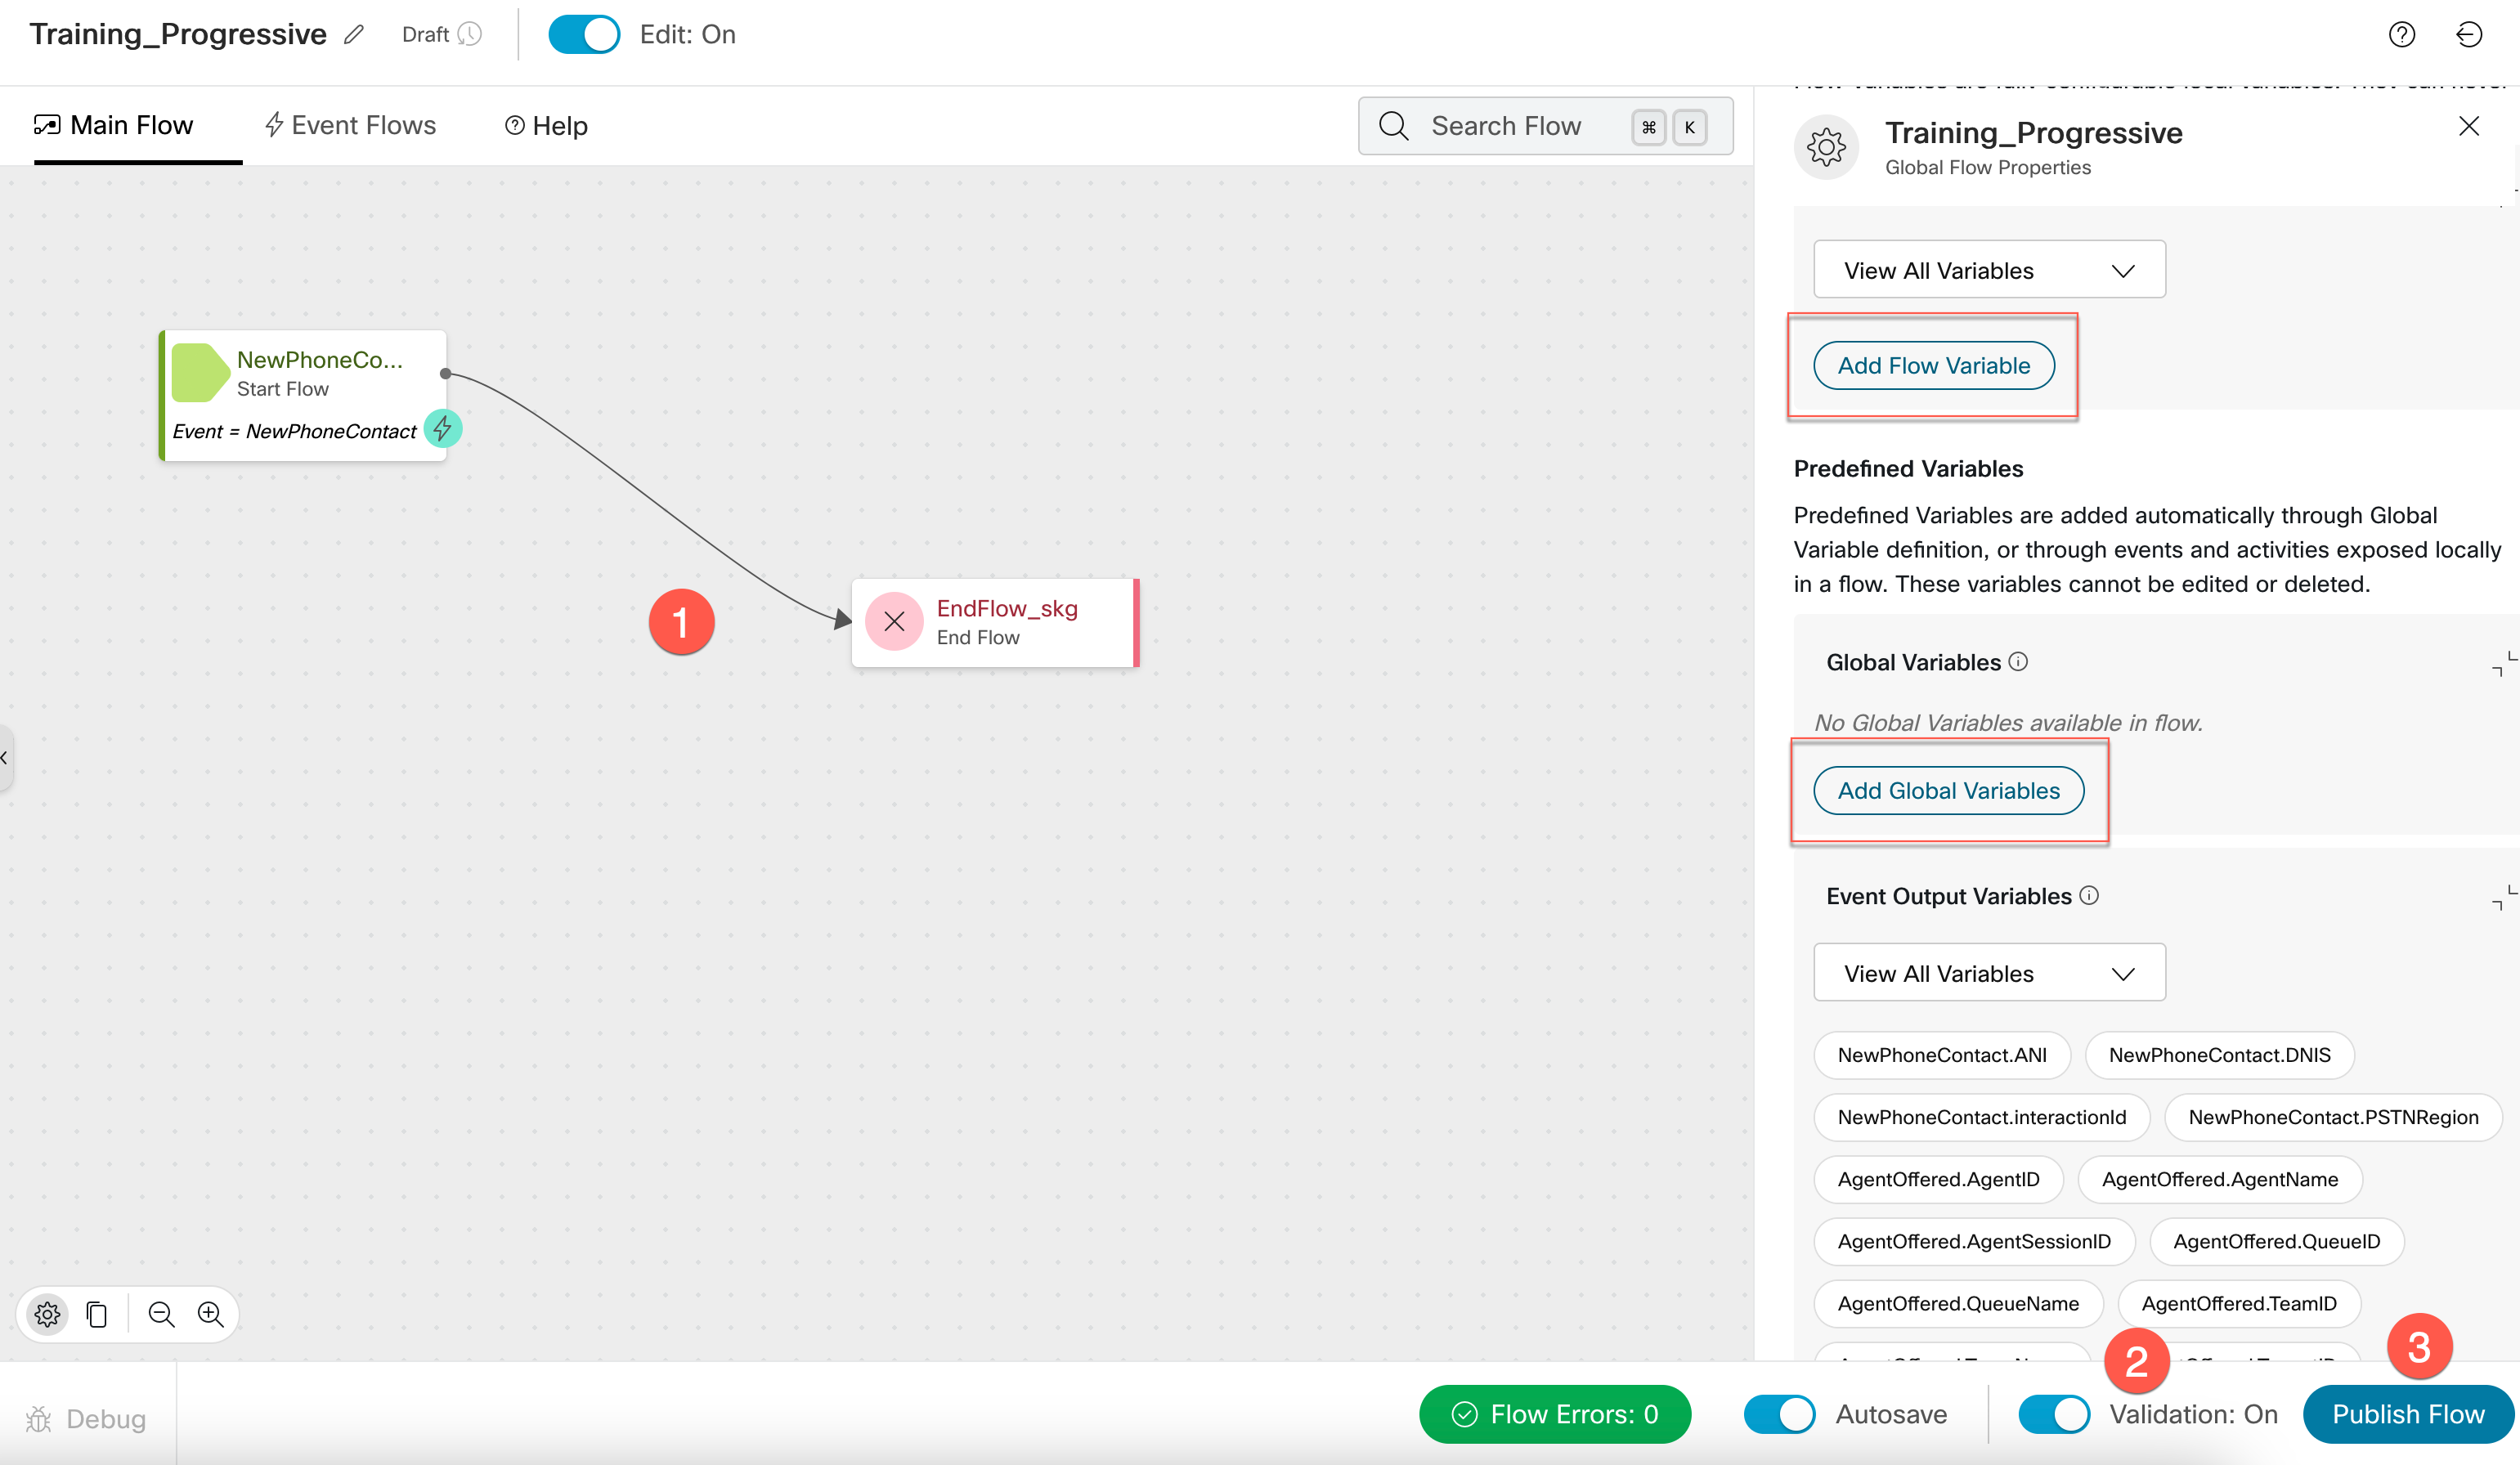
Step 3: Connect the NewPhoneContact activity to EndFlow activity. Set Validations to On and Publish Flow
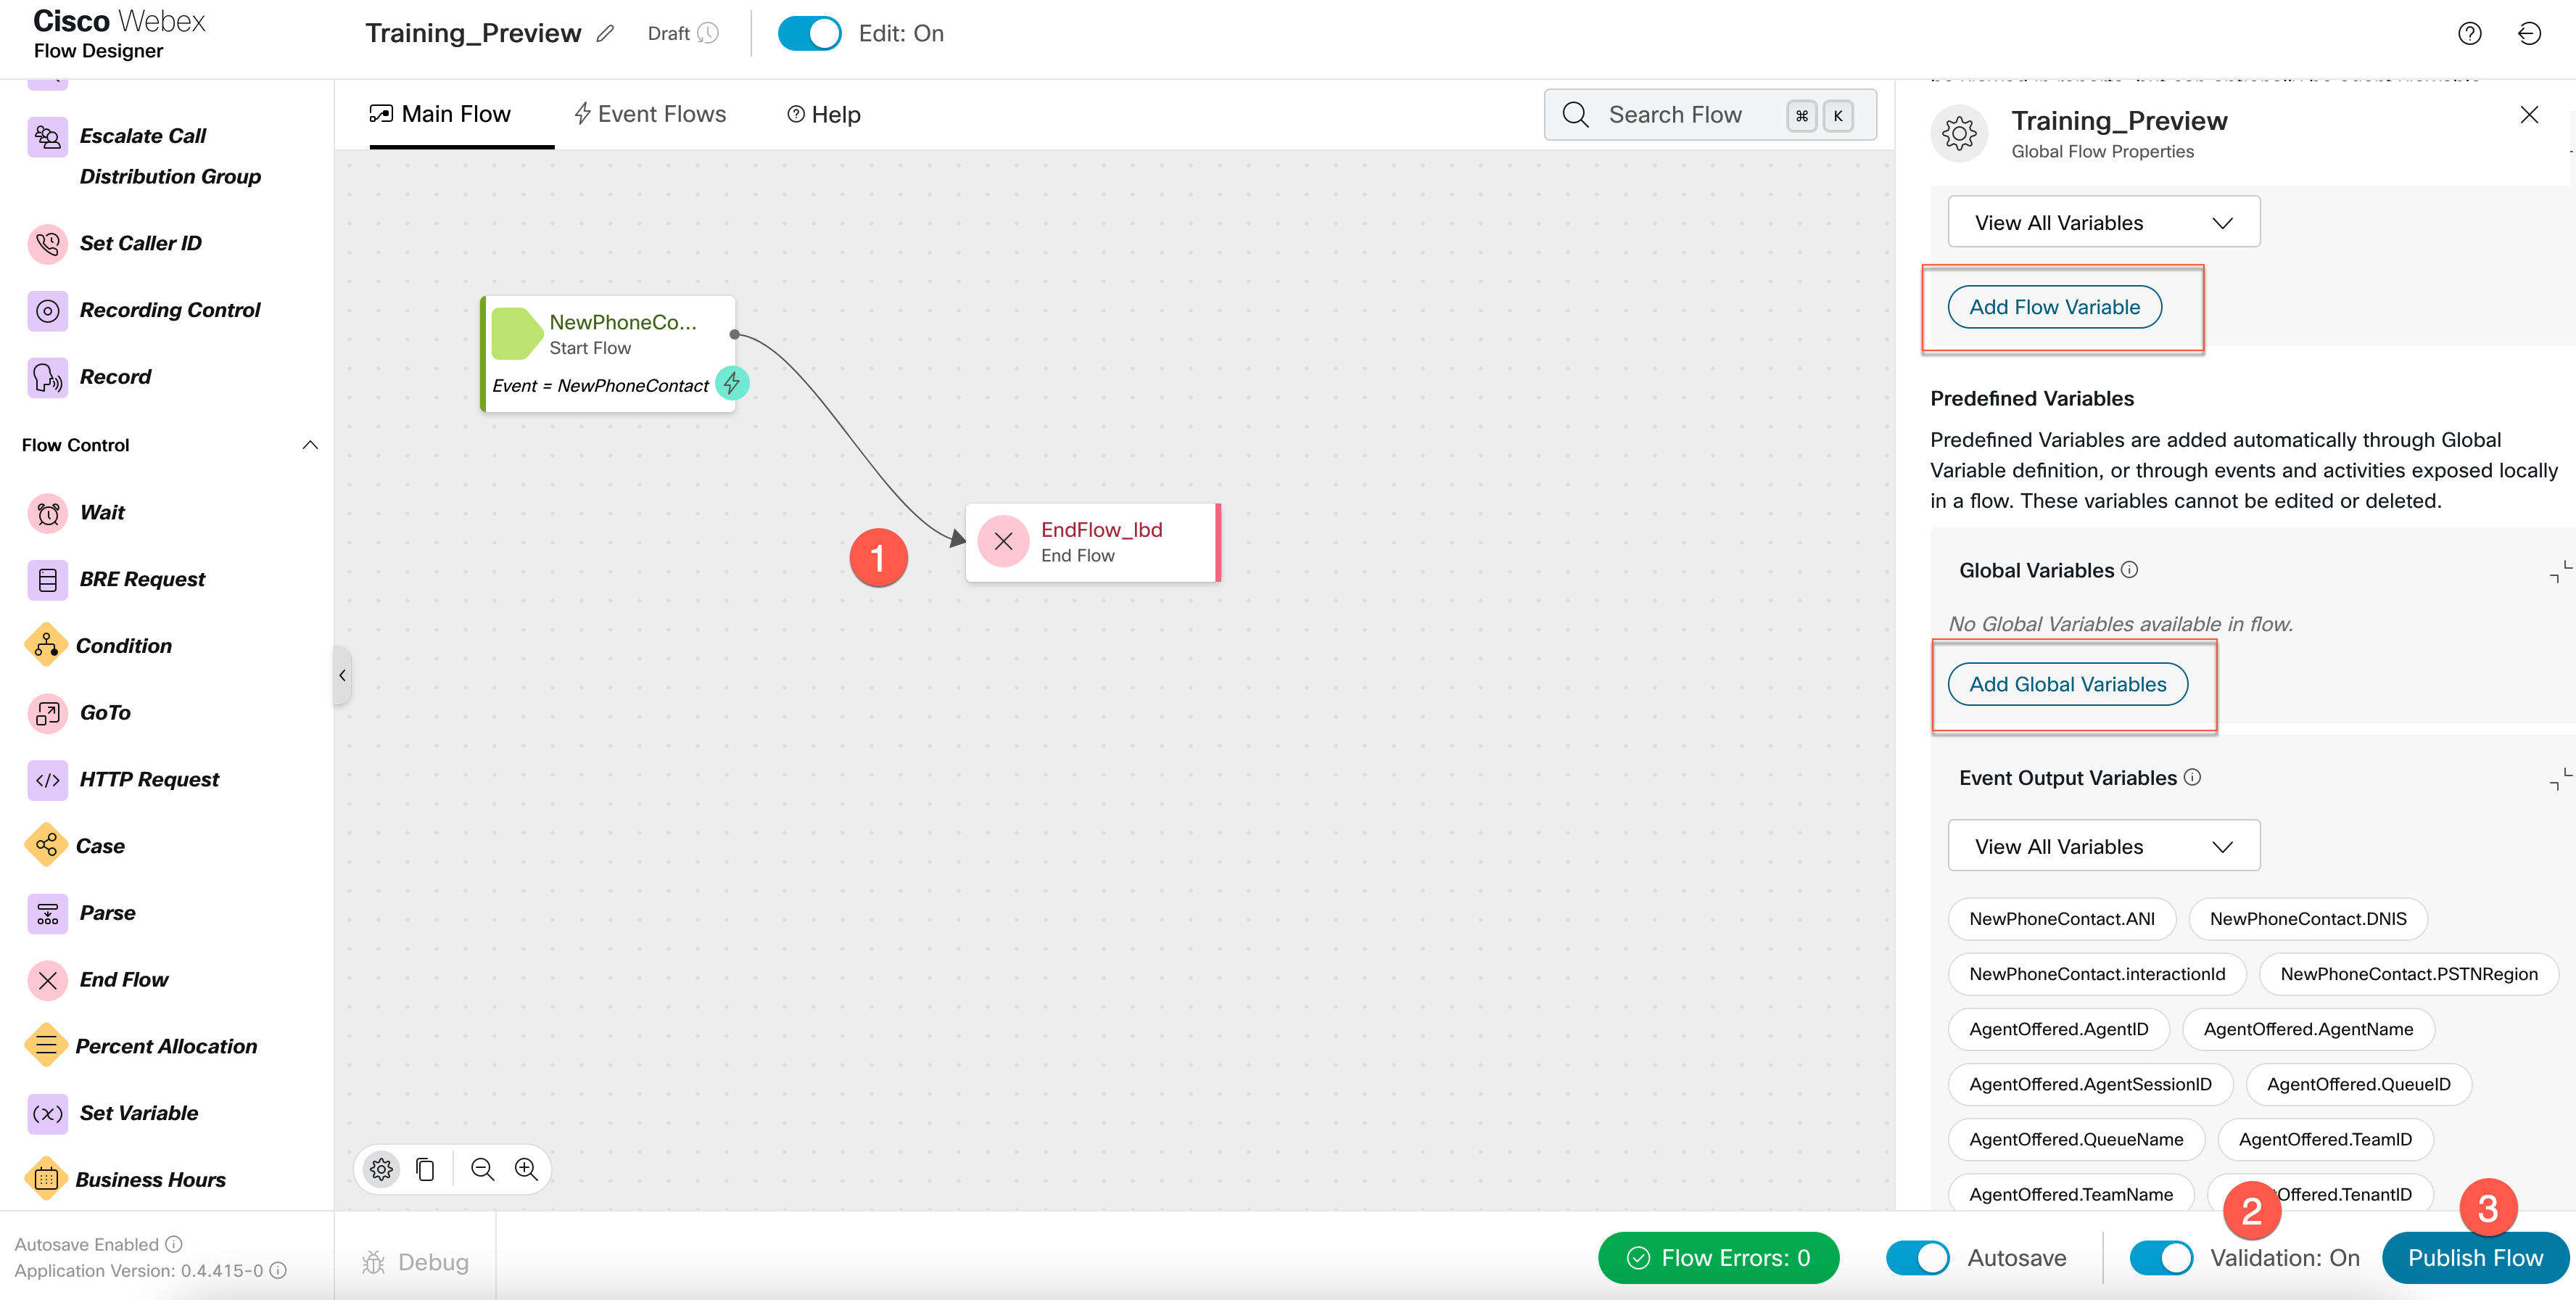
Note: A flow must be configured with each campaign, referenced by the outdial entrypoint. The flow is simple, but dictates which variables are shown on the agent desktop and in which order. This is done via global variables. Configure variables in the flow as required. In this lab exercise, we will not be configuring any variables.
Step 4: Create Outdial Queue
-
Navigate to
Queuesand clickCreate Queue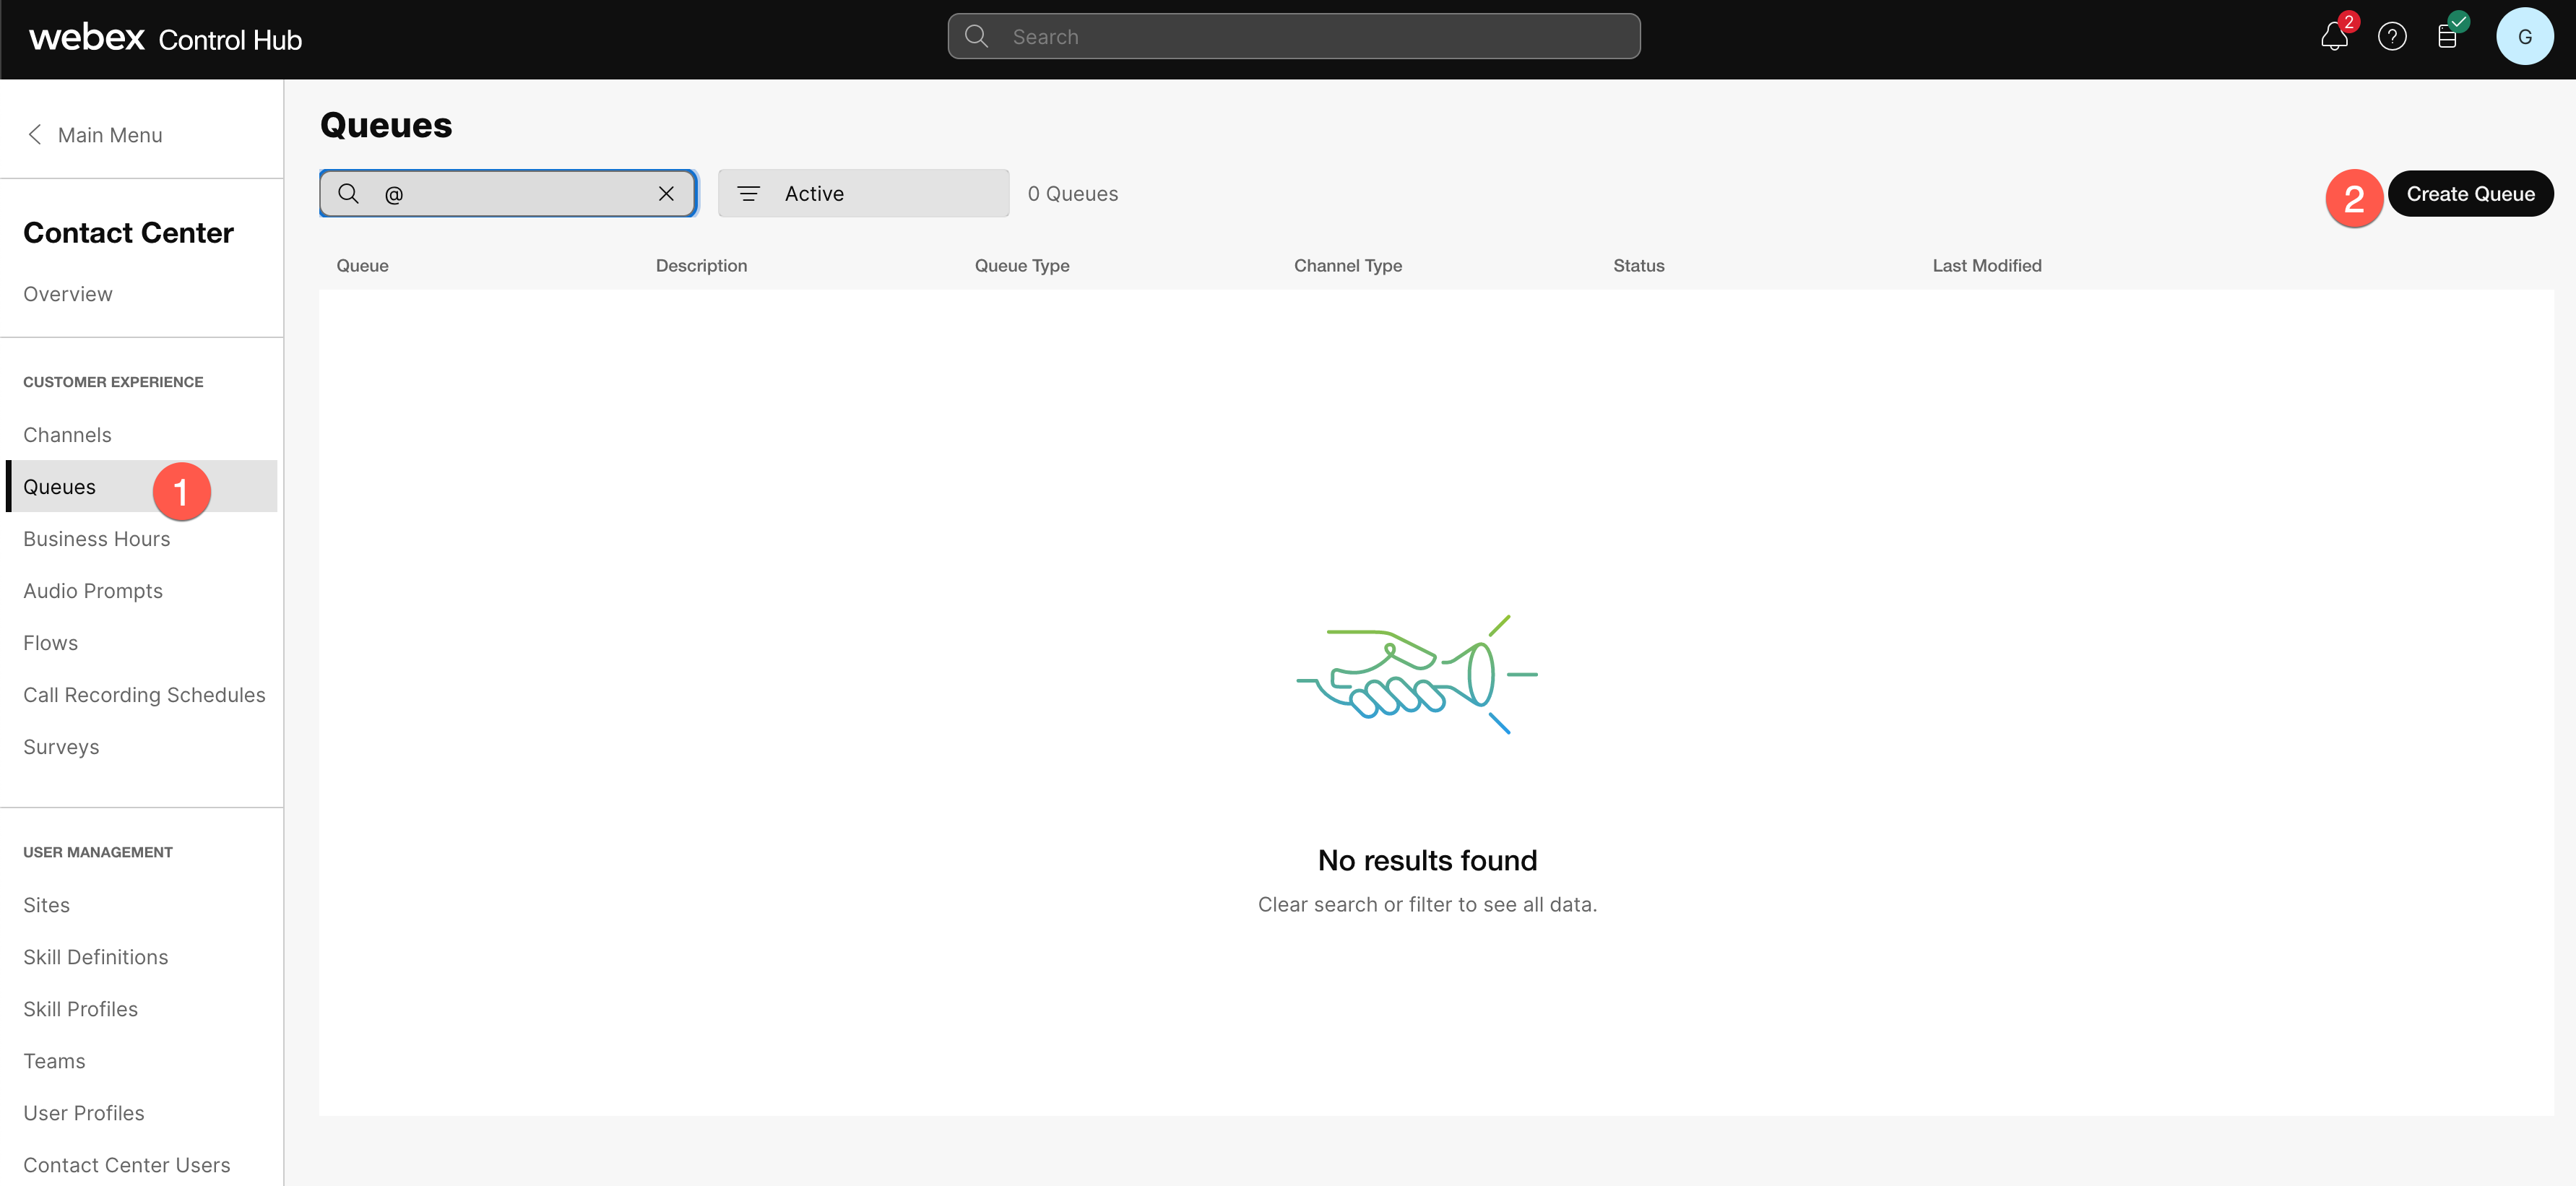
- Configure the outdial queue
- Name:
Provide any desired Name - Queue Type:
Outdial Queue - Outbound Campaign:
ON - Queue Routing Type:
Longest Available Agent - Call Distribution: Create Group > Select the team that the agent is part of
- Service Level Threshold:
Set a desired value - Maximum Time in Queue:
Set a desired value - Default Music in Queue:
Set a desired value
- Name:
- Click
Create
Step 5: Create Outdial EntryPoint
-
Navigate to
Channelsand clickCreate Channel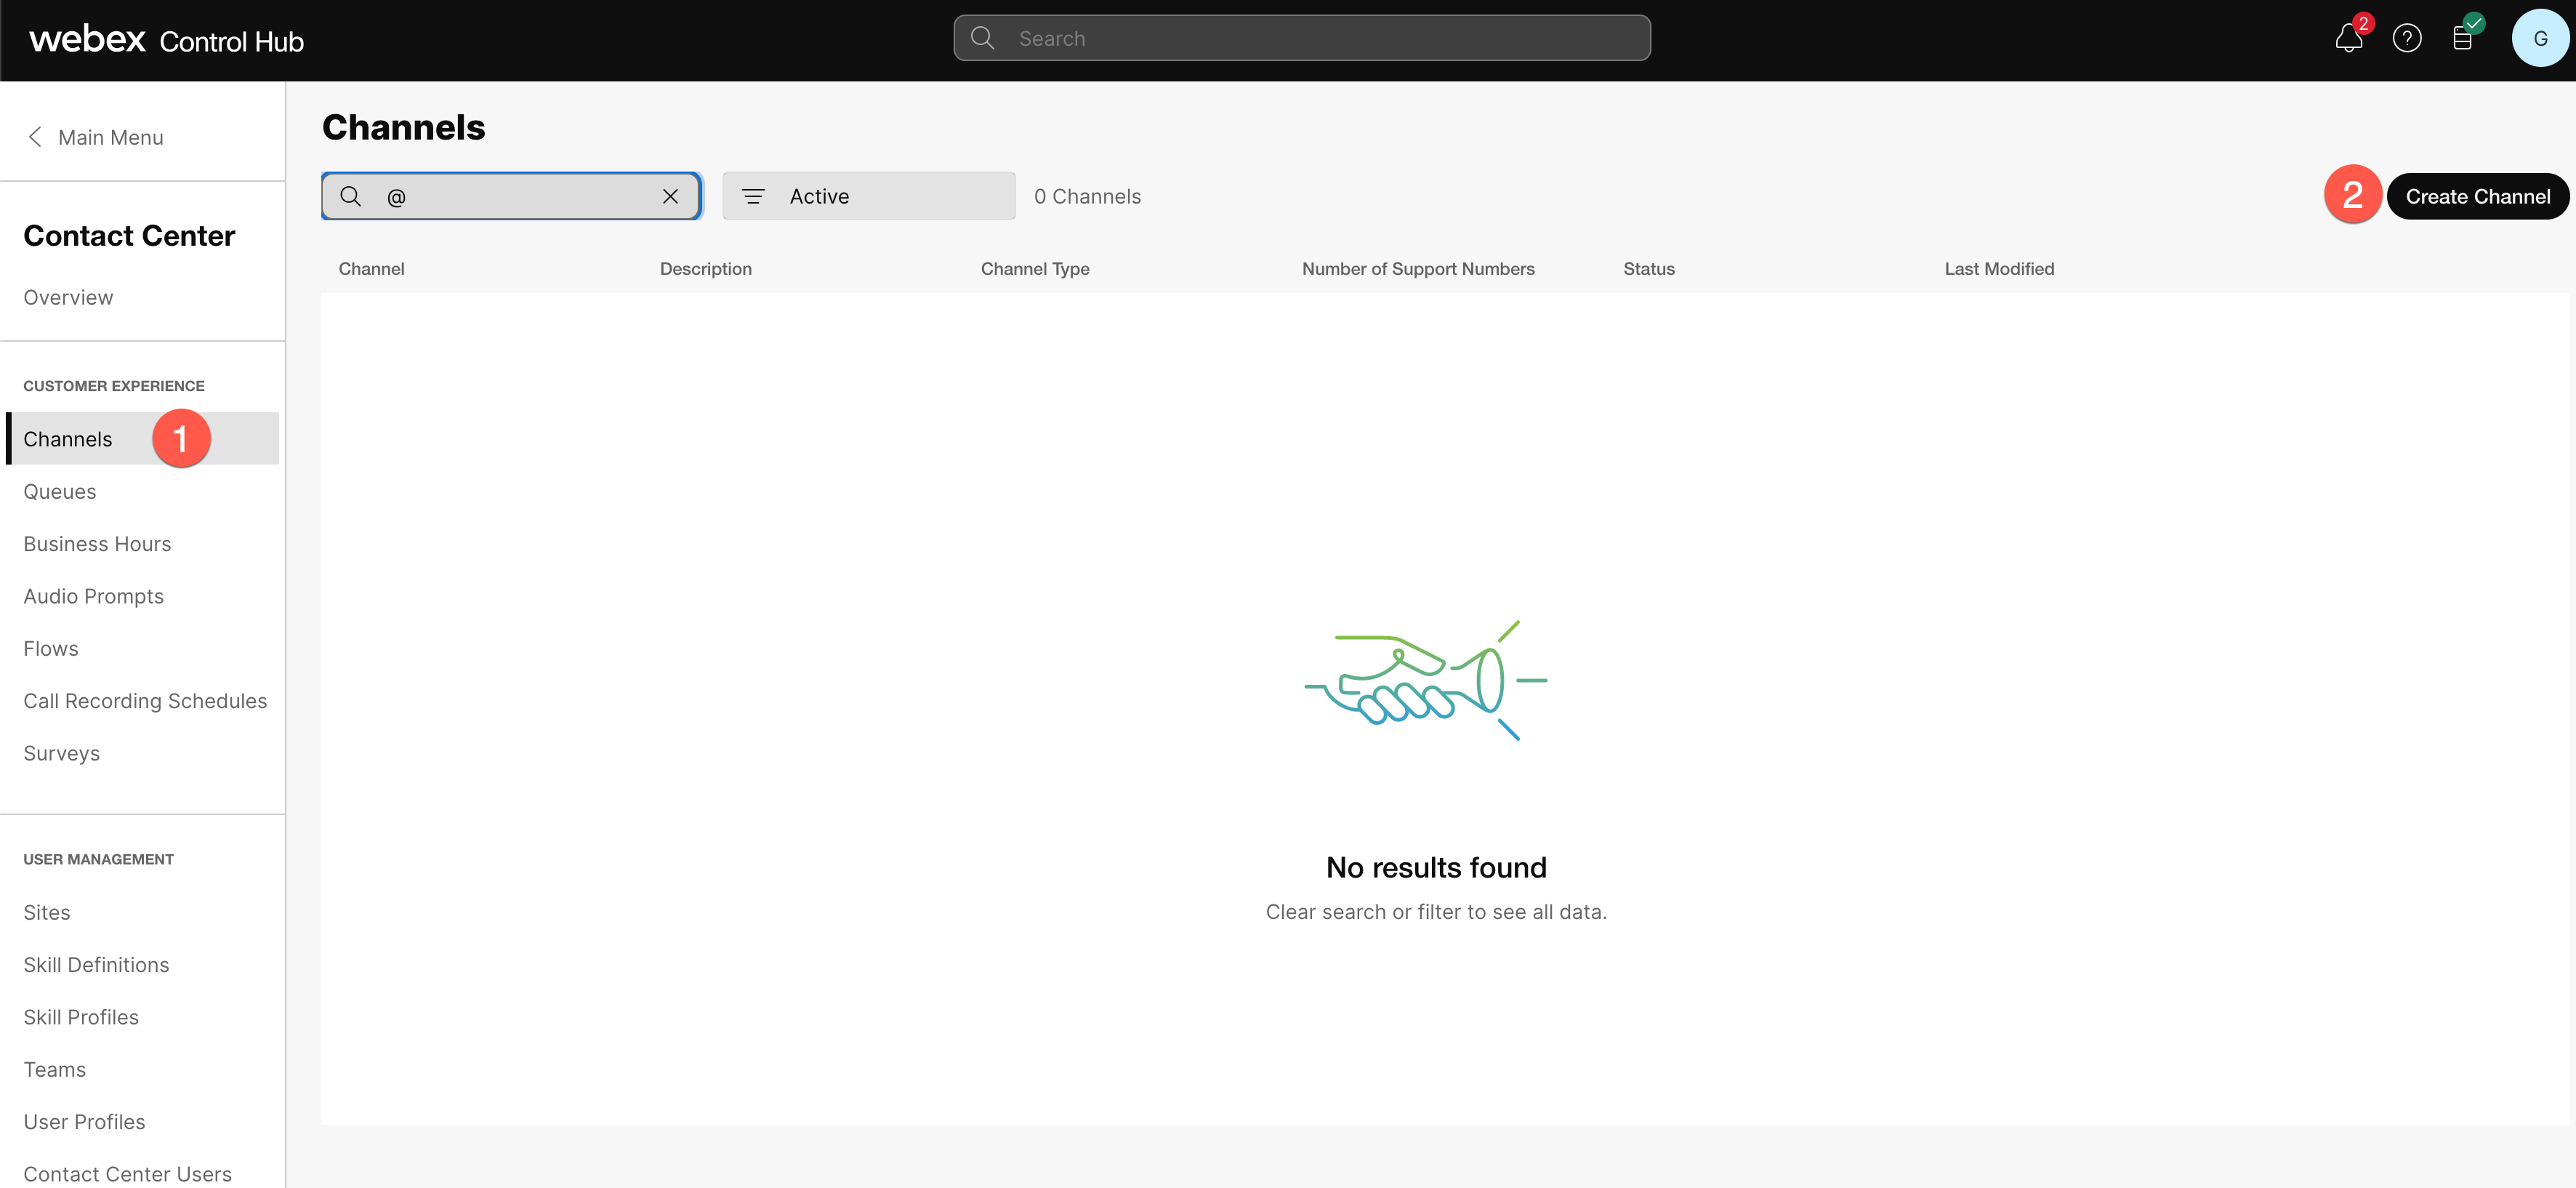
- Configure the outdial EntryPoint
- Name:
Provide any desired Name - Channel Type:
Outbound Telephony - Service Level Threshold:
Set a desired value - Routing Flow:
Select flow created in Step1 - Version Label:
Latest(or as per your configuration) - Outdial Queue:
Select the Queue created in previous step
- Name:
- Click
Create
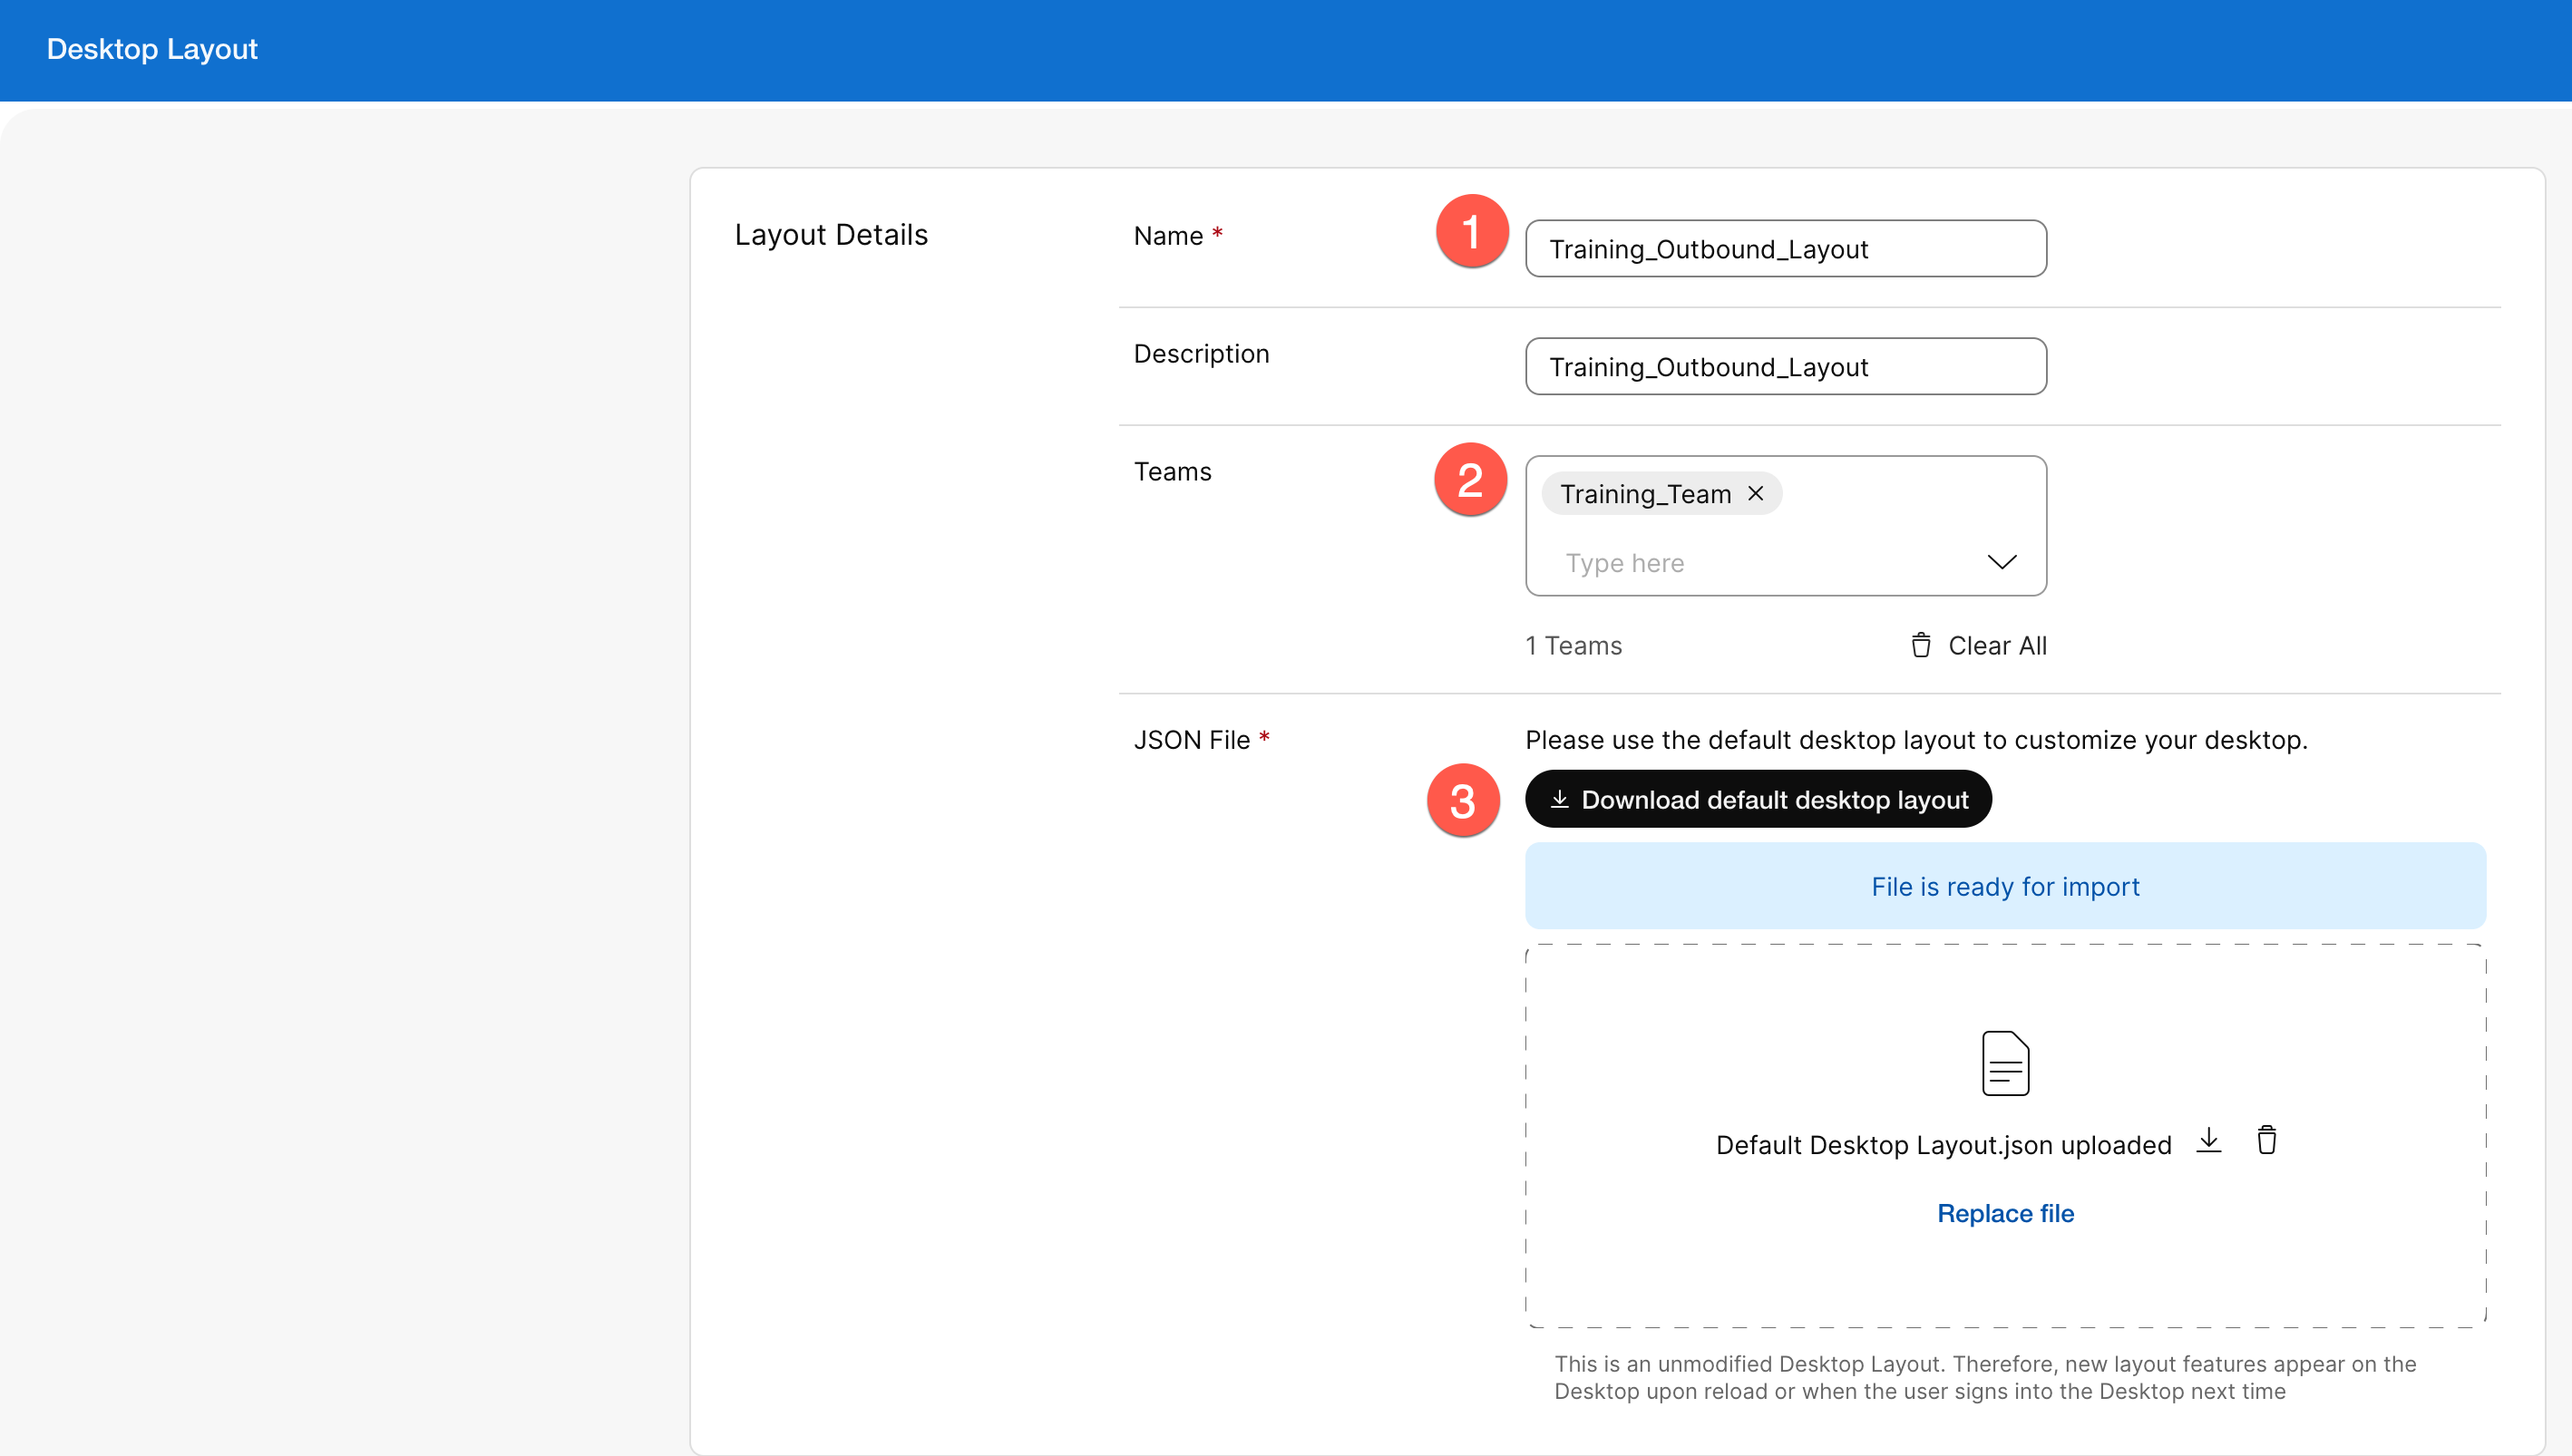
Step 6: Configure Desktop layout for preview
-
Navigate to
Desktop Layoutsand clickCreate Desktop Layout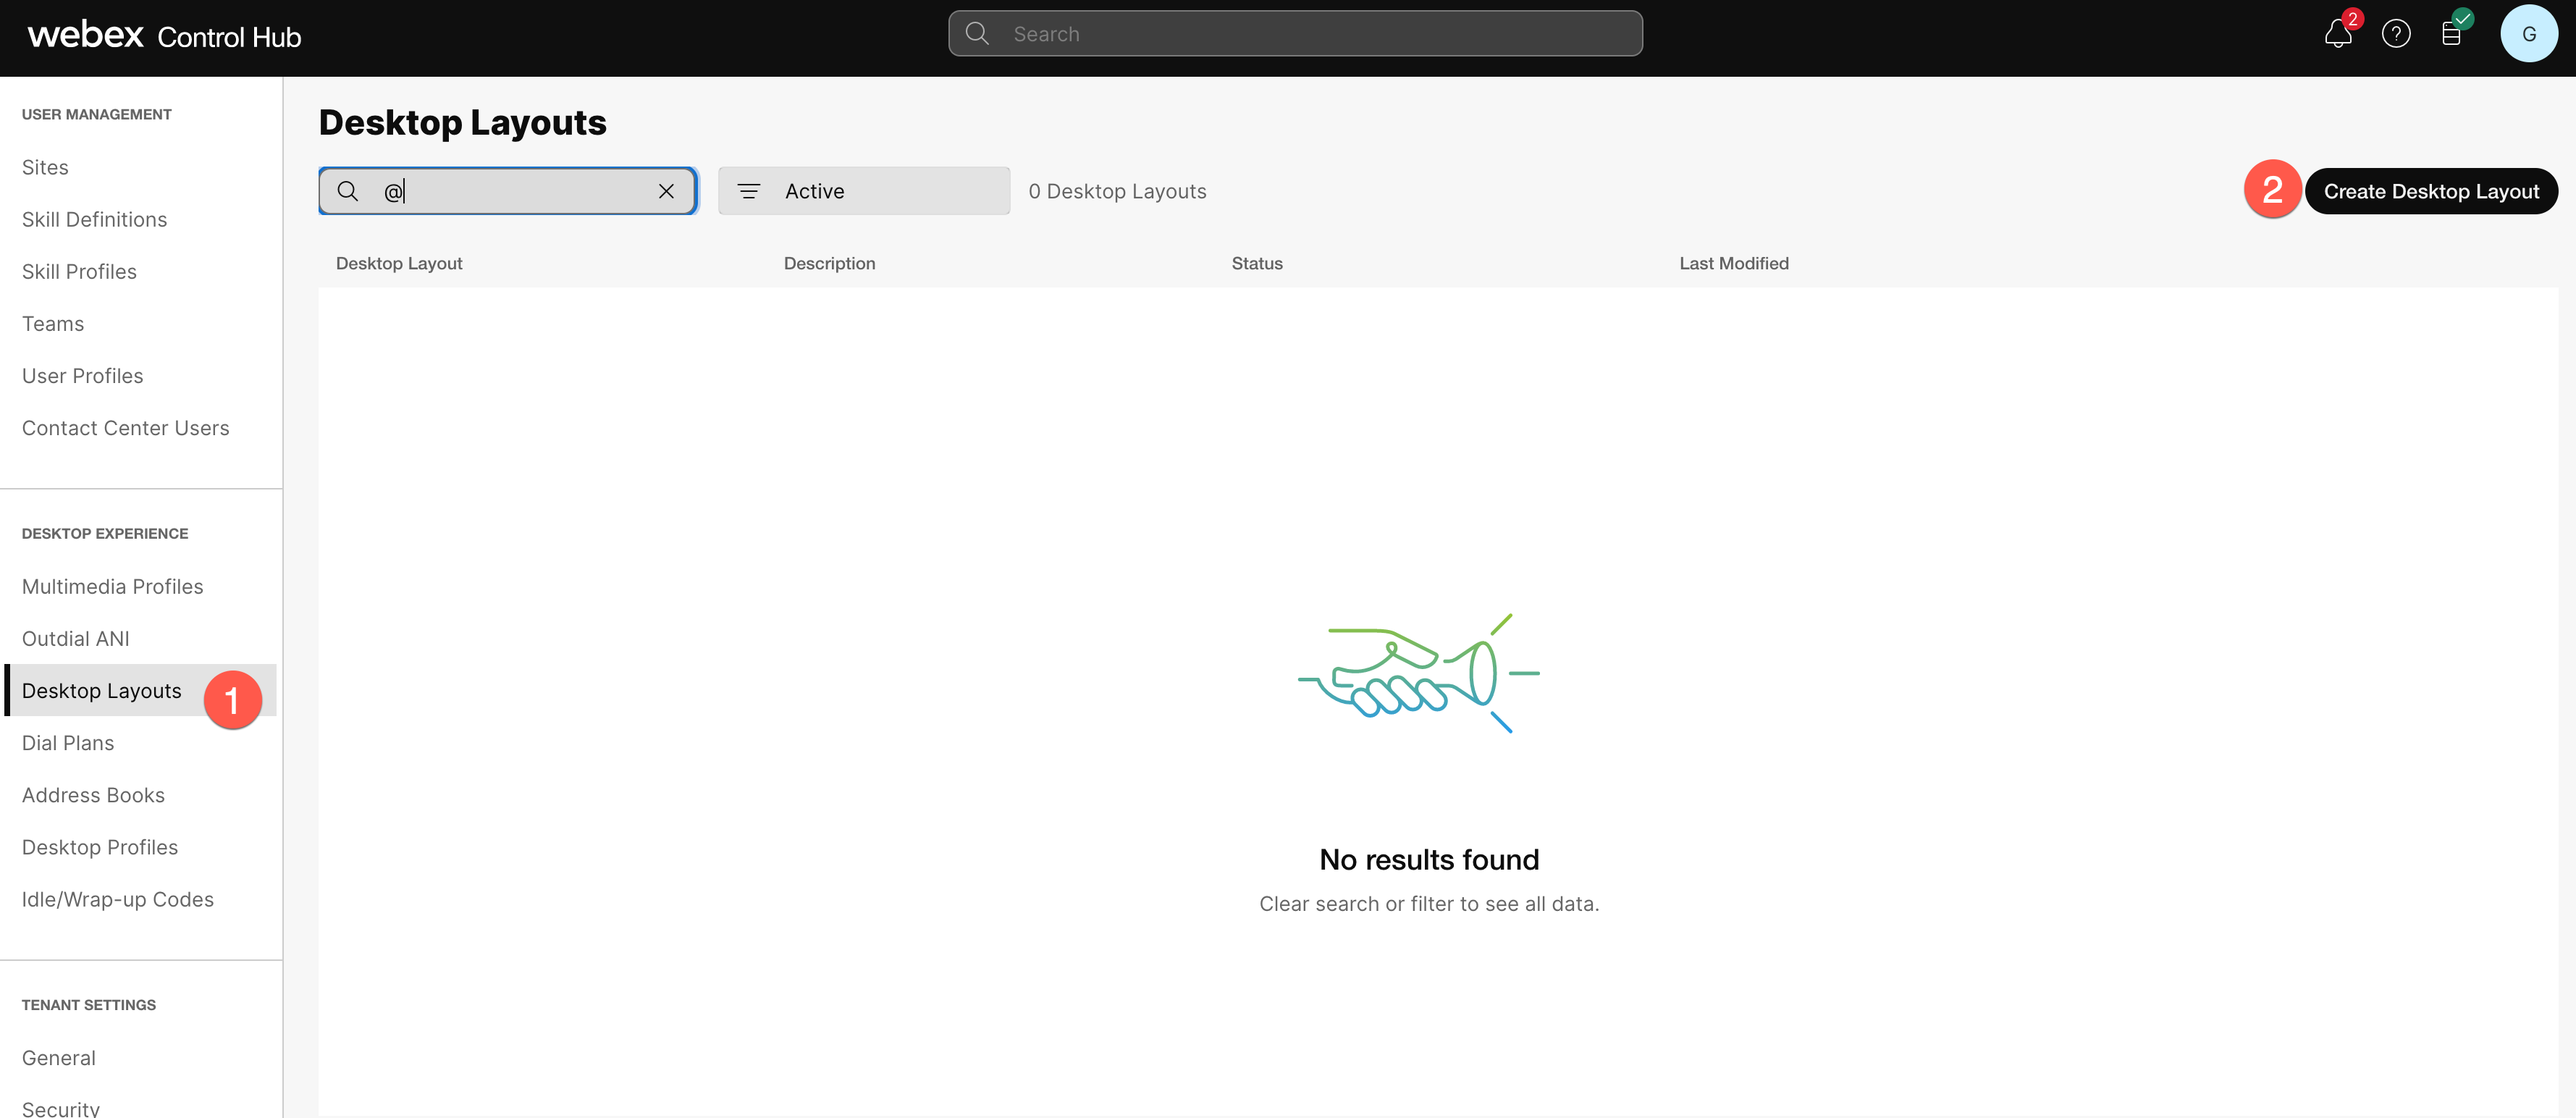
-
Provide a desired name and select the team that the agent is part of. Also, download the dekstop layout.
-
Edit the downloaded layout in any desired text editor and follow the instructions as per the desktop layout customization guide available here to update the layout. (search for
agentx-preview-campaignin this article to view the respective content) -
Save this layout as a new file and upload it to desktop layout configuration. Click
Save
-
Login to Agent desktop with the team that is assigned this layout and verify that the campaign management icon is visible on the desktop

Step 7: Create Campaign Group (Preview)
-
Navigate to Contact Center Administration portal
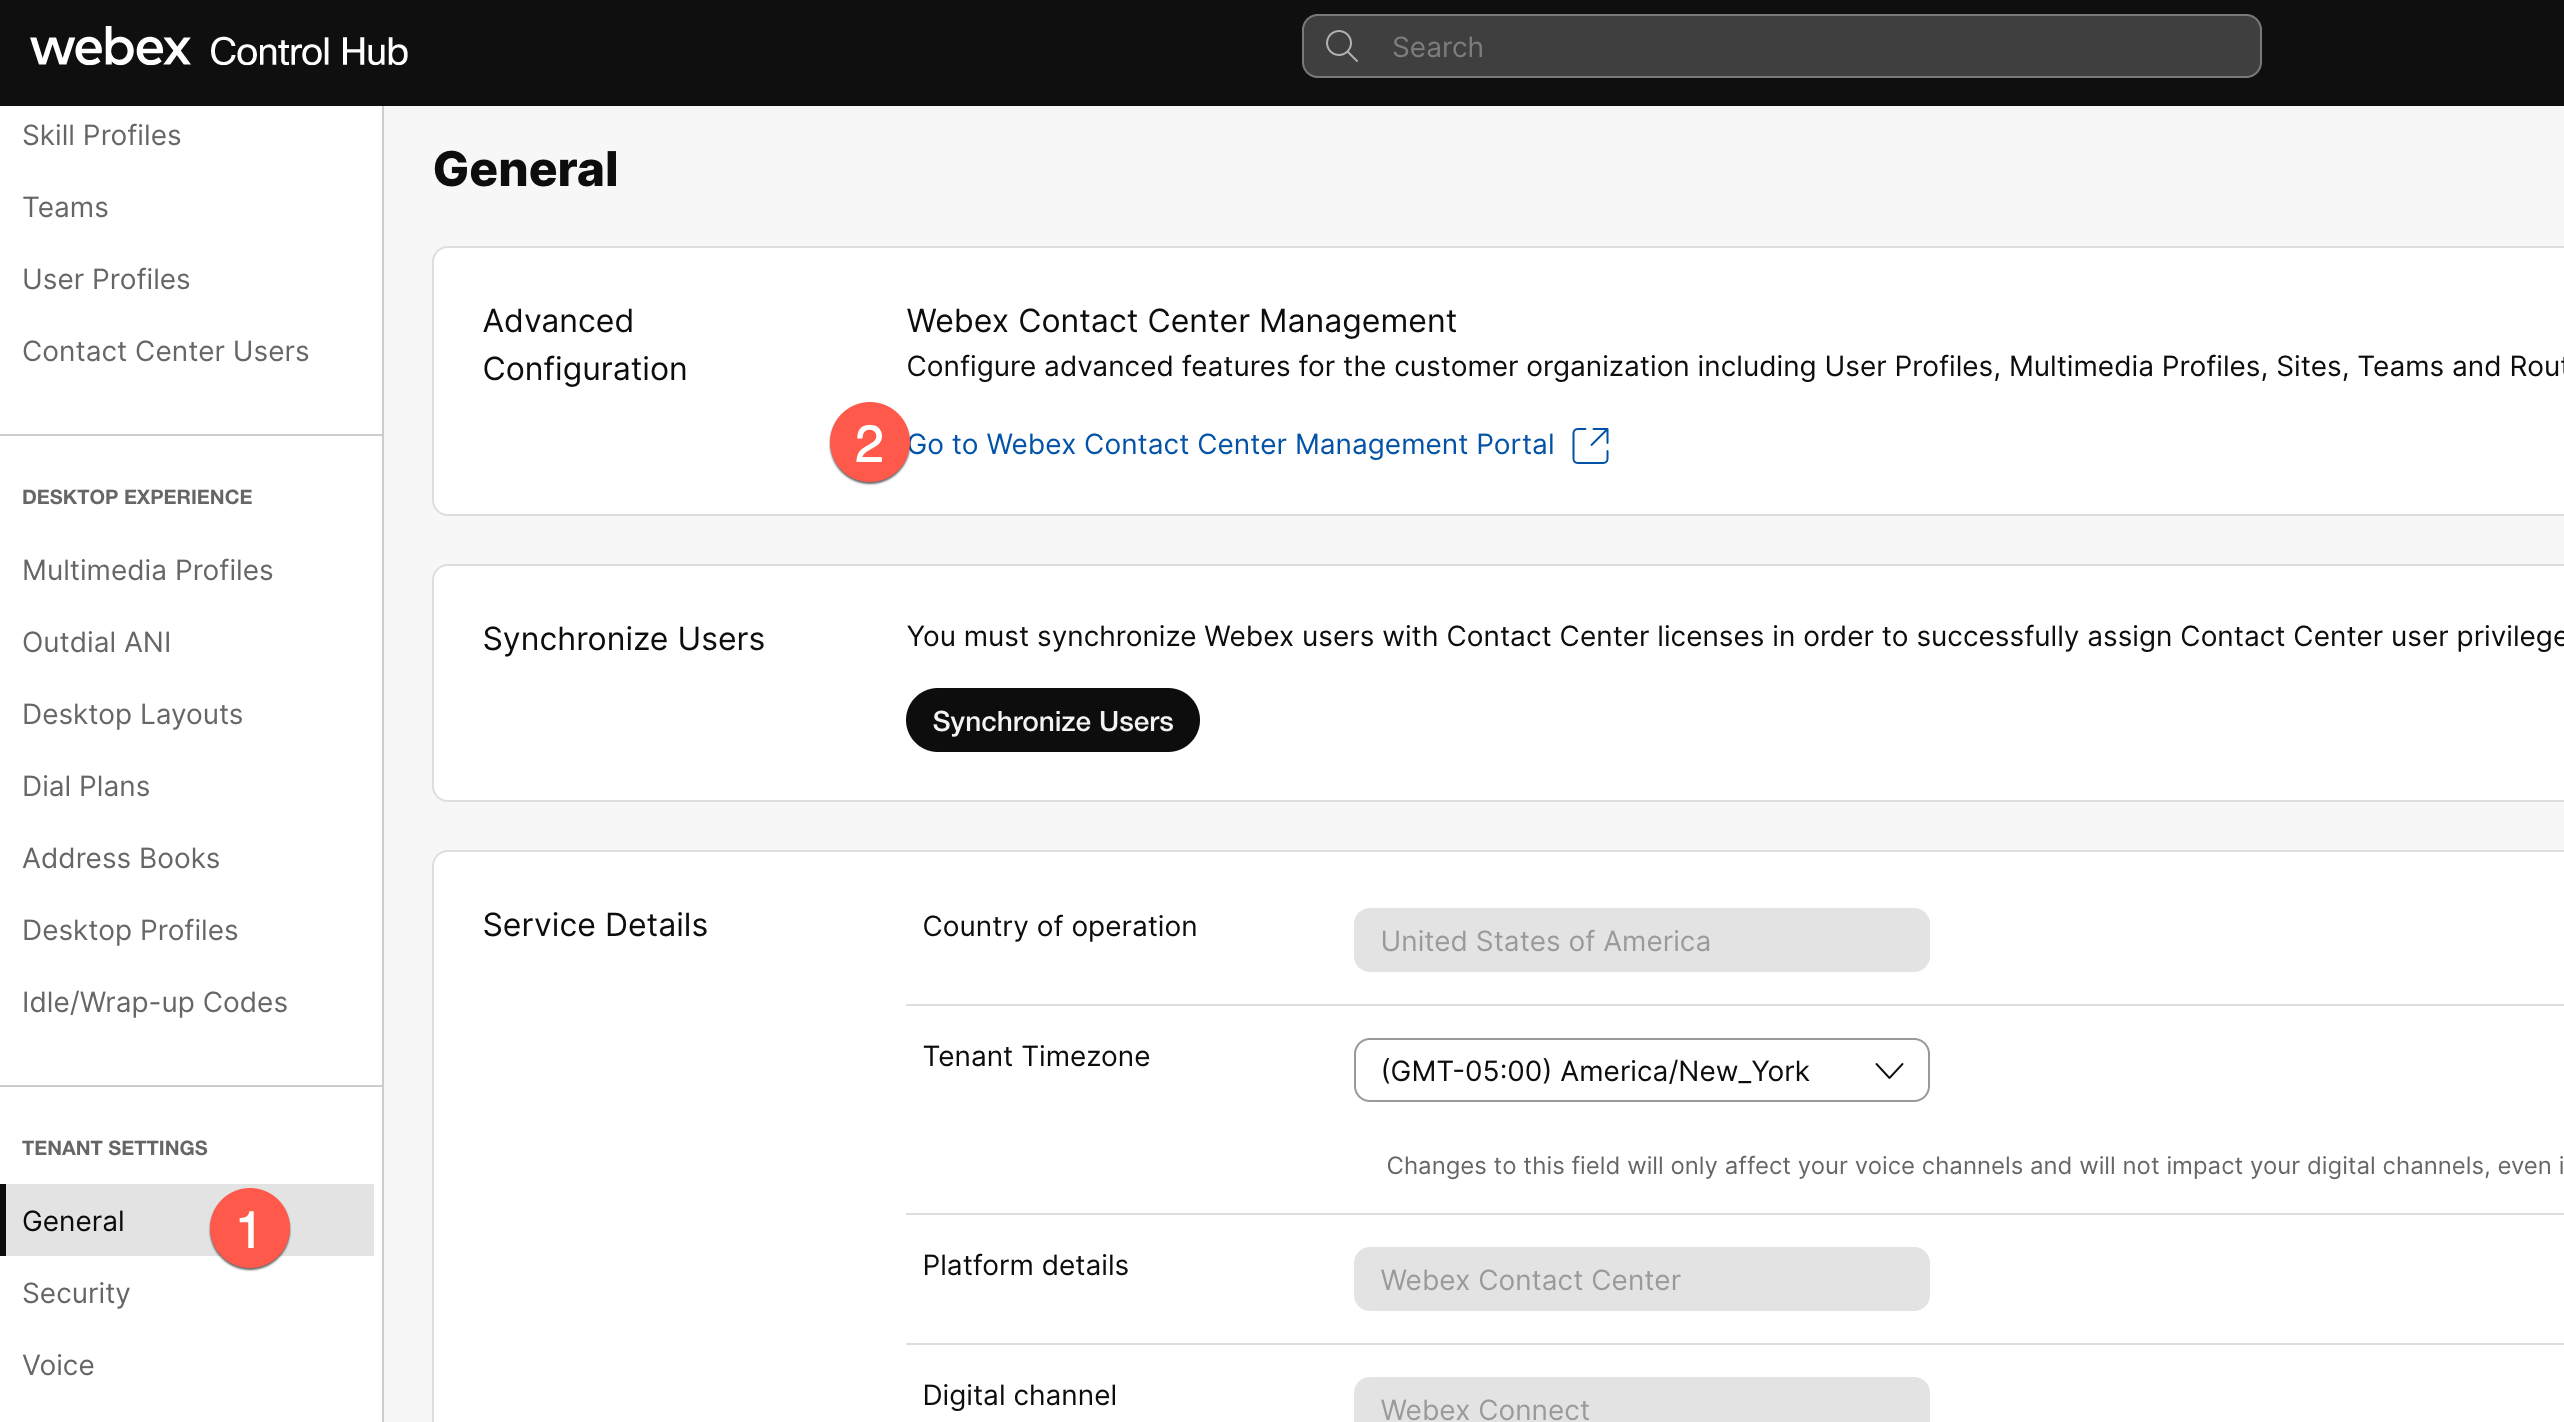
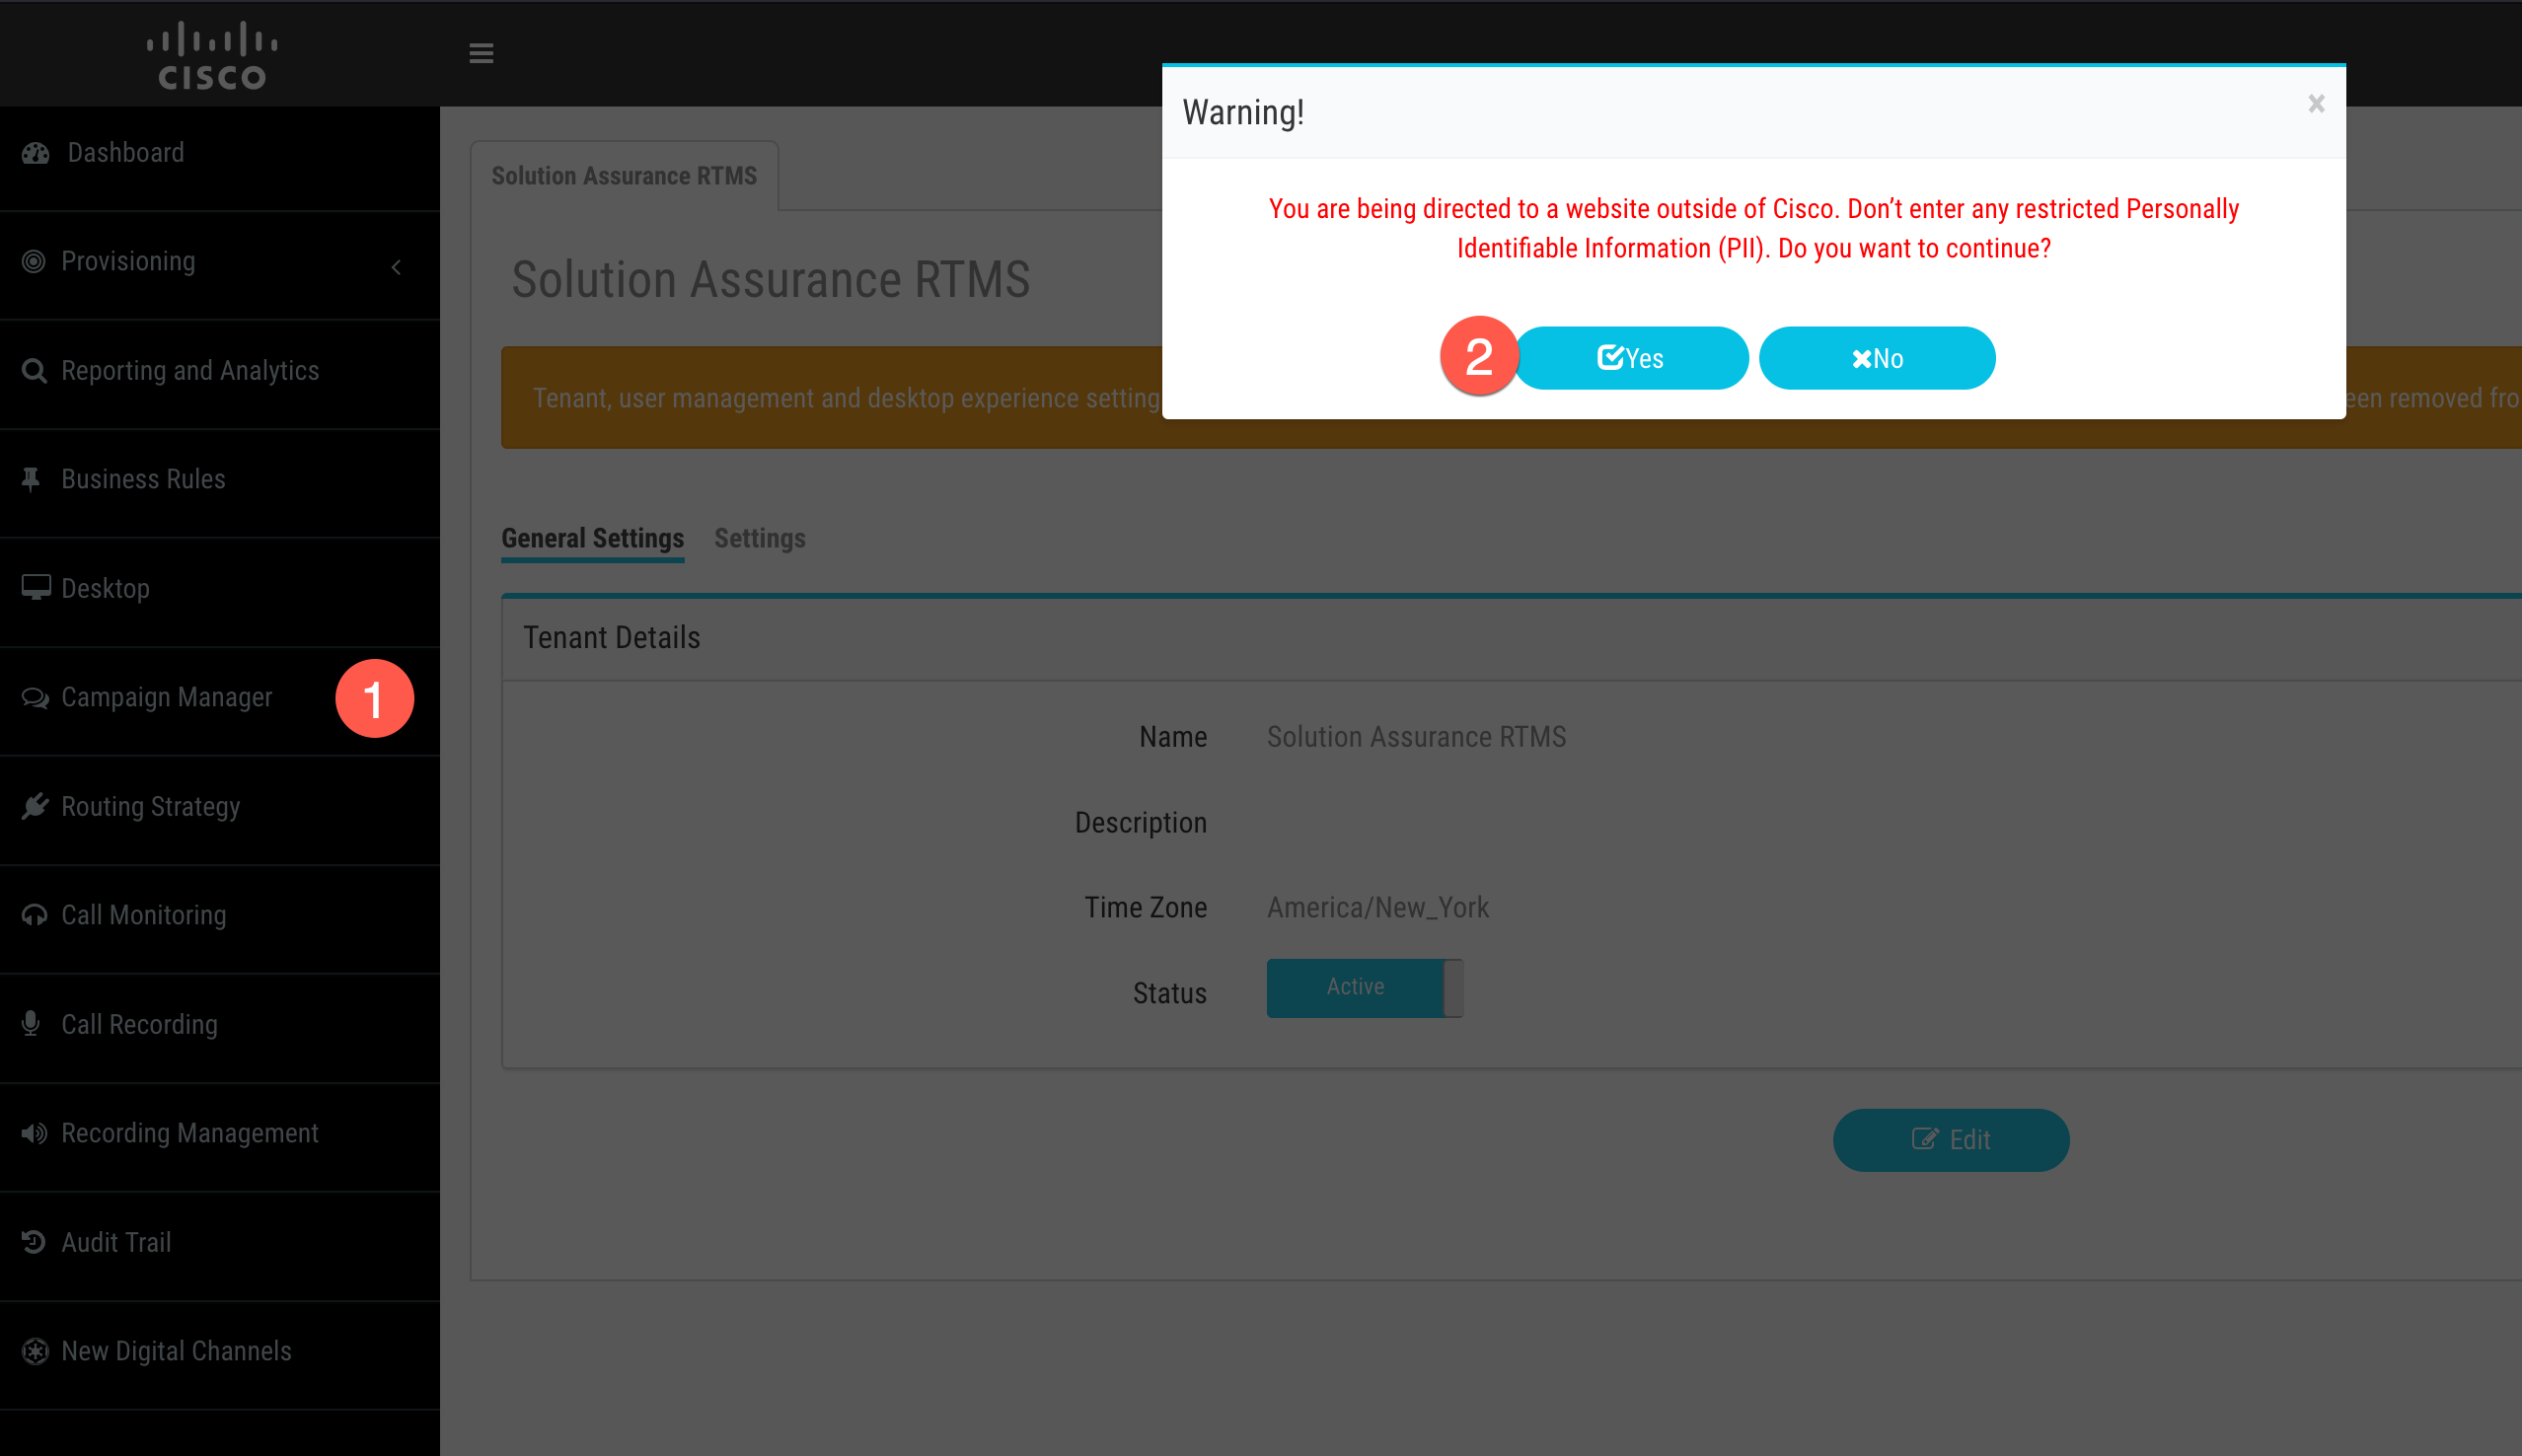
-
Cross launch into Acqueon administration portal
-
Navigate to
Groupand click+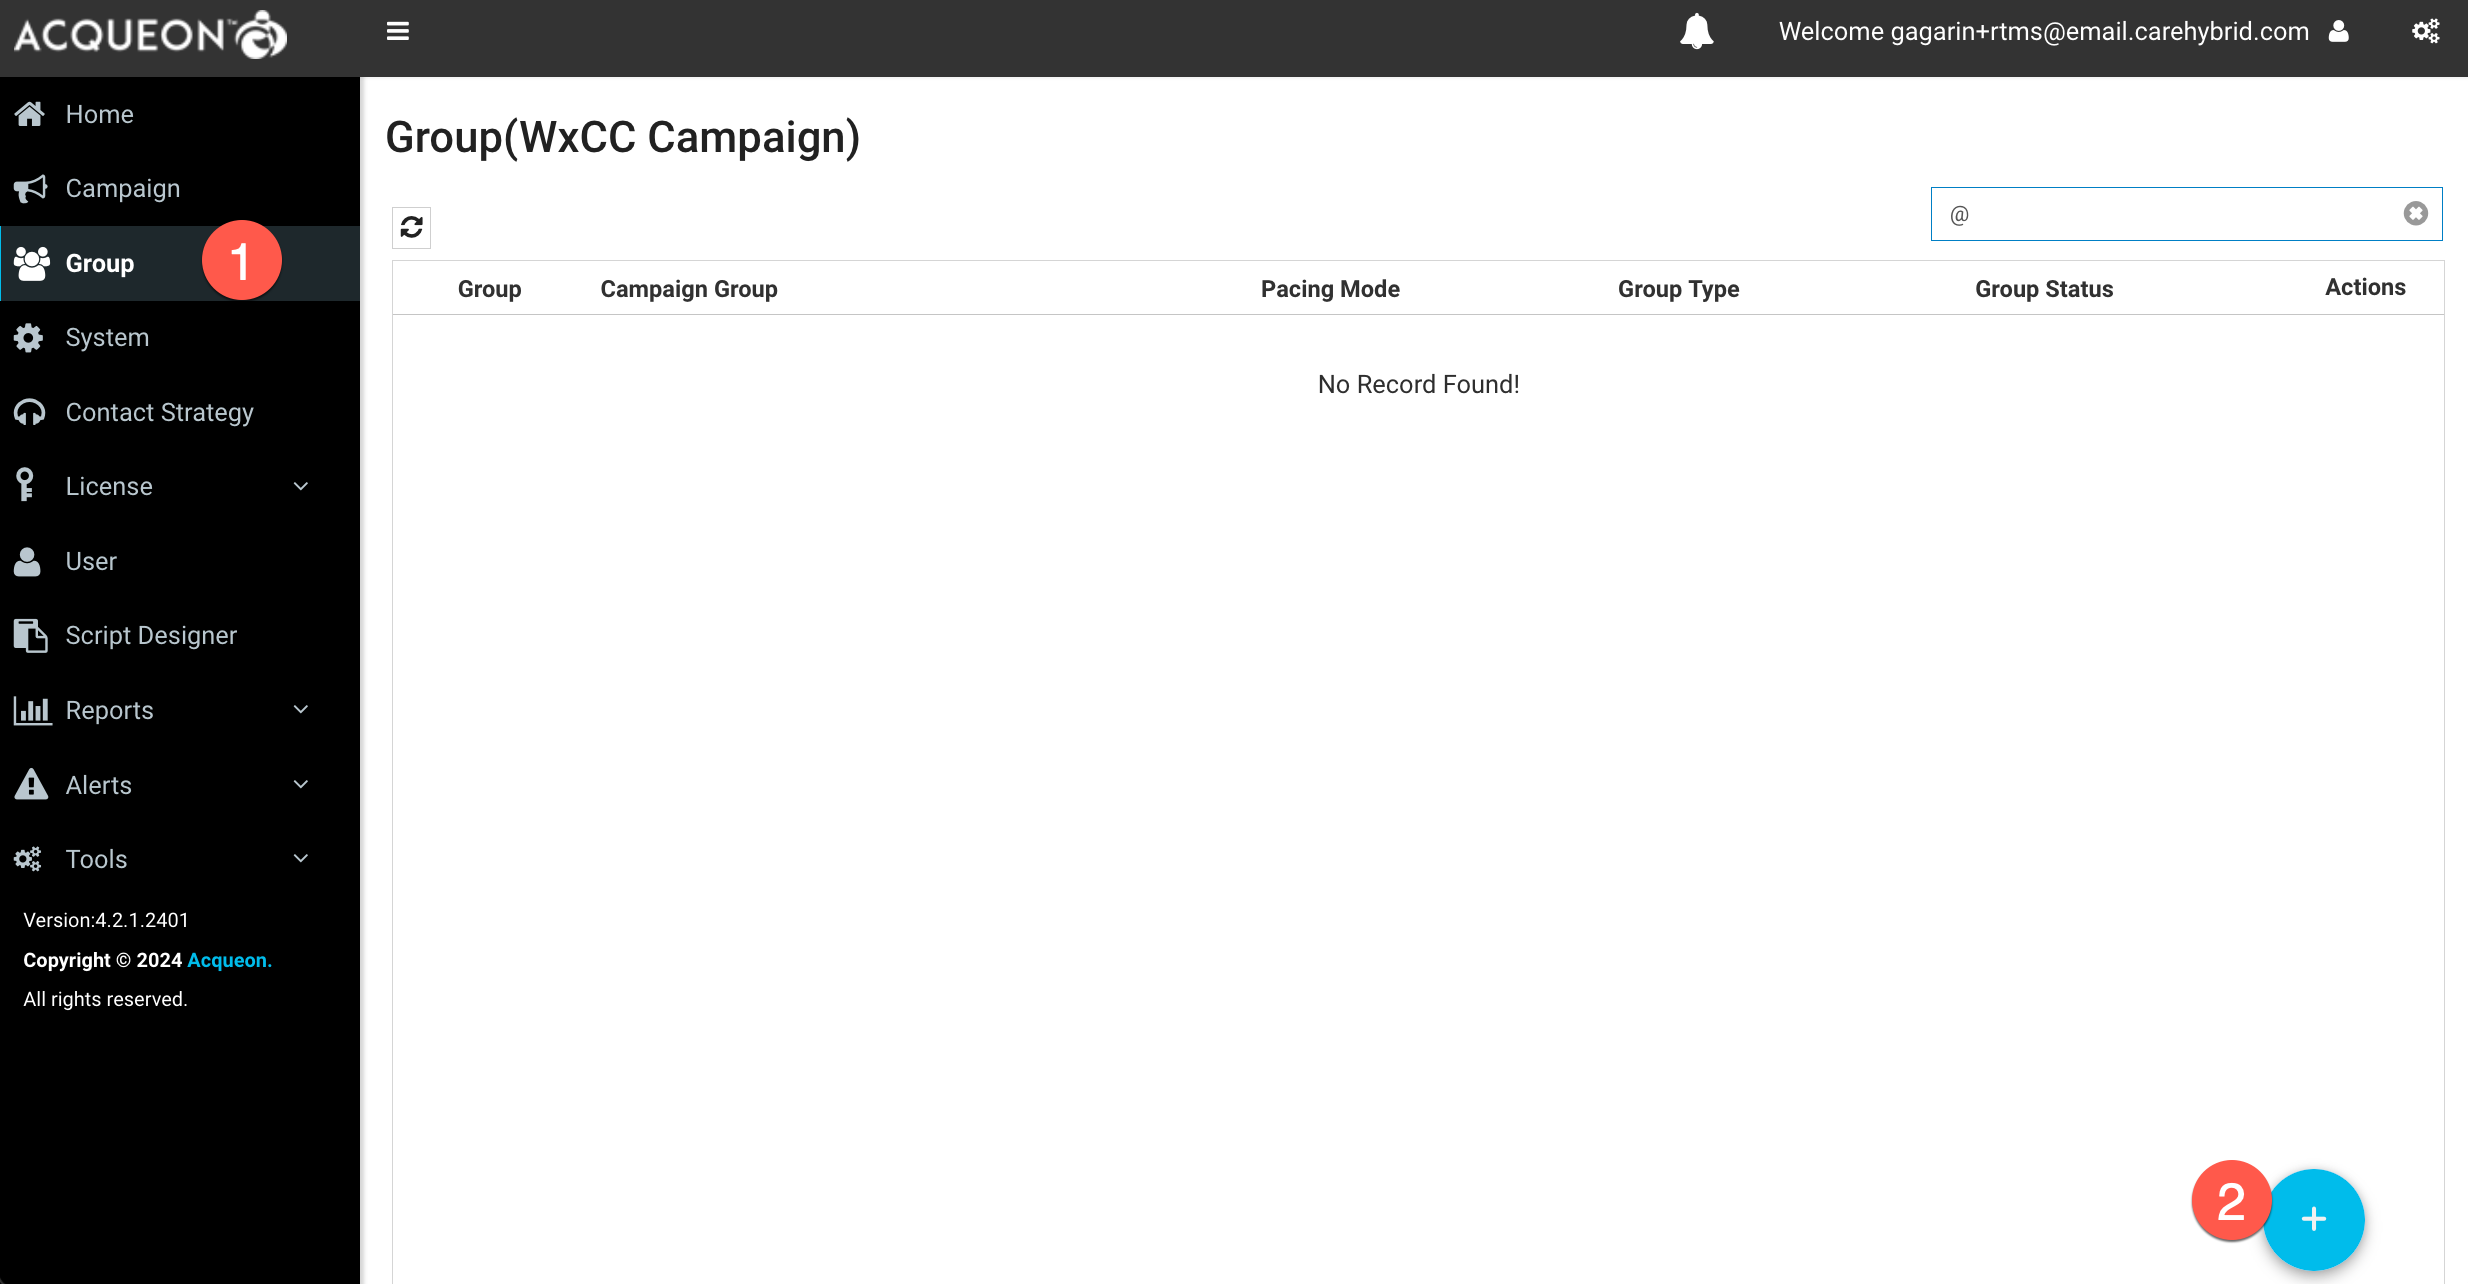
-
Select
Voice Campaign Groupoption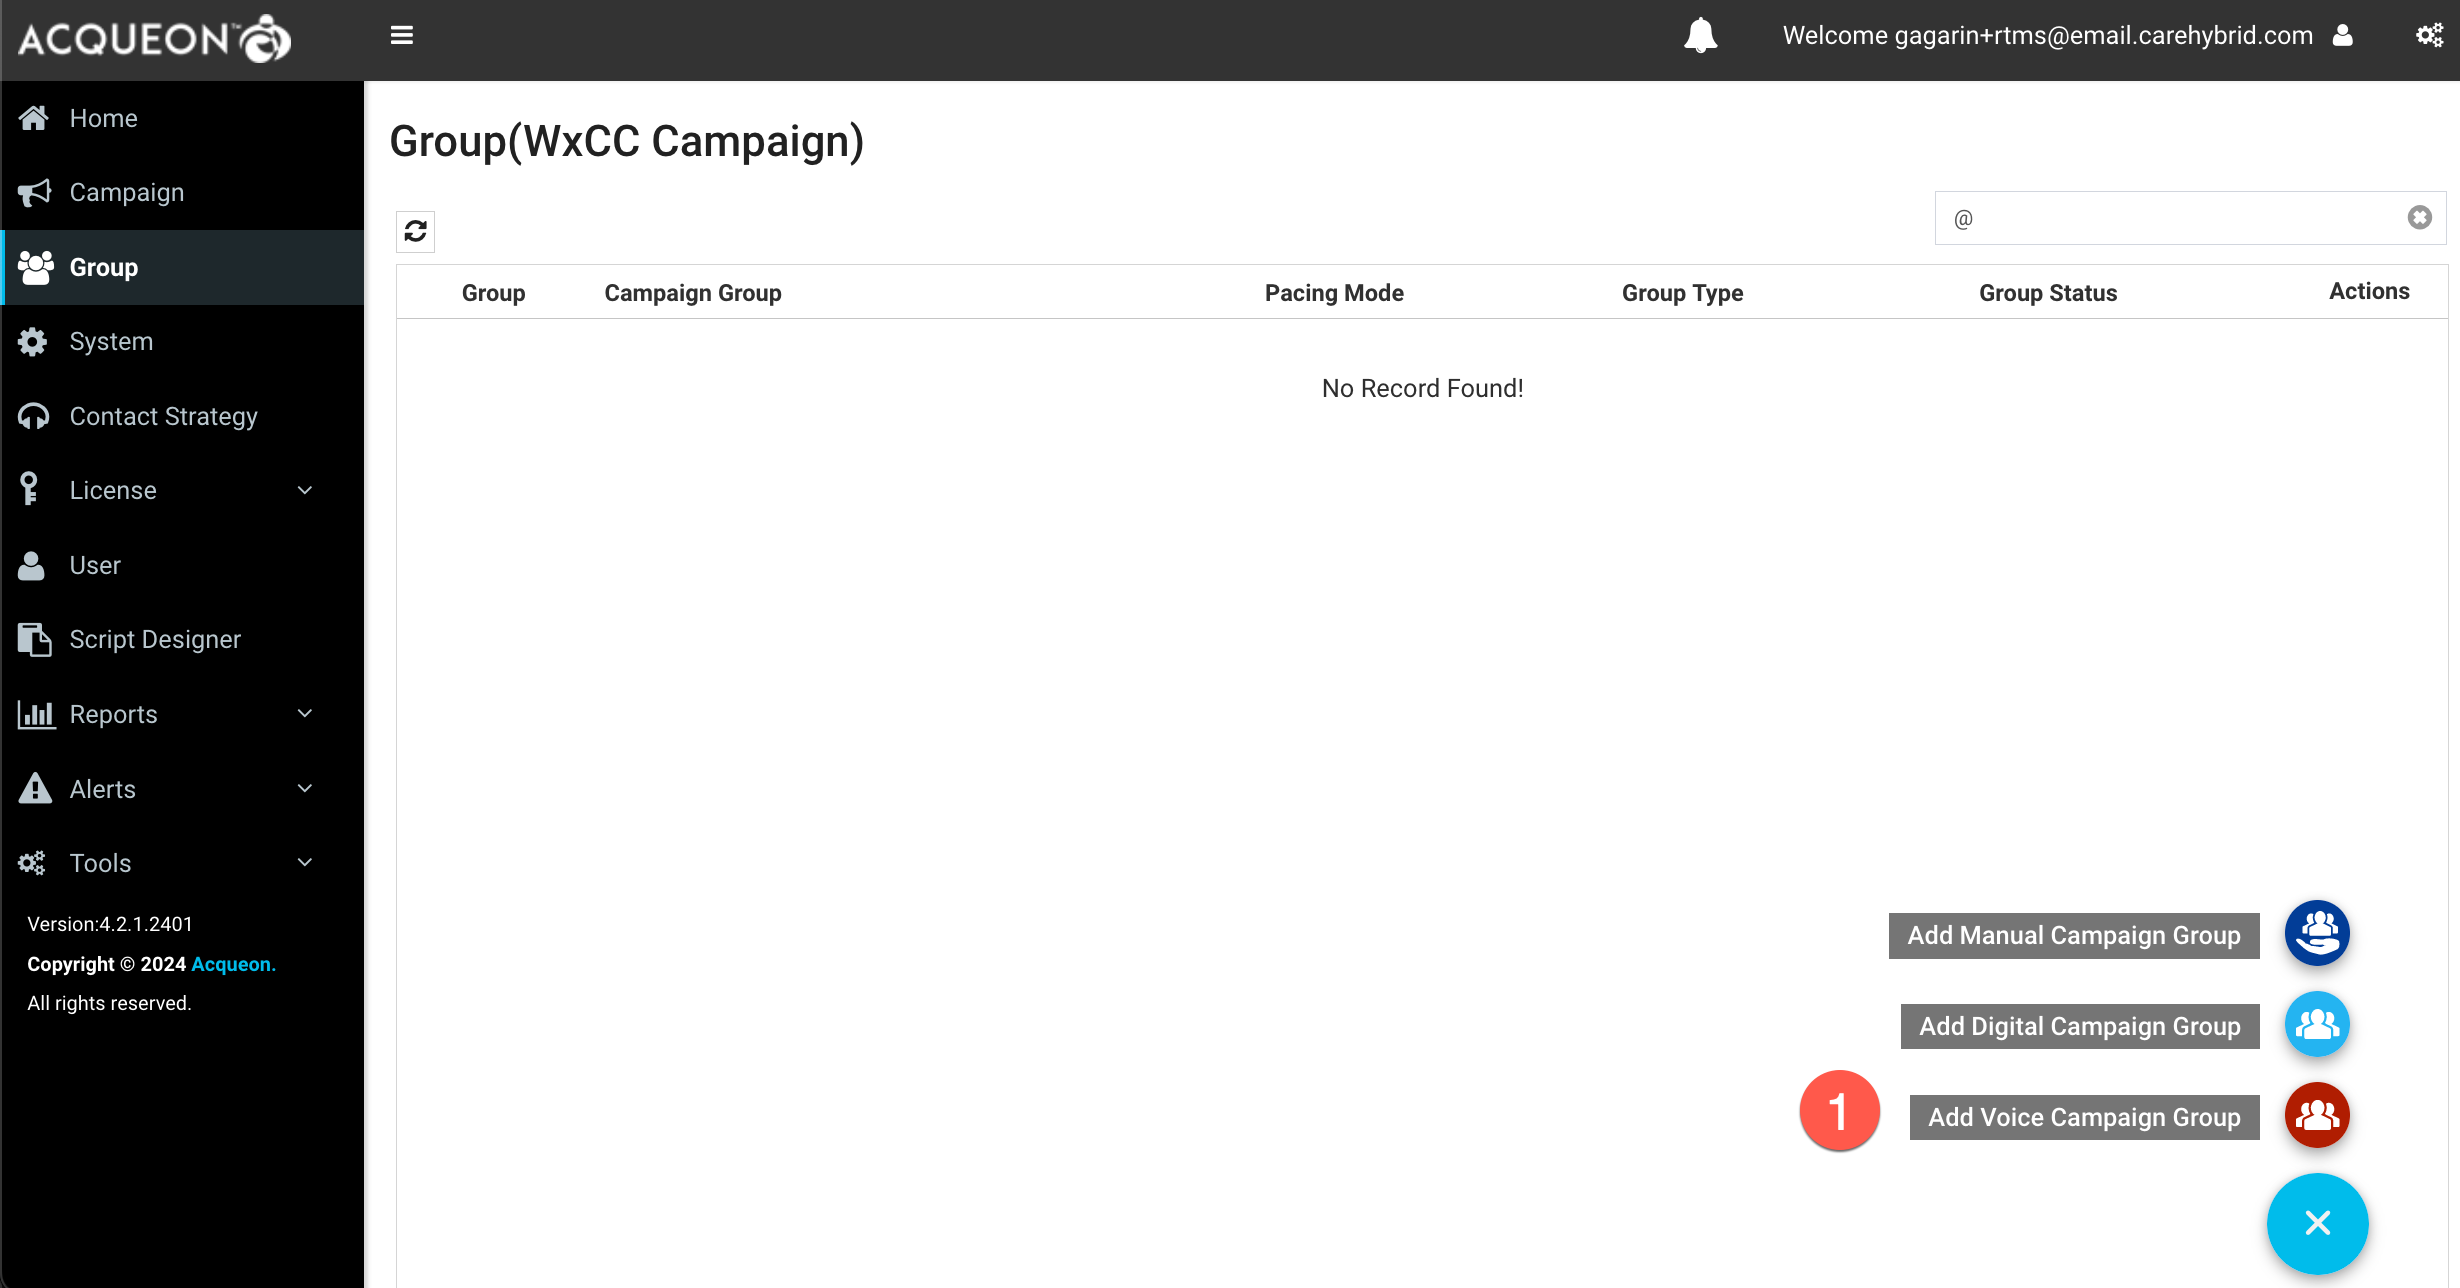
- Configure the below:
- Name:
Enter desired Name - Dialer Name:
Select the dialer configured in your tenant - Entry POint:
Select the outdial entrypoint created in Step 5 - Pacing Mode:
Preview
- Name:
-
Click
Next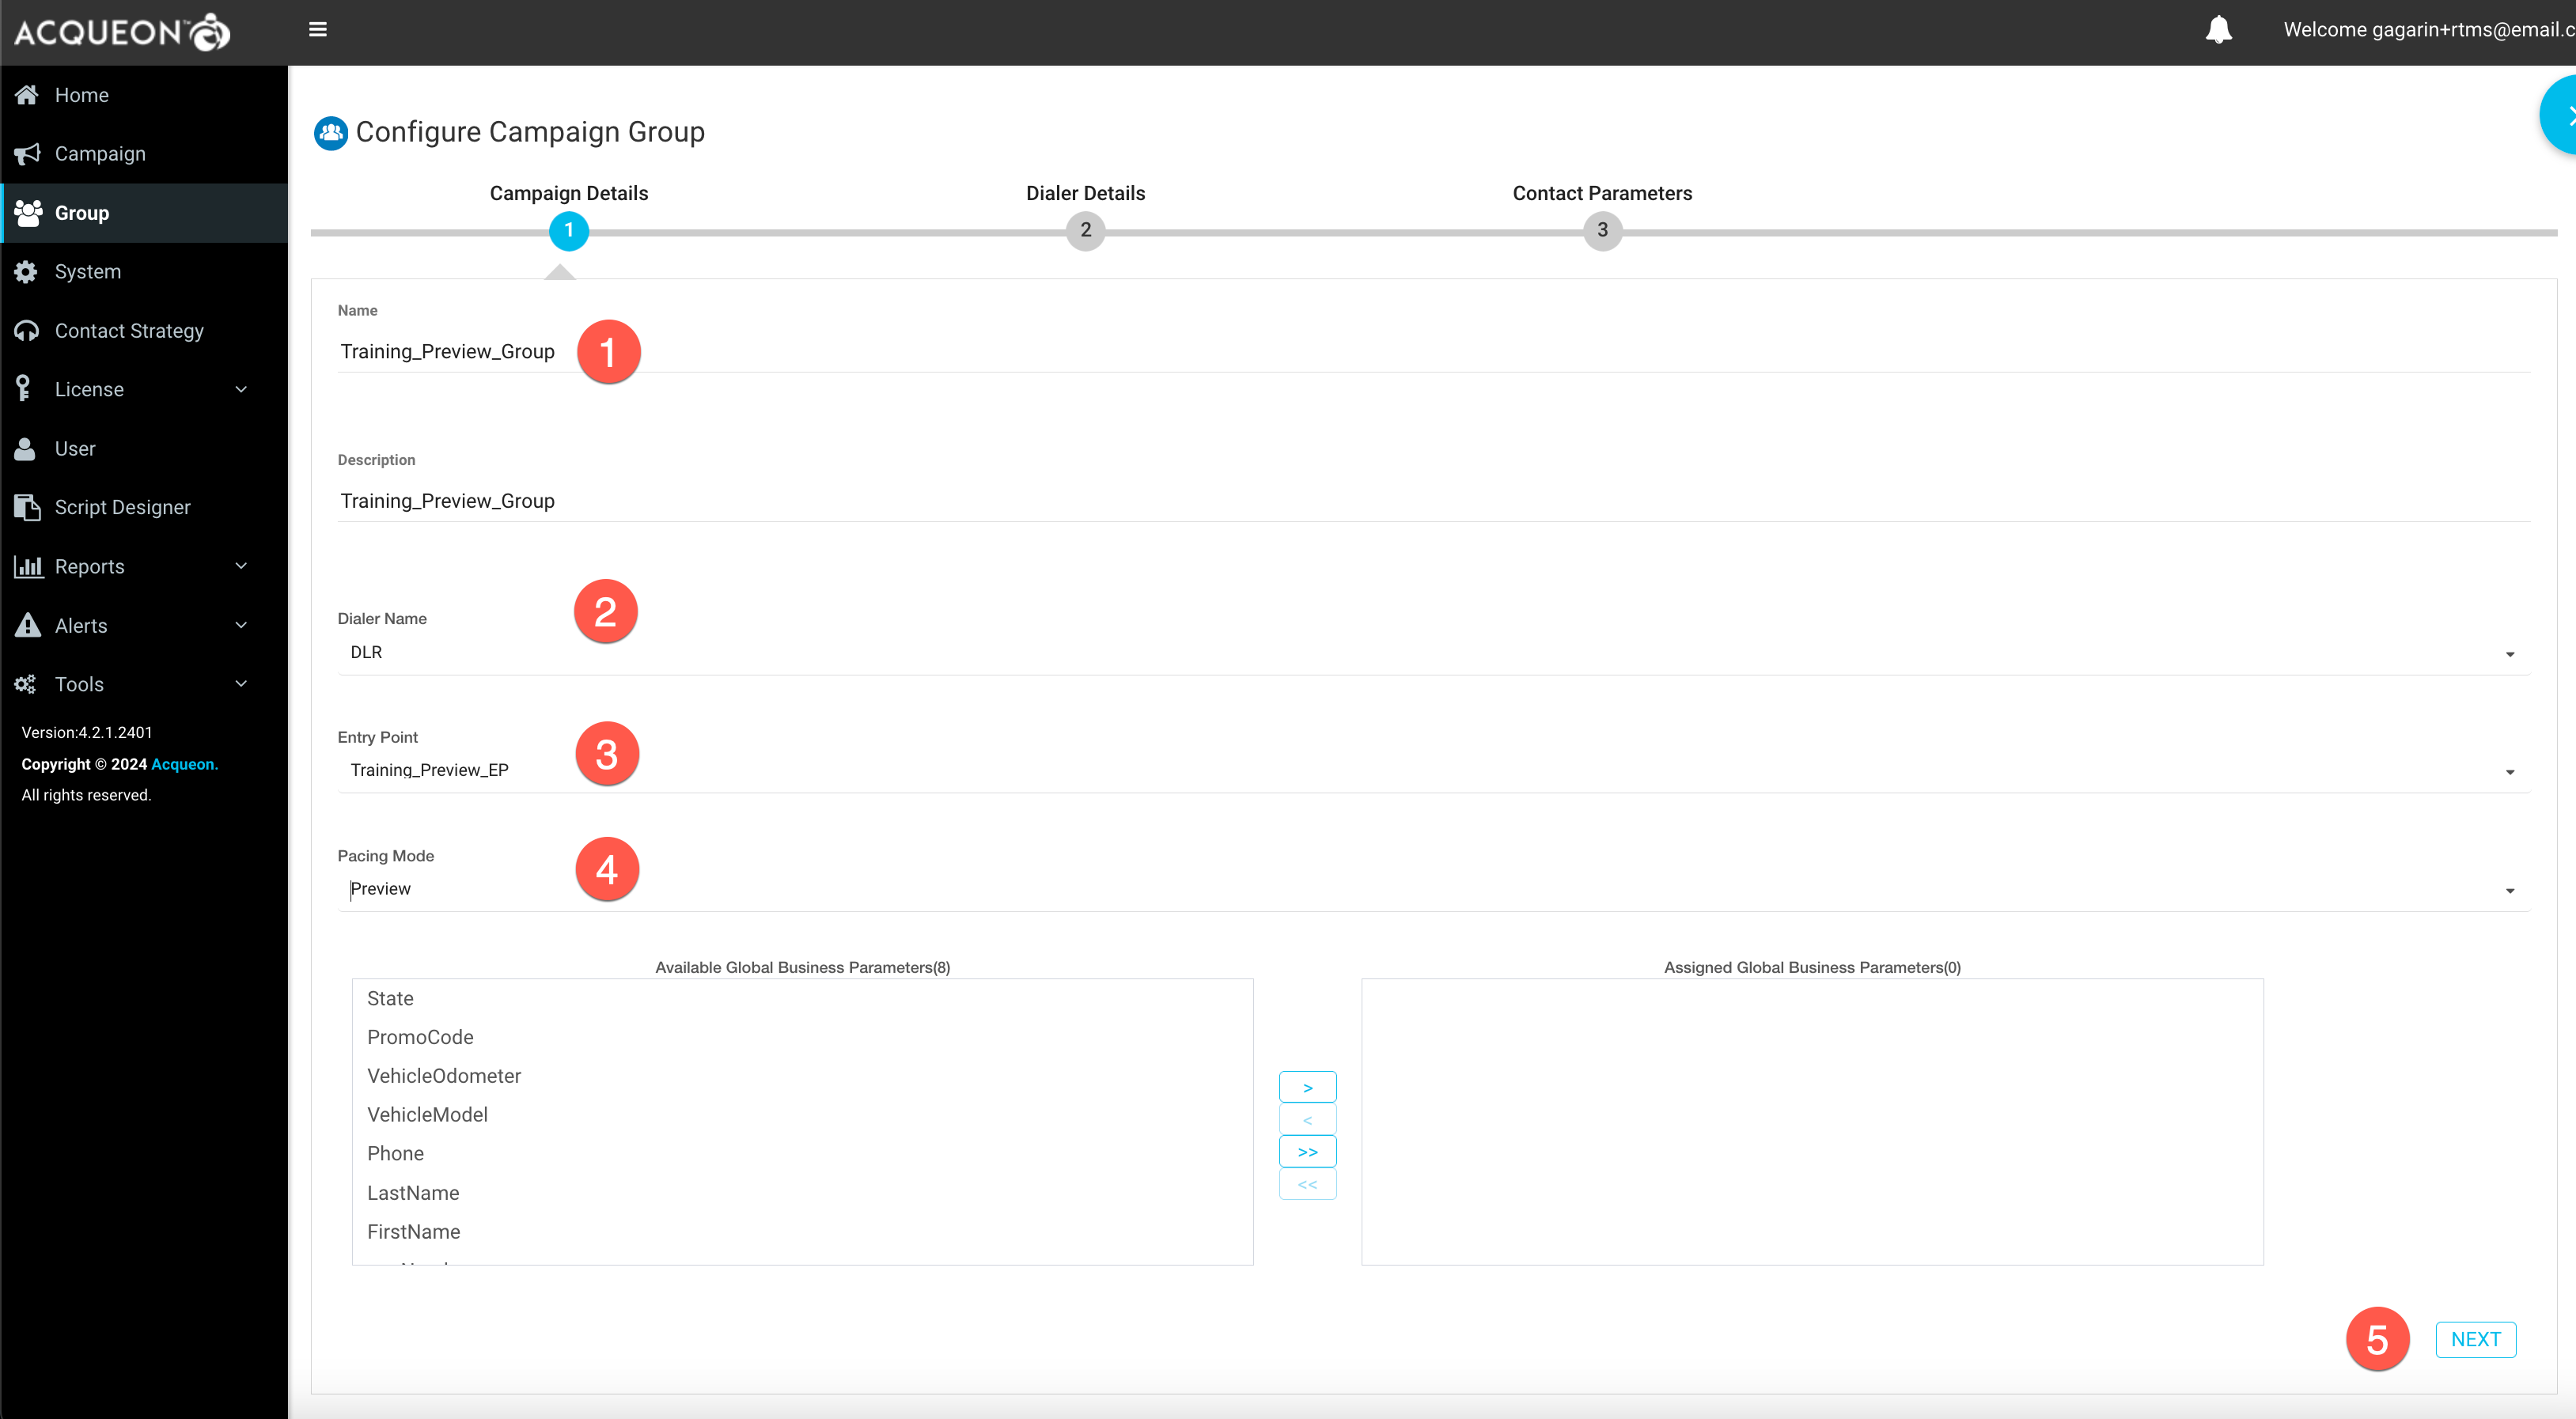
- Select ANI based on your requirement
-
From the list of available teams, select the respective team that is assigned to agent and move it under
Assigned Teams. ClickNext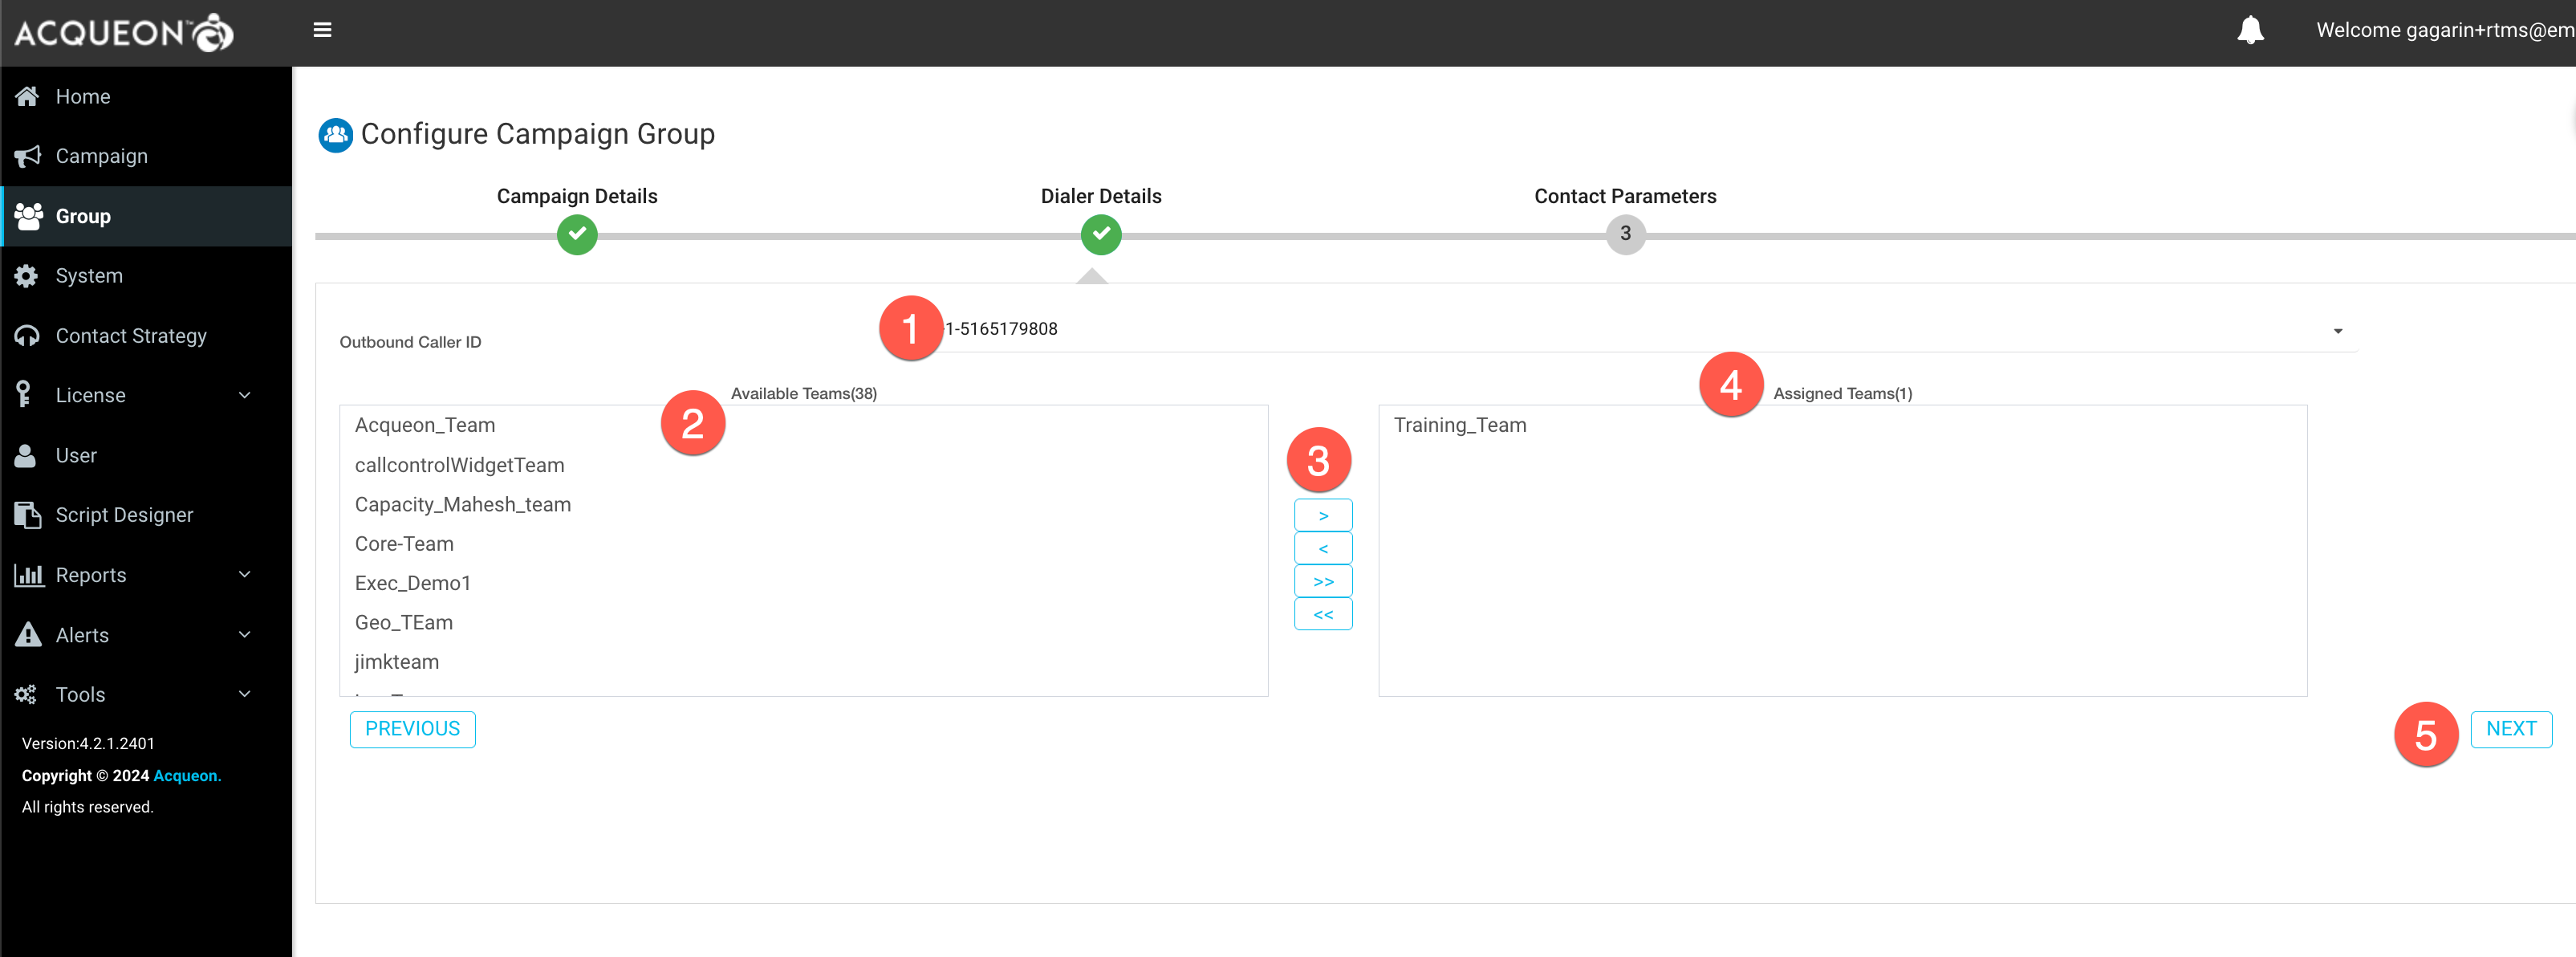
-
Click
Save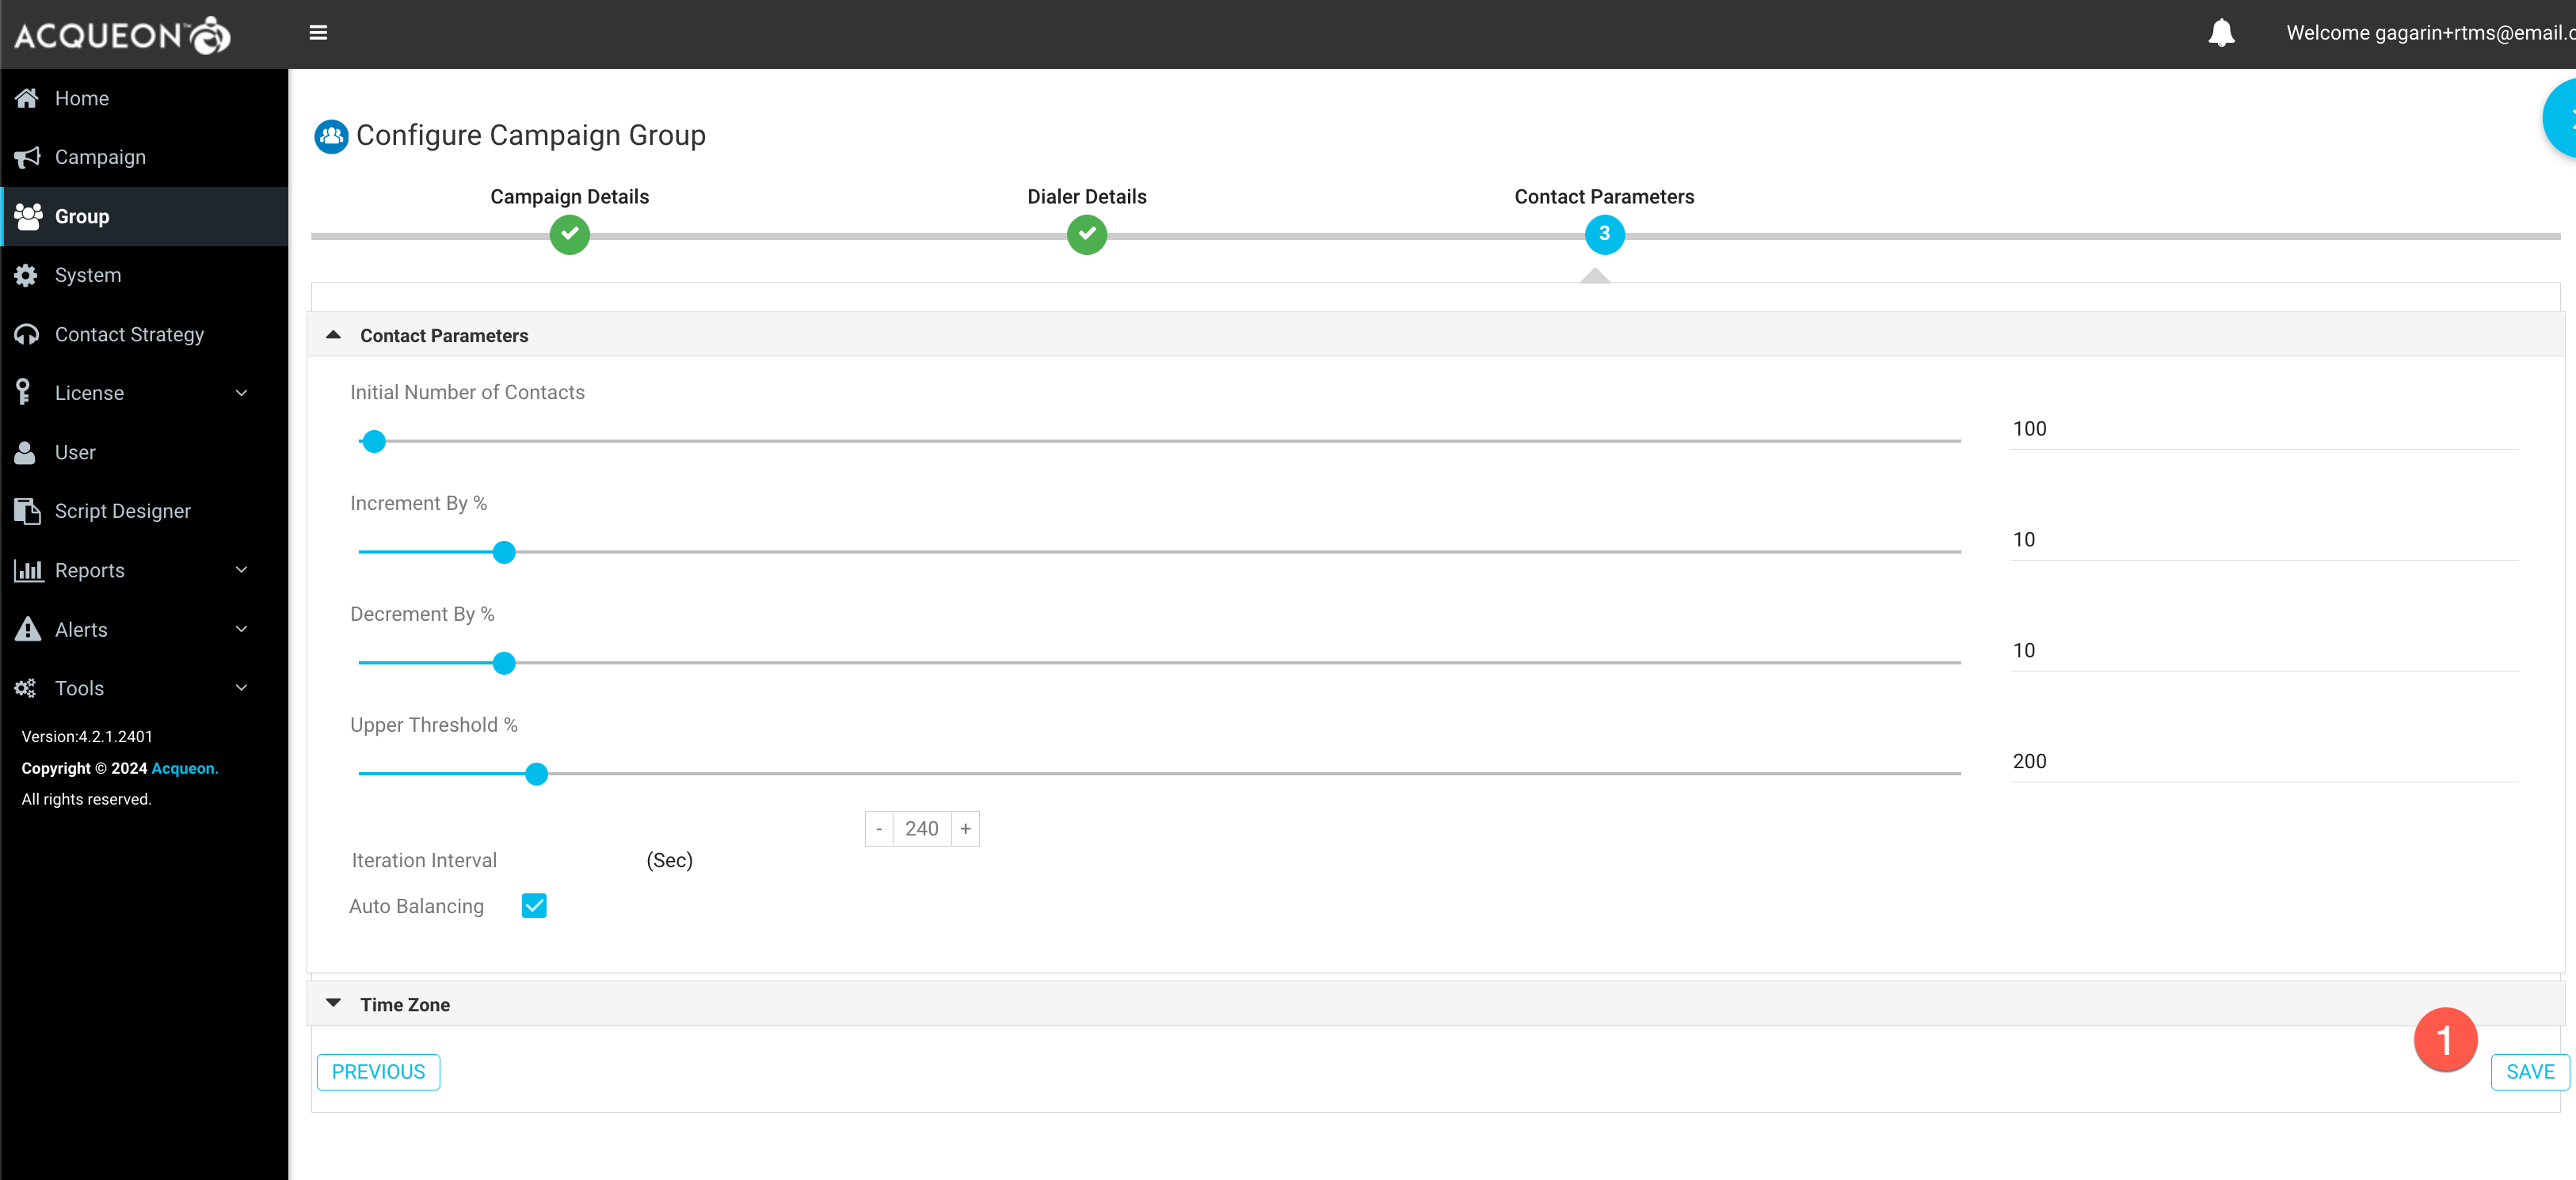
- Verify group status shows as
Executing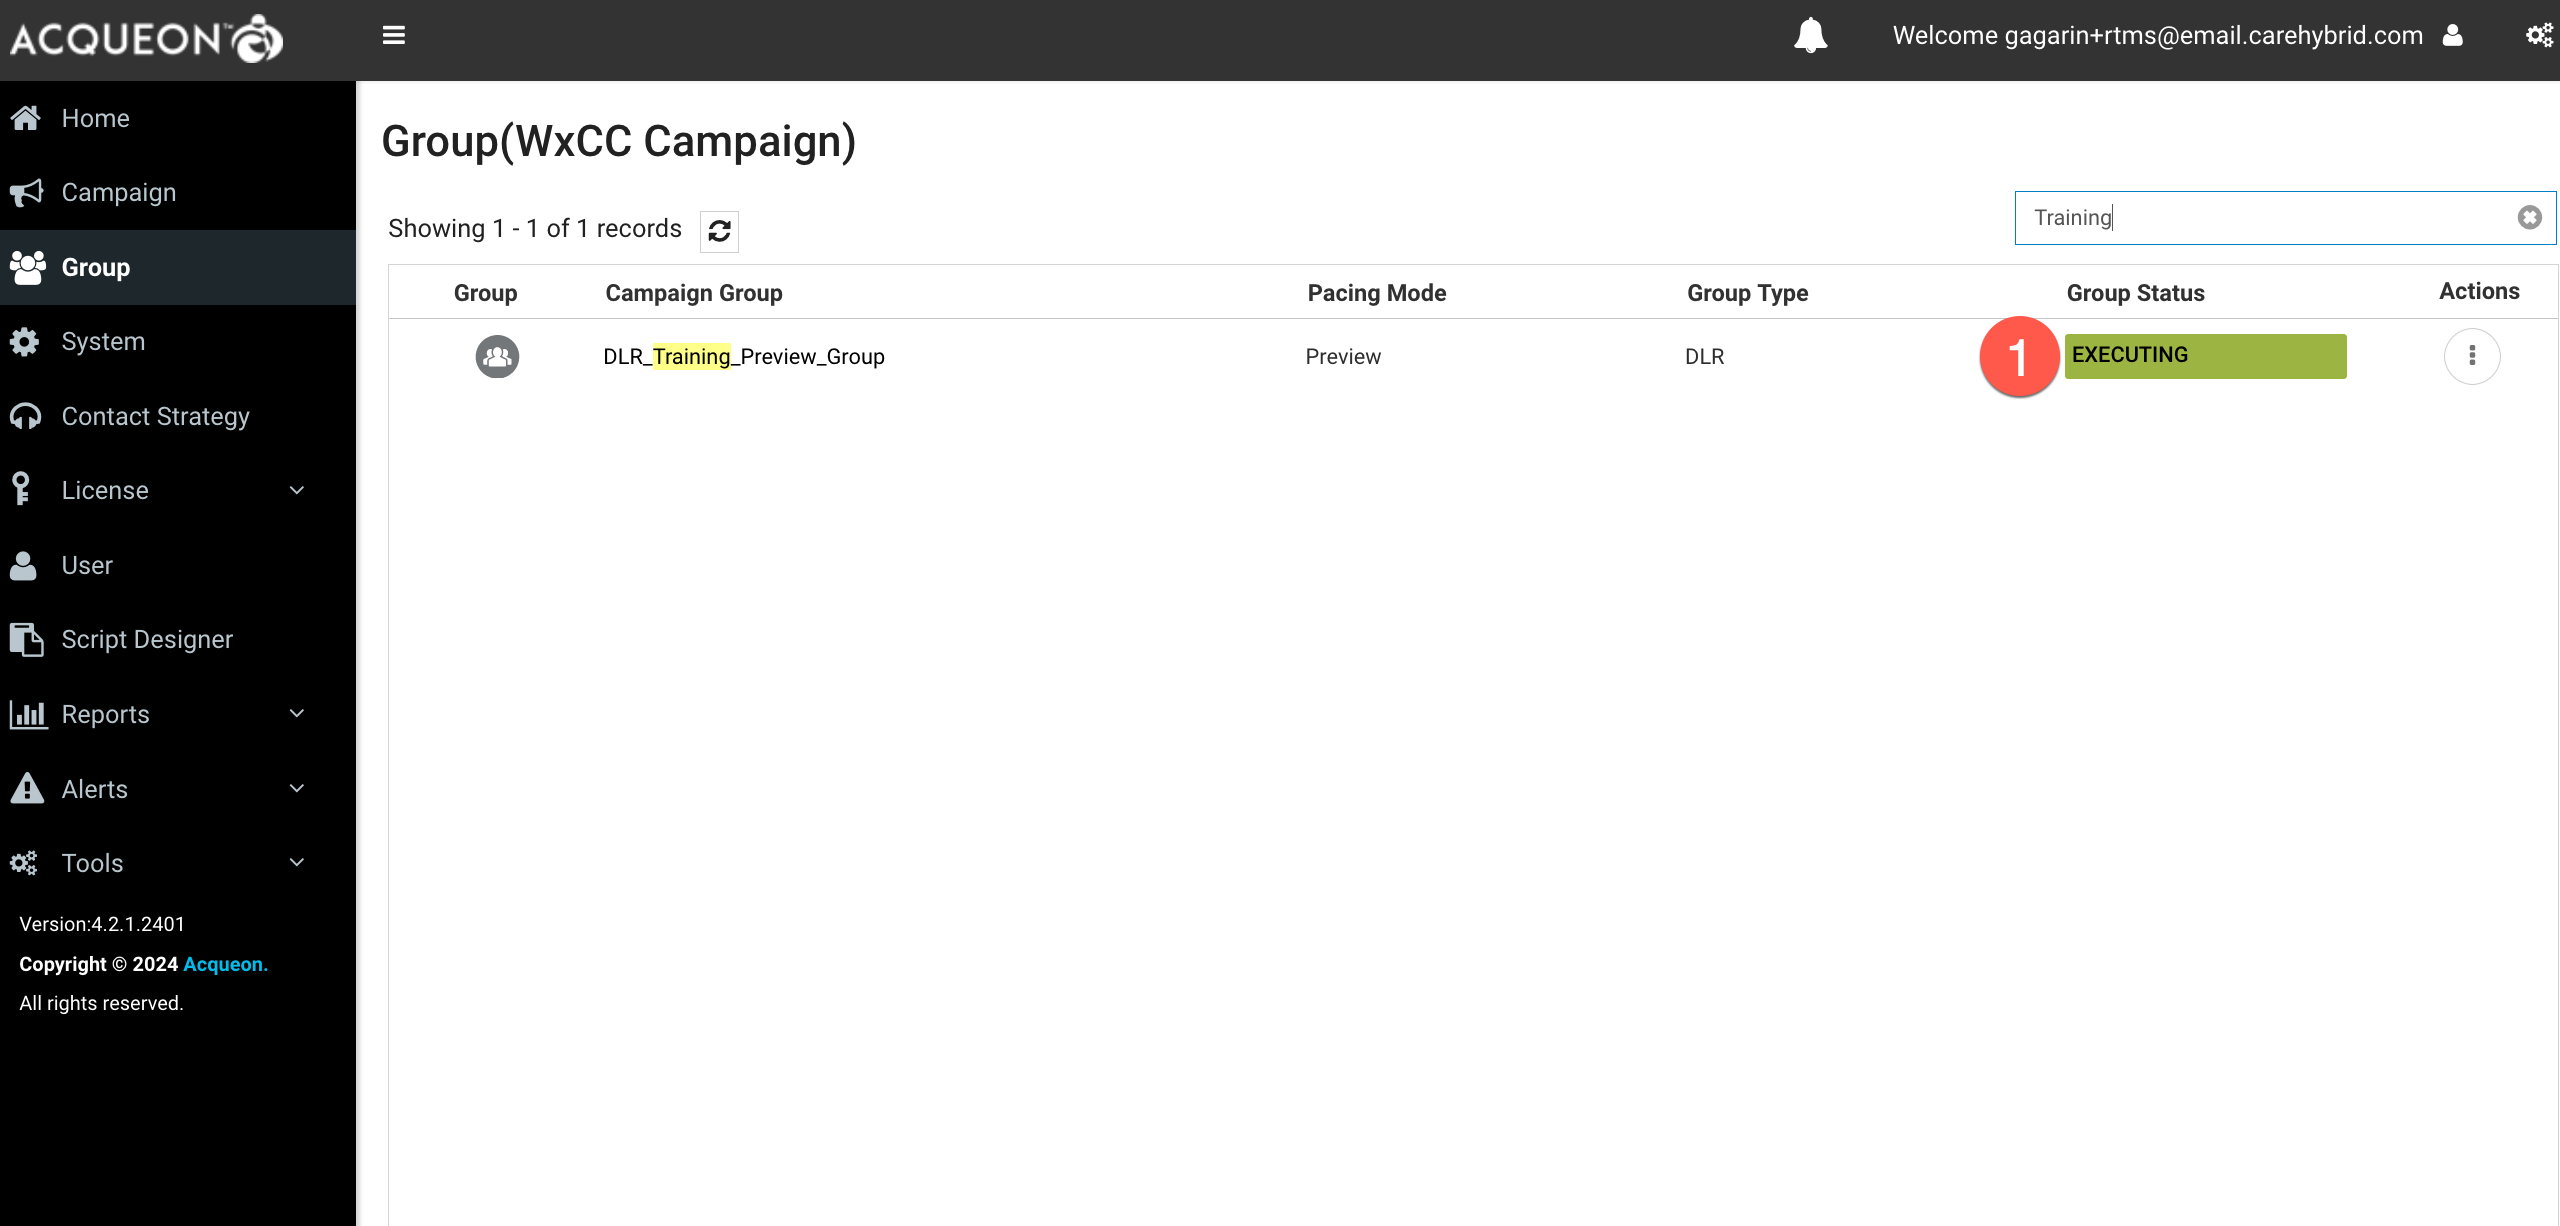
Step 8: Create Campaign (Preview)
-
Navigate to
Campaignand clickAdd Campaign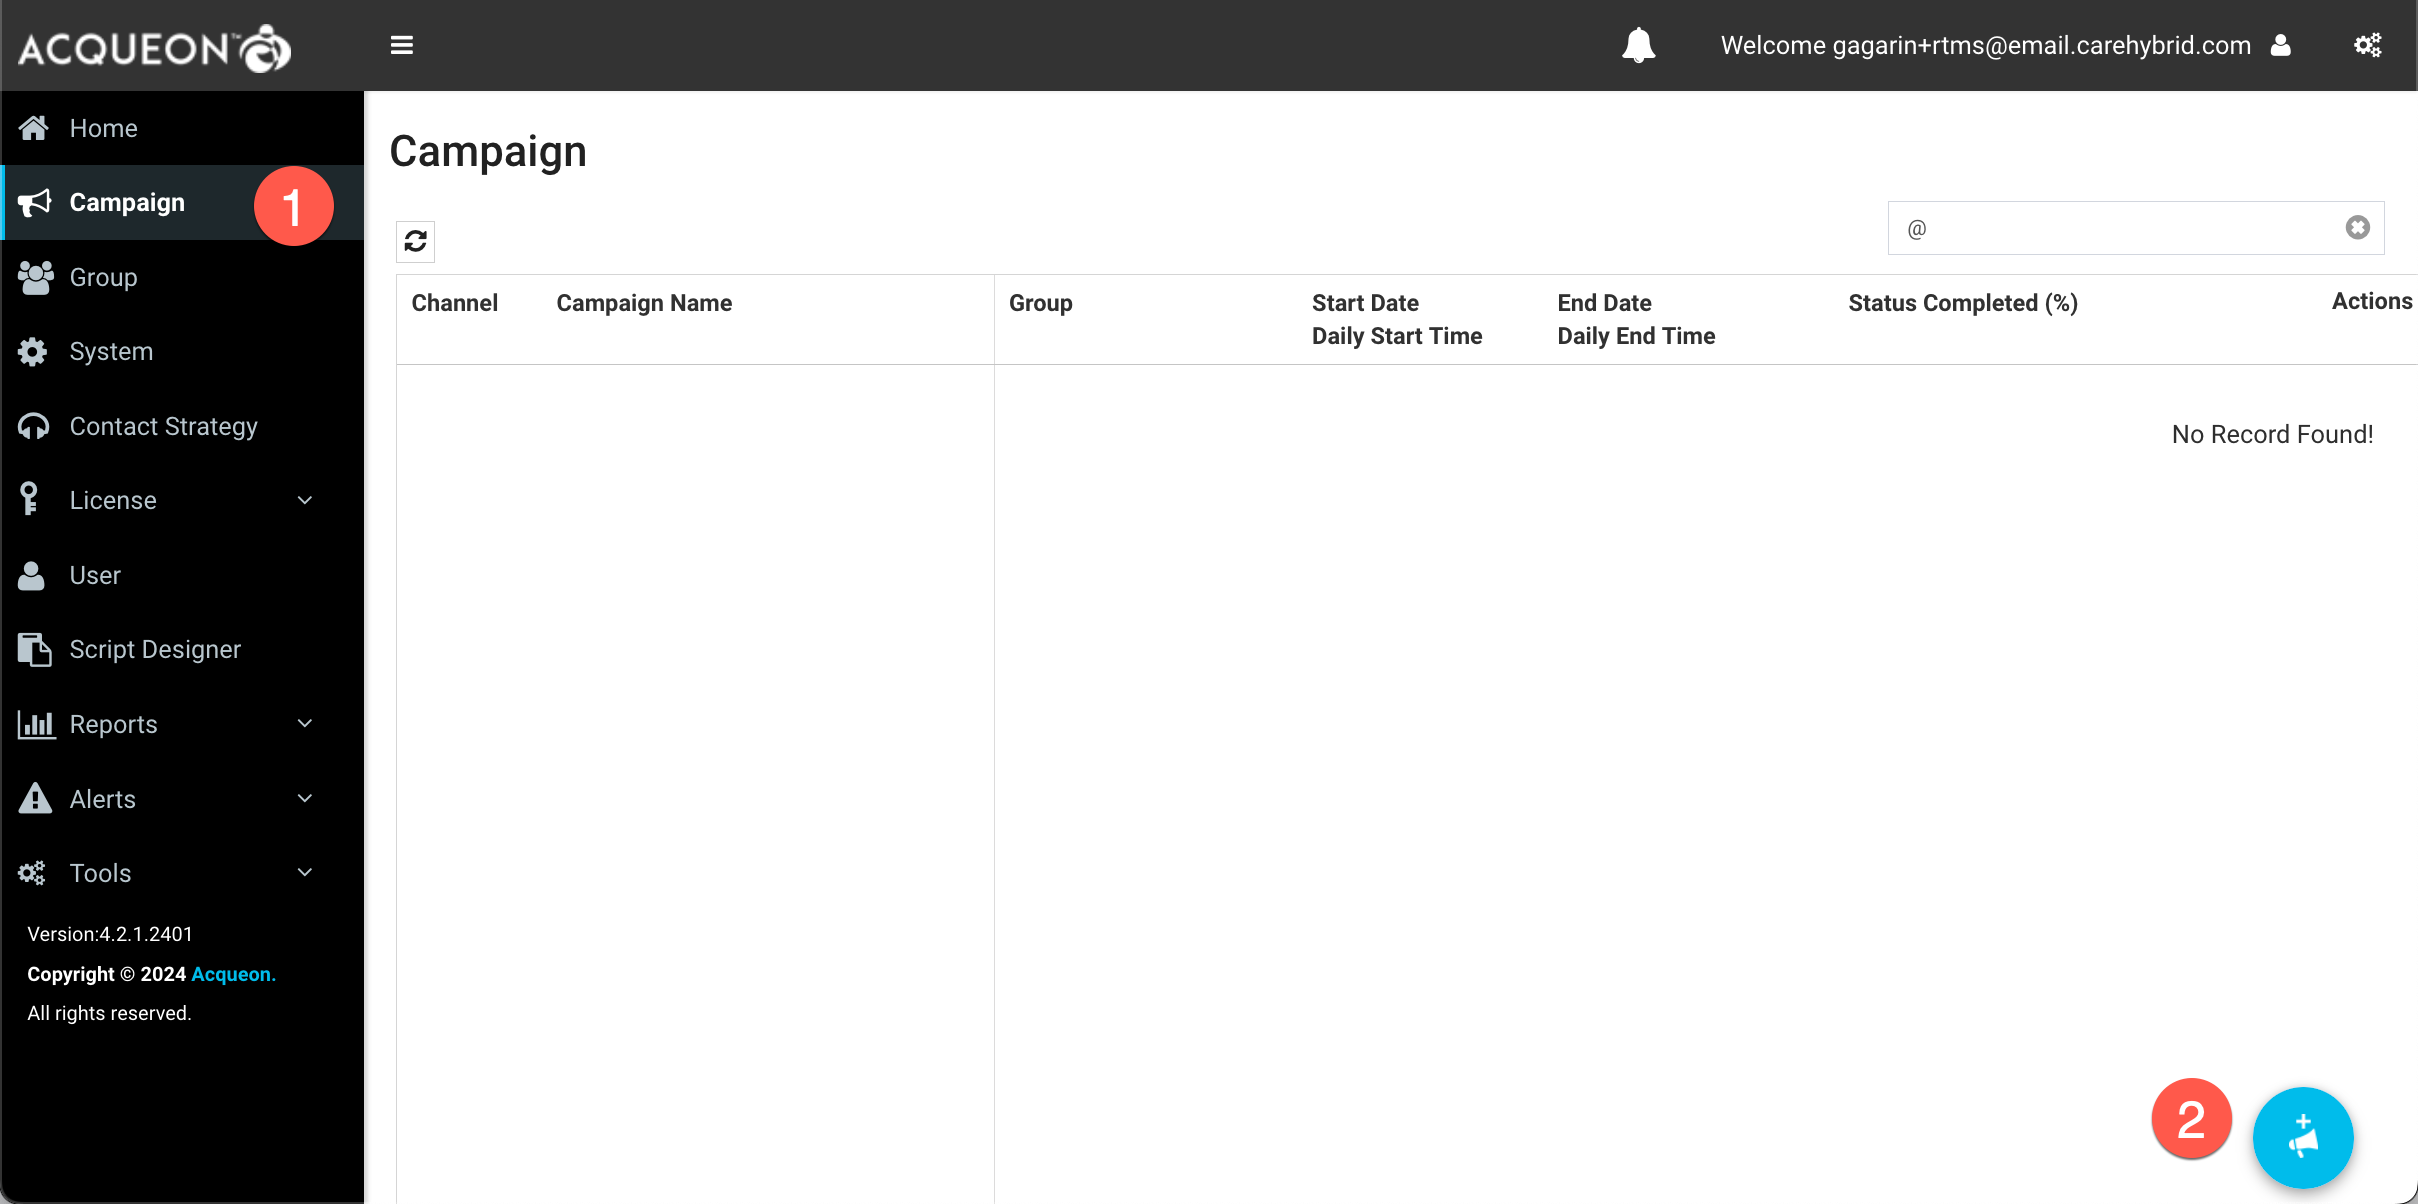
- Configure the below:
- Name:
Enter desired Name - Select Date Range, Time Range, TimeZone as per your requirement
- Name:
-
Click
Next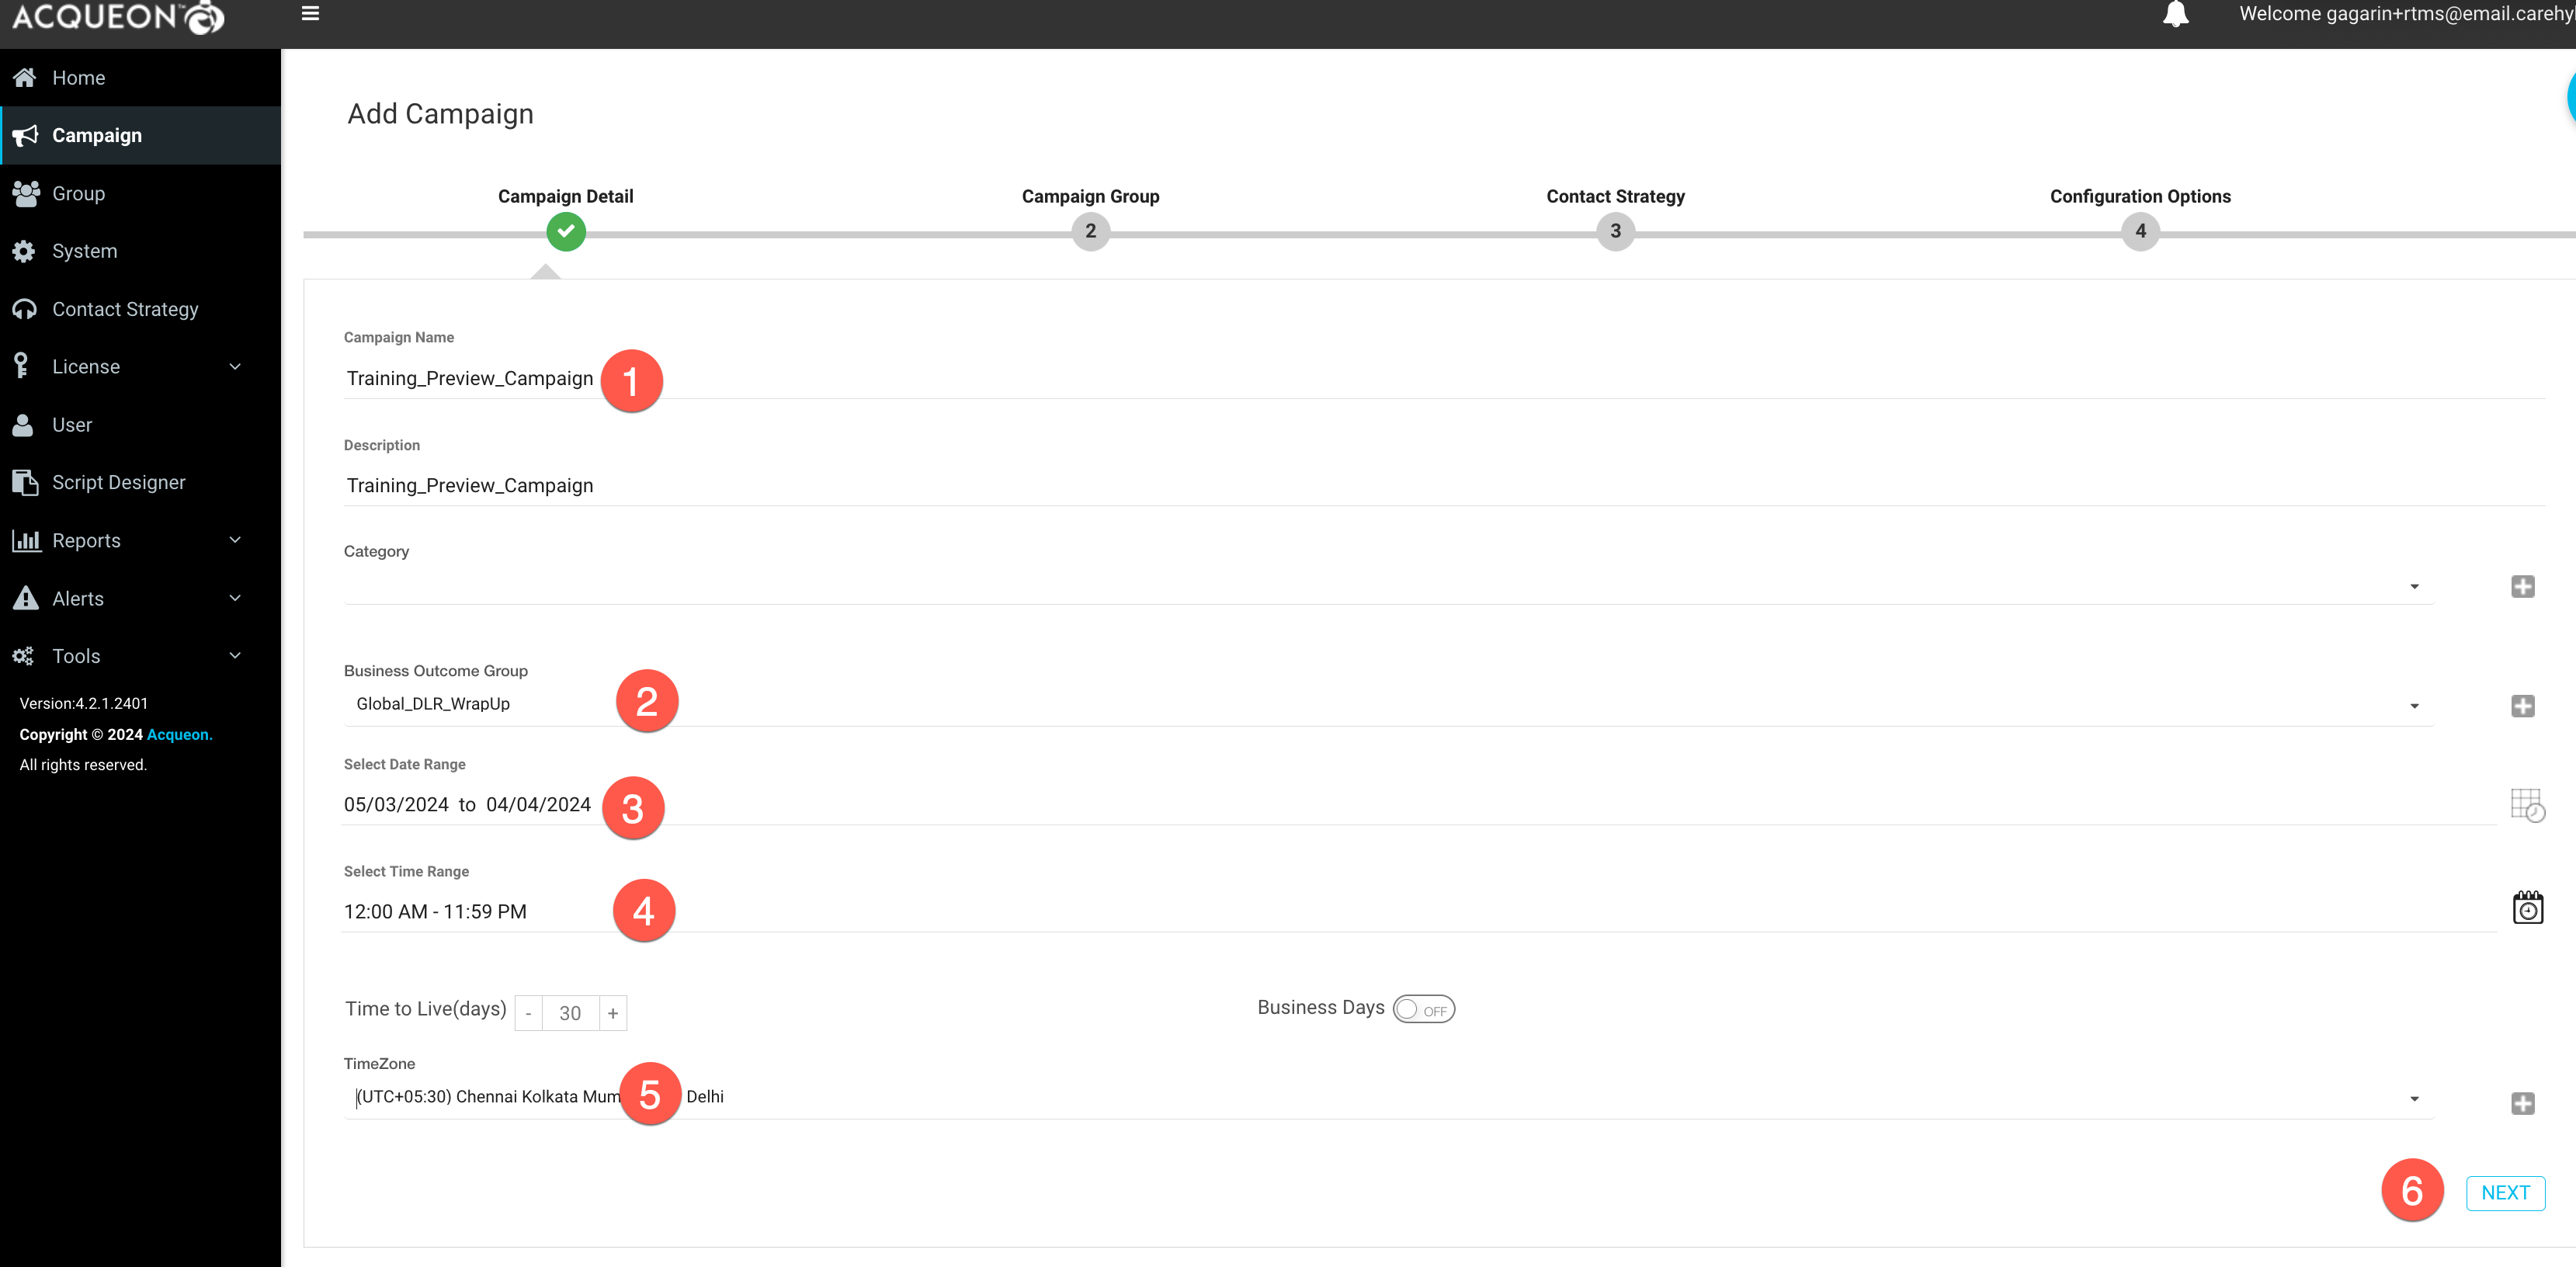
- Select
Dedicated Campaign Groupand select the group created in previous step -
Click
Next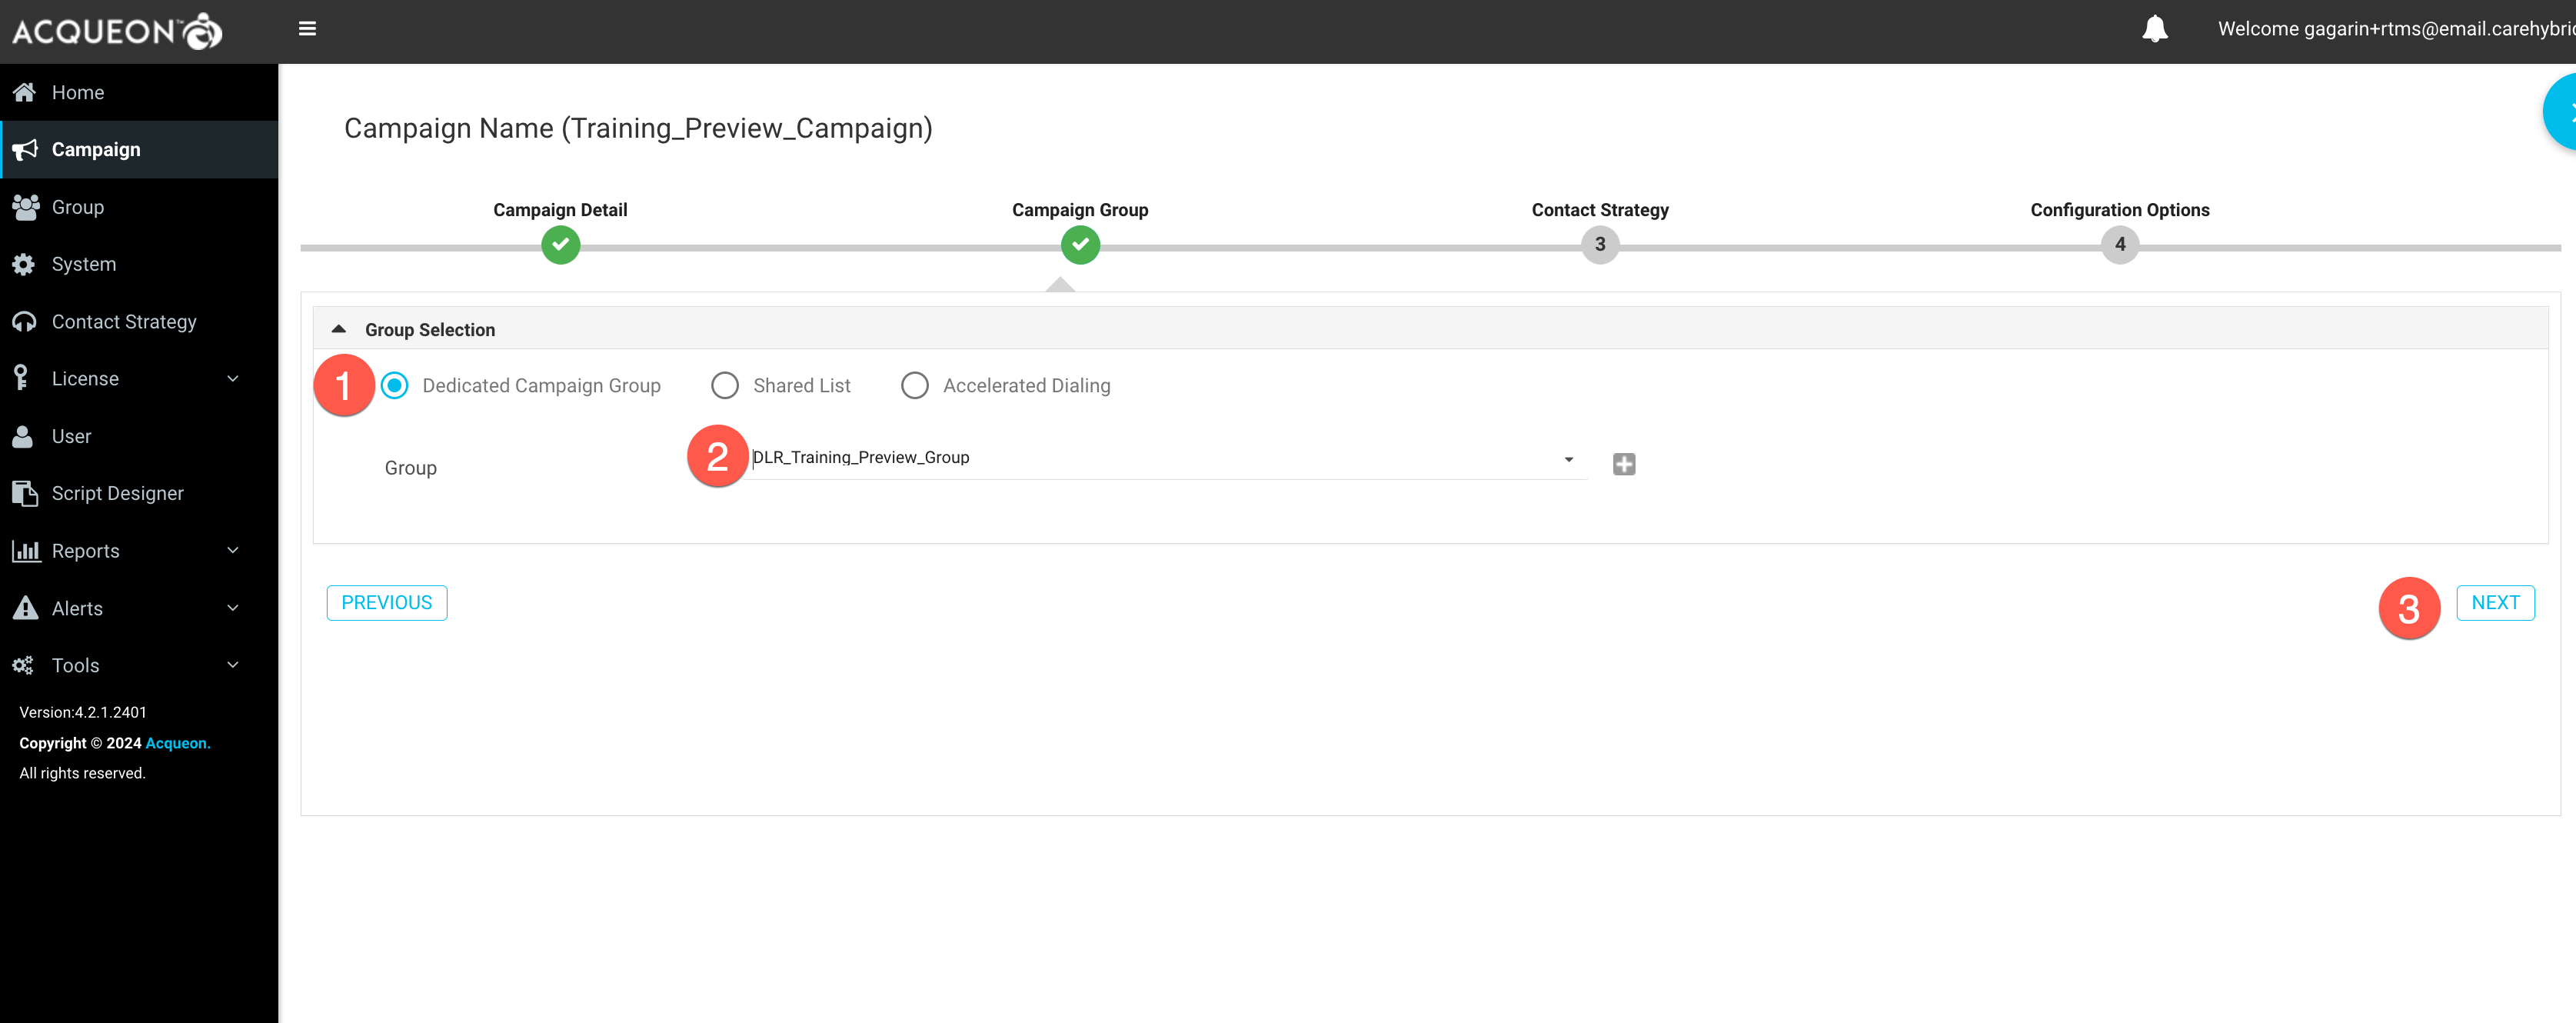
- Select
Default_Simple_Strategyas the contact strategy -
Click
Next
- Leave the default values as such and click
Save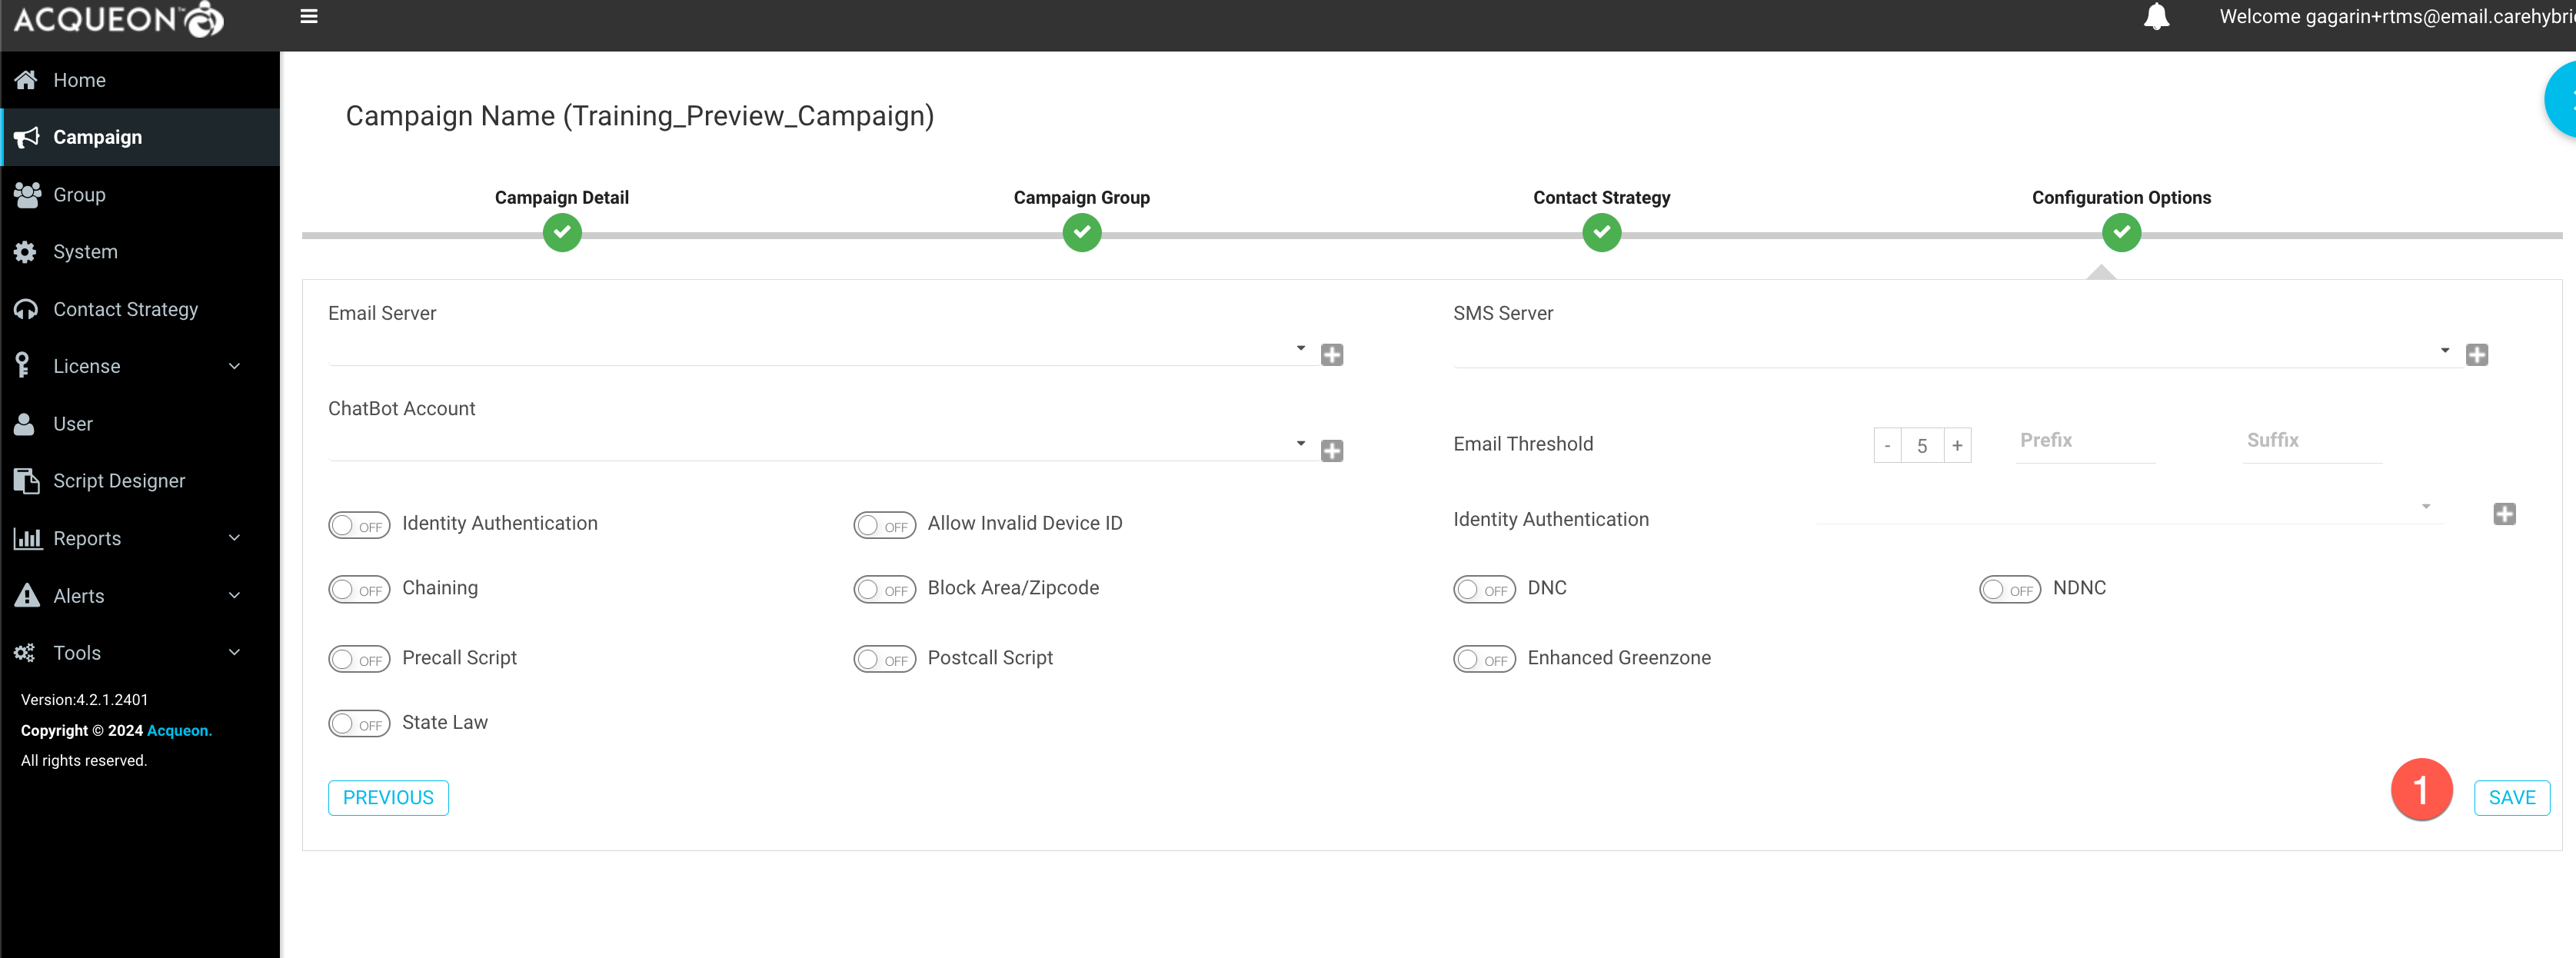
Step 9: Create and upload contact list
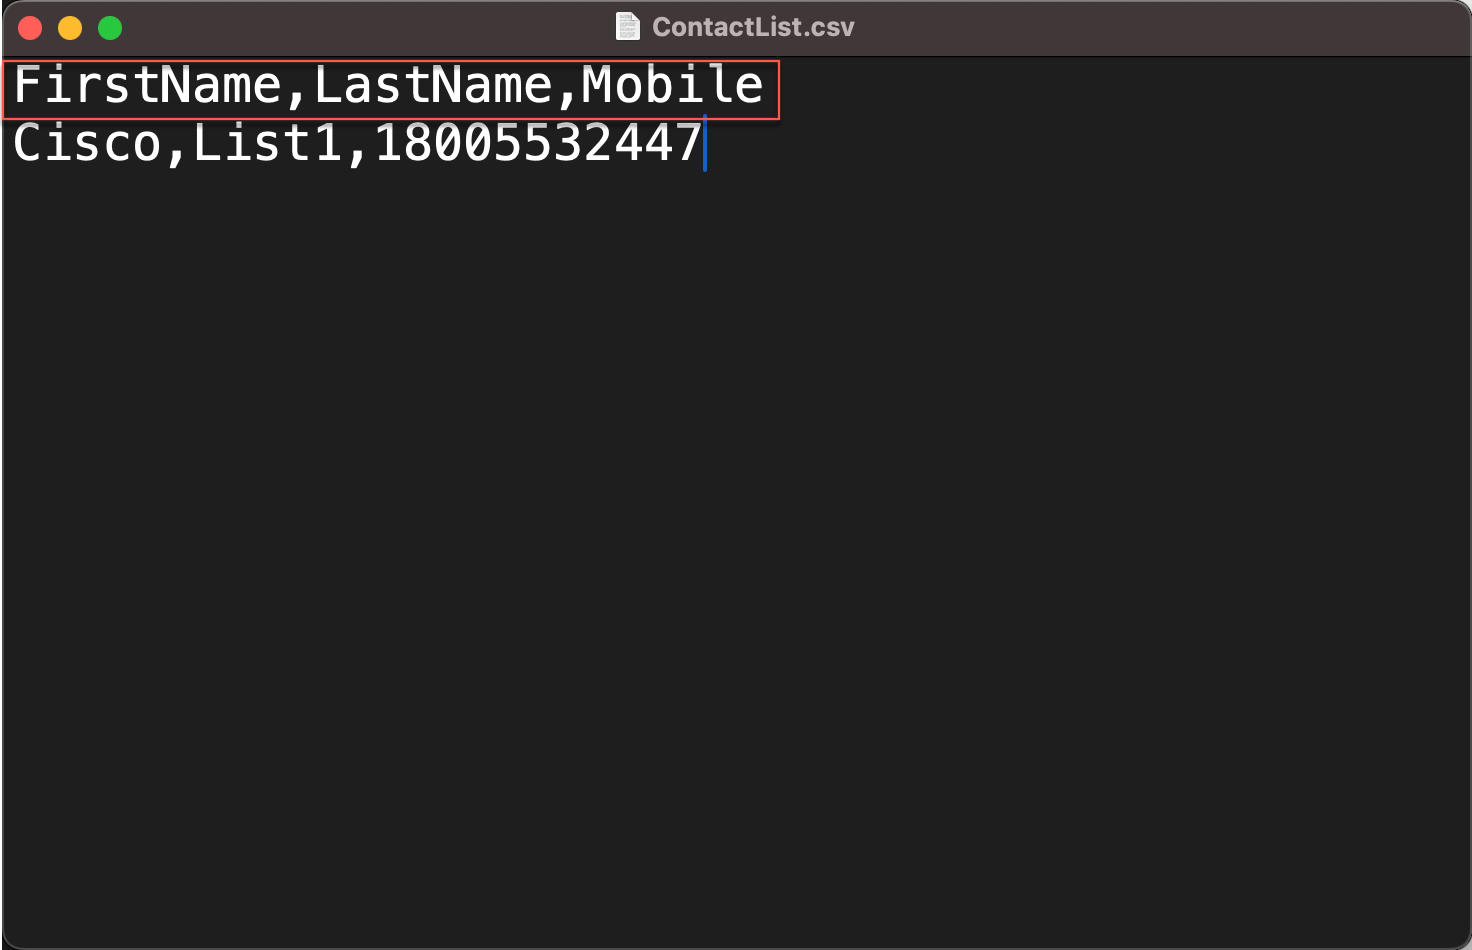
- Create a text file with comma seperated values as shown in the image below
- The first row in the file should be : Firstname,Lastname,Phone
- The second row in the file should be: Test,Agent1,<
Any US phone number of your choice> - Save the file
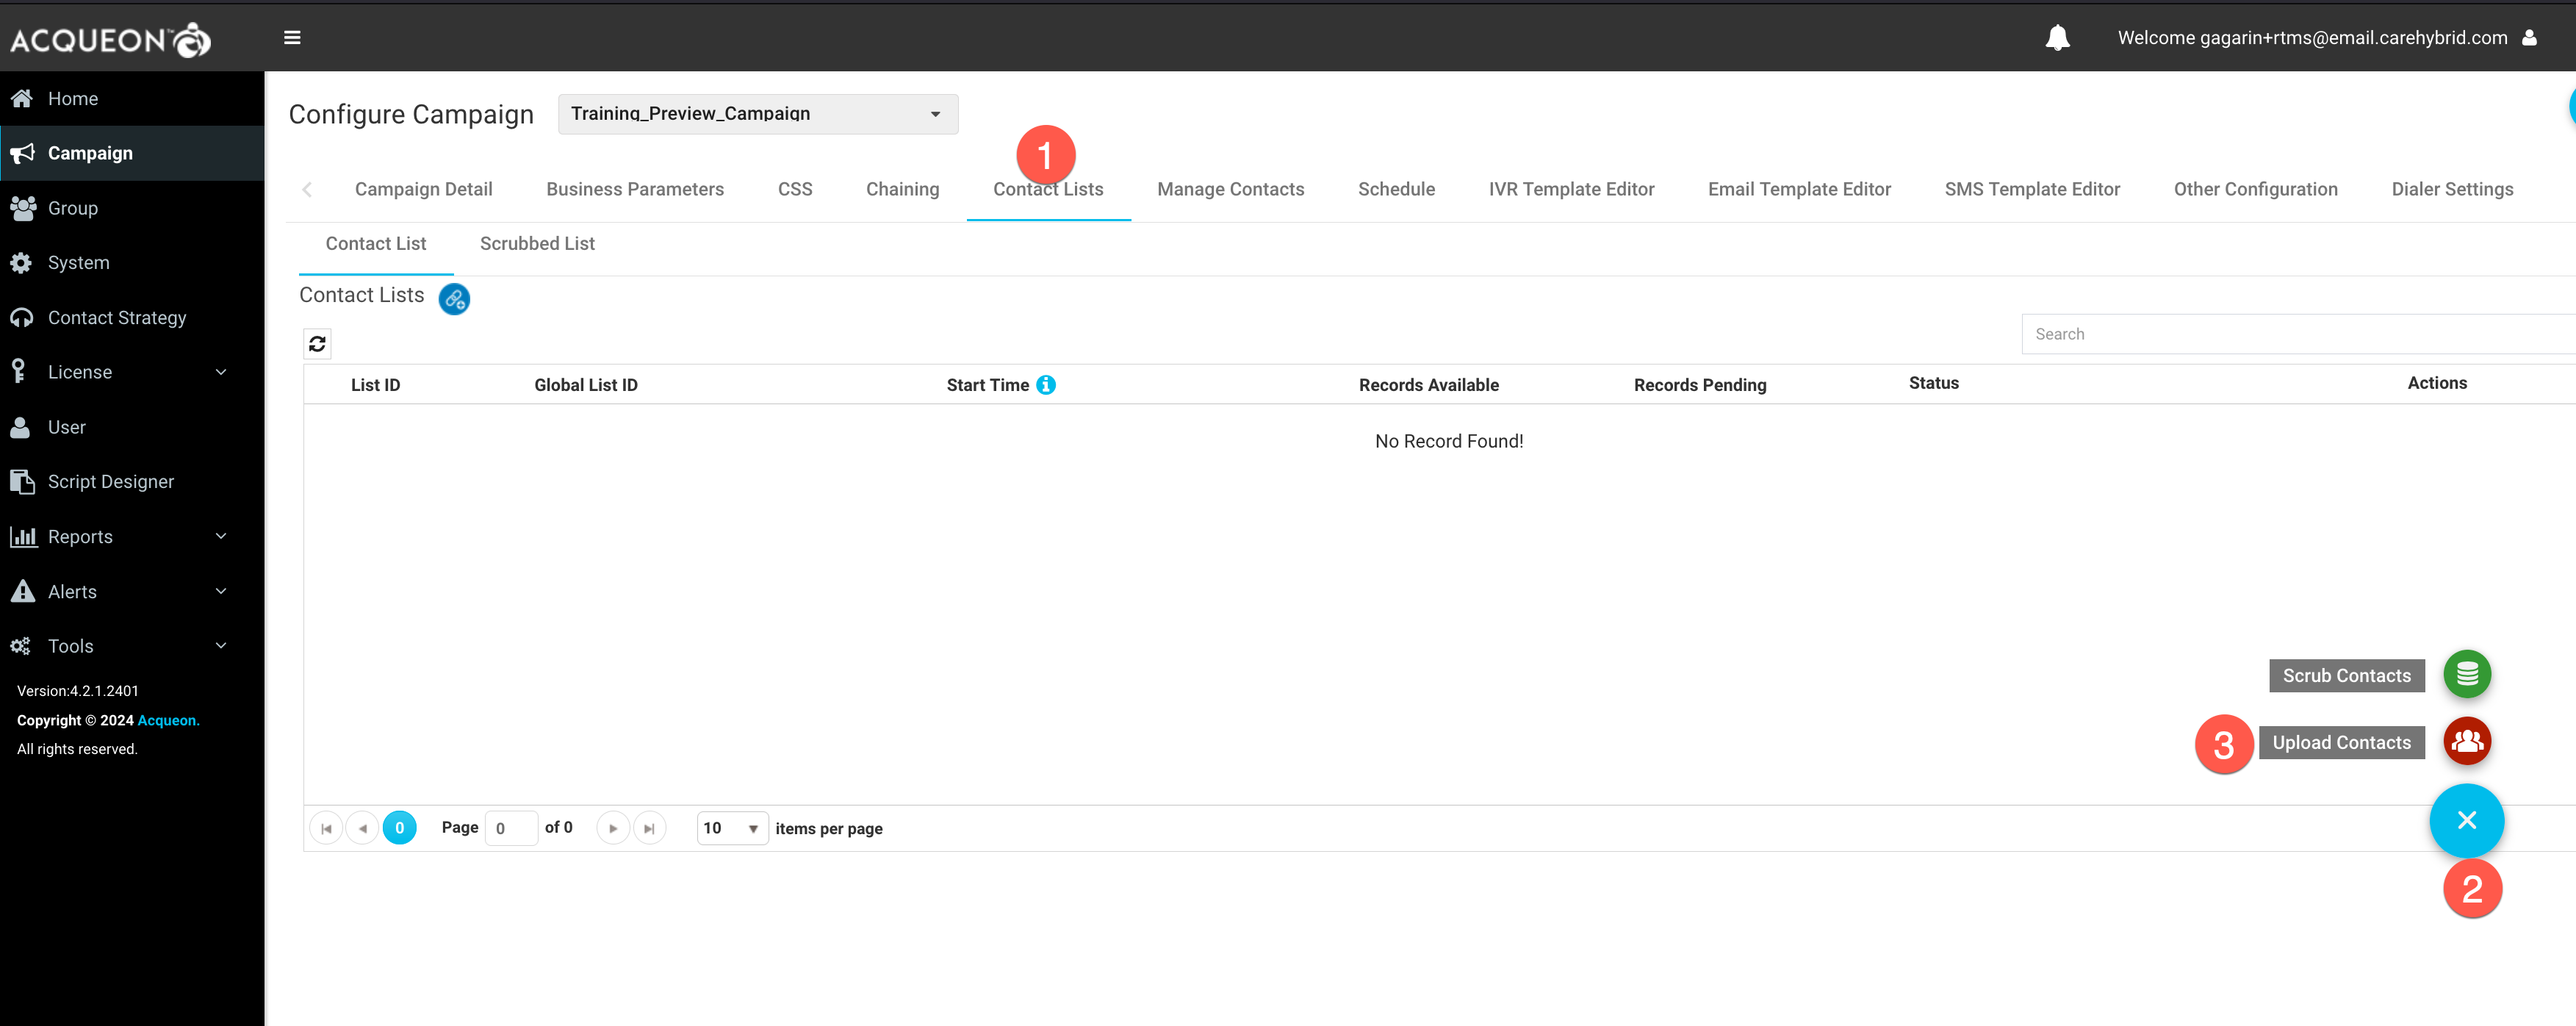
-
Navigate to “Contact Lists” section. Click on the “+” sign at the bottom right and click “Upload Contacts”
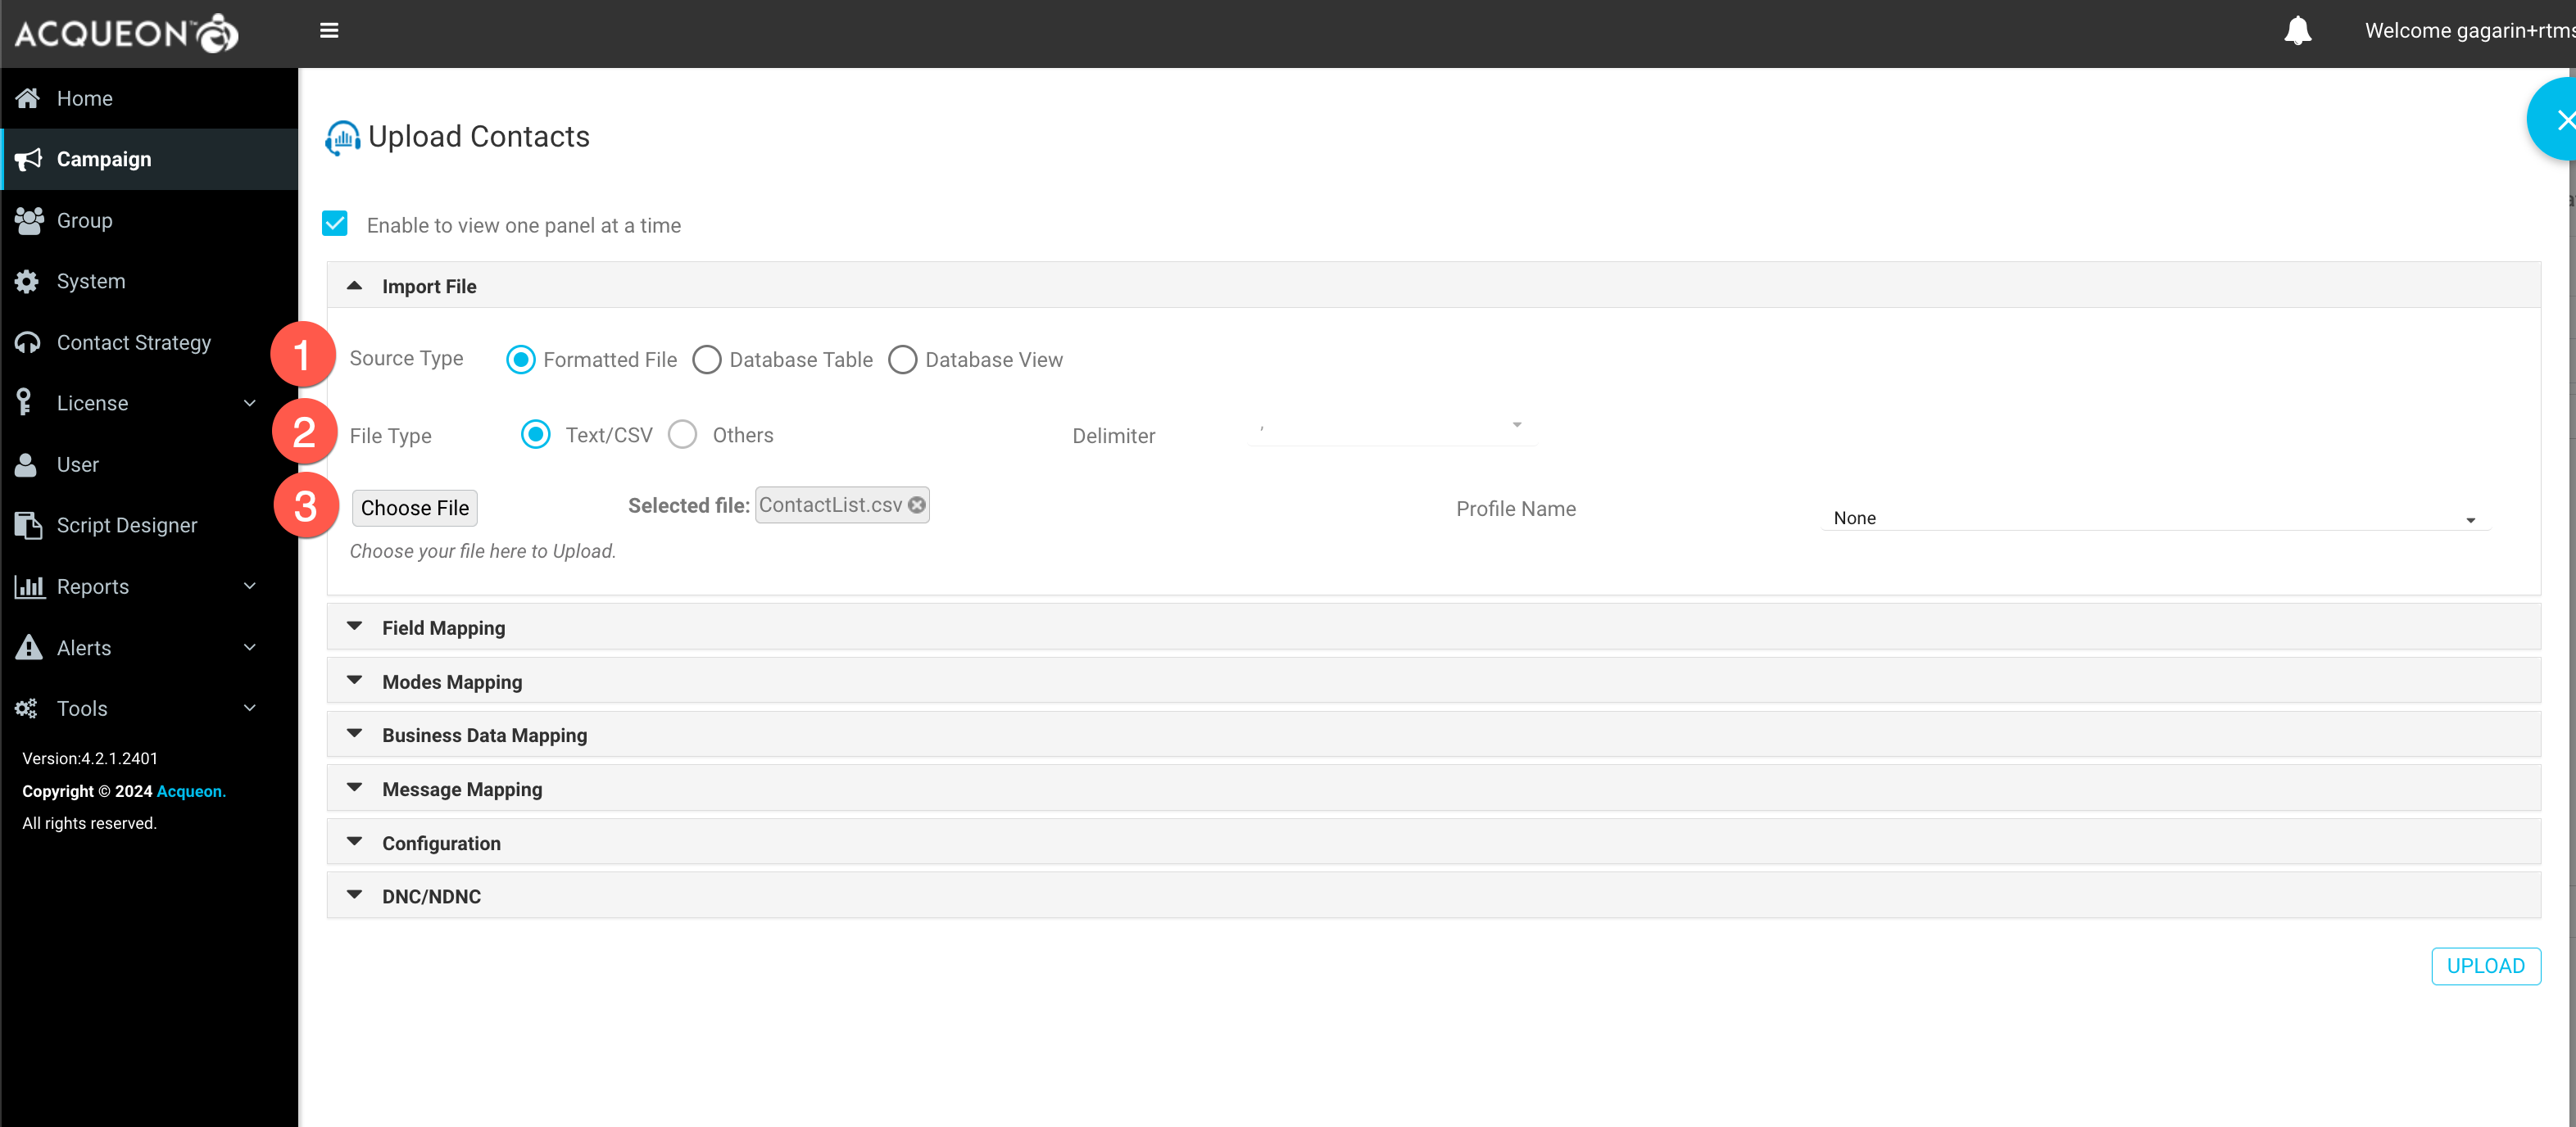
- Verify “Source Type” is
Formatted File - Verify “File Type” is
Text/CSVand “Delimiter” is, -
Click “Choose File” and select the file created in the previous step
-
Navigate to “Field Mapping”, select “ZoneName” as
Campaign Specific TimeZone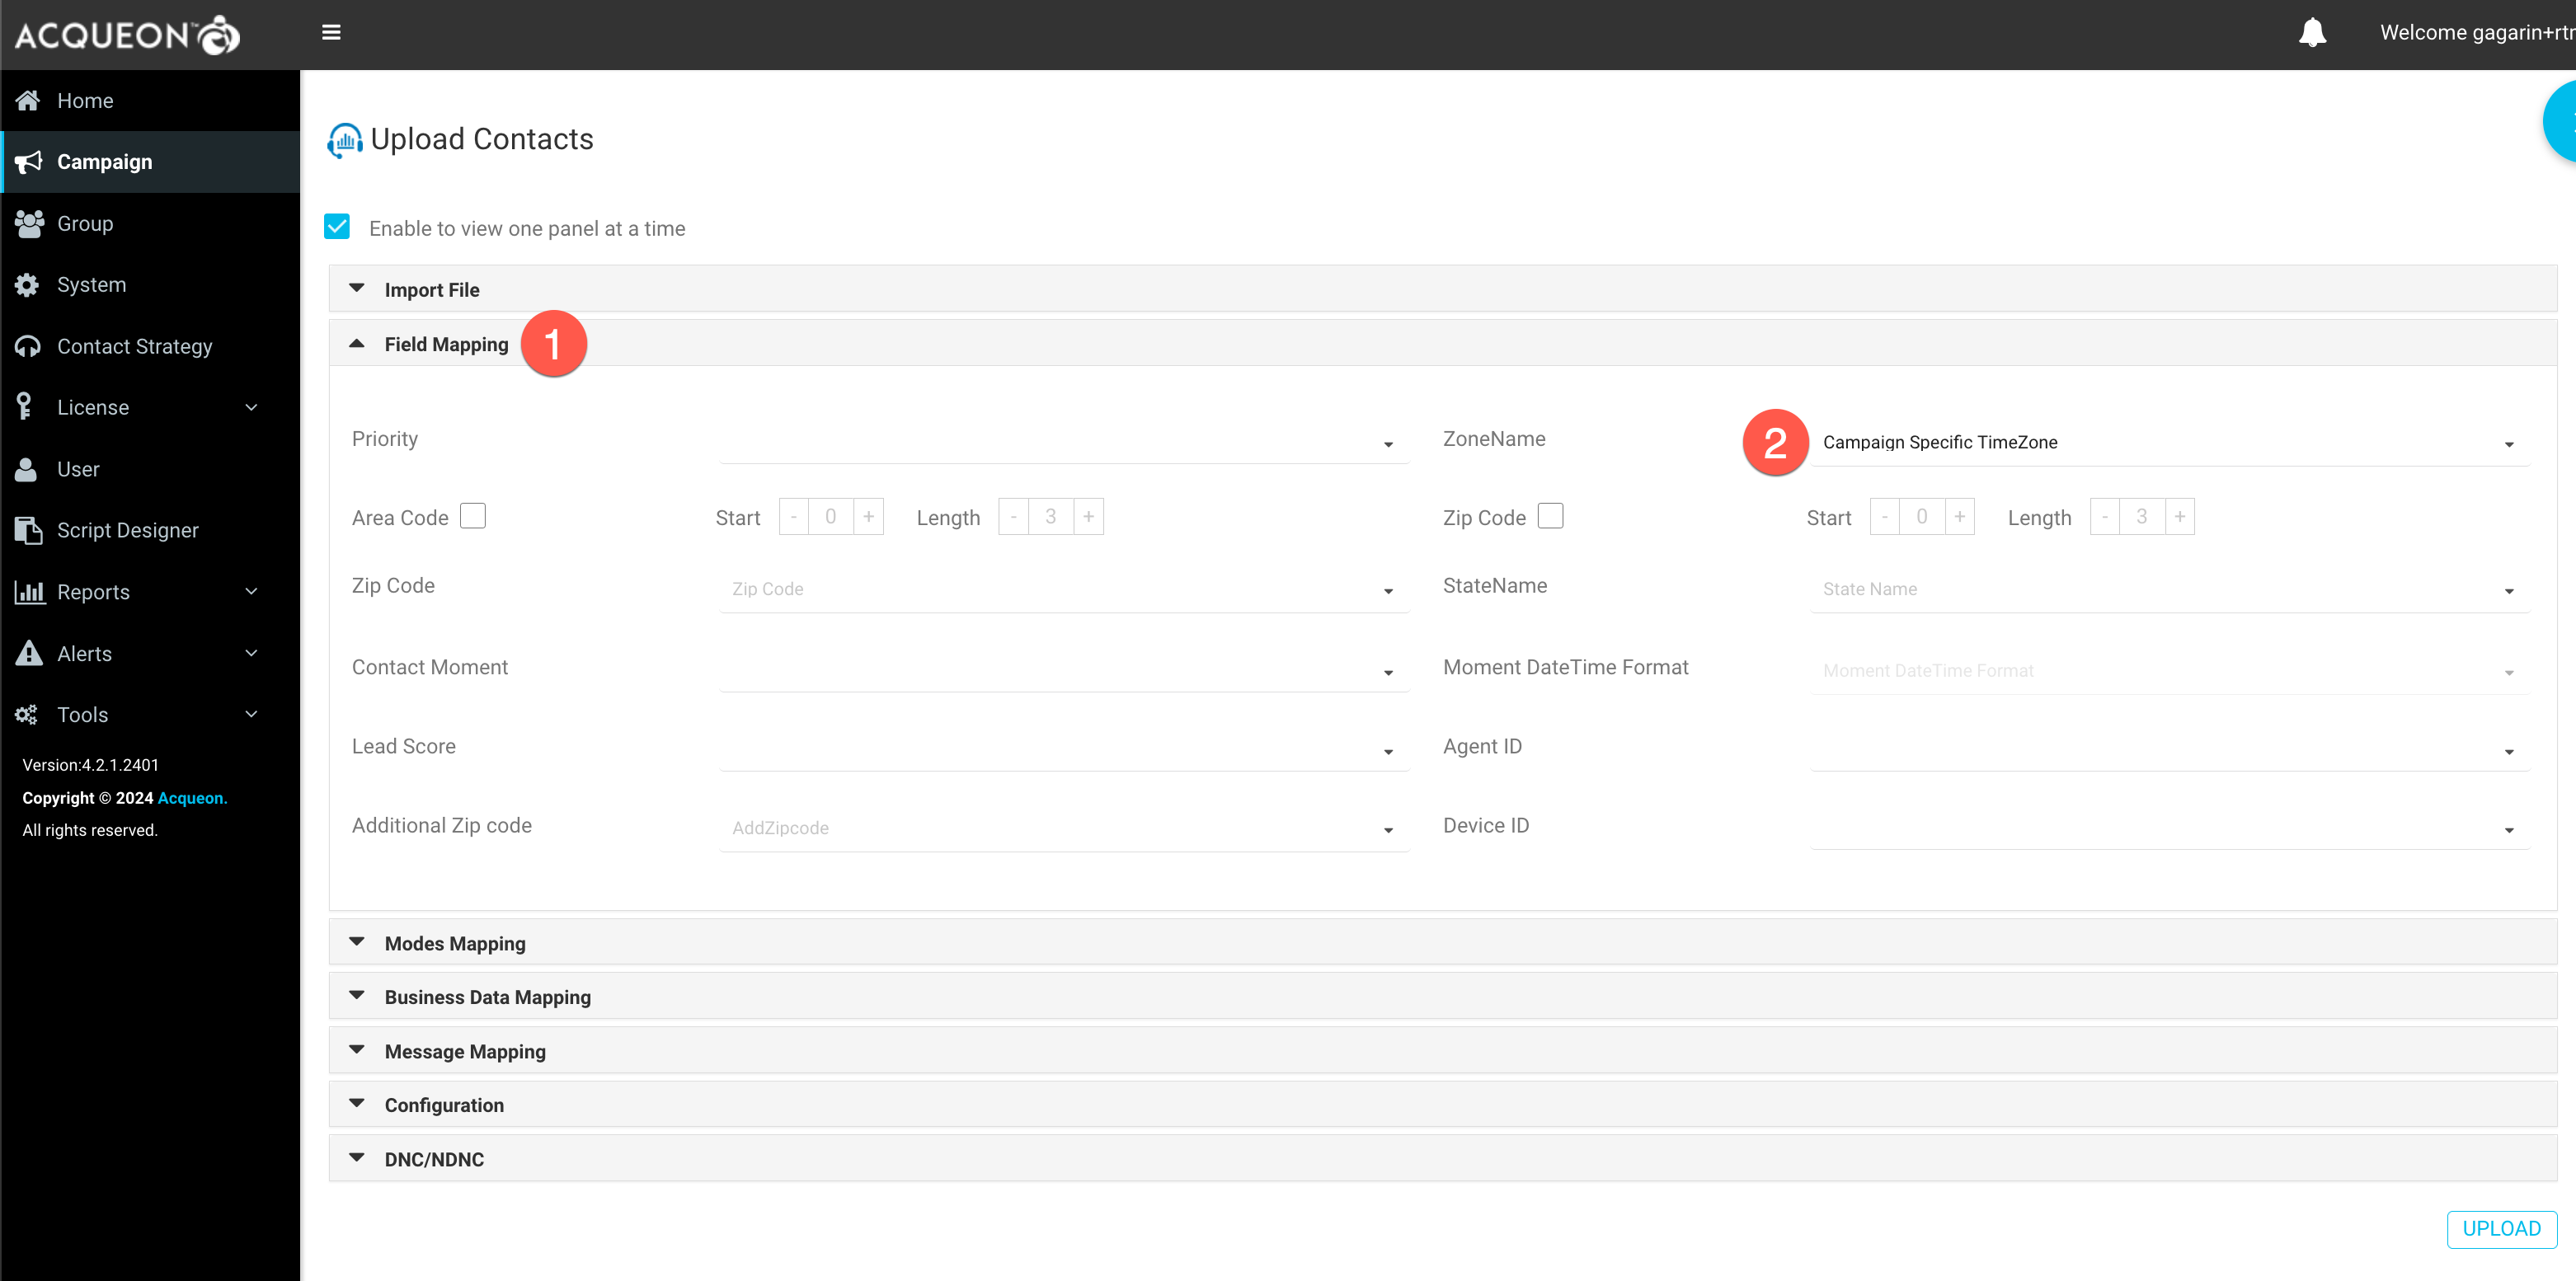
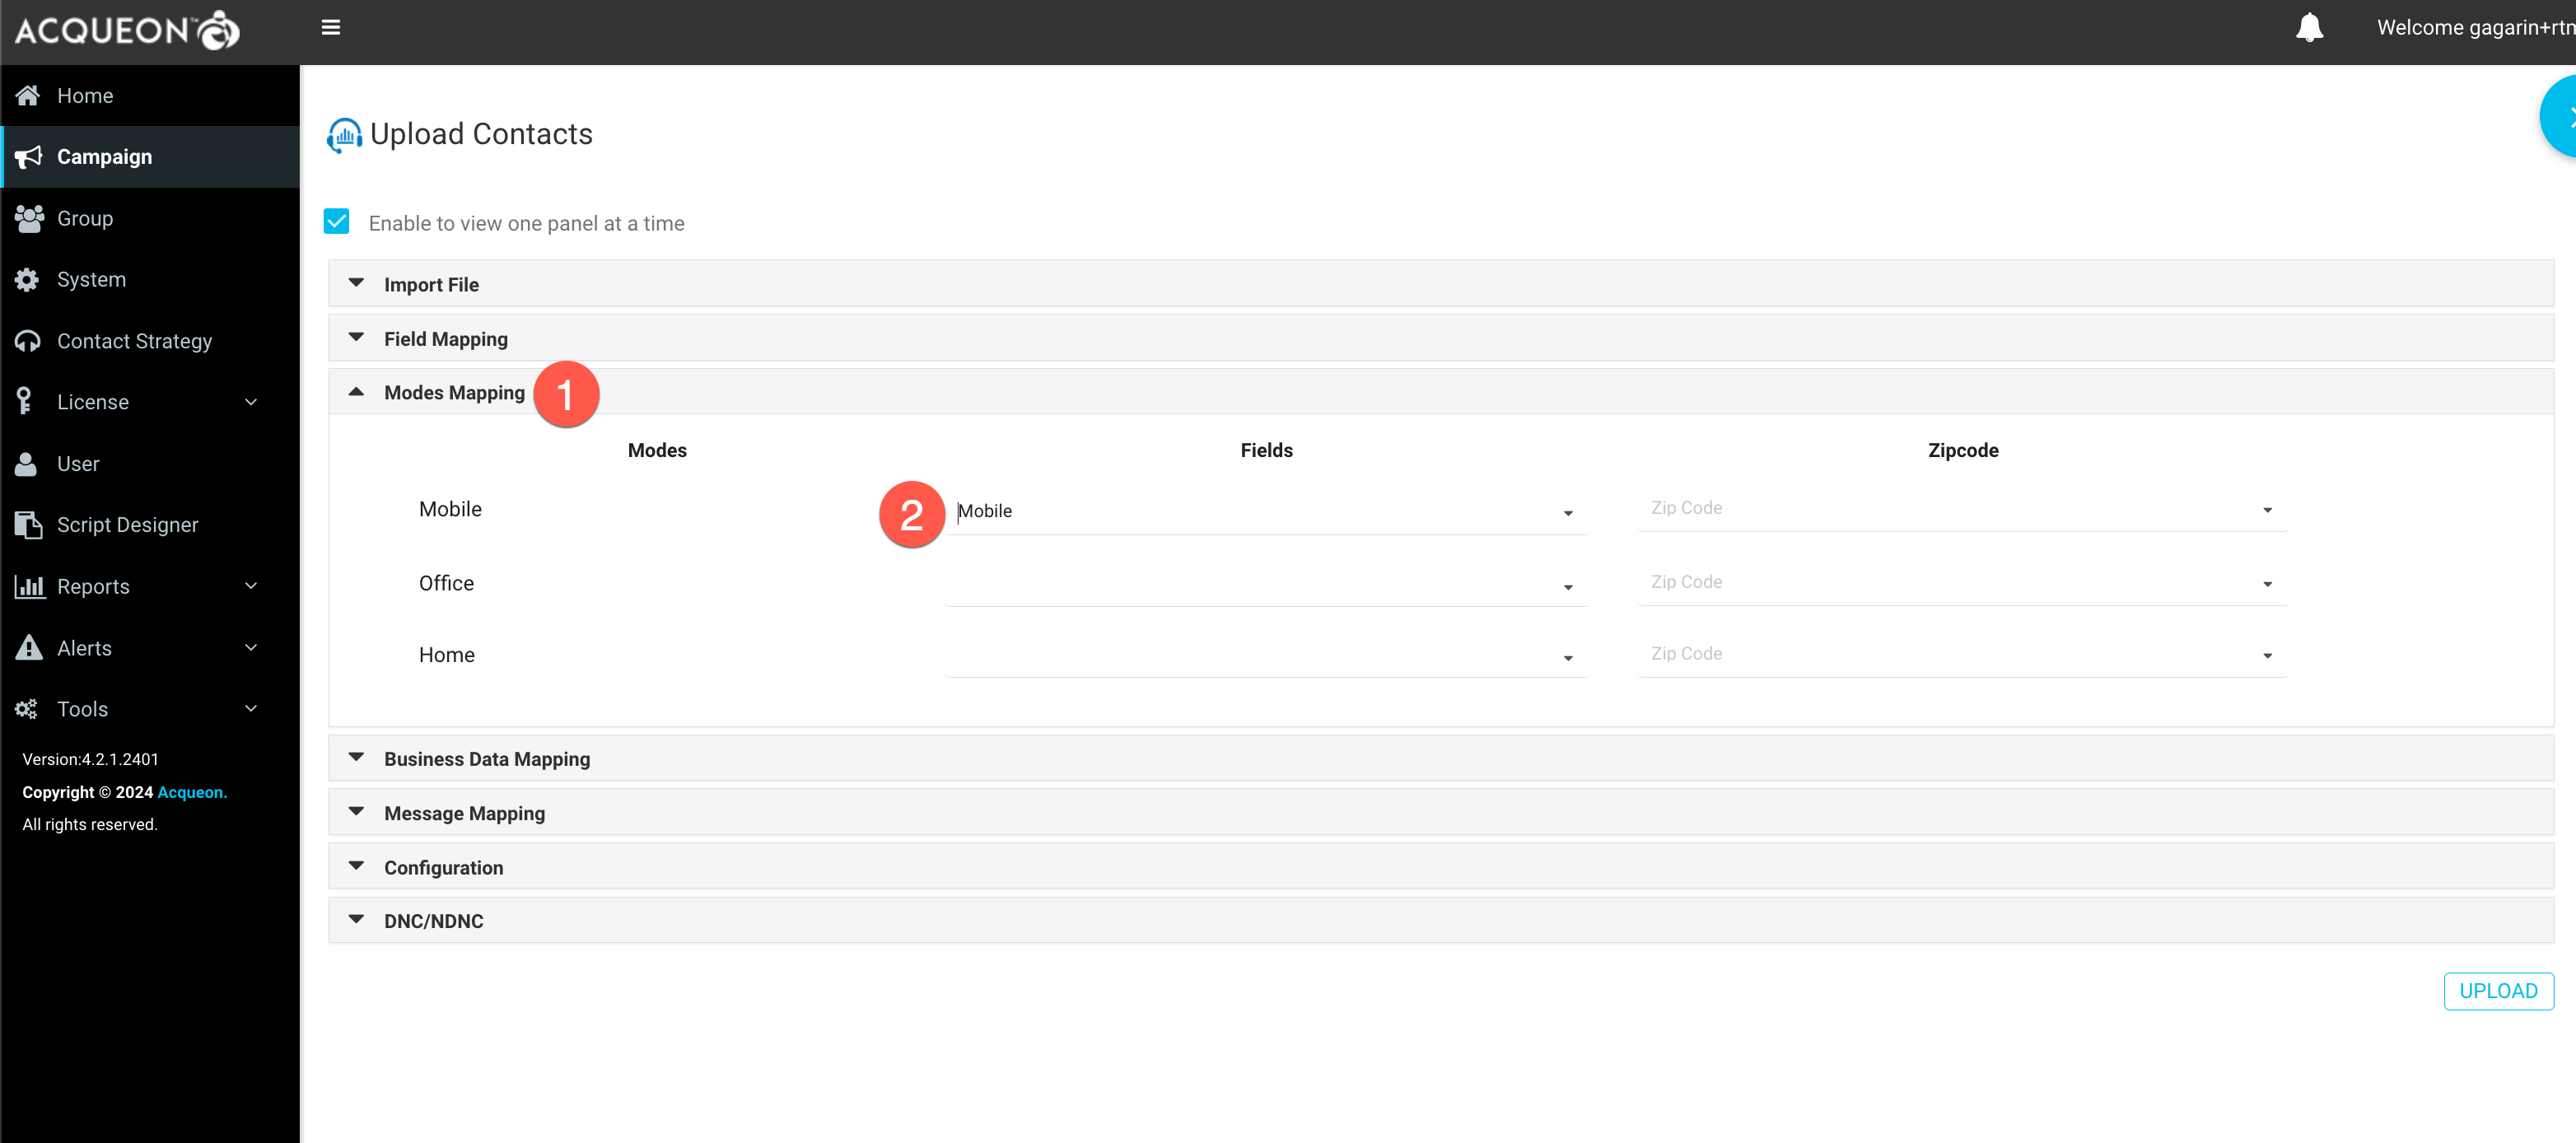
- Navigate to “Modes Mapping”, select “Mobile” as
Mobile -
Click “Upload”
-
Click “Refresh” and verify that the list shows up under the list of records

- Navigate to
Campaign>Actions>Start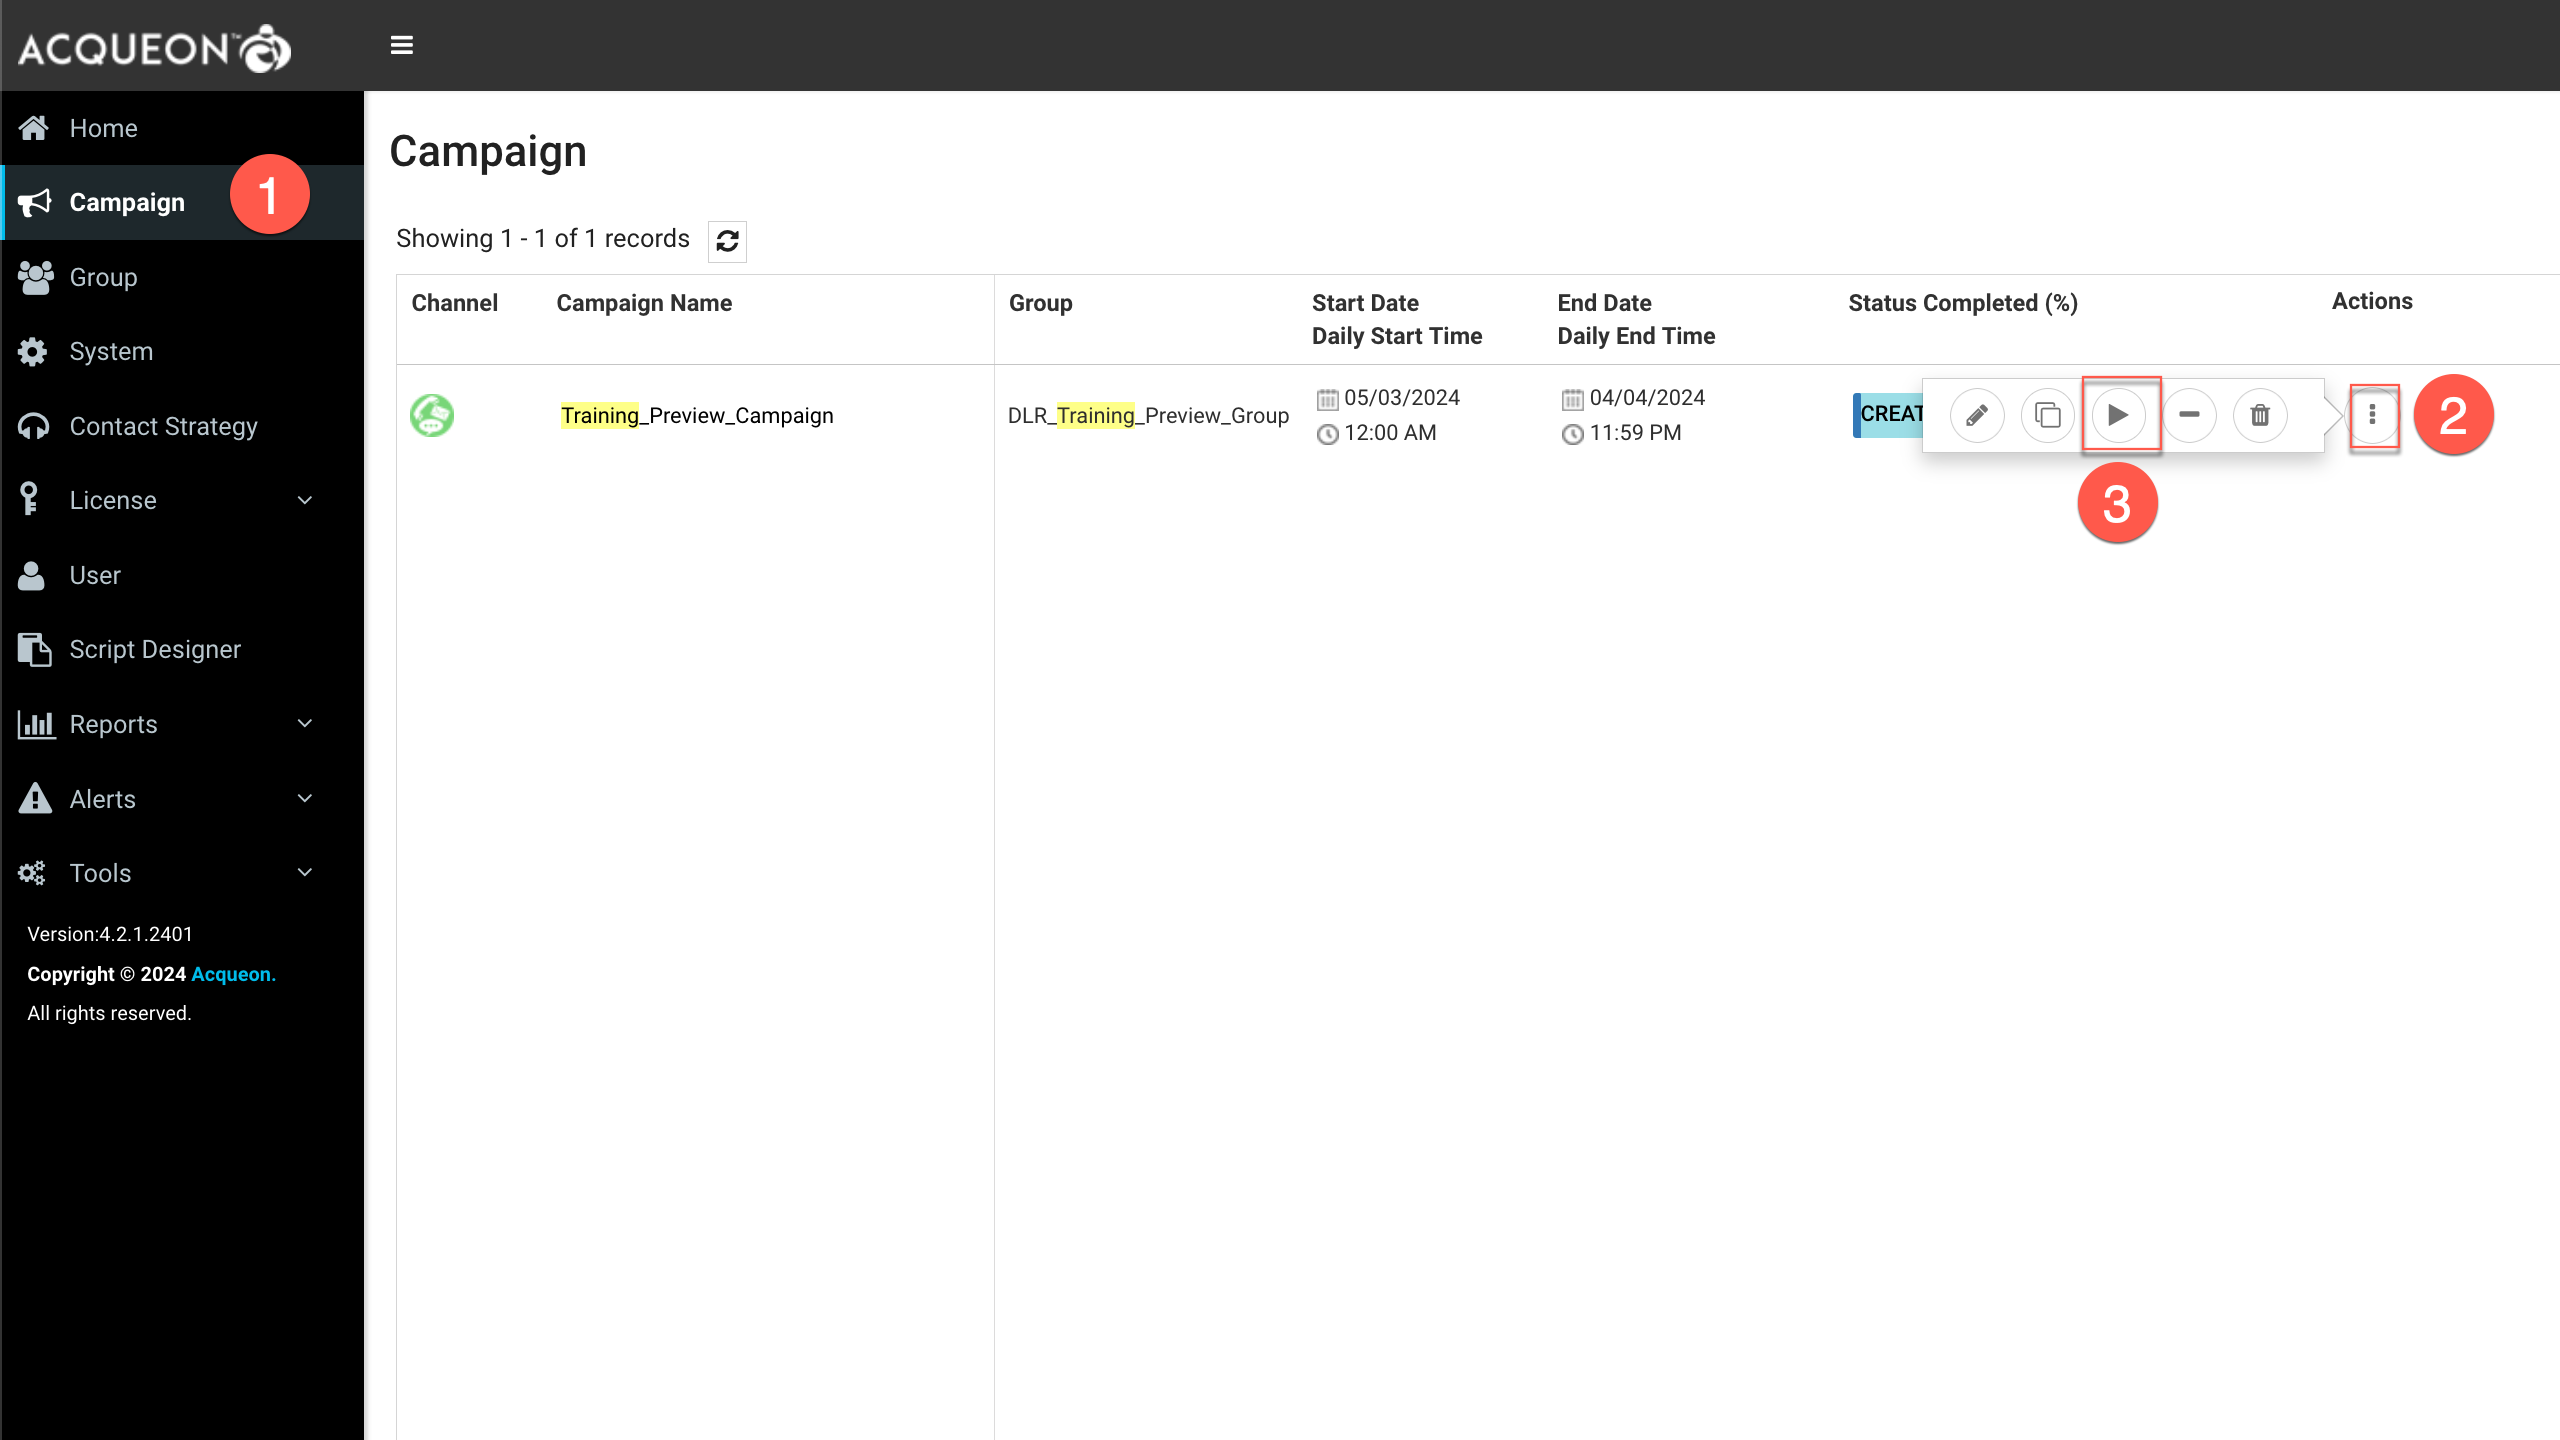
Step 10: Accept the Campaign Contact from Agent Desktop
- Login to desktop with agent credentials and select the appropriate team that was selected during the outdial queue creation.
- Click
Campaign Contactand accept the preview contact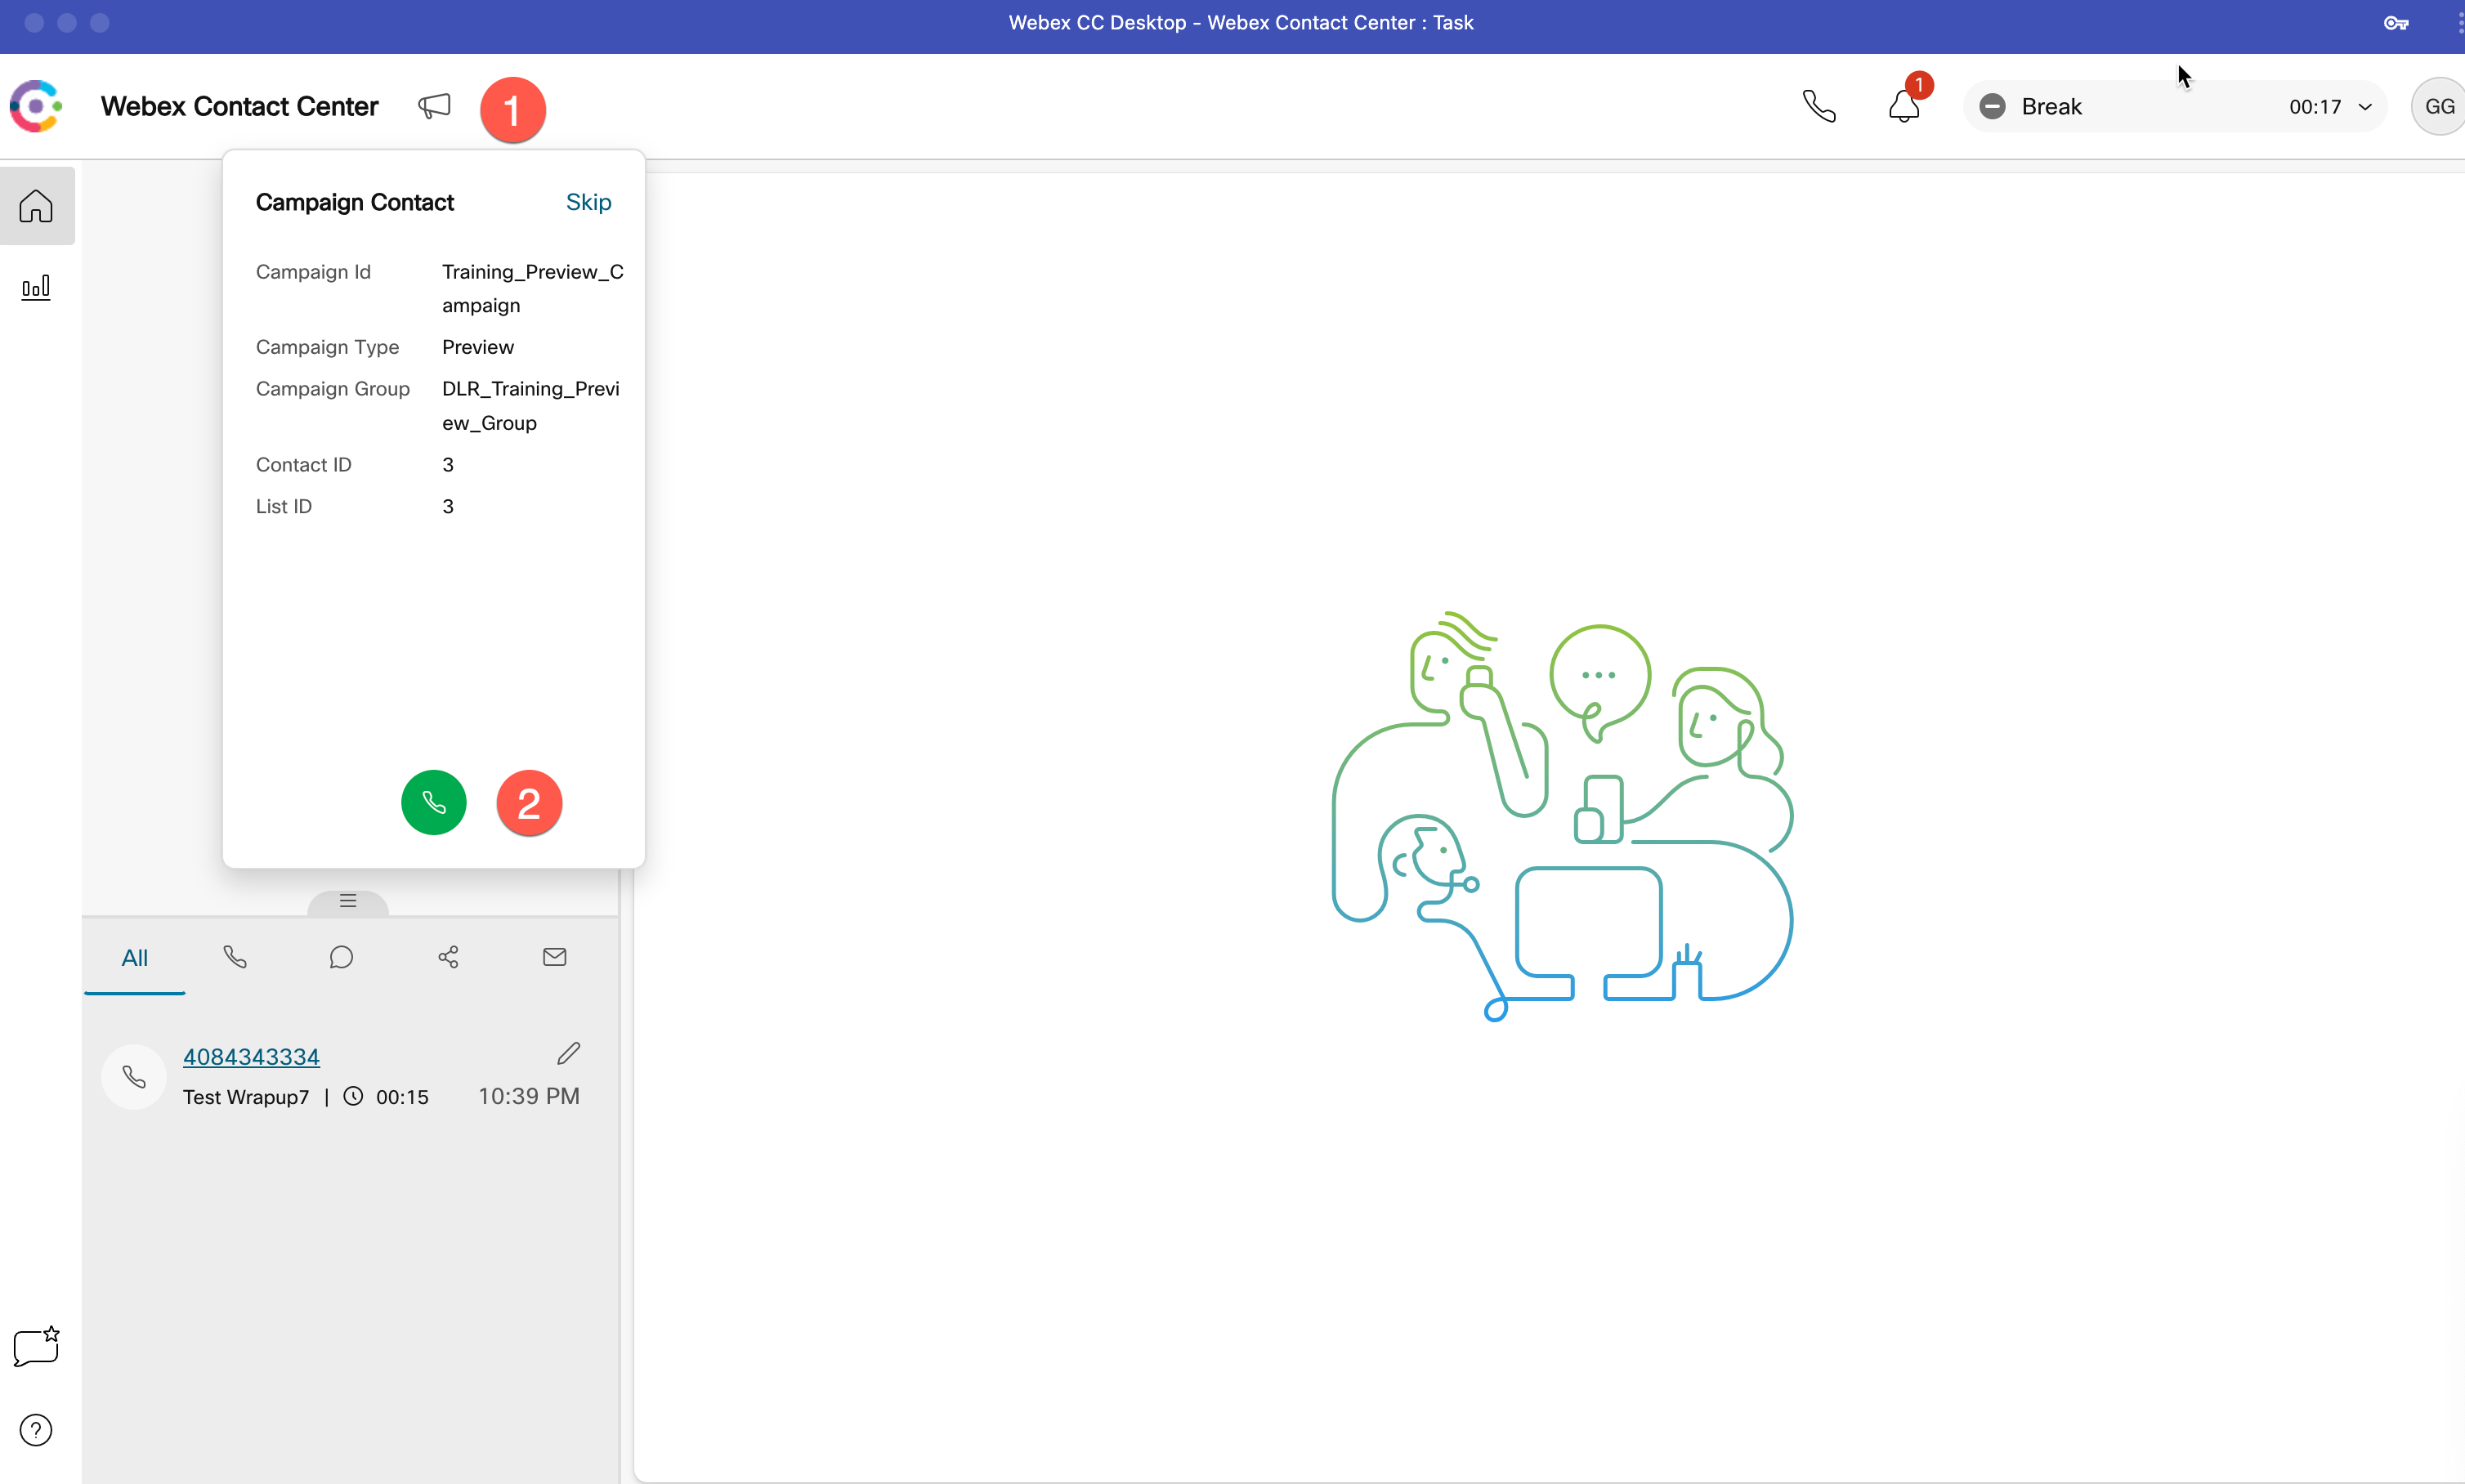
Lab 9.3 Progressive Campaign
Step 1: Navigate to Flows > Manage Flows > Create Flows
Step 2: Provide a desired Flow Name and click Start building Flow
Step 3: Connect the NewPhoneContact activity to EndFlow activity. Set Validations to On and Publish Flow
Note: A flow must be configured with each campaign, referenced by the outdial entrypoint. The flow is simple, but dictates which variables are shown on the agent desktop and in which order. This is done via global variables. Configure variables in the flow as required. In this lab exercise, we will not be configuring any variables.
Step 4: [Optional] Configure custom messages for Answering Machine or Abandoned Calls
- Navigate to
Event Flows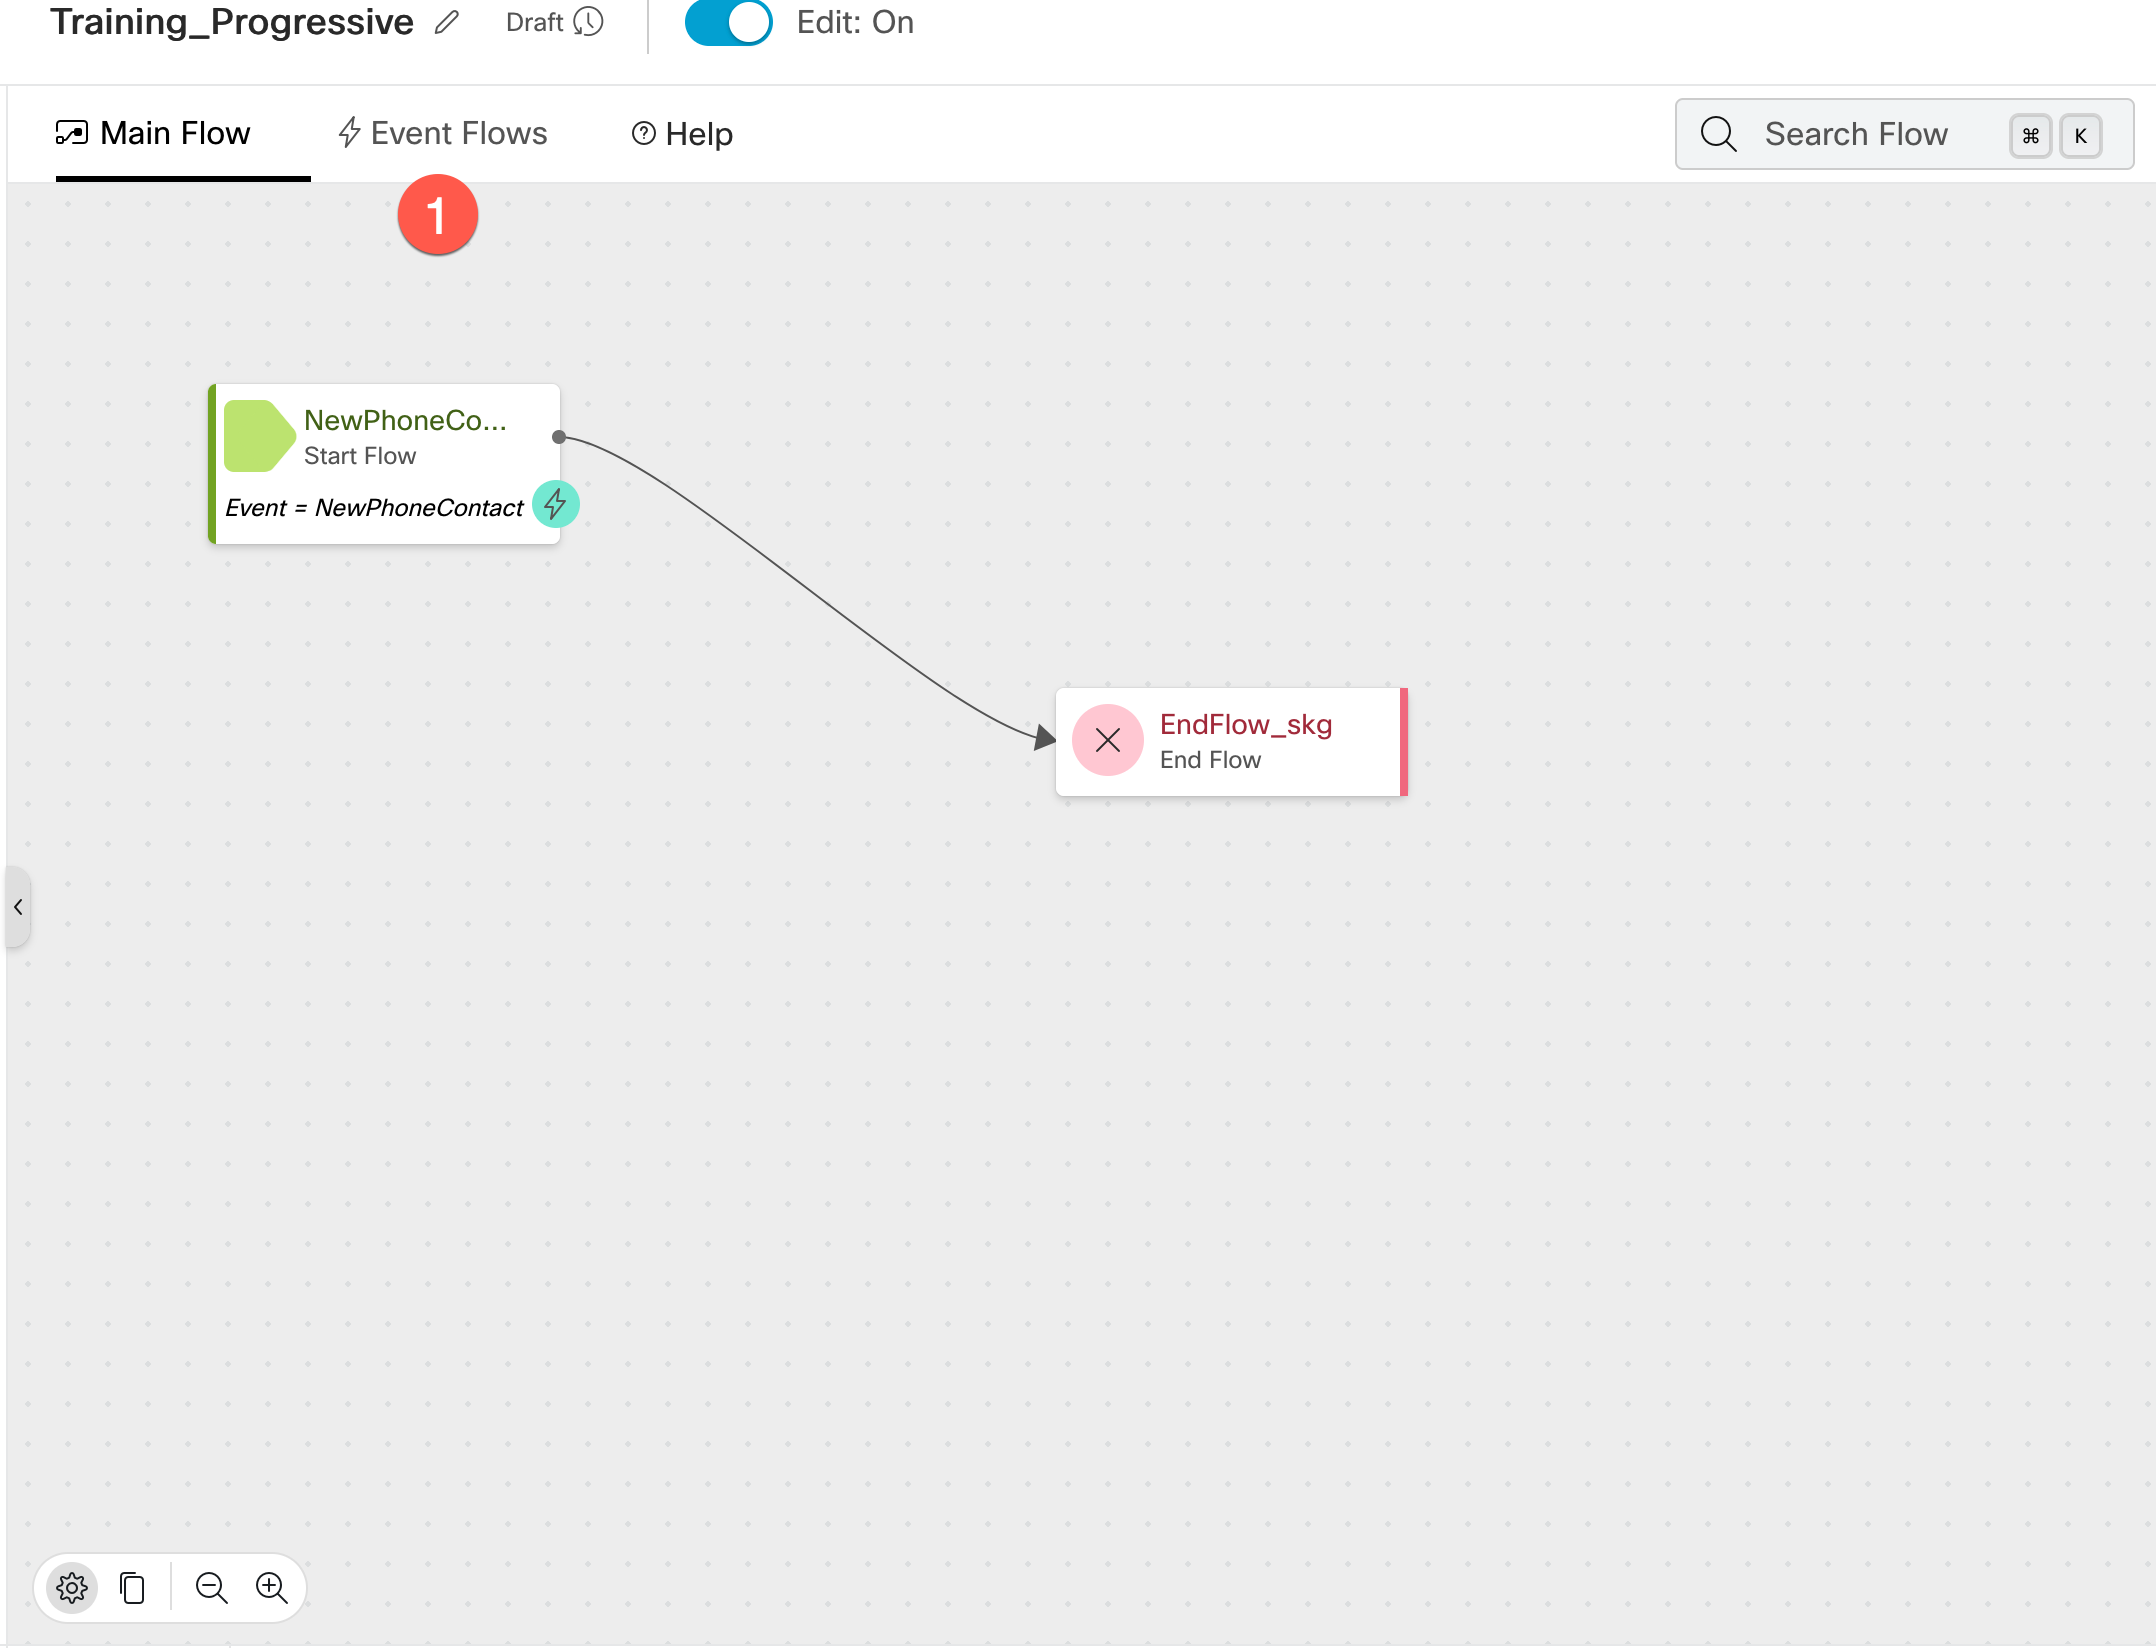
There is a new
OutboundCampaignCallResulthandler event which can be used to trigger a message to be played to the customer when the call has terminated at a voicemail/Answering machine or will be abandoned. In the diaexample below, a message is played for each case and the call is then disconnected. If the handler is not configured, the call will terminate when these two conditions occur.
- Add the
Caseactivity and configure the below 2 cases- Case1:
AMD - Case2:
ABANDONED - Select the variable as
OutboundCampaignCallResult.CPAResult
- Case1:
-
Add two
PlayMessageactivity and configure the custom message for both the cases. You can use Text-To-Speech (TTS) or a audio file as required. -
Case1 (AMD)
-
Case2 (ABANDONED)
- Add
DisconnectContactactivity and conenct the output of thePlayMessageactivity to it - Also connect the
Defaultoutcome of theCaseactivity to theDisconnectContactactivity - Connect the outcome of
OutboundCampaignCallResultactivity to theCaseactivity - Connect the
Caseoutcome nodes to its respectivePlayMessageactivity
- Set
Validationsto On andPublish Flow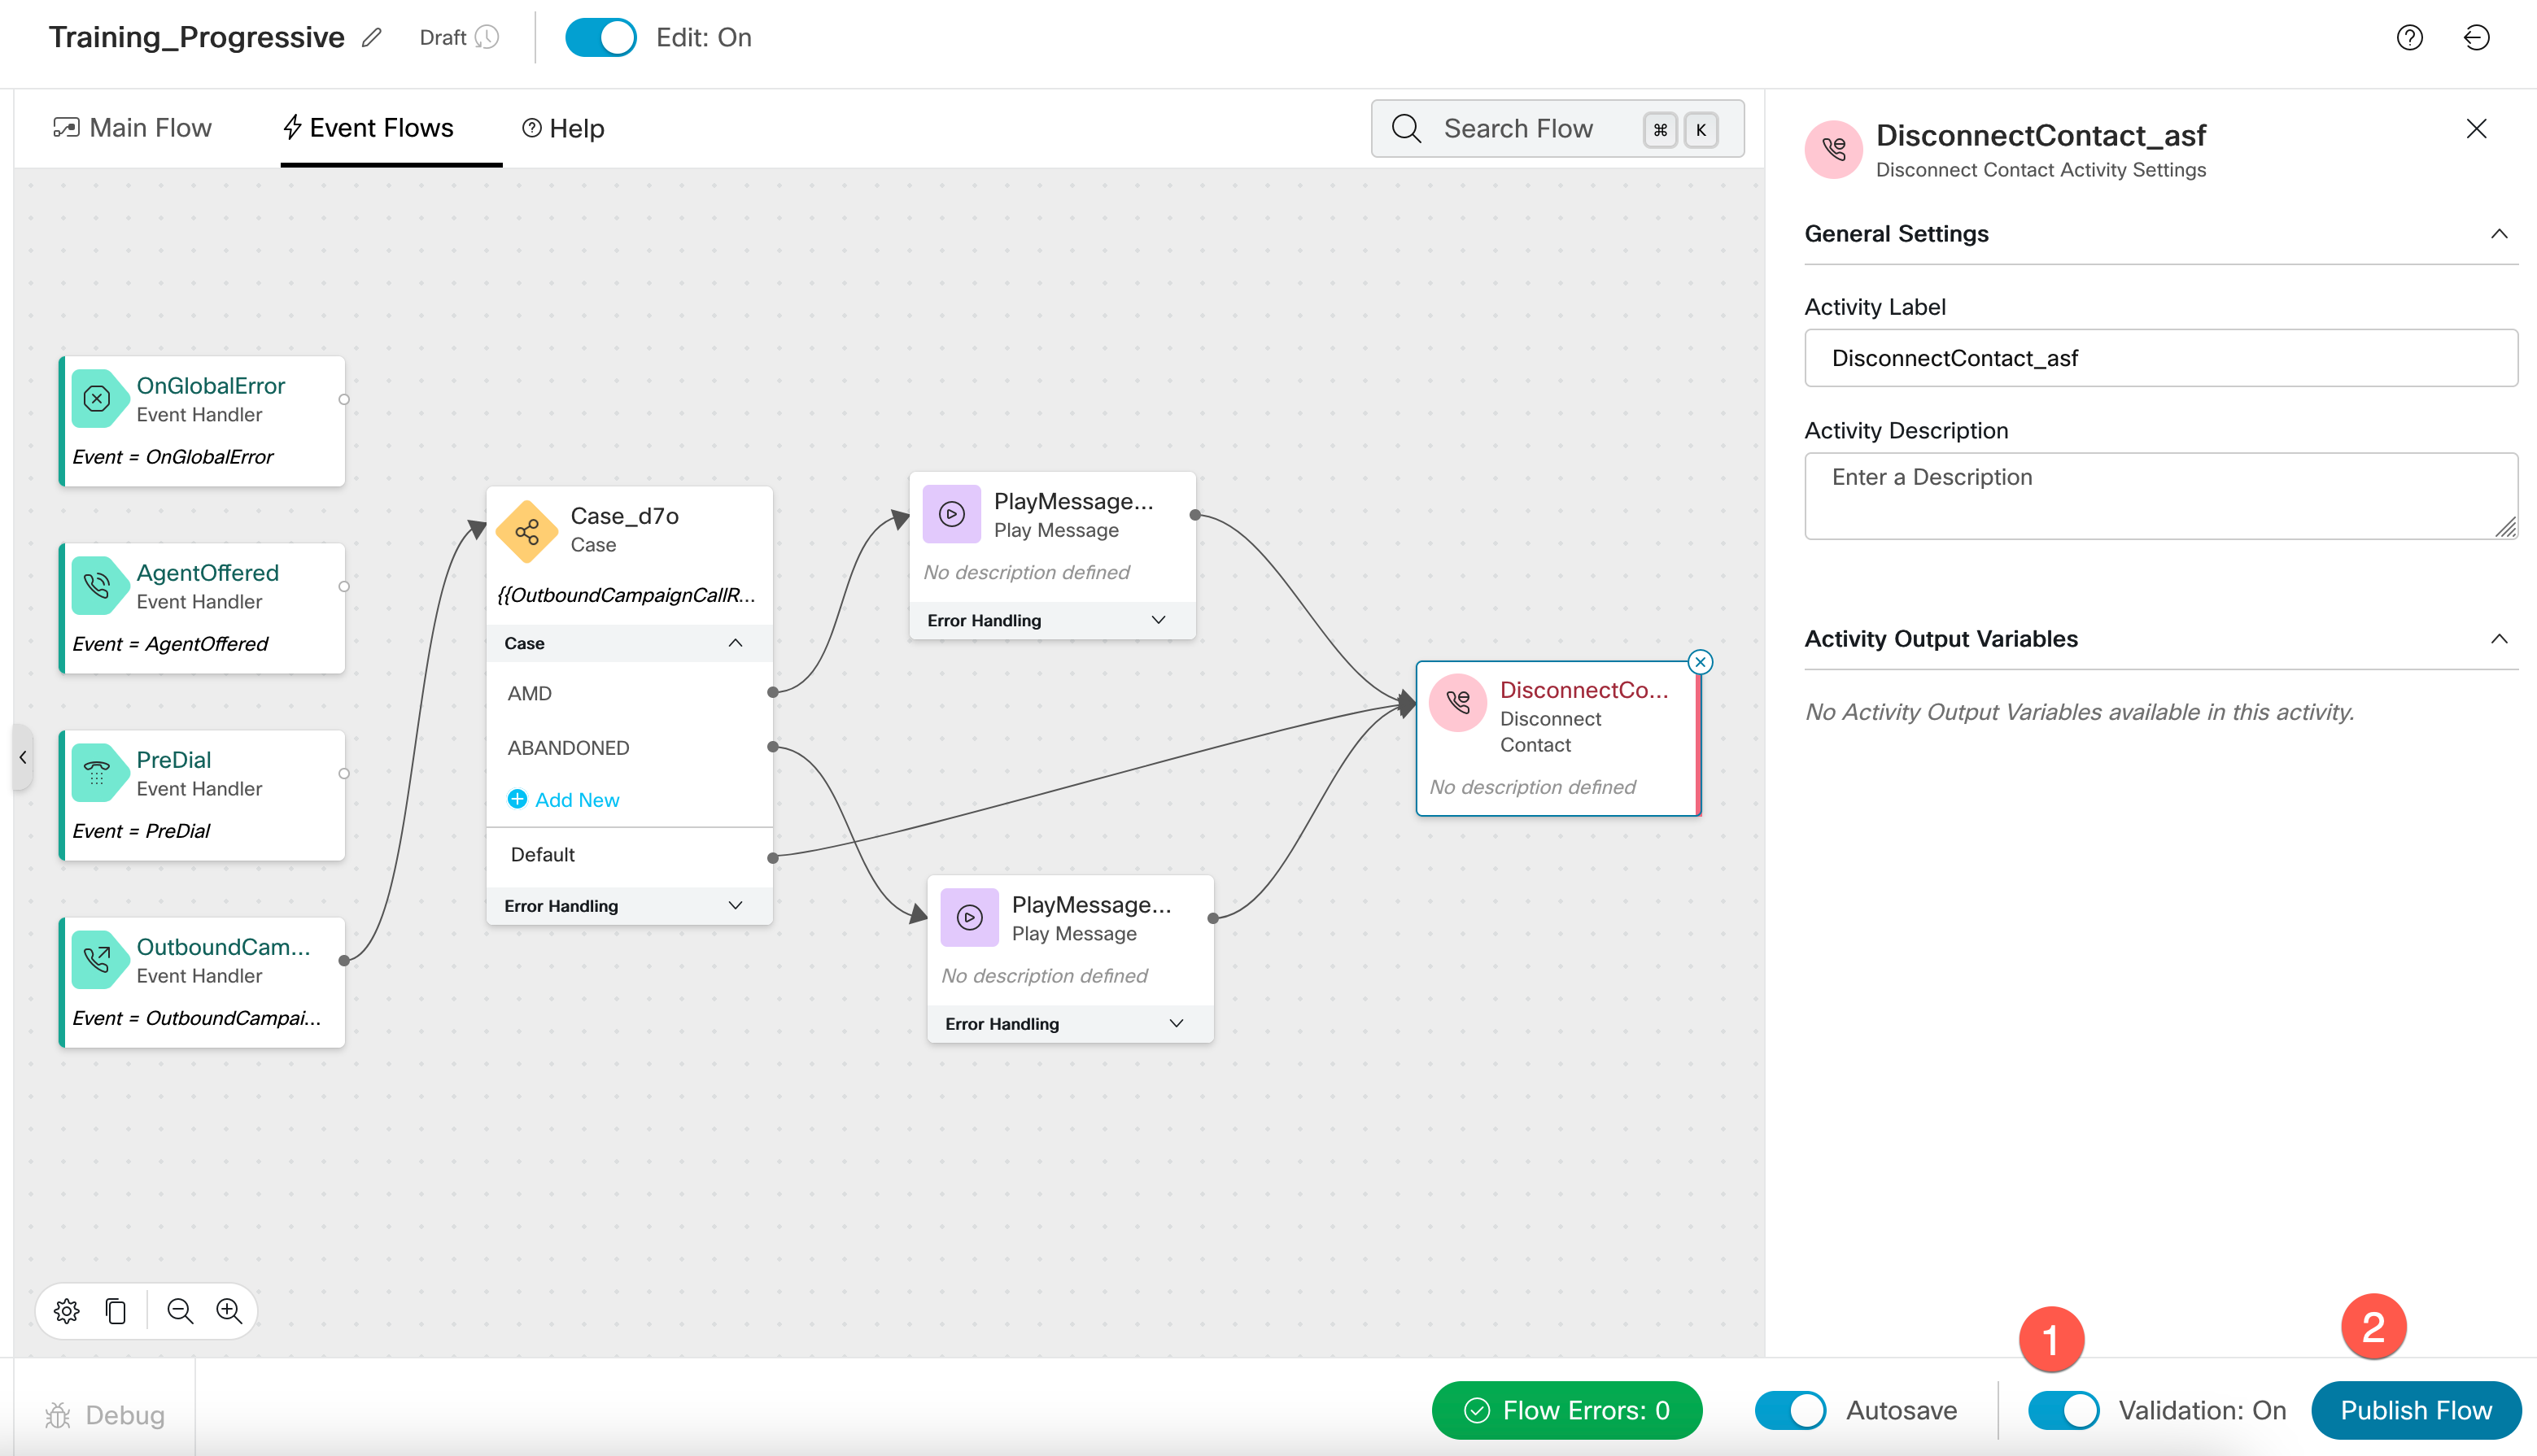
Step 5: Create Outdial Queue
-
Navigate to
Queuesand clickCreate Queue - Configure the outdial queue
- Name:
Provide any desired Name - Queue Type:
Outdial Queue - Outbound Campaign:
ON - Queue Routing Type:
Longest Available Agent - Call Distribution: Create Group > Select the team that the agent is part of
- Service Level Threshold:
Set a desired value - Maximum Time in Queue:
Set a desired value - Default Music in Queue:
Set a desired value
- Name:
- Click
Create
Step 6: Create Outdial EntryPoint
-
Navigate to
Channelsand clickCreate Channel - Configure the outdial EntryPoint
- Name:
Provide any desired Name - Channel Type:
Outbound Telephony - Service Level Threshold:
Set a desired value - Routing Flow:
Select flow created in Step1 - Version Label:
Latest(or as per your configuration) - Outdial Queue:
Select the Queue created in previous step
- Name:
- Click
Create
Step 7: Create Campaign Group (Progressive)
-
Navigate to Contact Center Administration portal
-
Cross launch into Acqueon administration portal
-
Navigate to
Groupand click+ -
Select
Voice Campaign Groupoption - Configure the below:
- Name:
Enter desired Name - Dialer Name:
Select the dialer configured in your tenant - Entry POint:
Select the outdial entrypoint created in Step 6 - Pacing Mode:
Progressive
- Name:
-
Click
Next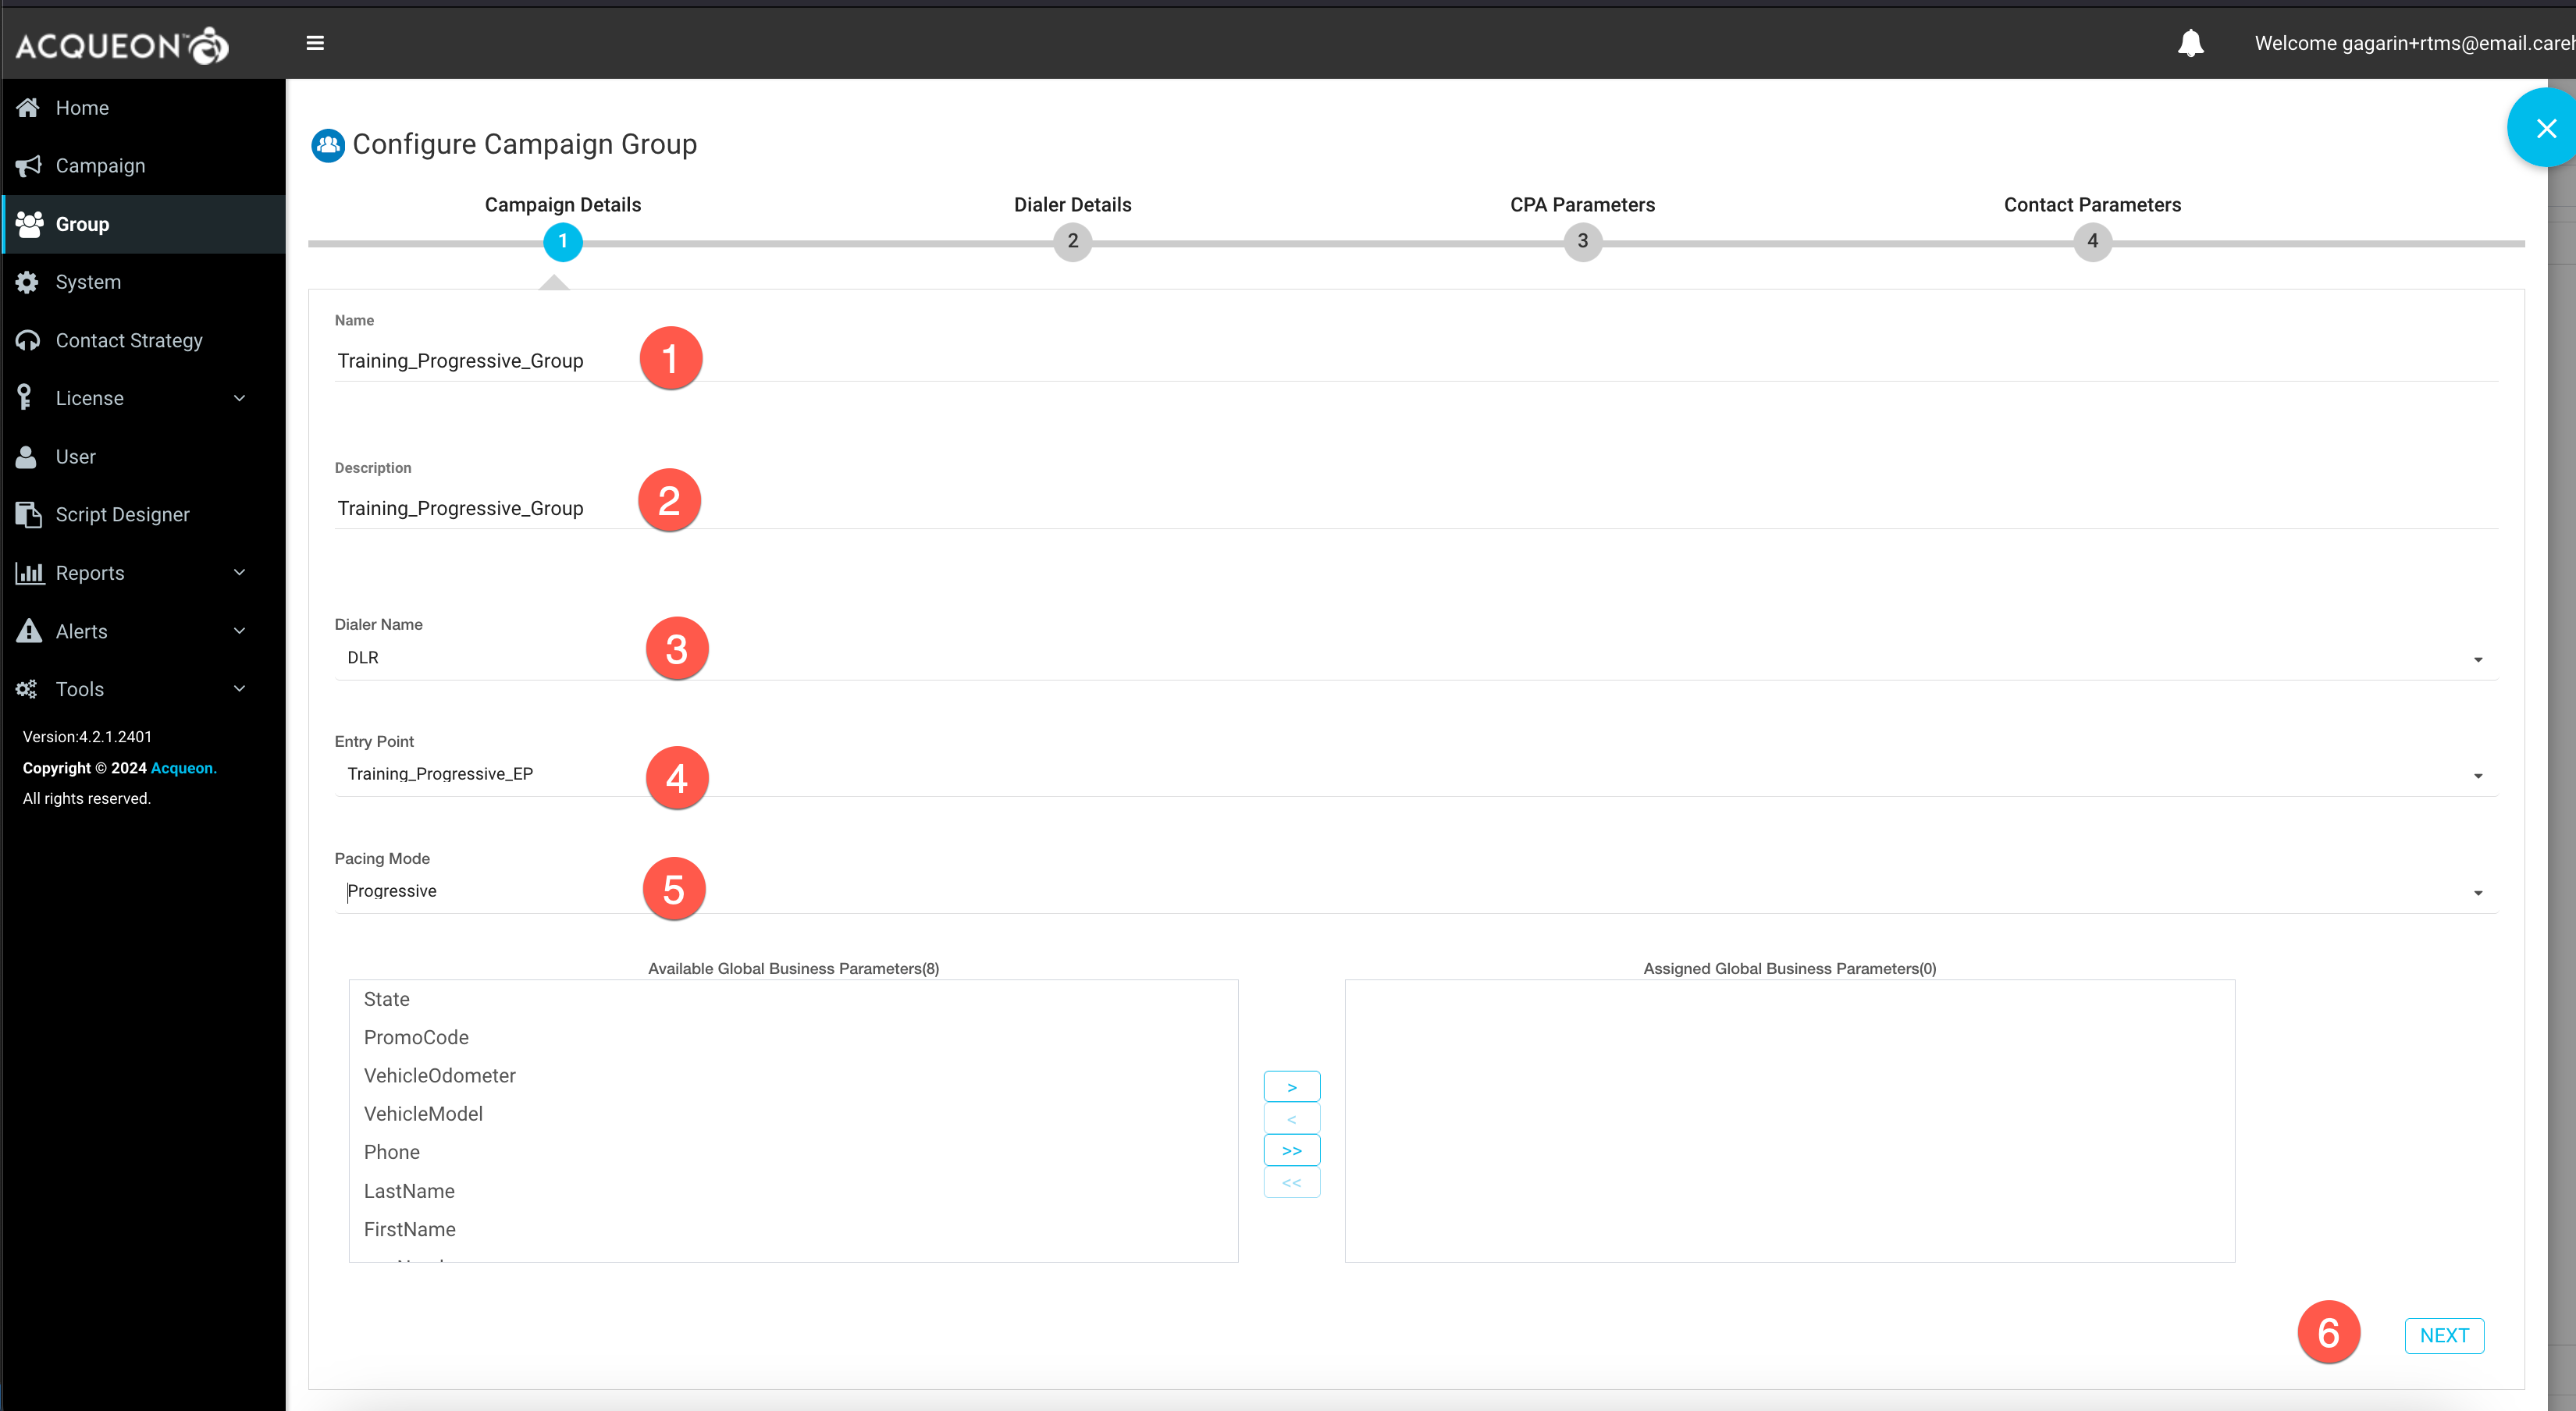
- Select ANI based on your requirement
- Configure
Dial RateandNo Answer Ring Limitas required or as shown in the image below - Click
Next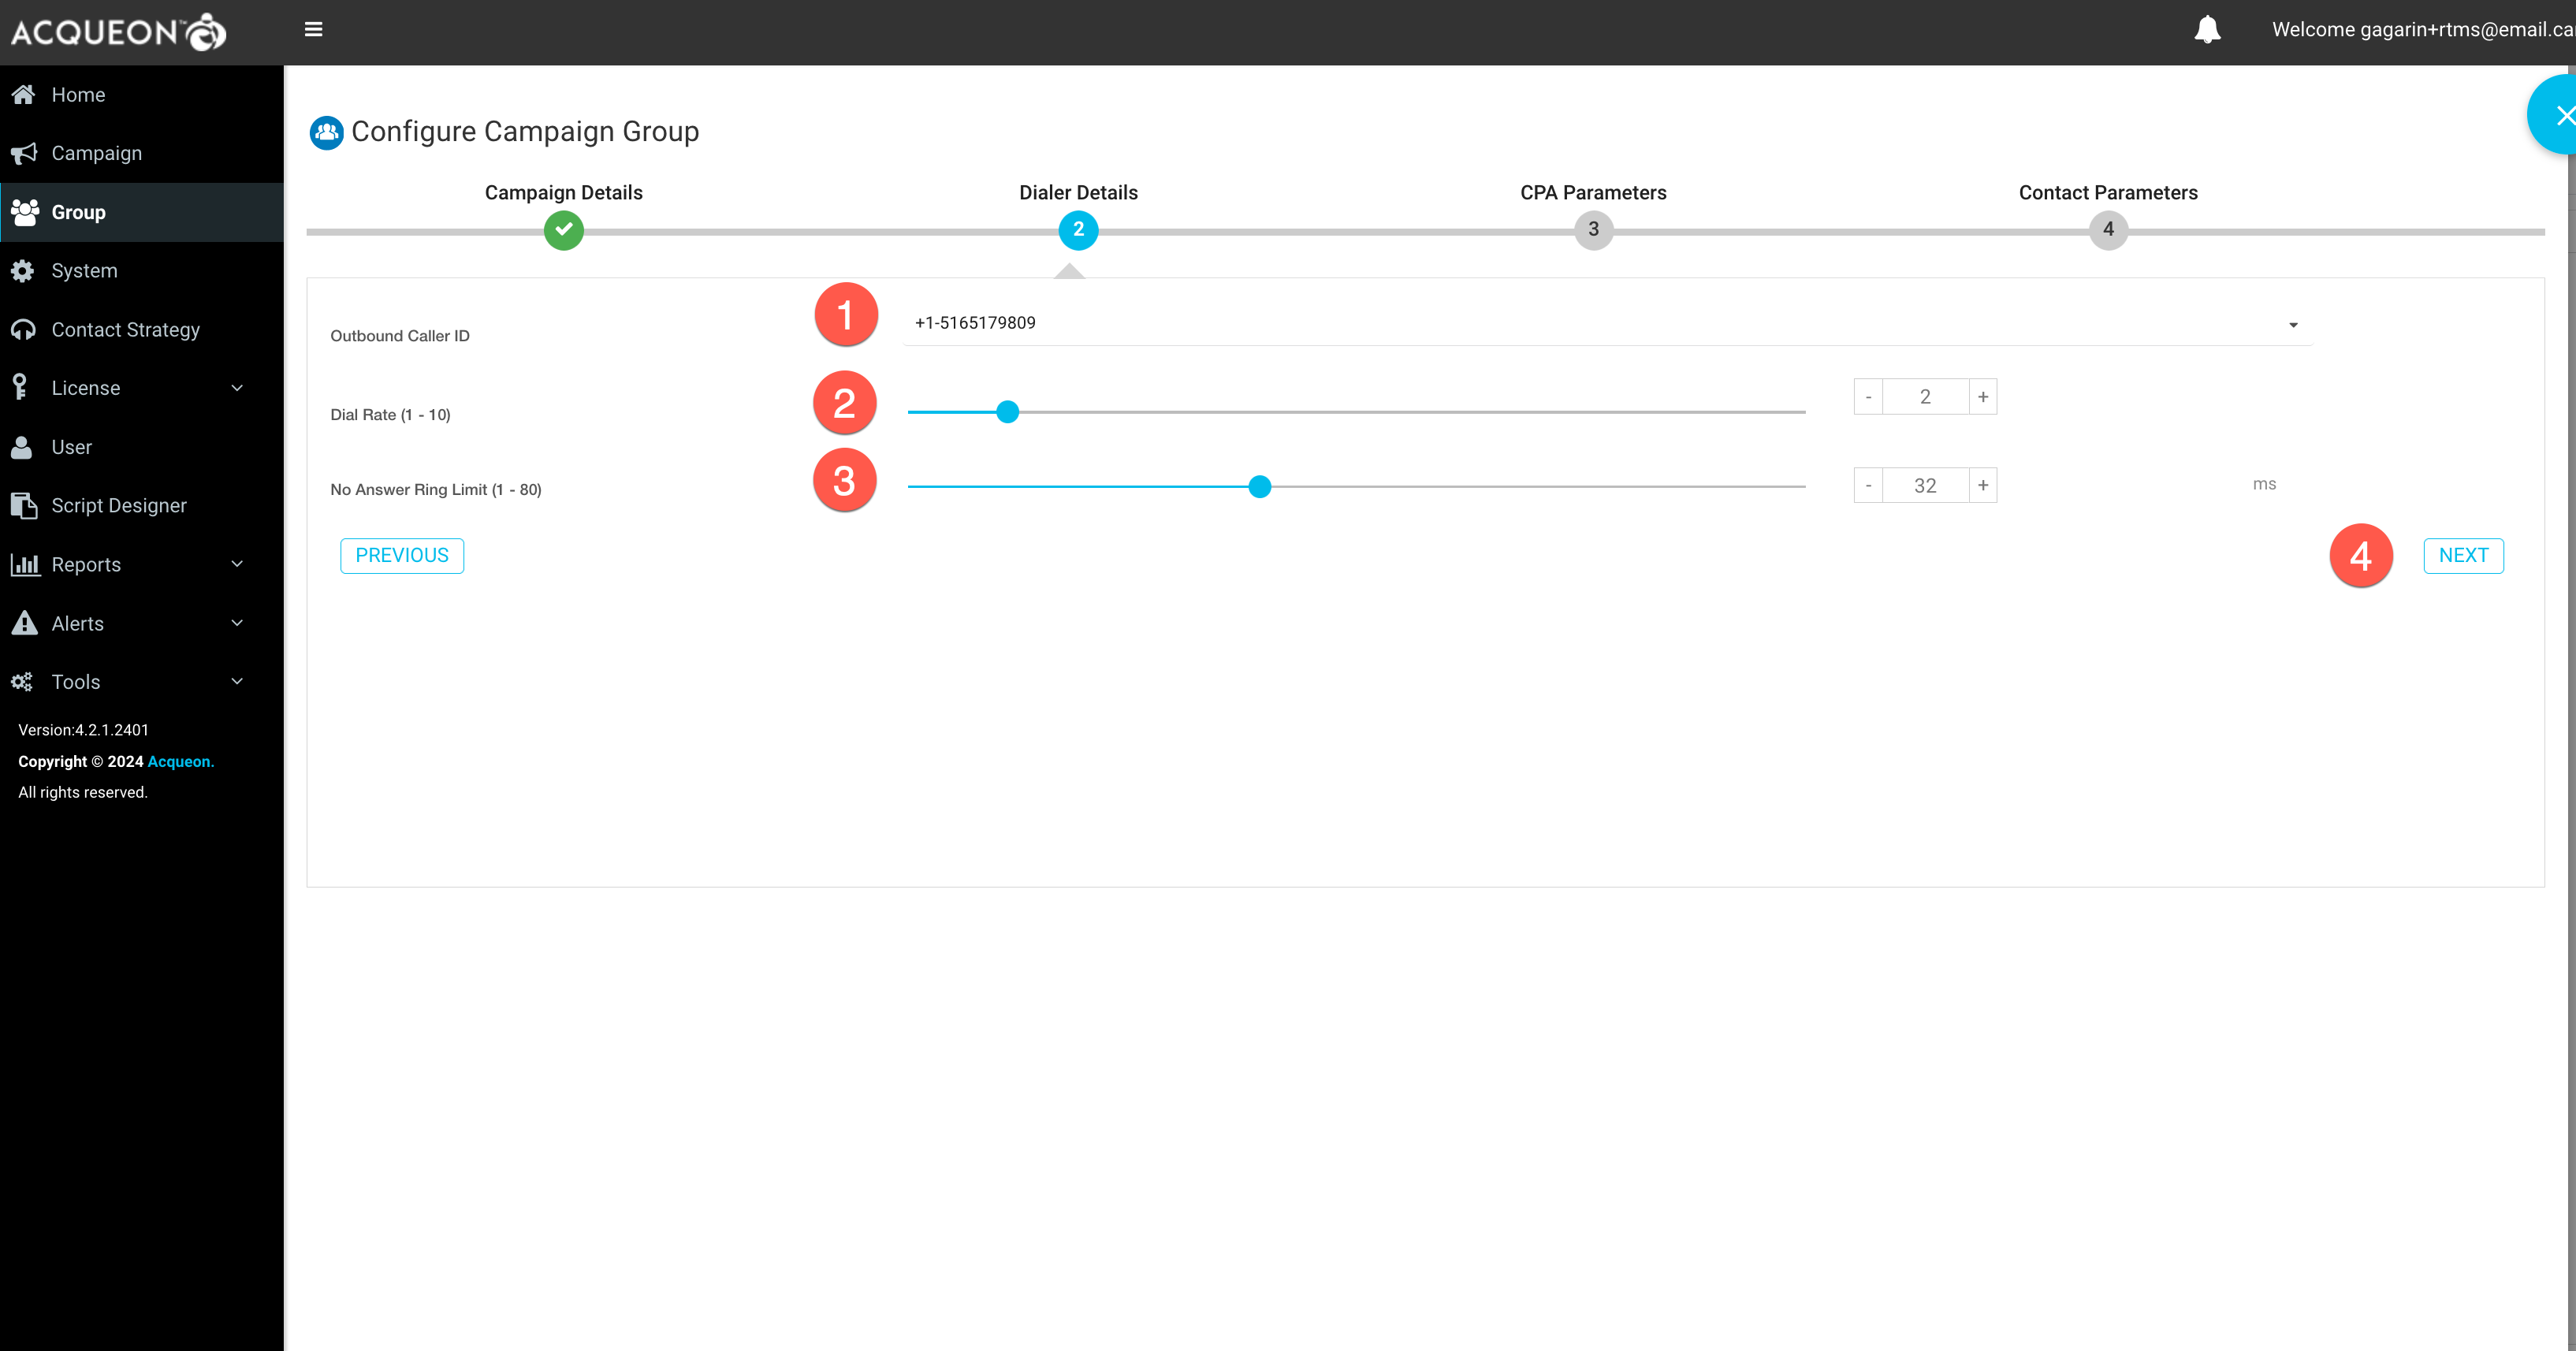
The
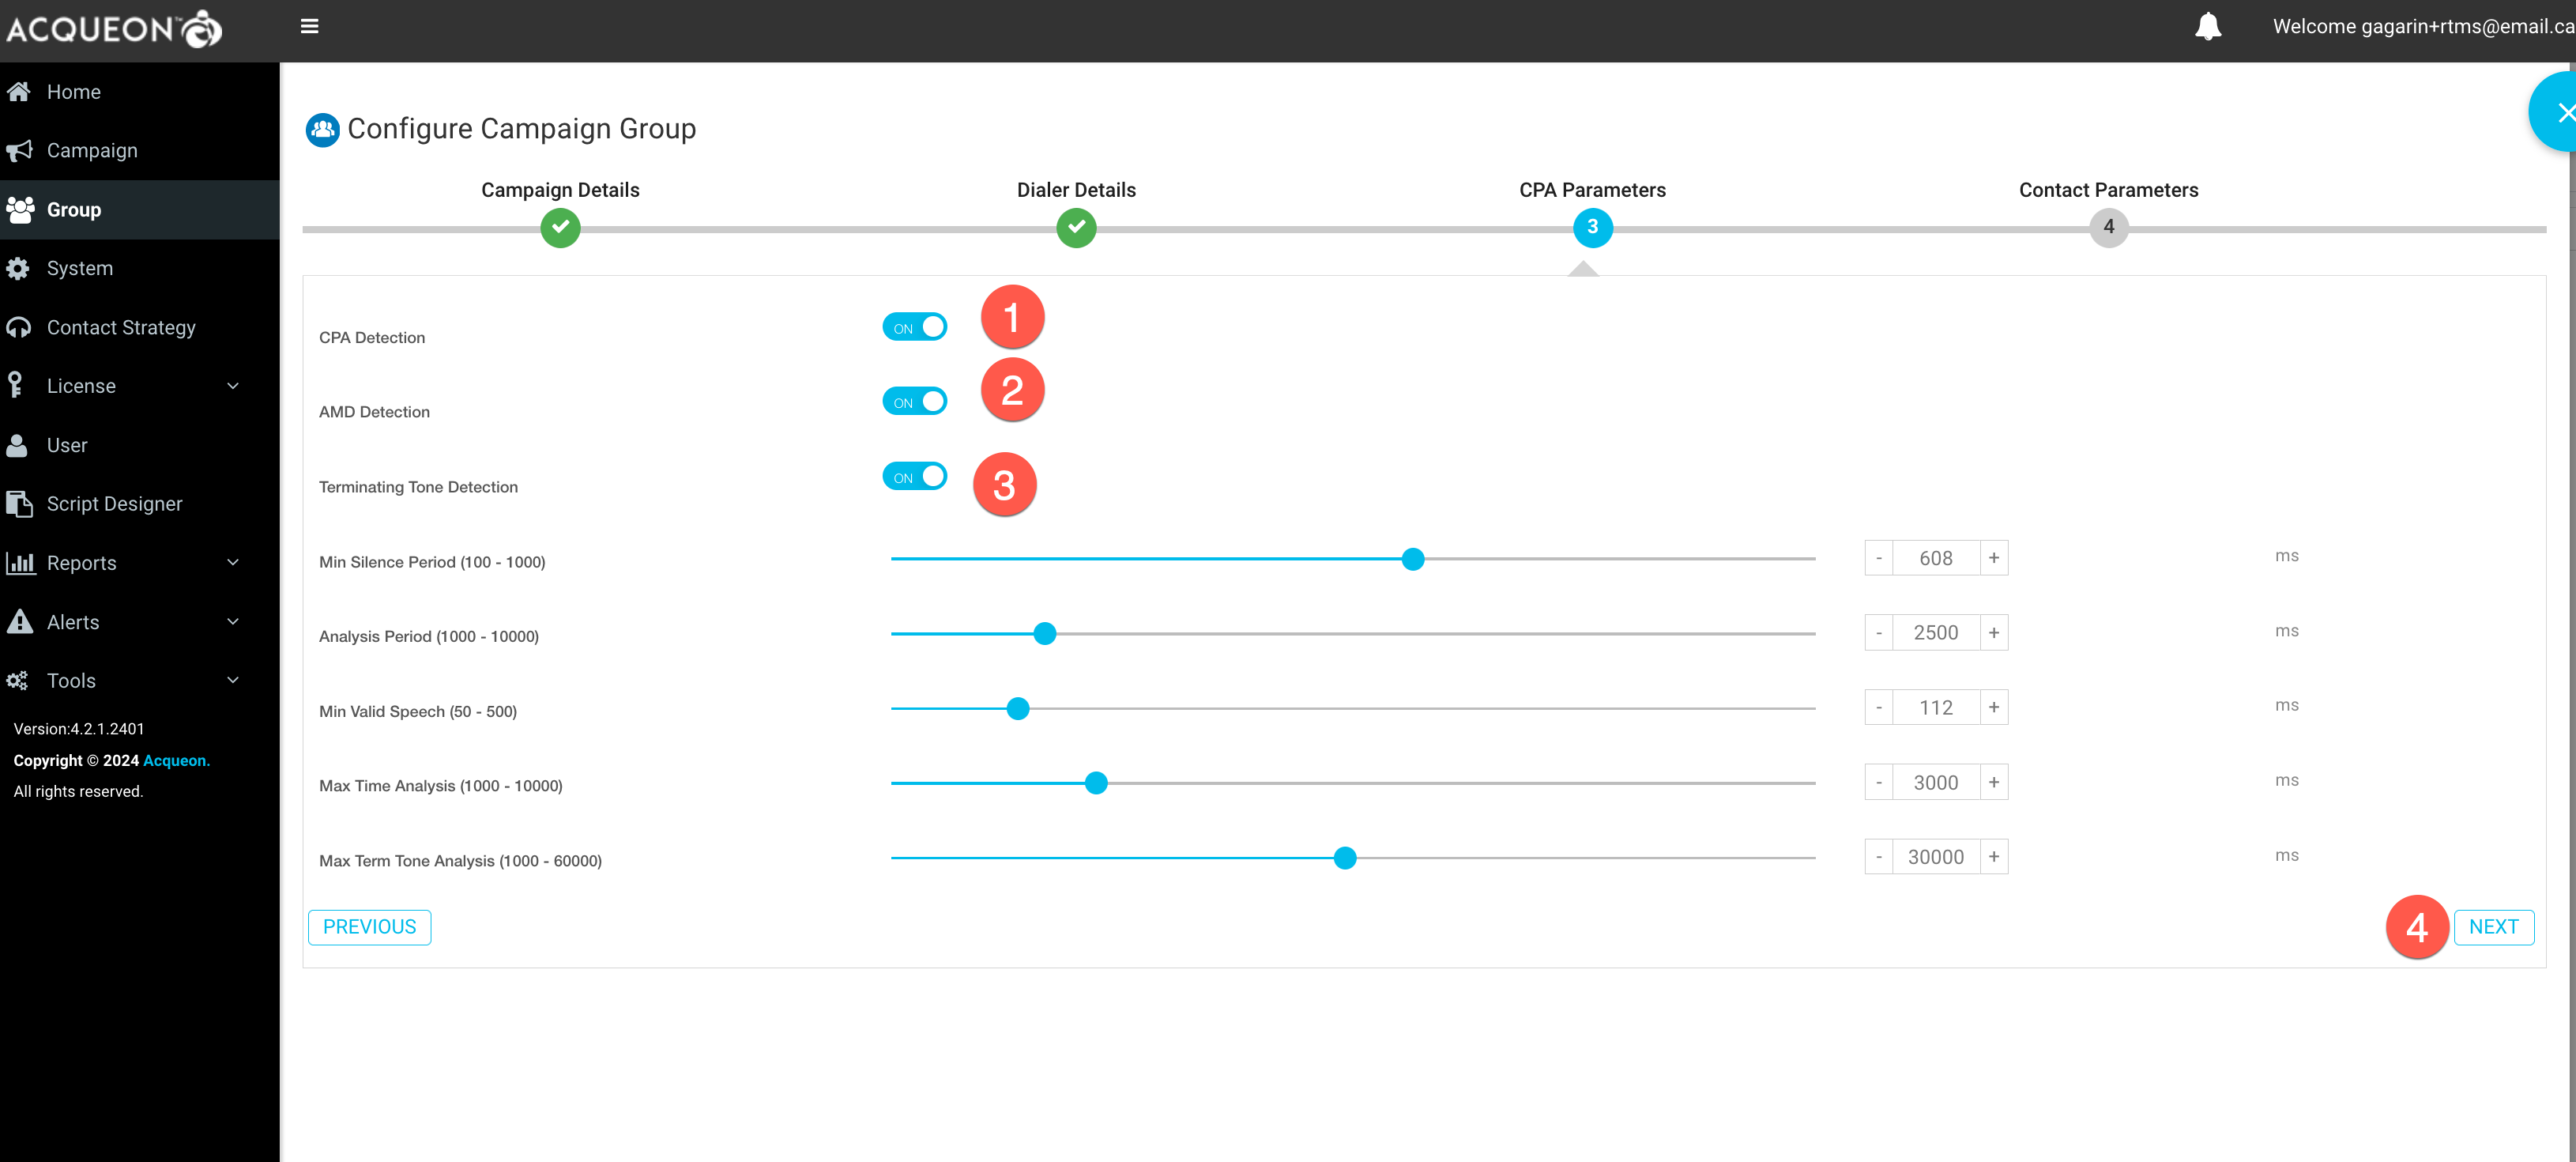
CPA Parameterstab of the Campaign Group specifies whether CPA and AMD are needed for the call. The CPA parameters are considered advanced and are not typically modified. CPA is performed on the call by the dialer directly - there is no agent awareness. It has the ability to detect FAX machines, busy signals, invalid numbers, no answer calls and answering machines / voicemails.
- Enable
CPA,AMD Detection,Terminating Tone Detectionand clickNext
-
Configure
Contact Parametersvalues as per the requirement and ClickSave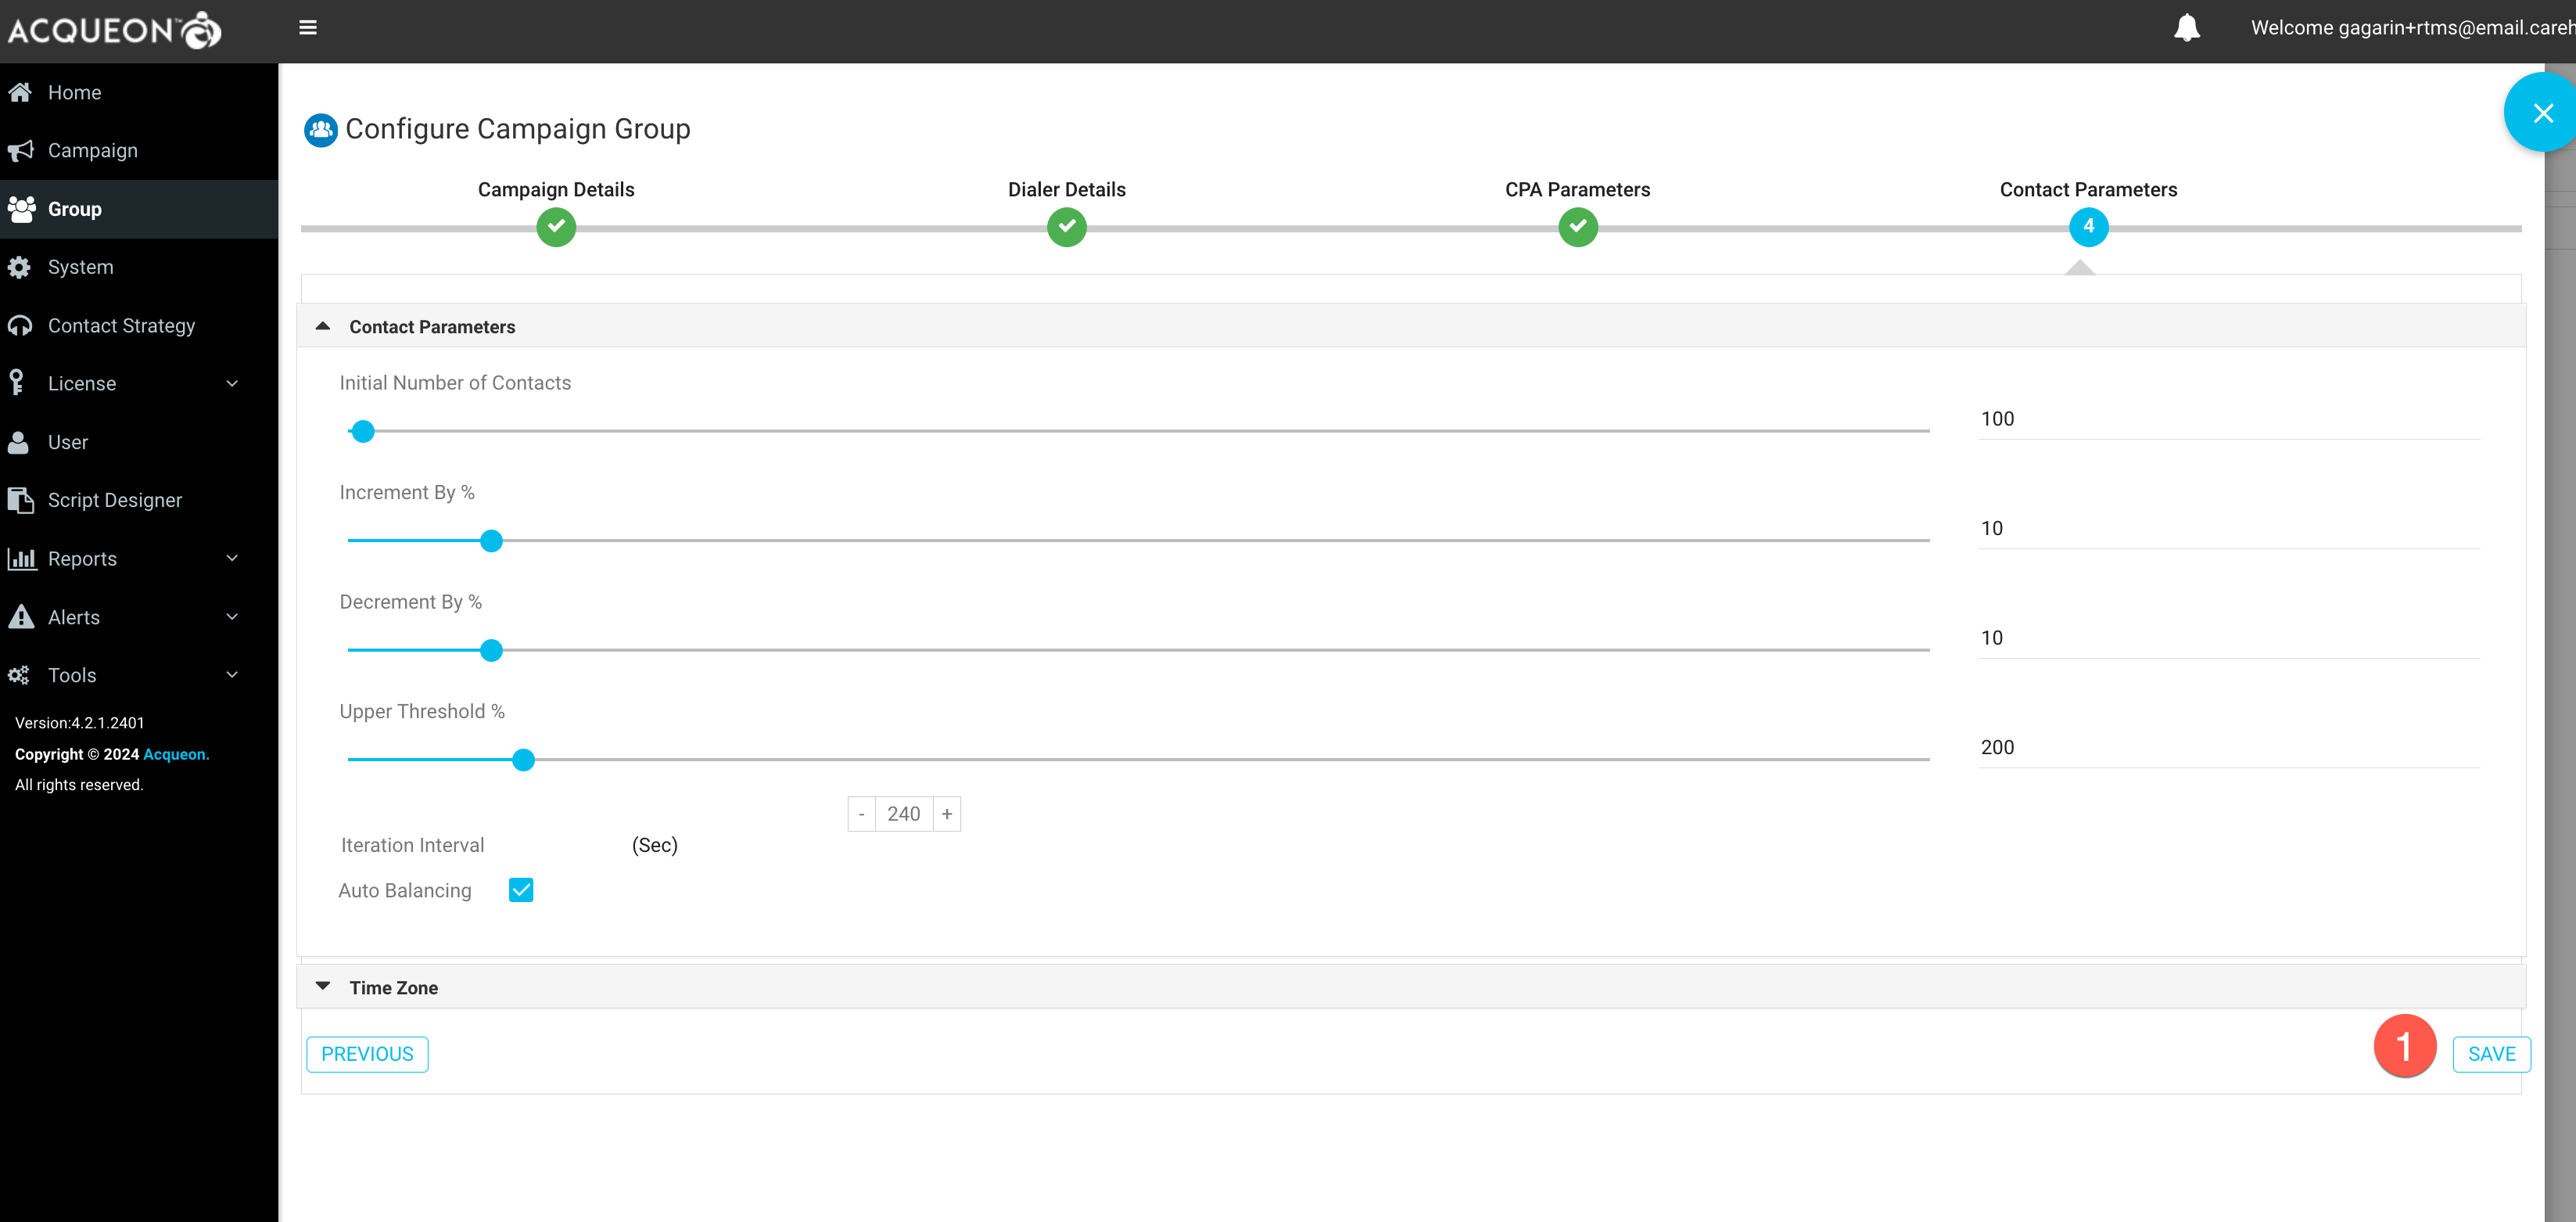
-
Verify group status shows as
Executing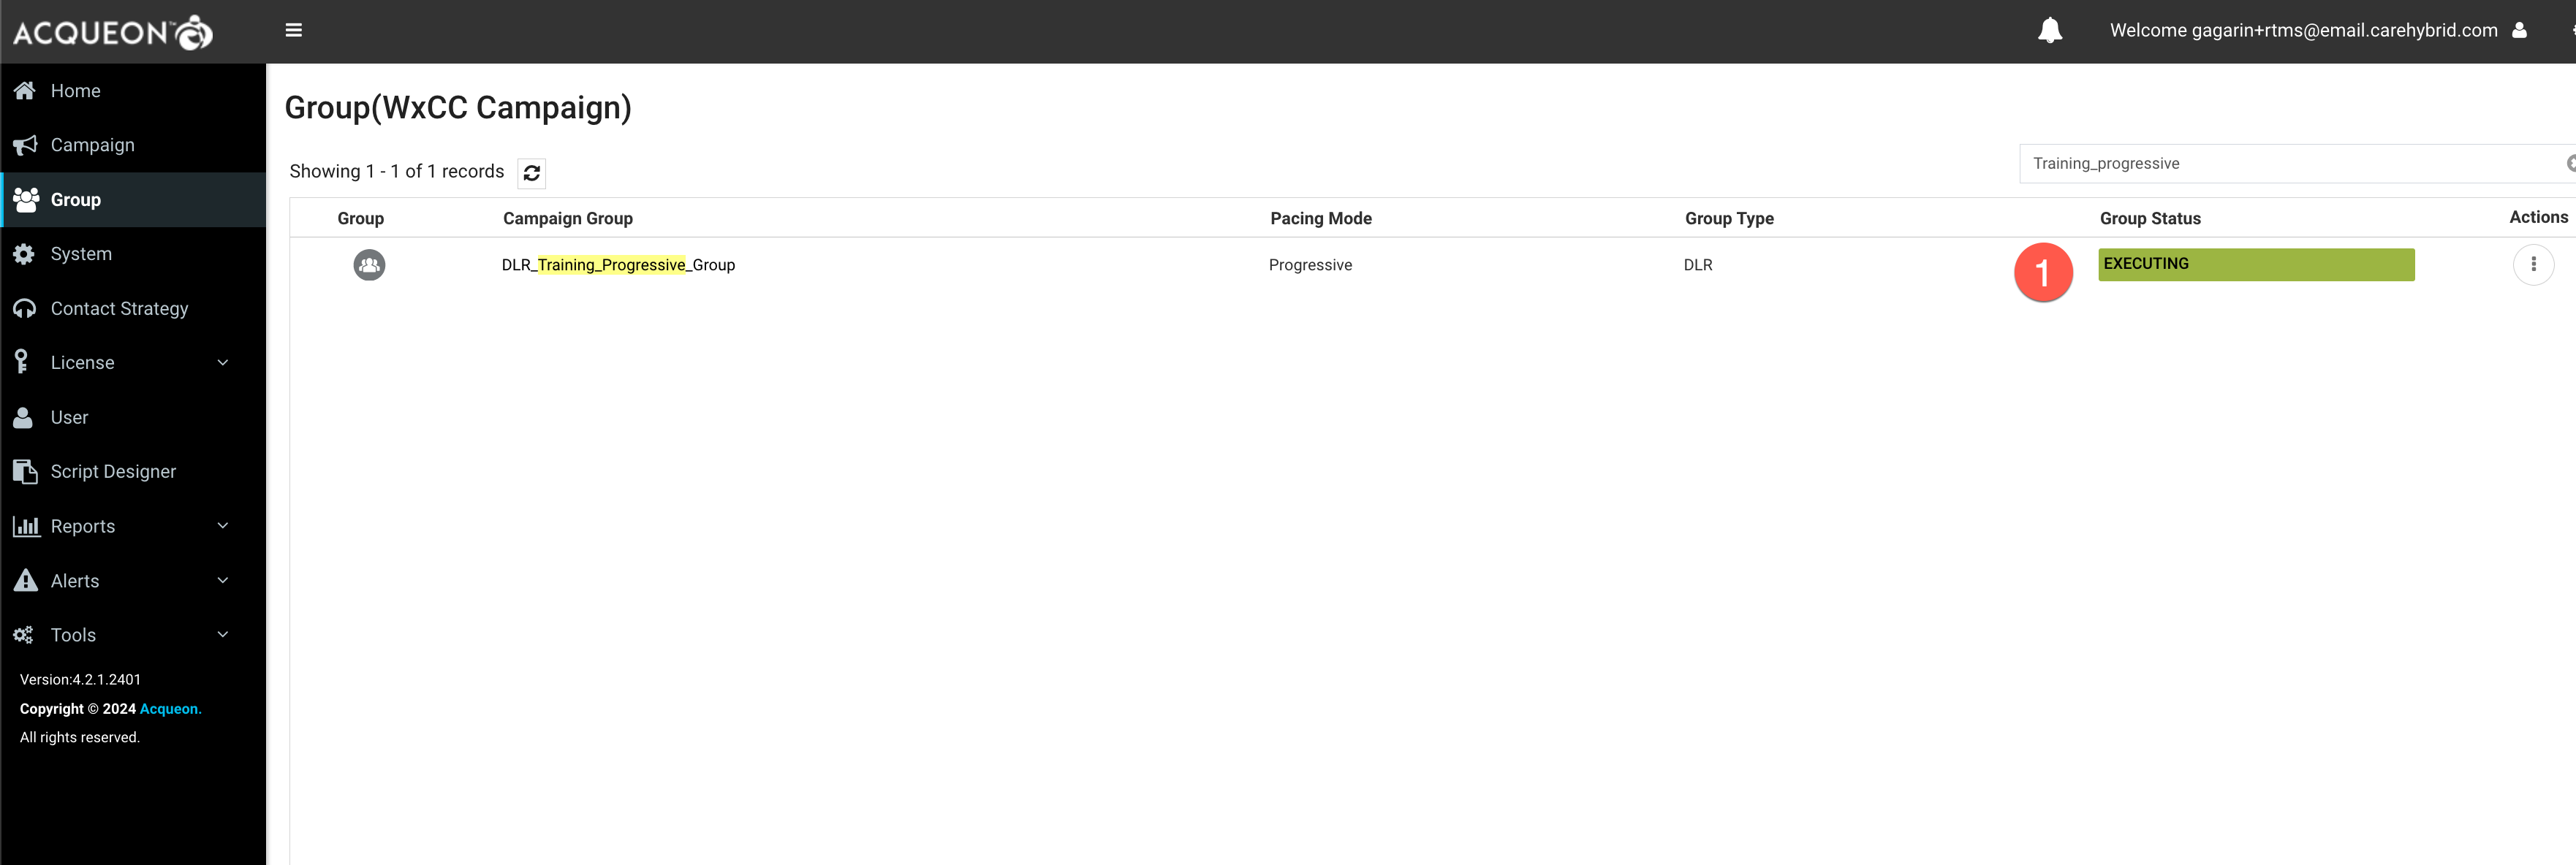
Step 8: Create Campaign (Progressive)
-
Navigate to
Campaignand clickAdd Campaign - Configure the below:
- Name:
Enter desired Name - Business Outcome Group:
Default group
- Name:
- Select Date Range, Time Range, TimeZone as per your requirement
-
Click
Next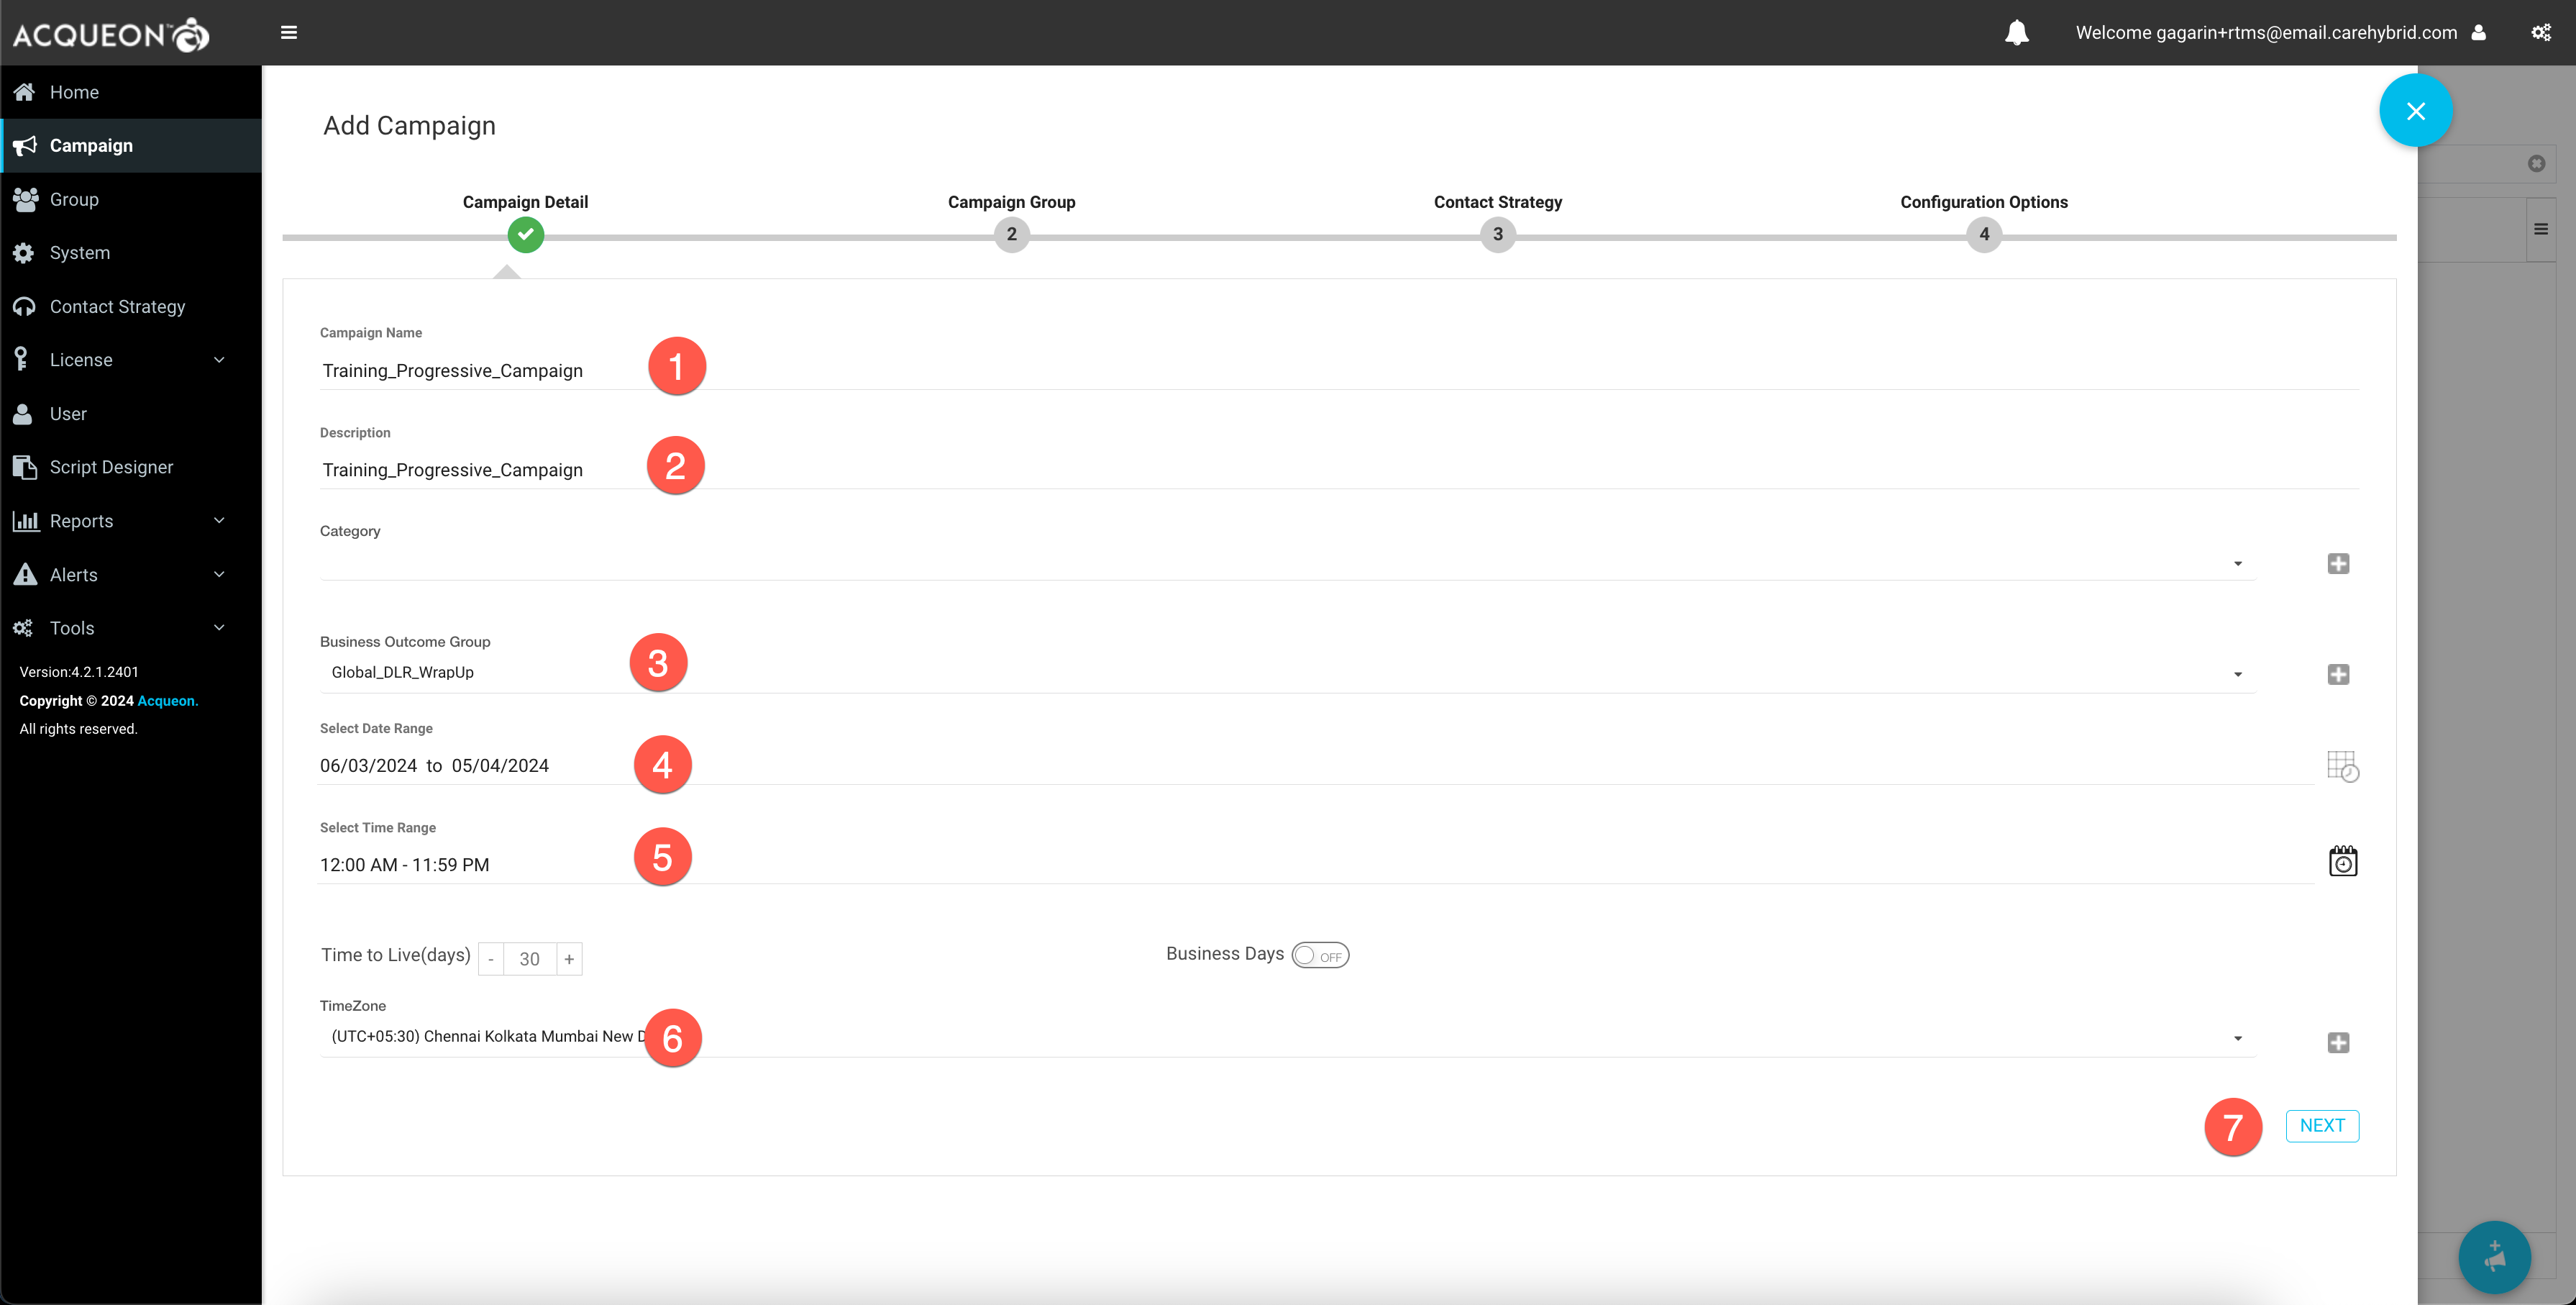
- Select
Dedicated Campaign Groupand select the group created in previous step -
Click
Next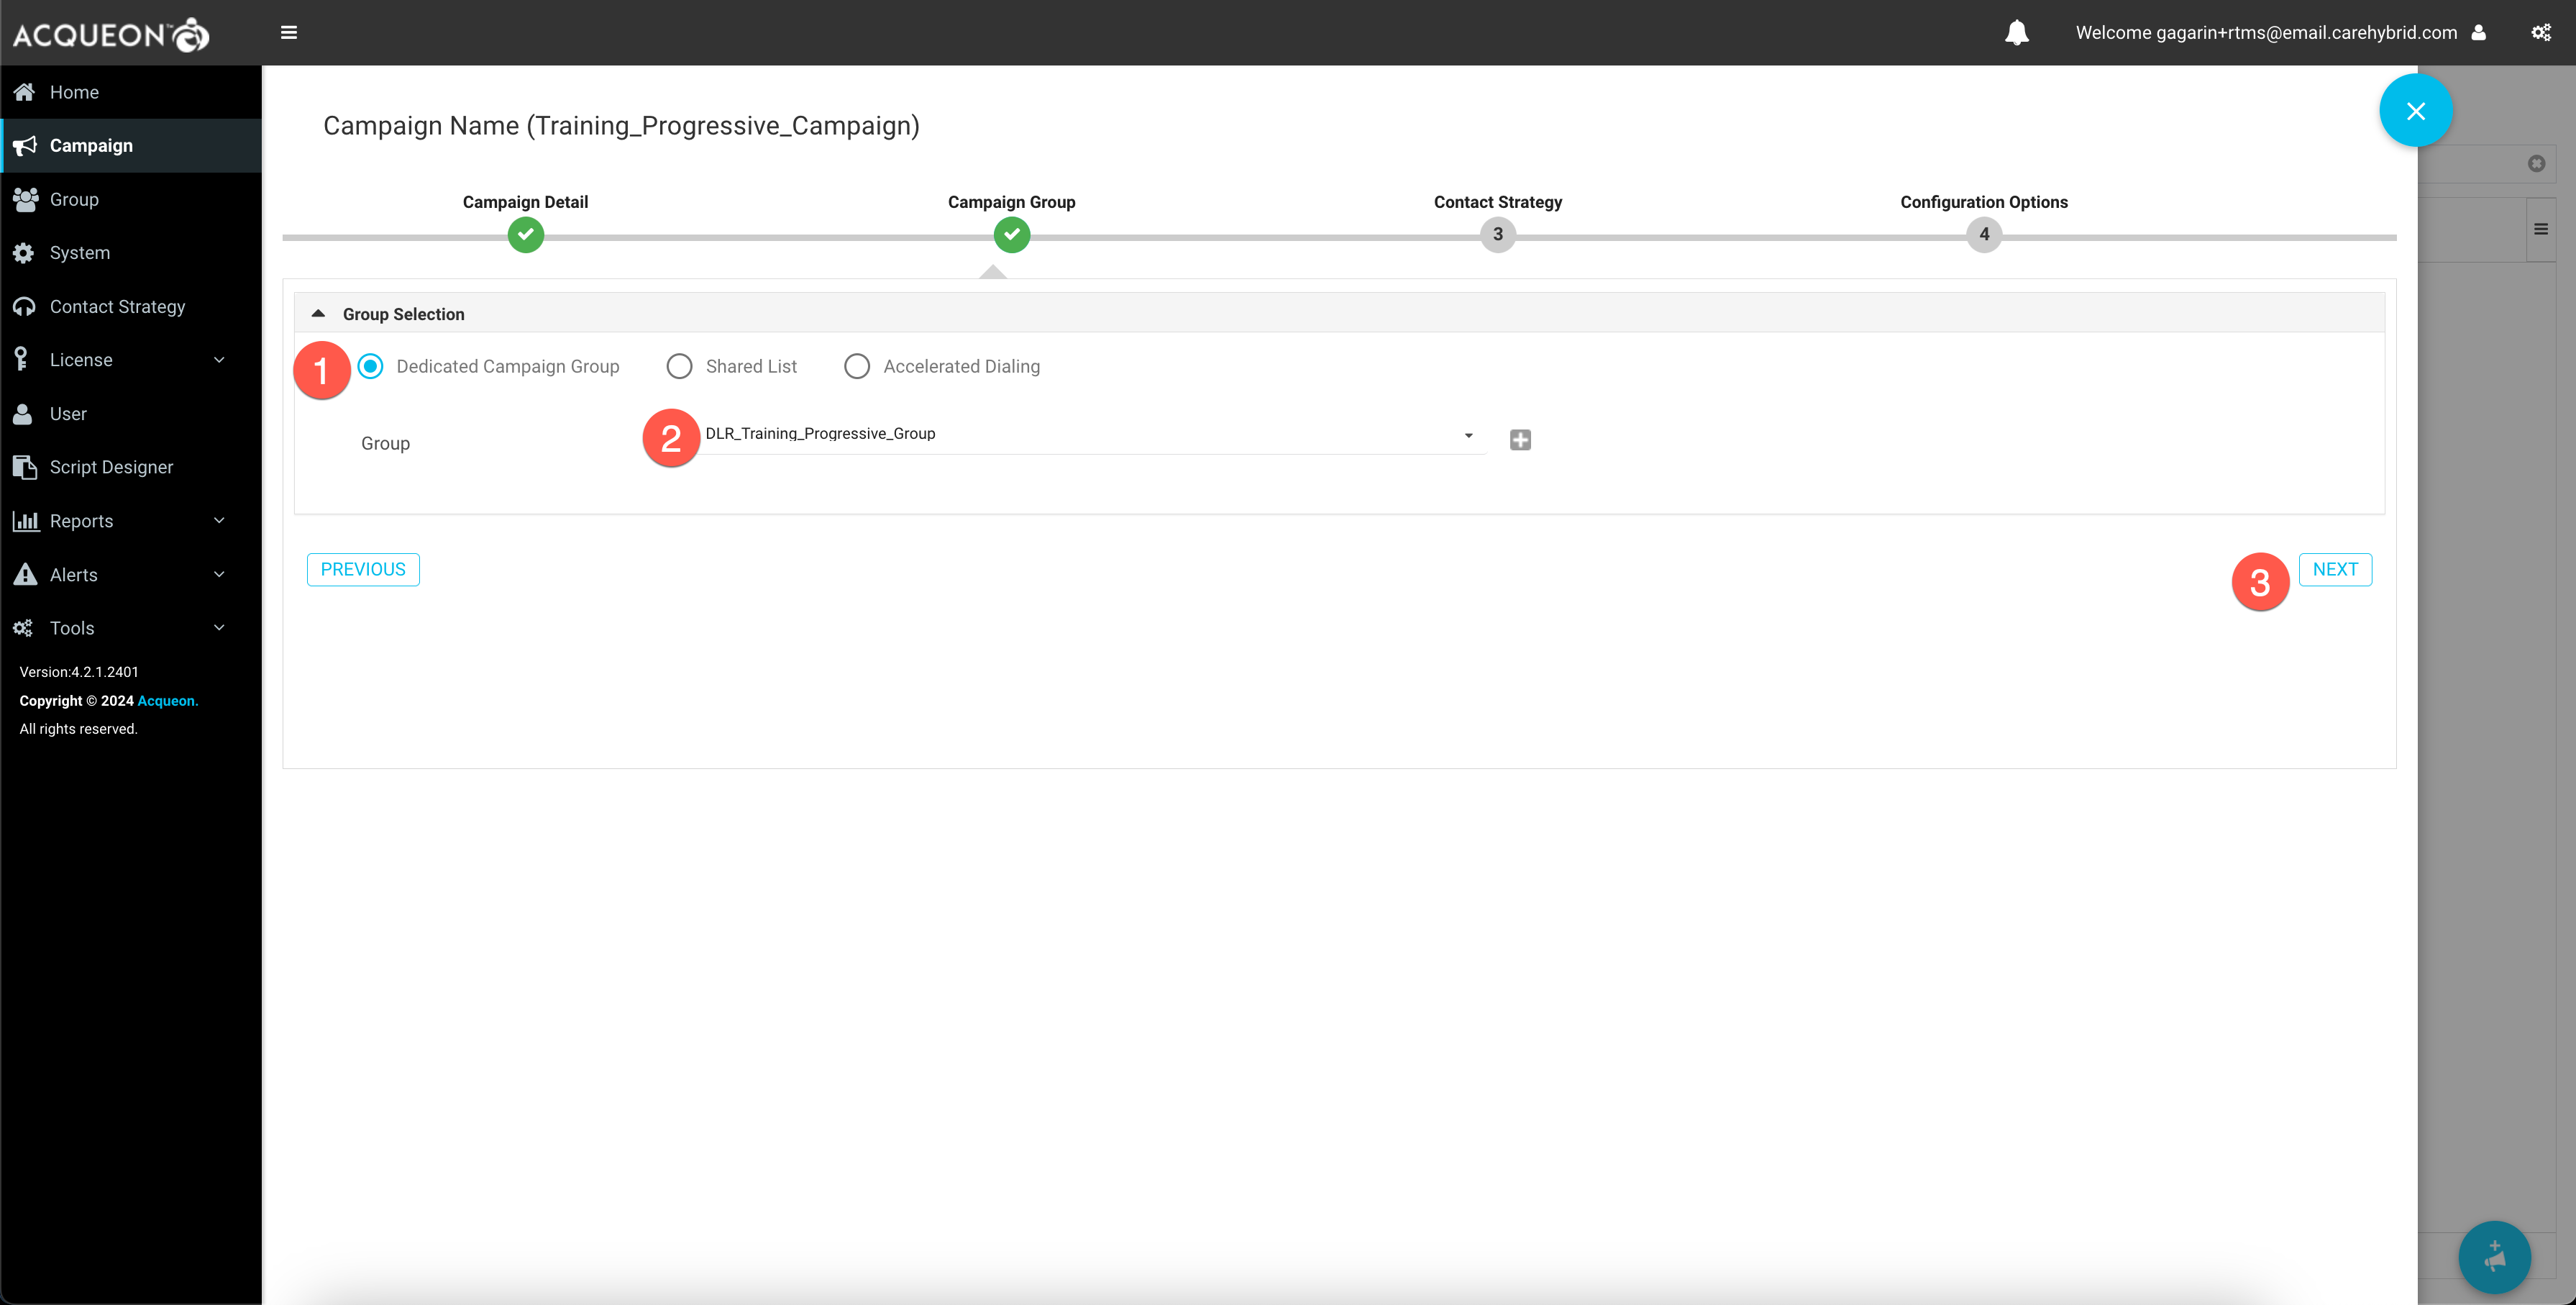
- Select
Default_Simple_Strategyas the contact strategy -
Click
Next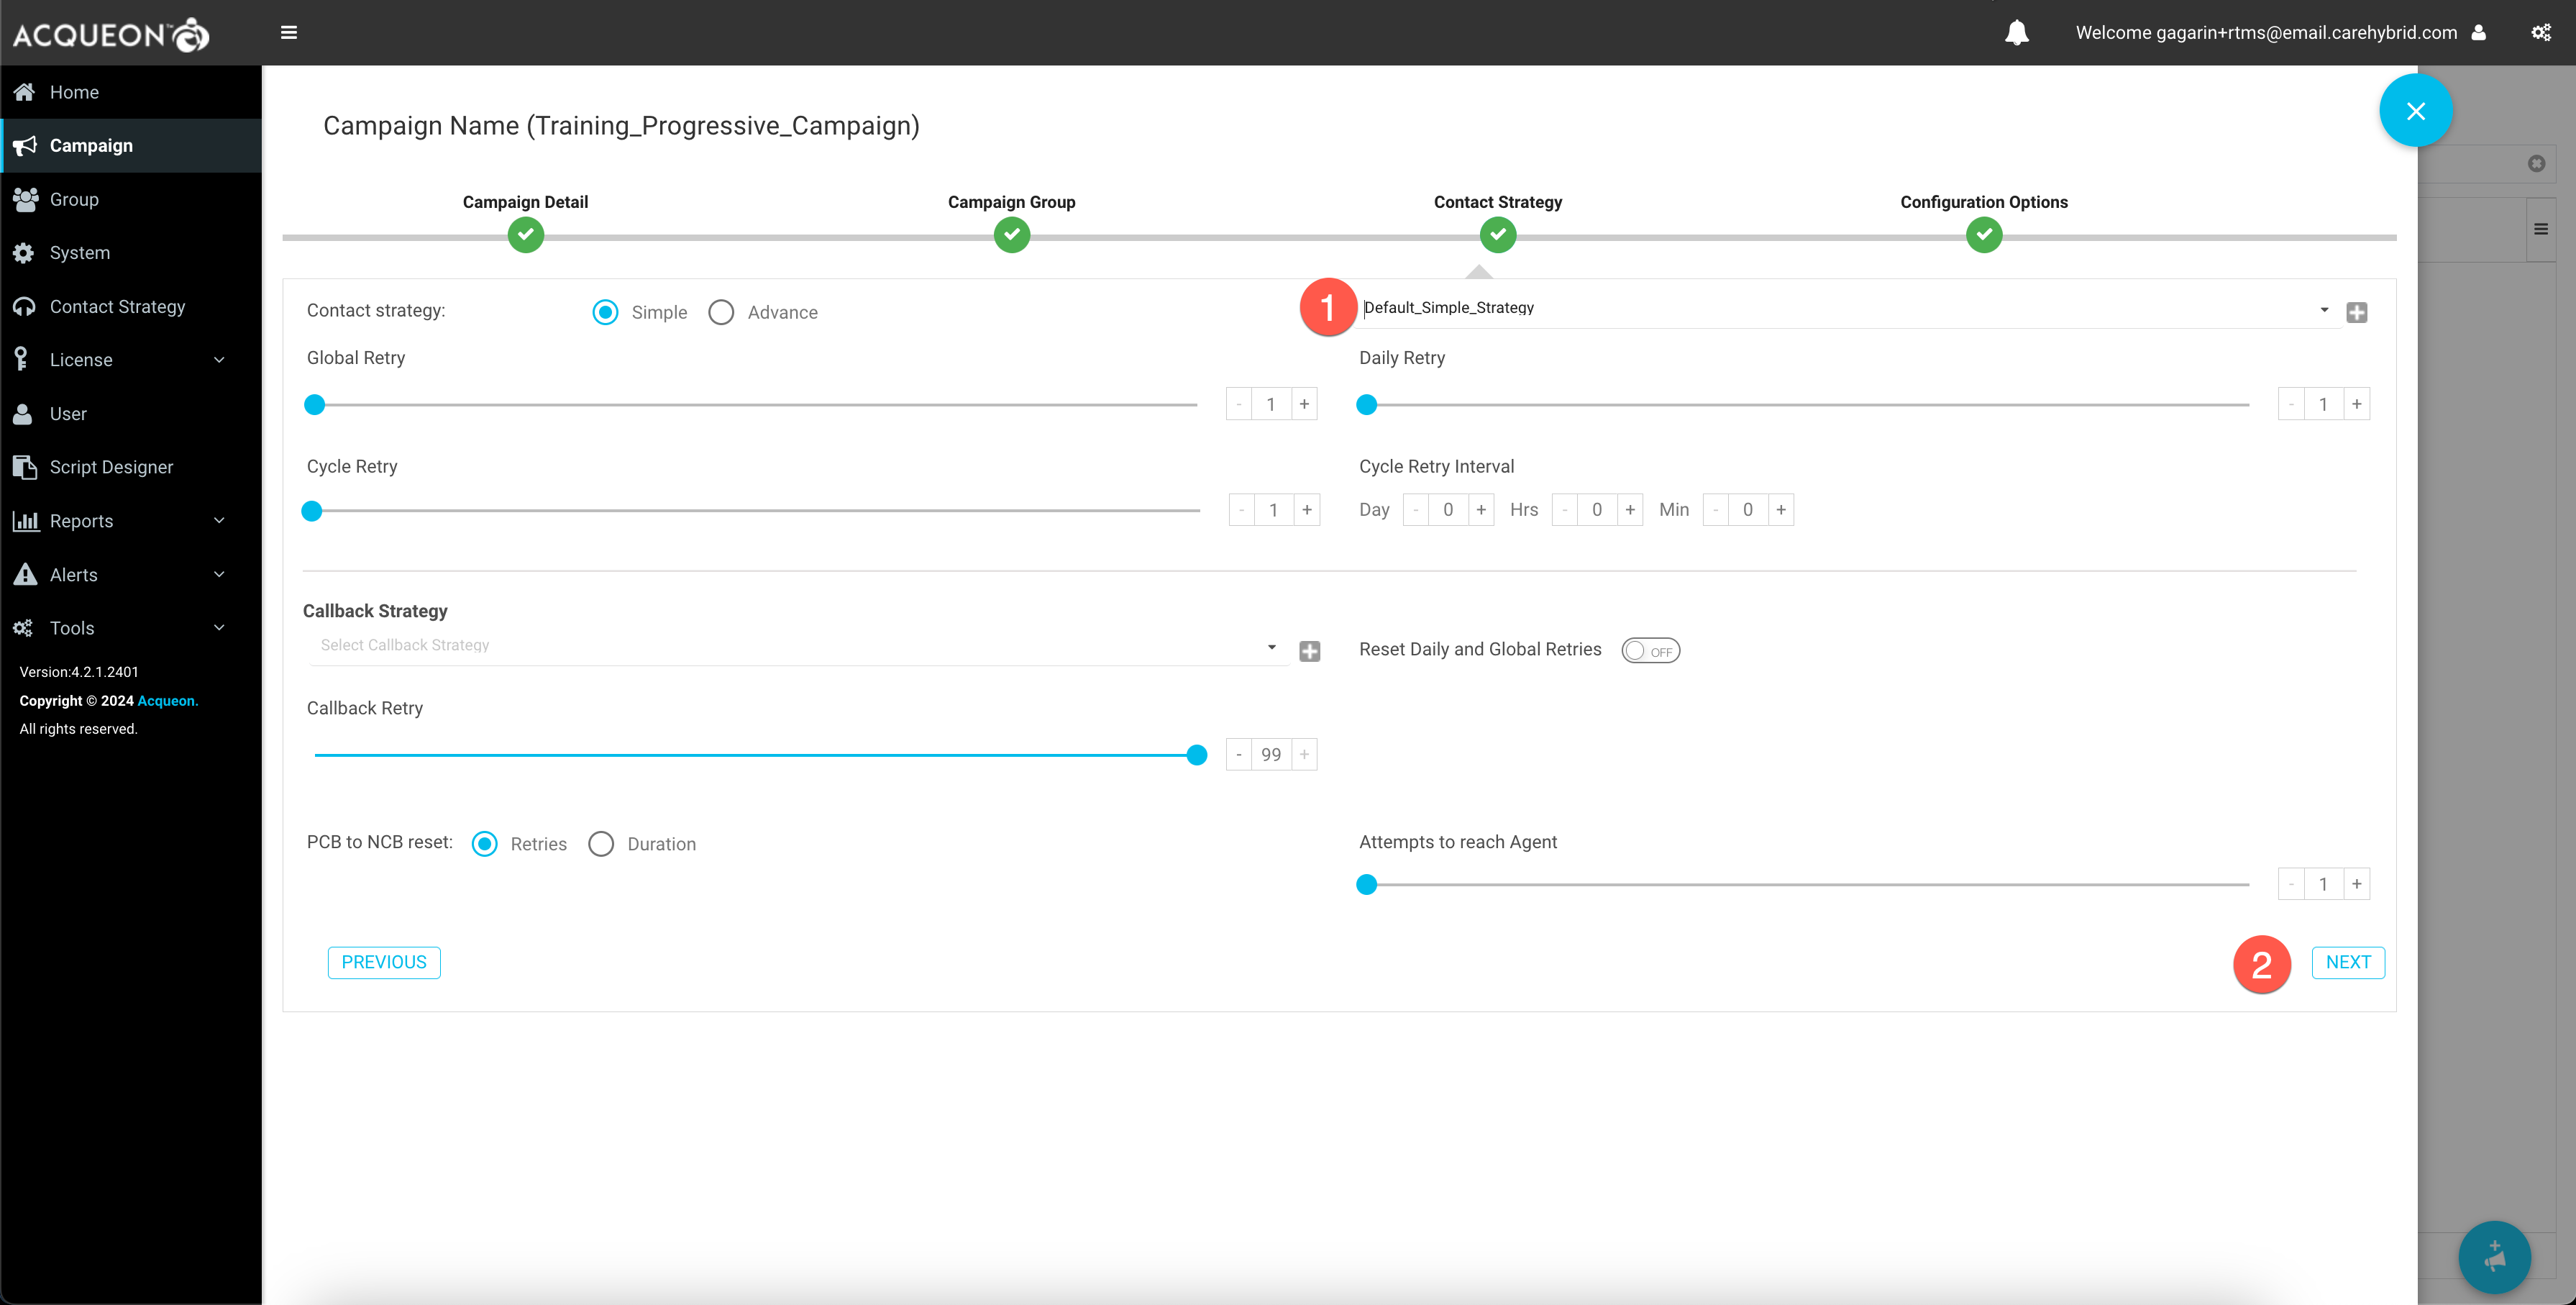
- Leave the default values as such and click
Save
Step 9: Create and upload contact list
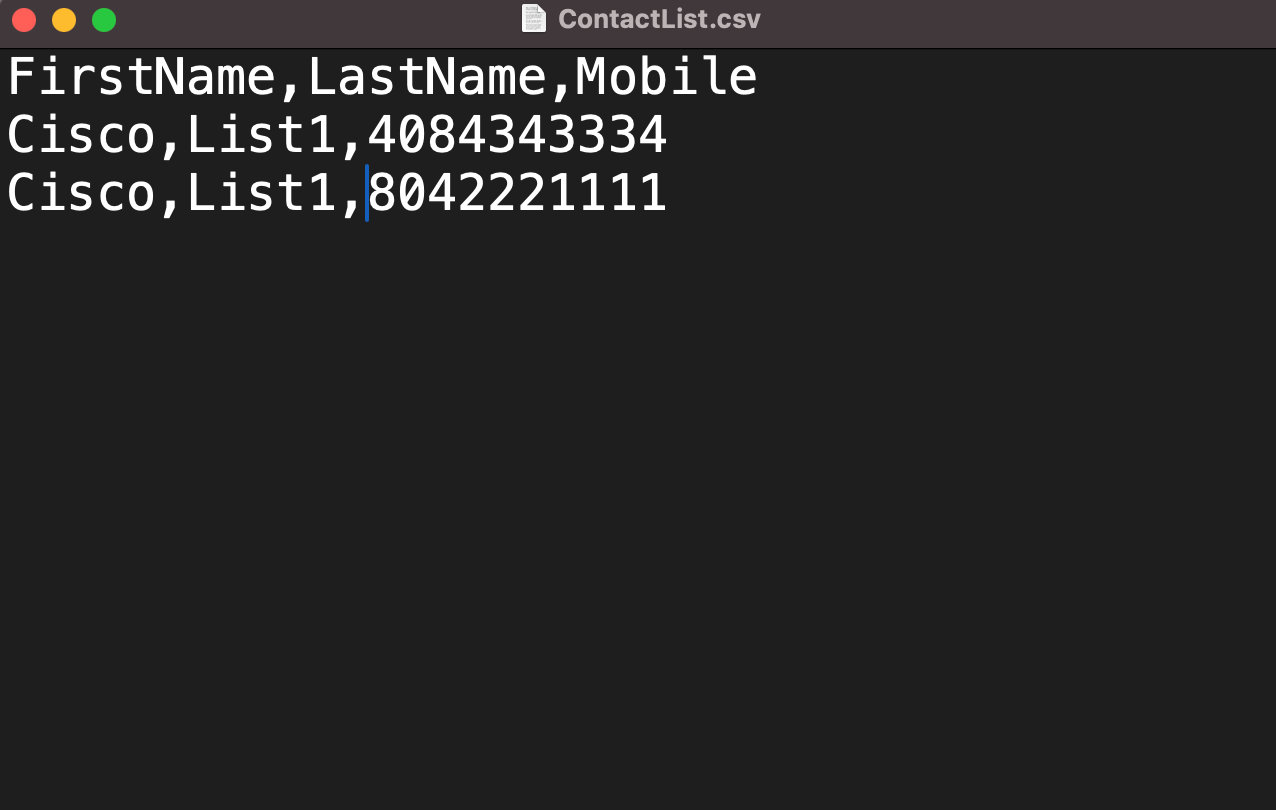
- Create a text file with comma seperated values as shown in the image below
- The first row in the file should be : Firstname,Lastname,Phone
- The second row in the file should be: Test,Agent1,<
Any US phone number of your choice> - Save the file
-
Navigate to
Contact Listssection. Click on the+sign at the bottom right and clickUpload Contacts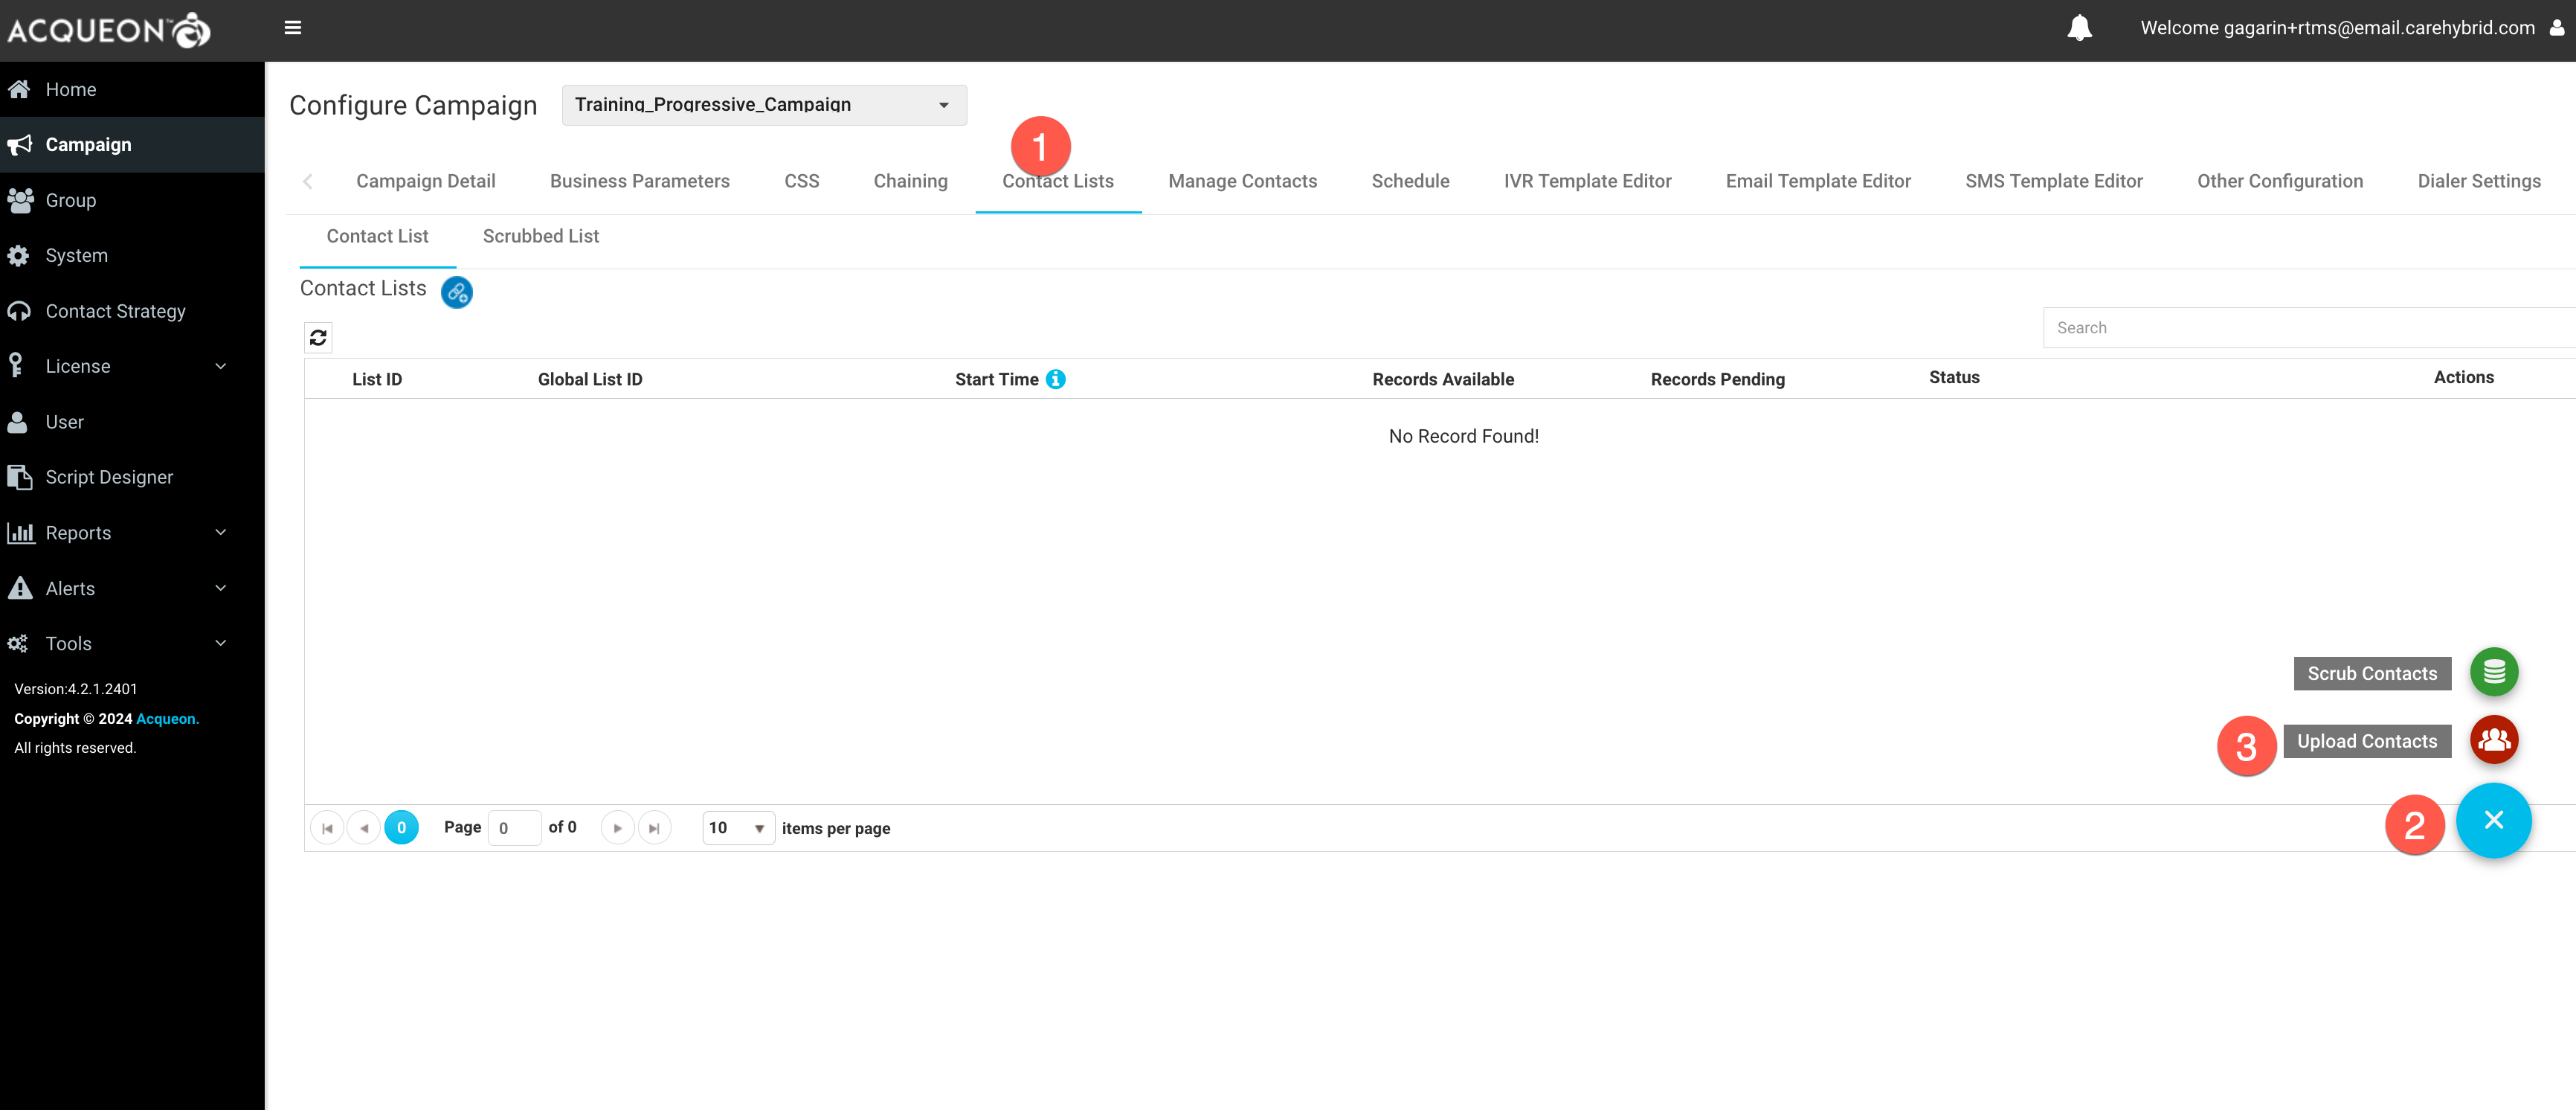
- Verify “Source Type” is
Formatted File - Verify “File Type” is
Text/CSVand “Delimiter” is, -
Click “Choose File” and select the file created in the previous step
-
Navigate to “Field Mapping”, select “ZoneName” as
Campaign Specific TimeZone - Navigate to “Modes Mapping”, select “Mobile” as
Mobile -
Click “Upload”
-
Click “Refresh” and verify that the list shows up under the list of records
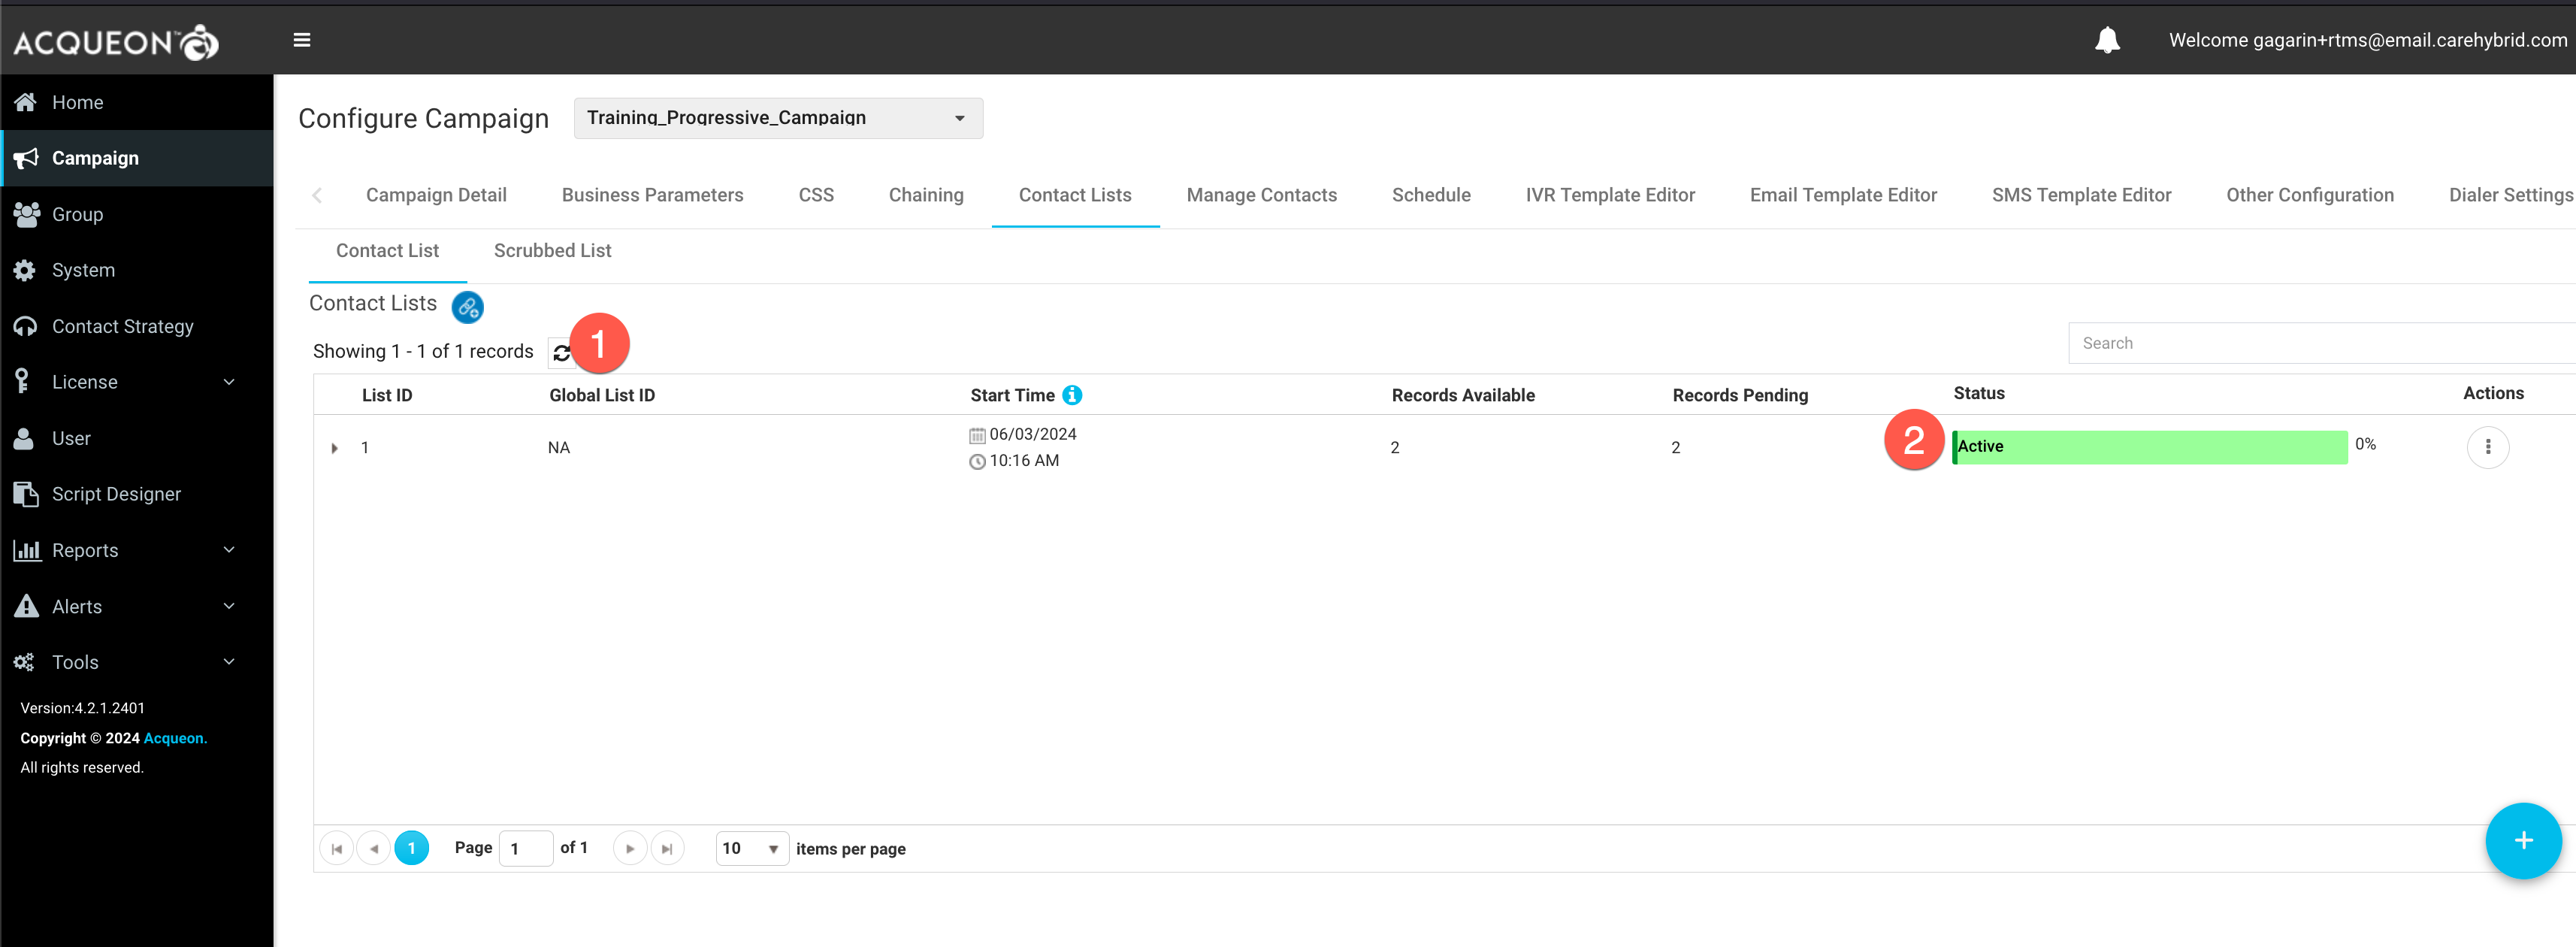
- Navigate to
Campaign>Actions>Start
Step 10: Accept the Campaign Contact from Agent Desktop
- Login to desktop with agent credentials and select the appropriate team that was selected during the outdial queue creation.
- Change agent status to
Available
The below example/demo covers a progressive 1:N dialer with Call Progress Analysis (CPA).
-
Once an agent is available, the system will place
Ncustomer calls (This value is configured in Step 7 underDial Rateconfiguration) -
For calls which result in live voice, the system will connect the agents
-
If customer call is abandoned or goes to voicemail, our system will invoke the flow to determine how to handle the scenario (Through Configurations done in
Step4)

- In the
Progressive & Predictive Campaign Realtime Reportwe can verify that both the numbers in the contact list were dialed once an agent was available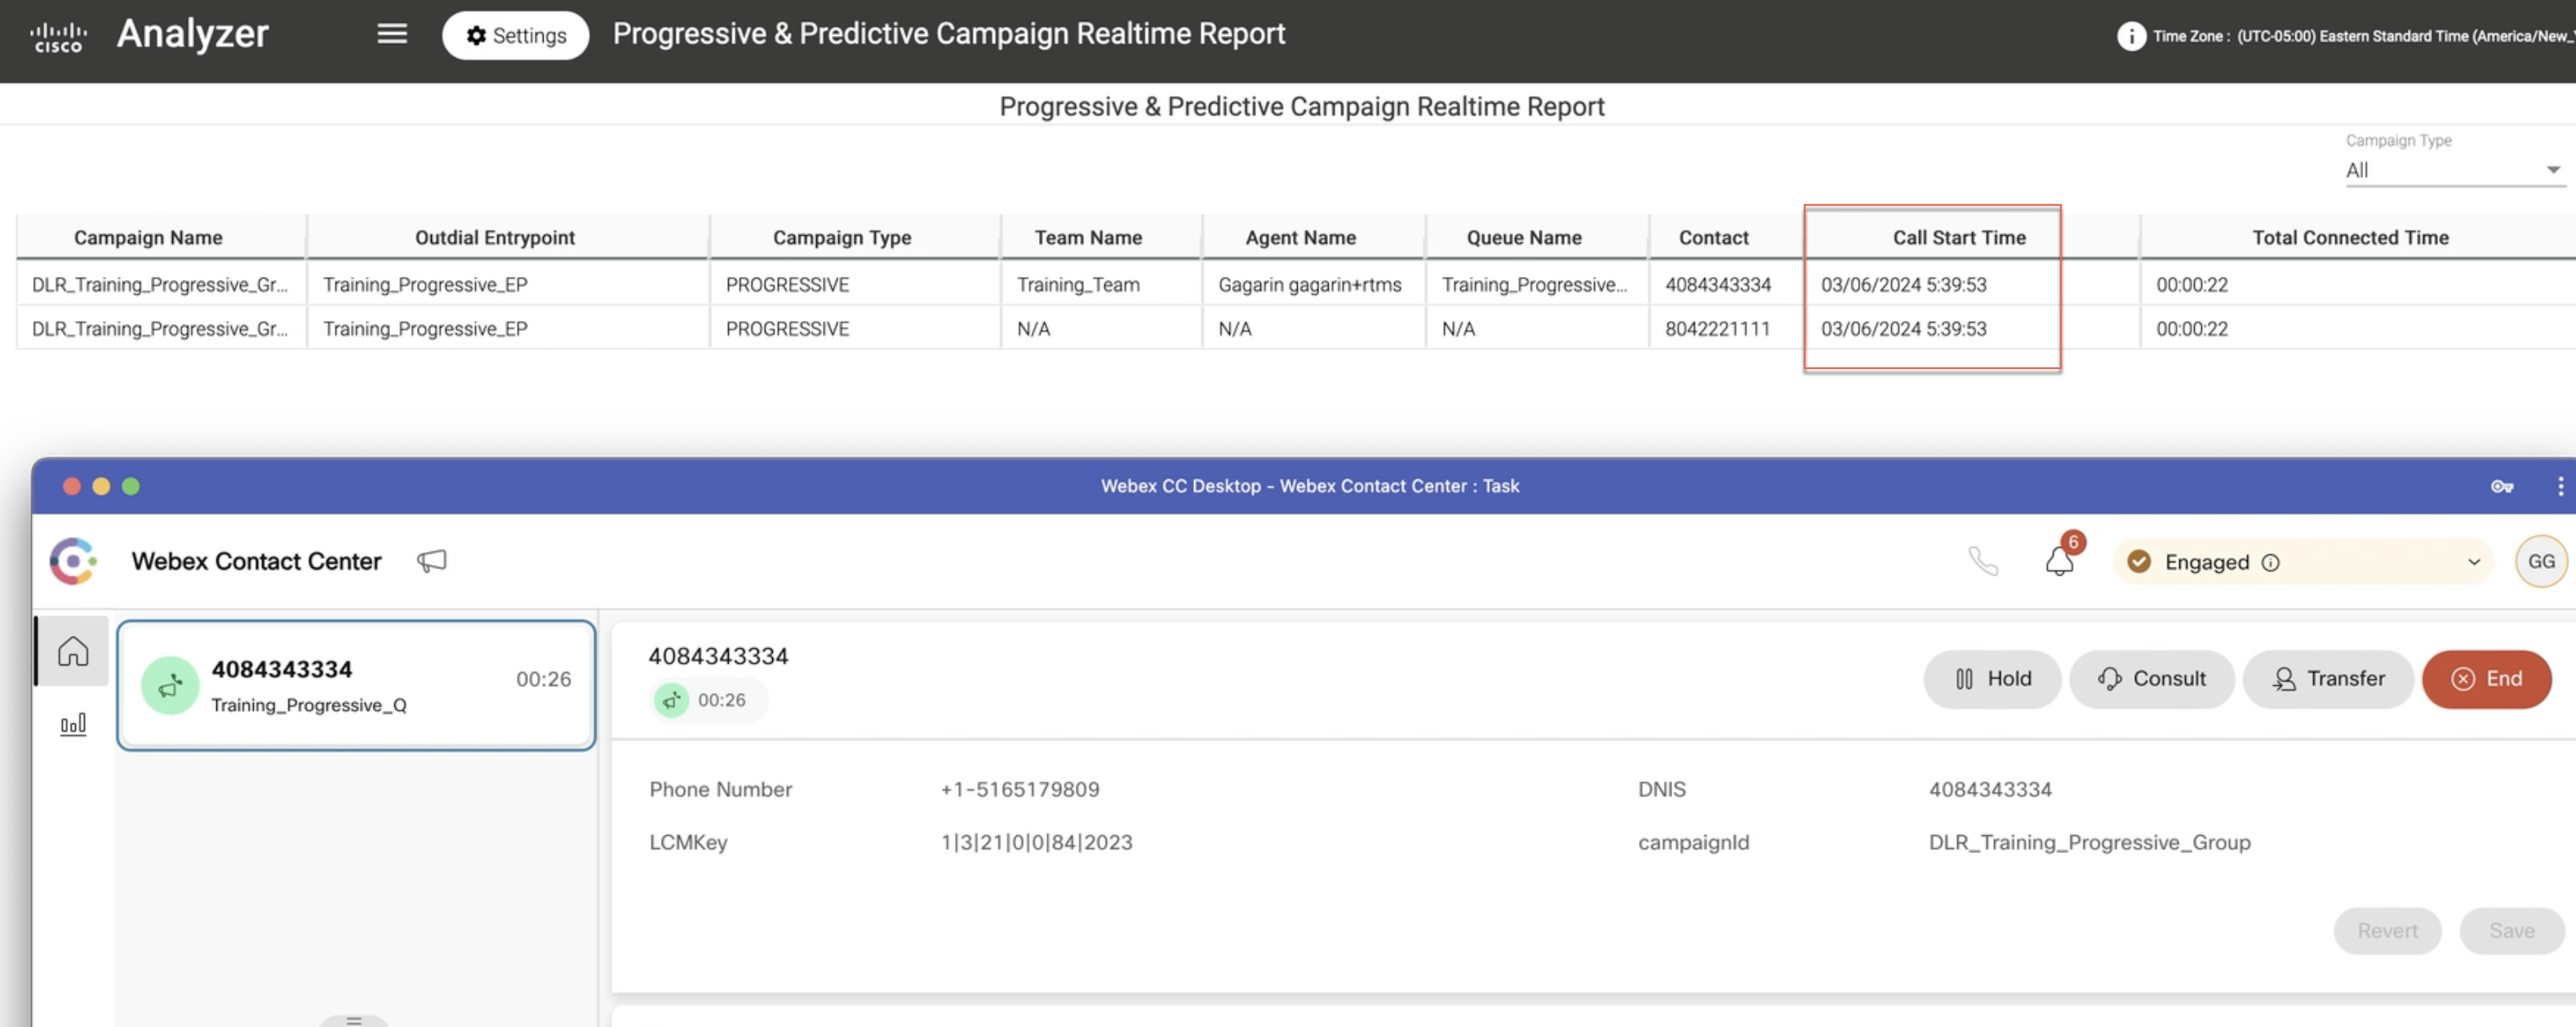
Lab 9.4 Predictive Campaign
Stay Tuned. Coming Soon !!!
Lab 9.5 Call Guide
Stay Tuned. Coming Soon !!!